Instrukcja obsługi Kenwood KDC-X790
Kenwood
Radia samochodowe
KDC-X790
Przeczytaj poniżej 📖 instrukcję obsługi w języku polskim dla Kenwood KDC-X790 (64 stron) w kategorii Radia samochodowe. Ta instrukcja była pomocna dla 3 osób i została oceniona przez 2 użytkowników na średnio 4.5 gwiazdek
Strona 1/64

CD-RECEIVER
KDC-X790
KDC-MP732
INSTRUCTION MANUAL
© B64-3301-00/01 (KW/K0)
Take the time to read through this instruction manual.
Familiarity with installation and operation procedures will help you obtain the best
performance from your new CD-receiver.
For your records
Record the serial number, found on the back of the unit, in the spaces designated on the
warranty card, and in the space provided below. Refer to the model and serial numbers
whenever you call upon your Kenwood dealer for information or service on the product.
Model KDC-X790/ KDC-MP732 Serial number
US Residence Only
Register Online
Register your Kenwood product at
www.Kenwoodusa.com

2 | English
Contents
Safety precautions 4
Notes 5
Warning 6
About CDs 7
About AAC, MP3 and WMA 8
Notes on Multi-function Key System
9
General features 10
Power
Selecting the Source
Volume
Attenuator
System Q
Audio Control
Adjusting the detail of Audio Control
Audio Setup
Speaker Setting
Subwoofer Output
TEL Mute
Faceplate Angle Adjustment
Theft Deterrent Faceplate
Display Type Selection
Graphic part Display Switching
Wallpaper selecting
Text Selection for Display
Text Display Switching
Font Color Select
G-Analyzer display Switching
Station/Disc Naming (SNPS/DNPS)
Tuner features 24
Tuning
Tuning Mode
Direct Access Tuning
Station Preset Memory
Auto Memory Entry
Preset Tuning
RDS features 26
Radio Text Scroll
PTY (Program Type)
Registration of a station as a PTY
Program Type preset
CD/Audio file/External disc control
features 28
Playing CD & Audio file
Playing External Disc
Fast Forwarding and Reversing
Track/File Search
Disc Search/Folder Search
Direct Track/File Search
Direct Disc Search
Track/File/Disc/Folder Repeat
Scan Play
Random Play
Magazine Random Play
All Random Play
Folder Select
Switching the Play mode
Letter Seek
Text/Title Scroll
SIRIUS tuner control features 34
Select SIRIUS Satellite Radio Mode
Switching Seek Mode
Select the channel
Category and Channel Search
Direct Access Tuning
Selecting the Preset Band
Channel Preset Memory
Preset Tuning
Channel Scan
Text Scroll for SIRIUS tuner source
HD Radio control features 37
About HD Radio
Tuning
English | 3
The "AAC" logo is trademark of Dolby
Laboratories.
Menu system 38
Menu System
Activating Security Code
Deactivating Security Code
Touch Sensor Tone
Manual Clock Adjustment
Date Adjustment
Date Mode
Synchronize Clock
DSI (Disabled System Indicator)
Selectable Illumination
Display Illumination Control
Dimmer
Built-in Amp Setting
G-Counter Level set
G-Analyzer Reset
G-Analyzer Calibration setup
G-Analyzer Horsepower Gauge setup
G-Analyzer Horsepower Analysis
G-Graphic Select
G-Analyzer Stop Watch
Dual Zone System Setting
Supreme Setting
B.M.S. (Bass Management System)
B.M.S. Frequency Offset
AMP Control
Traffic Information
CRSC (Clean Reception System Circuit)
Receive mode Setting
SIRIUS ID (ESN) display
Auxiliary Input Display Setting & Station/Disc
Naming
Text Scroll
Built-in Auxiliary input Setting
CD Read Setting
Picture downloading
Voice Index
ACDrive firmware version display
Unique ID display
Audio Preset Memory
Audio Preset Recall
Demonstration mode Setting
Basic Operations of remote control
52
Accessories/ Installation Procedure
55
Connecting Wires to Terminals 56
Installation 57
Removing the Unit 59
Troubleshooting Guide 60
Specifications 64
4 | English
Safety precautions
• Do not apply excessive force to the open
faceplate or place objects on it. Doing so will
cause damage or breakdown.
• Do not use your own screws. Use only the screws
provided. If you use the wrong screws, you could
damage the unit.
Attach the panel while you are on the
vehicle
The panel lock arm appears when the panel is
removed. Therefore, the panel must be attached
while the electrical system of the car is operating.
Do Not Load 3-in. CDs in the CD slot
If you try to load a 3 in. CD with its adapter into the
unit, the adapter might separate from the CD and
damage the unit.
About CD players/disc changers
connected to this unit
Kenwood disc changers/ CD players released in
1998 or later can be connected to this unit.
Refer to the catalog or consult your Kenwood
dealer for connectable models of disc changers/
CD players.
Note that any Kenwood disc changers/ CD players
released in 1997 or earlier and disc changers made
by other makers cannot be connected to this unit.
Connecting unsupported disc changers/CD players
to this unit may result in damage.
Set the "O-N" Switch to the "N" position for the
applicable Kenwood disc changers/ CD players.
The functions you can use and the information
that can be displayed may differ depending on the
models being connected.
• You can damage both your unit and the CD changer if
you connect them incorrectly.
Lens Fogging
When you turn on the car heater in cold weather,
dew or condensation may form on the lens in the
CD player of the unit. Called lens fogging, this
condesnation on the lens may not allow CDs to
play. In such a situation, remove the disc and wait
for the condensation to evaporate. If the unit still
does not operate normally after a while, consult
your Kenwood dealer.
2 WARNING
To prevent injury while using this
product, take the following safety
precautions:
• To prevent a short circuit and possible fire,
never put any metallic objects (such as coins or
metal tools) inside the product.
• If you are the driver and your vehicle is moving,
do not watch the product’s display or use its
controls for an extended period.
• Do not use this product in any way that
prevents you from driving safely.
• Follow all driving laws and use common sense
when using this product.
NOTE:
• Like your vehicle’s speedometer, G-Analyzer is
no more than a measuring function. The HP
or G value measured by this unit may not be
completely accurate due to its simplified method
of measurement. The G-Analyzer is only for
reference and should not be used to confirm the
horsepower specifications of your vehicle.
• Mounting and wiring this product requires
skills and experience. For safety’s sake, leave the
mounting and wiring work to professionals.
2CAUTION
To prevent damage to the machine, take
the following precautions:
• Make sure to ground the unit to a negative 12V
DC power supply.
• Do not install the unit in a spot exposed to direct
sunlight or excessive heat or humidity. Also avoid
places with too much dust or the possibility of
water splashing.
• Do not place the faceplate (and the faceplate
case) in areas exposed to direct sunlight, excessive
heat or humidity. Also avoid places with too much
dust or the possibility of water splashing.
• To prevent deterioration, do not touch the
terminals of the unit or faceplate with your
fingers.
• Do not subject the faceplate to excessive shock,
as it is a piece of precision equipment.
• When replacing a fuse, only use a new fuse with
the prescribed rating. Using a fuse with the wrong
rating may cause your unit to malfunction.
English | 5
Notes
• If you experience problems during installation,
consult your Kenwood dealer.
• When you purchase optional accessories, check
with your Kenwood dealer to make sure that they
work with your model and in your area.
• If the unit fails to operate properly, press the Reset
button to restore factory settings.
• Press the reset button if the disc auto changer fails
to operate correctly. Normal operation should be
restored.
• We recommend the use of <Activating Security
Code> (page 39) to prevent theft.
• The characters conforming to ISO 8859-1
character set can be displayed.
• The RDS feature won’t work where the service is
not supported by any broadcasting station.
• There are places in this manual where lit
indicators are described; however, the only time
an indicator will light is in the following settings.
When Indicator is selected as mentioned in <Text
Display Switching> (page 18).
• The illustrations of the display and the panel
appearing in this manual are examples used to
explain more clearly how the controls are used.
Therefore, what appears on the display in the
illustrations may differ from what appears on the
display on the actual equipment, and some of the
illustrations on the display may be inapplicable.
Cleaning the Unit
If the faceplate of this unit is stained, wipe it with a
dry soft cloth such as a silicon cloth.
If the faceplate is stained badly, wipe the stain off
with a cloth moistened with neutral cleaner, then
wipe it again with a clean soft dry cloth.
• Applying spray cleaner directly to the unit may affect its
mechanical parts. Wiping the faceplate with a hard cloth
or using a volatile liquid such as thinner or alcohol may
scratch the surface or erases characters.
Cleaning the Faceplate Terminals
If the terminals on the unit or faceplate get dirty,
wipe them with a clean soft dry cloth.
Before using this unit for the first time
This unit is initially set on the Demonstration mode.
When using this unit for the first time, cancel the
<Demonstration mode Setting> (page 51).
NOTE
This Class B digital apparatus complies with
Canadian ICES-003.
Reset button

6 | English
2CAUTION
Use of controls or adjustments or performance of
procedures other than those specified herein may
result in hazardous radiation exposure.
In compliance with Federal Regulations, following
are reproductions of labels on, or inside the product
relating to laser product safety.
Kenwood Corporation
2967-3, ISHIKAWA-MACHI,
HACHIOJI-SHI
TOKYO, JAPAN
KENWOOD CORP. CERTIFIES THIS EQUIPMENT
CONFORMS TO DHHS REGULATIONS N0.21 CFR
1040. 10, CHAPTER 1, SUBCHAPTER J.
Location : Bottom Panel
FCC WARNING
This equipment may generate or use radio
frequency energy. Changes or modifications to
this equipment may cause harmful interference
unless the modifications are expressly approved
in the instruction manual. The user could lose
the authority to operate this equipment if an
unauthorized change or modification is made.
NOTE
This equipment has been tested and found to
comply with the limits for a Class B digital device,
pursuant to Part 15 of the FCC Rules. These limits
are designed to provide reasonable protection
against harmful interference in a residential
installation. This equipment may cause harmful
interference to radio communications, if it is
not installed and used in accordance with the
instructions. However, there is no guarantee
that interference will not occur in a particular
installation. If this equipment does cause harmful
interference to radio or television reception, which
can be determined by turning the equipment off
and on, the user is encouraged to try to correct
the interference by one or more of the following
measures:
• Reorient or relocate the receiving antenna.
• Increase the separation between the equipment
and receiver.
• Connect the equipment into an outlet on a
circuit different from that to which the receiver is
connected.
• Consult the dealer or an experienced radio/TV
technician for help.
2Warning
About DAB Tuner control
Refer to A group on the Instruction manual of DAB
Tuner KTC-9090DAB (optional accessory) for the
control method of DAB Tuner function.
However, the following control methods of the
function for this unit may be differed from the
Instruction manual; therefore, refer to the following
supplemental instruction.
<Auto Ensemble Memory Entry>
1. Select the preset band for Auto Ensemble
Memory Entry.
2. Press the [AME] button for at least 2 seconds.
Open Auto Ensemble Memory Entry.
After storing in the memory finishes, the
number of the pre-set buttons and the
ensemble label are displayed.
<Searching by programme type and language>
and <Languages to be displayed> in
<Programme Type (PTY) Function>
At the operation to press [DISP] button, use [AUTO]
button instead.
About "Media Manager" of PC application
attached to KDC-X790
• "Media Manager" is recorded in the CD-ROM
attached to this unit.
• Refer to the attached installation manual for the
installation method of "Media Manager".
• Refer to the user’s manual recorded in the
installation CD-ROM and Help of "Media Manager"
for the operation method of "Media Manager".
• The unit can play CD (hereafter called "ACDrive
disc") created by "Media Manager".
• Refer to the following site for the updated
information of "Media Manager".
http://www.kenwood.mediamanager.jp
• Contact Kenwood for the function and operation
of the "Media Manager".
• "Media Manager" is a product of PhatNoise.
Notes

English | 7
Handling CDs
• Do not touch the recording surface of the CD.
• CD-R and CD-RW are easier to damage than a
normal music CD. Use a CD-R or a CD-RW after
reading the caution items on the package etc.
• Do not stick tape etc. on the CD, or use a CD with
tape stuck on it.
When using a new CD
If the CD center hole or outside rim has burrs,
use the CD only after removing the burrs with a
ballpoint pen etc.
CD accessories
Do not use disc type accessories.
CD cleaning
Clean from the center of the disc and move
outward.
About CDs
Burrs
Burrs
Removing CDs
When removing CDs from this unit pull them out
horizontally.
CDs that cannot be used
• CDs that are not round cannot be used.
• CDs with coloring on the recording surface or CDs
that are dirty cannot be used.
• This unit can only play the CDs with
.
This unit may not correctly play discs which do
not have the mark.
• You cannot play a CD-R or CD-RW that has not
been finalized. (For the finalization process refer to
your CD-R/CD-RW writing software, and your CD-
R/CD-RW recorder instruction manual.)
CD storage
• Do not place CDs in direct sunlight (On the seat
or dashboard etc.) or where the temperature is
high.
• Store CDs in their cases.

8 | English
About AAC, MP3 and WMA
The playable AAC/MP3/WMA file (hereafter called
Audio file) and the media format has the following
limitation. The Audio file, which is not conforming
to the specification, may not play normally, or the
file and folder names may not display correctly.
Playable Audio file
• AAC, MP3, WMA
• Attach the correct extension for the Audio file
(AAC: ".M4A", MP3: ".MP3", WMA: ".WMA")
• Do not attach the extensions to files other than the
Audio file. If the extension is attached, the file, which is
not the Audio file, will play and outputs a loud noise,
causing damage to the speaker.
• The files with copy protection cannot be played.
• The settings of your encoding software and the
environment in which it is used may now allow you
to play or view specific audio files. For encoding
specifications and instructions on how to set encoding
software, browse through software help or check with
the developers.
• The unit may not be compatible with upgrade
of compression format standard and additional
specifications.
Playable AAC file
• ".m4a" file encoded by AAC-LC format.
Refer to
http://www.kenwood.mediamanager.jp
for the details.
Playable MP3 file
• MPEG 1/2 Audio Layer 3 file
• Transfer bit rate: 8-320 kbps
• Sampling frequency
KDC-X790: 16, 22.05, 24, 32, 44.1, 48 kHz
KDC-MP732: 8, 11.025, 12, 16, 22.05, 24, 32, 44.1,
48 kHz
Playable WMA file
• The file in accordance with Windows Media Audio
(Except for the file for Windows Media Player 9 or
after which applies the new functions)
• Transfer bit rate: 48-192 kbps
• Sampling frequency: 32, 44.1, 48 kHz
Playable media
• CD-ROM, CD-R, CD-RW
• CD-RW discs which are quick formatted by the writing
software cannot be used.
• When recording to the maximum media capacity at
once, the writing software is set to "Disc at once".
Playable disc format
• ISO 9660 Level 1/2
• Joliet
• Romeo
• Long file name.
The maximum number of characters for
display
File/Folder name:
KDC-X790: 128 characters
KDC-MP732: 64 characters
MP3 ID3 Tag/ WMA Contents property:
30 characters
AAC song information:
KDC-X790: 60 characters
KDC-MP732: 30 characters
• File/Folder name is the number of the characters
including the extensions.
• This unit can display the following versions of MP3 ID3
tag:
KDC-X790: version 1.0/ 1.1/ 2.3
KDC-MP732: version 1.0/ 1.1
• AAC ID3 Tag cannot be displayed.
Limitation of structure for the file and the
folder
• Maximum number of directory levels: 8
• Maximum number of folders: 100
• Maximum number of files per folder:
KDC-X790: 4096/ KDC-MP732: 255
Playing order of the Audio file
The Audio file plays in the order which is written by
writing software. You may be able to set the playing
order by writing the play sequence numbers such
as "01" to "99" at the beginning of the file name.
Example
CD
¡!
¡"
2
( )1
0: Folder
¡: Audio file
3
¡%
4
¡#
¡$
• Playing order
Playing order after play.¡!
➡ , , , ...¡" ¡# ¡$ ¡%
• File search
Forward file search during ¡# play.
Push the Control knob towards [¢] ➡¡$
• Folder search
Forward folder search during play.¡"
Push the Control knob towards [FM] ➡ , ...3 4
• Folder select
When the selection is set to directory , and you 4
want to skip to the folder 2 at the same level.
Push the Control knob towards [4] ➡2
When the selection is set to directory 3, moves
the level up by folder select.
Push the Control knob towards [AM] ➡ 2

English | 9
Notes on Multi-function Key System
Multi-function Key System serves to control various
functions with the [1] — [6] buttons.
The basic operation of the Multi-function Key
System is described below.
What is the Multi-function Key System?
This unit is equipped with the Multi-function Key
System that enables the operation of multiple
functions with one button.
For example, you can enter the Display Control
Mode or turn ON/OFF the Random Play by pressing
the [3] button during CD play.
Setting each function
The function display will show the controllable
function of the [1] — [6] button above the button.
Pressing the [1] — [6] button below the desired
function enables the setting of the function.
Displaying the desired function
If five or more functions are available to be set with
the [1] — [6] button, they are divided into multiple
function groups (referred to by sections in this
manual) for registration.
Press the [NEXT] button to switch the sections.
Example: KDC-X790
S.MODE
SCAN RDM REP FSEL
SYS.Q DISP
2nd section
1st section
Real operational example of the Multi-
function Key System
Example: Turning ON/OFF the Random Play during
CD play.
1. Show the function display of the Random Play.
If "RDM" is not shown in the display, press the
[NEXT] button to alternate the sections until the
"RDM" function display is shown above the [3]
button.
2. Turn ON/OFF the Random Play.
Press the [3] button.
Each time you press the [3] button under the
"RDM" function display the Random Play is
turned ON/OFF.
Example: KDC-X790
XT
SYS.Q DISP
S.MODE
SCAN REPRDM
F SEL
Button
Function
displaying

10 | English
General features
Power
Turning ON the Power
Press the [SRC] button.
Turning OFF the Power
Press the [SRC] button for at least 1 second.
Selecting the Source
Press the [SRC] button.
Source required Display
SIRIUS tuner (Optional accessory) "SIRIUS"
Tuner or HD Radio (Optional accessory) "TUNER" or "HD Radio"
CD "Compact Disc"
External disc (Optional accessory) "CD Changer"
Auxiliary input "AUX"
Auxiliary input (Optional accessory) "AUX EXT"
Standby (Illumination only mode) "STANDBY"
Volume
Increasing Volume
Turn the [VOL] knob clockwise.
Decreasing Volume
Turn the [VOL] knob counterclockwise.
Attenuator
Turning the volume down quickly.
Press the [ATT] button.
Each time you press the button, the Attenuator
turns ON and OFF.
When the Attenuator is ON, "ATT" is displayed.
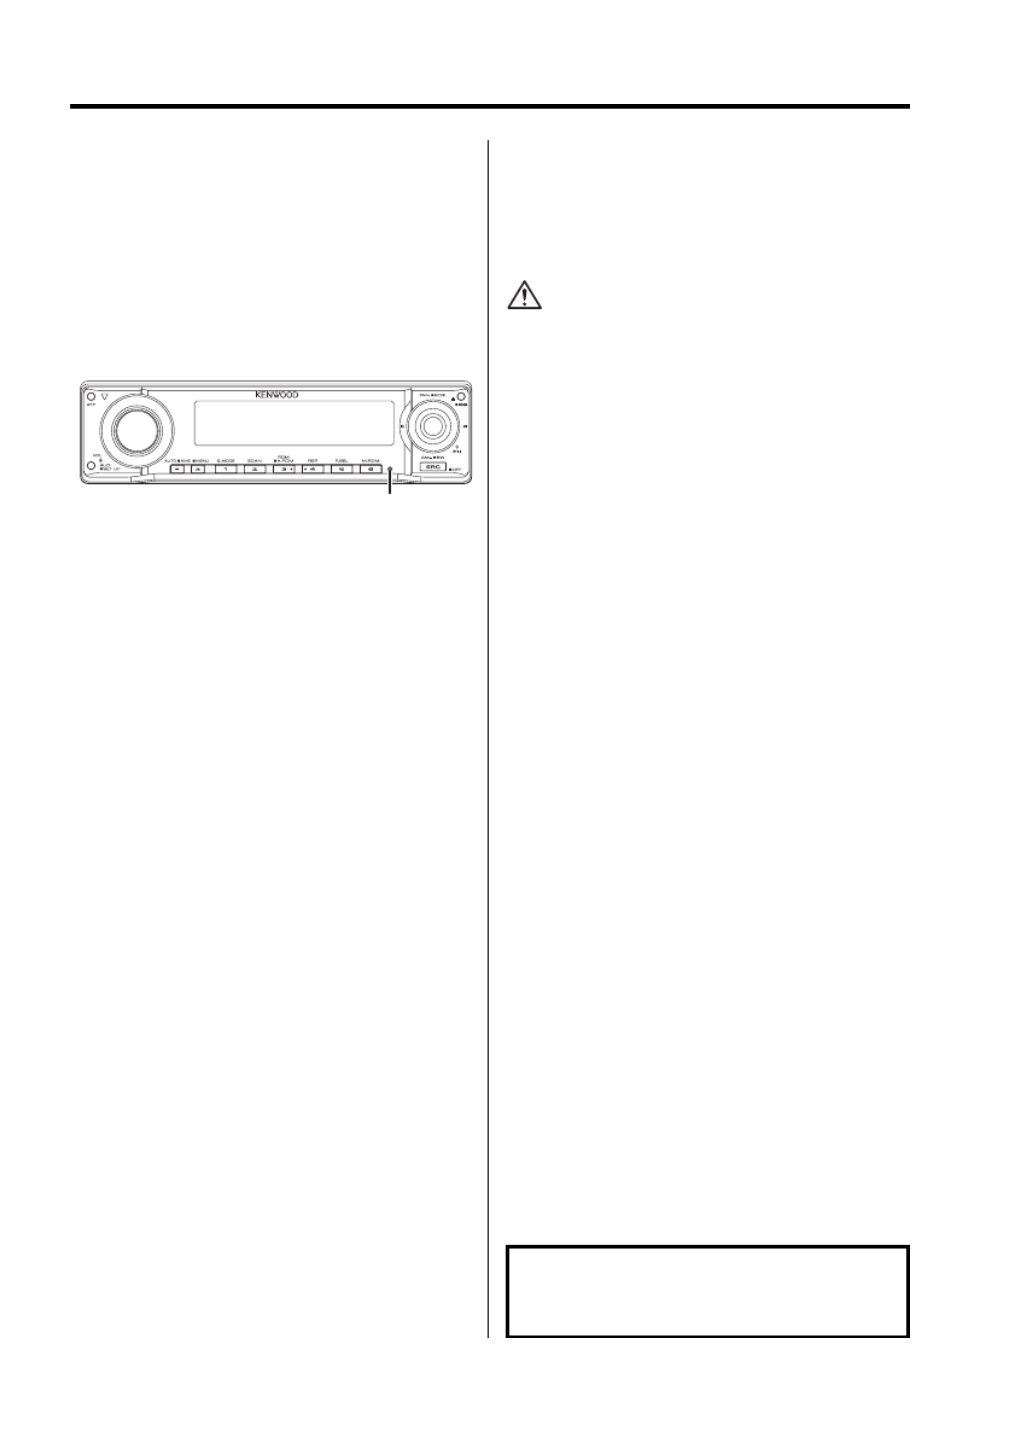
AT T VOL ANG
NEXT/
MENU
1 – 6 SRC
Release button
Control knob

English | 11
System Q
Selecting the best sound setting preset for
different types of music.
1 Select the source to adjust
Press the [SRC] button.
2 Select the key function section
Press the [NEXT] button.
Repeatedly press the button until "SYS.Q" is
displayed above the [1] button.
Refer to <Notes on Multi-function Key System>
(page 9).
3 Enter System Q mode
Press the [1] ("SYS.Q") button.
4 Select the Sound type
Push the Control knob towards [4] or
[ ].¢
Each time the knob is pushed, the setting
switches as shown below.
Sound setting Display
User memory "USER"
Rock "ROCK"
Pops "POPS"
Easy "EASY"
Top 40 "TOP 40"
Jazz "JAZZ"
Natural "NATURAL"
• User memory:
The values set on the <Audio Control> (page 11).
• Change each setting value with the <Speaker
Setting> (page 13).
First, select the speaker type with the Speaker setting.
Audio Control
1 Select the source to adjust
Press the [SRC] button.
2 Enter Audio Control mode
Press the [VOL] knob.
3 Select the Basic Audio item to adjust
Press the [VOL] knob.
Each time you press the knob, the item to be
adjusted alternates between the items shown in
the table below.
4 Adjust the Basic Audio item
Turn the [VOL] knob.
Adjustment Item Display Range
Rear Volume *1"Rear Volume" 0 — 35
Subwoofer level*2,3 "Sub-W Level" –15 — +15
Bass level*4"Bass Level" –8 — +8
Middle level*4"Middle Level" –8 — +8
Treble level*4"Treble Level" –8 — +8
Balance "Balance" Left 15 — Right 15
Fader*3"Fader" Rear 15 — Front 15
Exit Audio Control mode (Volume control mode)
• *1 You can control this item when "2 ZONE" of <Audio
Setup> (page 12) is set to "ON".
• *2 You can control this item when <Subwoofer
Output> (page 13) is set to "SW ON".
• *3 You can control this item when "2 ZONE" of <Audio
Setup> (page 12) is set to "OFF".
• *4 You can adjust these items in detail. Refer to
<Adjusting the detail of Audio Control>(Page 12).
(Function of the KDC-X790)
• *4 Source tone memory: Puts the set up value in the
memory per source. (Detail Audio item is included)
5 Exit Audio Control mode
Press any button.
Press a button other than the [VOL] knob, [ANG]
and [ATT] button.
12 | English
General features
Function of the KDC-X790
Adjusting the detail of Audio
Control
Among the Basic Audio items, you can adjust the
Bass level, Middle level, and Treble level in detail.
1 Select the Basic Audio item
Select the desired item to be set in detail from
followings;
• Bass level
• Middle level
• Treble level
For how to select Basic Audio items, see <Audio
Control> (page 11).
2 Enter Detail adjustment mode of Audio
Control
Press the [VOL] knob for at least 1 second.
3 Select the Detail Audio item to adjust
Press the [VOL] knob.
Each time you press the knob, the item to be
adjusted alternates between the items shown in
the table below.
4 Adjust the Detail Audio item
Turn the [VOL] knob.
Bass level
Adjustment Item Display Range
Bass Center Frequency "Bass FRQ" 40/50/60/70/80/100/
120/150 Hz
Bass Q Factor "Bass Q Factor" 1.00/1.25/1.50/2.00
Bass Extend "Bass EXT" OFF/ON
Middle level
Adjustment Item Display Range
Middle Center Frequency "Middle FRQ" 0.5/1.0/1.5/2.0 kHz
Middle Q Factor "Middle Q
Factor"
1.00/2.00
Treble level
Adjustment Item Display Range
Treble Center Frequency "Treble FRQ" 10.0/12.5/15.0/17.5 kHz
5 Exit the Detail Audio Control mode
Press the [VOL] knob for at least 1 second.
• When you set the Bass Extend to ON, low frequency
response is extended by 20%.
Audio Setup
Setting the Sound system, such as Cross over
Network.
1 Select the source to adjust
Press the [SRC] button.
2 Enter Audio Setup mode
Press the [VOL] knob for at least 1 second.
3 Select the Audio Setup item to adjust
Press the [VOL] knob.
Each time you press the knob, the item to be
adjusted alternates between the items shown in
the table below.
4 Setup the Audio item
Turn the [VOL] knob.
Adjustment Item Display Range
Front High Pass Filter*2"HPF-F Fc" Through/40/60/80/100/120/
150/180/220 Hz
Rear High Pass Filter*
2"HPF-R Fc" Through/40/60/80/100/120/
150/180/220 Hz
Low Pass Filter*1,2 "LPF-SW" 50/60/80/100/120/
Through Hz
Subwoofer Phase*1,2,3 "SW Phase" Reverse (180°)/ Normal (0°)
Volume offset "Vol-Offset" –8 — ±0
Loudness "LOUD" OFF/ON
Dual Zone System "2 ZONE" OFF/ON
• Volume offset: Sets each source’s volume as a
difference from the basic volume.
• Loudness: Compensates for low and high tones
during low volume.
• *1 You can control this item when <Subwoofer
Output> (page 13) is set to "SW ON".
• *2 You can control this item when "2 ZONE" of <Audio
Setup> (page 12) is set to "OFF".
• *3 You can control this item when Low Pass Filter is not
set to Through.
• You can exit the Audio Control mode at anytime by
pressing any button except for [VOL], [ANG] and [ATT]
buttons.
English | 13
• Dual Zone System
Main source and sub source (Auxiliary input) output
Front channel and Rear channel separately.
- Set up the channel of sub source by <Dual Zone
System Setting> (page 45).
- Select Main source by [SRC] button.
- Adjust the volume of Front channel by [VOL] knob.
- Adjust the volume of Rear channel by <Audio
Control> (page 11).
- The Audio Control has no effect on sub source.
• You can use the Dual Zone System with the Auxiliary
input sources listed below.
- Internal auxiliary input
5 Exit Audio Setup mode
Press the [VOL] knob for at least 1 second.
Speaker Setting
Fine-tuning so that the System Q value is optimal
when setting the speaker type.
1 Enter Standby
Press the [SRC] button.
Select the "STANDBY" display.
2 Enter Speaker Setting mode
Press the [VOL] knob.
"SP SEL" is displayed.
3 Select the Speaker type
Turn the [VOL] knob.
Each time you turn the knob, the setting
alternates between the settings shown in the
table below.
Speaker type Display
OFF "OFF"
For 5 & 4 in. speaker "5/4 inch"
For 6 & 6x9 in. speaker "6x9/6 inch"
For the OEM speaker "O.E.M."
4 Exit Speaker Setting mode
Press the [VOL] knob.
Subwoofer Output
Turning the Subwoofer output ON or OFF.
Push the Control knob toward [AM] for at
least 2 seconds.
Each time you push the knob, Subwoofer output
switches ON and OFF.
When it is ON, "SW ON" is displayed.
• You can control this function when "2 ZONE" of
<Audio Setup> (page 12) is set to "OFF".
TEL Mute
The audio system automatically mutes when a
call comes in.
When a call comes in
"CALL" is displayed.
The audio system pauses.
Listening to the audio during a call
Press the [SRC] button.
The "CALL" display disappears and the audio
system comes back ON.
When the call ends
Hang up the phone.
The "CALL" display disappears and the audio
system comes back ON.
• To use the TEL Mute feature, you need to hook up
the MUTE wire to your telephone using a commercial
telephone accessory. Refer to <Connecting Wires to
Terminals> (page 56).
Faceplate Angle Adjustment
Press the [ANG] button for at least 1 second.
• Do not apply excessive force to the faceplate. It can
cause damage.

14 | English
General features
Theft Deterrent Faceplate
The faceplate of the unit can be detached and
taken with you, helping to deter theft.
Removing the Faceplate
Press the Release button.
The faceplate is unlocked, allowing you to detach
it.
• The faceplate is a precision piece of equipment and
can be damaged by shocks or jolts.
• Keep the faceplate in its faceplate case while
detached.
• Do not expose the faceplate (and the faceplate case)
to direct sunlight or excessive heat or humidity. Also
avoid places with too much dust or the possibility of
water splashing.
Reattaching the Faceplate
1 Align the shaft on the unit with the
depression on the faceplate.
2 Push the faceplate in until it clicks.
The faceplate is locked in place, allowing you to
use the unit.
Display Type Selection
Changing the display mode.
1 Select the key function section
Press the [NEXT] button.
Repeatedly press the button until "DISP" is
displayed above the [2] button.
Refer to <Notes on Multi-function Key System>
(page 9).
2 Enter display control mode
Press the [2] ("DISP") button.
3 Select the display mode
Press the [1] ("MODE") button.
4 Select the display Type
Push the Control knob towards [4] or
[ ].¢
Each time you push the knob, the display mode
alternates between the display modes shown in
the table below.
Display Mode Display
"Display Type A" 1
"Display Type B" 12
"Display Type C" 43
3 5
36
"Display Type D" 4 7
6
888888
"Display Type E" 9
1 Graphic display part
2 Text display part
3 Text icon display part
4 Upper text display part
5 Middle text display part
6 Lower text display part

English | 15
7 Source icon display part
8 Function item display
9 G-Analyzer display part
5 Exit display control mode
Press the [6] ("RTN") button.
• Under the display type other than "Display Type D",
the function item is not displayed. When you select
the display type other than "Display Type D", press [1]
to [6] buttons or [NEXT] button. The function item will
be displayed approximately 5 seconds.
• The indicator is displayed when the display type is set
to "Display Type C" or "Display Type D".
• Change the information by the Display Type. Refer to
the page on the following table for the methods to
alternate by the Display Type.
Display Type
A B C D E
Graphic 115 15 ———
Text 2— 16 — — —
Upper 4— — 18 18 —
Middle 5— — 20 — —
Lower 6— — 20 20 —
G-Analyzer 9— — — — 22
Display Type A/ Display Type B
Graphic part Display Switching
Changing the graphic Display.
1 Select the key function section
Press the [NEXT] button.
Repeatedly press the button until "DISP" is
displayed above the [2] button.
Refer to <Notes on Multi-function Key System>
(page 9).
2 Enter display control mode
Press the [2] ("DISP") button.
3 Select the display mode
Press the [1] ("MODE") button.
4 Select the display Type
Push the Control knob towards [4] or
[ ].¢
Select the "Display Type A"/ "Display Type B"
display.
5 Select the graphic display
Press the [3] ("Graph") button.
6 Select the graphic part display
Push the Control knob towards [4] or
[ ].¢
Each time you push the knob, the graphic display
alternates between the displays shown in the
table below.
Graphic display
Movie 1
Movie 2
Movie 3 (KDC-X790 only)
*Downloaded movie
Wallpaper & *Downloaded Wallpaper
• * Function of the KDC-X790
• * For Download movie and Download Wall Paper, refer
to <Picture downloading> (page 49).
7 Exit display control mode
Press the [6] ("RTN") button.
• The setting of this function is available while "Display
Type A"/ "Display Type B" is selected for the Display
mode.

16 | English
General features
Display Type A/ Display Type B
Wallpaper selecting
Selecting a wallpaper to display when Display
Type is set to "Display Type A"/ "Display Type B".
1 Select the wallpaper display
Refer to <Graphic part Display Switching> (page
15).
2 Select the wallpaper
Display the wallpapers one after another
Press the Control knob.
Each time you press the knob, the Wallpaper
scan is turned ON and OFF.
When scan is ON, "SCAN" is displayed.
When scan is ON, each wallpaper is displayed
every several seconds.
Select wallpaper manually
1 Turn the wallpaper scan OFF.
Press the Control knob.
Each time you press the knob, the Wallpaper
scan is turned ON and OFF.
2 Select the wallpaper.
Push the Control knob towards [FM] or [AM].
Each time you push the knob, the Wallpaper
changes.
3 Exit Display Control mode
Press the [6] ("RTN") button.
Display Type B
Text Selection for Display
Selecting the text display.
1 Select the key function section
Press the [NEXT] button.
Repeatedly press the button until "DISP" is
displayed above the [2] button.
Refer to <Notes on Multi-function Key System>
(page 9).
2 Enter display control mode
Press the [2] ("DISP") button.
3 Select the display mode
Press the [1] ("MODE") button.
4 Select the display Type
Push the Control knob towards [4] or
[ ].¢
Select the "Display Type B" display.
5 Enter text select mode
Press the [2] ("TEXT") button.
6 Select the text
Push the Control knob towards [4] or
[ ].¢
In Tuner source
Information Display
Station name or *1Program Service name "SNPS"*
*1Radio text or *1Program Service name
(FM)
"Radio Text"*
Frequency "Frequency"
Clock "Clock"
Date "Date"
In CD & External disc source
Information Display
Disc title "Disc Title"*
Track title "Track Title"*
Track number & Play time "P-Time"
Disc name "DNPS"
Clock "Clock"
Date "Date"

English | 17
In Audio file source
Information Display
Song title & Artist name "Title/Artist"*
Album name & Artist name "Album/Artist"*
Folder name "Folder Name"
File name "File Name"
Play time & File number "P-Time"
Clock "Clock"
Date "Date"
In HD Radio source
Information Display
Station name "Station Name"*
Title "Title"*
Frequency "Frequency"
Clock "Clock"
Date "Date"
In Standby/ Auxiliary input source
Information Display
Source name "Source Name"
Clock "Clock"
Date "Date"
In SIRIUS tuner source
Information Display
Channel Name "Channel Name"
Song Title "Song Title"
Artist Name "Artist Name"
Composer name "Composer Name"
Category Name "Category Name"
Label Name "Label Name"
Comment "Comment"
Band & Channel Number "Channel Number"
Clock "Clock"
Date "Date"
7 Exit Display Control mode
Press the [6] ("RTN") button.
• *1 KDC-X790 only.
• * If the contents of the information cannot be
displayed, Play time or Frequency is displayed.
• If the contents of the information for the SIRIUS
tuner source cannot be displayed, channel number is
displayed.
• When LX-AMP is connected, the item setup by the
Display mode of LX-AMP is displayed. (KDC-X790 only)
• Track number at Audio file displays the last 3 digits
when the track number exceeds 1000 songs. (KDC-
X790 only)
• Album name cannot be displayed in WMA file. (KDC-
MP732 only)
18 | English
General features
Display Type C/ Display Type D
Text Display Switching
Changing the text display.
1 Select the key function section
Press the [NEXT] button.
Repeatedly press the button until "DISP" is
displayed above the [2] button.
Refer to <Notes on Multi-function Key System>
(page 9).
2 Enter display control mode
Press the [2] ("DISP") button.
3 Select the display mode
Press the [1] ("MODE") button.
4 Select the display Type
Push the Control knob towards [4] or
[ ].¢
Select the "Display Type C"/"Display Type D"
display.
5 Enter text select mode
Press the [2] ("TEXT") button.
6 Select the text display part
Push the Control knob towards [FM] or [AM].
The cursor ( ) moves to the selected text display
part.
Select the text
Push the Control knob towards [4] or
[ ].¢
Refer to the table described later for setting
items.
7 Exit Display Control mode
Press the [6] ("RTN") button.
• You can switch the information displayed in Upper
text display part, Middle text display part and Lower
text display part when "Display Type C" is selected.
• You can switch the information displayed in Upper
text display part and Lower text display part when
"Display Type D" is selected.
• Same information cannot be displayed in Upper text
display part, Middle text display part and Lower text
display part. However, the blank display is able to have
multiple selections.
• Album name cannot be displayed in WMA file. (KDC-
MP732 only)
• Track number at Audio file displays the last 3 digits
when the track number exceeds 1000 songs. (KDC-
X790 only)
• If the contents of the information for the SIRIUS
tuner source cannot be displayed, channel number is
displayed.
• When LX-AMP is connected, the item setup by the
Display mode of LX-AMP is displayed. (KDC-X790 only)
The text display in the Upper text display
part
In Tuner source
Information Display
Station name or *1Program Service name "SNPS"*
*1Radio text or *1Program Service name (FM) "Radio Text"*
Frequency "Frequency"
Clock "Clock"
Date "Date"
In CD & External disc source
Information Display
Disc title "Disc Title"*
Track title "Track Title"*
Track number & Play time "P-Time"
Disc name "DNPS"
Clock "Clock"
Date "Date"
In Audio file source
Information Display
Song title & Artist name "Title/Artist"*
Album name & Artist name "Album/Artist"*
Folder name "Folder Name"
File name "File Name"
Play time & File number "P-Time"
Clock "Clock"
Date "Date"
In Standby/ Auxiliary input source
Information Display
Source name "Source Name"
Clock "Clock"
Date "Date"
English | 19
In HD Radio source
Information Display
Station name "Station Name"*
Title "Title"*
Frequency "Frequency"
Clock "Clock"
Date "Date"
In SIRIUS tuner source
Information Display
Channel Name "Channel Name"
Song Title "Song Title"
Artist Name "Artist Name"
Composer name "Composer Name"
Category Name "Category Name"
Label Name "Label Name"
Comment "Comment"
Band & Channel Number "Channel Number"
Clock "Clock"
Date "Date"
• *1 KDC-X790 only.
• * If the contents of the information cannot be
displayed, Play time or Frequency is displayed.

20 | English
General features
The text display in the Middle text display
part
In Tuner source
Information Display
Clock "Clock"
Date "Date"
Blank "Blank"
Radio text (FM) (KDC-X790 only) "Radio Text"*
In CD & External disc source
Information Display
Clock "Clock"
Date "Date"
Blank "Blank"
Disc title "Disc Title"*
Track title "Track Title"*
Disc name "DNPS"
In Audio file source
Information Display
Clock "Clock"
Date "Date"
Blank "Blank"
Song title & Artist name "Title/Artist"*
Album name & Artist name "Album/Artist"*
Folder name "Folder Name"
File name "File Name"
In Standby/ Auxiliary input source
Information Display
Clock "Clock"
Date "Date"
Blank "Blank"
In HD Radio source
Information Display
Clock "Clock"
Date "Date"
Blank "Blank"
Title "Title"*
In SIRIUS tuner source
Information Display
Clock "Clock"
Date "Date"
Blank "Blank"
Channel Name "Channel Name"
Song Title "Song Title"
Artist Name "Artist Name"
Composer name "Composer Name"
Category Name "Category Name"
Label "Label Name"
Comment "Comment"
• * If the contents of the information cannot be
displayed, Kenwood Logo is displayed. However, in
HD Radio source, the display becomes blank.
The text display in the Lower text display
part
In Tuner source
Information Display
Indicator "Status"
Clock "Clock"
Date "Date"
Blank "Blank"
Radio text (FM) (KDC-X790 only) "Radio Text"*
In CD & External disc source
Information Display
Indicator "Status"
Clock "Clock"
Date "Date"
Blank "Blank"
Disc title "Disc Title"*
Track title "Track Title"*
Disc name "DNPS"

English | 21
In Audio file source
Information Display
Indicator "Status"
Clock "Clock"
Date "Date"
Blank "Blank"
Song title & Artist name "Title/Artist"*
Album name & Artist name "Album/Artist"*
Folder name "Folder Name"
File name "File Name"
In Standby/ Auxiliary input source
Information Display
Indicator "Status"
Clock "Clock"
Date "Date"
Blank "Blank"
In HD Radio source
Information Display
Indicator "Status"
Clock "Clock"
Date "Date"
Blank "Blank"
Title "Title"*
In SIRIUS tuner source
Information Display
Indicator "Status"
Clock "Clock"
Date "Date"
Blank "Blank"
Channel Name "Channel Name"
Song Title "Song Title"
Artist Name "Artist Name"
Composer name "Composer Name"
Category Name "Category Name"
Label "Label Name"
Comment "Comment"
• * If the contents of the information cannot be
displayed, indicator is displayed. However, In HD
Radio source, a display becomes a blank display.
Display Type B/ Display Type C/ Display Type D
Font Color Select
Selecting the display font color.
1 Select the key function section
Press the [NEXT] button.
Repeatedly press the button until "DISP" is
displayed above the [2] button.
Refer to <Notes on Multi-function Key System>
(page 9).
2 Enter display control mode
Press the [2] ("DISP") button.
3 Select the display mode
Press the [1] ("MODE") button.
4 Select the display Type
Push the Control knob towards [4] or
[ ].¢
Select the "Display Type B"/ "Display Type C"/
"Display Type D" display.
5 Enter Font Color select mode
Press the [4] ("COLOR") button.
6 Select the text display part
Select the row (Display Type C/ Display Type
D only)
Push the Control knob towards [FM] or [AM].
The cursor ( ) moves to the selected text display
part.
Select the Font Color
Push the Control knob towards [4] or
[ ].¢
7 Exit display control mode
Press the [6] ("RTN") button.
• When you selected the Display Type B display, select
an easy viewable font color.
• The "Status" item of Display type C/D can be set;
however, the actual display color does not change.
• This function can be set for each display type.

22 | English
General features
Display Type E
G-Analyzer display Switching
Alternates G-Analyzer display when the Display
type is set to "Display Type E". (G: gravity)
• Before alternating G-Analyzer display, you are
required to setup <G-Counter Level set> (page 42),
<G-Analyzer Calibration setup> (page 42) and <G-
Analyzer Horsepower Gauge setup> (page 43).
1 Select the key function section
Press the [NEXT] button.
Repeatedly press the button until "DISP" is
displayed above the [2] button.
Refer to <Notes on Multi-function Key System>
(page 9).
2 Enter display control mode
Press the [2] ("DISP") button.
3 Select the display mode
Press the [1] ("MODE") button.
Select the "Display Type E" display.
4 Enter G-Analyzer display select mode
Press the [3] ("GMENU") button.
5 Select the G-Analyzer display
Push the Control knob towards [4] or
[ ].¢
G-Force Sensor display
G- Graphic display*
G-Meter display
(Graphic)
G-Meter display
(Text)
Point
Time
G-Counter display
• G-Graphic display
Displays the condition of G in horizontal direction
(e.g; when turning the curve) by the graphic.
• * G-Graphic can be switched to customized pictures.
Refer to <Picture downloading> (page 49) and <G-
Graphic Select> (page 44). (KDC-X790 only)
• G-Meter display (Graphic)
Displays the maximum value of acceleration G, right
direction G, and left direction G by the numerical
value.
• G-Meter display (Text)
The maximum value of acceleration G, right direction
G, and left direction G is displayed by the numerical
value. The value of G is only the reference, so is
different from the actual value.
• G-Counter display
Adds the point of the acceleration level. The point is
determined after a lapse of 1 hr drive or at power off
(ACC Off ), and then it will be displayed by the graph.
Furthermore, the G-Counter displays the average
of the past data by the line. (The scale of graph is
determined along with the largest point among the
past 10 data.)
• The value of G-Meter display and G-Counter display
can be reset by <G-Analyzer Reset> (page 42).
6 Exit display control mode
Press the [6] ("RTN") button.

English
|
23
Station/Disc Naming (SNPS/DNPS)
Attaching a title to a Station or CD.
1 Receive/play the station/disc you want to
attach a title to
• A title cannot be attached to MD or Audio file media.
2 Enter Menu mode
Press the [MENU] button for at least 1 second.
"MENU" is displayed.
3 Select Name set mode
Push the Control knob towards [FM] or [AM].
Select the "Name Set" display.
4 Enter Name set mode
Press the Control knob for at least 1 second.
5 Move the cursor to the enter character
position
Push the Control knob towards [4] or
[ ].¢
6 Select the character type
Press the Control knob.
Each time you press the knob, the character type
alternates between the types shown in the table
below.
Character type
Alphabet upper case
Alphabet lower case
Numbers and symbols
Special characters (Accent characters)
7 Select the characters
Push the Control knob towards [FM] or [AM].
• Enter characters by using a remote control with
numbers buttons.
Example: If you are entering "DANCE".
Character Button Times pressed
"D" [3] 1
"A" [2] 1
"N" [6] 2
"C" [2] 3
"E" [3] 2
8 Repeat steps 5 through 7 and enter the name.
9 Exit Menu mode
Press the [MENU] button.
• When operation stops for 10 seconds the name at
that time is registered, and Name Set mode closes.
• Memory numbers
- FM/ AM: 30 stations
- Internal CD player: 10 discs
- External CD changer/ player: Varies according to the
CD changer/ player. Refer to the CD changer/ player
manual.
• Change the title of station/CD by the same operation
used to name it.

24 | English
Tuner features
Tuning
Selecting the station.
1 Select tuner source
Press the [SRC] button.
Select the "TUNER" display.
2 Select the band
Push the Control knob towards [FM] or [AM].
Each time you push the knob toward [FM], it
switches between the FM1, FM2, and FM3 bands.
3 Tune up or down band
Push the Control knob towards [4] or
[ ].¢
• During reception of stereo stations the "ST" indicator
is ON.
Tuning Mode
Choose the tuning mode.
Press the [AUTO] button.
Each time you press the button, the Tuning
mode alternates between the modes shown in
the table below.
Tuning mode Display Operation
Auto seek "Seek Mode
Auto1"
Automatic search for a station.
Preset station seek "Seek Mode
Auto2"
Search in order of the stations
in the Preset memory.
Manual "Seek Mode
Manual"
Normal manual tuning control.
NEXTAUTO/
AME
1 – 6 SRC
Frequency display
Band display
Preset station
number
ST indicator
Control knob

English
|
25
Function of remote control
Direct Access Tuning
Entering the frequency and tuning.
1 Select the band
Press the [FM] or [AM] button.
2 Enter Direct Access Tuning mode
Press the [DIRECT] button on the remote
control.
"– – – –" is displayed.
3 Enter the frequency
Press the number buttons on the remote
control.
Example:
Desired frequency Press button
92.1 MHz (FM) [0], [9], [2], [1]
810 kHz (AM) [0], [8], [1], [0]
Cancelling Direct Access Tuning
Press the [DIRECT] button on the remote
control.
Station Preset Memory
Putting a station in the memory.
1 Select the band
Push the Control knob towards [FM] or [AM].
2 Select the frequency to put in the memory
Push the Control knob towards [4] or
[ ].¢
3 Select the key function section
Press the [NEXT] button.
Repeatedly press the button until "[1]" — "[6]" are
displayed above the [1] — [6] buttons.
Refer to <Notes on Multi-function Key System>
(page 9).
4 Put the frequency in the memory
Press the desired [1] — [6] button for at least
2 seconds.
The preset number display blinks 1 time.
On each band, 1 station can be put in the
memory on each [1] — [6] button.
Auto Memory Entry
Putting stations with good reception in the
memory automatically.
1 Select the band for Auto Memory Entry
Push the Control knob towards [FM] or [AM].
2 Open Auto Memory Entry
Press the [AME] button for at least 2 seconds.
When 6 stations that can be received are put in
the memory Auto Memory Entry closes.
Preset Tuning
Recalling the stations in the memory.
1 Select the band
Push the Control knob towards [FM] or [AM].
2 Select the key function section
Press the [NEXT] button.
Repeatedly press the button until "[1]" — "[6]" are
displayed above the [1] — [6] buttons.
Refer to <Notes on Multi-function Key System>
(page 9).
3 Recall the station
Press the desired [1] — [6] button.
26 | English
RDS features
Function of the KDC-X790
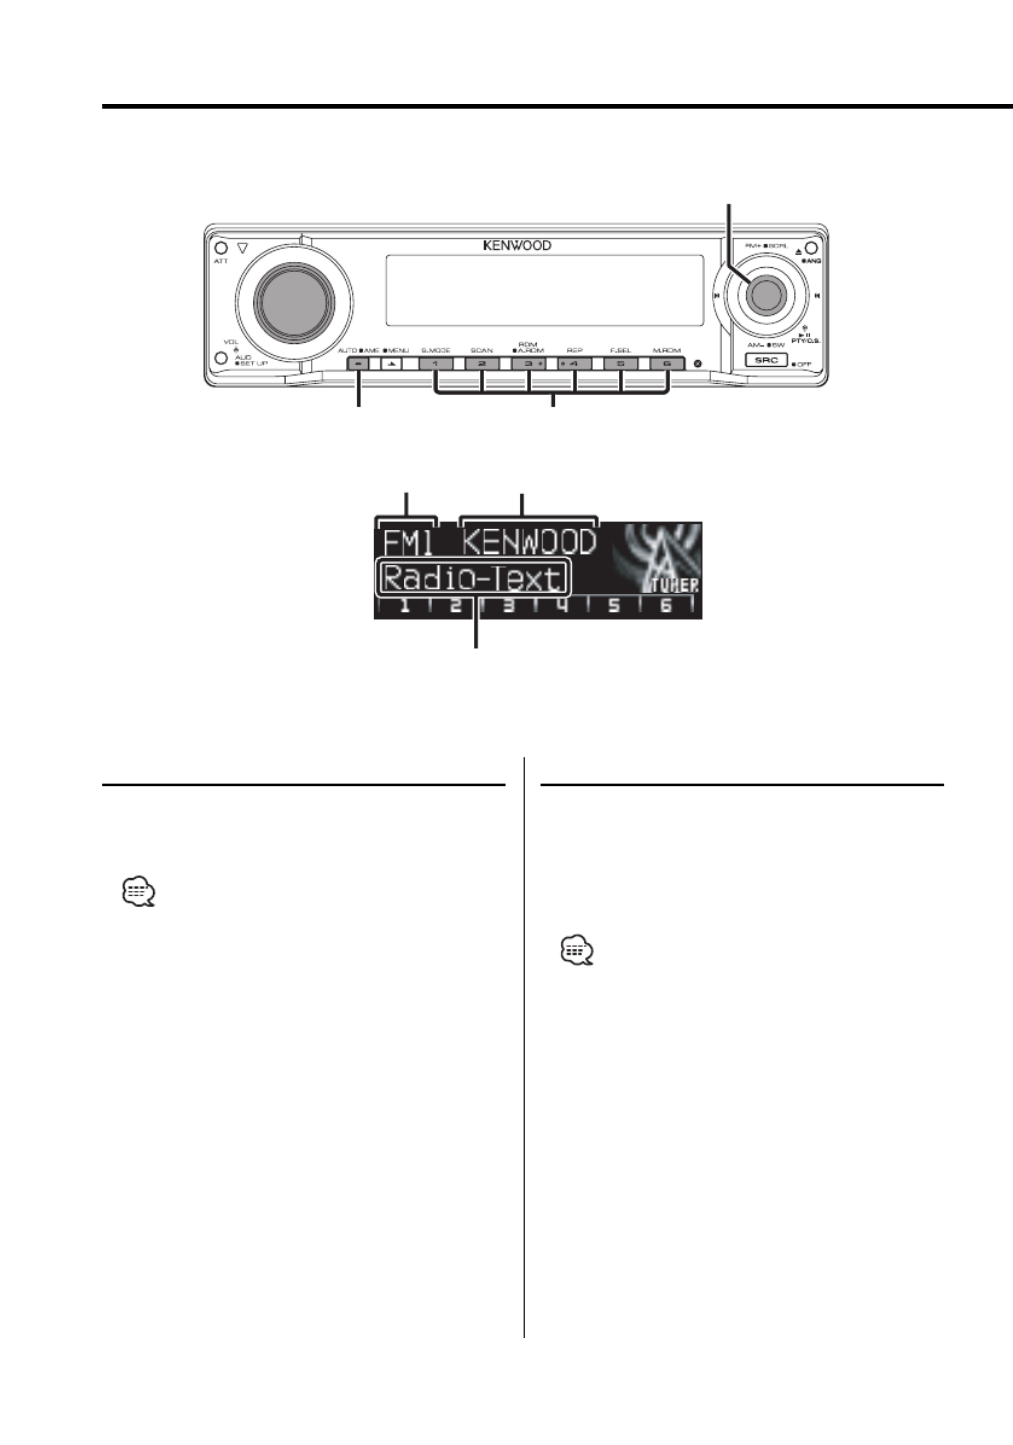
Radio Text Scroll
Scrolling the displayed radio text.
Push the Control knob toward [FM] for at
least 2 seconds.
• When the <Display Illumination Control> (page 41) is
set to OFF, the display may black out while scrolling.
PTY (Program Type)
Selecting the Program Type and searching for a
station.
1 Enter PTY mode
Press the Control knob.
"PTY Select" is displayed.
• The PTY function cannot be used during a traffic
bulletin or AM reception.
2 Select the Program Type
Push the Control knob towards [FM] or [AM].
AUTO 1 – 6
Program Service nameBand display
Radio text
Control knob
English | 27
No. Program Type Display
1. Speech "All Speech"
2. Music "All Music"
3. News "News"
4. Information "Information"
5. Sports "Sports"
6. Talk "Talk"
7. Rock "Rock"
8. Classic Rock "Classic Rock"
9. Adult Hits "Adult Hits"
10. Soft Rock "Soft Rock"
11. Top 40 "Top 40"
12. Country "Country"
13. Oldies "Oldies"
14. Soft "Soft"
15. Nostalgia "Nostalgia"
16. Jazz "Jazz"
17. Classical "Classical"
18. R & B "Rhythm & Blues"
19. Soft R & B "Soft R & B"
20. Language "Foreign Language"
21. Religious Music "Religious Music"
22. Religious Talk "Religious Talk"
23. Personality "Personality"
24. Public "Public"
25. College "College"
26. Weather "Weather"
• Speech and Music include the Program type below.
Music: No.7 — 19, 21
Speech: No.3 — 6, 20, 22 — 26
• The Program Type can be put in the [1] — [6] button
memory and recalled quickly. Refer to the <Program
Type preset> (page 27).
3 Search for the selected Program Type
station
Push the Control knob towards [4] or
[ ].¢
When you want to search for other stations, push
toward [ ] or [ ] of the Control knob again.4 ¢
• When selected Program Type is not found, "NO PTY" is
displayed. Select another Program Type.
4 Exit PTY mode
Press the Control knob.
Registration of a station as a PTY
Registering a Program Type for stations with no
PTY data.
1 Receive the station you want to register
2 Select the Program Type to register
Refer to <PTY (Program Type)> (page 26).
3 Register the Program Type
Press the [AUTO] button for at least 2
seconds.
Confirming the Program Type
Press the [AUTO] button.
The Program Type is displayed for 5 seconds.
4 Exit PTY mode
Press the Control knob.
Program Type preset
Putting the Program Type in the Preset button
memory and quick recall.
Presetting the Program Type
1 Select the Program Type to preset
Refer to <PTY (Program Type)> (page 26).
2 Preset the Program Type
Press the desired [1] [6] button for at least —
2 seconds.
Recalling the preset Program Type
1 Enter PTY mode
Refer to <PTY (Program Type)> (page 26).
2 Recall the Program Type
Press the desired [1] [6] button.—

28 | English
CD/Audio file/External disc control features
Playing CD & Audio file
When there is no disc inserted
1 Open the panel
Press the [ ] button.0
2 Insert a disc.
• When the faceplate slides open, it might interfere
with the shift lever or other vehicle function. If this
happens, pay attention to safety and move the shift
lever or take an appropriate action to remove the
obstacle, then operate the unit.
• Insert the disc horizontal to the slot. If you insert the
Disc as you push down on the Disc, it may scratch the
Disc.
• For KDC-X790, you can play the disc (ACDrive disc)
made by Media Manager by the same operation.
• You can cancel the announcement when selecting
the folder by <Voice Index> (page 50) during the play
of the ACDrive. (KDC-X790 only)
• When a disc is inserted the "IN" indicator is ON.
When a disc is inserted
Press the [SRC] button.
Select the "Compact Disc" display.
Pause and play
Press the Control knob.
Each time you press the knob, the audio pauses
or plays.
Eject the disc
1 Eject the disc
Press the [0] button.
2 Return the panel to the original position
Press the [ ] button.0
0
NEXT SRC1 – 6
Control knob
Track number Play time
IN indicator
English
|
29
Playing External Disc
Playing discs set in the optional accessory disc
player connected to this unit.
Press the [SRC] button.
Select the display for the disc player you want.
Display examples:
Display Disc player
"CD Changer" CD changer
"MD Changer" MD changer
Pause and play
Press the Control knob.
Each time you press the knob, the audio pauses
or plays.
• The functions that can be used and the information
that can be displayed will differ depending on the
external disc players being connected.
Fast Forwarding and Reversing
Fast Forwarding
Hold down toward [¢] with the Control
knob.
Release your finger to play the disc at that point.
Reversing
Hold down toward [4] with the Control
knob.
Release your finger to play the disc at that point.
• There is no sound while the Audio file is being
searched.
• You cannot fast Forwarding and Reversing while AAC
file is being played. (KDC-MP732 only)
• You cannot fast Forwarding and Reversing depending
on AAC file format. (KDC-X790 only)
Track/File Search
Searching for a song on the disc or in the Audio
file folder.
Push the Control knob towards [4] or
[ ].¢
Function of disc changer/ Audio file
Disc Search/Folder Search
Selecting the disc set in the Disc changer or the
folder recorded on the Audio file media.
Push the Control knob towards [FM] or [AM].
Function of remote control
Direct Track/File Search
Doing Track/File Search by entering the track/file
number.
1 Enter the track/file number
Press the number buttons on the remote
control.
• You can select Direct File Search up to 999. (KDC-X790
only)
2 Do Track/File Search
Press the [ ] or [ ] button.4 ¢
Cancelling Direct Track/File Search
Press the [ ] button.38
Function of disc changers with remote control
Direct Disc Search
Doing Disc Search by entering the disc number.
1 Enter the disc number
Press the number buttons on the remote
control.
2 Do Disc Search
Press the [ ] or [ ] button.+ –
Cancelling Direct Disc Search
Press the [ ] button.38

30
| English
CD/Audio file/External disc control features
Track/File/Disc/Folder Repeat
Replaying the song, disc in the Disc changer or
Audio file folder folder you are listening to.
1 Select the key function section
Press the [NEXT] button.
Repeatedly press the button until "REP" is
displayed above the [4] button.
Refer to <Notes on Multi-function Key System>
(page 9).
2 Turn ON/OFF the Repeat Play
Press the [4] ("REP") button.
Each time you press the button, the Repeat Play
alternates between the modes shown in the
tables below.
In CD & External disc source
Repeat play Display
Track Repeat "Track Repeat ON"
Disc Repeat (In Disc Changer) "Disc Repeat ON"
OFF "Repeat OFF"
In Audio file source
Repeat play Display
File Repeat "File Repeat ON"
Folder Repeat "Folder Repeat ON"
OFF "Repeat OFF"
Scan Play
Playing the first part of each song on the disc
or Audio file folder you are listening to and
searching for the song you want to hear.
1 Select the key function section
Press the [NEXT] button.
Repeatedly press the button until "SCAN" is
displayed above the [2] button.
Refer to <Notes on Multi-function Key System>
(page 9).
2 Start Scan Play
Press the [2] ("SCAN") button.
"Scan ON"/ "Track Scan ON"/ "File Scan ON" is
displayed.
3 Release it when the song you want to listen
to is played
Press the [2] button.

English | 31
Random Play
Play all the songs on the disc or Audio file folder
in random order.
1 Select the key function section
Press the [NEXT] button.
Repeatedly press the button until "RDM" is
displayed above the [3] button.
Refer to <Notes on Multi-function Key System>
(page 9).
2 Turn ON/OFF the Random Play
Press the [3] ("RDM") button.
Each time you press the button, Random Play
turns ON or OFF.
When the Random mode is ON, "Random
ON"/ "Disc Random ON"/ "Folder RDM ON" is
displayed.
• When you push the Control knob toward [¢], the
next random song starts.
Function of disc changer
Magazine Random Play
Play the songs on all the discs in the disc changer
in random order.
1 Select the key function section
Press the [NEXT] button.
Repeatedly press the button until "M.RDM" is
displayed above the [6] button.
Refer to <Notes on Multi-function Key System>
(page 9).
2 Turning ON/OFF the Magazine Random Play
Press the [6] ("M.RDM") button.
Each time you press the button, the Magazine
Random Play turns ON or OFF.
When the Magazine Random mode is ON,
"Magazine RDM ON" is displayed.
• When you push the Control knob toward [ ], the ¢
next random song starts.
Function of the KDC-X790
Function of Audio file
All Random Play
Playing randomly from all of the Audio files
recorded in the disc.
1 Select the key function section
Press the [NEXT] button.
Repeatedly press the button until "RDM" is
displayed above the [3] button.
Refer to <Notes on Multi-function Key System>
(page 9).
2 Turn ON the All Random Play
Press the [3] ("RDM") button for at least 1
second.
When the random mode is ON, "All Random ON"
is displayed.
Cancelling the All Random Play
Press the [3] ("RDM") button.
• When you push the Control knob toward [¢], the
next random song starts.

32 | English
CD/Audio file/External disc control features
Function of the KDC-X790
Function of ACDrive disc
Switching the Play mode
Arrange the playing orders of the songs by
categories.
1 Select the key function section
Press the [NEXT] button.
Repeatedly press the button until "S.MODE" is
displayed above the [1] button.
Refer to <Notes on Multi-function Key System>
(page 9).
2 Select the Play mode
Press the [1] ("S.MODE") button.
Each time you press the button, the Play mode
alternates between the modes shown on the
table below.
Play mode Category which is to be arranged
"PlayList Mode" Play list order.
"Genre Mode" By genre.
"Artist Mode" By artist.
"Album Mode" By album.
"Folder Mode" By the folder recorded in Disc.
• The category information of each song is the data
registered in Media Manager when ACDrive disc is
being generated.
• You can cancel the announcement made when the
mode is changed by <Voice Index> (page 50).
• You can select the advancement of the Play mode
information by [AM] and [FM] knob.
Function of Audio file
Folder Select
Quickly selecting the folder you want to hear.
1 Select the key function section
Press the [NEXT] button.
Repeatedly press the button until "FSEL" is
displayed above the [5] button.
Refer to <Notes on Multi-function Key System>
(page 9).
2 Enter Folder Select mode
Press the [5] ("FSEL") button.
"FOLDER SELECT" is displayed.
During Select mode the folder information is
displayed as shown below.
Folder name display
Displays the current folder name.
Folder number display
Displays the number in the folder belonging to
the currently selected folder.
• The Folder select mode does not function when <All
Random Play> (page 31) is ON.
3 Select the folder level*
Push the Control knob towards [FM] or [AM].
With the [FM] button, you move 1 level down
and with the [AM] button, 1 level up.
Selecting a folder in the same level
Push the Control knob towards [4] or
[ ].¢
With the [4] of the Control knob, you move
to the previous folder, and with the [¢] of the
Control knob, to the next folder.
Returning to the top level*
Press the [3] ("HOME") button.
• * You cannot operate this function when <Switching
the Play mode> (page 32) is set to other than "Folder
Mode" while playing ACDrive.
Scrolling the folder name display
Push the Control knob toward [FM] for at
least 2 seconds.
4 Decide the folder to play
Press the [1] ("OK") button.
The Folder Select mode releases, and the Audio
file in the folder being displayed plays.
Cancelling the Folder Select mode
Press the [2] ("EXIT") button.
English | 33
Function of the KDC-X790
Function of ACDrive disc
Letter Seek
You can search for the song, you want to play, by
selecting the initial of Genre name, Artist name,
or Album name.
1 Select the key function section
Press the [NEXT] button.
Repeatedly press the button until "S.MODE" is
displayed above the [1] button.
Refer to <Notes on Multi-function Key System>
(page 9).
2 Enter the Letter Seek mode
Press the [1] ("S.MODE") button for at least 1
second.
• This operation does not function when <All Random
Play> (page 31) is ON.
• This function is available only when the Play mode is
set Genre, Artist, or Album.
Cancelling the Letter Seek
Press the [1] ("EXIT") button.
3 Start the Letter Seek
Push the Control knob towards [4] or
[ ].¢
The initial of Genre name, Artist name, or Album
name is displayed and announced in order.
• The announcement of the initial can be canceled by
<Voice Index> (page 50).
• When you push the Control knob to the reverse [4]
or [¢] during Letter Seek, the initial is displayed and
announced in the reversed order.
• Once Letter Seek starts, it cannot be cancelled.
4 Select the song to play
Press the Control knob when the initial of
the song you are searching is displayed and
announced.
The selected initial group plays.
Text/Title Scroll
Scrolling the displayed CD text, Audio file text, or
MD title.
Push the Control knob toward [FM] for at
least 2 seconds.
• When the <Display Illumination Control> (page 41) is
set to OFF, the display may black out while scrolling.

34 | English
SIRIUS tuner control features
Select SIRIUS Satellite Radio Mode
Selecting the SIRIUS Satellite Radio Tuner
(optional accessory) connected to this unit.
Selecting SIRIUS Mode
Press the [SRC] button.
Select the "SIRIUS" display.
• You need to subscribe to SIRIUS to receive the service
by SIRIUS Satellite Radio. Consult SIRIUS if "CALL 888-
539-SIRIUS TO SUBSCRIBE" appears.
• The radio may take a little time to start receiving after
you select the SIRIUS source.
• If the signal reception fails, "Acquiring Signal" appears.
Switching Seek Mode
Sets the seeking mode.
Press the [AUTO] button.
Each time you press the button, the Seek mode
alternates between the operations shown in the
table below.
Display Operation
"Seek Mode Channel" Normal manual seeking control.
"Seek Mode Preset" Search in order of the channels in the Preset
memory.
Select the channel
Selecting the channel.
Push the Control knob towards [4] or
[ ].¢
NEXTAUTO 1 – 6 SRC
Control knob
Band display Channel number
English | 35
Category and Channel Search
Selecting the channel and category you want to
receive.
1 Enter Category and Channel Search mode
Press the Control knob.
2 Select the Category
Push the Control knob towards [FM] or [AM].
• It is the item when the category of Middle text display
part is selected.
3 Select the Channel
Push the Control knob towards [4] or
[ ].¢
• You cannot Channel search until the category
information is acquired.
Cancelling Category and Channel Search
mode
Press the Control knob.
Function of remote control
Direct Access Tuning
Entering the channel and tuning.
1 Enter Direct Access Tuning mode
Press the [DIRECT] button on the remote
control.
2 Enter the channel
Press the number buttons.
3 Do Channel Search
Push the Control knob towards [4] or
[ ].¢
Cancelling Direct Access Tuning
Press the [DIRECT] button on the remote
control.
• If you make no button operation for 10 seconds, the
Direct Access Tuning mode is automatically canceled.
• You can set up until Channel number 223.
• If there is no signal in the input Channel, "No Channel"
appears. (KTC-SR901: optional accessory)
• You cannot search for a channel number which is not
broadcasting.
(KTC-SR902/KTC-SR903: optional accessory)
• If you cannot receive any signal in the input Channel
due to bad conditions on radio wave or other such
problems, "Acquiring Signal" appears.
Selecting the Preset Band
Push the Control knob toward [FM].
Each time you push the knob, the preset band
alternates between the SR1, SR2, SR3 and SR4.
Channel Preset Memory
Putting the channel in the memory.
1 Select the preset band
Push the Control knob toward [FM].
2 Select the channel to put in the memory
Push the Control knob towards [4] or
[ ].¢
3 Select the key function section
Press the [NEXT] button.
Repeatedly press the button until "[1]" — "[6]" are
displayed above the [1] — [6] buttons.
Refer to <Notes on Multi-function Key System>
(page 9).
4 Put the channel in the memory
Press the desired [1] — [6] button for at least
2 seconds.
The preset number display blinks 1 time.
On each band, you can put 1 channel in the
memory on each [1] — [6] button.
• Only the channel number is stored. Category
information is not stored.

36 | English
Preset Tuning
Recalling the channels in the memory.
1 Select the preset band
Push the Control knob toward [FM].
2 Select the key function section
Press the [NEXT] button.
Repeatedly press the button until "[1]" — "[6]" are
displayed above the [1] — [6] buttons.
3 Recall the channel
Press the desired [1] — [6] button.
Channel Scan
Checks every receivable Channel for 10 seconds.
1 Start Channel Scan
Press the [AUTO] button for at least 2
seconds.
The channel number display blinks.
2 Release the button when the song you want
to hear is received
Press the [AUTO] button for at least 2
seconds.
Text Scroll for SIRIUS tuner source
Scrolls the displayed channel name and other
items.
Push the Control knob toward [FM] for at
least 2 seconds.
• When the <Display Illumination Control> (page 41) is
set to OFF, the display may black out while scrolling.
SIRIUS tuner control features

English | 37
HD Radio control features
About HD Radio
• When you connect an HD Radio, Tuner features
of the unit are disabled and changed to HD
Radio tuner features. A portion of the setting
methods including the Tuning Mode will
change.
• With the HD Radio tuner, you can use the
similar functions to <Station Preset Memory>,
<Auto Memory Entry>, and <Preset Tuning> of
Tuner features. Refer to Tuner features for how
to use the functions.
Tuning
Selecting the station.
1 Select HD Radio source
Press the [SRC] button.
Select the "HD Radio" display.
2 Select the HD FM band
Push the Control knob toward [FM].
Each time you push the knob to [FM], the band
alternates between the HF1, HF2, and HF3 bands.
Select the HD AM band
Push the Control knob toward [AM].
3 Tune up or down band
Push the Control knob towards [4] or
[ ].¢
SRC
Control knob
Frequency displayBand display

38 | English
Menu system
Menu System
Setting beep sound during operation, etc.
functions.
The Menu system basic operation method is
explained here. The reference for the Menu items
and their setting content is after this operation
explanation.
1 Enter Menu mode
Press the [MENU] button for at least 1 second.
"MENU" is displayed.
2 Select the menu item
Push the Control knob towards [FM] or [AM].
Example: When you want to set the beep sound
select the "Beep" display.
3 Set the menu item
Push the Control knob towards [4] or
[ ].¢
Example: When you select "Beep", each time you
push the knob it alternates between
"Beep : ON" or "Beep : OFF". Select 1 of
them as the setting.
You can continue by returning to step 2 and
setting other items.
4 Exit Menu mode
Press the [MENU] button.
• When other items those applicable to the basic
operation method above are displayed, their setting
content chart is entered. (Normally the setting listed at
the top of the chart is the original setting.)
Also, the explanation for items that are not applicable
(<Manual Clock Adjustment> etc.) are entered step
by step.
• Three menu items appear on the display. The menu
item displayed at the center is the one you can adjust.
MENU SRC
Control knob
Menu display

English | 39
In Standby mode
Activating Security Code
Activating the Security Code disables the usage
of audio unit by someone else. Once the Security
Code is activated, the entry of authorized Security
Code is required to turn on the audio unit when
it is removed from the vehicle. Indication of this
Security Code activation prevents your precious
audio unit from stealing.
• Set the Security Code when the <Demonstration mode
Setting> (page 51) is set to OFF.
• You can set the Security Code with a 4 digit number of
your choice.
• The Security Code cannot be displayed or referenced.
Make a note of the Security Code and treasure it up.
1 Enter Standby
Press the [SRC] button.
Select the "STANDBY" display.
2 Enter Menu mode
Press the [MENU] button for at least 1 second.
When "MENU" is displayed, "Security Set" is also
displayed.
3 Enter Security Code mode
Press the Control knob for at least 1 second.
When "Enter" is displayed, "Security Set" is also
displayed.
4 Select the digits to enter
Push the Control knob towards [4] or
[ ].¢
5 Select the Security Code numbers
Push the Control knob towards [FM] or [AM].
6 Repeat steps 4 and 5, and complete the
Security Code.
7 Confirm the Security Code
Press the Control knob for at least 3 seconds.
When "Re-Enter" is displayed, "Security Set" is also
displayed.
8 Do the step 4 through 7 operation, and
reenter the Security Code.
"Approved" is displayed.
The Security Code function activates.
9 Exit Security Code mode
Press the [MENU] button.
• If you enter the wrong Code in steps 4 through 6,
repeat from step 4.
Resetting the Security Code function when
the audio unit is first used after removed
from the battery power source or the Reset
button is pressed
1 Turn the power ON.
2 Do the step 4 through 7 operation, and enter
the Security Code.
"Approved" is displayed.
Now, you can use the unit.
• When the Security Code function is activated,
"Security Set" changes to "Security Clear".
• To deactivate the Security Code function, see the next
section <Deactivating Security Code>.
In Standby mode
Deactivating Security Code
To deactivate the Security Code function.
1 Select Security Code mode
Push the Control knob towards [FM] or [AM].
Select the "Security Clear" display.
2 Enter Security Code mode
Press the Control knob for at least 1 second.
When "Enter" is displayed, "Security Set" is also
displayed.
3 Select the digits to enter
Push the Control knob towards [4] or
[ ].¢
4 Select the Seciruty Code numbers
Push the Control knob towards [FM] or [AM].
5 Repeat steps 3 and 4, and complete the
Security Code.
6 Press the Control knob for at least 3 seconds.
"Clear" is displayed.
The Security Code function deactivates.
• If a wrong security code is entered, "Error" is displayed.
Enter a correct security code.
40 | English
In Standby mode
Touch Sensor Tone
Setting the operation check sound (beep sound)
ON/OFF.
Display Setting
"Beep : ON" Beep is heard.
"Beep : OFF" Beep canceled.
In Standby mode
Manual Clock Adjustment
• You can do this adjustment when the <Synchronize
Clock> (page 41) is set as OFF. (KDC-X790 only)
1 Select Clock Adjustment mode
Push the Control knob towards [FM] or [AM].
Select the "Clock Adjust" display.
2 Enter Clock Adjust mode
Press the Control knob for at least 1 second.
The clock display blinks.
3 Adjust the hours
Push the Control knob towards [FM] or [AM].
Adjust the minutes
Push the Control knob towards [4] or
[ ].¢
4 Exit Clock adjustment mode
Press the [MENU] button.
In Standby mode
Date Adjustment
1 Select Date Adjust mode
Push the knob towards [FM] or [AM].
Select the "Date Adjust" display.
2 Enter Date Adjust mode
Press the Control knob for at least 1 second.
The date display blinks.
3 Selecting the item (day, month, or year) to
adjust
Push the Control knob towards [4] or
[ ].¢
The items that are blinking are items that you
can adjust.
4 Adjust each item
Push the Control knob towards [FM] or [AM].
5 Repeat step 3 and 4 operation and adjust the
date.
6 Exit Date adjustment mode
Press the [MENU] button.
In Standby mode
Date Mode
Setting the date format.
1 Select Date Mode
Push the Control knob towards [FM] or [AM].
Select the "Date Mode" display.
2 Select the date format
Push the Control knob towards [4] or
[ ].¢
3 Exit Menu mode
Press the [MENU] button.
Menu system
English | 41
Function of the KDC-X790
In Standby mode
Synchronize Clock
Synchronizing the RDS station time data and this
unit’s clock.
Display Setting
"SYNC : OFF" Adjust the time manually.
"SYNC : ON" Synchronizes the time.
• It takes 3 to 4 minutes to synchronize the clock.
In Standby mode
DSI (Disabled System Indicator)
A red indicator will blink on the unit after the
faceplate is removed, warning potential thieves.
Display Setting
"DSI : ON" LED flashes.
"DSI : OFF" LED OFF.
In Standby mode
Selectable Illumination
Selecting the button illumination color as green
or red.
Display Setting
"Button : Red" The illumination color is red.
"Button : Green" The illumination color is green.
Display Illumination Control
This function turns off the display when you
perform no operation for 5 seconds. This function
is effective when you are driving at night.
Display Setting
"Display : ON" Keeps the display on.
"Display : OFF" Turns off the display when you perform no
operation for 5 seconds.
• Set the Display Illumination Control when the
<Demonstration mode Setting> (page 51) is set to
OFF.
• When the display is off, pressing any key will turn on
the display.
• When the display is off, you cannot perform any
operation except for the following:
• Volume
• Attenuator
• Selecting the source
• Ejecting the disc
• Faceplate Angle Adjustment
• Turning off the power
• During function control, such as the Menu System, the
display stays on.
In Standby mode
Dimmer
Dimming this unit’s display automatically when
the vehicle light switch is turned ON.
Display Setting
"Dimmer : ON" The display dims.
"Dimmer : OFF" The display doesn’t dim.
In Standby mode
Built-in Amp Setting
Controlling the built-in amplifier.
Turning OFF this control enhances the preout
quality.
Display Setting
"AMP : ON" The built-in amplifier activates.
"AMP : OFF" The built-in amplifier deactivates.
42 | English
In Standby mode
G-Analyzer Calibration setup
G-Analyzer requires calibration for horizontal
acceleration and braking.
• To ensure accurate calibration, go through the
following steps at a level place where you can move
the vehicle straight ahead.
1 Park the vehicle in a horizontal location
2 Select G-Analyzer Calibration setup mode
Push the Control knob towards [FM] or [AM].
Select the "G-Calibration" display.
3 Enter G-Analyzer Calibration setup mode
Press the Control knob for at least 1 second.
"Stop" is displayed.
4 Start Calibration of horizontal direction
Press the Control knob.
Once "Move Forward" appears on the display, the
vehicle must be advanced.
5 Start Calibration of straight direction
Start moving the vehicle ahead.
Calibration of straight direction automatically
starts.
When the Calibration is finished, "Calibration OK"
is displayed.
• If you fail to complete the calibraton, "No Calibration"
is displayed. In such a case, repeat steps 1 through 6.
6 Exit G-Analyzer Calibration setup mode
Press the [MENU] button.
Menu system
In Standby mode
G-Counter Level set
Calibrating G-Point. Setting the level according to
the kinds of vehicles.
Display Setting
"G-Counter : Level1" Counter is easy to go up.
"G-Counter : Level2"
…
"G-Counter : Level3" Counter is hard to go up.
• In the case of driving situations calling for few
accelerations, set the G-Point up to "G-Counter :
Level1". In the case of frequent accelerations, set it up
to "G-Counter : Level3".
In Standby mode
G-Analyzer Reset
Resets the value of G-Meter, G-Counter and G-
Analyzer Horsepower Analysis.
1 Select G-Analyzer Reset mode
Push the Control knob towards [FM] or [AM].
Select the "G-Reset" display.
2 Enter G-Analyzer Reset mode
Press the Control knob for at least 1 second.
3 Select the Reset item
Push the Control knob towards [FM] or [AM].
"G-Meter Reset": Reset the value of G-Meter.
"G-Counter Reset": Reset the value of G-Counter.
"G-Power Reset": Reset the value of G-Analyzer
Horsepower Analysis.
4 Reset the value
Press the Control knob for at least 2 seconds.
"Reset OK" is displayed.
5 Exit G-Analyzer Reset mode
Press the [MENU] button.

English | 43
In Standby mode
G-Analyzer Horsepower Gauge
setup
Enter vehicle class and weight to calculate
horsepower.
1 Select the G-Analyzer Horsepower Gauge
setup mode
Push the Control knob towards [FM] or [AM].
Select the "Hp Gauge Setup" display.
2 Enter G-Analyzer Horsepower Gauge setup
mode
Press the Control knob for at least 1 second.
"Class Select" is displayed.
3 Select vehicle class
Push the Control knob towards [4] or
[ ].¢
Each time you push the knob, the vehicle class
alternates between the modes shown in the
table below.
Display
"Mid Size"
"Full Size"
"SUV"
"Van/ Mini-Van"
"Pickup Truck"
"Sporty"
"Compact"
4 Enter Weight Input mode
Press the Control knob.
"Weight Input" is displayed.
5 Select the weight numbers
Push the Control knob towards [FM] or [AM].
• The weight input range is between 1000-9999 lbs.
6 Select the digits to enter
Push the Control knob towards [4] or
[ ].¢
7 Repeat steps 5 and 6, and complete the
weight input.
8 Exit G-Analyzer Horsepower Gauge setup
mode
Press the [NEXT] button.
44 | English
Menu system
G-Analyzer Horsepower Analysis
This measures the horsepower and displays graph
and max power. It automatically saves the highest
record.
• Do not use G-Analyzer Horsepower Analysis on the
Public roads.
• Do not use this product in any way that prevents you
from driving safely.
• Follow all driving laws and use common sense when
using this product.
• Before alternating G-Analyzer Horsepower Analysis,
you are required to setup <G-Analyzer Horsepower
Gauge setup> (page 43).
1 Select the G-Analyzer Horsepower Analysis
mode
Push the Control knob towards [FM] or [AM].
Select the "Horsepower" display.
2 Enter G-Analyzer Horsepower Analysis
mode
Press the Control knob for at least 1 second.
"Stop" is displayed.
Previous max power and record are displayed.
3 Begin measurement
Press the Control knob.
"Ready" is displayed.
4 Start the car
"Measure" is displayed.
After 15 seconds of measurement, the result is
displayed.
Display the result
The graph shows the variation in horsepower
between 0.1 to 15.0 seconds. The maximum
power is displayed in red and the markings
provided at intervals of 5 seconds are displayed
in blue.
• Pressing the Control knob also begins the
measurement. To prevent danger, push the control
knob before starting the car.
5 To display the maximum power in the
section:
Push the Control knob towards [4] or
[ ].¢
Each time you push the Control knob, the
maximum power in the section is displayed.
6 Exit G-Analyzer Horsepower Analysis mode
Press the [NEXT] button.
• Like your vehicle’s speedometer, G-Analyzer is no
more than a measuring function. The HP or G value
measured by this unit may not be completely accurate
due to its simplified method of measurement. The
G-Analyzer is only for reference and should not be
used to confirm the horsepower specifications of your
vehicle.
• Measuring after starting the car lowers the accuracy.
• The record will not be renewed if the measurement is
discontinued.
• The graph’s scale adjusts automatically to the
horsepower value.
• The value of max power and record can be reset by
<G-Analyzer Reset> (page 42).
Function of the KDC-X790
In Standby mode
G-Graphic Select
Select the picture to display on G-Graphic.
Display Setting
"G-Graph : Default" Display default picture.
"G-Graph : Custom" Display downloaded picture.
• G-Graphic pictures cannot be selected unless
downloaded beforehand. To download G-Graphic
pictures, refer to <Picture downloading> (page 49)
Specyfikacje produktu
| Marka: | Kenwood |
| Kategoria: | Radia samochodowe |
| Model: | KDC-X790 |
Potrzebujesz pomocy?
Jeśli potrzebujesz pomocy z Kenwood KDC-X790, zadaj pytanie poniżej, a inni użytkownicy Ci odpowiedzą
Instrukcje Radia samochodowe Kenwood

16 Stycznia 2025
4 Grudnia 2024
4 Grudnia 2024
15 Października 2024
24 Września 2024
24 Września 2024
23 Września 2024
22 Września 2024
22 Września 2024
22 Września 2024
Instrukcje Radia samochodowe
- Radia samochodowe Sony
- Radia samochodowe AEG
- Radia samochodowe LG
- Radia samochodowe Pioneer
- Radia samochodowe Fiat
- Radia samochodowe Philips
- Radia samochodowe SilverCrest
- Radia samochodowe Xblitz
- Radia samochodowe JBL
- Radia samochodowe Scott
- Radia samochodowe Opel
- Radia samochodowe Conceptronic
- Radia samochodowe Panasonic
- Radia samochodowe Norauto
- Radia samochodowe Muse
- Radia samochodowe Nedis
- Radia samochodowe Medion
- Radia samochodowe Boss
- Radia samochodowe Lenco
- Radia samochodowe Peiying
- Radia samochodowe Marquant
- Radia samochodowe Ford
- Radia samochodowe Majestic
- Radia samochodowe Jensen
- Radia samochodowe Mini
- Radia samochodowe Skoda
- Radia samochodowe Blaupunkt
- Radia samochodowe Volvo
- Radia samochodowe Dual
- Radia samochodowe Grundig
- Radia samochodowe Hyundai
- Radia samochodowe BLOW
- Radia samochodowe ECG
- Radia samochodowe Smart
- Radia samochodowe Alpine
- Radia samochodowe JVC
- Radia samochodowe Becker
- Radia samochodowe Ultimate
- Radia samochodowe Mercedes-Benz
- Radia samochodowe Biltema
- Radia samochodowe Auna
- Radia samochodowe Krüger&Matz
- Radia samochodowe OneConcept
- Radia samochodowe Renkforce
- Radia samochodowe Pure
- Radia samochodowe Zenec
- Radia samochodowe Clarion
- Radia samochodowe Fusion
- Radia samochodowe Magnat
- Radia samochodowe Manta
- Radia samochodowe Pyle
- Radia samochodowe VDO
- Radia samochodowe Harman Kardon
- Radia samochodowe Audio-Technica
- Radia samochodowe Maginon
- Radia samochodowe SPC
- Radia samochodowe Parrot
- Radia samochodowe Aiwa
- Radia samochodowe AKAI
- Radia samochodowe Sanyo
- Radia samochodowe Clatronic
- Radia samochodowe Telefunken
- Radia samochodowe Hifonics
- Radia samochodowe Kicker
- Radia samochodowe Deaf Bonce
- Radia samochodowe Elta
- Radia samochodowe Mac Audio
- Radia samochodowe McIntosh
- Radia samochodowe Denver
- Radia samochodowe Orion
- Radia samochodowe Hertz
- Radia samochodowe Trevi
- Radia samochodowe Technaxx
- Radia samochodowe Overmax
- Radia samochodowe Sencor
- Radia samochodowe Ground Zero
- Radia samochodowe Stinger
- Radia samochodowe Rockford Fosgate
- Radia samochodowe Nextbase
- Radia samochodowe Daewoo
- Radia samochodowe Kunft
- Radia samochodowe Crunch
- Radia samochodowe REVO
- Radia samochodowe Varta
- Radia samochodowe Audison
- Radia samochodowe Tevion
- Radia samochodowe Caliber
- Radia samochodowe Telestar
- Radia samochodowe Brigmton
- Radia samochodowe Xomax
- Radia samochodowe Audiosonic
- Radia samochodowe Vieta
- Radia samochodowe Audiovox
- Radia samochodowe MB Quart
- Radia samochodowe Tokai
- Radia samochodowe Naxa
- Radia samochodowe Boston Acoustics
- Radia samochodowe Farenheit
- Radia samochodowe Adcom
- Radia samochodowe Nikkei
- Radia samochodowe Autovision
- Radia samochodowe Lanzar
- Radia samochodowe Roadstar
- Radia samochodowe MT Logic
- Radia samochodowe Shuttle
- Radia samochodowe Axton
- Radia samochodowe Soundstream
- Radia samochodowe DLS
- Radia samochodowe VDO Dayton
- Radia samochodowe Macrom
- Radia samochodowe Watssound
- Radia samochodowe Tamashi
- Radia samochodowe Emphaser
- Radia samochodowe Scion
- Radia samochodowe Sendai
- Radia samochodowe Phonocar
- Radia samochodowe US Blaster
- Radia samochodowe Eltax
- Radia samochodowe RTO
- Radia samochodowe Sevic
- Radia samochodowe Cartronix
- Radia samochodowe Dension
- Radia samochodowe Spectron
- Radia samochodowe Mtx Audio
- Radia samochodowe Multilaser
- Radia samochodowe Raveland
- Radia samochodowe ESX
- Radia samochodowe RetroSound
- Radia samochodowe Lark
- Radia samochodowe Planet Audio
- Radia samochodowe VW
- Radia samochodowe Rodek
- Radia samochodowe Eclipse
- Radia samochodowe Voxx
- Radia samochodowe SoundMAX
- Radia samochodowe Impulse
- Radia samochodowe Twister
- Radia samochodowe Mystery
Najnowsze instrukcje dla Radia samochodowe

16 Stycznia 2025
16 Stycznia 2025
16 Stycznia 2025
16 Stycznia 2025

15 Stycznia 2025
14 Stycznia 2025
14 Stycznia 2025

14 Stycznia 2025
13 Stycznia 2025
13 Stycznia 2025