Instrukcja obsługi Kenwood DMX5020DABS
Kenwood
Radia samochodowe
DMX5020DABS
Przeczytaj poniżej 📖 instrukcję obsługi w języku polskim dla Kenwood DMX5020DABS (120 stron) w kategorii Radia samochodowe. Ta instrukcja była pomocna dla 7 osób i została oceniona przez 2 użytkowników na średnio 4.5 gwiazdek
Strona 1/120

B5H-0358-07 (E)© 2020 JVCKENWOOD Corporation
DMX5020DABS
MONITOR WITH RECEIVER
Quick Start Guide
ÉCRAN AVEC RÉCEPTEUR
Guide de démarrage rapide
MONITOR MIT EMPFÄNGER
Kurzanleitung
MONITOR MET ONTVANGER
Snelstartgids
Model name indication position
See Removing the trim plate (P. )26
Position d'indication du nom du modèle
Voir Retrait de la plaque de garniture
(p.54)
Anzeigeposition der Modellbezeichnung
Siehe Entfernen der Ziertafel (S.82)
Model naam indicatie positie
Zie Verwijderen van de afwerkingsplaat
(P.110)
• Updated information (the latest Instruction Manual, system updates, new
functions, etc.) is available from
• Des informations actualisées (le dernier mode d'emploi, les mises à jour du
système, les nouvelles fonctions, etc.) sont disponibles sur
• Die aktuellsten Informationen (die neueste Bedienungsanleitung,
Systemupdates, neue Funktionen usw.) nden Sie unter
• Bijgewerkte informatie (de meest recente gebruiksaanwijzing,
systeemupdates, nieuwe functies, enz.) is beschikbaar op
<https://www.kenwood.com/cs/ce/>
Trim plate
Plaque de garniture
Ziertafel
Afwerkingsplaat

2
Important Notice on Software
Ñ Software License on This Product
The software embedded in this product comprises a
number of independent software components, each
of which is copyrighted by JVCKENWOOD Corporation
or by a third party.
This product uses software components that
are based on an End-User License Agreement
(hereinafter called “EULA”) stipulated by JVCKENWOOD
Corporation and by third parties.
The EULA dictates the availability of the source codes
of free-software components as a prerequisite to
distributing them in executable form under the
terms of the GNU General Public License or the Lesser
General Public License (hereinafter called “GPL/LGPL”).
To get information about the software components
that are subject to the terms of the GPL/LGPL, please
visit the following Website:
Website URL https://www2.jvckenwood.com/gpl/
Queries concerning the contents of the source code or
the like will not be accepted.
Please note that software components based on a
EULA that is not subject to the terms of the GPL/LGPL
or those that have been developed or created by
JVCKENWOOD Corporation will be excluded from the
scope of source code disclosure.
Because licenses to use software components
distributed under the GPL/LGPL are offered to the
customers for free of charge, no warranty is granted to
the customers, whether explicitly or implicitly, to the
extent of the applicable laws.
Unless otherwise stipulated by the applicable laws
or agreed upon in writing, the copyright holders or
those who are entitled to modify and redistribute the
software components are not held responsible for
any and all damages resulting from their use or from
inability to use them. For more information about the
terms of use of the software components, required
items of compliance and so on, please refer to the
GPL/LGPL.
Customers wishing themselves to use a software
component that is subject to the GPL/LGPL embedded
in this product are encouraged to read the terms of
the corresponding license before use. Because each
individual license is prescribed by a third party other
than JVCKENWOOD Corporation, the original (English)
of the license is presented.
EULA
Ñ Software License Agreement
JVCKENWOOD Corporation (hereinafter called
“Licensor”) holds either the copyright to the
embedded software or the right to sublicense it. This
agreement establishes the conditions under which the
customer uses this “Licensed Software.”
The customer shall agree to the terms of this license
agreement before proceeding to use Licensed
Software.
This agreement is deemed to have taken effect when
the customer (hereinafter called “User”) has used a
product implementation of Licensed Software.
The Licensed Software may contain software Licensor
has been licensed to use by third parties directly
or indirectly. Some third parties may have terms of
use prescribed for their customers, apart from this
Software License Agreement. This agreement does not
apply to such software. Be sure to consult “Important
Notice on Software” as presented separately.
Article 1 (General)
Licensor grants to User a non-exclusive, non-
assignable right of use Licensed Software within
the country where the User purchases the Product
(hereinafter the "Country") (except for the exception
provided for in Paragraph 1, Article 3).
Article 2 (Right of Use)
1. The rise of use granted under this agreement is the
right to use Licensed Software in this product.
2. User may not duplicate, copy, modify, add to,
translate or otherwise alter, or loan licensed Software
and the associated literature in whole or in part.
3. Use of Licensed Software is limited to a private
extent , and Licensed Software may not be
distributed, licensed or sublicensed for any purposes
whatsoever, including commercial use.
4. User shall use Licensed Software as per the
instruction manual or instructions given in the help
file and may not use or duplicate data in violations
of the regulations of the Copyright Law or other
governing laws by using Licensed Software in whole
or in part.

3
Article 3 (Terms of License)
1. In assigning this product, User may not retain
the original copy of the embedded Licensed
Software (including associated literature, updates
and upgrades) and any duplicates and associated
literature with regard to the license to use Licensed
Software. User may transfer Licensed Software only
to the condition of binding the assignee to abide by
the terms of this Software License Agreement.
2. User may not reverse-engineer, disassemble,
decompile or otherwise analyze the source code of
Licensed Software.
Article 4 (Rights to Licensed Software)
All rights to Licensed Software and the associated
literature, including copyrights, shall reside with
Licensor or the original right holder who has granted
the Right of Use and right to sublicense to Licensor
(hereinafter referred to as “Original Right Holder”), and
User does not have any rights other than Right of Use
granted hereunder with regard to Licensed Software
and the associated literature.
Article 5 (Exemption Granted to Licensor)
1. Licensor and Original Right Holder do not assume
any responsibility for damages caused to User or
third parties resulting from the exercise by User of
the license granted hereunder, unless otherwise
provided by any law to the contrary.
2. Licensor does not warrant Licensed Software to
be merchantable, compatible and fit for specific
purposes.
Article 6 (Responsibility for Third Parties)
If disputes over the infringement of third parties’
intellectual property rights, such as copyrights and
patent rights, arise out of the use of Licensed Software
by User, User shall resolve these disputes at User’s
own expenses while keep Licensor and Original Right
Holder harmless.
Article 7 (Secrecy Obligation)
User shall keep confidential Licensed Software
provided hereunder, information contained in the
associated literature or the like and those provisions of
this agreement not yet in public knowledge and may
not disclose or leak these to third parties without prior
written consent from Licensor.
Article 8 (Cancellation of the Agreement)
Licensor reserves the right to cancel this agreement
forthwith and claim compensation from User for the
damages caused by such cancellation when User:
(1) Breaches any of the provisions of this agreement, or
(2) Has received a petition for seizure, provisional
seizure, provisional disposition or any other kind of
compulsory execution.
Article 9 (Destruction of Licensed Software)
If this agreement is terminated under the provision of
the foregoing paragraph, User shall destroy Licensed
Software, along with all associated literature and its
duplicates, within two (2) weeks from the date of
termination.
Article 10 (Copyright Protection)
1. Copyrights and all other intellectual property
rights relating to Licensed Software shall reside
with Licensor and Original Right Holder and in no
circumstances with User.
2. User shall abide by the laws relating to copyrights
and intellectual property rights in using Licensed
Software.
Article 11 (Export Control)
1. Licensed Software and the associated literature or
the like may not be exported to places outside the
Country (including transmission outside the Country
over the Internet or the like).
2. User agrees that Licensed Software is subject to
export controls imposed by the Country and the
United States of America.
3. User agrees to comply with all the international
and domestic laws that apply to this software (U.S.
Export Administration Regulations and regulations
established by the U.S., the Country and their
governmental agencies regarding usage by end
users and export destinations).
Article 12 (Miscellaneous)
1. Even if this agreement is invalidated in part by law,
all other provisions shall remain in effect.
2. Licensor and User shall consult each other in
good faith to resolve any matters not provided for
in this agreement or questions arising from the
interpretation of this agreement.
3. Licensor and User agree that this agreement is
governed by the law of Japan and that all disputes
involving claims and obligations that may arise out
of this agreement will be settled by arbitration at the
Tokyo District Court as the court of first instance.

Before Use
4
Contents Before Use
About the Quick start guide
This Quick Start Guide describes basic functions
of this unit.
For detailed operations and information, refer
to the INSTRUCTION MANUAL on the following
website:
<https://www.kenwood.com/cs/ce/>
The Instruction manual is subject to change
for modification of specifications and so forth.
Be sure to download the latest edition of the
Instruction manual for reference.
How to read this manual
• The screens and panels shown in this
manual are examples used to provide clear
explanations of the operations.
For this reason, they may be different from the
actual screens or panels used, or some display
patterns may be different.
• : English indications Indication language
are used for the purpose of explanation. You
can select the indication language from the
[ ]SETUP menu. See Instruction Manual.
Before Use 4 .....................................................................
About the Quick start guide 4 ...........................................................
How to read this manual 4 ..................................................................
Precautions 5 ................................................................................................
Basic Operations 6 .........................................................
Functions of the Buttons on the Front Panel 6 .......................
Turning on the Unit 6 .............................................................................
Getting Started 7 .......................................................................................
Adjusting the volume 8 .........................................................................
Touch screen operations 8 ..................................................................
HOME screen descriptions 9 ..............................................................
Source selection screen descriptions 9 .......................................
Source control screen descriptions 11 ........................................
MENU screen 12 .........................................................................................
List screen 12 ...............................................................................................
USB 13 ................................................................................
Connecting a USB device..............................................................13
USB Basic Operation 13 .........................................................................
Radio 14 .............................................................................
Radio Basic Operation 14 .....................................................................
Memory Operation 15 ...........................................................................
DAB ................................................................................16
DAB Basic Operation 16 ........................................................................
Storing Service in Preset Memory 17 ...........................................
Bluetooth Control.....................................................18
Register from the Bluetooth device........................................18
Using Hands-Free Unit 19 ....................................................................
Controlling Audio 22 .....................................................
Connection/Installation 24 .........................................
Before Installation 24 ..............................................................................
Installing the unit 25 ...............................................................................
Appendix 29 .....................................................................
Specifications 29 ........................................................................................
About this Unit 29 ....................................................................................

Before Use
5English
Precautions
# WARNINGS
Ñ To prevent injury or re, take
the following precautions:
• To prevent a short circuit, never put or leave
any metallic objects (such as coins or metal
tools) inside the unit.
• Do not watch or fix your eyes on the unit’s
display when you are driving for any extended
period.
• If you experience problems during installation,
consult your KENWOOD dealer.
Ñ Precautions on using this unit
• When you purchase optional accessories,
check with your KENWOOD dealer to make
sure that they work with your model and in
your area.
• You can select language to display menus,
audio file tags, etc. See Instruction Manual.
• The Radio Data System or Radio Broadcast
Data System feature won’t work where the
service is not supported by any broadcasting
station.
Ñ Protecting the monitor
• To protect the monitor from damage, do not
operate the monitor using a ball point pen or
similar tool with the sharp tip.
Ñ Cleaning the unit
• If the faceplate of this unit is stained, wipe it
with a dry soft cloth such as a silicon cloth.
If the faceplate is stained badly, wipe the
stain off with a cloth moistened with neutral
cleaner, then wipe it again with a clean soft
dry cloth.
NOTE
• Applying spray cleaner directly to the unit may
affect its mechanical parts. Wiping the faceplate
with a hard cloth or using a volatile liquid such
as thinner or alcohol may scratch the surface or
erase screened print.
Ñ How To Reset Your Unit
• If the unit or the connected unit fails to
operate properly, reset the unit. Press the
<Reset> button. The unit returns to factory
settings.
Reset button
Ñ Caution for Smartphone Users
• Simultaneously running multiple applications
on your smartphone while screen sharing
places heavy demand on the microprocessor
of the phone, potentially affecting
communication and performance.
• For best results while pairing with your
KENWOOD receiver, please be sure to close
any unused applications.

Basic Operations
6
Basic Operations
Functions of the Buttons on
the Front Panel
1
2
3
4
5
6
NOTE
• The panels shown in this guide are examples
used to provide clear explanations of the
operations. For this reason, they may be different
from the actual panels.
Name
• Motion
1
Remote Sensor
• Receives the remote control signal.
2
[ ] [ ] [ ]S, R (VOL )
• Adjusts volume.
The volume will go up until 15 when you
keep pressing .[ ]R
3
[ ]HOME
• Displays the HOME screen .(P.9)
• Pressing for 1 second turns the power off.
• When the power off, turns the power on.
4
[ ]MENU
• Displays the MENU screen.
• Pressing for 1 second turns the screen off.
5
[ ]VOICE
• Displays the Voice Recognition screen.
6
Reset
• If the unit or the connected unit fails to
operate properly, the unit returns to initial
settings when this button is pressed.
Turning on the Unit
1
Press the button.[ ]HOME
The unit is turned on.
●To turn off the unit:
1
Press the button for 1 second.[ ]HOME
NOTE
• If it is your first time turning the unit on after
installation, it will be necessary to perform Initial
setup .(P.7)
Basic Operations
7English
Getting Started
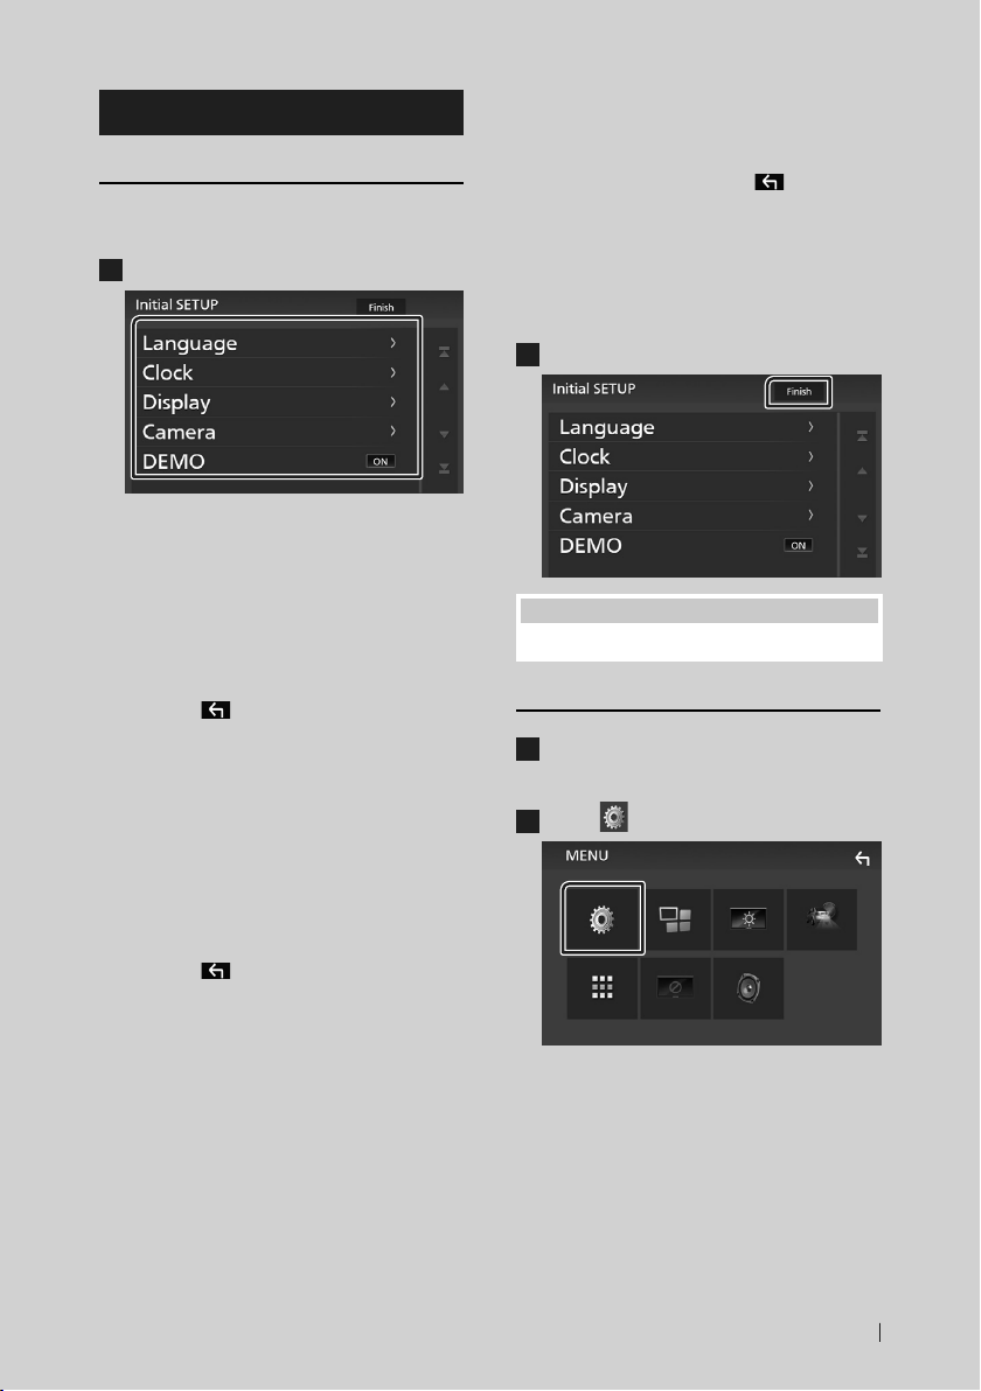
Initial setup
Perform this setup when you use this unit first
time.
1
Set each item as follows.
■[ ]Language
Select the language used for the control
screen and setting items. Default is “[British
English(en)]”.
1Touch .[ ]Language
2Touch .[ ]Language Select
3Select the desired language.
4Touch [ ].
■[ ]Clock
Adjusts clock.
For detailed operation, see Calendar/clock
settings (P.7).
■[ ]Display
Set the image on the screen.
1Touch [Display].
2Touch [Background].
3Select the image.
4Touch [ ].
For detailed operation, see Instruction
Manual.
■[ ]Camera
Set the parameters for the camera.
1Touch [Camera].
2Set each item and touch [ ].
For detailed operation, see Instruction
Manual.
■[ ]DEMO
Set the demonstration mode. Default is “ON”.
1Touch and set or .[ ]DEMO [ ]ON [ ]OFF
2
Touch [ ]Finish .
NOTE
• These settings can be set from the SETUP menu.
Calendar/clock settings
1
Press the button.[ ]MENU
MENU screen appears.
2
Touch .[ ]
SETUP Menu screen appears.

Basic Operations
8
3
Touch [ ]User Interface .
User Interface screen appears.
4
Touch [ ]Clock Adjust .
5
Adjust the date, then adjust the time.
6
Touch [ ]Set .
NOTE
• Deactivate [ ]RDS CT before adjusting the clock.
See Instruction Manual.
Adjusting the volume
To adjust the volume (0 to 40),
Press [ ] [ ]R to increase, and press S to decrease.
Holding [ ]R increases the volume continuously
to level 15.
Touch screen operations
To perform operations on the screen, you need
to touch, touch and hold, flick or swipe to select
an item, display setting menu screen or to
change the page, etc.
●Touch
Touch the screen gently to
select an item on the screen.
●Touch and hold
Touch the screen and keep
your finger in place until the
display changes or a message
is displayed.
●Flick
Slide your finger quickly to
the left or right on the screen
to change the page.
You can scroll the list screen
by flicking the screen up/
down.
●Swipe
Slide your finger up or down
on the screen to scroll the
screen.
Basic Operations
9English
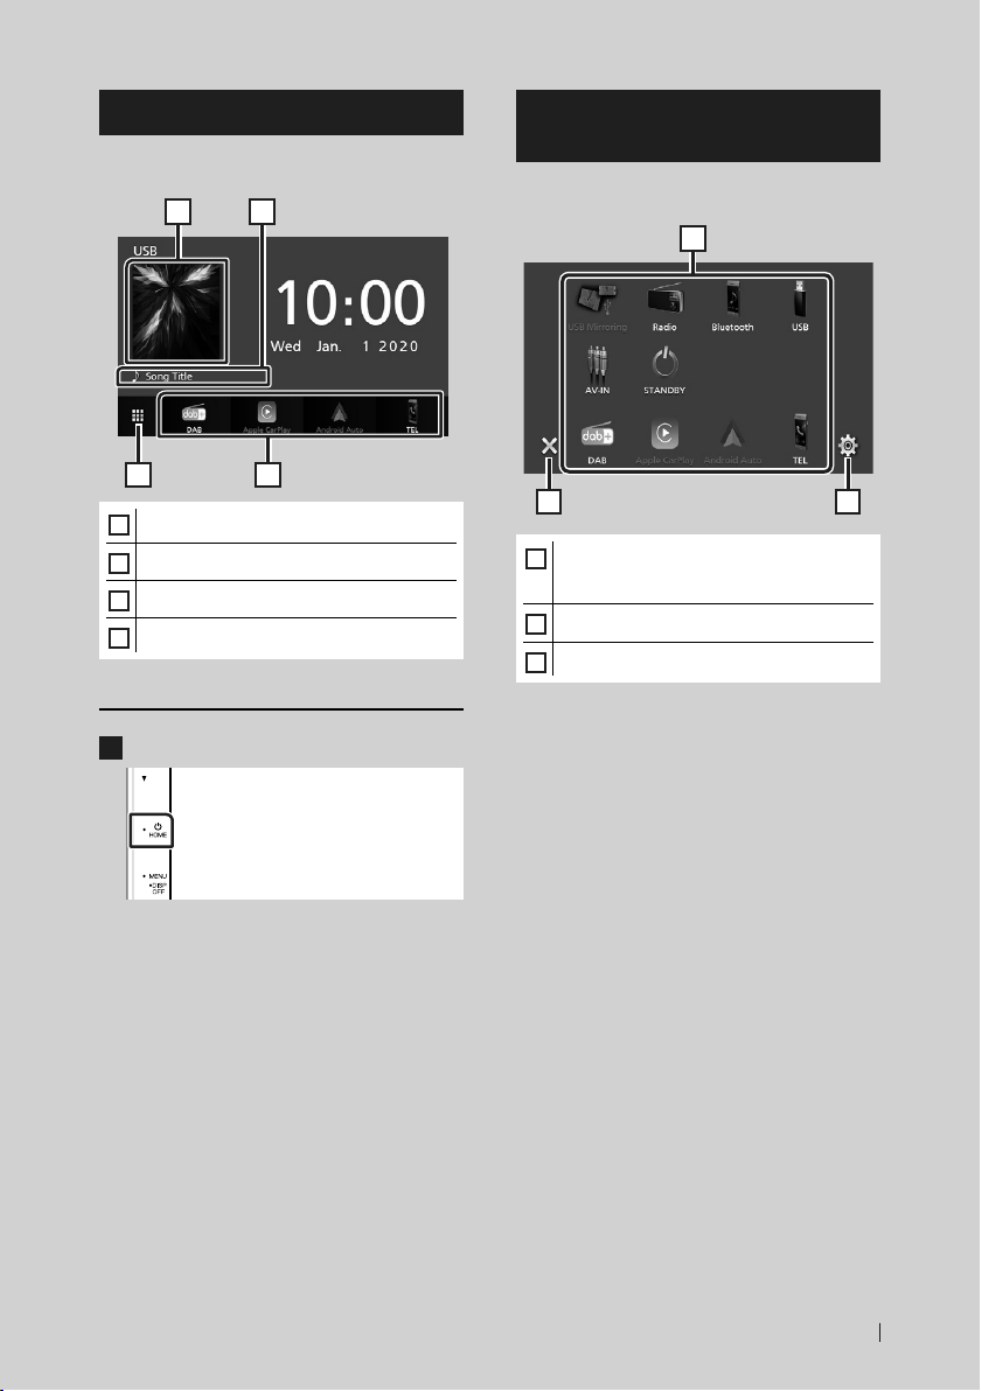
HOME screen descriptions
Most functions can be performed from the
HOME screen.
3
2
4
1
1
• Displays the control screen of current source.
2
• Current source information
3
• Displays the source selection screen. (P.9)
4
• Short-cut playback source icons (P.10)
Display the HOME screen
1
Press the button.[ ]HOME
HOME screen appears.
Source selection screen
descriptions
You can display all playback sources and options
on the source selection screen.
2 3
1
1
• Changes the playback source.
For playback sources, see Select the
playback source (P.10).
2
• Returns to previous screen.
3
• Displays the SETUP Menu screen.

Basic Operations
10
Select the playback source
1
Touch [ ] on the HOME screen.
From the screen, you can select the
following sources and functions.
• Switches to the DAB broadcast. (P.16)
• Switches to the Apple CarPlay screen from
the connected iPhone.
• Switches to the Android Auto screen from
the connected Android smartphone.
It is necessary to connect Android
smartphone compatible with
Android Auto and to set [ ]Mode to
[Android Auto].
• Displays the Hands Free screen. (P.19)
When neither Apple CarPlay, Android
Auto, nor a Bluetooth Hands-Free phone
is connected, displays " " [ ]Disconnected
message in the TEL screen.
When connecting as Apple CarPlay
or Android Auto, it works as a phone
provided in Apple CarPlay or Android
Auto.
• Switches to the USB Mirroring screen from
the connected Android smartphone.
It is necessary to connect Android
smartphone with “Mirroring OA for
KENWOOD” application installed and to
set . [ ]Mode to [ ]Mirroring for Android™
• Switches to the Radio broadcast. (P.14)
• Plays a Bluetooth audio player.
• Plays files on a USB device. (P.13)
• Switches to an external component
connected to the AV-IN input terminal.
• Puts the unit in standby. (P.10)
Put the unit in standby
1
Touch [ ] on the HOME screen.
2
Touch [STANDBY].

Basic Operations
11English
Source control screen
descriptions
There are some functions which can be
operated from most screens.
Indicators
1
2 3 4
Sub menu
1
/[ ] [ ]
Connected Bluetooth device information.
2
All sources icon
Displays all sources.
3
Secondary screen
• [ ] [ ]/ : The Secondary screen changes every
time you touch it. You can also change the
Secondary screen by icking left or right on
the screen.
• Indicators: Displays the current source
condition and so on.
– : The mute function is active.[ ]MUTE
– [LOUD]: The loudness control function is on.
• Sub menu
– : Operation when the icon is touched: [ ]
The rst touch darkens the screen, the second
touch darkens the screen further, and the third
touch restores the screen to its original brightness.
– [ ]: Displays the Graphic Equalizer screen.
(P.23)
– [ ]: Displays the APP (Apple CarPlay/ Android
Auto) screen.
4
[ ]Û
Touch to display the Hands Free screen.
(P.19)
When connecting as Apple CarPlay or Android
Auto, it works as a phone provided in Apple
CarPlay or Android Auto.

Basic Operations
12
MENU screen
1
Press the button.[ ]MENU
MENU screen appears.
2
Touch to display the MENU screen.
The contents of the menu are as follows.
• Displays the SETUP Menu screen.
• Displays the APP (Apple CarPlay/ Android
Auto) screen.
• Displays the Screen Adjustment screen.
• Displays the view camera.
• Displays the source selection screen.
(P.10)
• Turns the display off. (P.12)
• Displays the Audio Control Menu screen.
(P.22)
• Close the MENU screen.
Turn o the screen
1
Select [ ] on the MENU screen.
● To turn on the screen
1
Touch the display.
List screen
There are some common function keys in the
list screens of most sources.
61 2
3 4 5
1
Displays list type selection window.
2
Displays music/movie le list.
3
Text scroll
Scrolls the displayed text.
4
etc.
Keys with various functions are displayed here.
• [ ] : Plays all tracks in the folder containing
the current track.
• [ ] [ ] : Moves to the upper hierarchy.
5
/ / / Page scroll[ ] [ ] [ ] [ ]
You can change the page to display more items
by pressing [ ] [ ]/ .
• [ ] [ ]/ : Displays the top or bottom page.
6
Return
Returns to previous screen.
NOTE
• Buttons which cannot be activated from the list
screen are not displayed.
USB
13English
USB
Connecting a USB device
1 Connect the USB device with the USB
cable. (P.27)
2 Press the button.[ ]HOME
3 Touch .[ ]
4 Touch . [ ]USB (P.10)
Ñ Disconnect the USB device
1 Press the button.[ ]HOME
2 Touch .[ ]
3 Touch a source other than . [ ]USB
4 Detach the USB device.
Ñ Usable USB device
You can use a mass-storage-class USB device on
this unit.
The word “USB device” appearing in this manual
indicates a ash memory device.
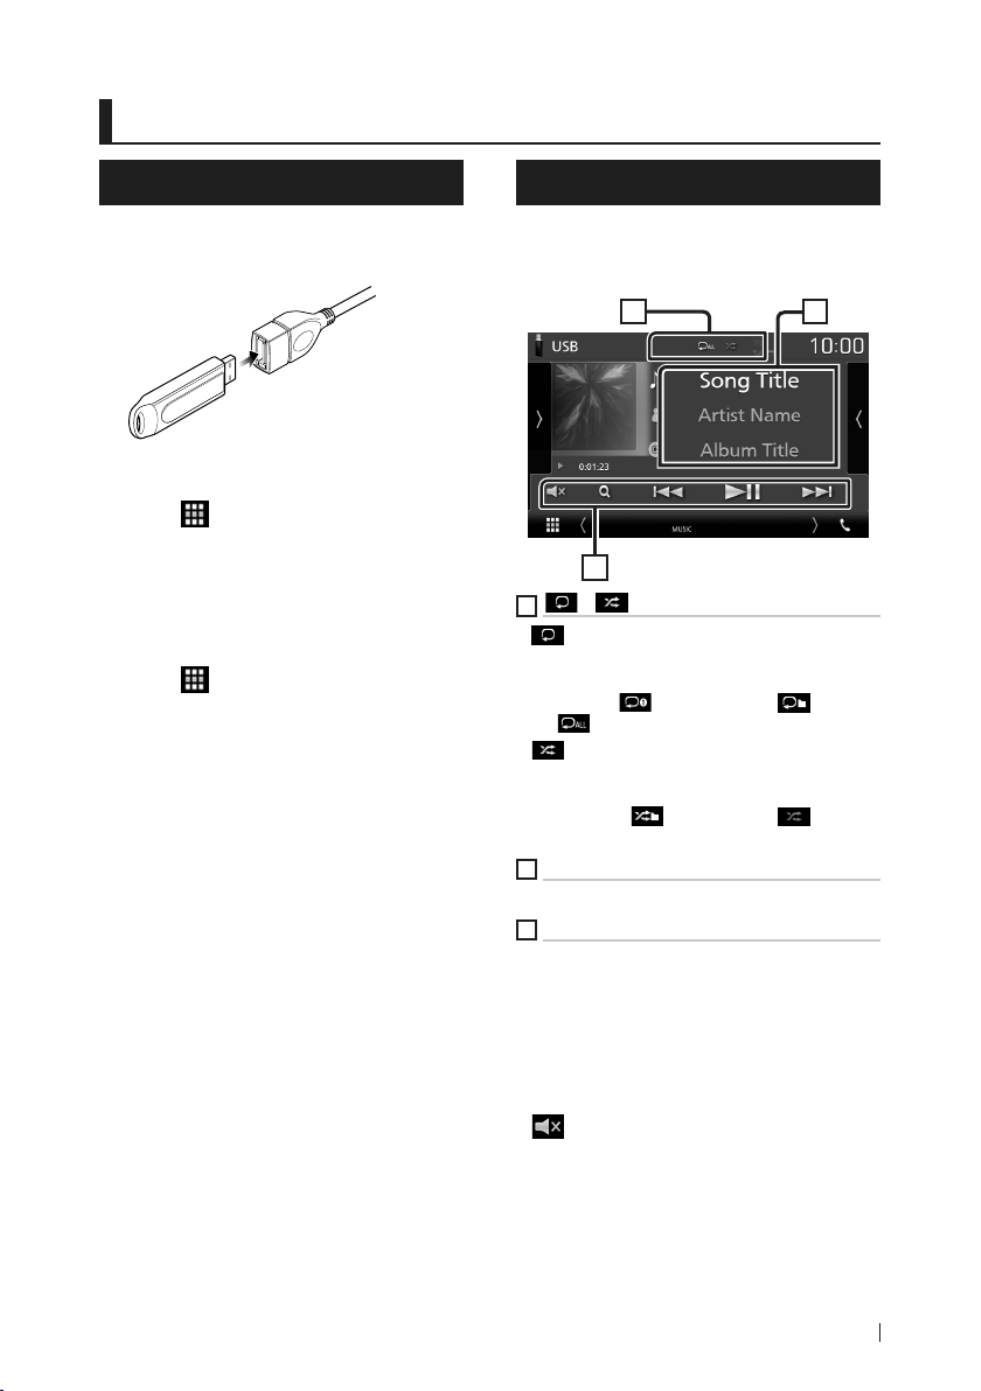
USB Basic Operation
Most functions can be controlled from the
source control screen and playback screen.
Control screen
21
3
1
/ [ ] [ ]
• [ ] : Repeats the current track/folder. Each
time you touch the key, repeat mode switches
in the following sequence;
File repeat ([ ] [ ]), Folder repeat ( ), Repeat
all ([ ])
• [ ] : Randomly plays all tracks in current
folder. Each time you touch the key, random
mode switches in the following sequence;
File random ([ ] [ ]), Random off ( )
2
Track information
Displays the information of the current le.
3
Operation keys[
• : Searches track/le. For details on search [ ]1
operation, see Instruction Manual.
• : Searches the previous/next track/[ ]E [ ]F
le.
Touch and hold to fast forward or fast
backward.
• : Plays or pauses.[ ] ]D H
• [ ] : Touch to mute or not to mute.

Radio
14
Radio
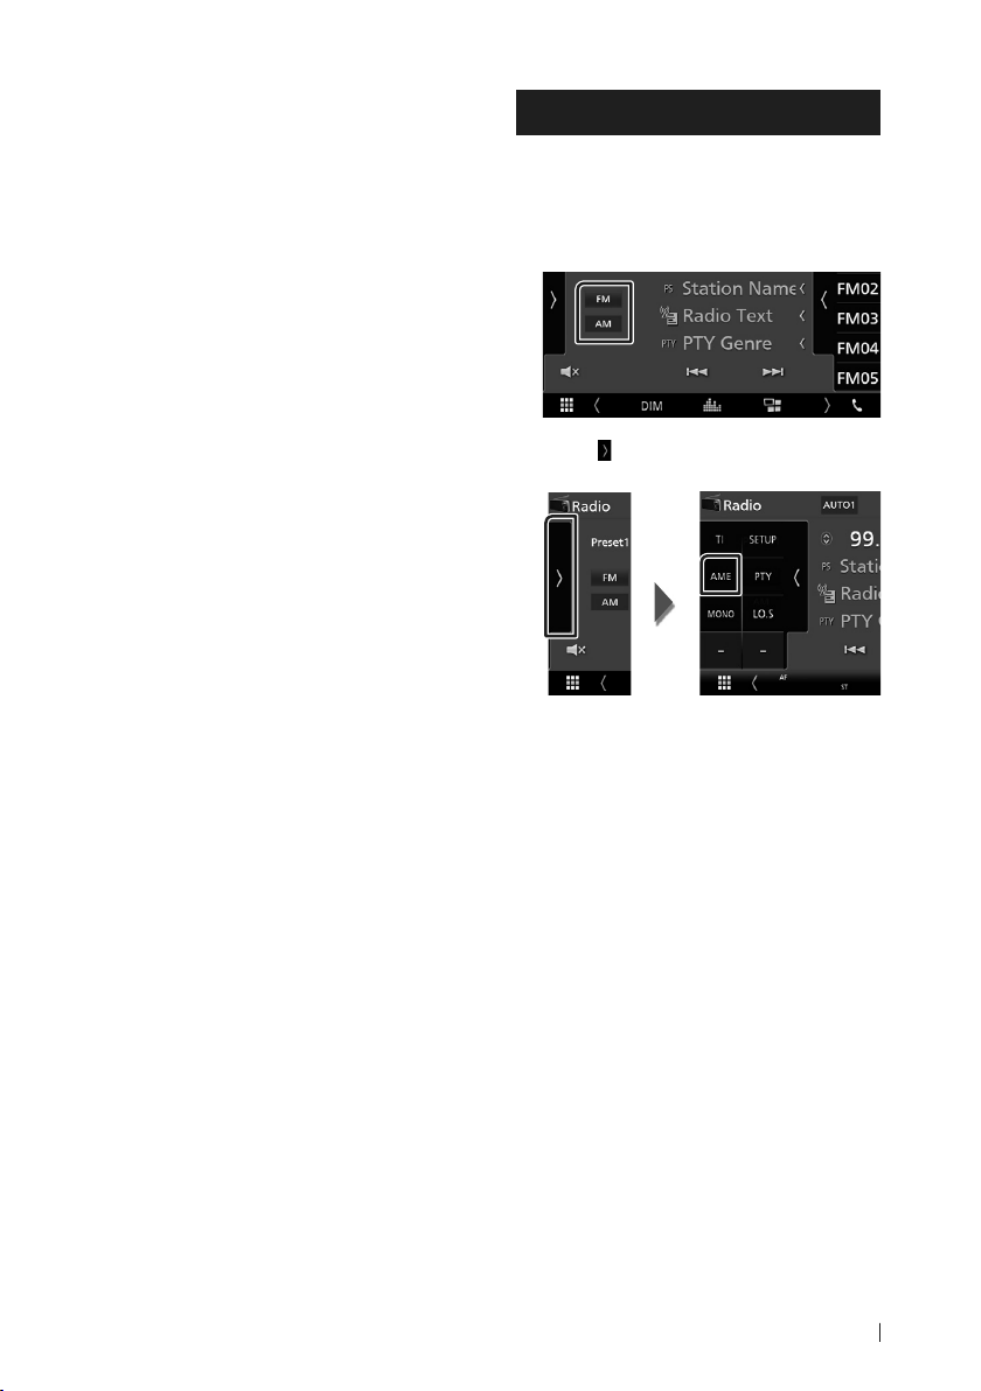
Radio Basic Operation
Most functions can be controlled from the
source control screen.
To enter Radio source, touch icon in the [ ]Radio
source selection screen. (P.10)
Control screen
4
6
5
3
2
1
Open the drawer
4
7
5
1
Information display
Displays the information of the current station:
Frequency
Touching [ ] allows you to switch between
Content A and Content B.
– Content A: PS name, Radio Text, PTY Genre
– Content B: Radio Text plus, Title Artist
[ ]Preset# : Preset number
2
Seek mode
Switches the seek mode in the following
sequence; [ ] [ ] [ ]AUTO1 , AUTO2 , MANUAL .
• : Tunes in a station with good [ ]AUTO1
reception automatically.
• : Tunes in stations in memory one [ ]AUTO2
after another.
• : Switches to the next frequency [ ]MANUAL
manually.
3
Operation keys
• : Tunes in a station. The method of [ ]E [ ]F
frequency switching can be changed (see 2
in table).
• [ ] : Touch to mute or not to mute.
4
Preset list
• Touch on the right side of the screen to
display the Preset list. Touch again to close
the list.
• Recalls the memorized station.
• When touched for 2 seconds, stores the
current receiving station in memory.
5
Function panel
Touch on the left side of the screen to display
the function panel. Touch again to close the
panel.
• [ ]TI (FM only): Sets the traffic information mode
on. For details, see Instruction Manual.
• (FM only): Displays the Radio SETUP [ ]SETUP
screen. For details, see Instruction Manual.
• : Presets stations automatically. For [ ]AME
details, see Instruction Manual.
• (FM only): Searches a program by setting [ ]PTY
program type. For details, see Instruction
Manual.
• (FM only): Select the Monaural [ ]MONO
reception.
• (FM only): Turns the Local Seek function [ ]LO.S
on or off.
6
[ ]FM [ ]AM
Switches the band.
7
Indicator Items
• : A stereo broadcast is being received.[ ]ST
• : The forced monaural function is on.[ ]MONO
• : The AF search function is on.[ ]AF
• : The Local Seek function is on.[ ]LOS
• : Indicates the state of the Radio Data [ ]RDS
System station when the AF function is on.
White: Radio Data System is being received.
Orange: Radio Data System is not being
received.
Radio
15English
• : Indicates the reception state of traffic [ ]TI
information.
White: TP is being received.
Orange: TP is not being received.
Memory Operation
Ñ Auto memory
You can store stations with good reception in
memory automatically.
1 Touch desired band key.
2 Touch on the left side of the screen. [ ]
Touch .[ ]AME
A confirmation screen appears.
3 Touch .[ ]Yes
Auto memory starts.
Ñ Manual memory
You can store the current receiving station in
memory.
1 Select a station you wish to store in
memory.
2 Touch (#: 1-24) or (#: 1-12) in [ ]FM# [ ]AM#
which you want to store the station for 2
seconds.

DAB
16
DAB
DAB Basic Operation
Most functions can be controlled from the
source control screen.
To enter DAB source, touch icon in the [ ]DAB
source selection screen. (P.10)
Control screen
5 6
21 43
7
Open the drawer
75 8
1
Artwork area
The picture data is displayed if available from
current content.
Touch to switch between the Control and
Information screen.
[[ ]P# : Preset number
[[ ]CH# : Channel display
2
Seek mode
Switches the seek mode in the following
sequence; [ ] [ ] [ ]AUTO1 , AUTO2 , MANUAL .
• : Tunes in a ensemble with good [ ]AUTO1
reception automatically.
• : Tunes in ensemble in memory one [ ]AUTO2
after another.
• : Switches to the next ensemble [ ]MANUAL
manually.
3
Indicator display
Displays the received signal strength.
4
Information display
Displays the information of the current station:
Service Name
Touching [ ] allows you to switch between
Content A, Content B and Content C.
– Content A: Ensemble name, PTY Genre
– Content B: Song Title, Artist Name, DLS
– Content C: Now Playing, Next Program, Audio
Quality
5
Function panel
Touch on the left side of the screen to display
the function panel. Touch again to close the
panel.
• : Sets the traffic information mode on. For [ ]TI
details, see Instruction Manual.
• : Displays the DAB SETUP screen. For [ ]SETUP
details, see Instruction Manual.
• : Searches a program by setting program [ ]PTY
type. For details, see Instruction Manual.
• : Display the Dynamic Label Segment [ ]DLS
screen.
6
Operation keys
• [ ]1 : Displays the Service List screen. For details
on search operation, see Instruction Manual.
• : Tunes in a ensemble, service, and [ ]E [ ]F
component. The seek mode switching can be
changed. (see
2
in table).
• [ ] : Touch to mute or not to mute.

DAB
17English
7
Preset list
• Touch on the right side of the screen to
display the Preset list. Touch again to close
the list.
• Recalls the memorized service.
• When touched for 2 seconds, stores the
current service in memory.
8
Indicator Items
• : Digital Radio is being received.[ ]DAB+
• : Radio Data System is being received.[ ]RDS
Storing Service in Preset
Memory
You can store the current receiving service in
memory.
1 Select a service you wish to store in
memory.
2 Touch on the right side of the screen.[ ]
3 Touch P# (#: 1-15) in which you want to [ ]
store the station for 2 seconds.

Bluetooth Control
18
Bluetooth Control
Ñ About the cell-phone and
Bluetooth audio player
This unit conforms to the following Bluetooth
specications:
Version
Bluetooth Ver. 4.1
Prole
Cell-phone:
HFP (Hands Free Prole)
SPP (Serial Port Prole)
PBAP (Phonebook Access Prole)
Audio player:
A2DP (Advanced Audio Distribution Prole)
AVRCP (Audio/Video Remote Control Prole)
Sound codec
SBC, AAC
NOTE
• The units supporting the Bluetooth function
have been certied for conformity with the
Bluetooth Standard following the procedure
prescribed by Bluetooth SIG.
• However, it may be impossible for such units to
communicate with your cell-phone depending
on its type.
Register from the Bluetooth
device
It is necessary to register the Bluetooth audio
player or cell-phone to this unit before using the
Bluetooth function.
1 Turn on the Bluetooth function on your
smartphone/cell-phone.
2 Search the unit (“DMX*****”) from your
smartphone/cell-phone.
3 Operate your smartphone/cell-phone
according to the displayed messages.
■Confirm the request on the
smartphone/cell-phone.
■If a PIN code is required, enter the PIN
code (“0000”).
4 Touch .[ ]Yes
5 Press the button.[ ]MENU
MENU screen appears.
6 Touch .[ ]
SETUP Menu screen appears.
7 Touch .[ ]Bluetooth
Bluetooth SETUP screen appears.

Bluetooth Control
19English
8 Touch in the Bluetooth [ ]Select Device
SETUP screen.
9 Touch you want to connect.[ ]
NOTE
• If the icon is lighted, it means that the unit will
use that device.
To delete the registered Bluetooth
device
1 Touch .[ ]
Confirmation message appears.
2 Touch .[ ]Yes
Using Hands-Free Unit
You can use telephone function by connecting
the Bluetooth telephone to this unit.
NOTE
• While Apple CarPlay or Android Auto is being
connected, Bluetooth Hands-Free function
cannot be used. Only Apple CarPlay or Android
Auto Hands-Free function can be used.
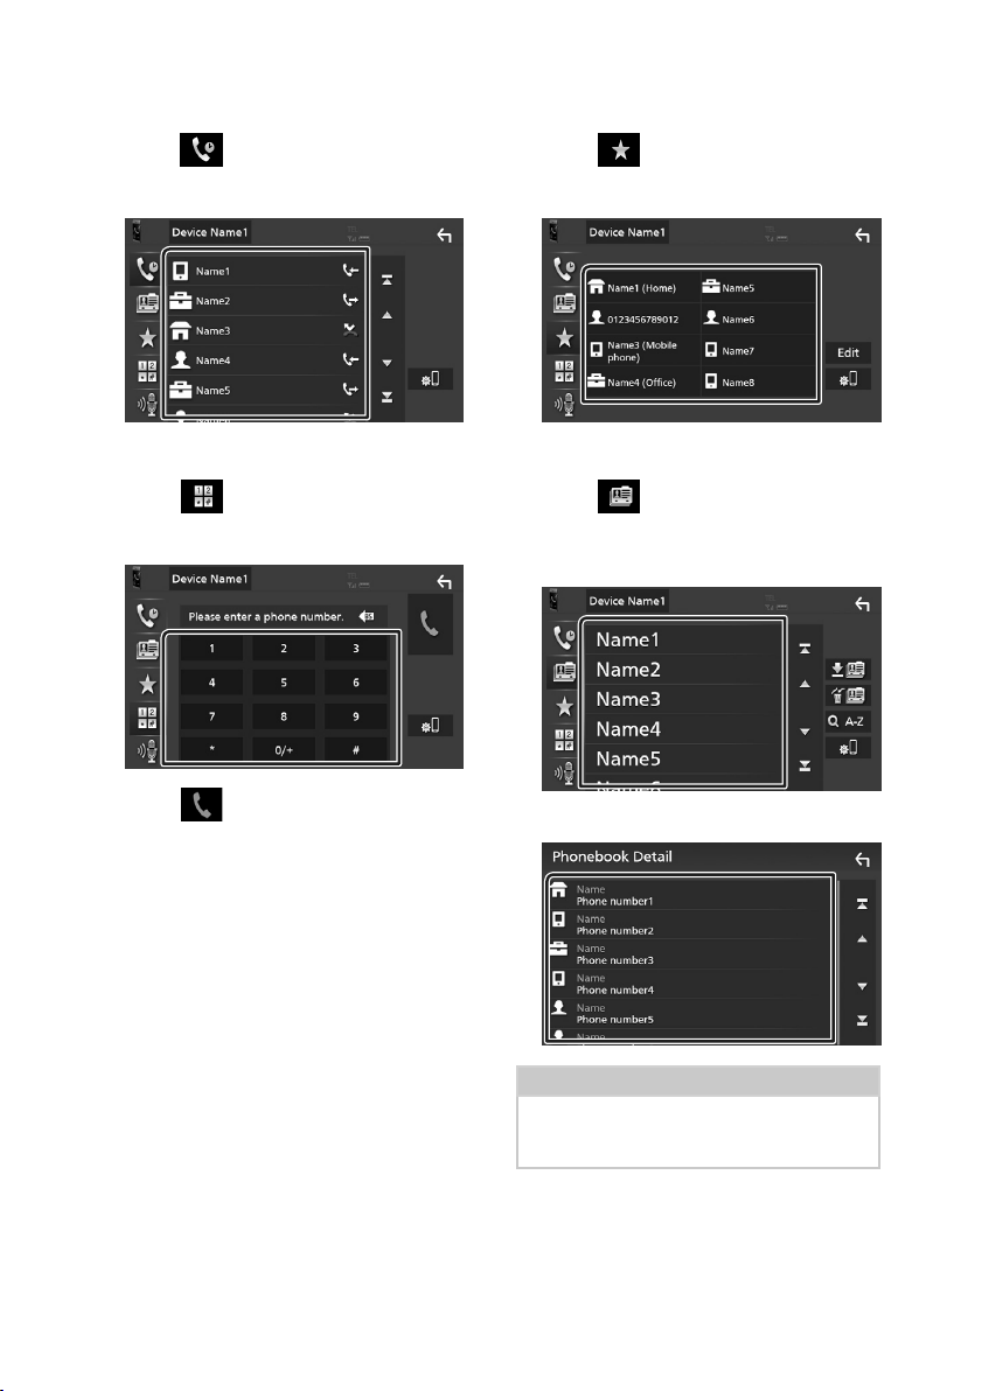
Ñ Make a call
1 Touch / .[ ]TEL [ ]Û
Hands Free screen appears.
2 Select a dialing method.
• : Call using call records[ ]
• [ ]: Call using the phonebook
• [ ]: Call using the preset number
• [ ]: Call by entering a phone number
• [ ]: Voice Recognition
• [ ]: Bluetooth SETUP
● Bluetooth SETUP
1) Touch [ ].
Bluetooth SETUP screen appears.
NOTE
• The status icons such as battery and antenna
displayed may differ from those displayed on the
cell-phone.
• Setting the cell-phone in the private mode can
disable the hands-free function.
Bluetooth Control
20
Call using call records
1 Touch . [ ]
2 Select the phone number from the list.
Call by entering a phone number
1 Touch .[ ]
2 Enter a phone number with number keys.
3 Touch .[ ]
Call using the preset number
1 Touch .[ ]
2 Touch the Name or phone number.
Call using the phonebook
1 Touch .[ ]
2 Select the person you want to call from
the list.
3 Select the phone number from the list.
NOTE
• If no Phonebook has been downloaded,
touching [Download Phonebook Now] will
start downloading the Phonebook.

Bluetooth Control
21English
Ñ Receive a call
1 Touch to answer a phone call or [ ] [ ]
to reject an incoming call.
NOTE
• While monitoring the view camera, this screen
does not appear even if a call comes in. To
display this screen, return the shift knob of car to
the driver position.
To end call
1 While talking, touch .[ ]
Ñ Operations during a call
● Adjust the receiver volume
Press the or [ ]S [ ]R button.
● Output the dial tone
Touch [ ]DTMF to display the tone input screen.
You can send tones by touching desired keys on
the screen.
● Switching the speaking voice output
Touching [ ] [ ]/ each time switches the
speaking voice output between cell-phone and
speaker.
● Call-waiting
When you receive a call while talking on another
call, you can answer the newly received call by
touching [ ]. The current call is on hold.
Each time you touch [ ], the caller will change.
When you touch [ ], the current call will end
and switch to the call in hold.

Controlling Audio
22
Controlling Audio
You can adjust the various settings such as
audio balance or subwoofer level.
1 Press the button.[ ]MENU
MENU screen appears.
2 Touch .[ ]
Ñ Controlling General Audio
1 Press the button.[ ]MENU
MENU screen appears.
2 Touch .[ ]
Audio screen appears.
3 Touch [Fader / Balance].
4 Set each item as follows.
■ [Fader / Balance] [ ]
Adjust the volume balance around the
touched area.
[ ] [ ]C and D adjust the right and left volume
balance.
[ ] [ ]R and S adjust the front and rear volume
balance.
■ [Center]
Clear the adjustment.

Controlling Audio
23English
Ñ Equalizer Control
You can adjust equalizer by selecting the
optimized setting for each category.
1 Press the button.[ ]MENU
MENU screen appears.
2 Touch .[ ]
Audio screen appears.
3 Touch .[ ]Equalizer
4 Touch the screen and set the Graphic
Equalizer as desired.
■ [ ]ALL SRC
Apply the adjusted equalizer to all sources.
Touch [ALL SRC OK] [ and then touch ] on the
confirmation screen.
■ Gain level (dotted frame area)
Adjust the gain level by touching the each
frequency bar.
You can select frequency bar and adjust its
level by , .[ ]R [ ]S
■ [ ]Preset Select
Displays the screen to recall the preset
equalizer curve.
■ [ ]Initialize
The current EQ curve returns to flat.
■ [ ]Memory
Saves the adjusted equalizer curve from
“[ ]User1 ” to “[ ]User3 ”.
■ [ ]Bass EXT (Bass Extend Settings)
When turned on, the frequency lower than
62.5 Hz is set to the same gain level as 62.5
Hz.
■ [ ]SW Level
Adjusts the subwoofer volume.

Connection/Installation
24
Connection/Installation
Before Installation
Before installation of this unit, please note the
following precautions.
# WARNINGS
• If you connect the ignition wire (red) and
the battery wire (yellow) to the car chassis
(ground), you may cause a short circuit, that
in turn may start a re. Always connect those
wires to the power source running through
the fuse box.
• Do not cut out the fuse from the ignition wire
(red) and the battery wire (yellow). The power
supply must be connected to the wires via
the fuse.
# CAUTION
• Install this unit in the console of your vehicle.
Do not touch the metal part of this unit during
and shortly after the use of the unit. Metal part
such as the heat sink and enclosure become
hot.
NOTE
• Mounting and wiring this product requires
skills and experience. For best safety, leave the
mounting and wiring work to professionals.
• Make sure to ground the unit to a negative 12V
DC power supply.
• Do not install the unit in a spot exposed to
direct sunlight or excessive heat or humidity.
Also avoid places with too much dust or the
possibility of water splashing.
• If the power is not turned ON (“There is an
error in the speaker wiring. Please check
the connections.” is displayed), the speaker
wire may have a short-circuit or touched
the chassis of the vehicle and the protection
function may have been activated. Therefore,
the speaker wire should be checked.
• If your car’s ignition does not have an ACC
position, connect the ignition wires to a power
source that can be turned on and off with the
ignition key. If you connect the ignition wire
to a power source with a constant voltage
supply, such as with battery wires, the battery
may be drained.
• If the console has a lid, make sure to install the
unit so that the front panel will not hit the lid
when closing and opening.
• If the fuse blows, rst make sure the wires
aren’t touching to cause a short circuit, then
replace the old fuse with one with the same
rating.
• Insulate unconnected wires with vinyl tape
or other similar material. To prevent a short
circuit, do not remove the caps on the ends of
the unconnected wires or the terminals.
• Connect the speaker wires correctly to the
terminals to which they correspond. The unit
may be damaged or fail to work if you share
the wires or ground them to any metal part ¤
in the car.
• When only two speakers are being connected
to the system, connect the connectors either
to both the front output terminals or to both
the rear output terminals (do not mix front
and rear). For example, if you connect the ¢
connector of the left speaker to a front output
terminal, do not connect the ¤ connector to
a rear output terminal.
• After the unit is installed, check whether the
brake lamps, blinkers, wipers, etc. on the car
are working properly.
• Do not press hard on the panel surface when
installing the unit to the vehicle. Otherwise
scars, damage, or failure may result.
• Reception may drop if there are metal objects
near the Bluetooth antenna.
Bluetooth antenna unit

Connection/Installation
25English
Ñ Supplied accessories for
installation
1
(3 m)
x1
2
x1
3(2 m)
x1
4
x1
5
x2
Ñ Installation procedure
1) To prevent a short circuit, remove the key
from the ignition and disconnect the ¤
terminal of the battery.
2) Make the proper input and output wire
connections for each unit.
3) Connect the ISO connector to the unit.
4) Install the unit in your car.
5) Reconnect the terminal of the battery.¤
6) Press the reset button.
Installing the unit
Bend the tabs of the
mounting sleeve with
a screwdriver or similar
utensil and attach it in
place.
NOTE
• Make sure that the unit is installed securely in
place. If the unit is unstable, it may malfunction
(eg, the sound may skip).
Ñ Trim plate
1) Attach accessory to the unit.2
2

Connection/Installation
26
Ñ Microphone unit
1) Check the installation position of the
microphone (accessory ).1
2) Clean the installation surface.
3) Remove the separator of the microphone
(accessory ), and stick the microphone to 1
the place shown below.
4) Wire the microphone cable up to the unit
with it secured at several positions using tape
or other desired method.
5) Adjust the direction of the microphone
(accessory ) to the driver.1
1
Fix a cable with a commercial item of tape.
NOTE
• Swap the clips if necessary.
Ñ Removing the trim plate
1) Use the extraction key (accessory ) to lever 4
out the four tabs (two on the left part, two on
the right part).
4
2) Pull the trim plate forward.
Ñ Removing the unit
1) Remove the trim plate by referring to step 1 in
“Removing the trim plate”.
2) Insert the extraction key (accessory ) deeply 5
into the slot as shown. (The protrusion at the
tip of the extraction key must face toward
the unit.)
5
3) With the inserted extraction key secured,
insert the other extraction key into the slot.
5
4) Pull out the unit halfway.
NOTE
• Be careful to avoid injury from the catch pins
on the extraction key.
5) Pull the unit all the way out with your hands,
being careful not to drop it.
Connection/Installation
27English
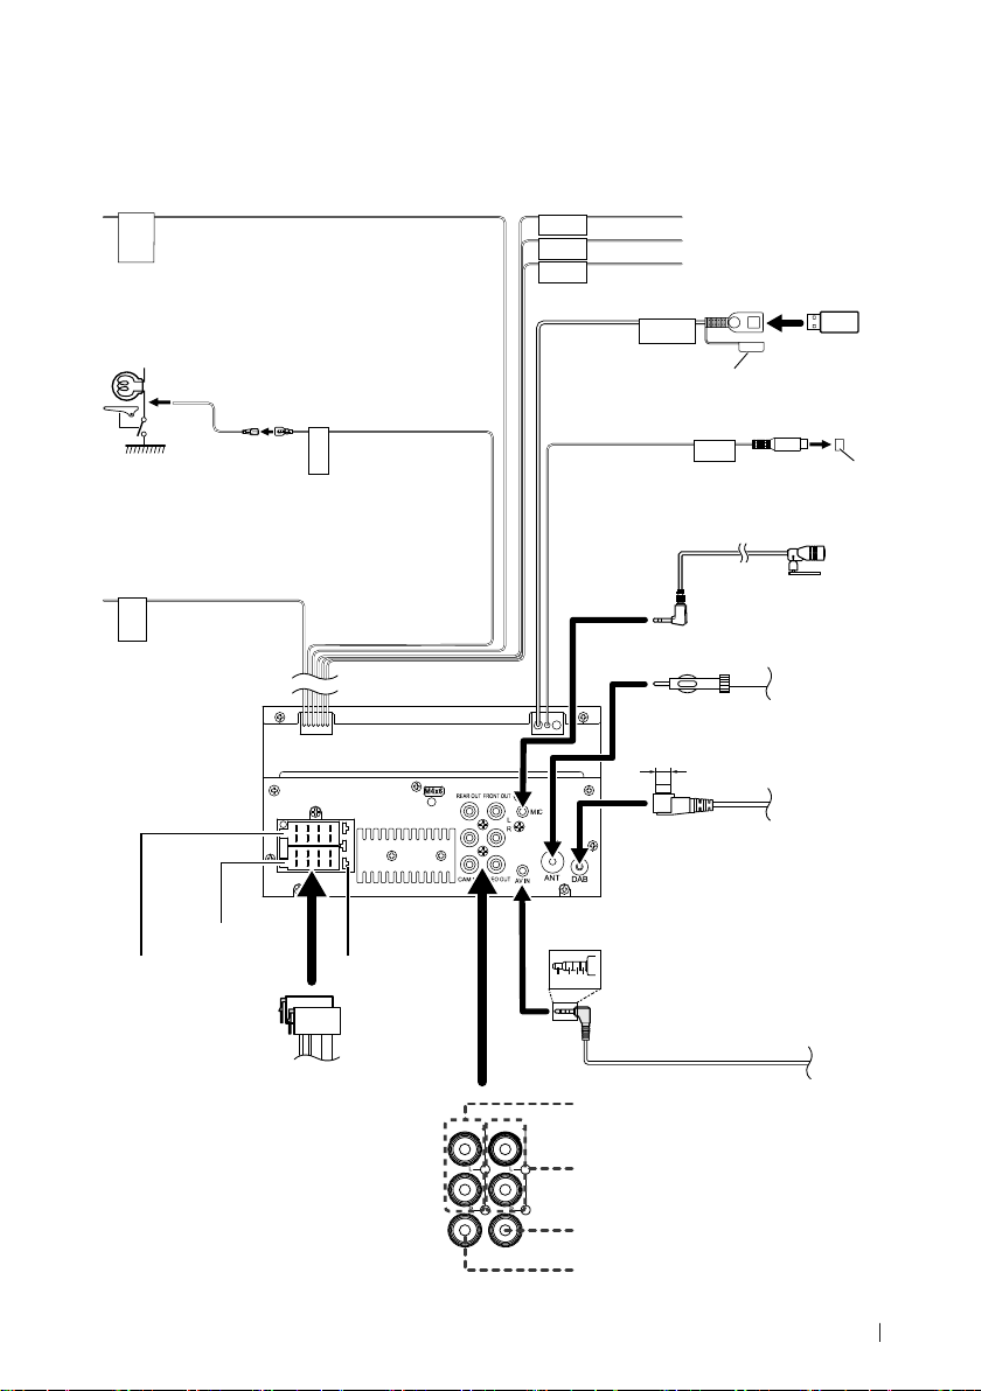
Ñ Connecting wires to terminals
PRK SW
STEERING
WHEEL
REMOTE
INPUT
2468
1357
2468
1357
REVERSE
SUB
WOOFER
1 2 3 4
5V=1.5A
ST REMOTE
INPUT 1
ST REMOTE
INPUT 2
ST REMOTE
GND
Connect to the vehicle’s
parking brake detection
switch harness.
For best safety, be sure
to connect the parking
sensor.
Light Green (Parking sensor wire)
Accessory 3: Parking Extention cable
Purple/White (Reverse sensor wire)
Accessory 1:
Bluetooth Microphone
To steering remote
To use the steering wheel remote control feature,
you need an exclusive remote adapter (not
supplied) matched to your car.
Connect to vehicle’s
reverse lamp harness
when using the
optional rear view
camera.
Light Blue/Yellow (Steering remote control wire)
Fuse (15A)
Subwoofer Preout
Cap
Cap
FM/AM antenna
Φ 6.5 mm (maximum)
DAB antenna
CX-DAB1
[3]
Connector A
Connector B
USB device
[2]
USB terminal
[1] (1.0 m)
[1] USB maximum power supply current :
DC 5 V = 1.5 A
[2]
Sold separately
[3]
Optional accessory
ISO Connector
FRONT OUTREAR OUT
VIDEO OUTCAM IN
Rear Audio Preout
(Left; White, Right; Red)
AV-IN
[2]
(1; Left audio, 2; Composite
video, 3; Ground, 4; Right audio).
# CAUTION
Use of a CX-DAB1 (optional accessory)
as a DAB antenna is recommended.
When using a commercially available
DAB antenna, the diameter of the SMB
connector must be Φ 6.5 mm or less.
Front Audio Preout
(Left; White, Right; Red)
Visual Output (Yellow)
Rear view camera input (Yellow)
Bright Green/Red
Purple/Red
Gray/Red
Connect to vehicle’s steering remote harness.
Contact your KENWOOD dealer for details.

Appendix
29English
Appendix
Specications
■ Bluetooth section
Frequency
: 2.402 – 2.480 GHz
RF Output Power (E.I.R.P.)
: +8 dBm (Avg.), Power Class 1
■ General
Operating Voltage
: 12V DC Car Battery
Speaker Impedance
: 4 – 8 Ω
Specications subject to change without
notice.
About this Unit
■ Copyrights
• The Bluetooth® word mark and logos are registered
trademarks owned by Bluetooth SIG, Inc. and any use
of such marks by JVCKENWOOD Corporation is under
license. Other trademarks and trade names are those of
their respective owners.
• Windows Media is a registered trademark or trademark
of Microsoft Corporation in the United States and/or
other countries.
• This product is protected by certain intellectual
property rights of Microsoft. Use or distribution of
such technology outside of this product is prohibited
without a license from Microsoft.
• Use of the Made for Apple badge means that an
accessory has been designed to connect specifically
to the Apple product(s) identified in the badge, and
has been certified by the developer to meet Apple
performance standards. Apple is not responsible for
the operation of this device or its compliance with
safety and regulatory standards. Please note that the
use of this accessory with an Apple product may affect
wireless performance.
• Apple, iPhone and Lightning are trademarks of Apple
Inc., registered in the U.S. and other countries.
• Apple, Siri, Apple CarPlay and Apple CarPlay logo are
trademarks of Apple Inc., registered in the U.S. and other
countries.
• App Store is a service mark of Apple Inc., registered in
the U.S. and other countries.
• IOS is a trademark or registered trademark of Cisco in
the U.S. and other countries and is used under license.
• Google, Android, Google Play and Android Auto are
trademarks of Google LLC.
• To use Android Auto on your car display, you’ll need an
Android Auto compatible vehicle or aftermarket stereo,
an Android phone running Android 5.0 or higher, and
the Android Auto app.
• Linux® is the registered trademark of Linus Torvalds in
the U.S. and other countries.
• THIS PRODUCT IS LICENSED UNDER THE AVC PATENT
PORTFOLIO LICENSE FOR THE PERSONAL USE OF A
CONSUMER OR OTHER USES IN WHICH IT DOES NOT
RECEIVE REMUNERATION TO (¡)ENCODE VIDEO IN
COMPLIANCE WITH THE AVC STANDARD (“AVC VIDEO”)
AND/OR (¡¡)DECODE AVC VIDEO THAT WAS ENCODED BY
A CONSUMER ENGAGED IN A PERSONAL ACTIVITY AND/
OR WAS OBTAINED FROM A VIDEO PROVIDER LICENSED
TO PROVIDE AVC VIDEO. NO LICENSE IS GRANTED OR
SHALL BE IMPLIED FOR ANY OTHER USE. ADDITIONAL
INFORMATION MAY BE OBTAINED FROM MPEG LA, L.L.C.
SEE HTTP://WWW.MPEGLA.COM
• THIS PRODUCT IS LICENSED UNDER THE MPEG-4 VISUAL
PATENT PORTFOLIO LICENSE FOR THE PERSONAL
AND NON-COMMERCIAL USE OF A CONSUMER FOR

Appendix
30
(¡) ENCODING VIDEO IN COMPLIANCE WITH THE
MPEG-4 VISUAL STANDARD (“MPEG-4 VIDEO”) AND/
OR (¡¡) DECODING MPEG-4 VIDEO THAT WAS ENCODED
BY A CONSUMER ENGAGED IN A PERSONAL AND
NON-COMMERCIAL ACTIVITY AND/OR WAS OBTAINED
FROM A VIDEO PROVIDER LICENSED BY MPEG LA TO
PROVIDE MPEG-4 VIDEO. NO LICENSE IS GRANTED OR
SHALL BE IMPLIED FOR ANY OTHER USE. ADDITIONAL
INFORMATION INCLUDING THAT RELATING TO
PROMOTIONAL, INTERNAL AND COMMERCIAL USES
AND LICENSING MAY BE OBTAINED FROM MPEG LA, LLC.
SEE HTTP://WWW.MPEGLA.COM.
• THIS PRODUCT IS LICENSED UNDER THE VC-1 PATENT
PORTFOLIO LICENSE FOR THE PERSONAL AND NON-
COMMERCIAL USE OF A CONSUMER TO ( i ) ENCODE
VIDEO IN COMPLIANCE WITH THE VC-1 STANDARD
(“VC-1 VIDEO”) AND/OR ( ii ) DECODE VC-1 VIDEO
THAT WAS ENCODED BY A CONSUMER ENGAGED IN A
PERSONAL AND NON-COMMERCIAL ACTIVITY AND/
OR WAS OBTAINED FROM A VIDEO PROVIDER LICENSED
TO PROVIDE VC-1 VIDEO. NO LICENSE IS GRANTED OR
SHALL BE IMPLIED FOR ANY OTHER USE. ADDITIONAL
INFORMATION MAY BE OBTAINED FROM MPEG LA, L.L.C.
SEE HTTP://WWW.MPEGLA.COM
• libFLAC
Copyright (C) 2000,2001,2002,2003,2004,2005,2006,2007
,2008,2009 Josh Coalson
Redistribution and use in source and binary forms, with
or without modification, are permitted provided that
the following conditions are met:
– Redistributions of source code must retain the above
copyright notice, this list of conditions and the
following disclaimer.
– Redistributions in binary form must reproduce the
above copyright notice, this list of conditions and the
following disclaimer in the documentation and/or
other materials provided with the distribution.
– Neither the name of the Xiph.org Foundation nor the
names of its contributors may be used to endorse or
promote products derived from this software without
specific prior written permission.
THIS SOFTWARE IS PROVIDED BY THE COPYRIGHT
HOLDERS AND ONTRIBUTORS ``AS IS’’ AND ANY
EXPRESS OR IMPLIED WARRANTIES, INCLUDING,
BUT NOT LIMITED TO, THE IMPLIED WARRANTIES OF
MERCHANTABILITY AND FITNESS FOR A PARTICULAR
PURPOSE ARE DISCLAIMED. IN NO EVENT SHALL THE
FOUNDATION OR CONTRIBUTORS BE LIABLE FOR ANY
DIRECT, INDIRECT, INCIDENTAL, SPECIAL, EXEMPLARY,
OR CONSEQUENTIAL DAMAGES (INCLUDING, BUT NOT
LIMITED TO, PROCUREMENT OF SUBSTITUTE GOODS
OR SERVICES; LOSS OF USE, DATA, OR PROFITS; OR
BUSINESS INTERRUPTION) HOWEVER CAUSED AND ON
ANY THEORY OF LIABILITY, WHETHER IN CONTRACT,
STRICT LIABILITY, OR TORT (INCLUDING NEGLIGENCE OR
OTHERWISE) ARISING IN ANY WAY OUT OF THE USE OF
THIS SOFTWARE, EVEN IF ADVISED OF THE POSSIBILITY
OF SUCH DAMAGE.
• libvorbis
Copyright (c) 2002-2008 Xiph.org Foundation
Redistribution and use in source and binary forms, with
or without modification, are permitted provided that
the following conditions are met:
– Redistributions of source code must retain the above
copyright notice, this list of conditions and the
following disclaimer.
– Redistributions in binary form must reproduce the
above copyright notice, this list of conditions and the
following disclaimer in the documentation and/or
other materials provided with the distribution.
– Neither the name of the Xiph.org Foundation nor the
names of its contributors may be used to endorse or
promote products derived from this software without
specific prior written permission.
THIS SOFTWARE IS PROVIDED BY THE COPYRIGHT
HOLDERS AND CONTRIBUTORS ``AS IS’’ AND ANY
EXPRESS OR IMPLIED WARRANTIES, INCLUDING,
BUT NOT LIMITED TO, THE IMPLIED WARRANTIES OF
MERCHANTABILITY AND FITNESS FOR A PARTICULAR
PURPOSE ARE DISCLAIMED. IN NO EVENT SHALL THE
FOUNDATION OR CONTRIBUTORS BE LIABLE FOR ANY
DIRECT, INDIRECT, INCIDENTAL, SPECIAL, EXEMPLARY,
OR CONSEQUENTIAL DAMAGES (INCLUDING, BUT NOT
LIMITED TO, PROCUREMENT OF SUBSTITUTE GOODS
OR SERVICES; LOSS OF USE, DATA, OR PROFITS; OR
BUSINESS INTERRUPTION) HOWEVER CAUSED AND ON
ANY THEORY OF LIABILITY, WHETHER IN CONTRACT,
STRICT LIABILITY, OR TORT (INCLUDING NEGLIGENCE OR
OTHERWISE) ARISING IN ANY WAY OUT OF THE USE OF
THIS SOFTWARE, EVEN IF ADVISED OF THE POSSIBILITY
OF SUCH DAMAGE.
• libogg
Copyright (c) 2002, Xiph.org Foundation Redistribution
and use in source and binary forms, with or without
modification, are permitted provided that the following
conditions are met:
– Redistributions of source code must retain the above
copyright notice, this list of conditions and the
following disclaimer.
– Redistributions in binary form must reproduce the
above copyright notice, this list of conditions and the
following disclaimer in the documentation and/or
other materials provided with the distribution.
– Neither the name of the Xiph.org Foundation nor the
names of its contributors may be used to endorse or
promote products derived from this software without
specific prior written permission.
THIS SOFTWARE IS PROVIDED BY THE COPYRIGHT
HOLDERS AND CONTRIBUTORS ``AS IS’’ AND ANY
EXPRESS OR IMPLIED WARRANTIES, INCLUDING,
BUT NOT LIMITED TO, THE IMPLIED WARRANTIES OF
MERCHANTABILITY AND FITNESS FOR A PARTICULAR
PURPOSE ARE DISCLAIMED. IN NO EVENT SHALL THE
FOUNDATION OR CONTRIBUTORS BE LIABLE FOR ANY
DIRECT, INDIRECT, INCIDENTAL, SPECIAL, EXEMPLARY,
OR CONSEQUENTIAL DAMAGES (INCLUDING, BUT NOT
LIMITED TO, PROCUREMENT OF SUBSTITUTE GOODS
OR SERVICES; LOSS OF USE, DATA, OR PROFITS; OR
BUSINESS INTERRUPTION) HOWEVER CAUSED AND ON
ANY THEORY OF LIABILITY, WHETHER IN CONTRACT,
STRICT LIABILITY, OR TORT (INCLUDING NEGLIGENCE OR
OTHERWISE) ARISING IN ANY WAY OUT OF THE USE OF
THIS SOFTWARE, EVEN IF ADVISED OF THE POSSIBILITY
OF SUCH DAMAGE.

Appendix
31English
■ Information on Disposal of Old
Electrical and Electronic Equipment
and Batteries (applicable for EU
countries that have adopted separate
waste collection systems)
Products and batteries with the symbol (crossed-out
wheeled bin) cannot be disposed as household waste.
Old electrical and electronic equipment and batteries
should be recycled at a facility capable of handling
these items and their waste byproducts.
Contact your local authority for details in locating a
recycle facility nearest to you.
Proper recycling and waste disposal will help conserve
resources whilst preventing detrimental effects on our
health and the environment.
Notice: The sign “Pb” below the symbol for batteries
indicates that this battery contains lead.
■ ילמשח דויצ לש הפשאל הכלשה רבדב עדימ
תונידמל יטנוולר( תוללוס ןכו ןשי ינורטקלאו
.)תדרפומ הפשא ףוסיא תכרעמב תושמתשמש
X םע הפשא חפ( ןומיסה םע תוללוסו םירצומ ךילשהל ןתינ אל
.הליגר תיתיב הפשאכ )וילע
ןקתמב תוללוס ןכו ןשי ינורטקלאו ילמשח דויצ רזחמל שי
.םהלש יאוולה ירצותבו הלאכ םיטירפב לפטל לגוסמה
ןקתמ תודוא םיטרפ תלבקל תימוקמה תושרה םע רשק ורצ
ורזעי םיתואנ הפשאל הכלשהו רוזחימ .םכילא בורקה רוזחימה
לעו ונתואירב לע תוילילש תועפשה עונמלו םיבאשמ רמשל
.הביבסה
ןייצמ תוללוס רובע ןומיסל תחתמש ןומיסה :בל ומישPb
.תרפוע הליכמ הללוסהש
Specyfikacje produktu
| Marka: | Kenwood |
| Kategoria: | Radia samochodowe |
| Model: | DMX5020DABS |
Potrzebujesz pomocy?
Jeśli potrzebujesz pomocy z Kenwood DMX5020DABS, zadaj pytanie poniżej, a inni użytkownicy Ci odpowiedzą
Instrukcje Radia samochodowe Kenwood

16 Stycznia 2025
4 Grudnia 2024
4 Grudnia 2024
15 Października 2024
24 Września 2024
24 Września 2024
23 Września 2024
22 Września 2024
22 Września 2024
22 Września 2024
Instrukcje Radia samochodowe
- Radia samochodowe Sony
- Radia samochodowe AEG
- Radia samochodowe LG
- Radia samochodowe Pioneer
- Radia samochodowe Fiat
- Radia samochodowe Philips
- Radia samochodowe SilverCrest
- Radia samochodowe Xblitz
- Radia samochodowe JBL
- Radia samochodowe Scott
- Radia samochodowe Opel
- Radia samochodowe Conceptronic
- Radia samochodowe Panasonic
- Radia samochodowe Norauto
- Radia samochodowe Muse
- Radia samochodowe Nedis
- Radia samochodowe Medion
- Radia samochodowe Boss
- Radia samochodowe Lenco
- Radia samochodowe Peiying
- Radia samochodowe Marquant
- Radia samochodowe Ford
- Radia samochodowe Majestic
- Radia samochodowe Jensen
- Radia samochodowe Mini
- Radia samochodowe Skoda
- Radia samochodowe Blaupunkt
- Radia samochodowe Volvo
- Radia samochodowe Dual
- Radia samochodowe Grundig
- Radia samochodowe Hyundai
- Radia samochodowe BLOW
- Radia samochodowe ECG
- Radia samochodowe Smart
- Radia samochodowe Alpine
- Radia samochodowe JVC
- Radia samochodowe Becker
- Radia samochodowe Ultimate
- Radia samochodowe Mercedes-Benz
- Radia samochodowe Biltema
- Radia samochodowe Auna
- Radia samochodowe Krüger&Matz
- Radia samochodowe OneConcept
- Radia samochodowe Renkforce
- Radia samochodowe Pure
- Radia samochodowe Zenec
- Radia samochodowe Clarion
- Radia samochodowe Fusion
- Radia samochodowe Magnat
- Radia samochodowe Manta
- Radia samochodowe Pyle
- Radia samochodowe VDO
- Radia samochodowe Harman Kardon
- Radia samochodowe Audio-Technica
- Radia samochodowe Maginon
- Radia samochodowe SPC
- Radia samochodowe Parrot
- Radia samochodowe Aiwa
- Radia samochodowe AKAI
- Radia samochodowe Sanyo
- Radia samochodowe Clatronic
- Radia samochodowe Telefunken
- Radia samochodowe Hifonics
- Radia samochodowe Kicker
- Radia samochodowe Deaf Bonce
- Radia samochodowe Elta
- Radia samochodowe Mac Audio
- Radia samochodowe McIntosh
- Radia samochodowe Denver
- Radia samochodowe Orion
- Radia samochodowe Hertz
- Radia samochodowe Trevi
- Radia samochodowe Technaxx
- Radia samochodowe Overmax
- Radia samochodowe Sencor
- Radia samochodowe Ground Zero
- Radia samochodowe Stinger
- Radia samochodowe Rockford Fosgate
- Radia samochodowe Nextbase
- Radia samochodowe Daewoo
- Radia samochodowe Kunft
- Radia samochodowe Crunch
- Radia samochodowe REVO
- Radia samochodowe Varta
- Radia samochodowe Audison
- Radia samochodowe Tevion
- Radia samochodowe Caliber
- Radia samochodowe Telestar
- Radia samochodowe Brigmton
- Radia samochodowe Xomax
- Radia samochodowe Audiosonic
- Radia samochodowe Vieta
- Radia samochodowe Audiovox
- Radia samochodowe MB Quart
- Radia samochodowe Tokai
- Radia samochodowe Naxa
- Radia samochodowe Boston Acoustics
- Radia samochodowe Farenheit
- Radia samochodowe Adcom
- Radia samochodowe Nikkei
- Radia samochodowe Autovision
- Radia samochodowe Lanzar
- Radia samochodowe Roadstar
- Radia samochodowe MT Logic
- Radia samochodowe Shuttle
- Radia samochodowe Axton
- Radia samochodowe Soundstream
- Radia samochodowe DLS
- Radia samochodowe VDO Dayton
- Radia samochodowe Macrom
- Radia samochodowe Watssound
- Radia samochodowe Tamashi
- Radia samochodowe Emphaser
- Radia samochodowe Scion
- Radia samochodowe Sendai
- Radia samochodowe Phonocar
- Radia samochodowe US Blaster
- Radia samochodowe Eltax
- Radia samochodowe RTO
- Radia samochodowe Sevic
- Radia samochodowe Cartronix
- Radia samochodowe Dension
- Radia samochodowe Spectron
- Radia samochodowe Mtx Audio
- Radia samochodowe Multilaser
- Radia samochodowe Raveland
- Radia samochodowe ESX
- Radia samochodowe RetroSound
- Radia samochodowe Lark
- Radia samochodowe Planet Audio
- Radia samochodowe VW
- Radia samochodowe Rodek
- Radia samochodowe Eclipse
- Radia samochodowe Voxx
- Radia samochodowe SoundMAX
- Radia samochodowe Impulse
- Radia samochodowe Twister
- Radia samochodowe Mystery
Najnowsze instrukcje dla Radia samochodowe

16 Stycznia 2025
16 Stycznia 2025
16 Stycznia 2025
16 Stycznia 2025

15 Stycznia 2025
14 Stycznia 2025
14 Stycznia 2025

14 Stycznia 2025
13 Stycznia 2025
13 Stycznia 2025