Instrukcja obsługi JVC LT-70MAW795
Przeczytaj poniżej 📖 instrukcję obsługi w języku polskim dla JVC LT-70MAW795 (156 stron) w kategorii Telewizja. Ta instrukcja była pomocna dla 4 osób i została oceniona przez 2 użytkowników na średnio 4.5 gwiazdek
Strona 1/156

Illu rations in this ar providedst guide e
act pr uct arance.ual od appe
User Guide
LT-43MAW595/LT-50MAW595
LT-55MAW595/LT-65MAW595/LT-70MAW795
Version 8.1
For U.S.
English

Copyright
© 2018 Roku, Inc. All rights reserved. ROKU, the ROKU Logo, and “NOW THIS IS TV” are trademarks and/or registered
trademarks of Roku, Inc. Material in this User Manual is the property of Roku, In , and is protected under US and c.
International copyright and/or other inte ectual property law Reproduction or transmi ion of the materials, in whole ll s. ss
or in part, in any manner, electronic, print, or otherwise, without the prior written consent of Roku, Inc., is a violation of
rights under the aforementioned laws.Roku, Inc.’s,
No part of this publication may be stored, reproduced, t ransmitted or distributed, in whole or in part, in any manner,
electronic or otherwise, whether or not for a harge or other or no consideration, without the prior written permission c
of Roku, Inc.
Requests for permission to store, reproduce, transmit or distribute materials shall be made to both of the following
address:
Roku, Inc.
150 Winchester Circle
Los Gatos, CA 95032
Product name:
Document name: User Guide
Document revision: 8.1 - U.S English
Publication date: 91 July, 2019
Warning: Changes or modifications to this unit not expressly approved by the party responsible for compliance could
void the user's authority to operate the equipment.
NOTE: This equipment has been test ed and found to comply with the limits for a Class B digital device, pursuant to
Part 15 of the FCC Rules.
These limits are designed to provide reasonable protection against harmful interference in a resident ial
installation. This equipment generates, uses and can radiate radio frequency energy and, if not installed and
used in accordance with the instructions, may cause harmful interference to radio communications. However,
there is no guarantee that interference will not occur in a particular installation. If this equipment does cause
harmful interference to radio or television reception, which can be determined by turning the equipment o
and on, the user is encouraged to try to correct the interference by one or more of the following measures:
- Reorient or relocate the receiving antenna.
- Increase the separation between the equipment and receiver.
- Connect the equipment into an outlet on a circuit dierent from that to which the receiver is connected.
- Consult the dealer or an experienced radio/ TV technician for help.
FCC Notice

iii
Contents
W
Connections and Setup
elcome .................................................................................................................................................4
Safety and Warnings ..........................................................................................................................1
The new standard in Smart TVs ....... .. ... .. ... ... .. ... .. .... .... ... ........ . . ........ .. ... .. .... ........... 4... .. ... .. .. .. .. ... .. .. .. ... .. ...... .... .. .. ... .. ..
Get the most out of your new TV .... ... .. .... .... .... .. ... .. .... .... ... ........ . . ........ .. ... .. . ........... 5.. ... .. .. .. .. .. ... .. .. .. ... .. ...... .... .. .. ... .. ..
................................................................................................................... 8
..............................................................................................8
.......................................................................................... .......... 9
............................................................................................................................................... 10
....................................................................................................................11
C
Main features, Accessories, Specifications
Front panel, Rear/Side Connections
Installation
Base Stand Assembly Instruction
.............................................................................................................................. 12External Connection
............................................................................................................................................ 16Wall Mount
onnecting an antenna, cable, or satellite box .... ... .. .... .... .... .. ... .. .... .... .... .. ... .. ..... ... .. .. .. .. .. ... .. .. .. .. .. ... ... .............17..
Connecting external equipment with a composite AV video cable ... . .. .. ... .. ..... .. ... ........... 18.. .. ... .. ... .. .. .. ...
Connecting external equipment with an HDMI® cable ... .... ... .. ... .... .. ... .. .... .... .... .. ............ 18... .. ... .. ... .. .. ... .. .. .. .. ..
Connecting headphones or analog sound bar to the TV .. .. ... .. .. .. .. .. ... .. .. .. .... ... .. .... .... .... .. ... .. .... .... .... ............ 19
Connecting headphones to the Roku Enhanced Voice Remote ... .... ... .. ... .... .. ... .. ............... 19... .. ... .. ... .. .. ... ..
Connecting an AV receiver or digital sound bar ... .... ... .. ... ....... .... ... .. ... .... .. ... .. .............. 20... .. ... .. ... ... .. ... .. ... .. .. ... ..
Preparing for Internet connectivity .... .. ... ... ... ... .. ... .. .... .... .... .. ... .. .... .... .... .. ... ............. 20... .. ... ... ... .. .. ... .. .. .. .. .. ... .. .. .. .. .. ...
AC power ....................................................... ....... .. ... .. .... .... .... .. ... .. .... .... ....... .... ... .. ... .................. 21.. .. .. ... .. .. .. .. .. ... .. .. .. ... .. ... .. ...
Roku remote batteries ................................ .. ... .. .... .... .... .. ... .. .... .... .... .. ... .. .... .... ....... .............. 21.. .. ... .. .. .. .. .. ... .. .. .. .. .. ... .. .. .. ...
Roku TV remote ........................................ .. ... ... ...... .. ... .. .... .... .... .. ... .. .... .... .... .. ... .. .... ........... 21.. .. ... ... .. .. ... .. .. .. .. .. ... .. .. .. .. .. ... .. ..
Panel buttons ............................................... ... .. ..... .. ... .. .... .... ....... .... ... .. ... ...... ... .. .. .. ... .. .. .. ... .. ... .. ... .. .. ... .. .. .... ... .. .... .... ......... 25
Single button .......................................... .. .... .... ...... .. .. .. .. .. ... .. .. .. ..... ... .. .... .... ....... .... ... .. ... .... .. ... .. .... ........... 25.. ... .. ... .. .. ... .. ..
Three buttons ......................................... ... ... ... ...... . .. .. ... .. ..... .. ... .. .... .... .... .. ... .. .... .......... 26.. ... ... ... .. .. ... .. ... .. .. .. ... .. .. .. .. .. ... .. ..
Game-pad style joystick .................... ... .... .. ... .. .... .... .... .. ... .. .... .... .... .. ... .. .... .... .............. 26.. ... .. .. ... .. .. .. .. .. ... .. .. .. .. .. ... .. .. ..
Four buttons ............................................ ... .. ... ...... . .. .. ... .. ........ .... ... .. ... .... .. ... .. .... ............ 26.. ... .. .. .. .. ... .. ... .. ... .. ... .. ... .. .. ... .. ..
Five buttons (with mute) .................... ... ...... .... ... .. ... .... .. ... .. .... .... .... .. ... .. .... .... ............ 27... ... ... .. ... .. ... .. .. ... .. .. .. .. .. ... .. .. ..
Five buttons (without mute) ........ .. ... ... ...... .. ... .. .... .... .... .. ... .. .... .... ...... .. ... ... .. .. ... .. .. .. .. .. ... .. .. .. .. .. ... .. .... ... .. .... ........... 27
Seven buttons .......................................... .. ... .. ........ . .. .. ... .. ..... .. ... .. .... .... ....... .. ... .. .. .. ... .. ... .. .. .. ... .. .. .. .. .. ... .. .... ... .. .... ......... 28
Guided Setup ....................................................................................................................................... 29
Starting Guided Setup ................................... . .. .. ... .. ........ .... ... .. ... .... .. ... .. .... .... .... .. ............. 29.. .. ... .. ... .. ... .. ... .. ... .. .. ... .. .. .. .. ..
Completing Guided Setup .................. ... ......... . .. .. ... .. ..... .. ... .. .... .... .... .. ... .. .... .... ............... 30.. ... .. .. ... .. ... .. .. .. ... .. .. .. .. .. ... .. .. ..
Network connection .......................... .... .. ... .. .... .... .... .. ... .. .... .... .... .. ... .. .... .... .... .. .......... 32.. .. .. ... .. .. .. .. .. ... .. .. .. .. .. ... .. .. .. .. ..
Activation ................................................. .. ... ...... .... ... .. ... .... .. ... .. .... .... .... .. ... .. .... .... ........... 37... .. .. ... .. ... .. ... .. .. ... .. .. .. .. .. ... .. .. ..
Connect your devices ........................ ...... .. ... .. .... .... .... .. ... .. .... .... .... .. ... .. .... .... .... .. ........ 38.. .. .. ... .. .. .. .. .. ... .. .. .. .. .. ... .. .. .. .. ..
Home screen ................................................ .. .... ....... . .. .. ... .. ..... .. ... .. .... .... .... .. ... .. .... .... .......... 41.. .. .. .. .. ... .. ... .. .. .. ... .. .. .. .. .. ... .. .. ..
Personalize your Home screen ...... .. .. ... .. ..... .. ... .. .... .... .... .. ... .. .... .... .... .. ... .. ............. 43.. ... .. ... .. .. .. ... .. .. .. .. .. ... .. .. .. .. .. ... ..
Benefits of connecting ................................................................................................................... 44
... .... ... .. ... ....... .... ... .. ... .... .. ... .. .... ......... 44... .. ... .. ... ... .. ... .. ... .. .. ... .. ..
What is streaming?
Connect ri s out y r TV’s full oten al!ing b ng ou p ti
.................................. .. ...... .. ... .. ... .. .. .. ... .. ... .... ... .. ...... . .. .. ... .. ........ .... ... .. ... .... .. ... .. ......... 45... .. ... .. ... .. .. ... ..
What if di ’t c e my TV? ........ .. ... ... ......... . .. .. ... .. ..... .. ... .. .... .... .... .. ... .. .... ........ 47 I dn onn ct .. .. ... ... .. .. ... .. ... .. .. .. ... .. .. .. .. .. ... .. ..

iv
Setting up Antenna TV .................................................................................................................. 48
How do I set up the TV tuner? .. . . . . . . .. . . . . . ... . . . . . .. . . . . ........ 49.. .. .. .. ..... ..... .... .. ...... .... .... .... .... ... .... .... ..... ..... .... ... .... .... ..... .....
Using your TV ...................................................................................................................................... 53
Status indicator .. . . ... ... ... ........ . ... . . . ... . . . . . ... . . . . . .. . . . . ........ 53.. .. .. .. ... .. .. .. .... .... .... .... .. ...... .... .... .... .... ... .... .... ..... ..... .... ... .... .... ..... .....
Standby mode energy savings.. . . . . . . .. . . . . . ... . . . . . ... . . . . ........ 54.. .. .. .. ..... ..... .... .. ...... .... .... .... .... .. ...... .... .... .... .... ... .... .... ..... .....
Opting in to Smart TV experience (U.S. only) .. ...... .... .... .... .... .. ...... .... .... .... .... ... .... .... ..... ..... ... . . . . ... . . . . . ... . . . . . ...... 54
Disable Smart TV experience .. . . . . . . .. . . . . . .. . . . . . .. . . . . ...... 55.. .. ... .... .... .... ... ... .... .... ..... ..... .... ... .... .... ..... ..... .... ... .... .... ..... .....
Disable Auto Notifications .. . . ..... . . .. . . . . . ... . . . . . .... .. .. .... ..... .... .. ...... .... .... .... .... ... .... .... ..... ..... .... ... .... .... ..... ..... ..... . . . . ....... 55
Watching Antenna TV channels .. . . . . . . .. . . . . . ... . . . . . .. . . . . ...... 56.. .. ... .... .... .... ... .. ...... .... .... .... .... ... .... .... ..... ..... .... ... .... .... ..... ...
Changing channels.. . . ... . ... ... ... . . . . . .. . . . . . .. . . . . . .. . . ...... 56.. .. .. .. .. .. ... ... .... .... ..... ..... .... ... .... .... ..... ..... .... ... .... .... ..... ..... .... .. ...... ....
Favorite Channels in non-connected mode .. ...... .... .... .... .... ... .... .... ..... ..... .... ... .... .... ..... ...... . . . . ... . . . . . .. . . . . ........ 57
Smart Guide (U.S. only) .. . . ... ... . . .. . . . . . .... .. .. .. ... .... ... ... .... .... ..... ..... .... ... .... .... ..... ..... .... ... .... .... ..... ..... .... .... . . . . .. . . . . . .. ........ 59
Viewing program information .. . . . . . ... . . . . . .. . . . . . .. . . . . ........ .... .... .... .... .... ... .... .... ..... ..... .... ... .... .... ..... ..... .... ... .... .... ..... ... 61
Adjusting settings while watching a show ... .... .... ..... ..... .... ... .... .... ..... ..... ..... . . . . .. . . . . . .. . . . . . ....... ... .... .... ..... ..... .... 63
Pausing Live TV.. . . ... . ... ... ..... . ... . . . .. . . . . . ... . . . . . ... . . . . ........ 63.. .. .. .. .. .. ... .. .. ... ..... ..... .... .. ...... .... .... .... .... .. ...... .... .... .... .... ... .... .... ..... .....
Requirements .. . . ... ... ... ........ . . . . . . .. . . ... .. .. .. ... .. .. .. ... .... ..... .... .. .. ...... .... ..... . ... . . . . . ... . . . . ....... 63.... .... .. ...... .... .... .... .... ... .... .... ..... .....
Enabling Live TV Pause .. . . ... ... . . .. . . . . . ... . . . . . ... . . . . . .... .. .. .. ... .... ... .. ...... .... .... .... .... .. ...... .... .... .... .... ... .... .... ..... ..... .... ........... 64
Using Live TV Pause .. . . ... . ... ... .. . . . . . .. . . . . . .. . . . . . .. . . ...... 64.. .. .. .. .. .. .... ... .... .... ..... ..... .... ... .... .... ..... ..... .... ... .... .... ..... ..... .... ... .... ..
Notes about Live TV Pause .. . . . . . . ... . . . . . .. . . . . . .. . . . . . ....... 66.. .. .. ... .... .... .... ... .... .... ..... ..... .... ... .... .... ..... ..... .... ... .... .... ..... ..... ..
More Ways to Watch (U.S. only) .. ... . . . . .. . . . . . ... . . . . . .. . . . . ...... 66.. .... .... ..... .... .. .. ...... .... .... .... .... ... .... .... ..... ..... .... ... .... .... ..... ...
Using More Ways to Watch .. . . .. . . . .. . . . . . ... . . . . . .. . . . . . ...... 67.. .. .. .... ..... .... .. .. ...... .... .... .... .... ... .... .... ..... ..... .... ... .... .... ..... ..... ..
Getting the most from More Ways to Watch .. ...... .... .... .... .... .. ...... .... .... .... .... ... .... .... ..... .... . . . . ... . . . . . ... . . . . ....... 70
Switching TV inputs .. . . ... . ... ... ... . . . . . ... . . . . . .. . . . . . .. . . . ...... .. .. .. .. .. .. ... .. ...... .... .... .... .... ... .... .... ..... ..... .... ... .... .... ..... ..... .... .. ...... .... .. 70
Auto-detecting devices .. . . ... . ... . .. . . . . . .. . . . . . .. . . . . . .. ........ .. .. .. .. .. .... .... ... .... .... ..... ..... .... ... .... .... ..... ..... .... ... .... .... ..... ..... .... ... 70
Adjusting audio/video settings .. . . . . . .. . . . . . .. . .... ..... .... ..... .... .. ... .... .... ..... ..... .... .. ...... ..... . . ... . . . . ..... .... .... .... ... .... .... ..... .. 70
Playing content from USB storage devices .. ...... .... .... .... .... .. ...... .... .... .... ..... . . . . ... . . . . . ... . . . . . ......... ... .... .... ..... ..... .... 71
Auto player launch.. . . ... . ... ... ... . . . . . .. . . . . . .. . . . . . .. . . ........ .. .. .. .. .. .. ... ... .... .... ..... ..... .... ... .... .... ..... ..... .... ... .... .... ..... ..... .... ... .... .... 71
Playing content from local network media servers .. ...... .... .... .... .... ... .... .... ..... ..... .... ... .... .... ... . . . . ... . . . . . .. . . . ...... 72
Using your TV in a hotel or dorm room ... .... .... ..... ..... .... ... .... .... ..... ..... .... ... .... .... ..... ..... .... .. ....... . . . . .. . . . . . .. . . . . . .. . ..... 72
About using your TV on a restricted public network ... .... .... ...... . . ...... .... ... .... .... ..... ..... .... ... ..... .. . . . . . .. . ..... 72
Getting your Roku TV on line on a restricted public network ... .... .... ..... ..... .... .. ...... .... .... ... . . . . .. . . . . ...... 73
Roku voice remotes (select models only) ... .... .... ..... ..... .... .. ...... .... .... .... .... ... .... .... ..... ..... .... .... . . . . .. . . . . . ... . . . . . .. ....... 75
Re-pairing your Roku voice remote .. ...... .... .... .... ..... . . . . ... . . . . . ... . . . . . ... . . ...... 75.. ...... .... .... .... .... .. ...... .... .... .... .... .. ...... ..
Checking the Roku voice remote battery level . . . . . ... . . . . . ... . . . . ..... 75.. ...... .... .... .... .... .. ...... .... .... .... .... ... .... .... ..... ..
Finding your Roku Enhanced Voice Remote ... .... .... ..... ..... .... ... .... .... ..... ...... . . . . .. . . . . ..... ... .... .... ..... ....... . . . . ..... 76
Changing and previewing the Enhanced Voice Remote finder sound .. ...... .... .... .... ..... . . . . ... ........ 77...
Adjusting TV settings .................................................................................................................... 78
Settings menu .. . . ... . ... ... ..... . . ... . . . .. . . . . . .. . . . . . .. . . . . . .......78.. .. .. .. .. .. ... .. .. .. ... .... .... ... ... .... .... ..... ..... .... ... .... .... ..... ..... .... ... .... .... ..... ..... ..
Options menu .. . . ... . ... ... ..... . . ... . . . .. . . . . . .... .. .. .. .. .. ... .. .. .. ... ..... .... .. ... .... .... ..... ..... .... .. ...... .... .... .... .... ... .... .... ..... ..... ..... . . . . ... . . . . . ...... 79
Options menu settings .. . . ... . ... . .... .. .. .. .. .... .... .. ...... .... .... .... .... ... .... .... ..... ..... .... ... .... .... ..... ..... .... ... ... . . . . ... . . . . . .. . . . . . .. . ...... 80
Accessibility (U.S. only) .. . . ... . ... .. ... . . . . . .. . . . . . .. . . . . . ... . ..... 82.. .. .. .. .. .. .... ... .... .... ..... ..... .... ... .... .... ..... ..... .... .. ...... .... .... .... .... .. ......
Accessibility menu settings .. . . ... . . . .. . . . . . .. . . . . . ... . . . . . ...... 82.. .. .. ... .... .... ... ... .... .... ..... ..... .... .. ...... .... .... .... .... ... .... .... ..... ..... ..
Video description through Secondary Audio Program (SAP) . . . . . .. . . . ........ 83... .... .... ..... ..... .... ... .... .... .....

vi
Audio Guide settings .. . . ... . ... ... .. . . . . . .... .. .. .. .. .. .... ... .... .... ..... ..... .... ... .... .... ..... ..... .... ... .... .... ..... ..... .... .. ....... . . . . .. . . . . . .. . .... 112
Changing caption settings (Canada only) ... .... .... ..... ..... .... .. ...... .... .... .... .... ... .... .... ..... ..... ..... . . . . .. . . . . . ... . . . . . ........... 113
Conguring parental controls .. . . . . . . ... . . . . . .. . . . . . ... . . . . . ..... 115.. .. .. ... .... .... .... ... .... .... ..... ..... .... .. ...... .... .... .... .... ... .... .... ..... ..... ..
Creating a parental control PIN .. . . . . . .. . . . . . .. . . . . . ... . . . .... 115... ..... .... ..... .... .. ... .... .... ..... ..... .... .. ...... .... .... .... .... ... .... .... ......
Blocking Movie Store, TV Store, and News (U.S. only) ... .... .... ..... ..... .... .... . . . . .. . . . . . .. ...... 116.... .... ..... ..... .... ...
Blocking Broadcast TV shows .. ... . . . . .. . . . . . .. . . . . . .. . . . . .... 116.. .... .... .... .... ... ... .... .... ..... ..... .... ... .... .... ..... ..... .... ... .... .... ..... ...
What happens when a TV show is blocked? ... .... .... ..... ..... .... ... .... .... ..... ..... .... ... .... .... ..... ...... . . . . .. . . . . . .. . . . . ..... 122
Changing the parental control PIN ... .... .... ..... ..... .... ... .... .... ..... ..... .... ... .... .... ..... ..... .... ... .... ..... . . . . .. . . . . . .. . . . . . .. . . ........ 123
Resetting parental controls .. . . . . . . ... . . . . . .. . . . . . ... . . . . . ....... .. .. .. ... .... .... .... ... .... .... ..... ..... .... .. ...... .... .... .... .... ... .... .... ..... ..... .. 124
More settings ..................................................................................................................................... 125
Changing network settings .. . . ... ... . . .. . . . . . .. . . . . . .. . . . . . .......... 5.. .. .. .. .... .... .. ... .... .... ..... ..... .... ... .... .... ..... ..... .... ... .... .... ..... ..... .... 12
Changing ZIP Code .. . . ... ... ... ...... . . . . . ... . . . . . .. . . . . . .. . . . ..... .. .. .. .. ... .. .. ...... .... .... .... .... ... .... .... ..... ..... .... ... .... .... ..... ..... .... ... .... .... .... 126
Changing time settings .. . . ... ... ... . .. . . . . . ... . . . . . .. . . . . . .. . ....... .. .. .. .. ... ... .. .. ...... .... .... .... .... ... .... .... ..... ..... .... ... .... .... ..... ..... .... ... .... 126
Scanning for Antenna TV channels again .. ...... .... .... .... .... ... .... .... ..... ..... .... ... .... .... ..... ..... .... .... . . . . ... . . . . . .. . . . . . .. ....... 127
Setting the HDMI ® mode (4K models only) ... .... .... ..... ..... .... ... .... .... ..... ..... .... ... .... .... ..... ..... ..... . . . . .. . . . . . .. . . . . . ........ 127
Adjusting external device connections .. ...... .... .... .... .... ... .... .... ..... ..... .... ... .... .... ..... ..... .... ... ..... . . . . ... . . . . . .. . . . . . .. . ....... 128
Using the TV in a home theater .. . ... . . . ... . . . . . ... . . . . . .. . . . . ...... .. .. .... .... .... .... .. ...... .... .... .... .... ... .... .... ..... ..... .... ... .... .... ..... ..... 129
Turning he speakers .. . . ... . . . .. . . . . . ... . . . . . .. . . . . . .. ...... .. .. .. .. ... ..... .... .. ...... .... .... .... .... ... .... .... ..... ..... .... ... .... .... ..... ..... .... ... 129
Setting up a digital audio connection .. ...... .... .... .... .... ... .... .... ..... ..... .... ... .... .... ..... ..... .... ... ..... . . . . ... . . . . . .. . . . . . .. . ..... 130
Controlling other devices through CEC ... .... .... ..... ..... .... ... .... .... ..... ..... .... ... .... .... ..... ..... ..... . . . . .. . . . . . .. . . . . . .. ...... ... 131
Restarting the TV .. . . ... . ... ... ..... .. . . . . .. . . . . . ... . . . . . .. . . . ......... 133.. .. .. .. .. .. ... .. ..... .... ..... .... .. .. ...... .... .... .... .... ... .... .... ..... ..... .... ... .... .... .....
Resetting the TV .. . . ... ... ... ........ . . . . . ... . . . . . ... . . ... .. .. .. ... .. .. .... .... .... .... .... .. ...... .... .... .... .... ... .... .... ...... . .. . . . . ....... 133..... .... ... .... .... ..... ...
Reset audio/video setti ngs .. . . . . . . .. . . . . . .. . . . . . .. . . . . . ....... 133.. .. .. .. ..... ..... .... ... .... .... ..... ..... .... ... .... .... ..... ..... .... ... .... .... ..... ..... ..
Factory reset everything .. . . ... . . . ... . . . . . .. . . . . . .. . . . . . .........134.. .. .. .. ... .... .... ... .... .... ..... ..... .... ... .... .... ..... ..... .... ... .... .... ..... ..... ....
What if i can’t access the Factory Reset option? .. ...... .... .... .... .... ... .... .... ..... ..... .... ... .... .... ... . . . . ... . . . . . .. . . . .....134
Network connection reset .. . . ... . . . .. . . . . . ... . . . . . .. . . . . . ..... 135.. .. .. ... .... .... ... .. ...... .... .... .... .... ... .... .... ..... ..... .... ... .... .... ..... ..... ....
Changing your Roku Channel Store PIN preference .. ...... .... .... .... .... ... .... .... ..... ..... ..... . . . . ... . . . . . ..... .... ..... . ..... 135
Gettin g system updates .. . . ... . ... . .. . . . . . ... . . . . . ... . . . . . .. . .... 136.. .. .. .. .. .... .... .. ...... .... .... .... .... .. ...... .... .... .... .... ... .... .... ..... ..... .... ... ....
Checking for updates on a connected TV ... .... .... ..... ..... .... ... .... .... ..... ..... .... ... .... .... ..... ..... ..... . . . . .. . . . . . .. . . . . . ..... 137
Getting updates on a non-connected TV ... .... .... ..... ..... .... ... .... .... ..... ..... .... ... .... .... ..... ..... ..... . . . . .. . . . . . .. . . . . . ...... 137
Other devices .................................................................................................................................... 140
Screen Mirroring your phone or tablet ... .... .... ..... ..... .... ... .... .... ..... ..... .... ... .... .... ..... ..... .... ... ..... . . . . .. . . . . . .. . . . . . .. . ...... 140
Getting and using the Roku mobile app ... .... .... ..... ..... .... ... .... .... ..... ..... .... ... .... ..... . . . . .. . . . . . .. . . . ..... ..... .... ... ... . .. . ..... 141
Private Listening on the Roku mobile app ... .... .... ..... ..... .... ... .... .... ..... ..... .... ... .... .... ..... ..... ..... . . . . .. . . . . . .. . . . . . .... 141
Using a universal remote .. . . ... . ... . .. . . . . . .. . . . . . .. . . . . . .. . ..... 141.. .. .. .. .. .... .... ... .... .... ..... ..... .... ... .... .... ..... ..... .... ... .... .... ..... ..... .... ... ..
FAQ ....................................................................................................................................................... 142
Othe infor n ............................................................................................................................ 143r matio
Notice .......................................................................................................................................... 143

1
CAUTION:TO REDUCE THE RISK OF ELECTRIC SHOCK, DO NOT
REMOVE COVER(OR BACK).NO USER SERVICEABLE
PARTS INSIDE.REFER SERVICING TO QUALIFIED
SERVICE PERSONNEL.
WARNING: TO PREVENT FIRE OF SHOCK HAZARD, DO NOT EXPOSE THIS APPLIANCE
TO RAIN OR MOISTURE.
TO PREVENT THE SPREAD OF FIRE, KEEP CANDLES OR OPEN FLAMES AWAY
FROM THIS PRODUCT AT ALL TIMES.
CAUTION: TO PREVENT ELECTRIC SHOCK. DO NOT USE THIS POLARIZED PLUG WITH
AN EXTENSION CORD, RECEPTACLE OR OTHER OUTLET UNLESS THE
BLADES CAN BE FULLY INSERTED TO PREVENT BLADE EXPOSURE.
WARNING:
CAUTION:
The lightning ash with arrowhead symbol,within an
equilateral triangle is intended to alert the user to the
presence of uninsulated dangerous voltage within the
to constitute a risk of electric shock.
The exclamation point within an equilateral triangle is
intended to alert the user to the presence of important
operating and maintenance(servicing)instructions in the
literature accompanying the appliance.
Safety and Warnings
RISK OF ELECTRIC SHOCK!
CAUTION
DO NOT OPEN!
ATTENTION
NE PAS OUVRIR!
RISQUE DE CHOC ELECTRIQUE!
This equipment has been tested and found to comply with the limits for a Class B digital device,
pursuant to Part 15 of the FCC Rules. These limits are designed to provide reasonable protection
against harmful interference in a residential installation. This equipment generates, uses and can
radiate radio frequency energy and, if not installed and used in accordance with the instructions,
may cause harmful interference to radio communications.
However,there is no guarantee that interference will not occur in a particular installation. If this
equipment does cause harmful interference to radio or television receptions,which can be
interference by one or more of the following measures:
- Reorient or relocate the receiving antenna.
- Increase the separation between the equipment and receiver.
- Consult the dealer or an experienced radio/TV technician for help.
Changes or modications not expressly approved by the party responsible for compliance with
the FCC Rules could void the user’s authority to operate this equipment.
THIS DEVICE COMPLIES WITH PART 15 OF THE FCC RULES. OPERATION IS SUBJECT TO THE FOLLOWING
TWO CONDITIONS:
(1)THIS DEVICE MAY NOT CAUSE HARMFUL INTERFERENCE, AND (2) THIS DEVICE MUST ACCEPT ANY
INTERFERENCE RECEIVED, INCLUDING INTERFERENCE THAT MAY CAUSE UNDESIRED OPERATION.
Important Note:
In the spaces below, enter the model and serial
number of your television(located at the rear of the
television cabinet). Staple your sales receipt or
invoice to the inside cover of this guide. Keep this
user’s guide in a convenient place for future
reference. Keep the carton and original packaging
for future use.
Location of the required marking
BATTERY PRECAUTIONS:
The rating sheet and the safety caution are on the
rear of the unit.
Batteries should not be exposed to excessive heat
such as sunshine, re or the like.
Incorrect use of batteries may cause them to leak
or burst. Read the battery warning and use the
batteries properly.
Do not mix old and new batteries.
Do not mix alkaline, standard(carbon-zinc), or
rechargeable,(Ni-Cd, Ni-MH,etc.)batteries.
Remove batteries if the remote control will not be
operated for anextended period of time.
The remote control unit uses infrared beams to
transmit signals, so sunlight or uorescent light on
the remote sensor may shorten operating distance.

2
IMPORTANT SAFETY INSTURCTIONS
WARNING:
Safety and Warnings
1) Read these instructions.
2) Keep these instructions.
3) Heed all warnings.
4) Follow all instructions.
5) Do not use this apparatus near water.
6) Clean only with non abrasive dry cloth.
7) Do not block any ventilation openings, install in
accordance with the instructions.
8) Do not install near any heat sources such as
radiations, heat registers, stoves, or other apparatus
(including ampliers) that produce heat.
9) Do not defeat the safety purpose of the polarized
plug. If the provided plug does not t into your outlet,
consult an electrician for replacement of the obsolete
outlet.
10) Protected the power cord from being walked on or
pinched particularly at plugs, convenience receptacles,
and the point where they exit from the apparatus.
11) Only use attachments/accessories specied by the
manufacturer.
12) Unplug this apparatus during lighting storms or
when unused for long periods of time.
13) Refer all servicing to qualied service personnel.
Servicing is required when the apparatus has been
damaged in any way, such as power-supply cord or
plug is damaged, liquid has been spilled or objects have
fallen into the apparatus, the apparatus has been
exposed to rain or moisture, does not operate normally,
or has been dropped.
14) Mains plug is used as the disconnect device, the
disconnect device shall remain readily operable.
15) Do not cover the ventilation opening with items such
as newspapers, table-cloth, curtains, etc.
16) No naked ame sources, such as lighted candles,
should be placed on the apparatus.
17) Attention should be drawn to the environmental
aspects of battery disposal.
18) Use apparatus in moderate climate.
19) The apparatus shall not be exposed to dripping or
splashing and that no objects lled with liquids, such as
vases, shall be placed on the apparatus.
20)Use only with a cart, stand, tripod, bracket, or table
specied by the manufacturer, or sold with the apparatus.
When a cart is used, use caution when moving the cart/
apparatus combination to avoid injury from tip-over.
The symbol indicates that dangerous
voltages constituting a risk of electric shock
are present within this unit.
The symbol indicates that there are
inportant operating and maintenance
instructions in the literature
accompany this unit.
The symbol indicates that this product incorporates
double insulation between hazardous mains voltage
and user accessible parts. When servicing use only
identical replacement parts.
This marking indicates that this product should not
be disposed with other household wastes. To prevent
possible harm to the environment or human health
from uncontrolled waste disposal, recycle it
responsibly to promote the sustainable
reuse of material resources. To return your used
device, please use the return and collection systems
or contact the retailer where the product was
purchased. They can take this product for
environmental safe recycling.
To reduce the risk of re or electric shock,do
not expose this apparatus to rain or moisture.
WARNING:
The batteries shall not be exposed to
excessive heat such as, re or the like.
WARNING:
The excessive sound pressure from earphones
and headphones can cause hearing loss.

3
Safety and Warnings
High voltages are used in the operation of this television
receiver. Do not remove the cabinet back from your set.
Refer servicing to qualied service personnel.
Never stand on, lean on, or suddenly push the television or
its stand. You should pay special attention to children.
Serious injury may result if it falls.
Do not place your television on an unstable cart, stand,
shelf or table. Serious injury to an individual , and damage
to the television, may result if it falls. Recommended to
utilize rear mount screw holes for anti-tipping(hardware
not included)
When the television receiver is not used for an
extended period of time, it is advisable to disconnect
the AC power cord from the AC outlet.
Avoid exposing the television receiver to direct sunlight
and other sources of heat. Do not stand the television
e.g. video cassette players and audio ampliers. Do not
receiver directly on other products which give o heat,
place naked ame sources, such as lighted candles on
the television.
If the television is to be built into a compartment or similar
enclosure, the minimum distances must be maintained. Heat
build-up can reduce the service life of your television, and
can also be dangerous.
To prevent re or electrical shock hazard, do not expose
the television receiver to rain or moisture.
Do not drop or push objects into the television cabinet
slots or openings. Never spill any kind of liquid on the
television receiver.
Do not block the ventilation holes in the back cover.
Adequate ventilation is essential to prevent failure of
electrical components.
Do not trap the power supply cord under the television
receiver.

4
Welcome
Congratulations on the purchase of your new Roku TV Discover the joy of endless !
entertainment.
channels that may include paid subscription channels like Netflix or free channels like
YouTube, Crackle, CNET and literally thousands more.
Important:
Your TV receives automatic updates from time to time, enabling new
content and features. This edition of the User Guide describes Roku TV version 8.0. To
determine the current version of your Roku TV, go to Settings > System > About
after you complete Guided Setup.
The new standard in Smart TVs
most likely never seen before a home screen that you can
personalize with your favorite devices and streaming channels. Choose from hundreds
of thousands of streaming movies and TV episodes, plus music, sports, kids, family,
international and much more. You should never run out of things to watch.
Note:
A paid subscription or other payments may be required for some channel
content. Channel availability is subject to change and varies by country.

5
Get the most out of your new TV
Follow these simple steps to get the most out of your new . TV
1. Connect to the Internet
• s easy, and it will unlock a world of entertainment. All you need
is a network connection There are hundreds of free streaming channels, .
paid subscription services like Netflix and Spotify and convenient ways to ,
rent or buy a favorite film or show with, for example, Google Play .
2. Pick your favorite streaming channels
• Find the entertainment you love. From the latest blockbuster movies to
your favorite TV shows, with tons of live sports, a broad selection of music
streaming channels, popular programming in a dozen international
languages, 24x7 live news and so much more, your new Roku TV has your
sweet spot. A paid subscription or other payments may be required for
some channels.
3. Find Antenna TV shows in the Smart Guide
•
Only in the United States
, use the Smart TV
right now, but what was on up to a week ago, and what will be on in the
coming two weeks. And for many over-the-air programs, if you start
watching the program after it is already in progress, or you see something
you missed in the Smart Guide, you can use More Ways to Watch to find
streaming channels where you can see the show from the beginning, find
other episodes, or entire seasons of the show, if applicable.
4. discover More Ways to Watch on other
inputs
•
Only in the United
States When watching programs from a cable box, Blu-,
ray player, or other source connected to the HDMI ® or AV inputs, keep an
eye out for notification of streaming channels that offer the programa
other episodes, the entire
series, or other programs with similar themes.

6
5. Personalize your Home screen
• Put your favorite streaming channels, and TV inputs front-and-center on the
Home screen. No more flipping through inputs or wading through
complicated menus. You can even customize the names of each input and
move tiles around so your most-often used devices and streaming channels
are only a click away.
6. Search for your favorite movie, show, actor, or directorTV
• easily search across top
streaming channels and Antenna TV channels. Search by movie or TV show
title, actor or director all from one place. Search by typing words or
phrases using the on-screen keyboard or on your mobile device or,
only in
the United States
, speak words or phrases in a conversational tone using
Voice Search. Some channels and content require payment.
7. Pause live TV
• Pause, resume, fast forward, and rewind TV shows. Simply connect your
own USB drive with 16GB or bigger capacity to the TV and pause live TV for
up to 90 minutes.
Note:
Live TV Pause is available on digital TV shows received on the
Antenna TV input, and only when the TV is linked to a valid Roku account.
8. Control your TV with voice commands
•
Only in the United States
, use your Roku Voice Remote (select models),
Enhanced Voice Remote (select models), or the free Roku mobile app to
control your Roku TV. Use conversational voice commands to search for
programs by title, actor, director, or genre. Also use voice commands to
launch streaming channels switch inputs, change Antenna TV channels, or,
open the Smart Guide.
9. Send your personal media to the big screen
• Send personal photos, videos, and music from your compatible smartphone
or tablet to the TV screen in just a few taps. Plus, with certain channels,
such as Netflix and YouTube, you can send movies, shows, sport highlights,
and more directly to your .TV

7
10. Follow movies coming soon
• Use My Feed to choose from and follow a list of upcoming movies, and then
watch for alerts each time one of your followed movies becomes available
or changes price.
11. Take charge with a smartphone or tablet
• Control your TV with the included remote or from your compatible
smartphone or tablet with the free mobile app for iOS ® and Android
mobile devices *. Browse channels, view My Feed listen to audio from,
Antenna TV and streaming channels. Search more easily using a your
keyboard and,
only in the United States
, Voice Search.
• Mirror your compatible smartphone or tablet on your TV. Share videos,
photos, web pages, and more from compatible devices.
12. Connect your Roku TV to networks found in hotels and college dorms
• You can temporarily link the TV to your smartphone or table to agree to
any terms, enter codes, or provide required information before you can get
Internet access.
Note:
Using your Roku TV on a restricted public network requires wireless
availability and use of your network-connected smartphone, tablet, or
computer to authenticate access to your account. You must use your Roku
TV remote to initiate the connection process. Streaming content might be
limited due to your geographic location or because of restrictions imposed
by the network host.
Go to support.roku.com for device compatibility information.
*
IOS® is a trademark or registered trademark of Cisco in the U.S. and other countries and is used under license.
8
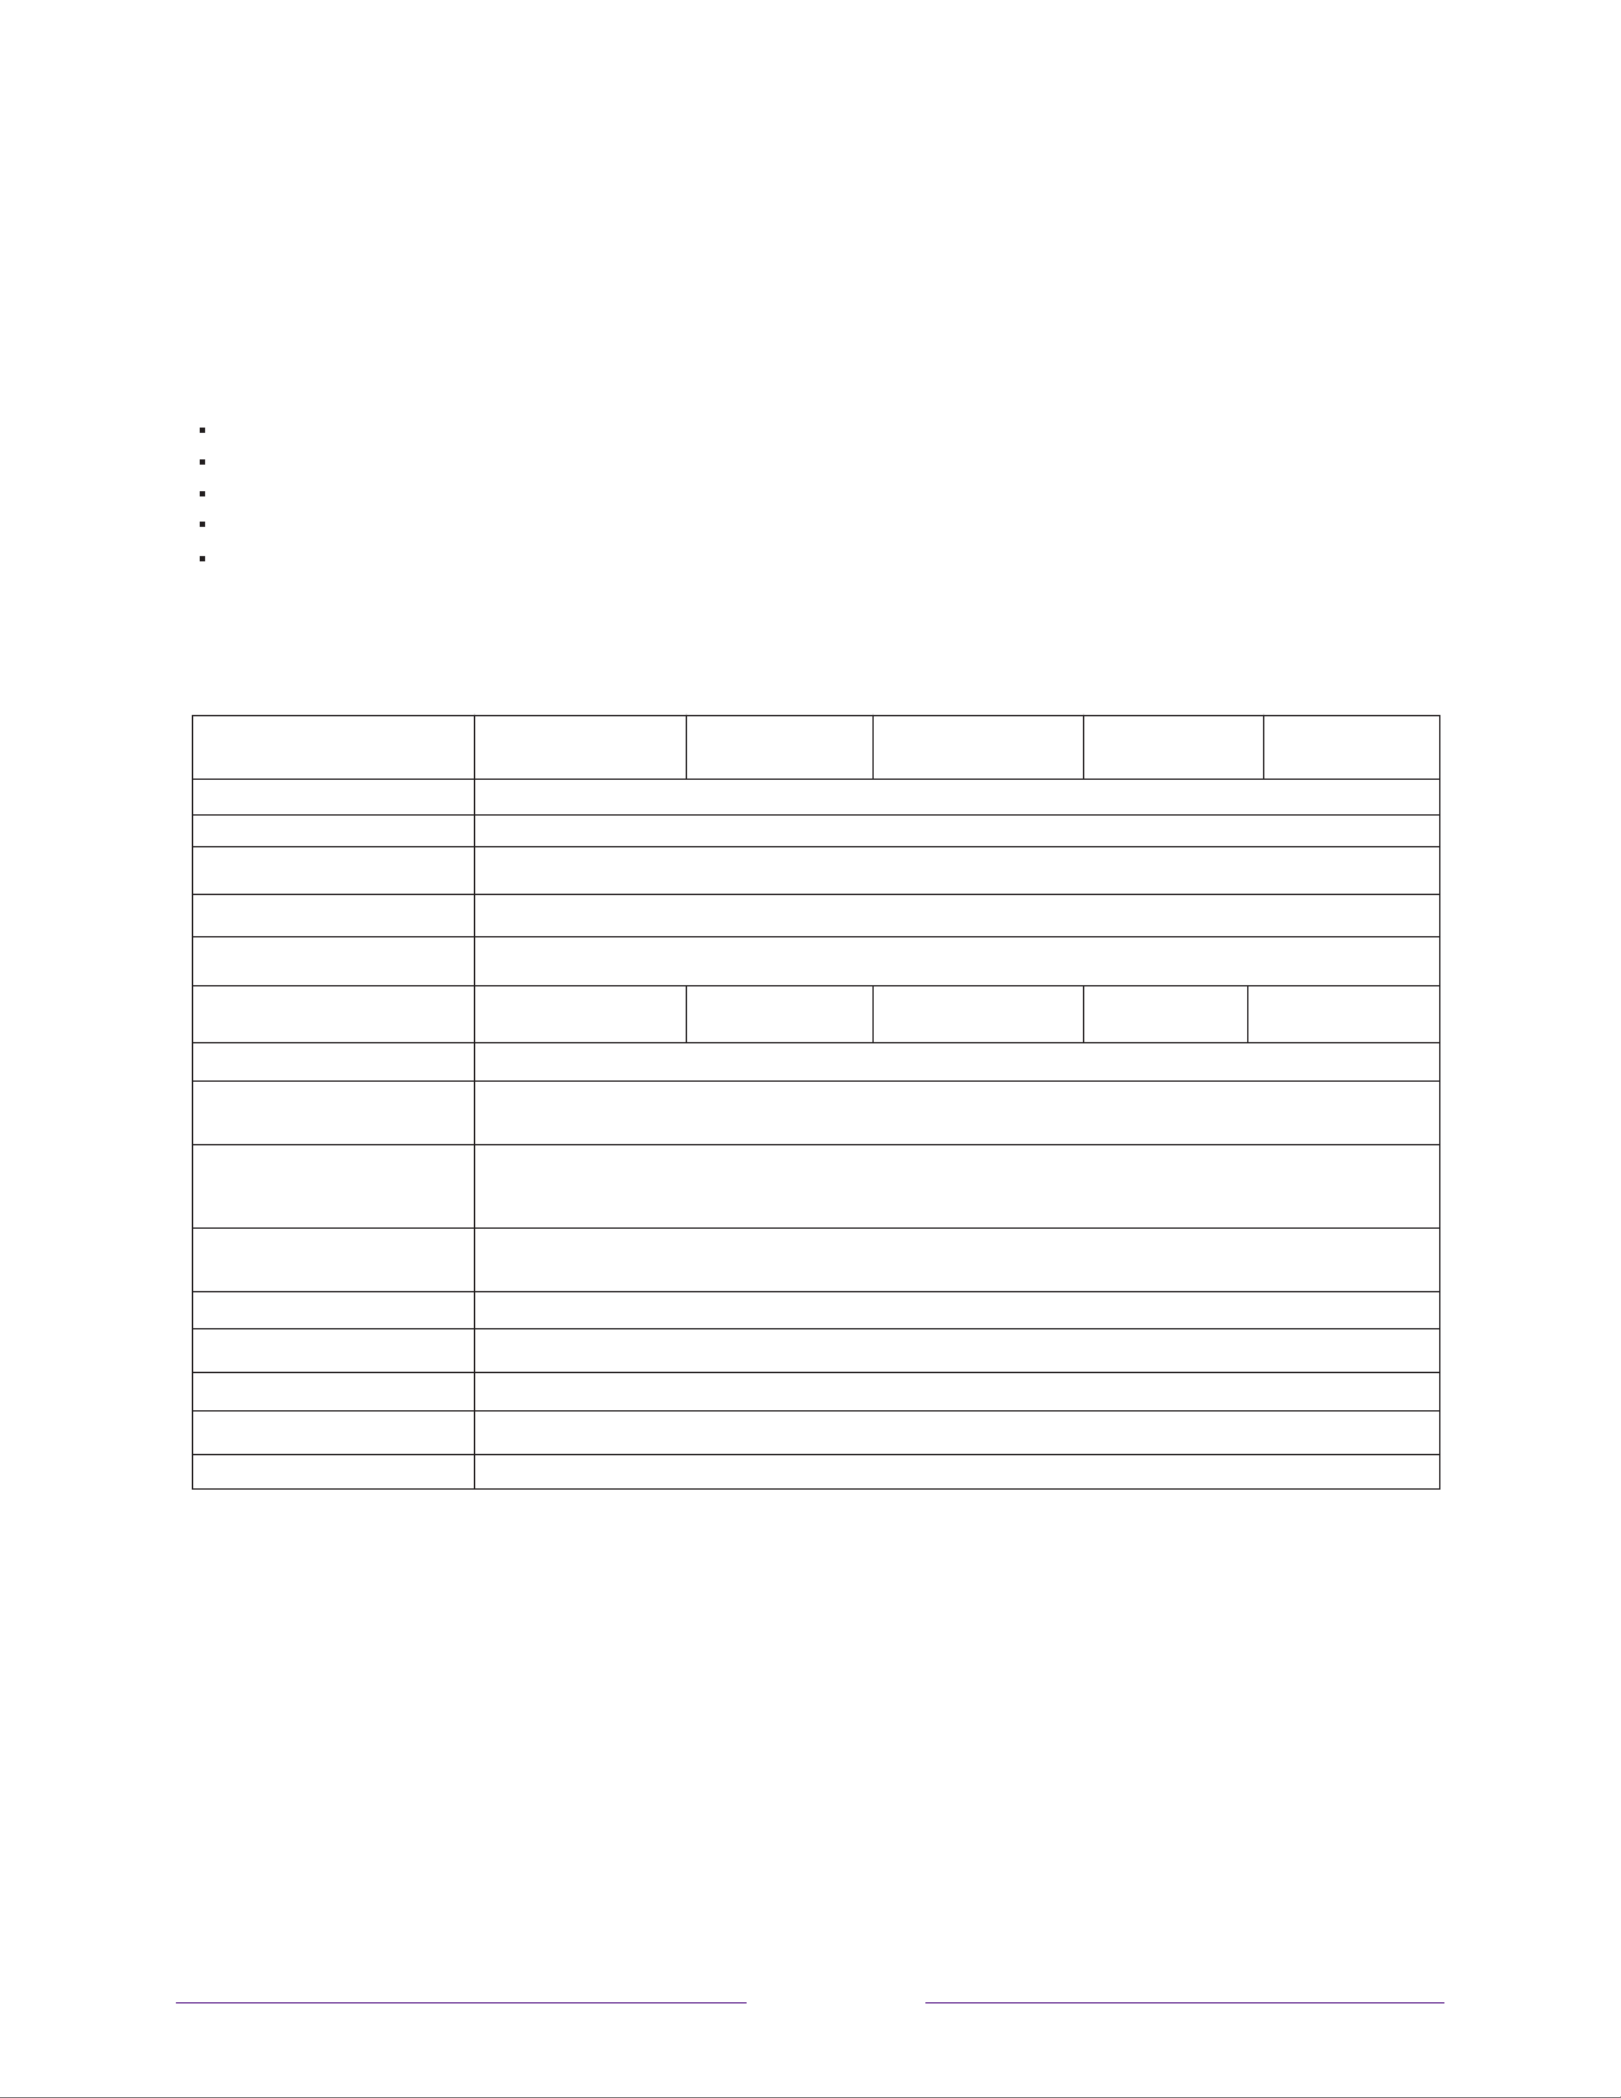
Main features
Specifications
Accessories
wide screeen for a complete home theater experience Infrared Remote Control................................... 1
User’s Manaul.......................................................... 1
Battery (AAA)........................................................ 2
Super slim LCD TV with LED backlight
3840x2160 native resolution for HD performance
Integrated ATSC TV tuner for HDTV broadcast reception
HDMI inputs for true digital connections
Connections and setup
Viewing Picture
Size(diagonal)
Resolution:
Aspect Ratio:
TV System:
Video Signal System :
Receiving Channel :
Maximum Power
Consumption:
Input Power Voltage:
Audio Output Power
(THD ≤7%)
High-Denition
Multimedia Interface
(HDMI) Input
Composite Video
Input
Audio Input
Headphone Output
Optical Output
USB 2.0 Input
“The product is manufactured, distributed, serviced and warranted exclusively by SHEN ZHEN MTC CO.,
LTD...“JVC” is the trademark of JVC KENWOOD Corporation, used by such company
under license.”
x1
x1
x1
LAN Input x1
x1
x1
2x8W
x3
100-240V ~ 50/60Hz
78W 220W
Cable: 1-135/Air: 2-69(ATV&DTV)
NTSC
ATSC Digital system and NTSC Analog system
16:9
3840x2160
43” class
(42.5” diagonal)
50” class
(50” diagonal)
55” class
(54.6” diagonal)
70” class
(70” diagonal)
65” class
(65” diagonal)
120W 150W 198W
9
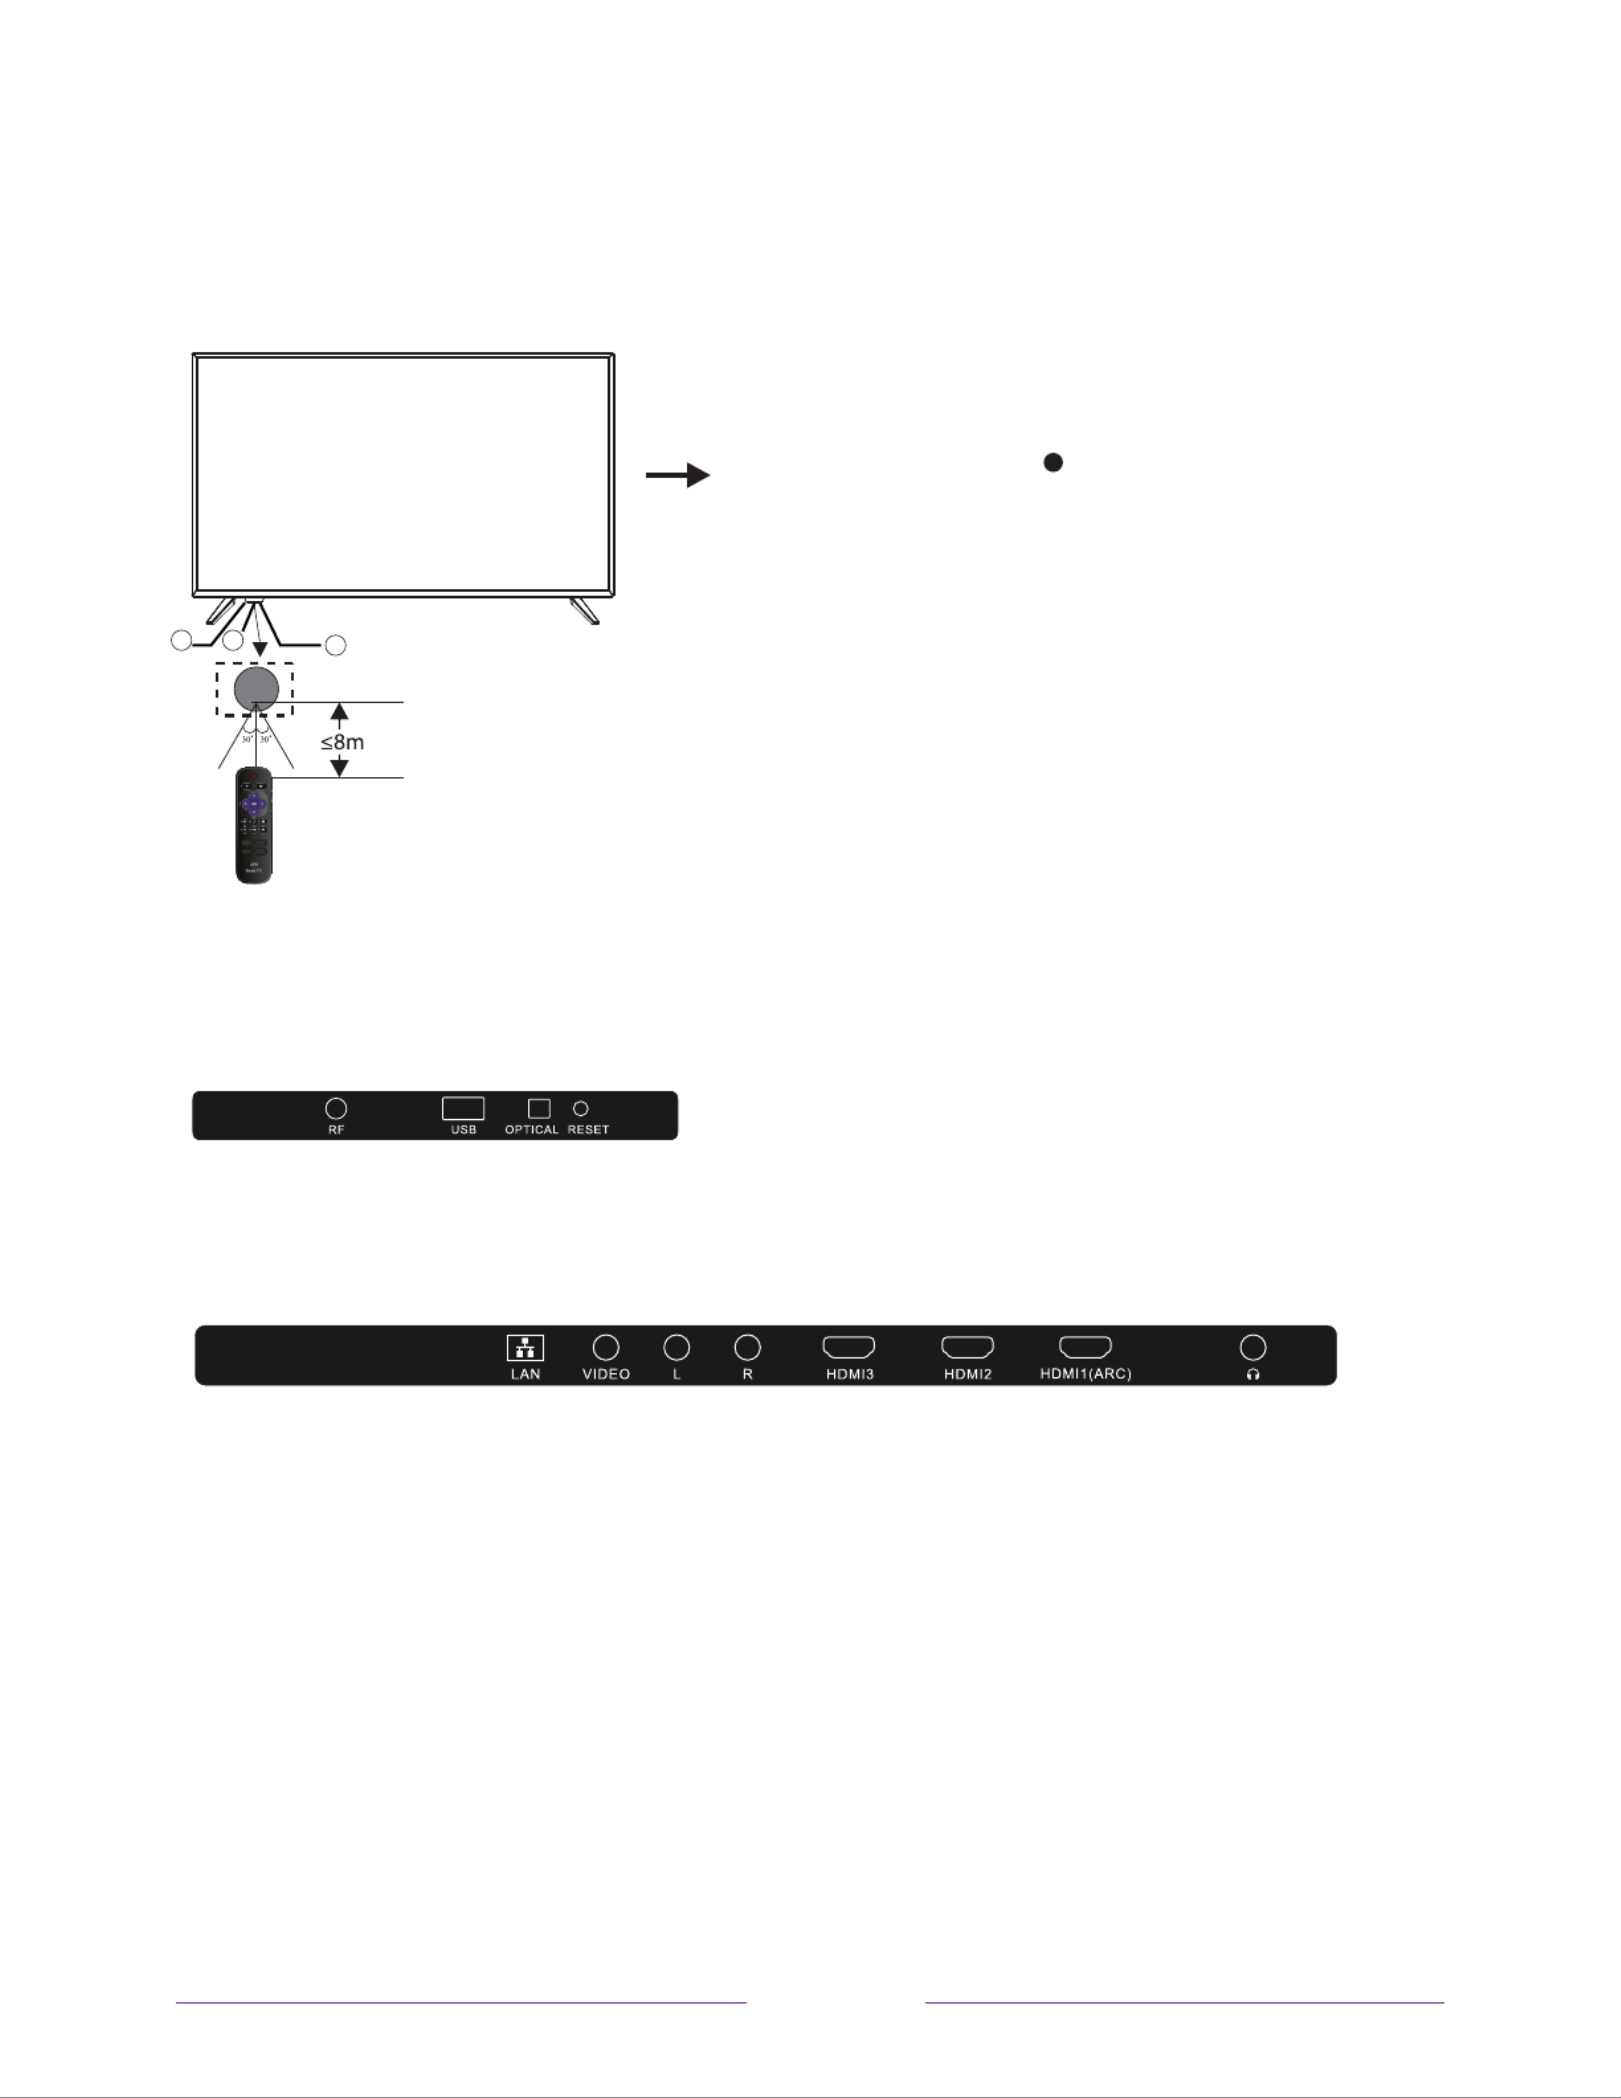
1: Remote control sensor.
2: Indicator LED: RED STANDBY.
3: Power / Input button
All the terminals are(from left to right):
RF, USB, OPTICAL OUTPUT, RESET.
All the terminals are(from left to right):
LAN INPUT, VIDEO INPUT, AUDIO INPUT, HDMI3, HDMI2, HDMI1(ARC), HEADPHONE OUTPUT.
Front panel
Rear Connections
SIDE Connections
2 1 3

10
INSTALLATION
Antenna
With the tuner built-in you can connect your TV to an antenna and enjoy over-the-air entertainment.
1. When the setup wizard is complete select the Antenna TV icon from the home screen.
2. Follow the on-screen instructions.
3. Whenever you want to watch antenna TV, select the Antenna icon.
Note:
Aerial connections : F connector.
Input impendance : 75 unbalanced.Ω
RF coaxial cable
(not included)
OR
Check to ensure that you have selected the right cables for the ports and that they are connected
External Equipment not included.)
Power Cord Wall outlet
Plug in and turn on TV
Connect your power cord to the TV, then plug it into the wall outlet.
Press the power button on your TV remote control.
Please note: After unpackint, allow the TV to reach ambient room temperature before
connection the TV to the mains power socket.
CABLE
When shipped from the factory, the Signal Type option is for the RF connector(F-type) set to
the “AIR” (Over-the air antenna) mode.
Power connection
PRESET MODE(HDMI)
1 800*600 60 37.88
48.36
47.7
47.3
67.5
60
60
60
60
1024*768
1366*768
1280*768
1920*1080
RESOLUTION V.Freq.(Hz) H.Freq.(KHz)
2
3
4
5
67.5
603840*2160
6
112.5
603840*2160
7
135
603840*2160
8

11
Base Stand Assembly Instruction
Attach the stands e tto f the y e s t to th bo m o TV b in rting thse tand in o sl tso o the TV. n
Se rcu e the stands to the w TV ith the suppli d re . e sc ws
It is rec mm nded o e t o ewo pe pl handle V s s T tand in tallation.
T t o preven scrat h c or damage to the TV n, pla e thscree c e TV on a soft, at s faur ce.
To attach the left and right leg that forms the stand:
1. cPla e the legs tto s into the bo m lots f the ser i e o TV, in t and t ght n the screws
(found i tn he a ries bag in thccesso ) e c cir led area with ths e sc ewr driver (no ovided).t pr
2 f r secur. A te ing the placstand, e the V o t T n a s able surface. The T iV s ready fo ser u now.
Note: TV can also be w o eall m unt d. Wall mount sold parase tely.
leg
Screws

12
Yo us tu can e he ear r i t enpu t rminals as follows.
Vide Equi eo pm nt: VCR Mu ti D sc Pla r, D, l i ye VD Player, corder, Video me, etc. Cam Ga
Y
Y
W R
W R
AUDIO Rece eriv
YVIDEO
WAUDIO L
RAUDIO R
External Connection
AV E iqu pment
1 WAN234

13
External Connection
Connecting a Camcorder
The r ne jear pa l acks y V on our T make it easy to co ecnn t a camcorder to yo TV. Theyur allow you
to e vi w the camcorde tape wr s it ut ho us R.ing a VC
When connecting a Camcorder o DVD cr , mat h the color of the nnectioco n ter al to the cable.min
1. ect o e Conn a Vide Cabl between the AV VI i o e eDEO n jacks n th TV and the Vid o out ja k on thec
c o .amc rder
3. t Connec a Vide Cabl beo e tween t V jache A VIDEO in ks o e on th TV and the Vide out jack n tho e
DVD.
2. t A i e Connec ud o Cables b twe A jen the UDIO L and IO R AUD ack U ss on the TV and the A DIO out jack
o c cor r.n the am de
N :otes
1. e Wh never y e iceou connect an ext rnal dev to your , s e TV make ure that pow r o en th unit
2. e Wh n connecting an rnal devicexte e, ma ch tht e c ool r o tf he c c .onne tion terminal to the cable
VIDEO
Y
Camcorder
Y lowel
Red
White
Yellow
Red
White
Audio Cable(Not supplied)
Video Cable(Not pl d) sup ie
14
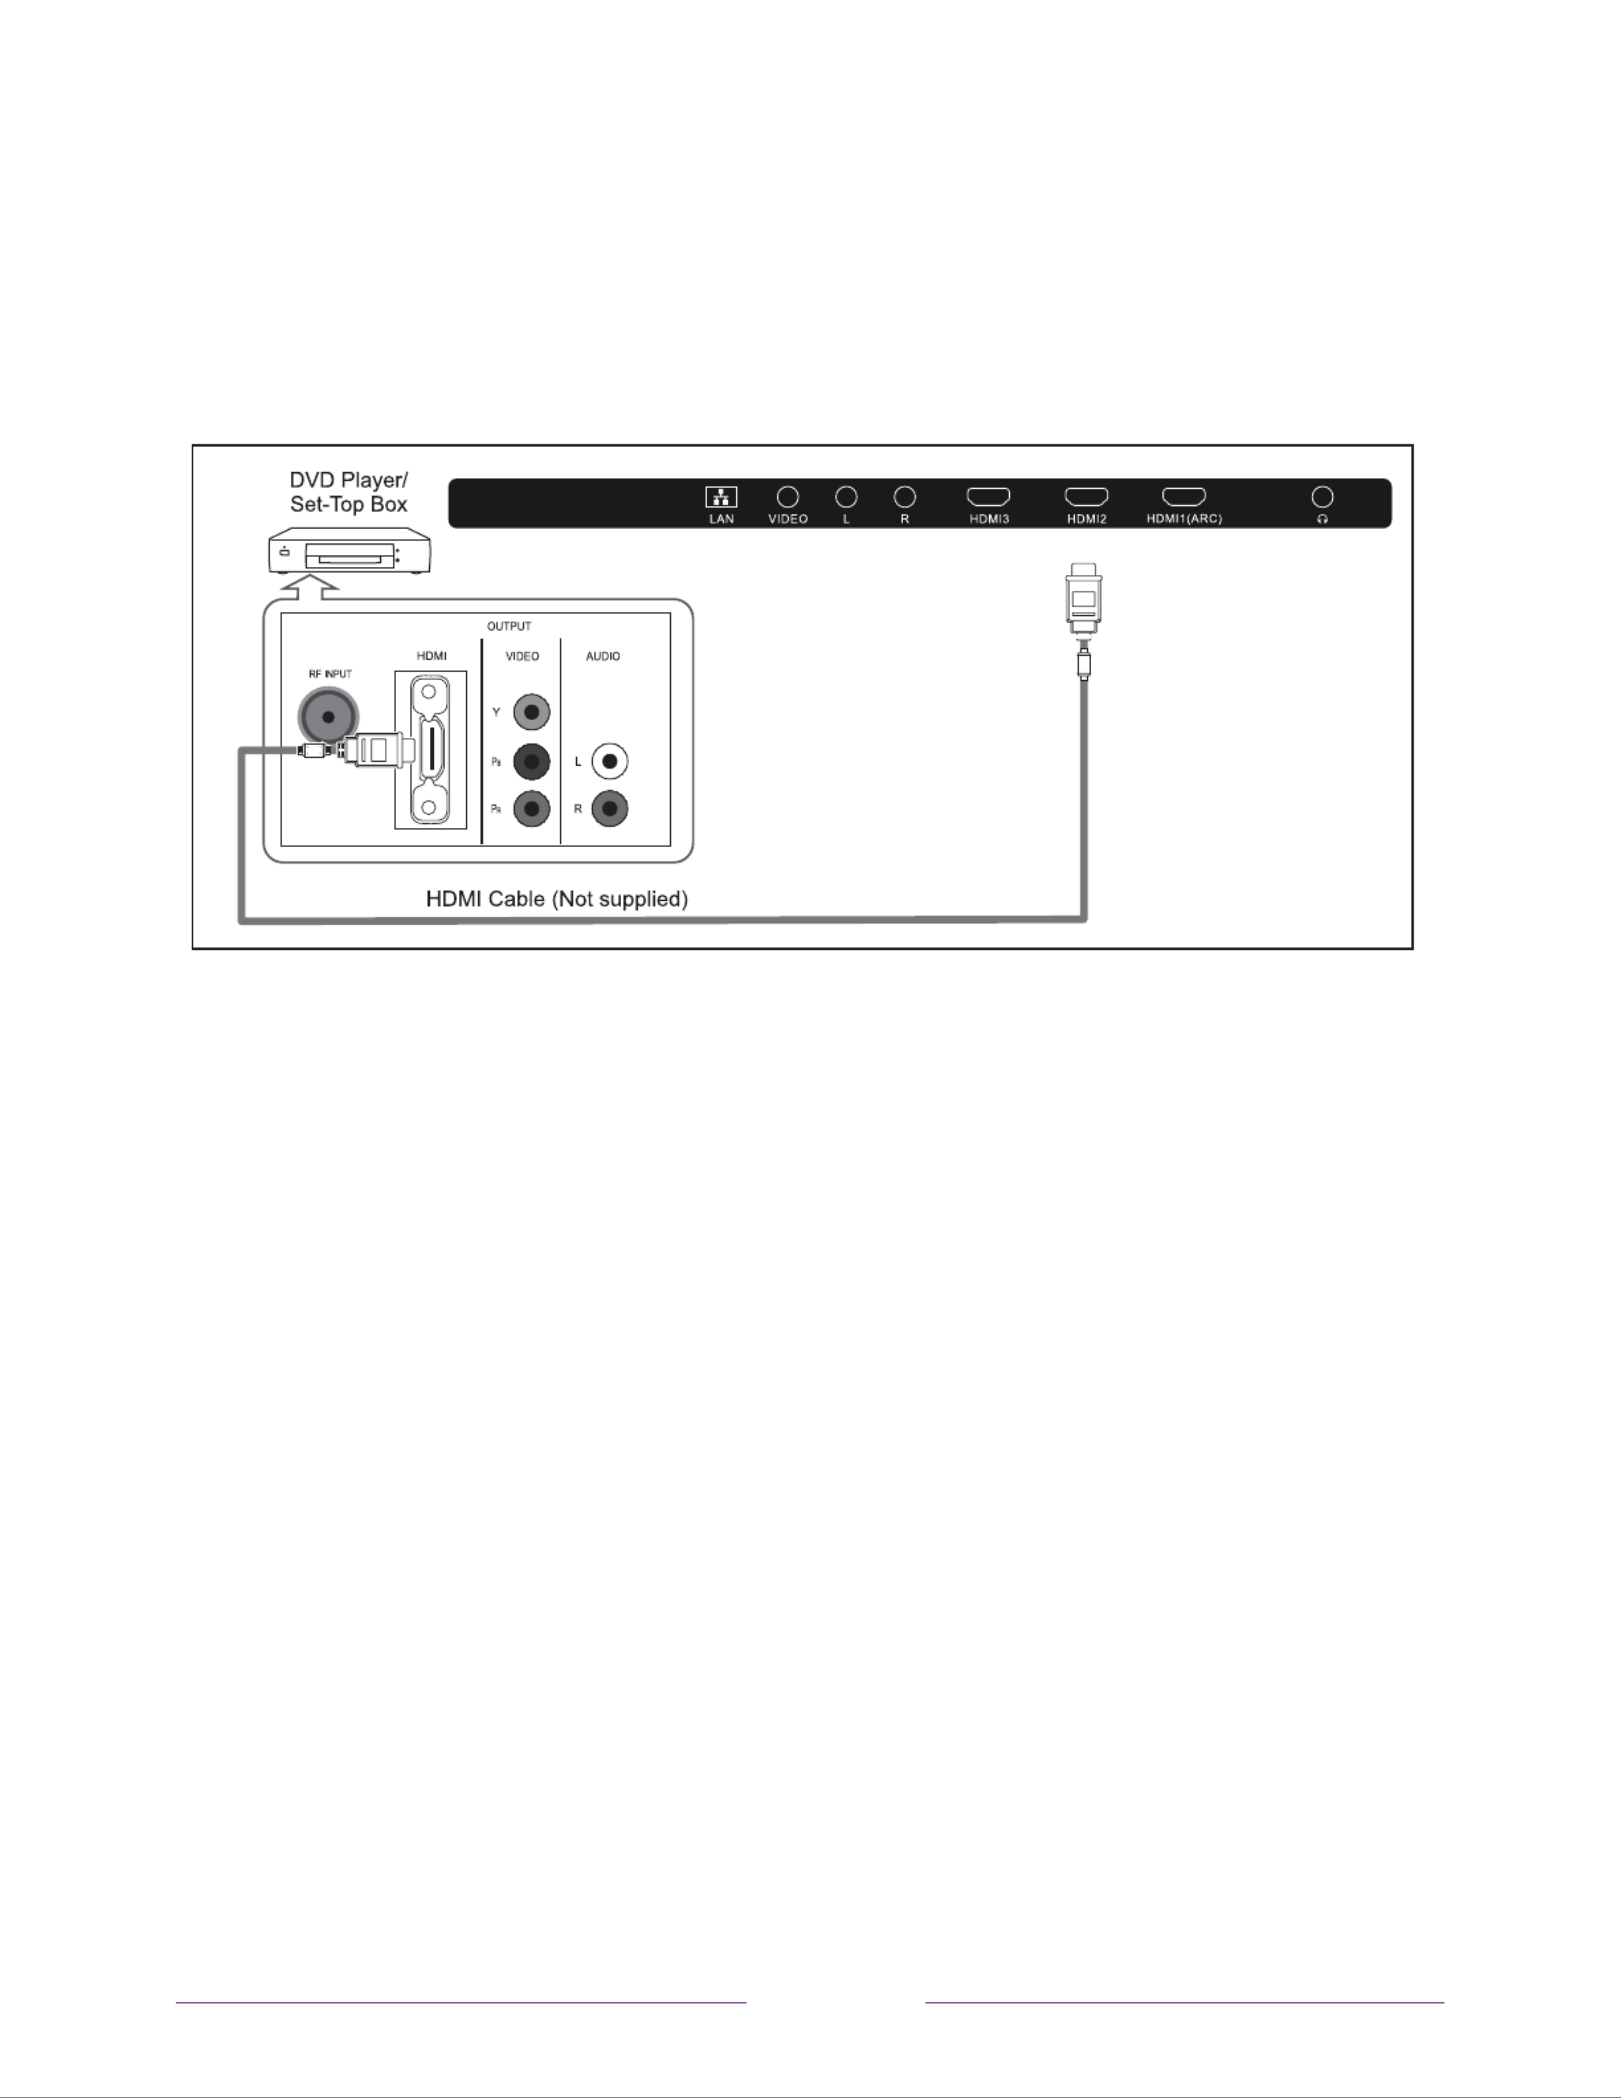
External Connection
Connecting Digital Audio System
This connection can only be made if there is a HDMI Output connector on the external device.
What is HDMI?
HDMI, or high-denition multimedia interface, is a next-generation interface that enables the transmission of
digital audio and video signals using a single cable without compression.
Multimedia interface is a more accurate name for it especially because it allows multiple channels of digital audio.
The dierence between HDMI and DVI is that the HDMI device is smaller in size, has the HDCP(High Bandwidth
Digital Copy Protection) coding feature installed, and supports multi-channel digital audio.
Each DVD player/STB has a dierent back panel conguration.
Connect an HDMI Cable between the HDMI1, HDMI2, HDMI3 connector on the TV and the HDMI connector on the
DVD player/Set-Top Box.
Notes:
1. Whenever you connect an external device to your TV, make sure that power on the unit is turned o.
2. When connecting an external device, match the color of the connection terminal to the cable.
15
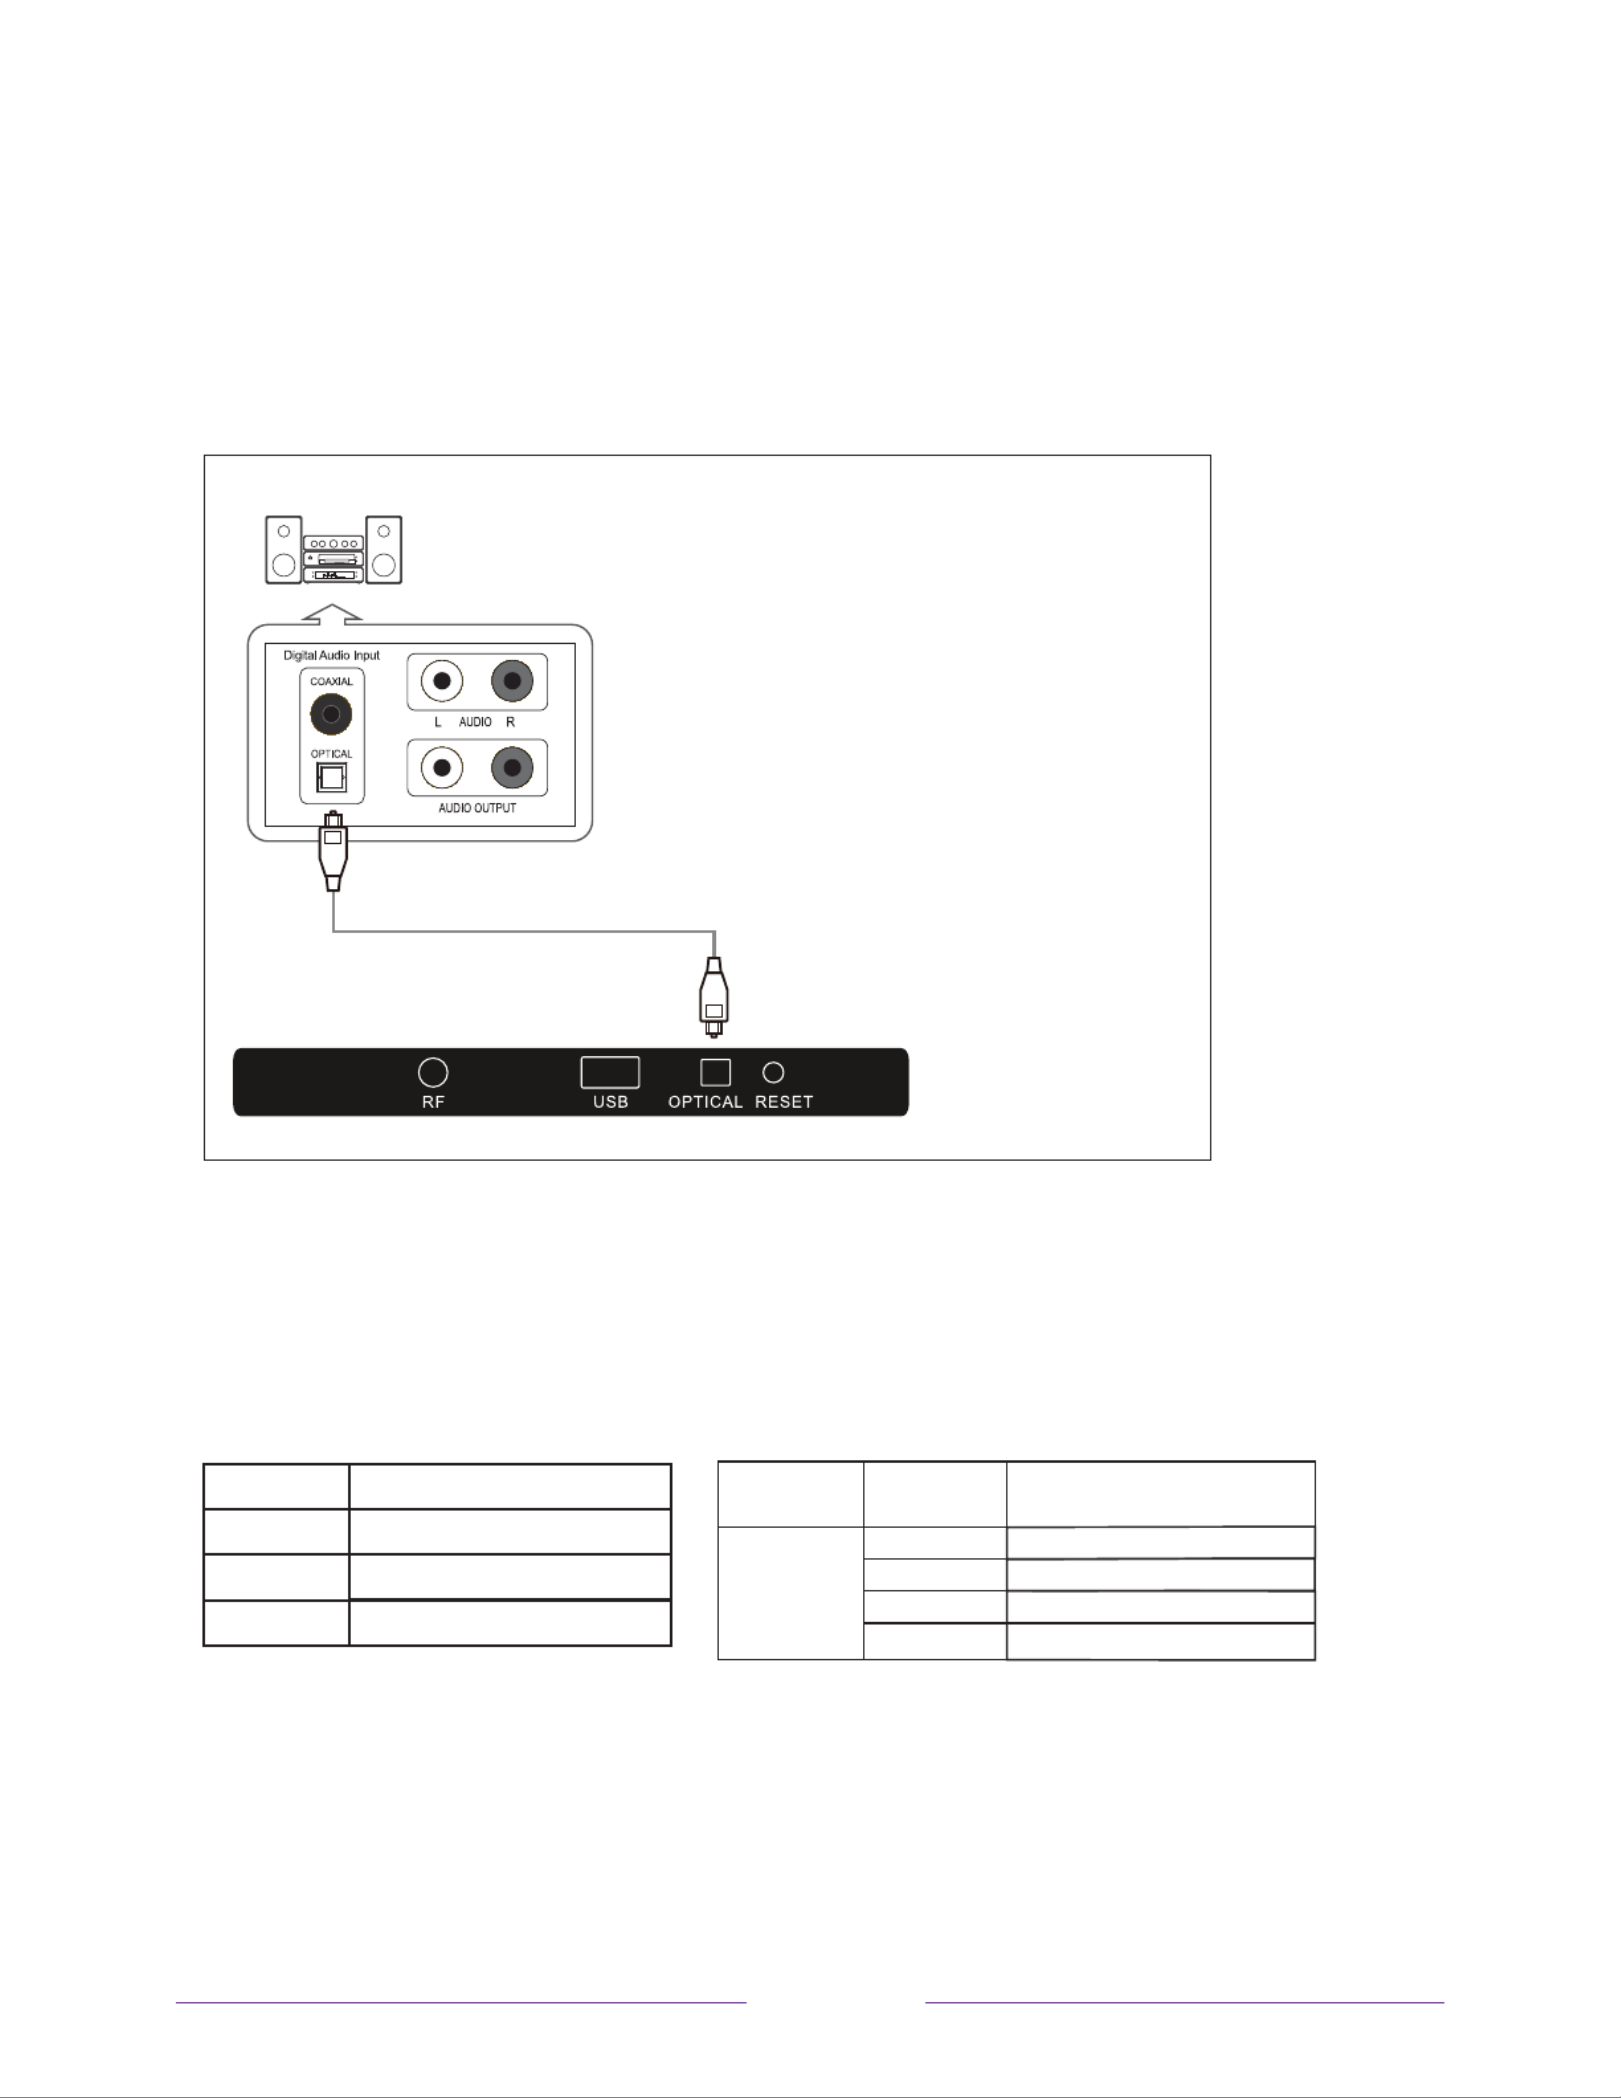
External Connection
Connecting PC
The rear panel jacks on your TV make it easy to connect a Digital Audio System to your TV.
5.1 CH audio is possible when the TV is connected to an external device supporting 5.1 CH.
Supporting Signals
Input Input Resolution Vertical
Frequency
50Hz/60Hz
50Hz/60Hz
50Hz/60Hz
720p
1080i
1080p
24Hz/25Hz/30Hz/60Hz
3840x2160
HDMI
Digital
Analog
CVBS
Mode
ATSC
NTSC
NTSC
Connect an OPTICAL Cable between the OPTICAL jacks on the TV and the Digital Audio Input jacks
on the Digital Audio System. When a Digital Audio System is connected to the OPTICAL terminal:
Decrease the gain (volume) of the tv, and adjust the volume level with the Digital Audio System’s
volume control.
AUD ece r(Not included)IO R ive
(Black)
Digital Audio System

16
Wall Mount
Instruction for Wall Mount
A wall mount kit(purchased separately) would allow you to mount your JVC TV on the wall. For
detailed information on installing the wall mount, refer to the instructions provided by the wall
mount manufacturer. It is strongly recommended to contack a technician for professional
assistance for wall mount installation. JVC is not resposible for any damage to the product or
injury to yourself or others resultint from the wall-mounting.
This JVC TV is compatible with a mounting hole pattern(43”/50”:200mm x 200mm;
55”/65”/70”: ).400mm x 200mm
- 4 pcs of type screws are required for installing the wall mount bracket to your JVC TV. Do M6
not use screws that are longer than Screws that are too long may cause damage to the 12mm.
inside of the TV set.
- Do not fasten the screws too tight for this may damage the TV or cause the TV to fall,
resulting in personal injury. JVC is not liable for these kinds of incidents.
- Do not mount your JVC TV at more than a 15 degree tilt.
- Always use two people to mount the TV to a wall.
- Do not install your Wall Mount Kit while your TV is turned on. It may result in personal injury
due to electric shock.
Dimensions for Mounting Hole Pattern

17
-
specific information about attaching the base or a wall mount and making
connections to AC power and to your other audio/video devices. The following
information applies to all Roku TV models.
Connecting an antenna, cable, or satellite box
If you are using an antenna, CATV cable without a set-top box, or a cable or satellite
box that has only an antenna output, connect a 75-ohm coaxial cable (not provided)
from the device to the ANT/CABLE input on the . TV
Tip:
If you are using an antenna with a 300 ohm twin-lead cable, you need to use a
300- -75 ohm adapter (not provided) to adapt the twin-lead cable to a connection to
that is compatible with the input.TV
Tip:
If you receive your TV stations through a set top box from a cable or satellite TV
provider, connect it to the TV using the best connection method available. From most
to least desirable:
• HDMI ® input Digital HD and SD video
• AV input analog SD video
• Antenna input analog SD video using NTSC

18
Connecting external equipment with a composite
AV video cable
If the best connection available on your device is AV or composite video output,
connect it to the using a composite AV cable (not provided). Composite AV TV
cables typically have three RCA-type plugs on each end, color coded as follows:
• Yellow Video
• Red Audio, right channel
• White or black Audio, left channel
Connect each plug to the corresponding connector on the device and on the . TV
Note:
Select models have an AV Input that looks like a headphone jack. Use the
breakout cable (included) to adapt this input to the three RCA-type plugs on your
composite cable.
Connecting external equipment with an HDMI ®
cable
If possible, connect your devices using HDMI ® cables (not provided). They help to
provide the best video quality and also carry audio signals, so that only one cable is
needed. For better picture quality, we recommend that you use cables designated as
High Speed HDMI ® Cables.
Tip:
You might need to configure the device to send its signal through its HDMI ®
connector.
The connector labeled HDMI IN (ARC) has the additional ability to use the audio
return channel to send digital audio to a receiver or sound bar, as explained in
Connecting an AV receiver or digital sound bar.

19
Connecting headphones or analog sound bar to the
TV
You can connect headphones or an analog sound bar (not provided) to the TV
headphone jack.
Tip:
Inserting a plug in the -in
speakers.
Warning:
Loud noise can damage your hearing. When using headphones, use the
lowest volume setting on your headphones that still lets you hear the sound.
Select models also have an audio line out connection that is not affected by TV
volume or mute settings and does not disable the TV speakers. Use this connection
when you want to use your amplifier or sound bar to control the TV volume. To turn
s built-in speakers, in the Home screen menu, navigate to Settings > Audio
> TV speakers and change the setting.
Connecting headphones to the Roku Enhanced
Voice Remote
Select Roku TVs come with the Roku Enhanced Voice Remote. On these models, you
can connect headphones to the jack on the left side of the remote.
Tip:
Inserting a plug in the remote
built-in speakers or attached receiver or sound bar. The volume and mute controls on
the right side of the remote adjust the volume level of the connected headphones.
Warning:
Loud noise can damage your hearing. When using headphones, use the
lowest volume setting on your headphones that still lets you hear the sound. You
might notice that connecting headphones to your remote shortens the
battery life somewhat.

21
AC power
Plug your into a power outlet. You can tell that the TV has power because the TV
status indicator lights up when the TV is off .
The topic Status indicator explains how the status indicator shows what is happening
with the TV.
Roku remote batteries
Open the back of your Roku remote and insert the included batteries, observing the
proper orientation as indicated in the battery compartment. Reattach the back cover.
Roku TV remote
Use the following information to identify the buttons on your Roku remote.
Note:
Certain remote buttons and features vary by model. Your remote might not
have all buttons or features listed.
•
If your remote has a microphone button just below the purple pad, then you
have a Roku Voice Remote.
•
If your remote has a headphone jack on its left edge, then you have a Roku
Enhanced Voice Remote.

22
The Roku voice remotes have additional capabilities as described in the following
table.
BUTTON FUNCTION DESCRIPTION
POWER Turns TV on and off.
BACK • Menu: Goes back to previous menu/screen.
• Home screen tile: Moves highlight back to the Home
screen option.
• Watching Antenna TV or a TV input: Returns to
Home screen.
• Playing streaming content: Stops playing stream
and returns to the previous menu or screen.
• Browsing streaming content: Goes to the previous
level in the content tree.
HOME Immediately returns to the Home screen.
PAD • LEFT/RIGHT/UP/DOWN moves the highlight in the
corresponding direction.
• OK selects the highlighted option.
While watching TV:
• UP/DOWN changes channel.
• LEFT displays the Smart Guide (connected mode)
or channel list (non-connected mode).
• LEFT/RIGHT
only on TVs operating in non-
connected mode
, while in the channel list switches
between All Channels and FAVORITE CHANNEL s.
• OK while in the channel list selects the highlighted
channel.
While watching live TV: displays the program
information banner.

23
BUTTON FUNCTION DESCRIPTION
or
VOICE SEARCH
and VOICE
COMMANDS
Only in the United States on select models with Roku
voice remotes
. Hold and say the name of a movie, TV
show, actor, or director to search across many
streaming and Antenna channels Say a command to TV .
start streaming, change a channel, and more. For more
information, go to:
go.roku.com/voicesearch
GAME MODE
Select models
. Displays a banner showing the current
Game mode or . Subsequent Not available at this time
presses toggle Game mode. When , the TV performs On
less image processing and has less input lag, producing
a better experience with action games.
Available only
for HDMI and AV inputs.
INSTANT REPLAY
Select models
. Streaming programs that support this
feature and Antenna channels: if Live TV Pause is TV
enabled, jumps back a few seconds with each press and
resumes playing.
Broadcast TV: I Live TV Pause is disabled, jumps to f
previous channel.
When using an on-screen keyboard: Backspaces in the
text you are entering.
Smart Guide: Returns to the current day and time.
SLEEP
Select models
. Displays a banner showing the remaining
sleep time, if any, or . Subsequent Sleep timer is off
presses cycle among the preset sleep time intervals.
Once set, the sleep timer remains in effect regardless of
what you are watching.
MEDIA PLAYBACK
CONTROLS
Rewind, pause, play, and fast forward streaming content
and Antenna TV channels (if Live TV Pause is enabled).
Press or one, two, or three REWIND FAST FORWARD
times to control the speed of the operation.
REWIND FAST FORWARD and also jump backward and
forward one page at a time when viewing long lists, such
as when you are browsing Antenna TV shows in the
channel list or Smart Guide (U.S. only).

24
BUTTON FUNCTION DESCRIPTION
OPTIONS Displays additional options when available. -screen On
hints let you know when this button is active.
or
PRESET
CHANNEL
SHORTCUT
Dedicated buttons show the logo of a preset streaming
content provider. Dedicated content providers vary by
model and region. Pressing a button:
•
have already added the channel to your Home
screen.
• -up page if
you have not already added the channel.
VOLUME/MUTE Located on the right edge of the remote.
Increases/decreases volume and mutes the TV sound.
Note:
If the TV is muted, pressing VOLUME UP
unmutes. Pressing does not unmute VOLUME DOWN
the sound.
HEADPHONE
Select models with Roku Enhanced Voice Remote
.
Connect headphones to the jack on the left edge of the
remote to listen privately. Plugging in headphones
mutes the TV speakers.

25
Panel buttons
Your TV has a set of panel buttons that perform simple control functions. The TV
panel buttons are not a substitute for the remote, as they do not give you access to
all TV functions.
Depending on model, your TV model has one of several different panel button
designs. Choose the one that applies to your TV from the following list:
• Single button
• Three buttons
• Game-pad style joystick
• Four buttons
• Five buttons (with mute)
• Five buttons (without mute)
• Seven buttons
Single button
If your TV has this style of panel button, you can perform the following functions:
• Turn TV on: short press.
• Display the Input List: short press when TV is on.
• Select the next input in the Input List: short press while the TV is showing the
Input List.
• Dismiss the Input List without changing inputs: no press.
• Turn TV off: long press.
Short press = less than two seconds
Long press = more than two seconds
No press: = no press within two seconds

26
Three buttons
If your TV has this style of panel buttons, you can perform the following functions:
• Turn TV on: middle button, short or long press.
• Volume up: right button when Input List is not active.
• Volume down: left button when Input List is not active.
• Display Input List: middle button, short press when TV is on.
• Highlight next input in the Input List: right button when Input List is active.
• Highlight previous input in the Input List: left button when Input List is active.
• Select highlighted item in the Input List: middle button, short press, or no
press.
• Turn TV off: middle button, long press.
Short press = less than two seconds
Long press = more than two seconds
No press: = no press within four seconds
Game-pad style joystick
If your TV has this style of panel button, you can perform the following
functions:
• Press in: Toggle between power ON and Standby.
• Press up or down: Increase/decrease the volume.
• Press left or right: Switch inputs. Each press moves the highlight up or down
one item. Pausing for a few moments selects the highlighted item.
Four buttons
If your TV has this style of panel buttons, you can perform the following functions:
• Power: Turns the power on and off.
• Input: Selects among TV inputs. Each press moves down one item. Pausing for
a few moments selects the highlighted item.
• Volume +: Increases the volume.
• Volume : Decreases the volume.
27
Five buttons (with mute)
If your TV has this style of panel buttons, you can perform the following functions.
Note that the order of the buttons might vary from model to model. Examine the
• Power: Turns the power on and off.
• Input: Selects among TV inputs. Each press moves down one item. Pausing for
a few moments selects the highlighted item.
• Volume +: Increases the volume.
• Volume : Decreases the volume.
• Mute: Mutes and unmutes the sound.
Five buttons (without mute)
If your TV has this style of panel buttons, you can perform the following functions.
Note that the order of the buttons might vary from model to model. Examine the
• Power: Turns the power on and off.
• Input +: Selects the next TV input. Each press moves down one item. Pausing
for a few moments selects the highlighted item.
• Input -: Selects the previous TV input. Each press moves up one item. Pausing
for a few moments selects the highlighted item.
• Volume +: Increases the volume.
• Volume : Decreases the volume.
29
Guided Setup
With the pr your . As the TV starts for TV
the first time, it leads you through Guided Setup, which configures the TV before you
start to use it.
:
• Answer a few questions
• Provide network connection information
• Get a software update
• Link your TV to your Roku account.
• Connect devices such as a DVD player, game console, or cable box.
Starting Guided Setup
To start Guided Setup, press the button on the remote to turn on your POWER TV.
Note:
Guided Setup normally runs only once, the first time you turn on your TV. If you
Factory reset everything.
When you first turn on your TV, it will take a few seconds to get itself ready. Y
notice the following things happening:
1. The status indicator blinks every time the TV is busy doing something; in this
2. The power-on screen appears and the status indicator blinks slowly for a few
more seconds. The power-on screen shows a brand logo while the TV starts up.
3. After a few seconds, Guided Setup starts.

30
Completing Guided Setup
Follow these steps to complete Guided Setup. At this point, you should be seeing the
Language screen.
1.
Only on models that have Roku voice remotea
: A few moments after the
get started screen appears, Guided Setup starts the pairing process for the
voice remote. you have this type of remote because it will have
microphone or search button just below the down arrow on the purple pad If .)
the voice remote does not pair automatically, follow the instructions on the
screen to complete the pairing process.
Tip:
On TVs sold in the United States, if you are blind or visually impaired, you
can activate Audio Guide, a text- -speech screen reader to help you navigate to
button
on the remote four times in rapid succession. Repeat to disable Audio Guide.
(The
button is located directly below the directional pad on the right side of
the Roku remote.)
Note:
If you enabled Audio Guide, choosing any language other than English
disables . it
2. Press the DOWN arrow on the remote to highlight your preferred language,
and then press or the arrow. OK RIGHT

36
9.
Only if your TV cannot get the correct time zone and current time from your
network service provider
: Use the and arrows to highlight your time UP DOWN
zone, and then press . OK
Tip:
Your TV needs to know the local time zone so that it can correctly display
information about the program you are currently watching. If the TV is unable
to automatically determine the local time zone, it prompts you to choose your
time zone from a list.
As soon as the TV is able to connect to the Internet, it downloads and installs
its first software update, and then restarts.
Tip:
Your automatically checks for updates periodically. These updates TV
provide new features and improve your overall experience with the TV. After
an update, you might notice that some Options have moved, and that there are
new options or features. This User Guide describes version 8.0. To determine
your current Roku TV software version, go to
Settings > System > About
after
you complete Guided Setup. You can download an updated User Guide that
matches your Roku TV software version from the Roku TV web site.
Specyfikacje produktu
| Marka: | JVC |
| Kategoria: | Telewizja |
| Model: | LT-70MAW795 |
Potrzebujesz pomocy?
Jeśli potrzebujesz pomocy z JVC LT-70MAW795, zadaj pytanie poniżej, a inni użytkownicy Ci odpowiedzą
Instrukcje Telewizja JVC

18 Stycznia 2025
18 Stycznia 2025
17 Stycznia 2025
17 Stycznia 2025
11 Stycznia 2025
3 Października 2024
2 Października 2024
30 Września 2024
24 Września 2024
24 Września 2024
Instrukcje Telewizja
- Telewizja Sony
- Telewizja Yamaha
- Telewizja Samsung
- Telewizja Electrolux
- Telewizja AEG
- Telewizja Beko
- Telewizja LG
- Telewizja Küppersbusch
- Telewizja Xiaomi
- Telewizja Sharp
- Telewizja TCL
- Telewizja Pioneer
- Telewizja Lenovo
- Telewizja Philips
- Telewizja SilverCrest
- Telewizja Acer
- Telewizja Nokia
- Telewizja Hisense
- Telewizja Infiniton
- Telewizja Panasonic
- Telewizja Muse
- Telewizja Viewsonic
- Telewizja Nedis
- Telewizja AG Neovo
- Telewizja Medion
- Telewizja OK
- Telewizja Lenco
- Telewizja Polar
- Telewizja Marquant
- Telewizja Toshiba
- Telewizja Tesla
- Telewizja Westinghouse
- Telewizja Majestic
- Telewizja Jensen
- Telewizja ILive
- Telewizja Blaupunkt
- Telewizja Brandt
- Telewizja Vivax
- Telewizja Terris
- Telewizja Salora
- Telewizja Siemens
- Telewizja Teac
- Telewizja Casio
- Telewizja Iiyama
- Telewizja Citizen
- Telewizja Dual
- Telewizja Grundig
- Telewizja Haier
- Telewizja Soundmaster
- Telewizja Hyundai
- Telewizja Manhattan
- Telewizja Strong
- Telewizja ECG
- Telewizja Oyster
- Telewizja Icy Box
- Telewizja Bang & Olufsen
- Telewizja V7
- Telewizja Dell
- Telewizja Furrion
- Telewizja Funai
- Telewizja Oppo
- Telewizja TechniSat
- Telewizja Schneider
- Telewizja Krüger&Matz
- Telewizja Philco
- Telewizja CHiQ
- Telewizja Qilive
- Telewizja Uniden
- Telewizja Thomson
- Telewizja Ferguson
- Telewizja Wharfedale
- Telewizja Manta
- Telewizja Pyle
- Telewizja Cecotec
- Telewizja Marantz
- Telewizja AOC
- Telewizja Monster
- Telewizja Peerless-AV
- Telewizja Caratec
- Telewizja Nevir
- Telewizja Mitsubishi
- Telewizja Arçelik
- Telewizja Continental Edison
- Telewizja GoGen
- Telewizja Intenso
- Telewizja NEC
- Telewizja Polaroid
- Telewizja Aiwa
- Telewizja AKAI
- Telewizja Sanyo
- Telewizja Clatronic
- Telewizja Telefunken
- Telewizja Optoma
- Telewizja SVAN
- Telewizja Innoliving
- Telewizja Abus
- Telewizja Jay-Tech
- Telewizja Bush
- Telewizja Loewe
- Telewizja Kemo
- Telewizja VOX
- Telewizja Insignia
- Telewizja AYA
- Telewizja Element
- Telewizja Orima
- Telewizja Denver
- Telewizja Kernau
- Telewizja Aspes
- Telewizja Albrecht
- Telewizja Orion
- Telewizja Hitachi
- Telewizja Technika
- Telewizja Seiki
- Telewizja SereneLife
- Telewizja RCA
- Telewizja MBM
- Telewizja BenQ
- Telewizja Trevi
- Telewizja Lexibook
- Telewizja GPX
- Telewizja Sencor
- Telewizja Odys
- Telewizja Nabo
- Telewizja Nextbase
- Telewizja Zenith
- Telewizja Daewoo
- Telewizja Allview
- Telewizja Metz
- Telewizja Kunft
- Telewizja Grunkel
- Telewizja Alphatronics
- Telewizja XD Enjoy
- Telewizja RevolutionHD
- Telewizja FFalcon
- Telewizja Dyon
- Telewizja Reflexion
- Telewizja Megasat
- Telewizja Sogo
- Telewizja Proline
- Telewizja Finlux
- Telewizja Alden
- Telewizja Aldi
- Telewizja Airis
- Telewizja Aristona
- Telewizja Apex
- Telewizja Ziggo
- Telewizja Techwood
- Telewizja Walker
- Telewizja Saba
- Telewizja Antarion
- Telewizja Tevion
- Telewizja Proscan
- Telewizja Vestel
- Telewizja Tucson
- Telewizja Energy Sistem
- Telewizja Sagem
- Telewizja Sunstech
- Telewizja Sylvania
- Telewizja Sunny
- Telewizja Luxor
- Telewizja Nordmende
- Telewizja AudioAffairs
- Telewizja Magnum
- Telewizja Audiosonic
- Telewizja Kubo
- Telewizja Coby
- Telewizja Seg
- Telewizja Vivo
- Telewizja Daitsu
- Telewizja Changhong
- Telewizja Alba
- Telewizja Naxa
- Telewizja Star-Light
- Telewizja Fantec
- Telewizja Mpman
- Telewizja Sweex
- Telewizja Vizio
- Telewizja Cello
- Telewizja Mx Onda
- Telewizja Nikkei
- Telewizja Peaq
- Telewizja Hannspree
- Telewizja DGM
- Telewizja Yasin
- Telewizja Roadstar
- Telewizja Humax
- Telewizja MT Logic
- Telewizja Superior
- Telewizja Difrnce
- Telewizja ITT
- Telewizja Avtex
- Telewizja Inovia
- Telewizja Lin
- Telewizja Aconatic
- Telewizja NPG
- Telewizja Bluesky
- Telewizja Videocon
- Telewizja Xoro
- Telewizja Durabase
- Telewizja HKC
- Telewizja Edenwood
- Telewizja Woxter
- Telewizja Premier
- Telewizja Onn
- Telewizja Teleco
- Telewizja Packard Bell
- Telewizja Opera
- Telewizja LTC
- Telewizja JTC
- Telewizja Zalman
- Telewizja Horizon
- Telewizja United
- Telewizja SYLVOX
- Telewizja Doffler
- Telewizja FOX Electronics
- Telewizja Viewpia
- Telewizja XS4ALL
- Telewizja JGC
- Telewizja Online
- Telewizja DirecTV
- Telewizja Tele 2
- Telewizja Graetz
- Telewizja Kogan
- Telewizja Telesystem
- Telewizja EKO
- Telewizja E-motion
- Telewizja Mitsai
- Telewizja Selfsat
- Telewizja High One
- Telewizja Tve
- Telewizja ISymphony
- Telewizja Pantel
- Telewizja Magnavox
- Telewizja ATYME
- Telewizja HCI
- Telewizja Inno-Hit
- Telewizja Engel
- Telewizja Bang Olufsen
- Telewizja TechLine
- Telewizja Elements
- Telewizja Digihome
- Telewizja Englaon
- Telewizja Time
- Telewizja Reflex
- Telewizja Astar
- Telewizja Visco
- Telewizja Tivax
- Telewizja H&B
- Telewizja Norcent
- Telewizja TELE System
- Telewizja TIM
- Telewizja Belson
- Telewizja Vision Plus
- Telewizja Sbr
- Telewizja Bauhn
- Telewizja Voxx
- Telewizja Rm 2000
- Telewizja Hoher
- Telewizja Felson
- Telewizja Mach Power
- Telewizja Elbe
- Telewizja Axing
- Telewizja CGV
- Telewizja Smart Tech
- Telewizja Séura
- Telewizja Mitzu
- Telewizja JTC24
- Telewizja Coocaa
- Telewizja Kivi
- Telewizja Smart Brand
- Telewizja Mystery
- Telewizja Linsar
Najnowsze instrukcje dla Telewizja

9 Kwietnia 2025

9 Kwietnia 2025

9 Kwietnia 2025
9 Kwietnia 2025
9 Kwietnia 2025
9 Kwietnia 2025
9 Kwietnia 2025

9 Kwietnia 2025
9 Kwietnia 2025
9 Kwietnia 2025