Instrukcja obsługi JVC kd-sh9101
JVC
Radia samochodowe
kd-sh9101
Przeczytaj poniżej 📖 instrukcję obsługi w języku polskim dla JVC kd-sh9101 (299 stron) w kategorii Radia samochodowe. Ta instrukcja była pomocna dla 9 osób i została oceniona przez 2 użytkowników na średnio 4.5 gwiazdek
Strona 1/299

ENGLISH
DEUTSCH
FRANÇAIS
LVT1005-001B
[E/EX]
INSTRUCTIONS
BEDIENUNGSANLEITUNG
MANUEL D’INSTRUCTIONS
GEBRUIKSAANWIJZING
NEDERLANDS
CD RECEIVER
CD-RECEIVER
RECEPTEUR CD
CD-RECEIVER
KD-SH9104/KD-SH9103/
KD-SH9102/KD-SH9101
For installation and connections, refer to the separate manual.
Angaben zu Einbau und Verkabelung entnehmen Sie bitte der gesonderten Anleitung.
Pour l’installation et les raccordements, se référer au manuel séparé.
Zie de afzonderlijke handleiding voor details aangaande het installeren en verbinden van het
toestel.
This unit is equipped with the display demonstration. To cancel it, see page 8.
Dieses Gerät ist mit einer Demonstrationsfunktion für das Display ausgestattet. Auf
Seite 8 wird beschrieben, wie Sie diese Demonstrationsfunktion deaktivieren können.
Cet appareil est équipé d’une démonstration des affichages. Pour l’annuler, référez-
vous à la page 8.
Dit toestel heeft een display-demonstratiefunctie. Zie bladzijde 8 voor het annuleren
van deze functie.
Detachable
ANGLE
RM-RK100
CD
FM
AM
CH
AUX SEL
VOLUME
R D
ATT
DAB
DISC
PRESET PRESET
DISC
EQ
KD-SH9101
MOSFET
3456 M21
D
SRC
DISP
ATT
SEL
T/P
MODE
COVER_SH9104[E_EX]f.p65 6/15/03, 10:12 PM3

2
ENGLISH
BEFORE USE
*
For safety....
• Do not raise the volume level too much, as this will
block outside sounds, making driving dangerous.
• Stop the car before performing any complicated
operations.
*
Temperature inside the car....
If you have parked the car for a long time in hot or
cold weather, wait until the temperature in the car
becomes normal before operating the unit.
How to reset your unit
Press the reset button on the control panel using a
ball-point pen or similar tool.
This will reset the built-in
microcomputer.
Note:
Your preset adjustments—such as
preset channels or sound
adjustments—will also be erased.
CAUTION:
NEVER insert
your finger in
between the
control panel and
the unit, as it may get
caught or hurt.
(See page 52.)
56 M
T/P
MODE
Note:
For security reasons, a numbered ID card is provided with this unit, and the same ID number is imprinted on
the unit’s chassis. Keep the card in a safe place, as it will help the authorities to identify your unit if stolen.
Position And Reproduction Of Labels
Name/Rating plate
Bottom panel of the main unit
IMPORTANT FOR LASER PRODUCTS
Precautions:
1.CLASS 1 LASER PRODUCT
2.CAUTION: Invisible laser radiation when open and
interlock failed or defeated. Avoid direct exposure to
beam.
3.CAUTION: Do not open the top cover. There are no
user-serviceable parts inside. Leave all servicing to
qualified service personnel.
4.CAUTION: This CD player uses invisible laser radiation
and is equipped with safety switches to prevent
radiation emission when unloading CDs. It is dangerous
to defeat the safety switches.
5.CAUTION: Use of controls, adjustments or performance
of procedures other than those specified herein may
result in hazardous radiation exposure.
Caution:
This product contains a laser component
of higher laser class than Class 1.
CLASS
LASER
1
PRODUCT
CAUTION: Invisible laser
radiation when open and
interlock failed or defeated.
AVOID DIRECT EXPOSURE
TO BEAM. (e)
ADVARSEL: Usynlig laser-
stråling ved åbning, når
sikkerhedsafbrydere er ude
af funktion. Undgåudsæt-
telse for stråling. (d)
VARNING: Osynlig laser-
strålning när denna del är
öppnad och spärren är
urkopplad. Betrakta ej
strålen. (s)
VARO: Avattaessa ja
suojalukitus ohitettaessa
olet alttiina näkymättö-
mälle lasersäteilylle.
Älä katso säteeseen. (f)
EN02-06SH9101[E_EX]f.p65 03.2.27, 22:482

3
ENGLISH
CONTENTS
Thank you for purchasing a JVC product. Please read all instructions carefully before operation,
to ensure your complete understanding and to obtain the best possible performance from the unit.
How to reset your unit .............................. 2
LOCATION OF THE BUTTONS ........... 4
Control panel ............................................ 4
Remote controller ..................................... 5
Preparing the remote controller ................ 6
BASIC OPERATIONS ...................... 7
Turning on the power ............................... 7
Canceling the display demonstration ....... 8
Setting the clock ....................................... 8
Selecting the level meter .......................... 9
RADIO OPERATIONS ..................... 10
Listening to the radio ................................ 10
Storing stations in memory ...................... 12
Tuning in to a preset station ..................... 13
Changing the display pattern ................... 14
RDS OPERATIONS ........................ 15
What you can do with RDS ...................... 15
Other convenient RDS functions and
adjustments ........................................... 20
CD OPERATIONS .......................... 22
About MP3 and WMA discs ..................... 22
Playing a disc ........................................... 22
Locating a particular portion on a track ..... 24
Locating a track on a disc ........................ 25
Locating a folder on a disc ....................... 26
Selecting a folder and a track using the
name lists .............................................. 28
Selecting playback modes ....................... 29
Prohibiting disc ejection ........................... 30
Changing the display pattern ................... 31
DSP OPERATIONS ........................ 32
Selecting the DSP modes ........................ 32
EQUALIZER OPERATIONS ............... 35
Selecting preset sound modes
(iEQ: intelligent equalizer) ..................... 35
Storing your own sound modes ............... 36
CAUTION on Volume Setting:
Discs produce very little noise compared with
other sources. If the volume level is adjusted for
the tuner, for example, the speakers may be
damaged by the sudden increase in the output
level. Therefore, lower the volume before playing a
disc and adjust it as required during playback.
SOUND ADJUSTMENTS .................. 37
Performing the basic sound settings ........ 37
GRAPHIC DISPLAYS ...................... 39
Downloading images and animations ...... 40
Deleting unwanted files ............................ 42
Activating the downloaded images and
animations ............................................. 44
OTHER MAIN FUNCTIONS ............... 46
Changing the general settings (PSM) ...... 46
Selecting the dimmer mode ..................... 50
Assigning names to the sources .............. 51
Changing the control panel angle ............ 52
Detaching the control panel ..................... 53
CD CHANGER OPERATIONS ............. 54
Playing discs ............................................ 54
Locating a folder on a disc ....................... 57
Selecting a disc/folder/track using
the name lists ........................................ 58
Selecting playback modes ....................... 59
EXTERNAL COMPONENT OPERATIONS .... 61
Playing an external component ................ 61
DAB TUNER OPERATIONS ............... 62
Tuning in to an ensemble and one of the
services ................................................. 62
Storing DAB services in memory ............. 64
Tuning in to a preset DAB service ........... 64
What you can do more with DAB ............. 66
Changing the display pattern ................... 70
ADDITIONAL INFORMATION ............ 71
TROUBLESHOOTING ..................... 72
MAINTENANCE ............................ 74
Handling discs .......................................... 74
SPECIFICATIONS .......................... 75
Caution:
If the temperature inside the car is below 0°C, the
movement of animation and text scroll will be
halted on the display to prevent the display from
being blurred. (LOW TEMP.) indicator
appears on the display.
When the temperature increases, and the operating
temperature is resumed, these functions will start
working again.
EN02-06SH9101[E_EX]f.p65 03.2.27, 22:483

4
ENGLISH
LOCATION OF THE BUTTONS
Control panel
1SRC (source) button
2DISP (D) (display) button
35 (up) button
4 4/¢ buttons
5Display window
6•0 (eject) button
• (angle) button
7T/P (traffic programme/programme type)
button
Illumination Navigation for easy operations:
If you use MODE (M) or SEL (select), the display and some controls (such as the number buttons,
4/¢ , 5 / ∞, and control dial) enter the corresponding control mode, then the controls
start flashing to lead you to the next operational steps. (Illumination Navigation)
• The display show how these buttons function during this period.
Ex. When you press number button 1 after pressing MODE (M), to operate the FM tuner.
To use these controls for original functions again, wait until the controls stop flashing without
using these controls.
• Pressing MODE (M) again also restores original functions. However, pressing SEL (select)
makes the unit into a different mode.
3456 M21
D
SRC
DISP
ATT
SEL
T/P
MODE
1 2 3 6
57
89 q er t
pw
4
8• (standby/on/attenuator) button
•Control dial
9Remote sensor
p∞ (down) button
qSEL (select) button
wNumber buttons
eMODE (M) button
r (control panel release) button
tReset button
M
MODE
Time countdown indicator
Appear only when selecting
the FM band
345621
EN02-06SH9101[E_EX]f.p65 03.2.27, 22:484

5
ENGLISH
Remote controller
1•Turns on the unit if pressed when the unit is
turned off.
•Turns off the unit if pressed and held for a
few seconds.
•Drops the volume level in a moment if
pressed briefly.
Press again to resume the volume.
2Changes the angle of the control panel to four
positions.
3Skips to the root while listening to an MP3
disc.
4•CD: Selects CD player.
•FM/DAB:
–Selects FM tuner if pressed briefly.
Each time you press the button, FM band
(FM1, FM2 and FM3) changes.
–Selects DAB tuner if pressed and held.*1
Each time you press and hold the button,
DAB band (DAB1, DAB2 and DAB3)
changes.
•AM: Selects AM tuner.
•CH: Selects CD changer.*1
•AUX: Selects the external component
(LINE IN).*2
5 *3•Changes the volume.
6Selects the sound (iEQ) mode.
Each time you press the button, the sound
(iEQ) mode changes.
7•Searches stations while listening to the
radio.
•Selects ensembles while listening to the
DAB tuner.
•Fast-forwards or reverses the track if
pressed and held while listening to a disc.
•Skips to the beginning of the next track or
goes back to the beginning of the current (or
previous) tracks if pressed briefly while
listening to a disc.
8•Selects services while listening to the DAB
tuner.
•Changes the disc number while listening to
the CD changer. Each time you press and
hold the button, the disc number changes,
and the selected disc starts playing.
•Skips to the first track of a folder on a higher
hierarchy level or on a lower hierarchy level
if pressed briefly while listening to an MP3
or a WMA disc. (This does not function for
WMA discs on the MP3-compatible CD
changer).
•Adjusts the fader level on the fader/balance
adjustment screen.
9•Changes the preset channel number while
listening to the radio (or the DAB tuner).
Each time you press the button, the preset
channel number changes, and the selected
station (or service) is tuned in.
•Skips to the first track of the next folder or
the first track of the previous folder if
pressed and held while listening to an MP3
or a WMA disc.
•Skips to the first track of the next folder or
the first track of the previous folder on the
same hierarchy level if pressed briefly while
listening to an MP3 or a WMA disc. (This
does not function for WMA discs on the
MP3-compatible CD changer).
•Adjusts the balance level on the fader/
balance adjustment screen.
p *3Turns on or off the fader/balance adjustment
screen. Then you can adjust them using the
buttons explained above (8 and 9).
*1Without connecting the DAB tuner or CD
changer, you cannot select it as the source to
play.
*2If the “Line In” setting is changed to “Off,” you
cannot select “LINE IN” (see pages 48 and 49).
*3These buttons do not function in the preferred
setting mode (PSM) adjustment.
ANGLE
RM-RK100
CD
FM
AM
CH
AUX SEL
VOLUME
R D
ATT
DAB
DISC
PRESET PRESET
DISC
EQ
6
7
8
9
p
1
2
3
4
5
EN02-06SH9101[E_EX]f.p65 03.2.27, 22:485

6
ENGLISH
Preparing the remote controller
Before using the remote controller:
•Aim the remote controller directly at the remote
sensor on the main unit. Make sure there is no
obstacle in between.
•Do not expose the remote sensor to strong light
(direct sunlight or artificial lighting).
Installing the battery
When the controllable range or effectiveness of the
remote controller decreases, replace the battery.
1. Remove the battery holder.
1) Push out the battery holder in the direction
indicated by the arrow using a ball-point
pen or a similar tool.
2) Remove the battery holder.
2. Place the battery.
Slide the battery into the holder with the + side
facing upwards so that the battery is fixed in
the holder.
3. Return the battery holder.
Insert again the battery holder pushing it until
you hear a clicking sound.
(back side)
Lithium coin battery
(product number:
CR2025)
(back side)
Remote sensor
WARNING:
• Store the battery in a place where children cannot
reach.
If a child accidentally swallows the battery,
consult a doctor immediately.
• Do not recharge, short, disassemble or heat the
battery or dispose of it in a fire.
Doing any of these things may cause the battery
to give off heat, crack or start a fire.
• Do not leave the battery with other metallic
materials.
Doing this may cause the battery to give off heat,
crack or start a fire.
• When throwing away or saving the battery, wrap
it in tape and insulate; otherwise, the battery may
start to give off heat, crack or start a fire.
• Do not poke the battery with tweezers or similar
tools.
Doing this may cause the battery to give off heat,
crack or start a fire.
CAUTION:
DO NOT leave the remote controller in a place
(such as dashboards) exposed to direct sunlight
for a long time. Otherwise, it may be damaged.
1)
2)
3421
D
SRC
DISP
ATT
SEL
This receiver is equipped with the steering
wheel remote control function.
If your car is equipped with the steering
wheel remote controller, you can operate this
receiver using the controller.
•See the Installation/Connection Manual
(separate volume) for connection to utilize
this function.
EN02-06SH9101[E_EX]f.p65 03.2.27, 22:486

7
ENGLISH
BASIC OPERATIONS
Turning on the power
1
Turn on the power.
Note on One-Touch Operation:
When you select a source in step
2
below, the
power automatically comes on. You do not have
to press this button to turn on the power.
2
Select the source.
Each time you press the button,
the source changes as follows.
*1Without connecting the DAB tuner or CD
changer, you cannot select it as the source to
play.
*2If a disc is not in the loading slot, you cannot
select CD as the source to play.
*3When “Line In” is set to “Off” in the PSM
setting, you cannot select “LINE IN” as the
source (see page 49).
3
Adjust the volume.
4
Select the DSP mode and sound
mode as you want.
To drop the volume in a moment
Press briefly while listening to any
source. “ATT” starts flashing on the display, and
the volume level will drop in a moment.
To resume the previous volume level, press the
button briefly again.
• If you turn the control dial, you can also restore
the sound.
To turn off the power
Press for more than 1 second.
•If you turn off the power while listening to a
disc, playback will start from where playback
has been stopped previously, next time you
turn on the power.
1, 3
2
3456 M21
D
SRC
DISP
ATT
SEL
T/P
MODE
ATT
SRC
Current sound (iEQ) mode (see page 35)
Current DSP mode (see page 32)
ATT
Clock time
Display indication:
If you have changed
some PSM items (see
pages 47 and 48), the
indications on the
display you see may be
different from those used
in this manual.
*1*2
*3
CD CD-CH
(CD changer)
LINE IN
TUNER DAB
(DAB tuner)
*1
EN07-09SH9101[E_EX]f.p65 03.2.27, 22:497

8
ENGLISH
Canceling the display
demonstration
When shipped from the factory, display
demonstration has been activated, and starts
automatically when no operations are done for
about 20 seconds.
•It is recommended to cancel the demonstration
before you use the unit for the first time.
To cancel the display demonstration, follow
the procedure below:
1
Press and hold SEL (select) for more
than 2 seconds so that one of the
PSM items appears on the display.
(PSM: see pages 47 and 48.)
2
Press number button 1 to select
“MOVIE”—Movie category of the PSM
settings.
The “Graphics” setting screen appears on
the display.
3
Select “Off.”
4
Finish the setting.
SEL
ATT
To activate the display demonstration, repeat
the same procedure and select “Int Demo” or
“All Demo” in step
3
.
•For more details, see “To show the graphics on
the display—Graphics” on page 48.
Setting the clock
You can also set the clock system to 24 hours or
12 hours.
1
Press and hold SEL (select) for more
than 2 seconds so that one of the
PSM items appears on the display.
(PSM: see pages 47 and 48.)
2
Press number button 2 to select
“CLOCK”—Clock category of the
PSM settings.
The “Clock Hr” setting screen appears on
the display.
3
Adjust the hour.
4
Set the minute.
1Select “Clock Min (minute).”
2Adjust the minute.
SEL
ATT
SEL
345621
12
345621
ATT
EN07-09SH9101[E_EX]f.p65 03.2.27, 22:498

9
ENGLISH
5
Set the clock system.
1Select “24H/12H.”
2Adjust “24Hours” or “12Hours.”
6
Finish the setting.
To check the current clock time when the unit
is turned off, press DISP (D).
The power turns on and the clock time is shown
for about 5 seconds, then the power turns off.
Selecting the level meter
You can show the level meters on the display
while playing any source. This unit is equipped
with three level meter patterns.
1
Press and hold SEL (select) for more
than 2 seconds so that one of the
PSM items appears on the display.
(PSM: see pages 47 and 48.)
2
Press number button 3 to select
“DISP”—Display category of the PSM
settings.
3
Select “Theme.”
ATT
12
SEL
4
Select the level meter pattern you
want.
As you turn the control
dial, the level meters
change as follows:
5
Finish the setting.
Standard:
No level meter appears on the display. (Initially
selected when shipped from the factory.)
Meter 1:
The left and right audio level meters appear.
Meter 2:
Level meters fluctuate horizontally from center to
both sides as audio levels changes.
Meter 3:
Signal waves fluctuate at the center and spread
outward.
SEL
ATT
Meter 1
Standard
Meter 2
Meter 3
SEL
3
EN07-09SH9101[E_EX]f.p65 03.2.27, 22:499

10
ENGLISH
RADIO OPERATIONS
Listening to the radio
You can use either automatic searching or manual
searching to tune in to a particular station.
Searching a station automatically:
Auto search
1
Select the band (FM1 – 3, AM).
1Press SRC (source)
repeatedly to select the tuner.
2Press and hold SRC for more
than 1 second.
The band indication on the
display starts flashing.
3Within about 5 seconds (while
the band indication is
flashing), press SRC again.
Each time you press the
button, the band changes.
Last received station of the selected band is
tuned in.
3456 M21
D
SRC
DISP
ATT
SEL
T/P
MODE
Lights up when receiving an FM stereo broadcast
with sufficient signal strength.
Note:
This receiver has three FM bands (FM1, FM2,
FM3). You can use any one of them to listen to an
FM broadcast.
2
Start searching a station.
When a station is received, searching stops.
To stop searching before a station is received,
press the same button you have pressed for
searching.
Press ¢ to search
stations of higher
frequencies.
Press 4 to search
stations of lower
frequencies.
FM1
FM2FM3
AM
Ex. When the band is FM
Program station (PS)
name (see page 14)
Programme type (PTY)
(see page 14)
SRC
EN10-14SH9101[E_EX]f.p65 03.2.27, 22:5010

11
ENGLISH
Searching a station manually:
Manual search
1
Select the band (FM1 – 3, AM).
1Press SRC (source)
repeatedly to select the tuner.
2Press and hold SRC for more
than 1 second.
3Within about 5 seconds, press
SRC again.
Each time you press the
button, the band changes.
Note:
This receiver has three FM bands (FM1, FM2,
FM3). You can use any one of them to listen to an
FM broadcast.
2
Press and hold ¢ or 4 until
“Manual Search” appears on the
display.
3
Tune in to a station you want while
“Manual Search” is still on the display.
• If you release your finger from the button,
the manual mode will automatically turn off
after about 5 seconds.
• If you hold down the button, the frequency
keeps changing (in 50 kHz intervals for FM
and 9 kHz intervals for AM—MW/LW) until
you release the button.
Press ¢ to tune in to
stations of higher
frequencies.
Press 4 to tune in to
stations of lower
frequencies.
To tune in FM stations only with strong
signals—LO/DX (Local/Distant)
While searching FM stations (including SSM—
see page 12), this unit stops searching whenever
it detects signals (DX mode: The DX indicator is
lit—initial setting). If received signals are weak,
you may only hear noises.
By setting LO/DX to “Local,” you can make this
unit detects only stations with sufficient signal
strength.
1Press MODE (M) while listening to
an FM stereo broadcast.
“Mode” appears on the display, and
the number buttons start flashing.
2Press number button 2, while “Mode” is still
on the display.
Each time you press the button, the “LO/DX”
setting alternates between “Local” and “DX.”
LO indicator appears
After about
5 seconds
The display returns to the source indication
screen.
FM1
FM2FM3
AM
M
MODE
345621
See page 40 for this function.
SRC
EN10-14SH9101[E_EX]f.p65 03.2.27, 22:5111

12
ENGLISH
Storing stations in memory
You can use one of the following two methods to
store broadcasting stations in memory.
•Automatic preset of FM stations: SSM (Strong-
station Sequential Memory)
•Manual preset of both FM and AM stations
FM station automatic preset: SSM
You can preset 6 local FM stations in each FM band
(FM1, FM2 and FM3).
1
Select the FM band (FM1 – 3) you want
to store FM stations into.
1Press SRC (source)
repeatedly to select the tuner.
2Press and hold SRC for more
than 1 second.
The band indication on the
display starts flashing.
3Within about 5 seconds (while
the band indication is
flashing), press SRC again.
Each time you press the
button, the band changes.
2
Start SSM.
1Press MODE (M).
“Mode” appears on the
display, and the number
buttons start flashing.
2Press and hold number
button 5 until “– SSM –”
appears.
Local FM stations with the strongest signals are
searched and stored automatically in the band
number you have selected (FM1, FM2 or FM3).
These stations are preset in the number buttons —
No.1 (lowest frequency) to No.6 (highest
frequency).
When automatic preset is over, the station stored
in number button 1 will be automatically tuned in.
When an FM stereo broadcast is hard to
receive:
Set the FM reception mode to “Mono On.”
1Press MODE (M) while listening to
an FM stereo broadcast.
“Mode” appears on the display, and
the number buttons start flashing.
2Press number button 1, while “Mode” is still
on the display.
Each time you press the button, “Mono On”
and “Mono Off” alternately appears.
MO indicator appears
After about
5 seconds
The display returns to the source indication
screen.
SRC
M
MODE
5
FM1
FM2FM3
AM
M
MODE
345621
If the sound quality decreases and the
stereo effect is lost while listening to an
FM station
In some areas, adjacent stations may
interfere with each other. If this interference
occurs, this unit can automatically reduce this
interference noise (initial factory setting).
However, in this case, the sound quality will
be degraded and the stereo effect will be also
lost.
If you do not want to degrade the sound
quality and to lose the stereo effect, rather
than to eliminate the interference noise, see
“To change the FM tuner selectivity—IF
Filter” on page 49.
EN10-14SH9101[E_EX]f.p65 03.2.27, 22:5112

13
ENGLISH
Manual preset
You can preset up to 6 stations in each band (FM1,
FM2, FM3 and AM) manually.
Ex.: Storing an FM station of 92.5 MHz into the
preset number 1 of the FM1 band.
1
Select the band (FM1 – 3, AM) you
want to store stations into (in this
example, FM1).
1Press SRC (source)
repeatedly to select the tuner.
2Press and hold SRC for more
than 1 second.
3Within about 5 seconds, press
SRC again.
Each time you press the
button, the band changes.
2
Tune in to a station (in this example,
of 92.5 MHz).
3
Press and hold the number button (in
this example, 1) for more than 2
seconds.
The selected preset number
flashes for a while.
4
Repeat the above procedure to store
other stations into other preset
numbers.
Press ¢ to tune in to
stations of higher
frequencies.
Press 4 to tune in to
stations of lower frequencies.
SRC
1
FM1
FM2FM3
AM
SRC
FM1
FM2FM3
AM
345621
Notes:
• A previously preset station is erased when a new
station is stored in the same preset number.
• Preset stations are erased when the power supply to
the memory circuit is interrupted (for example,
during battery replacement). If this occurs, preset
the stations again.
Tuning in to a preset station
You can easily tune in to a preset station.
Remember that you must store stations first. If you
have not stored them yet, see “Storing stations in
memory” on pages 12 and 13.
Selecting a preset station directly
1
Select the band (FM1 – 3, AM).
1Press SRC (source)
repeatedly to select the tuner.
2Press and hold SRC for more
than 1 second.
The band indication on the
display starts flashing.
3Within about 5 seconds (while
the band indication is
flashing), press SRC again.
Each time you press the
button, the band changes.
2
Select the number (1 – 6) for the preset
station you want.
EN10-14SH9101[E_EX]f.p65 03.2.27, 22:5113

14
ENGLISH
Changing the display pattern
By pressing DISP (D), you can change the
information shown on the display.
Each time you press the button, the
display patterns change as follows:
•Initial display pattern:
•Programme station (PS) name is
emphasized:
Selecting a preset station using the
preset station list
If you forget what stations are stored in what
preset numbers, you can check the preset station
list, then select your desired station on the list.
1
Select the band (FM1 – 3, AM).
1Press SRC (source)
repeatedly to select the tuner.
2Press and hold SRC for more
than 1 second.
3Within about 5 seconds, press
SRC again.
Each time you press the
button, the band changes.
2
Press and hold 5 (up) or ∞ (down) until
the preset station list for the current
band (FM1, FM2, FM3, or AM) appears
on the display.
The currently received station will
be highlighted on the display.
Notes:
•If one of FM band preset station lists (FM1,
FM2, or FM3) is shown on the display, you
can show the other lists by pressing 5 (up) or
∞ (down).
•If a preset station is an FM RDS station with
PS signal, PS name will be shown instead of
the station frequency.
3
Select the number (1 – 6) for the preset
station you want.
SRC
FM1
FM2FM3
AM
345621
D
DISP
*1“No Name” always appears for AM or FM non-RDS
stations (see the following pages).
*2Appears only when selecting a preset station.
*3PTY code appears only when receiving an RDS
station.
*2
*1
*3
EN10-14SH9101[E_EX]f.p65 03.2.27, 22:5114

15
ENGLISH
RDS OPERATIONS
What you can do with RDS
RDS (Radio Data System) allows FM stations to
send an additional signal along with their regular
programme signals. For example, the stations
send their station names, as well as information
about what type of programme they broadcast,
such as sports or music, etc.
Another advantage of RDS function is called
“Enhanced Other Networks.” By using the
Enhanced Other Networks data sent from a
station, you can tune in to a different station of a
different network broadcasting your favorite
programme or traffic announcement while
listening to another programme or to another
source such as CD.
By receiving the RDS data, this unit can do the
following:
• Tracing the same programme automatically
(Network-Tracking Reception)
• Standby Reception of TA (Traffic
Announcement) or your favorite programme
• PTY (Programme Type) search
• Programme search
• And some other functions
Tracing the same programme
automatically (Network-Tracking
Reception)
When driving in an area where FM reception is
not good, the tuner built in this unit automatically
tunes in to another RDS station, broadcasting the
same programme with stronger signals. So, you
can continue to listen to the same programme in
its finest reception, no matter where you drive.
(See the illustration on page 21.)
Two types of the RDS data are used to make
Network-Tracking Reception work correctly
—PI (Programme Identification) and AF
(Alternative Frequency).
Without receiving these data correctly from the
RDS station you are listening to, Network-
Tracking Reception will not operate.
To use Network-Tracking Reception
You can select the different modes of network-
tracking reception to continue listening to the
same programme in its finest reception.
When shipped from the factory, “AF” is selected.
• AF: Network-Tracking Reception is
activated without Regionalization.
With this setting, the unit switches to
another station within the same
network when the receiving signals
from the current station become
weak. (In this mode, the programme
may differ from the one currently
received.)
The AF indicator lights up.
• AF Reg: Network-Tracking Reception is
activated with Regionalization.
With this setting, the unit switches to
another station, within the same
network, broadcasting the same
programme when the receiving
signals from the current station
become weak.
The REG indicator lights up.
• Off: Network-Tracking Reception is
deactivated.
Neither the AF nor the REG indicator
lights up.
Note:
If a DAB tuner is connected and Alternative Reception
(for DAB services) is activated, Network-Tracking
Reception is also activated (“AF”) automatically. On
the other hand, Network-Tracking Reception cannot
be deactivated without deactivating Alternative
Reception. (See page 69.)
AF or REG indicator lights up.
EN15-21SH9101[E_EX]f.p65 03.2.27, 22:5515

16
ENGLISH
1
Press and hold SEL (select) for more
than 2 seconds so that one of the
PSM items appears on the display.
(PSM: see pages 47 and 48.)
2
Press number button 4 to select
“TUNER”—Tuner category of the
PSM settings.
The “PTY Stnby” (standby) setting screen
appears on the display.
3
Select “AF-Regn’l” (alternative
frequency/regionalization
reception).
4
Select the desired mode—“AF,”
“AF Reg,” or “Off.”
5
Finish the setting.
Using TA Standby Reception
TA Standby Reception allows the unit to switch
temporarily to Traffic Announcement (TA) from
the current source (another FM station, CD, or
other connected components).
• TA Standby Reception will not work if you are
listening to an AM station.
Press T/P to activate TA Standby
Reception.
Each time your press the button,
this function is turned on and off
alternately.
• When the DAB tuner is connected, this also
turns on and off Road Traffic Flash Standby
Reception (see page 66).
7When the current source is FM, the TP
indicator either lights up or flashes.
•If the TP indicator lights up, TA Standby
Reception is activated.
If a station starts broadcasting a traffic
announcement, “Traffic Flash” appears on
the display, and this unit automatically tunes
in to the station. The volume changes to the
preset TA volume level (see page 20) and
the traffic announcement can be heard.
•If the TP indicator flashes, TA Standby
Reception is not yet activated since the
station being received does not provide the
signals used for TA Standby Reception.
To activate TA Standby Reception, you need
to tune in to another station providing these
signals. Press ¢ or 4 to search
for such a station.
When a station providing these signals is
tuned in, the TP indicator stops flashing and
remains lit. Now TA Standby Reception is
activated.
SEL
ATT
SEL
T/P
345621
TP indicator appears
(either lights up or flashes)
EN15-21SH9101[E_EX]f.p65 03.2.27, 22:5516

17
ENGLISH
CONTINUED ON THE NEXT PAGE
SEL
ATT
M
MODE
SEL
345621
3
Select one of the twenty-nine PTY
codes. (See page 21.)
Selected code name
appears on the display
and is stored into
memory.
4
Finish the setting.
To set PTY Standby Reception
When the DAB tuner is connected, the following
operations will set PTY Standby Reception both
for the FM tuner and the DAB tuner. (See page
69.)
1Press MODE (M) while listening to
an FM stereo broadcast.
“Mode” appears on the display, and
the number buttons start flashing.
7When the current source is other than FM,
the TP indicator lights up.
If a station starts broadcasting a traffic
announcement, “Traffic Flash” appears on the
display, and this unit automatically changes the
source and tunes in to the station.
Using PTY Standby Reception
PTY Standby Reception allows the unit to switch
temporarily to your favorite programme (PTY:
Programme Type) from any source except AM
stations.
To select your favorite PTY code for PTY
Standby Reception
When shipped from factory, PTY Standby
Reception has been set to work for searching for
“News” programmes.
You can select your favorite programme type for
PTY Standby Reception.
1
Press and hold SEL (select) for more
than 2 seconds so that one of the
PSM items appears on the display.
(PSM: see pages 47 and 48.)
2
Press number button 4 to select
“TUNER”—Tuner category of the
PSM settings.
The “PTY Stnby” (standby) setting screen
appears on the display.
EN15-21SH9101[E_EX]f.p65 03.2.27, 22:5517

18
ENGLISH
Note:
After turning on PTY Standby Reception, you can
change the source without canceling PTY Standby
Reception. In this case, the PTY indicator stops
flashing if it was. If a station starts broadcasting the
selected PTY programme, this unit automatically
changes the source and tunes in to the station.
• If you change the source to AM, PTY Standby
Reception will be temporarily canceled.
• You can only deactivate the PTY Standby Reception
when the source is FM.
Searching your favorite programme
You can search any one of the PTY codes.
In addition, you can store your 6 favorite
programme types in the number buttons.
When shipped from the factory, the following
6 programme types have been stored in the
number buttons (1 to 6).
To store your favorite programme types, see
below and page 19.
To search your favorite programme type, see
page 19.
To store your favorite programme types
1
Press and hold T/P for more than 2
seconds while listening to an FM
station.
The last selected PTY code appears.
Pop M
123
Rock M Easy M
456
Classics Affairs Varied
T/P
345621
Ex.: When the currently selected PTY code
for PTY Standby Reception is “News”
After about
5 seconds
The display returns to the source indication
screen.
PTY indicator appears
(either lights up or flashes)
2Press number button 3 repeatedly to activate
PTY Standby Reception while “Mode” is still
on the display.
Each time you press the button, PTY Standby
Reception turns on and off alternately.
The PTY indicator either lights up or flashes.
•If the PTY indicator lights up, PTY Standby
Reception is activated.
If a station starts broadcasting the selected
PTY programme, this unit automatically tunes
in to the station.
•If the PTY indicator flashes, PTY Standby
Reception is not yet activated since the station
being received does not provide the signals
used for PTY Standby Reception.
To activate PTY Standby Reception, you need
to tune in to another station providing these
signals. Press ¢ or 4 to search for
such a station.
When a station providing these signals is tuned
in, the PTY indicator stops flashing and
remains lit. Now PTY Standby Reception is
activated.
EN15-21SH9101[E_EX]f.p65 03.2.27, 22:5518

19
ENGLISH
2
To select one of your favorite
programme type
or
To select any one of the twenty-nine
PTY codes
How to use the
5
(up) or
∞
(down) button
By pressing 5 (up) or ∞ (down) repeatedly,
you can show the list of your preset PTY codes
and all twenty-nine PTY codes (six PTY codes
at a time). First, the list of your stored PTY
codes appears, then all twenty-nine PTY codes
(six PTY codes at a time) appears in sequence.
Press the number button to select your desired
PTY code on the list currently shown on the
display.
3
Start PTY search for your favorite
programme.
•If there is a station broadcasting a programme
of the same PTY code as you selected, that
station is tuned in.
•If there is no station broadcasting a
programme of the same PTY code as you
selected, the station will not change.
Note:
In some areas, the PTY search will not work correctly.
Ex.: When “Rock M” is selected
The last selected PTY code appears.
ATT
345621
T/P
T/P
345621
ATT
2
Select one of the twenty-nine PTY
codes. (See page 21.)
Selected code name
appears on the display.
3
Press and hold the number button
for more than 2 seconds to store the
PTY code selected into the preset
number you want.
Selected preset number flashes for a while.
4
Press and hold T/P for more than 2
seconds to exit from this mode.
To search your favorite programme type
1
Press and hold T/P for more than 2
seconds while listening to an FM
station.
EN15-21SH9101[E_EX]f.p65 03.2.27, 22:5519

20
ENGLISH
Setting the TA volume level
You can preset the volume level for TA Standby
Reception. When a traffic programme is received,
the volume level automatically changes to the
preset level.
•See also “Changing the general settings
(PSM)” on page 46.
1Press and hold SEL (select) for more than
2 seconds so that one of the PSM items
appears on the display.
2Press number button 4 to select “TUNER”—
Tuner category of the PSM settings.
3Press ¢ or 4 to select “TA
Volume.”
4Turn the control dial to set to the desired
volume.
You can set it from “Volume 0” to “Volume 50.”
5Press SEL (select) to finish the setting.
Automatic clock adjustment
When shipped from the factory, the clock built in
this unit is set to be readjusted automatically
using the CT (Clock Time) data in the RDS
signal.
If you do not want to use automatic clock
adjustment, follow the procedure below.
•See also “Changing the general settings
(PSM)” on page 46.
1Press and hold SEL (select) for more than
2 seconds so that one of the PSM items
appears on the display.
2Press number button 2 to select “CLOCK”—
Clock category of the PSM settings.
3Press ¢ or 4 to select “Auto Adj”
(adjustment).
4Turn the control dial counterclockwise to select
“Off.”
Now automatic clock adjustment is canceled.
5Press SEL (select) to finish the setting.
To reactivate clock adjustment, repeat the
same procedure and select “On” in step 4 by
turning the control dial clockwise.
Note:
You must stay tuned to the same station for more than
2 minutes after setting “Auto Adj” to “On.”
Otherwise, the clock time will not be adjusted. (This is
because the unit takes up to 2 minutes to capture the
CT data in the RDS signal.)
Other convenient RDS
functions and adjustments
Automatic selection of the station
when using the number buttons
Usually when you press the number button, the
preset station is tuned in.
However, when the preset station is an RDS
station, something different will happen. If the
signals from that preset station are not sufficient
for good reception, this unit, using the AF data,
tunes in to another frequency broadcasting the
same programme as the original preset station is
broadcasting. (Programme search)
•The unit takes some time to tune in to another
station using programme search.
To activate programme search, follow the
procedure below.
•See also “Changing the general settings
(PSM)” on page 46.
1Press and hold SEL (select) for more than
2 seconds so that one of the PSM items
appears on the display.
2Press number button 4 to select “TUNER”—
Tuner category of the PSM settings.
3Press ¢ or 4 to select
“P(Programme)-Search.”
4Turn the control dial clockwise to select “On.”
Now programme search is activated.
5Press SEL (select) to finish the setting.
To cancel programme search, repeat the same
procedure and select “Off” in step 4 by turning
the control dial counterclockwise.
EN15-21SH9101[E_EX]f.p65 03.2.27, 22:5520

21
ENGLISH
PTY codes
News: News
Affairs: Topical programmes expanding on
current news or affairs
Info: Programmes which impart advice
on a wide variety of topics
Sport: Sport events
Educate: Educational programmes
Drama: Radio plays
Culture: Programmes on national or
regional culture
Science: Programmes on natural science
and technology
Varied: Other programmes like comedies
or ceremonies
Pop M: Pop music
Rock M: Rock music
Easy M: Easy-listening music
Light M: Light music
Classics: Classical music
Other M: Other music
Weather: Weather information
Finance: Reports on commerce, trading, the
Stock Market, etc.
Children: Entertainment programmes for
children
Social: Programmes on social activities
Religion: Programmes dealing with any
aspect of belief or faith, or the
nature of existence or ethics
Phone In: Programmes where people can
express their views either by
phone or in a public forum
Travel: Programmes about travel
destinations, package tours, and
travel ideas and opportunities
Leisure: Programmes concerned with
recreational activities such as
gardening, cooking, fishing, etc.
Jazz: Jazz music
Country: Country music
Nation M: Current popular music from
another nation or region, in that
country’s language
Oldies: Classic pop music
Folk M: Folk music
Document: Programmes dealing with factual
matters, presented in an
investigative style
The same programme can be received on different frequencies.
Programme 1
broadcasting on
frequency A
Programme 1
broadcasting on
frequency E
Programme 1
broadcasting on
frequency B
Programme 1
broadcasting on
frequency D
Programme 1
broadcasting on
frequency C
EN15-21SH9101[E_EX]f.p65 03.2.27, 22:5521

22
ENGLISH
CD OPERATIONS
Playing a disc
1
Open the control panel.
2
Insert a disc into the loading slot.
The unit draws the
disc, the control panel
goes back to the
previous position (see
page 52), and playback
starts automatically.
All tracks will be played repeatedly until you stop
playback.
Notes:
• MP3 or WMA discs require a longer readout time.
(It differs due to the complexity of the folder/track
configuration.)
• For details on playable discs and other related
information, see page 74.
To stop play and eject the disc
Press 0.
Playback stops, the control panel moves down,
and the disc automatically ejects from the loading
slot.
If you change the source, the disc play also stops
(without ejecting the disc this time).
: Folders and their playback order
: MP3/WMA tracks and their playback
order
This unit has been designed to reproduce CDs,
CD-Rs (Recordable), CD-RWs (Rewritable), and
CD Texts.
• This unit is also compatible with MP3 and
WMA discs. For details about these discs,
refer to “A Guide to MP3/WMA” (separate
volume).
About MP3 and WMA discs
MP3 and WMA (Windows Media® Audio) “tracks”
(word “file” is not used to indicate MP3 or WMA
files, “track” is used in this manual) are recorded
in “folders.”
During recording, the tracks and folders can be
arranged in a way similar to arranging files and
folders of computer data.
“Root” is similar to the root of a tree. Every track
and folder can be linked to and be accessed from
the root.
3456 M21
D
SRC
DISP
ATT
SEL
T/P
MODE
• Microsoft and Windows Media are either registered trademarks or trademarks of Microsoft Corporation in the
United States and/or other countries.
1
1
2
3
10
11
12
4
5
6
7
8
9
01
01
05
02 03
04
Hierarchy
ROOT
Level 1 Level 2 Level 3 Level 4 Level 5
EN22-31SH9101[E_EX]f.p65 03.2.27, 22:5622

23
ENGLISH
• Display indications when inserting an
MP3 or a WMA disc
1Total folder number
2Total track number
3Disc type—MP3 or WMA
4Album name/performer (or folder name when
“Tag ” is set to “Off”—see page 49, or when no Tag
is recorded)
5Track title (or track name when “Ta g” is set to
“Off”—see page 49, or when no Tag is recorded)
6Current folder number
7Current track number
8Elapsed playing time of the current track
• Display indications when inserting an
audio CD or a CD Text:
1Total track number
2Total playback time of the disc
3Disc title/performer (if no title is recorded or
assigned*, “No Name” appears.)
4Track title (if no title is recorded, “No Name”
appears.)
5Current track number
6Elapsed playing time of the current track
*If a name has been assigned to the audio CD (see
page 51), it will be shown on the display.
Notes:
• When a disc is already in the loading slot, selecting “CD” as the source starts disc play.
• The unit cannot read or play an MP3 track without the extension code <mp3>, and a WMA track
without the extension code <wma>.
• When a disc is inserted upside down, the disc automatically ejects.
• If you change the source, playback also stops (without ejecting the disc).
Next time you select “CD” as the source, disc play starts from where it has been stopped previously.
To return the control panel to its previous
position, press 0 again.
•If you keep the loading slot open for about 1
minute, (beeps sound when the “Beep” setting
is turned “On”—see page 49) the control panel
returns to its previous position.
Be careful not to get the disc or your finger
caught in between the control panel and the
unit.
Note:
If the ejected disc is not removed within 15 seconds,
the disc is automatically inserted again into the
loading slot to prevent it from dust. (Disc will not play
this time.)
3
124
56
2
5
678
1
34
EN22-31SH9101[E_EX]f.p65 03.2.27, 22:5623

24
ENGLISH
Press ¢ briefly, while
playing a disc, to go ahead to
the beginning of the next track.
Each time you press the button
consecutively, the beginning of
the next tracks is located and
played back.
Press 4 briefly, while playing a disc, to go
back to the beginning of the current track.
Each time you press the button consecutively, the
beginning of the previous tracks is located and
played back.
What is ImageLink
When an MP3 or a WMA folder includes an
image <jml> file edited by Image Converter
(supplied in the CD-ROM), you can show the
image on the display while the tracks in the
folder are played back.
•While reading an image <jml> file, no
sounds come out (the preset image of a
coffee cup is shown on the display during
this period).
To activate ImageLink, follow the procedure
below
•See also “Changing the general settings
(PSM)” on page 46.
1Press and hold SEL (select) for more than 2
seconds so that one of the PSM items
appears on the display.
2Press number button 1 to select “MOVIE” —
Movie category of the PSM settings.
The “Graphics” setting screen appears on
the display.
3Turn the control dial to select “ImageLink.”
4Press SEL (select) to finish the setting.
ImageLink starts functioning when the next
folder starts playing.
Note:
ImageLink will not work in the following cases:
• If no <jml> file is included in an MP3/WMA
folder.
• If Intro Scan is activated.
• If the source is changed to another from “CD,” or
• If you turn off then on the unit while the preset
image of a coffee cup is shown on the display.
Locating a particular portion
on a track
To fast-forward or reverse the track
Note:
During this operation on an MP3 or WMA disc, you
can only hear intermittent sounds. (The elapsed
playing time also changes intermittently on the
display.)
To go to the next or previous tracks
Press and hold ¢ , while
playing a disc, to fast-forward the
track.
Press and hold 4 , while
playing a disc, to reverse the
track.
If there are more than one <jml> file in a folder, a
<jml> file with younger playback order number
will be shown on the display (in the above
example, “Photo2.jml” will be used for Album 2).
Album 1
(Folder 1)
Music001.mp3
Music002.mp3
Music003.mp3
Photo1.jml Photo1.jml
Photo2.jml
Album 2
(Folder 2)
Music004.wma
Music005.mp3
Music006.wma
Photo2.jml
Photo3.jml
Display window
Display window
EN22-31SH9101[E_EX]f.p65 03.2.27, 22:5624

25
ENGLISH
Track 6 \ 10 \ 20 \ 30 \ 31 \ 32
(Three times) (Twice)
Track 36 \ 30 \ 20 \ 10 \ 9 \ 8
(Three times) (Twice)
M
MODE
M
MODE
How to go to the desired track quickly
• Ex. 1: To select track number 32 while
playing track number 6
• Ex. 2 :To select track number 8 while
playing track number 36
M
MODE
Current track number
Current track number
Current folder number
Locating a track on a disc
To go to a particular track directly
(ONLY for CD and CD Text discs)
Press the number button corresponding to the
track number to start its playback.
•To select a track number from 1 – 6:
Press 1 (7) – 6 (12) briefly.
•To select a track number from 7 – 12:
Press and hold 1 (7) – 6 (12) for more than 1
second.
To go to a track quickly
1Press MODE (M) while playing a
disc.
“Mode” appears on the display, and
the number buttons and 5 (up)/ ∞
(down) buttons start flashing.
345621
2Press 5 (up) or ∞ (down), while
“Mode” is still on the display.
First time you press 5 (up) or ∞
(down), the track skips to the
nearest higher or lower track
with a track number of multiple ten (ex. 10th,
20th, 30th).
Then, each time you press the button, you
can skip 10 tracks (see “How to go to the
desired track quickly” that follows).
•After the last track, the first track will be
selected, and vice versa.
•While playing an MP3 or a WMA disc, this
operation is possible only within a folder.
While playing an audio CD or a CD Text disc:
While playing an MP3 or a WMA disc:
See page 40 for this function.
EN22-31SH9101[E_EX]f.p65 03.2.27, 22:5625

26
ENGLISH
345621
Locating a folder on a disc
The following operations are only possible
when playing an MP3 or a WMA disc.
To go to a folder directly
IMPORTANT:
To directly select the folders using the number
button(s), it is required that folders are
assigned 2 digit numbers at the beginning of
their folder names. (This can only be done
during the recording of CD-Rs or CD-RWs.)
Ex.: If folder name is “01 ABC”
=Press 1 to go to Folder “01 ABC.”
If folder name is “1 ABC,” pressing 1
does not work.
If folder name is “12 ABC”
=Press and hold 6 (12) to go to Folder
“12 ABC.”
Press the number button corresponding to the
folder number to start playing the first track in the
selected folder.
•To select a folder number from 01 – 06:
Press 1 (7) – 6 (12) briefly.
•To select a folder number from 07 – 12:
Press and hold 1 (7) – 6 (12) for more than 1
second.
Notes:
• If the folder does not contain any MP3 or WMA
tracks, playback will not start (“No Music” appears
on the display). Select another folder.
• You cannot directly select a folder with a number
greater than 12.
To select a particular track in a folder, press
¢ or 4 after selecting the folder.
To skip to the next or previous folder
(either on the same or different hierarchy levels)
On the control panel:
On the remote controller:
Press and hold 3 (right) while
playing a disc to skip to the next
folder.
Each time you press and hold the
button consecutively, the next
folder is located and the first track
in the folder starts playing.
Press 5 (up) while playing a disc
to skip to the next folder.
Each time you press the button
consecutively, the next folder is
located and the first track in the
folder starts playing.
Press ∞ (down) while playing a disc to skip back
to the previous folder.
Each time you press the button consecutively,
the previous folder is located and the first track in
the folder starts playing.
Press and hold 2 (left) while playing a disc to
skip back to the previous folder.
Each time you press and hold the button
consecutively, the previous folder is located and
the first track in the folder starts playing.
Note:
If the folder does not contain any MP3 or WMA
tracks, it is skipped.
See the hierarchy diagram on page 22.
01 02 03 04
PRESET PRESET
EN22-31SH9101[E_EX]f.p65 03.2.27, 22:5626

27
ENGLISH
To skip to the next or previous folder
within a folder (on the same hierarchy level)
ONLY on the remote controller:
See the hierarchy diagram on page 22.
03 04 03 04
Press 3 (right) while playing a disc
to skip to the next folder.
Each time you press the button
consecutively, the next folder
included within the same folder (on
the same hierarchy level) is
located (and the first track in the
folder starts playing if recorded).
Press 2 (left) while playing a disc to skip back to
the previous folder.
Each time you press the button consecutively,
the previous folder included within the same
folder (on the same hierarchy level) is located
(and the first track in the folder starts playing if
recorded).
Note:
If the folder does not contain any MP3 or WMA
tracks, playback will not start (“No Music” appears
on the display). Select another folder.
To skip to the folders on the lower or on
the higher hierarchy levels
ONLY on the remote controller:
01 05 01 05
Example 1
Example 2
See the hierarchy diagram on page 22.
01 02 03
04
ROOT
05
Press 5 (up) while playing a disc to
skip to a folder on the higher
hierarchy level.
Each time you press the button
consecutively, a folder on the higher
hierarchy level is located (and the
first track in the folder starts playing
if recorded).
Press ∞ (down) while playing a disc to skip to a
folder on the lower hierarchy level.
Each time you press the button consecutively, a
folder on the lower hierarchy level is located (and
the first track in the folder starts playing if
recorded).
•If there are more than one folder on the lower
or higher hierarchy level, a folder with younger
playback order number will be located.
Note:
If the folder does not contain any MP3 or WMA
tracks, playback will not start (“No Music” appears
on the display). Select another folder.
To go back to the root directly, press R•D on
the remote controller. You can go back to the root
from any folder.
•If tracks are recorded on the disc directly
without putting them into a folder, this unit
starts playing the tracks.
PRESET PRESET
DISC
DISC
EN22-31SH9101[E_EX]f.p65 03.2.27, 22:5627

28
ENGLISH
Folder name
list
Track name
list
345621 345621
To select a track and start playback
1
Press and hold 5 (up) or ∞ (down) so
that the folder name list of the inserted
disc appears on the display.
The currently playing folder will
be highlighted on the display.
2
Show the track name list of the current
folder.
Each time you press the button,
the lists on the display changes
as follows:
The currently playing track (or folder) will be
highlighted on the display.
Note:
The display can show only six names at a time.
You can show the other names on the next lists by
pressing 5 (up) or ∞ (down).
3
Select the number (1 – 6) for the track
you want to play.
Selecting a folder and a track
using the name lists
The following operations are only possible
when playing an MP3 or a WMA disc.
You can show the folder name and track name
lists on the display while playing a disc, then
select a folder or a track you want to play.
To select a folder and start playback
1
Press and hold 5 (up) or ∞ (down) so
that the folder name list of the inserted
disc appears on the display.
The currently playing folder will
be highlighted on the display.
Notes:
• The display can show only six names at a
time. You can show the other names on the
next lists by pressing 5 (up) or ∞ (down).
• If you press ¢ or 4 , the track
name list of the current playing folder
appears. Each time you press the button, the
folder name list and track name list
alternately appears.
• Only folders including MP3 or WMA tracks
will be listed.
2
Select the number (1 – 6) for the folder
you want to play.
EN22-31SH9101[E_EX]f.p65 03.2.27, 22:5728

29
ENGLISH
Selecting playback modes
To play back tracks at random (Random Play)
You can play back tracks on a disc (or in a folder
for MP3 and WMA discs) at random.
1Press MODE (M) while playing a
disc.
“Mode” appears on the display, then
the number buttons and the 5 (up)/
∞ (down) buttons start flashing.
2Press number button 3, while “Mode” is still
on the display.
Each time you press the button, random play
mode changes as follows:
For audio CD and CD Text discs:
For MP3 and WMA discs:
M
MODE
Current track number
345621
Random Off
Random DiscRandom Folder
Random Off
Random Disc
M
MODE
345621
Current track number
Current folder number
Mode Plays randomly
Random Folder
*:All tracks of the current folder,
then moves to the next folder and
so on.
•While playing, lights
up on the display.
Random Disc: All tracks on the disc.
•While playing, lights
up on the display.
*“Random Folder” can be used for MP3 and WMA
discs only.
To cancel Random Play, select “Random Off” by
pressing number button 3 repeatedly or press
number button 4 in step 2.
To play back tracks repeatedly (Repeat Play)
You can play back a track (or a folder for MP3 and
WMA discs) repeatedly.
1Press MODE (M) while playing a
disc.
“Mode” appears on the display, then
the number buttons and the 5 (up)/
∞ (down) buttons start flashing.
2Press number button 2, while “Mode” is still
on the display.
Each time you press the button, repeat play
mode changes as follows:
While playing an audio CD or a CD Text disc:
While playing an MP3 or a WMA disc:
EN22-31SH9101[E_EX]f.p65 03.2.27, 22:5729

30
ENGLISH
For audio CD and CD Text discs:
For MP3 and WMA discs:
Mode Plays repeatedly
Repeat Track : Current (or specified) track.
•While playing, lights
up on the display.
Repeat Folder
*:All tracks of the current (or
specified) folder.
•While playing, lights
up on the display.
*“Repeat Folder” can be used for MP3 and WMA
discs only.
To cancel Repeat Play, select “Repeat Off” by
pressing number button 2 repeatedly or press
number button 4 in step 2.
To play back only intros (Intro Scan)
You can play back the first 15 seconds of each
track sequentially.
1Press MODE (M) while playing a
disc.
“Mode” appears on the display, then
the number buttons and the 5 (up)/
∞ (down) buttons start flashing.
2Press number button 1, while “Mode” is still
on the display.
Each time you press the button, intro scan
mode changes as follows:
Repeat Off
Repeat Track
Repeat Off
Repeat FolderRepeat Track
For audio CD and CD Text discs:
For MP3 and WMA discs:
Mode Plays the beginnings of
Intro Track : All tracks of the disc.
•While playing, lights
up on the display.
Intro Folder* : First tracks of all folders.
•While playing, lights
up on the display.
*“Intro Folder” can be used for MP3 and WMA discs
only.
To cancel Intro Scan, select “Intro Off” by
pressing number button 1 repeatedly or press
number button 4 in step 2.
Prohibiting disc ejection
You can prohibit disc ejection and can lock a disc
in the loading slot.
While pressing SEL (select), press and
hold 0 for more than 2 seconds.
“No Eject” flashes on the display for about 5
seconds, and the disc is locked and cannot be
ejected.
To cancel the prohibition and unlock the disc
While pressing SEL (select), press and hold 0
again for more than 2 seconds.
“Eject OK” flashes on the display for about 5
seconds, and the disc is unlocked.
345621
Intro Off
Intro Track
Intro Off
Intro FolderIntro Track
M
MODE
SEL
EN22-31SH9101[E_EX]f.p65 03.2.27, 22:5730

31
ENGLISH
D
DISP
While playing an MP3 or a WMA disc:
•Initial display
•Album name/performer or folder name is
emphasized:
•Track title or track name is emphasized:
•Clock time is emphasized:
Notes:
*1If “Tag” is set to “Off” (see page 49), folder name
appear with .
*2If “Tag” is set to “Off” (see page 49), track name
appear with .
Display indication:
• When the title is emphasized at the center of the
display, it is shown entirely by scrolling if it
cannot be shown at a time. See also “To select
the scroll mode—Scroll” on page 48.
• Some characters or symbols will not be shown
(will be blanked or substituted) on the display.
*2
*1
*2
*1
Changing the display pattern
By pressing DISP (D), you can change the
information shown on the display.
Each time you press the button, the
display patterns change as follows:
While playing an audio CD or a CD Text disc:
•Initial display
•Disc title/performer or your assigned
disc name is emphasized:
•Track title is emphasized:
•Clock time is emphasized:
Notes:
*1If no name is assigned to the audio CD, or if no disc
title/performer is recorded for the CD Text, “No
Name” will appear.
To assign a name to an audio CD, see page 51.
*2“No Name” appears for an audio CD. If no track
title is recorded for the CD Text, “No Name” will
also appear.
EN22-31SH9101[E_EX]f.p65 03.2.27, 22:5731

32
ENGLISH
DSP OPERATIONS
SEL
1
Press SEL (select) once to show the
DSP mode selection screen.
The last selected DSP mode
screen appears.
• If you press the button twice or more, the
unit enters different sound adjustment
modes.
• For iEQ (sound mode) settings, see pages
35 and 36.
• For SEL/BBE (basic sound) settings, see
pages 37 and 38.
2
Press the number button to select
one of the DSP modes listed on the
display.
• This unit has two DSP mode selection
screens. To move to the other screen,
press 5 (up) or ∞ (down).
Selecting the DSP modes
Using the DSP (Digital Signal Processor) modes
built in this unit, you can create a more acoustic
sound field in your car compartment.
Available DSP modes:
THEATER: Reminds you of the intensity
reproducing a theater.
HALL: Reminds you of a large concert
hall with a being-there feeling.
CLUB: Reminds you of powerfulness
reproduced in a dance club.
DOME: Reminds you of a dome with a
high ceiling.
STUDIO: Reminds you of live sounds in a
recording studio.
V. CANCEL:Reduces the vocal sounds (Voice
Cancel). Good for mastering your
favorite songs—Karaoke.
DEFEAT: Cancels the DSP modes.
Note:
Effectiveness of “V.CANCEL” depends on the
recording condition of the sources. Especially, if you
play back the following sources you cannot get the
satisfactory results.
• Monaural sources such as AM and monaural FM
broadcasting programs,
• Multiplex sound sources, and
• Sources recorded with duets, strong echo, a chorus,
or only a few instruments.
Press 5 (up) or ∞ (down).
DSP
Canceled
iEQ SEL/BBE
345621
345621
EN32-38SH9101[E_EX]f.p65 03.2.27, 23:0232

33
ENGLISH
To make further precise settings for the
DSP modes
You can also make further precise settings to
make the best sound field in your car
compartment. These settings you make are valid
for all DSP modes except “V.CANCEL.”
Setting items:
The number of the built-in speakers :
Select the number of the speakers built
in your car—“2ch” or “4ch.”
•When you have four speakers (4ch)
built in your car, select your car size
(see step
5
on page 34).
Listening seat position:
Select the listening seat position where
you want to locate the sound image.
1
Press SEL (select) once to show the
DSP mode selection screen.
The currently activated DSP
mode appears on the display.
•If the DSP mode is not activated
(“DEFEAT” is selected), you cannot go to
the next step. Select one of the DSP
modes first.
SEL
Ex. When “Dome” is selected previously
3
Adjust the DSP effect level—1, 2, or
3.
The selected DSP effect
level is valid for all DSP
modes except “V.CANCEL.”
•As the number increases,
the effect level becomes
stronger.
To cancel the DSP modes, select “DEFEAT” in
step
2
.
To exit from the DSP mode selection screen,
press SEL (select) repeatedly or wait for about 15
seconds.
ATT
Ex. When “Dome” is selected in the previous step
CONTINUED ON THE NEXT PAGE
EN32-38SH9101[E_EX]f.p65 03.2.27, 23:0233

34
ENGLISH
2
Press number button 6 to enter the
further precise setting screen.
3
Select your listening seats position.
•Press number button 1 to select “LEFT
(front left)” seat.
•Press number button 2 to select “RIGHT
(front right)” seat.
•Press number button 3 to select “FRONT”
seats.
•Press number button 4 to select “ALL”
seats.
Note:
If fader or balance has been set close to its
extreme, appropriate effect may not be obtained.
4
Press number button 5 to set the
number of the built-in speakers.
•Select “4ch” for the four
speaker system, and “2ch” for
the two speaker system.
Note:
When “4ch” is selected, rear speakers are used
only to reproduce reflections and reverberations
in order to creates a being-there feeling in your
car compartment.
345621
ATT
5
MiddleCompact Large
5
If you select “4ch,” rotate the control
dial to select your car size.
As you rotate it, the car size
changes as follows:
•
Compact
: Select when the distance from
the rear speakers to the listening
seat position is shorten than that
from the front speakers.
•Middle: Select when the distance from
the rear speakers to the listening
seat position is almost equal to
that from the front speakers.
•Large: Select when the distance from
the rear speakers to the listening
seat position is longer than that
from the front speakers.
Note:
If you have selected “2ch” in the previous step,
you cannot select the car size.
To go back to the DSP mode selection screen,
press number button 6.
To exit from the DSP mode selection screen,
press SEL (select) repeatedly or wait for about 15
seconds.
6
EN32-38SH9101[E_EX]f.p65 03.2.27, 23:0234

35
ENGLISH
EQUALIZER OPERATIONS
Selecting preset sound modes
(iEQ: intelligent equalizer)
You can select a preset sound mode (iEQ:
intelligent equalizer) suitable to the music genre.
Available sound modes:
H. ROCK (Hard Rock)
R & B (Rhythm and Blues)
POP (Popular music)
JAZZ (Jazz)
DANCE (Dance music)
Country (Country music)
REGGAE (Reggae)
CLASSIC (Classical music)
USER 1, USER 2, USER 3
FLAT (No sound mode is applied)
1
Press SEL (select) twice to show the
sound selection screen.
The last selected sound mode is
called up.
•If you press the button more than twice,
the unit enters different sound adjustment
modes.
•For DSP mode settings, see pages 32
to 34.
•For SEL/BBE (basic sound) settings, see
pages 37 and 38.
SEL
Press 5 (up) or ∞ (down).
2
Press the number button to select
one of the sound modes listed on
the display.
•This unit has two sound mode selection
screens. To move to the other screen,
press 5 (up) or ∞ (down).
To cancel the sound mode, select “FLAT” in
step
2
.
To exit from the sound mode selection
screen, press SEL (select) repeatedly or wait for
about 15 seconds.
Notes:
•For details about the preset settings of each sound
mode, see page 71.
•If “V.CANCEL” is selected for the DSP mode, you
cannot change the sound modes.
345621
345621
DSP
Canceled
iEQ SEL/BBE
EN32-38SH9101[E_EX]f.p65 03.2.27, 23:0235

36
ENGLISH
Buttons used for adjustments
Storing your own sound modes
You can adjust the sound modes to your preference
and store your own adjustments in memory
(USER 1, USER 2 and USER 3).
1
Press SEL (select) twice to show the
sound mode selection screen.
The last selected sound mode is
called up.
2
Press the number button to select
one of the sound modes listed on
the display.
•This unit has two sound mode selection
screens. To move to the other screen,
press 5 (up) or ∞ (down).
3
Enter the sound adjustment mode.
The following sound mode
adjustment screen appears
on the display.
Ex. When you select “USER 1.”
Ex. When “R & B” is selected previously
SEL
345621
4
Make adjustments as you like.
1) Press ¢ or 4 to select the
frequency band—60Hz, 150Hz, 400Hz,
1kHz, 2.4kHz, 6kHz, 12kHz.
2) Press 5 (up) or ∞ (down) to adjust the
level of the selected band within the
range of –05 to +05.
3) Repeat steps 1) and 2) to adjust the
other frequency bands.
5
Store the adjustment you made.
The confirmation message
appears—whether you want to
store the adjustment.
If you want to cancel the adjustment,
press DISP (D).
•Adjustment you made remains effective
until you select another sound mode.
6
Press number button 1, 2 or 3 to
select one of the user sound modes
(USER 1, USER 2, or USER 3) you
want to store into.
SEL
345621
EN32-38SH9101[E_EX]f.p65 03.2.27, 23:0336

37
ENGLISH
SOUND ADJUSTMENTS
Performing the basic sound
settings
You can set the speaker output balance,
subwoofer output level, and input level of each
source.
•There is a time limit in doing the following
procedure. If the setting is canceled before you
finish, start from step
1
again.
1
Press SEL (select) repeatedly to
show one of the basic sound setting
(SEL) screens.
Each time you press the button,
the adjustable items change as
follows:
•For DSP mode settings, see pages 32
to 34.
•For iEQ (sound mode) settings, see pages
35 and 36.
Indication To do: Range
Fad Adjust the front R06 (Rear only)
and rear speaker |
balance. F06 (Front only)
Bal Adjust the left L06 (Left only)
and right speaker |
balance. R06 (Right only)
Sub Out Adjust the 00 (min.)
subwoofer output |
level and cutoff 08 (max.)
frequency level. Low/Mid/High
BBE Make sounds BBE Off, BBE 1,
natural. BBE 2, BBE 3
Vol Adj Adjust and store –05 (min.)
the input level |
of each source. +05 (max.)
SEL
2
Adjust the level.
To adjust fader and balance—Fad, Bal:
Make these two adjustments at the same
time.
•If you are using a two-speaker system, set
the fader level to “00.”
•Press 5 (up) or ∞
(down) to adjust the
fader.
•Press ¢ or
4 to adjust the
balance.
To adjust subwoofer output—Sub Out:
This takes effect only when a subwoofer is
connected.
You can also set an appropriate cutoff
frequency level according to the subwoofer
connected.
•Press ¢ or 4 to select “Low,”
“Mid,” or “High.”
Low: Frequencies higher than 50 Hz are
cut off to the subwoofer.
Mid: Frequencies higher than 80 Hz are
cut off to the subwoofer.
High: Frequencies higher than 115 Hz are
cut off to the subwoofer.
To increase the level.
To decrease the level.
ATT
Basic sound settings
Fad/Bal
Sub Out
Vol Adj BBE
DSP
Canceled
iEQ
EN32-38SH9101[E_EX]f.p65 03.2.27, 23:0337

38
ENGLISH
To make sounds natural—BBE:
BBE Digital* is a new digital processing
method to restore the brilliance and clarity of
the original live sound in recording,
broadcasts, etc.
When a speaker reproduces sound, it
introduces frequency-dependent phase
shifting, causing high-frequency sounds to
take longer to reach the ear than low
frequency sounds. BBE Digital adjusts the
phase relationship between the low, mid and
high frequencies by adding a progressively
longer delay time to the low and mid
frequencies, so that all frequencies reach
the listener’s ears at the proper time.
Select the effect level.
As the number gets higher, the effect level
becomes stronger.
When shipped from the factory, the effect
level is set to “BBE Off” (BBE Digital is
canceled).
Note:
If “V.CANCEL” is selected for the DSP mode, you
cannot change the BBE level.
*Manufactured under license from BBE Sound,
Inc.
Licensed by BBE Sound , Inc. under USP4638258
and 4482866. BBE and BBE symbol are
registered trademarks of BBE Sound, Inc.
ATT
To increase the level.
To decrease the level.To increase the level.
To decrease the level.
ATT
(INPUT OVER) indicator
To adjust the input level of each source
—Vol Adj:
This setting is required for each source
except FM. Before making an adjustment,
select an appropriate source for which you
want to make an adjustment.
Once you have made an adjustment, it is
memorized, and you will not need to adjust
the volume level each time you change the
source.
Adjust to match the input level to the FM
sound level.
If the (INPUT OVER) indicator appears
on the display, and sounds are distorted
The input level through the external component (LINE
IN) is set at a high level (more than 1.5 Vrms).
If this happens, adjust the output level on the
connected component so that the
(INPUT OVER) indicator will not appear.
BBE Off
(Canceled)
BBE 1 BBE 2 BBE 3
EN32-38SH9101[E_EX]f.p65 03.2.27, 23:0338

39
ENGLISH
GRAPHIC DISPLAYS
What is Image Converter
Image Converter is a JVC’s original software to produce a custom image to show on your JVC Car
Audio.
Here is a basic procedure to make a CD-R including still images (pictures) and animations
(movies) with Image Converter
In this manual, we only explain how to export the files (still images and animations) into the
memory built in this unit—step 5 below.
• For the other processes (from steps 1 to 4 below), refer to Image Converter manual (PDF files
included in the “Manual” folder of the supplied CD-ROM).
With Image Converter included in the supplied
CD-ROM, you can edit your own favorite pictures
and use them as your own opening screen,
ending screen, and graphic screen while playing
a source.
Image retouching and editing
Import of images Writing onto a CD-R
Play back on your car audio
KD-SH9104/
KD-SH9103/
KD-SH9102/
KD-SH9101
Install / Start the program
Install Image Converter on your PC.
Import the images
Import the source images from the Image Converter CD-ROM or from other equipment like a
digital camera or a digital video camera.
Retouch and edit the images
Retouch the images like trimming or adjusting the color, editing the animation effect, and
adding the texts.
Write your images onto a CD-R
Write the animations or the still images you made with Image Converter using your CD-R
writing software.
You have to write the images you made onto a CD-R to enjoy the images on your Car Audio.
• To write data onto a CD-R, refer also to the instruction of your CD-R writing software.
Enjoy the animations or the still images you made on your Car Audio
Export the images to your JVC Car Audio from the CD-R you made.
EN39-45SH9104[E_EX]f.p65 6/15/03, 10:07 PM39

40
ENGLISH
6
M
MODE
1
Open the control panel.
2
Insert a CD-ROM with the files (images
and animations) into the loading slot.
The unit draws the
disc, the control panel
goes back to the
previous position (see
page 52).
•If the disc includes playable audio files
such as MP3 tracks, playback starts
automatically.
3
Press MODE (M) after the disc is
detected.
“Mode” appears on the
display, then the number
buttons and the 5 (up)/
∞ (down) buttons start
flashing.
4
Press number button 6 to show the
download selection screen.
Downloading images and
animations
Before starting the following procedure, prepare a
CD-ROM including still images (pictures) and
animations (movies).
•The supplied Image Converter CD-ROM
includes sample images and animations, so
you can use this disc as your first trial.
IMPORTANT:
•Still images (pictures) should have <jml>,
and animations (movies) should have <jma>
as their extension code in their file names.
•Downloading a file can be done only while
selecting “CD” as the source; on the other
hand, deleting a file can be done while
selecting any source.
•Before you download or erase the files,
observe the following:
–Do not download a file while driving.
–Do not turn off the ignition key of the car
while downloading or erasing a file.*
– Do not detach the control panel while
downloading or erasing a file.*
* If you do it, the file download or erasure will
not be done correctly. In this case, perform
the same procedure again.
•If you have already downloaded an
animation for “PowerOn,” “PowerOff,” or
“Movie,” downloading a new animation
deletes the previously stored animation.
•It takes a long time for the unit to download
an animation.
–About 6 to 7 seconds for a still image (one
frame).
–About 3 to 4 minutes for an animation of 30
frames.
–About 10 minutes for an animation of 90
frames.
•While a station (or service for the DAB tuner)
is being tuned in by one of the Standby
Reception modes such as TA, PTY, or
Announcement, you cannot download or
delete a file. On the other hand, while you
are downloading or deleting a file, no
Standby Reception mode will work to have
this unit tune in a station (or service). It only
works after download or deletion is over.
345621
EN39-45SH9101[E_EX]f.p65 03.2.27, 23:0440

41
ENGLISH
Notes:
• On this list, the folders including the target
files—<jml> files for “Picture” and <jma>
files for the others—are shown.
• The display can show only six names at a time.
You can show the other names on the next lists
by pressing 5 (up) or ∞ (down).
• If a disc inserted does not include any <jml>
and <jma> files, beeps sound and you cannot
go to the next step.
If you want to cancel the procedure, press
DISP (D).
7
Select (highlight) a folder in which a
file you want is included.
8
Show the name list of the files
included in the selected folder.
Each time you press the button,
the lists on the display changes
as follows:
Note:
The display can show only six names at a time.
You can show the other names on the next lists by
pressing 5 (up) or ∞ (down).
1
345621
Ex. When you have selected “Picture” in step
5
.
Folder name
list
File name
list
5
Select (highlight) one of the listed
items for which you want to download
a file.
•PowerOn : Opening screen
To download an animation to be shown
after the unit is turned on. (You can store
only one animation consisting of 30 frames
maximum.)
•PowerOff : Ending screen
To download an animation to be shown
before the unit is turned off. (You can store
only one animation consisting of 30 frames
maximum.)
•Picture : Graphic screen*
To download a still image to be shown
while playing a source. (You can store 90
still images—each one frame.)
•Movie : Graphic screen*
To download an animation to be shown
while playing a source. (You can store only
one animation consisting of 90 frames
maximum.)
* Graphic screen will appear only if no operation
is done for about 20 seconds.
If you want to cancel the procedure, press
number button 5, the download selection
screen goes off.
6
Show the name list of the folder
included in the inserted CD-R.
“File Check....” appears for a
while, then the folder list
appears.
The currently selected folder will be
highlighted on the display.
CONTINUED ON THE NEXT PAGE
EN39-45SH9101[E_EX]f.p65 03.2.27, 23:0441

42
ENGLISH
345621
The file name appears, and the unit will
ask you “Download OK?”
Deleting unwanted files
• When “BACK” is shown on the display above
number button 5, you can go back to the
previous screen by pressing number button 5.
To delete all the stored files at a time
1Press MODE (M) while playing any
source.
“Mode” appears on the display, and
the number buttons and 5 (up)/ ∞
(down) buttons start flashing.
2Press number button 6 to show the
download selection screen.
3Press 5 (up) or ∞ (down) to
select (highlight) all the listed
items.
4Press number button 4.
The unit asks you “All File Delete
OK?”
5Press number button 4 again.
“Now Deleting...” appears while
erasing the files. When erasure is
over, the download selection
screen appears again.
6Press number button 5 to resume
the source indication screen.
1
9
Select a file you want to download.
10
If it is OK, press number button 1 to
start downloading.
Downloading starts, and
“Downloading...” appears on the
display.
If it is over, the file name list
appears again.
If it is not OK, press number button 5, the
file selection screen appears again. Repeat
from step
8
again.
11
Repeat steps
8
to
10
if you are
downloading files for “Picture” and
want to store more files.
12
Finish the download procedure.
To download a file for another item listed on the
download selection screen, repeat from step
3
again.
Notes:
• If you try to store the 91st image for picture screen,
“Picture Full” appears and you cannot start
downloading. In this case, delete unwanted files
before downloading.
• If the total frame number of an animation
downloaded exceeds the following number, the
frames exceeding that numbers are ignored.
– For opening and ending screens: 30
– For movie screen: 90
M
MODE
6
D
DISP
4
4
5
EN39-45SH9101[E_EX]f.p65 03.2.27, 23:0442

43
ENGLISH
To delete the files stored for “PowerOn,”
“PowerOff,” “Picture (all stored images at
a time),” and “Movie”
1Press MODE (M) while playing any
source.
“Mode” appears on the display, and
the number buttons and 5 (up)/ ∞
(down) buttons start flashing.
2Press number button 6 to show the
download selection screen.
3Press 5 (up) or ∞ (down) to
select (highlight) one of the
listed items.
4To delete the file stored in
“PowerOn,” “PowerOff,” and
“Movie,” press number button 3.
The file name of the previously stored
animation appears, and the unit asks you
“Delete OK?”
To delete all the files stored in
“Picture” at a time, press number
button 4.
The unit asks you “All Picture Delete
OK?”
5To delete the file stored in
“PowerOn,” “PowerOff,” and
“Movie,” press number button 3
again.
To delete all the files stored in
“Picture” at a time, press number
button 4 again.
“Now Deleting...” appears while erasing the
selected file. When erasure is over, the
download selection screen appears again.
6Press number button 5 to resume
the source indication screen.
M
MODE
To delete the stored files for “Picture”
(one by one)
1Press MODE (M) while playing any
source.
“Mode” appears on the display, and
the number buttons and 5 (up)/ ∞
(down) buttons start flashing.
2Press number button 6 to show the
download selection screen.
3Press 5 (up) or ∞ (down) to
select (highlight) “Picture.”
4Press number button 3.
The unit shows the name list of the
stored files.
Note:
The display can show only six names at a time. You
can show the other names by pressing 5 (up) or ∞
(down) repeatedly.
5Press the number buttons for the file you want
to delete.
Selected file name appears, and the unit asks
you “Delete OK?”
6Press number button 3 to start
erasure.
“Now Deleting...” appears while
erasing the selected file. When
erasure is over, the name list of the stored
file appears again.
Appears when “Picture” is selected (highlighted)
345621
6
3
4
3
4
Ex. When selecting “Picture”
3
5
3
CONTINUED ON THE NEXT PAGE
M
MODE
6
EN39-45SH9101[E_EX]f.p65 03.2.27, 23:0443

44
ENGLISH
345621
Ex. When you select “Opening”
SEL
ATT
SEL
SEL
3
Select “Opening” (opening screen
setting) or “Ending” (ending screen
setting).
4
Select “User.”
•Default: Factory-preset animation is used.
•User: Your own edited animation is
used.
5
Finish the setting.
To activate the graphic screen using either
picture or movie
Using this setting, you can change the graphic
displays. These graphic screen appears if no
operation is done for about 20 seconds.
•If no image is stored in “Picture,” or no
animation in “Movie,” “UserPict.” will not be
selected as a PSM item.
1
Press and hold SEL (select) for more
than 2 seconds so that one of the
PSM items appears on the display.
(PSM: see pages 47 and 48.)
7To delete more files, repeat from steps 5 and
6.
8Press DISP (D) to resume the
source indication screen.
Activating the downloaded
images and animations
To activate the animations stored for
opening and ending screens
After the unit turns on or before the unit turns off,
you can see preset animations on the display.
These are called opening screen and ending
screen. You can use your own edited animations
for these opening and ending screens.
•Opening and ending screens will not be shown
if the “KeyIn CFM” setting is set to “Short" or
“Off.” (See page 48).
•If no animation is stored in “PowerOn” and
“PowerOff,” “Opening” and “Ending” will not be
selected as a PSM item.
1
Press and hold SEL (select) for more
than 2 seconds so that one of the
PSM items appears on the display.
(PSM: see pages 47 and 48.)
2
Press number button 1 to select
“MOVIE”—Movie category of the PSM
settings.
The “Graphics” setting screen appears on
the display.
D
DISP
EN39-45SH9101[E_EX]f.p65 03.2.27, 23:0444

45
ENGLISH
To select a still image for graphic
display—User Picture
You cannot select “UserPict.” as a PSM item in
the following cases:
•If no image is stored in “Picture,” or
•“UserPict.” is not selected for the “Graphics”
setting (see the left column).
1
Press and hold SEL (select) for more
than 2 seconds so that one of the
PSM items appears on the display.
(PSM: see pages 47 and 48.)
2
Press number button 1 to select
“MOVIE”—Movie category of the PSM
settings.
The “Graphics” setting screen appears on
the display.
3
Select “UserPict.”
4
Select a file you want.
5
Finish the setting.
Ex. When you select “UserPict.”
SEL
SEL
File name of the currently selected image also
appears.
SEL
1
2
Press number button 1 to select
“MOVIE”—Movie category of the PSM
settings.
The “Graphics” setting screen appears on
the display.
3
Select “UserMovie,” “UserSlide,” or
“UserPict.”
•
UserMovie
: Your edited animation stored in
“Movie” is activated as your
graphic screen.
•UserSlide: Your edited still images stored
in “Picture” are activated and
shown in sequence as your
graphic screen.
•UserPict.: One of your edited still image
stored in “Picture” is activated
as your graphic screen.
Select one of the stored images
(see the next column).
4
Finish the setting.
To cancel all graphic displays, select “Off” in
step
3
.
Note:
For the “Graphics” setting, you can also select “All
Demo,” “Int Demo,” and “ImageLink.”
— See pages 8 and 48 for “All Demo” and “Int
Demo.”
— See pages 24 and 48 for “ImageLink.”
1
ATT
ATT
EN39-45SH9101[E_EX]f.p65 03.2.27, 23:0445

46
ENGLISH
Changing the general settings
(PSM)
You can change the items listed on the table on
the next page by using the PSM (Preferred
Setting Mode) control.
• The PSM items are grouped into five
categories—MOVIE, CLOCK, DISP (display),
TUNER, and AUDIO.
Basic Procedure
Ex. To change “Contrast”
1
Press and hold SEL (select) for more
than 2 seconds so that one of the
PSM items appears on the display.
(See pages 47 and 48.)
The number buttons , 4 /
¢ , and control dial start
flashing to teach you that they
can be used for the next
operational steps.
2
Press number button (in this
example, 3) to select one of the PSM
categories.
The first-listed item in the selected category
appears.
3
Select the PSM item you want to
adjust.
• By pressing ¢ or 4
repeatedly, you can also move to another
category.
4
Adjust the PSM item selected.
5
Repeat steps
2
to
4
to adjust the
other PSM items if necessary.
6
Finish the setting.
OTHER MAIN FUNCTIONS
SEL
ATT
SEL
Ex. When you have selected “Graphics” previously
345621
EN46-53SH9101[E_EX]f.p65 03.2.27, 23:1946

47
ENGLISH
Preferred Setting Mode (PSM) items
Graphics Movie demonstration
KeyIn CFM Key-in confirmation
Opening*1 Opening animation
Ending*1 Ending animation
UserPict.*2 User Picture
Clock Hr Hour adjustment
Clock Min Minute adjustment
24H/12H 24 hours or 12 hours
Auto Adj Automatic clock setting
Scroll Scroll mode
Dimmer Dimmer mode
From– To*3Dimmer time setting
Contrast Contrast
LCD Type Display type
Font Type Font type
Tag Tag display
Theme Theme—Level meter
PTY Stnby PTY standby
AF-Regn’l Alternate frequency/
Regionalization reception
TA Volume Traffic announcement
volume
P-Search Program search
DISP (display)
Once Auto
Off
Auto Off
On
1 – 10
12
OnOff
Positive
Negative
Auto
TUNER
Once 48
Auto 50
548
Auto 49
149
On 49
Time Set
Any time – Any time 18 – 750
CLOCK
0 – 23 (1 – 12)
24Hours12Hours
0 (0:00) 8
00 (0:00) 8
12Hours 8,9
Standard Meter 1
Meter 2
Meter 3
MOVIE
Long Short
Off
Int Demo 48
Default User
Default User
Long 48
Default 44
Default 44
Standard 9
Indications Selectable values Initial settings Page
See page 48.
From the stored files First stored 45
See page 21. News 17
AF AF Reg
Off*4
Volume 0 — Volume 50
On
Off Off 20
Volume 20 20
AF 16
On
Off On 20
*1Displayed only after a downlaodable file is stored in memory.
*2Displayed only after a downlaodable file is stored in memory and while selecting “UserPict.” for “Graphics.”
*3Displayed only when “Dimmer” is set to “Time Set.”
*4Displayed only when “DAB AF” is set to “Off.”
CONTINUED ON THE NEXT PAGE
00 – 59
EN46-53SH9101[E_EX]f.p65 03.2.27, 23:1947

48
ENGLISH
To show the graphics on the display—
Graphics
You can change the graphics shown on the
display. These graphics appear if no operation is
done for about 20 seconds (except for
“ImageLink”).
•All Demo: Display demonstration (animation)
appears (see page 8).
•Int Demo: Display demonstration (animation)
and playback source indication
appears alternately (see page 8).
•
UserMovie
: Your edited animation appears (see
pages 44 and 45).
•UserSlide: Your edited still images appears in
sequence (see pages 44 and 45).
•UserPict.: One of your edited still image
appears (see pages 44 and 45).
•ImageLink: To show a still image while playing
back an MP3/WMA tracks (see
page 24).
•Off: Cancels all graphic display above.
Note:
You can select “UserMovie,” “UserSlide,” and
“UserPict.” only after downloading the appropriate
files in memory. (See page 40.)
To select the source animation on the
display—KeyIn CFM
When changing the source, the display shows
the source animation. You can select the source
animation on the display according to your
preference.
•Long: A long source animation appears.
•Short: A short source animation appears.
•Off: Cancels the source animation.
To select the scroll mode—Scroll
When a disc information is emphasized at the
center of the display, it is shown entirely by
scrolling if it cannot be shown at a time.
•Once: Scrolls only once.
•Auto: Repeats the scroll (in 5-second
intervals).
•Off: Cancels scroll mode.
Note:
Even if the scroll mode is set to “Off,” you can scroll
the display by pressing DISP (D) for more than 1
second.
To adjust the display contrast level
—Contrast
You can adjust the display contrast level among
1 to 10.
Adjust it to make the display indications clear
and legible.
IF Filter Intermediate frequency
filter
DAB AF*5Alternative frequency
search
Announce*5Announcement standby
Beep Key-touch tone
Line In*6Line Input switch
Telephone Telephone muting
PowerAmp Power amplifier switch
Indications Selectable values Initial settings Page
AUDIO
Off On
Off On
On 49
On 49
Off On On 49
TUNER
Off On On 69
Off Muting1
Muting2 Off 49
See page 68. Travel 66
*5Displayed only when the DAB tuner is connected.
*6Not displayed when the current source is “LINE IN.”
Auto
Wide Auto 49
EN46-53SH9101[E_EX]f.p65 03.2.27, 23:1948

49
ENGLISH
To select the display illumination pattern
—LCD Type
You can select the display illumination patterns
according to your preference.
•Auto: Positive pattern will be selected
during the day time (depending on
the “Dimmer” setting); on the other
hand, negative pattern will be used
during the night time (depending on
the “Dimmer” setting).
•Positive: Positive (normal) pattern of the
display.
•Negative: Negative pattern of the display.
To select the font on the display
—Font Type
You can change the font types used on the
display. Select either “1” or “2” according to your
preference.
To turn the tag display on or off—Tag
An MP3 and WMA track can contain track
information called “Tag” where its album name,
performer, track title, etc. are recorded.
•On: Turns on the Tag display while playing
MP3 or WMA tracks.
•If a track does not have Tags, folder
name and track name appear.
•Off: Turns off the Tag display while playing
MP3 or WMA tracks. (Only the folder
name and track name appear.)
Notes:
• If you change the setting from “Off” to “On” while
playing a track, the tag display will be activated
when the next track starts playing.
• For MP3 tracks only: There are two versions—ID3v1
(ID3 Tag version 1) and ID3v2 (ID3 Tag version 2).
When both ID3v1 and ID3v2 are recorded, ID3v2
will be shown.
To change the FM tuner selectivity
—IF Filter
In some areas, adjacent stations may interfere
with each other. If this interference occurs, noise
may be heard.
•Auto: When this type of interference occurs,
this unit automatically increases the
tuner selectivity so that interference
noise will be reduced. (But the stereo
effect will also be lost.)
•Wide: Subject to the interference from adjacent
stations, but sound quality will not be
degraded and the stereo effect will not
be lost.
To turn on/off the key-touch tone—Beep
You can deactivate the key-touch tone if you do
not want it to beep each time you press a button.
•On: Activates the key-touch tone.
•Off: Deactivates the key-touch tone.
To select the telephone muting—
Telephone
This mode is used when a cellular phone system
is connected. Depending on the phone system
used, select either “Muting1” or “Muting2,”
whichever mutes the sounds from this unit.
•Muting1: Selects this if this setting can mute
the sounds when using the cellular
phone.
•Muting2: Selects this if this setting can mute
the sounds when using the cellular
phone.
•Off: Cancels the telephone muting.
To turn on/off the line input switch
—Line In
You can switch off the line input when no external
component is connected to the LINE IN plugs.
•On: You can select “LINE IN” as the playback
source.
•Off: You cannot select “LINE IN” as the
playback source.
To turn on/off the power amplifier switch—
PowerAmp
You can switch off the built-in amplifier and send
the audio signals only to the external amplifier(s) to
get clear sounds and to prevent internal heat buildup
inside this unit.
•On: When not using external amplifier(s).
•Off: When using external amplifier(s).
EN46-53SH9101[E_EX]f.p65 03.2.27, 23:1949

50
ENGLISH
Selecting the dimmer mode
You can dim the display at night automatically or
as you set the timer.
When shipped from the factory, Auto Dimmer
mode is activated.
Note:
Auto Dimmer equipped with this unit may not work
correctly on some vehicles, particularly on those
having a control dial for dimming.
In this case, select any other than “Auto.”
1
Press and hold SEL (select) for more
than 2 seconds so that one of the
PSM items appears on the display.
(PSM: see pages 47 and 48.)
2
Press number button 3 to select
“DISP”—Display category of the
PSM settings.
3
Press ¢ or 4 to select
“Dimmer.”
4
Set the dimmer mode as you like.
•Auto: Activates Auto Dimmer.
When you turn on the car
head lights, the display
automatically dims.
•Off: Cancels Auto Dimmer.
•On: Always dims the display.
•Time Set: Used to set the timer for the
dimmer mode.
Note:
Selecting “Auto” or “Time Set” may change the
display pattern to the “Negative” or “Positive”
pattern if “LCD Type” is set to “Auto.”
•If you select “Time Set,” go to the following
steps to set the timer.
•If you select any other than “Time Set,” go
to step
7
to finish the setting.
5
Select “From– To” to set the timer for
the dimmer mode.
6
Set the timer.
1Turn the control dial to select the start
time.
2Press ¢ once.
3Turn the control dial to select the end
time.
7
Finish the setting.
SEL
345621
ATT
SEL
EN46-53SH9101[E_EX]f.p65 03.2.27, 23:1950

51
ENGLISH
3
Select the character set you want
while the first character position is
flashing.
Each time you press the button,
the character set changes as
follows:
4
Select a character.
• About the available
characters, see page
71.
5
Move the cursor to the next
(or previous) character position.
6
Repeat steps
3
to
5
until you finish
entering the name.
7
Finish the procedure while the last
selected character is flashing.
To erase the entered characters
Insert spaces using the same procedure
described above.
Notes:
• When you try to assign a name to the 41st disc,
“Name Full” appears on the display, and you
cannot enter the text entry mode. In this case, delete
unwanted names before assignment.
• When the CD changer is connected, you can assign
names to CDs in the CD changer. These names can
also be shown on the display if you insert the CDs
in this unit.
Assigning names to the sources
You can assign names to CDs (both in this unit
and in the CD changer), and the external
component.
After assigning a name, it will appears on the
display when you select the source.
CDs* Up to 32 characters (up to
40 discs)
External component Up to 8 characters
*You cannot assign a name to CD Text, MP3, and
WMA discs.
.
1
Select a source you want to assign a
name to.
When you select a source, the
power automatically comes on.
2
While holding DISP (D), press and
hold SEL (select) for more than
2 seconds.
Maximum number of
characters
Sources
Ex.: When you select CD as the source
SRC
D
DISP
SEL
ATT
SEL
D
DISP
A – Z
(Upper case)
a – z
(Lower case)
Accented letters
(Lower case)
Accented letters
(Upper case)
0 – 9 & symbols
(Numbers)
EN46-53SH9101[E_EX]f.p65 03.2.28, 11:4051

52
ENGLISH
Changing the control panel
angle
You can change the angle of the control panel to
four positions.
1
Press and hold 0 ( ) until the
angle adjustment screen appears.
The 5 (up) and ∞ (down)
buttons start flashing to teach
you that they can be used for the
next operational steps.
2
Adjust the angle to the position you
want.
CAUTION:
NEVER insert your finger in between the
control panel and the unit, as it may get
caught or hurt.
Adj.1
Adj.2
Adj.3
Adj.4
The control panel angles changes as follows:
When using the remote controller
You can change the angle position simply by
pressing ANGLE 5 or ANGLE ∞.
EN46-53SH9101[E_EX]f.p65 03.2.27, 23:1952

53
ENGLISH
Detaching the control panel
You can detach the control panel when leaving
the car.
When detaching or attaching the control panel,
be careful not to damage the connectors on the
back of the control panel and on the panel
holder.
Detaching the control panel
Before detaching the control panel, be sure to
turn off the power.
1
Unlock the control panel.
The control panel
comes out toward you.
2
Move the control panel to the right,
then pull it out of the unit.
3
Put the detached control panel into
the provided case.
Attaching the control panel
1
Insert the left side of the control
panel into the groove on the panel
holder.
2
Press the right side of the control
panel to fix it to the panel holder.
Note on cleaning the connectors:
If you frequently detach the control panel, the
connectors will deteriorate.
To minimize this possibility, periodically wipe the
connectors with a cotton swab or cloth moistened
with alcohol, being careful not to damage the
connectors.
Connectors
EN46-53SH9101[E_EX]f.p65 03.2.27, 23:1953

54
ENGLISH
CD CHANGER OPERATIONS
We recommend that you use the JVC MP3-
compatible CD changer with your unit.
By using this CD changer, you can play back
your original CD-Rs (Recordable) and CD-RWs
(Rewritable) recorded either in audio CD format
or in MP3 format.
• You can also connect other CH-X series
CD changers (except CH-X99 and CH-X100).
However, they are not compatible with MP3
discs, so you cannot play back MP3 discs.
• You cannot use the KD-MK series CD
changers with this unit.
Before operating your CD changer:
• Refer also to the Instructions supplied with
your CD changer.
• If no discs are in the magazine of the CD
changer or the discs are inserted upside
down, “No Disc” will appear on the display. If
this happens, remove the magazine and set
the discs correctly.
• If no magazine is loaded in the CD changer,
“No Magazine” appears on the display. If this
happens, insert the magazine in the CD
changer.
• If “Reset 01” – “Reset 08” appears on the
display, something is wrong with the
connection between this unit and the CD
changer. If this happens, check the
connection and make sure the cords are
connected firmly. Then, press the reset
button of the CD changer.
Note:
You cannot control and play any WMA disc on the CD
changer.
Playing discs
Select the CD automatic changer
(CD-CH).
Each time you press the button,
the source changes as described
on page 7. When you select a
source, the power automatically
comes on.
Playback starts from the first track of the first
disc, and all tracks of all discs are played back.
•When the current disc is an audio CD or a
CD Text disc:
1Disc number
2Disc title/performer (if no title is recorded or assigned,
“No Name” appears.)
3Track title (if no title is recorded, “No Name”
appears.)
4Current track number
5Elapsed playing time of the current track
SRC
23
45
1
3456 M21
D
SRC
DISP
ATT
SEL
T/P
MODE
EN54-60SH9101[E_EX]f.p65 03.2.27, 23:2054

55
ENGLISH
To go to a particular disc directly
Press the number button corresponding to the
disc number to start its playback (while the CD
changer is playing).
•To select a disc number from 1 – 6:
Press 1 (7) – 6 (12) briefly.
•To select a disc number from 7 – 12:
Press and hold 1 (7) – 6 (12) for more than 1
second.
To fast-forward or reverse the track
Note:
During this operation on an MP3 disc, you can only
hear intermittent sounds. (The elapsed playing time
also changes intermittently on the display.)
To go to the next track or the previous
tracks
Press ¢ briefly, while
playing a disc, to go ahead to
the beginning of the next track.
Each time you press the button
consecutively, the beginning of
the next tracks is located and
played back.
Press 4 briefly, while playing a disc, to go
back to the beginning of the current track. Each
time you press the button consecutively, the
beginning of the previous tracks is located and
played back.
Press and hold ¢ , while
playing a disc, to fast-forward
the track.
Press and hold 4, while
playing a disc, to reverse the
track.
4
567
2 3
1
•When the current disc is an MP3 disc:
1Disc number
2Disc type—MP3
3Album title/performer (or folder name when “Ta g ”
is set to “Off”—see page 49, or when no Tag is
recorded)
4Track title (or track name when “Ta g ” is set to
“Off”—see page 49, or when no Tag is recorded)
5Current folder number
6Current track number
7Elapsed playing time of the current track
To change the display pattern
By pressing DISP (D), you can change the
information shown on the display.
Each time you press the button, the
display patterns change.
•For details, see page 31.
If you change the source or turn off the unit
Disc play also stops.
Next time you select “CD-CH” as the source, disc
play starts from where it has been stopped
previously.
345621
D
DISP
EN54-60SH9101[E_EX]f.p65 03.2.27, 23:2055

56
ENGLISH
To go to a track quickly
This operation is only possible when using
JVC MP3-compatible CD changer CH-X1500.
1Press MODE (M) while playing
a disc.
“Mode” appears on the display,
and the number buttons and 5 (up)/
∞ (down) buttons start flashing.
2Press 5 (up) or ∞ (down),
while “Mode” is still on the
display.
First time you press 5 (up) or
∞ (down), the track skips to
the nearest higher or lower track with a track
number of multiple ten (ex. 10th, 20th, 30th).
Then, each time you press the button, you
can skip 10 tracks (see “How to go to the
desired track quickly” that follows).
•After the last track, the first track will be
selected, and vice versa.
•While playing an MP3 disc, this operation is
possible only within a folder.
M
MODE
Track 6 \ 10 \ 20 \ 30 \ 31 \ 32
(Three times) (Twice)
Track 36 \ 30 \ 20 \ 10 \ 9 \ 8
(Three times) (Twice)
M
MODE
M
MODE
How to go to the desired track quickly
• Ex. 1: To select track number 32 while
playing track number 6
• Ex. 2 :To select track number 8 while
playing track number 36
Current track number
While playing an audio CD or a CD Text disc:
While playing an MP3 disc:
Current track number
Current folder number
See page 40 for this function.
EN54-60SH9101[E_EX]f.p65 03.2.27, 23:2056

57
ENGLISH
Locating a folder on a disc
The following operations are only possible
when playing an MP3 disc using a JVC MP3-
compatible CD changer, CH-X1500.
To skip to the next or previous folder
(either on the same or different hierarchy levels)
On the control panel:
On the remote controller:
Press and hold 3 (right) while
playing a disc to skip to the next
folder.
Each time you press and hold the
button consecutively, the next
folder is located and the first track
in the folder starts playing.
Press 5 (up) while playing a disc
to skip to the next folder.
Each time you press the button
consecutively, the next folder is
located and the first track in the
folder starts playing.
Press ∞ (down) while playing a disc to skip back
to the previous folder.
Each time you press the button consecutively,
the previous folder is located and the first track in
the folder starts playing.
Press and hold 2 (left) while playing a disc to
skip back to the previous folder.
Each time you press and hold the button
consecutively, the previous folder is located and
the first track in the folder starts playing.
Note:
If the folder does not contain any MP3 tracks, it is
skipped.
See the hierarchy diagram on page 22.
01 02 03 04
PRESET PRESET
To skip to the next or previous folder
within a folder (on the same hierarchy level)
ONLY on the remote controller:
See the hierarchy diagram on page 22.
03 04 03 04
Press 3 (right) while playing a disc
to skip to the next folder.
Each time you press the button
consecutively, the next folder
included within the same folder (on
the same hierarchy level) is
located (and the first track in the
folder starts playing if recorded).
Press 2 (left) while playing a disc to skip back to
the previous folder.
Each time you press the button consecutively,
the previous folder included within the same
folder (on the same hierarchy level) is located
(and the first track in the folder starts playing if
recorded).
Note:
If the folder does not contain any MP3 tracks,
playback will not start (“No Music” appears on the
display). Select another folder.
To go back to the root directly, press R•D on
the remote controller. You can go back to the
root from any folder.
•If tracks are recorded on the disc directly
without putting them into a folder, this unit
starts playing the tracks.
01 05 01 05
Example 1
Example 2
PRESET PRESET
EN54-60SH9101[E_EX]f.p65 03.2.27, 23:2057

58
ENGLISH
Selecting a disc/folder/track
using the name lists
To select a disc using the disc lists
If you forget what discs are loaded in the CD
changer, you can show the disc name list and
select a disc in the list shown on the display.
•The display can show only six names at a time.
1
While playing a disc, press and hold
5 (up) or ∞ (down) until a disc name
list appears on the display.
Note:
If a disc has a disc title (CD Text) or an assigned
disc name, it will be shown on the display.
However, if the disc has not been played before,
its disc number will appear.
2
Press 5 (up) or ∞ (down) to show
the other disc name list, if
necessary.
3
Select the number (1 – 6) for the disc
you want to play.
While playing an MP3 disc, you can also show
the folder list(s) and track list(s) on the display,
then select a folder or track.
1While playing an MP3 disc,
press and hold 5 (up) or
∞ (down) until a disc name list
appears on the display.
2Press ¢ or 4 to
show a folder list of the
current disc or track list of the
current folder.
Each time you press the button, the lists on
the display change as follows:
Note:
The display can show only six names at a time. You
can show the other names on the next lists by pressing
5 (up) or ∞ (down).
3Press the number button for the disc, folder or
track you want to play.
345621
Ex. When folder list is selected
Ex. When track list is selected
EN54-60SH9101[E_EX]f.p65 03.2.27, 23:2158

59
ENGLISH
Selecting playback modes
To play back tracks at random (Random
Play)
You can play back tracks on a disc, on all loaded
discs (or in a folder for MP3 discs) at random.
1Press MODE (M) while playing a
disc.
“Mode” appears on the display,
then the number buttons and the 5
(up)/∞ (down) buttons start
flashing.
2Press number button 3, while “Mode” is still
on the display.
Each time you press the button, random play
mode changes as follows:
345621
Random Off
Random AllRandom Disc
Random All
Random DiscRandom Folder
Random Off
Current track number
While playing an audio CD or a CD Text disc:
While playing an MP3 disc:
Current track number
Current folder number
For audio CD and CD Text discs:
For MP3 discs:
Mode Plays randomly
Random Folder
*:All tracks of the current folder,
then moves to the next folder and
so on.
•While playing, lights
up on the display.
Random Disc: All tracks on the disc.
•While playing, lights
up on the display.
Random All: All tracks of all discs inserted in
the magazine.
•While playing, lights
up on the display.
*“Random Folder” can be used for MP3 discs only.
To cancel Random Play, select “Random Off” by
pressing number button 3 repeatedly or press
number button 4 in step 2.
M
MODE
EN54-60SH9101[E_EX]f.p65 03.2.27, 23:2159

60
ENGLISH
To play back tracks repeatedly (Repeat Play)
You can play back a track, a disc (or a folder for
MP3 discs) repeatedly.
1Press MODE (M) while playing a
disc.
“Mode” appears on the display, then
the number buttons and the 5 (up)/
∞ (down) buttons start flashing.
2Press number button 2, while “Mode” is still
on the display.
Each time you press the button, repeat play
mode changes as follows:
For audio CD and CD Text discs:
For MP3 discs:
Mode Plays repeatedly
Repeat Track : Current (or specified) track.
•While playing, lights
up on the display.
Repeat Folder
* :All tracks of the current (or
specified) folder.
•While playing, lights
up on the display.
Repeat Disc : All tracks of the current (or
specified) disc.
•While playing, lights
up on the display.
*“Repeat Folder” can be used for MP3 discs only.
To cancel Repeat Play, select “Repeat Off” by
pressing number button 2 repeatedly or press
number button 4 in step 2.
M
MODE
345621
345621
Repeat Off
Repeat DiscRepeat Track
Repeat Disc
Repeat Folder
Repeat Track
Repeat Off
Intro Disc
Intro Track
Intro Off
Intro Disc
Intro FolderIntro Track
Intro Off
M
MODE
To play back only intros (Intro Scan)
You can play back the first 15 seconds of each
track sequentially.
1Press MODE (M) while playing a
disc.
“Mode” appears on the display, then
the number buttons and the 5 (up)/
∞ (down) buttons start flashing.
2Press number button 1, while “Mode” is still
on the display.
Each time you press the button, intro scan
mode changes as follows:
For audio CD and CD Text discs:
For MP3 discs:
Mode Plays the beginnings of
Intro Track : All tracks of the disc.
•While playing, lights
up on the display.
Intro Folder* : First tracks of all folders of the
current disc.
•While playing, lights
up on the display.
Intro Disc : First tracks of all inserted discs.
•While playing, lights
up on the display.
*“Intro Folder” can be used for MP3 discs only.
To cancel Intro Scan, select “Intro Off” by
pressing number button 1 repeatedly or press
number button 4 in step 2.
EN54-60SH9101[E_EX]f.p65 03.2.27, 23:2160

61
ENGLISH
EXTERNAL COMPONENT OPERATIONS
SRC
ATT
3456 M21
D
SRC
DISP
ATT
SEL
T/P
MODE
3
Adjust the volume.
4
Select the DSP mode and sound
mode as you want.
• For the DSP modes, see page 32.
• For the sound (iEQ) modes, see page 35.
Note:
When the source is “LINE IN,” the DISP (D) button
will not work.
If you have assigned a different name to the
external component, it will appear.
Playing an external component
You can connect an external components to the
LINE IN plugs on the rear.
• If you cannot select “LINE IN” as the source,
change the “Line In” setting to “On.” (See page
49.)
1
Select the external component
(LINE IN).
Each time you press the
button, the source changes
as described on page 7.
When you select a source,
the power automatically
comes on.
2
Turn on the connected component
and start playing the source.
EN61-61SH9101[E_EX]f.p65 03.2.27, 23:2261

62
ENGLISH
DAB TUNER OPERATIONS
Tuning in to an ensemble and
one of the services
A typical ensemble has 6 or more programmes
(services) broadcast at the same time. After
tuning in to an ensemble, you can select a
service you want to listen to.
1
Select the DAB tuner.
Each time you press the button,
the source changes as described
on page 7. When you select a
source, the power automatically
comes on.
2
Select the DAB band (DAB1, DAB2,
or DAB3).
1Press and hold SRC for more
than 1 second.
The band indication on the
display starts flashing.
2Within about 5 seconds (wile
the band indication is
flashing), press SRC again.
Each time you press the
button, the band changes.
Note:
This receiver has three DAB bands (DAB1,
DAB2, DAB3). You can use any of them to tune
in to an ensemble.
We recommend that you use DAB (Digital Audio
Broadcasting) tuner KT-DB1500 or KT-DB1000
with your unit.
If you have another DAB tuner, consult your JVC
IN-CAR ENTERTAINMENT dealer.
• Refer also to the Instructions supplied with
your DAB tuner.
What is DAB system?
DAB is one of the digital radio broadcasting
systems available today. It can deliver CD
quality sound without any annoying
interference and signal distortion.
Furthermore, it can carry text, pictures, and
data.
In contrast to FM broadcast, where each
programme is transmitted on its own
frequency, DAB combines several
programmes (called “services”) to form one
“ensemble.”
In addition, each “service”—called “primary
service”—can also be divided into its
components (called “secondary service”).
With the DAB tuner connected with this unit,
you can enjoy these DAB services.
3456 M21
D
SRC
DISP
ATT
SEL
T/P
MODE
SRC
SRC
DAB1
DAB2
DAB3
Last received ensemble (service) of the
selected band is tuned in.
Channel number
Ensemble label
EN62-70SH9101[E_EX]f.p65 03.2.27, 23:2962

63
ENGLISH
3
Start searching for an ensemble.
When an ensemble is received, searching
stops.
To stop searching before an ensemble is
received, press the same button you have
pressed for searching.
4
Select a service (either primary or
secondary) you want to listen to.
To tune in to a particular ensemble
without searching
1Press SRC repeatedly to select DAB tuner as
the source.
2Press and hold SRC for more than 1 second.
3Press SRC repeatedly to select the DAB
band (DAB1, DAB2, or DAB3).
4Press and hold ¢ or 4 for more
than one second.
5Press ¢ or 4 repeatedly until the
ensemble you want is reached.
•If you hold down the button, the frequency
keeps changing until you release the button.
6Press 5 (up) or ∞ (down) to select a service
(either primary or secondary) you want to
listen to.
When noises generated while running
interfere with your listening
While driving, surrounding sounds will interfere
with your listening. Especially the low level
sounds will be hard to listen.
If this happens, you can reinforce the low level
sounds to improve your listening.
For this purpose, some service provides
Dynamic Range Control signals together with
their regular program signals.
1Press MODE (M) while listening to
a DAB service.
“Mode” appears on the display, and
the number buttons start flashing.
2Press number button 1 repeatedly to activate
the DRC function while “Mode” is still on the
display.
Each time you press the button, the DRC
function will be set as follows:
As the number increases, the DRC effect level
also increases.
•The DRC indicator will be highlighted
() only when the unit received DRC
signals from the tuned service.
To cancel the DRC effect, select “DRC Off.”
Press ¢ to search for
ensembles of higher
frequency.
Press 4 to search for
ensembles of lower
frequency.
Press 5 (up) to select the
next service. (If a primary
service has some secondary
services, they are selected
before the next primary
service is selected.)
Press ∞ (down) to select the
previous service (either
primary or secondary).
DRC 1 DRC 2
DRC Off
DRC 3
M
MODE
345621
After about
5 seconds
The display returns to the source indication
screen.
DRC indicator appears
EN62-70SH9101[E_EX]f.p65 03.2.27, 23:2963

64
ENGLISH
5
Press and hold the number button
(in this example, 1) you want to store
the selected service into for more
than 2 seconds.
6
Repeat the above procedure to store
other DAB services into other preset
numbers.
Notes:
• You can only preset primary DAB services. If you
store a secondary service, its primary service will
be stored instead.
• A previously preset DAB service is erased when a
new DAB service is stored in the same preset
number.
Tuning in to a preset DAB
service
You can easily tune in to a preset DAB service.
Remember that you must store services first. If
you have not stored them yet, “Storing DAB
services in memory.”
1
Select the DAB tuner.
Each time you press the button,
the source changes as described
on page 7. When you select a
source, the power automatically
comes on.
The display pattern automatically changes
to the initial display pattern and the preset
number flashes (then the previous display
pattern resumes).
Storing DAB services in
memory
You can preset up to 6 DAB services in each
DAB band (DAB1, DAB2, and DAB3) manually.
1
Select the DAB tuner.
Each time you press the button,
the source changes as described
on page 7. When you select a
source, the power automatically
comes on.
2
Select the DAB band (DAB1, DAB2,
or DAB3).
1Press and hold SRC for more
than 1 second.
The band indication on the
display starts flashing.
2Within about 5 seconds (wile
the band indication is
flashing), press SRC again.
Each time you press the
button, the band changes.
3
Tune in to an ensemble you want.
4
Select a service of the ensemble you
want to listen to.
Press 5 (up) to select the next
service.
Press ∞ (down) to select the
previous service.
SRC
SRC
DAB1
DAB2
DAB3
1
SRC
EN62-70SH9101[E_EX]f.p65 03.2.27, 23:2964

65
ENGLISH
2
Select the DAB band (DAB1, DAB2,
or DAB3).
1Press and hold SRC for more
than 1 second.
The band indication on the
display starts flashing.
2Within about 5 seconds (while
the band indication is
flashing), press SRC again.
Each time you press the
button, the band changes.
3
Select the number (1 – 6) for the
preset DAB service (primary) you
want.
Note:
If the selected primary service has some secondary
services, pressing the same number button repeatedly
will tune in to the secondary services.
Selecting a preset service using the
preset service list
If you forget what services are stored in what
preset number, you can check the preset service
list, then select your desired service on the list.
1
Select the DAB tuner.
Each time you press the button,
the source changes as described
on page 7. When you select a
source, the power automatically
comes on.
2
Select the DAB band (DAB1, DAB2,
or DAB3).
1Press and hold SRC for more
than 1 second.
The band indication on the
display starts flashing.
2Within about 5 seconds (while
the band indication is
flashing), press SRC again.
Each time you press the
button, the band changes.
3
Press and hold 5 (up) or ∞ (down)
until the preset ensemble (primary
service) list for the current band
(DAB1, DAB2, or DAB3) appears on
the display.
Note:
You can show the other DAB band preset
ensemble (primary service) lists (DAB1, DAB2,
or DAB3) by pressing 5 (up) or ∞ (down).
4
Select the number (1 – 6) for a
service you want.
SRC
DAB1
DAB2
DAB3
345621
SRC
SRC
DAB1
DAB2
DAB3
345621
EN62-70SH9101[E_EX]f.p65 03.2.27, 23:2965

66
ENGLISH
•If you press the button while listening to
any other source than AM
–The TP indicator comes to light up when a
service supporting Road Traffic Flash signal
(or an FM RDS station supporting TA signal)
is tuned in by the built-in tuner. This receiver
now stands by for the Road Traffic Flash
signal (or TA signal) reception.
–The TP indicator keeps flashing when a
service supporting Road Traffic Flash signal
(or an FM RDS station supporting TA signal)
is NOT tuned in by the built-in tuner. In this
case, this receiver cannot stand by for Road
Traffic Flash signal (or TA signal) reception.
How Road Traffic Flash Standby Reception
works:
If a Road Traffic Flash (or Traffic Announcement)
starts broadcasting while the Road Traffic Flash
Standby Reception is activated, “Traffic Flash”
appears and the unit tunes into the service (or
FM RDS station) broadcasting Road Traffic Flash
(or Traffic Announcement). The volume
increases to the preset TA volume level and the
Road Traffic Flash (or Traffic Announcement) can
be heard.
Using Announcement Standby
Reception
Announcement Standby Reception allows the
unit to switch temporarily to your favorite service
(Announcement type).
To select your favorite announcement type
for Announcement Standby Reception
When shipped from factory, Announcement
Standby Reception has been set to work for
searching for “Travel” services.
You can select your favorite announcement type
for Announcement Standby Reception.
•If you do not want to change the announcement
type (from “Travel” to another one), go to page
68.
What you can do more with
DAB
With the DAB tuner connected, you can use the
following convenient functions.
•Road Traffic Flash Standby Reception
•Standby Reception of 9 types of
Announcement signals
•PTY Standby Reception
•PTY search
•Tracing the same program (service)
automatically while driving where the same
DAB ensemble is not received
Road Traffic Flash Standby Reception
Press T/P briefly to activate
Road Traffic Flash Standby
Reception.
Each time you press the button,
Road Traffic Flash Standby
Reception turns on and off.
•When this function is turned
on, the TP indicator lights up or
flashes (as follows).
•If you press the button while listening to a
service supporting Road Traffic Flash
signal, the TP indicator lights up.
This receiver now stands by for the Road
Traffic Flash signal reception.
•If you press the button while listening to a
service NOT supporting Road Traffic Flash
signal, the TP indicator flashes.
In this case, Road Traffic Flash Standby
Reception does not work.
–If an FM RDS station supporting TA signal is
tuned in by the built-in tuner. This receiver
stands by for the TA signal reception and the
TP indicator lights up.
T/P
TP indicator appears
(either lights up or flashes)
EN62-70SH9101[E_EX]f.p65 03.2.27, 23:2966

67
ENGLISH
SEL
ATT
SEL
345621
Ex.: When the currently selected
announcement type for Announcement
Standby Reception is “Travel”
To activate Announcement Standby
Reception
1Press MODE (M) while listening to a
DAB service.
“Mode” appears on the display, and
the number buttons start flashing.
2Press number button 2 repeatedly to activate
Announcement Standby Reception while
“Mode” is still on the display.
Each time you press the button,
Announcement Standby Reception turns on
and off alternately.
M
MODE
ANN indicator appears
(either lights up or flashes)
After about
5 seconds
The display returns to the source indication
screen.
345621
See page 40 for this
function.
1
Press and hold SEL (select) for more
than 2 seconds so that one of the
PSM items appears on the display.
(PSM: see pages 47 and 48.)
2
Press number button 4 to select
“TUNER”—Tuner category of the
PSM settings.
The “PTY Stnby” (standby) setting screen
appears on the display.
3
Select “Announce” (announcement).
4
Select one of the 9 announcement
types. (See page 68.)
Selected announcement
type appears on the
display and is stored into
memory.
5
Finish the setting.
CONTINUED ON THE NEXT PAGE
EN62-70SH9101[E_EX]f.p65 03.2.27, 23:2967

68
ENGLISH
The ANN (announcement) indicator either lights
up or flashes.
•If the ANN indicator lights up, Announcement
Standby Reception is activated.
If a service starts broadcasting a programme of
the selected announcement type, this unit
automatically tunes in to the service.
•If the ANN indicator flashes, Announcement
Standby Reception is not yet activated since
the service being received does not provide
the signals used for Announcement Standby
Reception.
To activate Announcement Standby Reception,
you need to tune in to another service
providing these signals. Press ¢ or
4 to search for such a service.
When a service providing these signals is
tuned in, the ANN indicator stops flashing and
remains lit. Now Announcement Standby
Reception is activated.
Note:
After turning on Announcement Standby Reception,
you can change the source without canceling
Announcement Standby Reception. In this case, the
ANN indicator stops flashing if it was. If a service
starts broadcasting the selected announcement type,
this unit automatically changes the source and tunes
in to the service.
How Announcement Standby Reception
works:
If a service of the selected Announcement type
starts broadcasting while the Announcement
Standby Reception is activated, selected
announcement type appears and the unit tunes
into the service.
Announcement type
Travel: Programmes about travel
destinations, package tours, and
travel ideas and opportunities
Warning: Warnings about earthquakes,
tsunami, etc.
News: News
Weather: Weather information
Event: Information about events, concerts,
etc.
Special: Special programmes expanding
on current news or affairs
Rad Inf: Radio information
Sports: Sport events
Finance: Reports on commerce, trading,
the Stock Market, etc.
EN62-70SH9101[E_EX]f.p65 03.2.27, 23:2968

69
ENGLISH
Using PTY Standby Reception
PTY Standby Reception allows the unit to switch
temporarily to your favorite programme (PTY:
Programme Type) from any source except AM
stations
•Operations are exactly the same as explained
on pages 17 and 18 for FM RDS stations. You
cannot use PTY Standby Reception separately
for the DAB tuner and for the FM tuner.
•PTY Standby Reception works for the DAB
tuner only using a Dynamic PTY, but not a
Static PTY.
To select your favorite PTY code for PTY
Standby Reception, see page 17.
To set PTY Standby Reception, see pages 17
and 18.
•You can set PTY Standby Reception when the
source is either “FM” or “DAB.”
Searching your favorite service
You can search any one of the PTY codes (either
Dynamic or Static PTY).
In addition, you can store your 6 favorite
programme types in the number buttons (see
page 18).
•Operations are exactly the same as explained
on pages 18 and 19 for FM RDS stations.
However, you cannot store PTY codes in the
number buttons separately for the DAB tuner
and for the FM tuner.
To store your favorite programme (service)
types, see pages 18 and 19.
To search your favorite programme (service)
type, see page 19.
•Search will be performed on the DAB tuner
only.
Tracing the same program
automatically (Alternative Reception)
You can keep listening to the same program.
•While receiving a DAB service:
When driving in an area where a service
cannot be received, this unit automatically
tunes in to another ensemble or FM RDS
station, broadcasting the same program.
•While receiving an FM RDS station:
When driving in an area where a DAB service
is broadcasting the same program as the
FM RDS station is broadcasting, this unit
automatically tunes in to the DAB service.
To use Alternative Reception
When shipped from the factory, Alternative
Reception is activated.
•See also “Changing the general settings
(PSM)” on page 46.
1Press and hold SEL (select) for more than
2 seconds so that one of the PSM items
appears on the display.
2Press number button 4 to select “TUNER”—
Tuner category of the PSM settings.
3Press ¢ or 4 to select “DAB AF”
(alternative frequency).
4Turn the control dial to select the desired
mode.
• On: Traces the program among DAB
services and FM RDS stations
—Alternative Reception. The AF
indicator lights up on the display (see
page 15).
• Off: Alternative Reception is deactivated.
5Press SEL (select) to finish the setting.
Note:
When Alternative Reception (for DAB services) is
activated, Network-Tracking Reception (for RDS
stations: see page 15) is also activated automatically.
On the other hand, Network-Tracking Reception
cannot be deactivated without deactivating
Alternative Reception.
EN62-70SH9101[E_EX]f.p65 03.2.27, 23:2969

70
ENGLISH
Changing the display pattern
By pressing DISP (D), you can change the information shown on the display.
Each time you press the button, the display patterns change as follows:
*1Ensemble label (primary service) indicator: The
different indicator ( ) will be displayed when
the secondary service is selected.
*2 TEXT indicator: implies the current service
received is providing DLS (Dynamic Label
Segment—DAB radio text information).
*3Each service can have several PTY codes. If a
service have several PTY codes, they will be shown
in turn.
D
DISP
*1
•Initial display pattern:
•Ensemble label (name) is emphasized
•Service label (name) is emphasized
•Dynamic Label Segment (DLS) is display
*3
*2
*1
EN62-70SH9101[E_EX]f.p65 03.2.27, 23:2970

71
ENGLISH
ADDITIONAL INFORMATION
Sound modes (preset frequency level settings)
The list below shows the preset frequency level settings for each sound mode.
• You can adjust the preset sound modes temporarily. However, your temporary adjustments will
be reset when you select another sound mode.
Available characters
In addition to the alphabets (A – Z, a – z), you can use the following characters to assign names to
CDs, and external component. (See page 51.)
• These characters can be also used to show other information such as disc title/performer, RDS,
and DAB on the display.
Accented letters
Lower case
Numbers and symbols
Sound Preset equalizing values
Mode 60 Hz 150 Hz 400 Hz 1 kHz 2.4 kHz 6 kHz 12 kHz
Flat 00 00 00 00 00 00 00
Hard Rock +03 +03 +01 00 00 +02 +01
R & B +03 +02 +02 00 +01 +01 +03
Pop 00 +02 00 00 +01 +01 +02
Jazz +03 +02 +01 +01 +01 +03 +02
DanceMusic +04 +02 00 –02 –01 +01 +01
Country +02 +01 00 00 00 +01 +02
Reggae +03 00 00 +01 +02 +02 +03
Classic +02 +03 +01 00 00 +02 00
User 1 00 00 00 00 00 00 00
User 2 00 00 00 00 00 00 00
User 3 00 00 00 00 00 00 00
Upper case
EN71-75SH9101[E_EX]f.p65 03.2.27, 23:3071

72
ENGLISH
What appears to be trouble is not always serious. Check the following points before calling a service
center.
TROUBLESHOOTING
Remedies
Stop playback while driving on
rough roads.
Change the disc.
Check the cords and
connections.
Set it to “On” (see page 49).
Check the cords and
connections.
Insert the disc correctly.
•Insert a finalized
CD-R/CD-RW.
•Finalize the CD-R/CD-RW
with the component which
you used for recording.
Unlock the disc (see page 30.)
While holding , press 0
for more than 2 seconds to eject
the disc.
Press the reset button on the
control panel using a ball-point
pen (see page 2).
Press the reset button on the
control panel using a ball-point
pen (see page 2). If the reset
button does not work. Check the
installation. (Ex. you have used a
screws which are longer than
specified.)
Adjust the output level on the
external component.
Remove the control panel, wipe
the connectors, then attach it
again (see page 53).
Store stations manually.
Connect the antenna firmly.
Causes
You are driving on rough
roads.
Disc is scratched.
Connections are incorrect.
The “PowerAmp” setting is set
to “Off.”
Connections are incorrect.
Disc is inserted upside down.
CD-R/CD-RW is not finalized.
Disc is locked.
The CD player may function
incorrectly.
The built-in microcomputer
may have functioned
incorrectly due to noise, etc.
There is something is blocking
the control panel movement.
Input level through the
external component (LINE
IN) is too high.
The control panel is not
attached correctly and firmly.
Signals are too weak.
The antenna is not connected
firmly.
Symptoms
•Sound is sometimes
interrupted.
•Sound cannot be heard
from the speakers.
•CD-R/CD-RW cannot be
played back.
•Tracks on the CD-R/CD-RW
cannot be skipped.
•Disc cannot be ejected.
•Disc cannot be recognized
(“No Disc,” “Loading Error,”
or “Eject Error” flashes).
•This unit does not work at
all.
•When “Reset P00” to “Reset
P44” appears on the
display.
• (INPUT
OVER) indicator appears
on the display.
•“Panel Connect Error”
appears on the display.
•SSM automatic preset
does not work.
•Static noise while listening
to the radio.
FM/AM General Playback
EN71-75SH9101[E_EX]f.p65 03.2.27, 23:3072

73
ENGLISH
MP3/WMA Playback CD Changer
Causes
You are trying to download an
animation of many frames.
Temperature in the car
compartment is very low—
(LOW TEMP.) indicator
appears.
No disc in the magazine.
This unit is not connected to a
CD changer correctly.
MP3/WMA tracks do not have
the extension code—mp3 or
wma in their file names.
MP3/WMA tracks are not
recorded in the format
compliant with ISO 9660 Level
1, ISO 9660 Level 2, Romeo,
or Joliet.
Tracks are not encoded in an
appropriate format.
WMA tracks are copy-
protected.
The track played back is not
an MP3/WMA file (although it
has the extension code—mp3
or wma).
This sometimes occurs during
play. This is caused by how
the tracks are recorded on the
disc.
The current MP3/WMA disc
does not contain any MP3/
WMA tracks.
No MP3/WMA tracks are
included in the folder.
Only <jml> and/or <jma> files
are recorded on the disc.
This unit can only display
alphabets (capital: A–Z, small:
a–z), numbers, and a limited
number of symbols.
Symptoms
•Download does not seem to
finish.
•Animation does not move.
•“Movie” category settings in
the PSM do not take effect.
•“No Disc” flashes on the
display .
•“Reset 08” flashes on the
display .
•“Reset 01” – “Reset 07”
flashes on the display.
•Disc cannot be played back.
•“Unplayable File” appears
and tracks skip.
•Noise is generated.
•Elapsed playing time is not
correct.
•“No Files” appears on the
display for a while, then the
disc ejects.
•“No Music” appears on the
display.
•Correct characters are not
displayed. (e.g. album name)
Remedies
This is normal (see page 40).
Wait until the operating
temperature resumes—until
(LOW TEMP.) indicator goes off.
Insert a disc.
Connect this unit and the CD
changer correctly and press the
reset button of the CD changer.
Press the reset button of the CD
changer.
Add the extension code—mp3 or
wma to their file names.
Change the disc.
(Record MP3/WMA tracks using
a compliant application.)
Insert a disc that contains tracks
encoded in an appropriate
format.
This is normal. Copy-protected
tracks cannot be played back.
Skip to another track or change
the disc. (Do not add the
extension code—mp3 or wma to
non-MP3 or WMA files.)
Select another folder.
Insert a disc that contains MP3/
WMA tracks.
Select another folder including
MP3/WMA tracks.
Insert a disc including MP3 or
WMA tracks.
Graphics
EN71-75SH9101[E_EX]f.p65 03.2.27, 23:3073

74
ENGLISH
MAINTENANCE
Center holder
Handling discs
This unit has been designed to reproduce CDs,
CD-Rs (Recordable), CD-RWs (Rewritable), and
CD Texts.
• This unit is also compatible with MP3 and
WMA discs.
How to handle discs
When removing a disc from its
case, press down the center
holder of the case and lift the
disc out, holding it by the edges.
•Always hold the disc by the edges. Do not
touch its recording surface.
When storing a disc into its case, gently insert
the disc around the center holder (with the
printed surface facing up).
•Make sure to store discs into the cases after
use.
To keep discs clean
A dirty disc may not play correctly.
If a disc does become dirty, wipe it
with a soft cloth in a straight line
from center to edge.
To play new discs
New discs may have some rough
spots around the inner and outer
edges. If such a disc is used, this
unit may reject the disc.
To remove these rough spots, rub
the edges with a pencil or ball-point pen, etc.
Moisture condensation
Moisture may condense on the lens inside the
CD player in the following cases:
•After starting the heater in the car.
•If it becomes very humid inside the car.
Should this occur, the CD player may
malfunction. In this case, eject the disc and leave
the unit turned on for a few hours until the
moisture evaporates.
When playing a CD-R or CD-RW
Before playing back CD-Rs or CD-RWs, read
their instructions or cautions carefully.
•Use only “finalized” CD-Rs or CD-RWs.
•Some CD-Rs or CD-RWs may not play back
on this unit because of their disc
characteristics, and for the following reasons:
–Discs are dirty or scratched.
– Moisture condensation on the lens inside the
unit.
– The pickup lens inside the unit is dirty.
•CD-RWs may require a longer readout time
since the reflectance of CD-RWs is lower than
that of regular CDs.
•CD-Rs or CD-RWs are susceptible to high
temperatures or high humidity, so do not leave
them inside your car.
•Do not use following CD-Rs or CD-RWs:
–Discs with stickers, labels, or protective seal
stuck to the surface.
–Discs on which labels can be directly printed
by an ink jet printer.
Using these discs under high temperatures or
high humidity may cause malfunctions or
damage to discs. For example,
–Stickers or labels may shrink and warp a
disc.
–Stickers or labels may peel off so discs
cannot be ejected.
–Print on discs may get sticky.
Read instructions or cautions about labels and
printable discs carefully.
CAUTIONS:
• Do not insert 8 cm discs (single CDs) into the
loading slot. (Such discs cannot be ejected.)
• Do not insert any disc of unusual shape—like a
heart or flower; otherwise, it will cause a
malfunction.
• Do not expose discs to direct sunlight or any
heat source or place them in a place subject to
high temperature and humidity. Do not leave
them in a car.
• Do not use any solvent (for example,
conventional record cleaner, spray, thinner,
benzine, etc.) to clean discs.
Sticker Sticker
residue Disc
Stick-on
label
Warped
disc
EN71-75SH9101[E_EX]f.p65 03.2.27, 23:3074

75
ENGLISH
SPECIFICATIONS
CD PLAYER SECTION
Type: Compact disc player
Signal Detection System: Non-contact optical
pickup (semiconductor laser)
Number of channels: 2 channels (stereo)
Frequency Response: 5 Hz to 20 000 Hz
Dynamic Range: 98 dB
Signal-to-Noise Ratio: 102 dB
Wow and Flutter: Less than measurable limit
MP3 (MPEG Audio Layer 3)
Max. Bit rate: 320 Kbps
WMA (Windows Media® Audio)
Max. Bit rate: 192 Kbps
GENERAL
Power Requirement:
Operating Voltage: DC 14.4 V
(11 V to 16 V allowance)
Grounding System: Negative ground
Allowable Operating Temperature:
0°C to +40°C
Dimensions (W × H × D):
Installation Size:
182 mm × 52 mm × 161 mm
Panel Size:
188 mm × 58 mm × 17 mm
Mass: 1.8 kg (excluding accessories)
Design and specifications are subject to change
without notice.
AUDIO AMPLIFIER SECTION
Maximum Power Output:
Front: 50 W per channel
Rear: 50 W per channel
Continuous Power Output (RMS):
Front: 19 W per channel into 4 Ω, 40 Hz
to 20 000 Hz at no more than
0.8% total harmonic distortion.
Rear: 19 W per channel into 4 Ω, 40 Hz
to 20 000 Hz at no more than
0.8% total harmonic distortion.
Load Impedance: 4 Ω (4 Ω to 8 Ω allowance)
Equalizer Control Range:
Frequencies: 60 Hz, 150 Hz, 400 Hz,
1 kHz, 2.4 kHz, 6 kHz, 12 kHz
Level: ±10 dB
Frequency Response: 40 Hz to 20 000 Hz
Signal-to-Noise Ratio: 70 dB
Line-In Level/Impedance:
LINE IN: 1.5 V/20 kΩ load
Line-Out Level/Impedance:
4.0 V/20 kΩ load (full scale)
Output Impedance: 1 kΩ
TUNER SECTION
Frequency Range:
FM: 87.5 MHz to 108.0 MHz
AM: (MW) 522 kHz to 1 620 kHz
(LW) 144 kHz to 279 kHz
[FM Tuner]
Usable Sensitivity: 11.3 dBf (1.0 µV/75 Ω)
50 dB Quieting Sensitivity: 16.3 dBf (1.8 µV/75 Ω)
Alternate Channel Selectivity (400 kHz): 65 dB
Frequency Response: 40 Hz to 15 000 Hz
Stereo Separation: 30 dB
Capture Ratio: 1.5 dB
[MW Tuner]
Sensitivity: 20 µV
Selectivity: 35 dB
[LW Tuner]
Sensitivity: 50 µV
EN71-75SH9101[E_EX]f.p65 03.2.27, 23:3075

2
DEUTSCH
VOR DEM GEBRAUCH
*
Für die Sicherheit....
• Die Lautstärke nicht zu laut stellen, da dadurch
Außengeräusche überdeckt und das Autofahren
gefährlich wird.
• Das Auto vor dem Durchführen von komplizierten
Bedienschritten anhalten.
*
Temperatur im Auto....
Wenn Sie das Auto für lange Zeit in heißem oder
kaltem Wetter parken, bitte warten, bis sich die
Temperatur im Auto sich normalisiert hat, bevor Sie
das Gerät einschalten.
Zurücksetzen des Geräts
Drücken Sie hierzu die Rücksetztaste auf der
Schalttafel mit Hilfe eines Kugelschreibers oder
einem ähnlichen Gegenstand.
Dadurch wird der eingebaute
Mikro-Computer zurückgesetzt.
Hinweis:
Ihre Voreinstellungen—wie
Vorwahlkanäle oder
Klangeinstellungen—werden ebenfalls
gelöscht.
ACHTUNG:
NIEMALS den
Finger zwischen
die Schalttafel
und das Gerät
bringen, er
kann eingeklemmt
und dabei verletzt werden.
(Siehe Seite 52).
56 M
T/P
MODE
Hinweis:
Zu diesem Gerät wird eine Identifikationskarte mitgeliefert, auf der die Gerätechassis-Nummer vermerkt ist.
Heben Sie diese Karte getrennt vom Gerät auf. Im Falle eines Diebstahls kann sie die Geräteidentifizierung
erleichtern.
Abbildung und Position der am Gerät befindlichen Aufkleber
Typenschild
Geräteunterseite
WICHTIG FÜR LASER-GERÄTE
Vorsichtsmaßregeln:
1.LASER-PRODUKT DER KLASSE 1
2.ACHTUNG: Unsichtbare Laserstrahlung bei Öffnung und
fehlerhafter oder beschädigter Sperre. Direkten Kontakt
mit dem Strahl vermeiden!
3.ACHTUNG: Das Gehäuseoberteil nicht abnehmen. Das
Gerät enthält keinerlei Teile, die vom Benutzer gewartet
werden können. Überlassen Sie Wartungsarbeiten
qualifizierten Kundendienst-Fachleuten.
4.ACHTUNG: Der Compact Disc-Player arbeitet mit
unsichtbaren Laserstrahlen und ist mit
Sicherheitsschaltern ausgestattet, die die Aussendung
von Strahlen verhindern, wenn bei Öffnen des CD-Halters
die Sicherheitssperren gestört oder beschädigt sind. Es
ist gefährlich, die Sicherheitsschaltung zu deaktivieren.
5.ACHTUNG: Falls die Verwendung der Regler,
Einstellungen oder Handhabung von den hierin
gegebenen Anleitungen abweichen, kann es zu einer
gefährlichen Strahlenfreisetzung kommen.
Achtung:
Die Klassifikation der Laserkomponente in
diesem Gerät liegt über Laser-Klasse 1.
CLASS
LASER
1
PRODUCT
CAUTION: Invisible laser
radiation when open and
interlock failed or defeated.
AVOID DIRECT EXPOSURE
TO BEAM. (e)
ADVARSEL: Usynlig laser-
stråling ved åbning, når
sikkerhedsafbrydere er ude
af funktion. Undgåudsæt-
telse for stråling. (d)
VARNING: Osynlig laser-
strålning när denna del är
öppnad och spärren är
urkopplad. Betrakta ej
strålen. (s)
VARO: Avattaessa ja
suojalukitus ohitettaessa
olet alttiina näkymättö-
mälle lasersäteilylle.
Älä katso säteeseen. (f)
GE02-06SH9101[E_EX]f.p65 2/26/03, 10:08 AM2

3
DEUTSCH
INHALT
Wir danken Ihnen für den Kauf eines JVC Produkts. Bitte lesen Sie die Anleitung vollständig durch,
bevor Sie das Gerät in Betrieb nehmen, um sicherzustellen, daß Sie alles vollständig verstehen und
die bestmögliche Leistung des Geräts erhalten.
Zurücksetzen des Geräts ............................. 2
ANORDNUNG DER TASTEN ................. 4
Schalttafel .................................................... 4
Fernbedieneinheit ........................................ 5
Vorbereiten de Fernbedienung .................... 6
GRUNDBEDIENUNGEN ...................... 7
Einschalten der Stromversorgung................ 7
Beendigung der Display-Demonstration ...... 8
Stellen der Uhr ............................................. 8
Auswählen der Pegelanzeige ...................... 9
RADIO-BETRIEB ............................ 10
Radiohören ................................................ 10
Speichern der Sender ................................ 12
Anwahl eines vorabgestimmten Senders ....
13
Display-Schema ändern............................. 14
RDS-BETRIEB .............................. 15
Betriebsmöglichkeiten mit der Funktion
RDS ......................................................... 15
Weitere praktische RDS-Funktionen und
-Einstellungsmöglichkeiten ...................... 20
CD-BETRIEB ................................ 22
Informationen zu MP3- und WMA-Discs .... 22
Wiedergeben einer Disc............................. 22
Einen bestimmten Abschnitt in einem Titel
suchen ..................................................... 24
Einen Titel auf einer Disc suchen ...................
25
Ein Verzeichnis auf einer Disc suchen ....... 26
Auswählen eines Verzeichnisses und
eines Titels über die Namensliste ............ 28
Auswählen eines Wiedergabe-Modus ....... 29
Unterdrücken des Disc-Auswurfs ..................
30
Display-Schema ändern............................. 31
DSP-BETRIEB............................... 32
Auswählen der DSP-Modi .......................... 32
EQUALIZER-BETRIEB ...................... 35
Auswahl von vorprogrammierten
Klangmodi (iEQ: intelligenter Equalizer) ....
35
Speichern eigener Klangmodi .................... 36
VORSICHT beim Einstellen der Lautstärke:
CDs produzieren sehr wenig Geräusche im Vergleich
zu anderen Signalquellen. Wenn zum Beispiel die
Lautstärke für den Tuner eingestellt wurde, können
die Lautsprecher durch den plötzlichen Anstieg des
Ausgangssignals beschädigt werden. Verringern Sie
daher die Lautstärke, bevor Sie eine Disc abspielen,
und justieren Sie die Lautstärke dann während des
Abspielens je nach Bedarf nach.
KLANGEINSTELLUNGEN .................. 37
Durchführen der Grundklangeinstellungen ....
37
GRAFISCHE ANZEIGEN.................... 39
Herunterladen von Bildern und
Animationen ............................................ 40
Löschen nicht benötigter Dateien .............. 42
Aktivieren der heruntergeladenen Bilder
und Animationen ...................................... 44
ANDERE WICHTIGE FUNKTIONEN ....... 46
Ändern der allgemeinen Einstellungen
(PSM) ...................................................... 46
Wählen des Abblendmodus ....................... 50
Zuweisung von Namen für Signalquellen ....
51
Ändern des Bedienfeldwinkels ................... 52
Abnehmen der Schalttafel.......................... 53
CD-WECHSLERBETRIEB .................. 54
Abspielen der Discs ................................... 54
Ein Verzeichnis auf einer Disc suchen ....... 57
Auswahl einer CD/eines Verzeichnisses/
eines Titels mit Hilfe der Namenlisten ..... 58
Auswählen eines Wiedergabe-Modus ....... 59
BETRIEB MIT EXTERNEN KOMPONENTEN ....
61
Wiedergeben einer externen Komponente ....
61
BETRIEB DES DAB-TUNERS .............. 62
Einstellen eines Ensembles und eines
Dienstes .................................................. 62
Sichern von DAB-Diensten im Speicher .... 64
Einstellen eines gespeicherten DAB-
Dienstes .................................................. 64
Welche anderen Möglichkeiten bietet DAB ....
66
Display-Schema ändern............................ 70
ZUSATZINFORMATIONEN ................. 71
FEHLERSUCHE ............................. 72
WARTUNG .................................. 74
Handhaben der Discs ................................ 74
TECHNISCHE DATEN ...................... 75
Vorsicht:
Beträgt die Temperatur innerhalb des Fahrzeugs
weniger als
0°C
, wird die Bewegung der Animation
und des Textbildlaufs auf dem Display angehalten, um
zu verhindern, dass das Display unscharf wird.
Die (LOW TEMP.)-Anzeige wird im Display angezeigt.
Wenn die Temperatur wieder ansteigt und
Betriebstemperatur erreicht, arbeiten diese
Funktionen wieder normal.
GE02-06SH9101[E_EX]f.p65 2/26/03, 10:08 AM3

4
DEUTSCH
ANORDNUNG DER TASTEN
Schalttafel
Beleuchtungsnavigation für einfacheren Betrieb:
Wenn die Tasten MODE (M) oder SEL (Auswahl) gedrückt werden, wechselt das Display und
manche Steuerungen (wie z. B. die Zifferntasten, 4/¢ , 5 / ∞, und der Drehregler) in
den entsprechenden Steuerungsmodus und die Steuerungen fangen an zu blinken. Hierdurch
werden Sie zu den nächsten Betriebsschritten geleitet. (Beleuchtungsnavigation)
•Auf dem Display wird angezeigt, wie diese Tasten während dieses Zeitraums funktionieren.
Esp.Wenn Sie die Taste Nr. 1 drücken, nachdem Sie MODE (M) gedrückt habe, um den
FM-Tuner zu bedienen.
Warten Sie, ohne die Steuertasten zu verwenden, bis diese mit dem Blinken aufgehört haben,
um diese Tasten in ihrer Originalfunktion zu verwenden.
•Wenn Sie die Taste MODE (M) noch einmal drücken, werden die Originalfunktionen
wiederhergestellt. Wenn Sie jedoch die Taste SEL (Auswahl) drücken, wechselt das Gerät in
einen anderen Modus.
3456 M21
D
SRC
DISP
ATT
SEL
T/P
MODE
1 2 3 6
57
89 q er t
pw
4
8•Taste (Standby/Ein/Dämpfung)
•Drehregler
9Fernbediensensor
pTaste ∞ (abwärts)
qTaste SEL (Auswahl)
wZifferntasten
eTaste MODE (M)
rTaste (Bedienfeldentriegelung)
tReset-Taste
M
MODE
345621
1Taste SRC (Signalquelle)
2Taste DISP (D) (Display)
3Taste 5 (aufwärts)
4Tasten 4/¢
5Displayfenster
6•Taste 0 (Auswurf)
• Taste (Winkel)
7Taste T/P (Verkehrsprogramm/Programmart)
Zeit-Countdownanzeige
Erscheinen nur, wenn das FM-
Frequenzband ausgewählt wird
GE02-06SH9101[E_EX]f.p65 2/26/03, 10:08 AM4

7
DEUTSCH
GRUNDBEDIENUNGEN
Einschalten der
Stromversorgung
1
Das Gerät einschalten.
Hinweis zum Ein-Tastendruck-Betrieb:
Wenn Sie die Programmquelle in abspielen
Schritt
2
unten wählen, wird das Gerät
automatisch eingeschaltet. Sie brauchen dafür
nicht die Taste zu drücken.
2
Die Programmquelle wählen.
Jeder Druck auf diese Taste
ändert die Signalquelle wie
folgt.
*1Sie können den DAB-Tuner erst als
Wiedergabequelle auswählen, nachdem Sie
den DAB-Tuner oder einen CD-Wechsler
angeschlossen haben.
*2Wenn sich keine Disc im Ladeschacht
befindet, können Sie CD nicht als
Wiedergabequelle auswählen.
*3Wenn die „Line In“-Einstellung in der PSM-
Einstellung auf „Off“ eingestellt ist, können
Sie „LINE IN“ nicht als Signalquelle
auswählen (siehe Seite 49).
3
Die Lautstärke einstellen.
4
Stellen Sie den DSP- und
Klangmodus nach Ihren Wünschen
ein.
Für ein sofortiges Absenken der Lautstärke
Kurz beim Hören einer beliebigen
Programmquelle drücken. „ATT“ blinkt auf dem
Display und die Lautstärke fällt sofort ab.
Zur Wiederherstellung der vorherigen
Lautstärkepegel die Taste nochmals kurz drücken.
•Wenn Sie den Drehregler drehen, können Sie
die Lautstärke auch wiederherstellen.
Zum Ausschalten des Geräts
Drücken , und halten Sie die länger als
eine Sekunde gedrückt.
•Wenn Sie die Stromversorgung
ausschalten, während Sie eine CD hören,
wird die CD beim nächsten Einschalten an
derselben Stelle wiedergeben, an der Sie die
Stromversorgung ausgeschaltet haben.
1, 3
2
3456 M21
D
SRC
DISP
ATT
SEL
T/P
MODE
ATT
SRC
Aktueller Klangmodus
(iEQ) (siehe Seite 35)
Aktueller DSP-Modus
(siehe Seite 32)
ATT
Uhrzeit
Displayanzeige:
Wenn von Ihnen einige
PSM-Parameter geändert
wurden (siehe Seiten 47 und
48), sind möglicherweise
die Anzeigen, die Sie auf
den Display sehen,
unterschiedlich zu denen,
die in dieser
Bedienungsanleitung zu
sehen sind.
CD CD-CH
(CD-Wechsler)
LINE IN
TUNER DAB
(DAB-Tuner)
*1*2*1
*3
GE07-09SH9101[E_EX]f.p65 2/28/03, 2:53 PM7

8
DEUTSCH
SEL
ATT
Wiederholen Sie das gleiche Verfahren und
wählen Sie „Int Demo“ oder „All Demo“ in Schritt
3
aus, um die Display-Demonstration zu
aktivieren.
•Siehe „Anzeigen der Grafiken auf dem
Display—Graphics“ auf Seite 48 bzgl. näherer
Einzelheiten.
Stellen der Uhr
Die Uhr kann so eingestellt werden, daß
entweder das 24-Stunden- oder das
12-Stunden-System angezeigt wird.
1
Drücken Sie die Taste SEL (Auswahl)
länger als 2 Sekunden, damit einer
der PSM-Parameter auf dem Display
erscheint. (PSM: siehe Seiten 47 und
48).
2
Drücken Sie die Zifferntaste 2, um
„CLOCK“—Uhrzeit-Kategorie der
PSM-Einstellungen auszuwählen.
Die Einstellanzeige „Clock Hr“ wird auf dem
Display angezeigt.
3
Stellen Sie die Stunden ein.
4
Stellen Sie die Minuten ein.
1Wählen Sie „Clock Min (Minute)“ aus.
2Stellen Sie die Minuten ein.
SEL
ATT
SEL
345621
12
345621
ATT
Beendigung der Display-
Demonstration
Die Display-Demonstration ist werkseitig aktiviert
und beginnt automatisch, wenn für ca. 20
Sekunden keine Aktionen durchgeführt wurden.
•Wir empfehlen, die Demonstration
abzubrechen, bevor das Gerät zum ersten Mal
verwendet wird.
Führen Sie die folgenden Schritte zur
Beendigung der Display-Demonstration aus:
1
Drücken Sie die Taste SEL (Auswahl)
länger als 2 Sekunden, damit einer
der PSM-Parameter auf dem Display
erscheint. (PSM: siehe Seiten 47 und
48).
2
Drücken Sie die Zifferntaste 1, um
„MOVIE“, die Filmkategorie der PSM-
Einstellungen, auszuwählen.
Die Einstellanzeige „Graphics“ wird auf dem
Display angezeigt.
3
Wählen Sie „Off“ aus.
4
Beenden Sie die Einstellung.
GE07-09SH9101[E_EX]f.p65 2/26/03, 10:08 AM8

10
DEUTSCH
RADIO-BETRIEB
Radiohören
Um einen Sender einzustellen, können Sie
entweder den automatischen Suchlauf verwenden,
oder Sie können den Sender manuell einstellen.
Automatisches Suchen eines Senders:
Automatischer Suchlauf
1
Wählen Sie das Band (FM1 – 3, AM).
1Drücken Sie wiederholt auf
die Taste SRC (Signalquelle),
um den Tuner auszuwählen.
2Drücken und halten Sie die
Taste SRC länger als 1
Sekunde gedrückt.
Die Frequenzbandanzeige
auf dem Display beginnt zu
blinken.
3Drücken Sie innerhalb von 5
Sekunden (während die
Frequenzbandanzeige blinkt)
erneut die Taste SRC. Bei
jedem Tastendruck wird das
Band gewechselt.
Der zuletzt empfangene Sender des
ausgewählten Frequenzbands wird
eingestellt.
3456 M21
D
SRC
DISP
ATT
SEL
T/P
MODE
SRC
Leuchtet auf, wenn eine UKW-Stereosendung mit
ausreiche nder Signalstärke empfangen wird.
Hinweis:
Dieser Receiver verfügt über drei UKW-
Frequenzbänder (FM1, FM2, FM3). Sie können
ein beliebiges Frequenzband wählen, um sich
eine UKW-Sendung anzuhören.
2
Beginnen Sie mit der Suche nach
einem Sender.
Wenn ein Sender empfangen wird, Stoppt
die Suche.
Zum Anhalten der Suche bevor ein Sender
empfangen wird, die gleiche Taste, die Sie für
die Suche gedrückt haben, nochmals drücken.
Drücken Sie auf die Taste
¢ , um Sender mit
höheren Frequenzen zu
suchen.
Drücken Sie auf die Taste
4, um Sender mit
niedrigen Frequenzen zu
suchen.
FM1
FM2FM3
AM
Bsp.: Wenn das Frequenzband FM ist
Sendername (PS)
(siehe Seite 14)
Programmtyp (PTY)
(siehe Seite 14)
GE10-14SH9101[E_EX]f.p65 2/28/03, 2:55 PM10

11
DEUTSCH
Manuelles Suchen eines Senders:
Manueller Suchlauf
1
Wählen Sie das Band (FM1 – 3, AM).
1Drücken Sie wiederholt auf
die Taste SRC (Signalquelle),
um den Tuner auszuwählen.
2Drücken und halten Sie die
Taste SRC länger als 1
Sekunde gedrückt.
3Drücken Sie innerhalb von 5
Sekunden erneut die Taste
SRC.
Bei jedem Tastendruck wird
das Band gewechselt.
Hinweis:
Dieser Receiver verfügt über drei UKW-
Frequenzbänder (FM1, FM2, FM3). Sie können
ein beliebiges Frequenzband wählen, um sich
eine UKW-Sendung anzuhören.
2
Drücken und halten Sie die Taste
¢ oder 4, bis „Manual
Search“ auf dem Display angezeigt
wird.
3
Stellen Sie einen gewünschten
Sender ein, während „Manual
Search“ noch auf dem Display
angezeigt wird.
•Wenn Sie die Taste loslassen, wird der
manuelle Modus automatisch nach 5
Sekunden deaktiviert.
•Wenn Sie die Taste gedrückt halten, ändert
sich die Frequenz (in 50 kHz Intervallen bei
UKW- und 9 kHz Intervallen bei MW/LW),
bis Sie die Taste freigeben.
Drücken Sie auf die Taste
¢ , um Sender mit
höheren Frequenzen zu
suchen.
Drücken Sie auf die Taste
4, um Sender mit
niedrigeren Frequenzen zu
suchen.
So stellen Sie FM-Sender mit starkem
Signal ein—LO/DX (nah/fern)
Bei der Suche nach UKW-Sendern
(einschließlich SSM – siehe Seite 12) hält dieses
Gerät immer dann an, wenn ein Signal
empfangen wird (DX-Modus: Die-DX-Anzeige
leuchtet auf – Grundeinstellung). Wenn die
empfangenen Signal zu schwach sind, ist
möglicherweise nur ein Rauschen zu hören.
Wenn Sie die Einstellung von LO/DX auf „Local“
ändern, werden von diesem Gerät nur Sender mit
einer entsprechend großen Signalstärke erkannt.
1Drücken Sie die Taste MODE (M),
während eine UKW-Stereosendung
wiedergegeben wird.
„Mode“ wird auf dem Display
angezeigt und die Zifferntasten
beginnen zu blinken.
2Drücken Sie die Zifferntaste 2, während
„Mode“ noch auf dem Display angezeigt wird.
Jeder Druck auf diese Taste wechselt die „LO/
DX“-Einstellung zwischen „Local“ und „DX“.
LO-Anzeige wird angezeigt
Nach ca. 5
Sekunden
Das Display zeigt wieder die Signalquelle an.
SRC
FM1
FM2FM3
AM
M
MODE
345621
Weitere Einzelheiten zu dieser Funktion
finden Sie auf Seite 40.
GE10-14SH9101[E_EX]f.p65 2/26/03, 10:09 AM11

13
DEUTSCH
Manuelles Vorabstimmen
Sie können bis zu 6 Sender pro Empfangsbereich
(FM1, FM2, FM3 und AM) von Hand vorabstimmen.
Bsp.:Speichern des UKW-Senders 92,5 MHz auf
der Speichertaste 1 des FM1-
Empfangsbereichs.
1
Die gewünschte Empfangs-
bereichzahl (FM1 – 3, AM), in der
Sender gespeichert werden sollen,
wählen (in diesem Beispiel FM1).
1Drücken Sie wiederholt auf
die Taste SRC (Signalquelle),
um den Tuner auszuwählen.
2Drücken und halten Sie die
Taste SRC länger als 1
Sekunde gedrückt.
3Drücken Sie innerhalb von 5
Sekunden erneut die Taste
SRC.
Bei jedem Tastendruck wird
das Band gewechselt.
2
Auf den Sender (in diesem Beispiel
92,5 MHz abstimmen).
3
Drücken Sie die Ziffertaste (in
diesem Beispiel 1), und halten Sie
sie länger als 2 Sekunden gedrückt.
Die ausgewählte gespeicherte
Nummer blinkt kurzzeitig auf.
4
Das obige Verfahren zum Speichern
der anderen Sender auf andere
numerische Tasten wiederholen.
Drücken Sie auf die Taste
¢ , um Sender mit
höheren Frequenzen zu
suchen.
Drücken Sie auf die Taste
4, um Sender mit
niedrigeren Frequenzen zu
suchen.
SRC
1
FM1
FM2FM3
AM
SRC
FM1
FM2FM3
AM
345621
Hinweise:
•Ein vorheriger vorabgestimmter Sender wird
gelöscht, wenn ein neuer Sender auf der gleichen
Speichertaste abgespeichert wird.
•Vorabgestimmte Sender werden gelöscht, wenn die
Stromversorgung des Speicherstromkreises
unterbrochen wird (z.B. beim Wechseln der Batterie).
In diesem Fall die Sender nochmals vorabstimmen.
Anwahl eines vorabgestimmten
Senders
Sie können einfach einen vorabgestimmten
Sender aufrufen. Bedenken Sie, daß Sie zuerst
Sender speichern müssen. Wenn Sie das noch
nicht getan haben, siehe „Speichern der Sender“
auf Seiten 12 und 13.
Direkte Anwahl eines
vorprogrammierten Senders
1
Wählen Sie das Band (FM1 – 3, AM).
1Drücken Sie wiederholt auf
die Taste SRC (Signalquelle),
um den Tuner auszuwählen.
2Drücken und halten Sie die
Taste SRC länger als 1
Sekunde gedrückt.
Die Frequenzbandanzeige auf
dem Display beginnt zu
blinken.
3Drücken Sie innerhalb von 5
Sekunden (während die
Frequenzbandanzeige blinkt)
erneut die Taste SRC. Bei
jedem Tastendruck wird das
Band gewechselt.
2
Die gewünschte Ziffer (1 – 6) für den
vorabgestimmten Sender wählen.
GE10-14SH9101[E_EX]f.p65 2/26/03, 10:09 AM13

16
DEUTSCH
1
Drücken Sie die Taste SEL (Auswahl)
länger als 2 Sekunden, damit einer
der PSM-Parameter auf dem Display
erscheint. (PSM: siehe Seiten 47 und
48).
2
Drücken Sie die Zifferntaste 4, um
„TUNER“, die Tunerkategorie der
PSM-Einstellungen, auszuwählen.
Der Einstellungsbildschirm „PTY Stnby“
(Bereitschaftsbetrieb) wird auf dem Display
angezeigt.
3
Wählen Sie „AF-Regn’l“
(Alternativfrequenz/
Regionalempfang).
4
Wählen Sie den gewünschten
Modus—„AF“, „AF Reg“ oder „Off“.
5
Bestätigen Sie die Einstellung.
Verwenden des TA-Standby-Empfangs
Mit Hilfe des TA-Standby-Empfangs können Sie
das Gerät vorübergehend von der aktuellen
Signalquelle (anderer UKW-Sender, CD oder
sonstige angeschlossene Komponente) auf
Verkehrsnachrichten (TA) umschalten.
•Der TA-Standby-Empfangs funktioniert nicht, wenn
Sie einen MW/LW-Sender empfangen.
Drücken Sie die Taste T/P, um
den TA-Standby-Empfangs zu
aktivieren.
Jeder Druck auf diese Taste
schaltet diese Funktion ein bzw.
aus.
•Wenn der DAB-Tuner angeschlossen ist, wird
außerdem der Verkehrsdurchsage-Standby-
Empfang ein- bzw. ausgeschaltet (siehe Seite
66).
7Wenn UKW als aktuelle Signalquelle
ausgewählt ist, leuchtet die Anzeige TP
entweder kontinuierlich oder blinkt.
•Wenn die Anzeige TP leuchtet, ist der
TA-Standby-Empfangs aktiviert.
Wenn ein Sender eine Verkehrsdurchsage
überträgt, wird „Traffic Flash“ im Display
angezeigt, und das Gerät stellt den Sender
automatisch ein. Die Lautstärke wird auf den
voreingestellten TA-Lautstärkepegel
eingestellt (siehe Seite 20), und die
Verkehrsdurchsage wird wiedergegeben.
•Wenn die Anzeige TP blinkt, ist der TA-
Standby-Empfangs noch nicht aktiviert,
da der empfangene Sender keine
Signale überträgt, die für den TA-Standby-
Empfangs verwendet werden.
Um den TA-Standby-Empfangs zu aktivieren,
müssen Sie einen anderen Sender
einstellen, der diese Signale überträgt.
Drücken Sie ¢ oder 4 um einen
solchen Sender zu suchen.
Wenn ein Sender eingestellt ist, der diese
Signale bereitstellt, blinkt die Anzeige TP
nicht mehr, sondern leuchtet kontinuierlich.
Jetzt ist der TA-Standby-Empfangs aktiviert.
SEL
ATT
SEL
T/P
345621
Die TP-Anzeige wird angezeigt
(leuchtet auf oder blinkt)
GE15-21SH9101[E_EX]f.p65 2/26/03, 10:09 AM16

17
DEUTSCH
FORTSETZUNG AUF DER NÄCHSTEN SEITE
SEL
ATT
M
MODE
SEL
345621
3
Wählen Sie einen der
neunundzwanzig PTY-Codes.
(Siehe Seite 21).
Der gewählte Codename
wird im Display
angezeigt
und im Speicher
gesichert.
4
Bestätigen Sie die Einstellung.
PTY-Standby-Empfang einstellen
Wenn der DAB-Tuner angeschlossen ist, kann
mit den folgenden Schritten der PTY-Standby-
Empfang für UKW- und DAB-Tuner eingestellt
werden. (Siehe Seite 69).
1Drücken Sie die Taste MODE (M),
während eine UKW-Stereosendung
wiedergegeben wird.
„Mode“ wird auf dem Display
angezeigt und die Zifferntasten
beginnen zu blinken.
7Wenn zurzeit eine andere Signalquelle als
UKW ausgewählt ist, leuchtet die Anzeige TP.
Wenn ein Sender eine Verkehrsdurchsage
überträgt, wird „Traffic Flash“ im Display
angezeigt, und das Gerät wechselt
automatisch die Signalquelle und stellt den
Sender ein.
Verwenden des PTY-Standby-Empfang
Mit dem PTY-Standby-Empfang kann das Gerät
aus einer beliebigen Signalquelle vorübergehend
zu Ihrem Lieblingsprogramm (PTY-Sendungstyp)
wechseln. Ausgenommen hiervon sind MW-/LW-
Sender.
Auswahl Ihres bevorzugten PTY-Codes für
den PTY-Standby-Empfang
Der PTY-Standby-Empfang ist werkseitig so
eingestellt, daß nach „News“ (Nachrichten)-
Programmen gesucht wird.
Sie können Ihr Lieblingsprogramm für den PTY-
Standby-Empfang auswählen.
1
Drücken Sie die Taste SEL (Auswahl)
länger als 2 Sekunden, damit einer
der PSM-Parameter auf dem Display
erscheint. (PSM: siehe Seiten 47 und
48).
2
Drücken Sie die Zifferntaste 4, um
„TUNER“, die Tunerkategorie der
PSM-Einstellungen, auszuwählen.
Der Einstellungsbildschirm „PTY Stnby“
(Bereitschaftsbetrieb) wird auf dem Display
angezeigt.
GE15-21SH9101[E_EX]f.p65 2/28/03, 3:15 PM17

18
DEUTSCH
Hinweis:
Nachdem der PTY-Standby-Empfang eingeschaltet
wurde, können Sie die Signalquelle wechseln, ohne
den PTY-Standby-Empfang zu deaktivieren. In diesem
Fall hört eine blinkende PTY-Anzeige auf zu blinken.
Wird von einem Sender das gewählte PTY-Programm
ausgestrahlt, wechselt das Gerät automatisch die
Signalquelle und stellt den Sender ein.
• Wenn Sie als Signalquelle AM einstellen, wird der
PTY-Standby-Empfang vorübergehend deaktiviert.
• Sie können den PTY-Standby-Empfang nur
deaktivieren,wenn die Signalquelle FM ist.
Suchen Ihrer Lieblingssendung
Sie können einen beliebigen PTY-Code suchen.
Darüber hinaus können Sie unter den
Zifferntasten 6 Lieblingsprogrammtypen
speichern.
Bei Auslieferung ab Werk sind die folgenden 6
Sendungstypen unter den Ziffertasten (1 bis 6)
gespeichert.
Weiter unten und auf Seite 19 finden Sie
Informationen, wie Sie Ihre
Lieblingssendungen speichern können.
Hinweise zu Suche Ihres Lieblingssendung
finden Sie siehe Seite 19.
So speichern Sie Ihre
Lieblingssendungstypen
1
Drücken Sie die Taste T/P, und halten
Sie sie länger als 2 Sekunden
gedrückt, während Sie einen UKW-
Sender hören.
Der zuletzt gewählte PTY-Code wird angezeigt.
Pop M
123
Rock M Easy M
456
Classics Affairs Varied
T/P
345621
2Drücken Sie mehrmals die Zifferntaste 3, um
den PTY-Standby-Empfang zu aktivieren,
während „Mode“ noch auf dem Display
angezeigt wird.
Jeder Druck auf diese Taste schaltet den PTY-
Standby-Empfang wechselweise ein und aus.
Die PTY-Anzeige leuchtet entweder auf oder sie
blinkt.
•Wenn die Anzeige PTY leuchtet, ist der PTY-
Standby-Empfang aktiviert.
Wenn ein Sender das ausgewählte PTY-
Programm überträgt, stellt das Gerät den
Sender automatisch ein.
•Wenn die Anzeige PTY blinkt, ist der PTY-
Standby-Empfang noch nicht aktiviert, da der
empfangene Sender keine Signale überträgt,
die für den PTY-Standby-Empfang verwendet
werden.
Um den PTY-Standby-Empfang zu aktivieren,
müssen Sie einen anderen Sender einstellen,
der diese Signale überträgt. Drücken Sie
¢ oder 4 um einen solchen
Sender zu suchen.
Wenn ein Sender eingestellt ist, der diese
Signale bereitstellt, blinkt die Anzeige PTY
nicht mehr, sondern leuchtet kontinuierlich.
Jetzt ist der PTY-Standby-Empfang aktiviert.
Bsp.: Wenn der momentan ausgewählte
PTY-Code für den PTY-Standby-
Empfang „News“ (Nachrichten) ist
Das Display zeigt wieder die Signalquelle an.
Die PTY-Anzeige wird angezeigt
(leuchtet auf oder blinkt)
Nach ca. 5
Sekunden
GE15-21SH9101[E_EX]f.p65 2/28/03, 3:15 PM18

19
DEUTSCH
2
Auswählen eines Ihrer
Lieblingsprogrammtypen
oder
Auswählen eines der
neunundzwanzig PTY-Codes
So verwenden Sie die Taste
5
(
aufwärts
) oder
∞
(
abwärts
)
Durch mehrmaliges Drücken der Tasten 5
(
aufwärts
) oder ∞ (
abwärts
) können Sie eine
Liste mit Ihren gespeicherten PTY-Codes sowie
alle 29 PTY-Codes (jeweils sechs PTY-Codes
auf einmal) anzeigen. Zuerst erscheint die Liste
mit Ihren gespeicherten PTY-Codes und danach
alle 29 PTY-Codes (jeweils sechs PTY-Codes
auf einmal). Drücken Sie die Zifferntaste, um
Ihren gewünschten PTY-Code aus der auf dem
Display dargestellten Liste auszuwählen.
3
Beginnen Sie die PTY-Suche nach
Ihrem Lieblingsprogramm.
•Wenn ein Sender eine Sendung mit dem PTY-
Code ausstrahlt, den Sie gewählt haben, wird
dieser Sender eingestellt.
•Wenn kein Sender eine Sendung mit dem
PTY-Code ausstrahlt, den Sie gewählt haben,
wird der aktuell eingestellte Sender weiterhin
wiedergegeben.
Hinweis:
In einigen Gebieten funktioniert die PTY-Suche
möglicherweise nicht richtig.
Beispiel: Wenn Sie „Rock M“ auswählen
Der zuletzt gewählte PTY-Code wird angezeigt.
ATT
345621
T/P
T/P
345621
ATT
2
Wählen Sie einen der
neunundzwanzig PTY-Codes.
(Siehe Seite 21).
Der gewählte Codename
wird im Display
angezeigt.
3
Drücken Sie die Ziffertaste und
halten länger als 2 Sekunden
gedrückt, um den gewählten PTY-
Code unter der gewünschten
Speichertaste zu speichern.
Die gespeicherte Nummer blinkt kurzzeitig auf.
4
Drücken Sie die Taste T/P, und halten
Sie sie länger als 2 Sekunden
gedrückt, um diese Modus zu
verlassen.
So suchen Sie Ihren Lieblingssendungstyp
1
Drücken Sie die Taste T/P, und halten
Sie sie länger als 2 Sekunden
gedrückt, während Sie einen UKW-
Sender hören.
GE15-21SH9101[E_EX]f.p65 2/28/03, 3:15 PM19
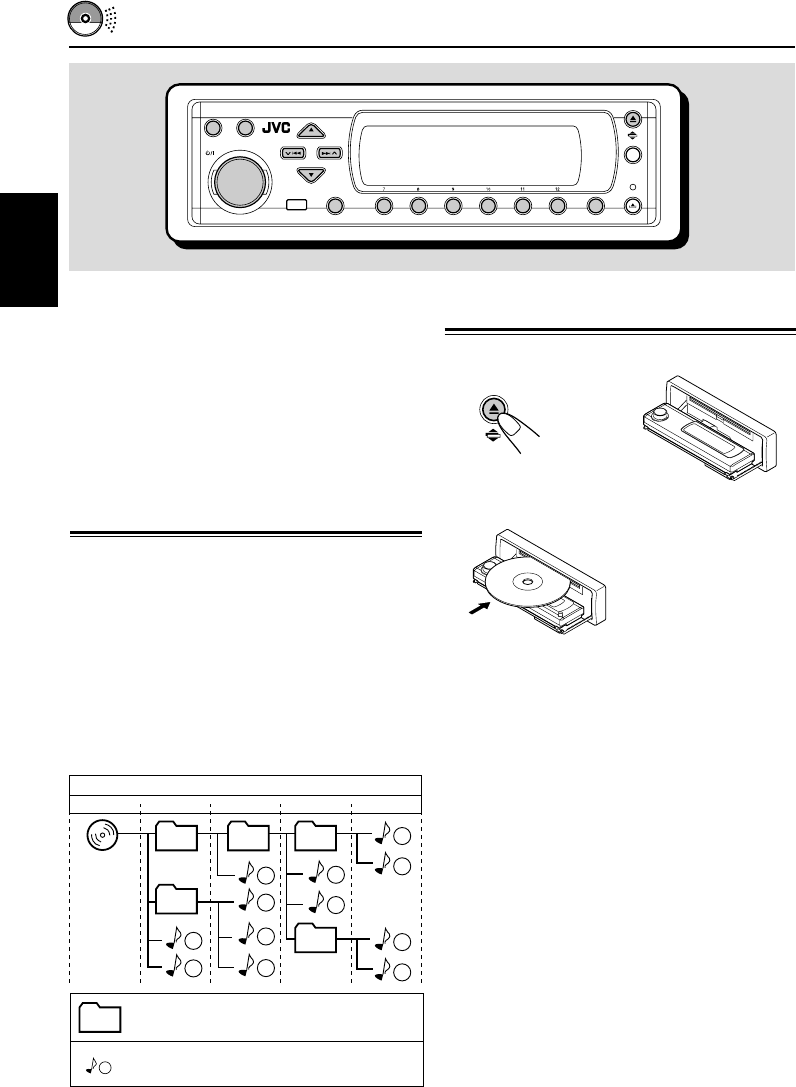
22
DEUTSCH
CD-BETRIEB
Wiedergeben einer Disc
1
Öffnen Sie das Bedienfeld.
2
Schieben Sie eine Disc in den
Ladeschlitz.
Das Gerät zieht die
Disc ein, das
Bedienfeld kehrt in
seine ursprüngliche
Position zurück (siehe
Seite 52) und die
Wiedergabe startet
automatisch.
Alle Titel werden wiederholt wiedergegeben, bis
Sie die Wiedergabe beenden.
Hinweise:
• MP3- oder WMA-Discs benötigen eine längere
Lesezeit. (abhängig von der Komplexität der
Verzeichnis/Titel-Konfiguration).
• Weitere Informationen bzgl. abspielbarer Discs und
anderer verwandter Themen finden Sie auf Seite 74.
Zum Beenden des Abspielens und
Auswerfen der Disc
Drücken Sie die Taste 0.
Die Wiedergabe wird gestoppt und das
Bedienfeld wird nach unten geklappt.
Anschließend wird die Disc automatisch aus dem
Ladeschacht ausgeworfen.
Die CD-Wiedergabe wird auch angehalten (ohne
dass die CD ausgeworfen wird), wenn die
Signalquelle gewechselt wird.
: Verzeichnisse und ihre
Wiedergabereihenfolge
: MP3/WMA-Titel und ihre
Wiedergabereihenfolge
Dieses Gerät dient zur Reproduktion von CDs
und CD-Rs (beschreibbar), CD-RWs
(wiederbeschreibbar) und CD Texts.
•
Dieses Gerät ist auch zu MP3- und WMA-
Discs kompatibel. Weitere Einzelheiten zu
diesen Discs können Sie im „Informationen
zu MP3/WMA“ (gesonderte Ausgabe)
nachlesen.
Informationen zu MP3- und
WMA-Discs
MP3- und WMA (Windows Media® Audio) „Titel“
(das Wort „Datei“ wird in dieser Betriebsanleitung
für MP3- und WMA-Dateien nicht verwendet, nur
„Titel“) werden in „Verzeichnissen“
aufgezeichnet. Während der Aufnahme können
die Titel und Verzeichnisse ähnlich angeordnet
werden, wie Dateien und Verzeichnisse auf PCs
gespeichert werden. „Stammverzeichnis“
ähnelt den Wurzeln eines Baumes. Auf jeden
Titel und jedes Verzeichnis kann über das
Stammverzeichnis verknüpft oder zugegriffen
werden.
3456 M21
D
SRC
DISP
ATT
SEL
T/P
MODE
• Microsoft und Windows Media sind entweder eingetragene Marken oder Marken von Microsoft Corporation in
den Vereinigten Staaten und/oder anderen Ländern.
1
1
2
3
10
11
12
4
5
6
7
8
9
01
01
05
02 03
04
Hierarchie
ROOT
Ebene
1
Ebene
2
Ebene
3
Ebene
4
Ebene
5
GE22-31SH9101[E_EX]f.p65 2/26/03, 6:38 PM22

23
DEUTSCH
•Displayanzeigen bei dem Einlegen
einer MP3- oder einer WMA-Disc
1Anzahl aller Verzeichnisse
2Titel-Gesamtanzahl
3Disc-Typ—MP3 oder WMA
4Album-Name/Interpret (oder Verzeichnisname ,
wenn „Tag “ auf „Off“ eingestellt ist—siehe Seite 49,
oder wenn kein Tag aufgezeichnet wurde)
5Titel-Name (oder Titel-Name , wenn „Tag“ auf
„Off“ eingestellt ist—siehe Seite 49, oder wenn kein
Tag aufgezeichnet wurde)
6Aktuelle Verzeichnisnummer
7Aktuelle Titelnummer
8Verstrichene Spielzeit des aktuellen Titels
•Displayanzeigen bei dem Einlegen
einer Audio-CD oder einer CD Text:
1Titel-Gesamtanzahl
2Gesamtspielzeit der Disc
3Disc-Name/Interpret (wenn kein Name
aufgezeichnet oder zugewiesen wurde, wird „No
Name“ angezeigt.)
4Titel-Name (wenn kein Name aufgezeichnet wurde,
wird „No Name“ angezeigt.)
5Aktuelle Titelnummer
6Verstrichene Spielzeit des aktuellen Titels
*Wurde einer Audio-CD ein Name zugewiesen (siehe Seite
51), wird der Name angezeigt.
Hinweise:
•Wenn sich bereits eine Disc im Ladeschacht befindet und „CD“ als Signalquelle ausgewählt wird, beginnt die
Wiedergabe.
•Das Gerät kann nur MP3-Titel lesen oder wiedergeben, deren Titelnamen mit <mp3> bzw. WMA-Titel mit <wma>
enden.
•Wenn eine Disc mit der falschen Seite nach oben eingelegt wird, wird diese automatisch wieder ausgeworfen.
•Die Wiedergabe wird auch angehalten (ohne dass die Disc ausgeworfen wird), wenn die Signalquelle gewechselt wird.
Wenn Sie das nächste Mal „CD“ als Signalquelle auswählen, wird die Wiedergabe von der Stelle wieder
aufgenommen, an der sie angehalten wurde.
Um das Bedienfeld wieder in seine
ursprüngliche Position zu bringen, drücken
Sie erneut die Taste 0.
•Wenn der Ladeschacht für ca. 1 Minute offen
gelassen wird (Pieptöne ertönen, wenn die
Einstellung „Beep“ auf „On“ gestellt ist—siehe
Seite 49), kehrt das Bedienfeld wieder in seine
ursprüngliche Position zurück.
Achten Sie darauf, dass sich weder Disc noch
Finger zwischen Bedienfeld und dem Gerät
befinden.
Hinweis:
Wird die ausgeworfene Disc nicht innerhalb von 15
Sekunden entnommen, wird die Disc automatisch wieder in
den Ladeschacht eingefahren, um sie vor Staub zu schützen.
(Die Disc wird in diesem Fall jedoch nicht wiedergegeben.)
3
124
56
2
5
678
1
34
GE22-31SH9101[E_EX]f.p65 2/26/03, 10:09 AM23

24
DEUTSCH
Drücken Sie während der
Wiedergabe einer Disc kurz
¢ , um zum Anfang des
nächsten Titels zu springen.
Mit jedem Druck auf diese Taste
wird jeweils zum Anfang des
nächsten Titels gesprungen und
dieser wiedergegeben.
Drücken Sie während der Wiedergabe einer Disc
kurz 4, um zum Anfang des aktuellen
Titels zu springen.
Mit jedem Druck auf diese Taste wird jeweils
zum Anfang des vorherigen Titels gesprungen
und dieser wiedergegeben.
Was ist ImageLink
Wenn ein MP3- oder WMA-Verzeichnis eine
Bilddatei <jml> enthält, die mit Image
Converter (mitgeliefert auf CD-ROM) bearbeitet
wurde, kann dieses Bild auf der Display
angezeigt werden, während die Titel in dem
Verzeichnis wiedergegeben werden.
•Während des Lesens einer <jml> Bilddatei
werden keine Töne ausgegeben (das
voreingestellte Bild einer Kaffeetasse wird
während dieser Zeit angezeigt).
Führen Sie die folgenden Schritte aus, um
ImageLink zu aktivieren.
•Siehe auch „Ändern der allgemeinen
Einstellungen (PSM)“ auf Seite 46.
1Drücken Sie die Taste SEL (Auswahl)
länger als 2 Sekunden, damit einer der
PSM-Parameter auf dem Display erscheint.
2Drücken Sie die Zifferntaste 1, um
„MOVIE“, die Filmkategorie der PSM-
Einstellungen, auszuwählen.
Die Einstellanzeige „Graphics“ wird auf dem
Display angezeigt.
3Drehen Sie am Drehregler, um „ImageLink“
auszuwählen.
4Drücken Sie zur Beendigung der
Einstellung die Taste SEL (Auswahl).
ImageLink wird aktiv, sobald der nächste
Verzeichnis wiedergegeben wird.
Hinweis:
„ImageLink“ funktioniert nicht in den folgenden
Fällen:
•Wenn sich keine <jml> Datei in einem MP3-/
WMA-Verzeichnis befindet.
•Wenn Intro Scan aktiviert ist.
•Wenn von der Signalquelle „CD“ auf eine
andere gewechselt wurde oder
•Wenn Sie das Gerät aus- und wieder einschalten,
während das voreingestellte Bild einer
Kaffeetasse auf dem Display angezeigt wird.
Einen bestimmten Abschnitt in
einem Titel suchen
Zum schnellen Vor- oder Rücklauf des Titels
Hinweis:
Während der Verwendung einer MP3-oder WMA-Disc,
ist der Ton nur mit Aussetzern zu hören. (Die
verstrichene Spielzeit wird ebenfalls sprunghaft im
Display angezeigt).
So springen Sie zu den nächsten oder
vorherigen Titeln
Halten Sie während der
Wiedergabe einer Disc die Taste
¢ gedrückt, um um einen
schnellen Vorlauf im Titel
durchzuführen.
Halten Sie während der
Wiedergabe einer Disc die Taste
4 gedrückt, um um einen
schnellen Rücklauf im Titel
durchzuführen.
Befindet sich mehr als eine <jml> Datei in einem
Verzeichnis, so wird die <jml> Datei mit der
neueren Wiedergabenummer auf dem Display
angezeigt (im obigen Beispiel wird „Photo2.jml“
für Album 2 verwendet).
Album 1
(Verzeichnis 1)
Music001.mp3
Music002.mp3
Music003.mp3
Photo1.jml Photo1.jml
Photo2.jml
Album 2
(Verzeichnis 2)
Music004.wma
Music005.mp3
Music006.wma
Photo2.jml
Photo3.jml
Displayfenster
Displayfenster
GE22-31SH9101[E_EX]f.p65 2/26/03, 10:09 AM24

25
DEUTSCH
M
MODE
Zum schnellen Wechsel zu einem
bestimmten Titel
• Bsp. 1:Titel 6 wird wiedergegeben und Titel
32 soll ausgewählt werden
• Bsp 2:Titel 36 wird wiedergegeben und
Titel 8 soll ausgewählt werden
M
MODE
Einen Titel auf einer Disc suchen
Zum direkten Anwählen eines bestimmten
Titel (NUR für CD und CD Text Discs)
Die Ziffertaste, die der Titelnummer entspricht
drücken, um sein Abspielen zu beginnen.
•Zum Wählen einer Titelnummer von 1 – 6:
1 (7) – 6 (12) kurz drücken.
•Zum Wählen einer Titelnummer von 7 – 12:
1 (7) – 6 (12) drücken und länger als 1
Sekunde halten.
Zum schnellen Wechsel zu einem Titel
1Drücken Sie während der
Wiedergabe einer Disc MODE (M).
„Mode“ wird auf dem Display
angezeigt, und die Zifferntasten und
die Tasten 5 (aufwärts)/ ∞
(abwärts) beginnen zu blinken.
345621
2Drücken Sie 5 (aufwärts) oder
∞ (abwärts), während „Mode“
auf dem Display angezeigt wird.
Wenn Sie das erste Mal auf die
Taste 5 (aufwärts) oder ∞
(abwärts) drücken, wird der nächste oder
vorherige Titel mit einer Titelnummer, die mit
10 multipliziert werden kann (Bsp.: 10., 20.,
30.), angesteuert.
Jeder weitere Tastendruck überspringt 10 Titel
(siehe nachfolgend „Zum schnellen Wechsel
zu einem bestimmten Titel“).
•Nach dem letzten Titel wird der erste Titel
ausgewählt und umgekehrt.
•Bei der Wiedergabe einer MP3- oder WMA-
Disc kann diese Funktion nur innerhalb
eines Verzeichnisses ausgeführt werden.
Während der Wiedergabe einer Audio CD oder CD
Text Disc: Titel 6 \ 10 \ 20 \ 30 \ 31 \ 32
(3x) (2x)
Titel 36 \ 30 \ 20 \ 10 \ 9 \ 8
(3x) (2x)
M
MODE
Aktuelle Titelnummer
Aktuelle Titelnummer
Aktuelle
Verzeichnisnummer
Während der Wiedergabe einer MP3- oder WMA-
Disc:
Weitere Einzelheiten zu
dieser Funktion finden
Sie auf Seite 40.
GE22-31SH9101[E_EX]f.p65 2/26/03, 10:09 AM25

26
DEUTSCH
345621
Ein Verzeichnis auf einer Disc
suchen
Die folgenden Funktionen können nur
während der Wiedergabe einer MP3- oder
WMA-Disc ausgeführt werden.
Zum direkten Anwählen eines bestimmten
Verzeichnisses
WICHTIG:
Zur direkten Auswahl der Verzeichnisse mit
Hilfe der Nummerntaste(n) müssen den
Verzeichnissen zweistellige Nummern am
Anfang der Verzeichnisnamen zugewiesen
werden. (Sie können dies nur während der
Aufnahme von CD-Rs oder CD-RWs tun).
Beispiel: Wenn das Verzeichnis den Namen „01
ABC“ hat
=Drücken Sie 1, um zum Verzeichnis
„
01 ABC
“
zu wechseln.
Wenn das Verzeichnis den Namen
„1 ABC“ hat, und Sie drücken 1, so
funktioniert dies nicht.
Wenn das Verzeichnis den Namen
„12 ABC“ hat
=
Drücken und halten Sie 6 (12), um zum
Verzeichnis „12 ABC“ zu wechseln.
Drücken Sie die Nummerntaste, die der
Verzeichnisnummer entspricht, um die
Wiedergabe der ersten Datei in dem gewählten
Verzeichnis zu beginnen.
•So wählen Sie eine Verzeichnisnummer von
01 – 06 aus:
1 (7) – 6 (12) kurz drücken.
•So wählen Sie eine Verzeichnisnummer von
07 – 12 aus:
1 (7) – 6 (12) drücken und länger als 1
Sekunde halten.
Hinweise:
•Wenn das Verzeichnis keine MP3- oder WMA-Titel
enthält, wird die Wiedergabe nicht gestartet. („No
Music“ wird auf dem Display angezeigt). Wählen
Sie ein anderes Verzeichnis aus.
•Sie können kein Verzeichnis direkt auswählen, das
eine Nummer hat, die größer als 12 ist.
Drücken Sie nach dem Auswählen des
Verzeichnisses ¢ oder 4, um einen
bestimmten Titel in einem Verzeichnis
auszuwählen.
So springen Sie zum nächsten oder
vorherigen Verzeichnis
(entweder auf der gleichen oder einer anderen
Hierarchie-Ebene)
Auf dem Bedienfeld:
Auf der Fernbedienung:
Drücken Sie während der
Wiedergabe einer Disc 3 (rechts),
um zum nächsten Verzeichnis zu
springen.
Mit jedem Druck auf diese Taste
wird das nächste Verzeichnis
gesucht und der erste Titel in
diesem Verzeichnis wiedergegeben.
Drücken Sie während der
Wiedergabe einer Disc 5
(aufwärts), um zum nächsten
Verzeichnis zu springen.
Mit jedem Druck auf diese Taste
wird das nächste Verzeichnis
gesucht und der erste Titel in
diesem Verzeichnis wiedergegeben.
Drücken Sie während der Wiedergabe einer Disc
∞ (abwärts), um zum vorherigen Verzeichnis zu
springen.
Mit jedem Druck auf diese Taste wird das vorherige
Verzeichnis gesucht und der erste Titel in diesem
Verzeichnis wiedergegeben.
Drücken Sie während der Wiedergabe einer Disc 2
(links), um zum vorherigen Verzeichnis zu
springen.
Mit jedem Druck auf diese Taste wird das vorherige
Verzeichnis gesucht und der erste Titel in diesem
Verzeichnis wiedergegeben.
Hinweis:
Das Verzeichnis wird übersprungen, wenn es keine
MP3- oder WMA-Titel enthält.
Sehen Sie hierzu das Hierarchie-Diagramm auf
Seite 22.
01 02 03 04
PRESET PRESET
GE22-31SH9101[E_EX]f.p65 2/26/03, 10:10 AM26

27
DEUTSCH
So springen Sie zum nächsten oder
vorherigen Verzeichnis innerhalb eines
Verzeichnisses
(auf der gleichen Hierarchie-Ebene)
NUR auf der Fernbedienung:
Sehen Sie hierzu das Hierarchie-Diagramm auf
Seite 22.
03 04 03 04
Drücken Sie während der
Wiedergabe einer Disc 3 (rechts),
um zum nächsten Verzeichnis zu
springen.
Mit jedem Druck auf diese Taste
wird das nächste Verzeichnis, das
sich innerhalb des gleichen
Verzeichnisses (auf der gleichen
Hierarchie-Ebene) befindet,
gesucht (und die erste Titel in
diesem Verzeichnis
wiedergegeben, wenn sie
aufgezeichnet wurde).
Drücken Sie während der Wiedergabe einer Disc
2 (links), um zum vorherigen Verzeichnis zu
springen.
Mit jedem Druck auf diese Taste wird das
vorherige Verzeichnis, das sich innerhalb des
gleichen Verzeichnisses (auf der gleichen
Hierarchie-Ebene) befindet, gesucht (und die
erste Titel in diesem Verzeichnis wiedergegeben,
wenn sie aufgezeichnet wurde).
Hinweis:
Wenn das Verzeichnis keine MP3- oder WMA-Titel
enthält, wird die Wiedergabe nicht gestartet. („No
Music“ wird auf dem Display angezeigt). Wählen Sie
ein anderes Verzeichnis aus.
So springen Sie zu den Verzeichnissen,
die sich auf niedrigeren oder höheren
Hierarchie-Ebenen befinden
NUR auf der Fernbedienung:
01 05 01 05
Beispiel 1
Beispiel 2
Sehen Sie hierzu das Hierarchie-Diagramm auf
Seite 22.
01 02 03
04
ROOT
05
Drücken Sie während der Wiedergabe
einer Disc 5 (aufwärts), um zu einem
Verzeichnis auf einer höheren
Hierarchie-Ebene zu springen.
Mit jedem Druck auf diese Taste wird
ein Verzeichnis auf der höheren
Hierarchie-Ebene gesucht (und die
erste Titel in diesem Verzeichnis
wiedergegeben, wenn sie
aufgezeichnet wurde).
Drücken Sie während der Wiedergabe einer Disc
∞ (abwärts), um zu einem Verzeichnis auf einer
niedrigeren Hierarchie-Ebene zu springen.
Mit jedem Druck auf diese Taste wird ein
Verzeichnis auf der niedrigeren Hierarchie-Ebene
gesucht (und die erste Titel in diesem
Verzeichnis wiedergegeben, wenn sie
aufgezeichnet wurde).
•Befindet sich auf der niedrigeren oder höheren
Hierarchie-Ebene mehr als ein Verzeichnis,
wird das Verzeichnis mit der neueren
Wiedergabenummer gesucht.
Hinweis:
Wenn das Verzeichnis keine MP3- oder WMA-Titel
enthält, wird die Wiedergabe nicht gestartet. („No
Music“ wird auf dem Display angezeigt). Wählen Sie
ein anderes Verzeichnis aus.
Drücken Sie auf der Fernbedienung R•D, um
zum Stammverzeichnis zurückzukehren. Sie
können von jedem beliebigen Verzeichnis zum
Stammverzeichnis zurückkehren.
•Wenn auf der Disc Titel aufgezeichnet sind, die
sich in keinem Verzeichnis befinden, so werden
diese Titel wiedergegeben.
PRESET PRESET
DISC
DISC
GE22-31SH9101[E_EX]f.p65 2/26/03, 10:10 AM27

28
DEUTSCH
Verzeichnisnamenslisten Titelnamenslisten
345621
345621
So wählen Sie einen Titel aus und
starten die Wiedergabe
1
Drücken und halten Sie 5 (aufwärts)
oder ∞ (abwärts) gedrückt, so dass
die Verzeichnisnamensliste der
eingelegten Disc auf dem Display
angezeigt wird.
Das momentan
wiedergegebene Verzeichnis
wird auf dem Display
angezeigt.
2
Anzeigen der Titelnamensliste des
aktuellen Verzeichnisses.
Bei jedem Tastendruck ändern
sich die Listen auf der Anzeige
wie folgt:
Der momentan wiedergegebene Titel (oder
Verzeichnis) wird auf dem Display
angezeigt.
Hinweis:
Auf dem Display können jeweils nur sechs
Namen gleichzeitig angezeigt werden. Weitere
Namen der folgenden Listen können Sie sich
durch 5 (aufwärts) oder ∞ (abwärts) anzeigen
lassen.
3
Wählen Sie die Nummer (1 – 6) für
den Titel, der wiedergegeben werden
soll.
Auswählen eines
Verzeichnisses und eines
Titels über die Namensliste
Die folgenden Funktionen können nur
während der Wiedergabe einer MP3- oder
WMA-Disc ausgeführt werden.
Sie können Verzeichnis- und Titelnamenslisten
auf dem Display während der Wiedergabe einer
Disc anzeigen und dann ein von Ihnen
gewünschtes Verzeichnis oder Titel auswählen.
So wählen Sie ein Verzeichnis aus und
starten die Wiedergabe
1
Drücken und halten Sie 5 (aufwärts)
oder ∞ (abwärts) gedrückt, so dass
die Verzeichnisnamensliste der
eingelegten Disc auf dem Display
angezeigt wird.
Das momentan
wiedergegebene Verzeichnis
wird auf dem Display
angezeigt.
Hinweise:
•
Auf dem Display können jeweils nur sechs
Namen gleichzeitig angezeigt werden. Weitere
Namen der folgenden Listen können Sie sich
durch 5 (aufwärts) oder ∞ (abwärts) anzeigen
lassen.
•Wenn Sie ¢ oder 4drücken,
wird die Titelliste der momentan
wiedergegebenen Verzeichnisses angezeigt.
Jeder Druck auf diese Taste bewirkt, dass
abwechselnd die Verzeichnisnamensliste und
die Titelnamensliste auf dem Display erscheint.
•Nur Verzeichnisse, die MP3- oder WMA-Titel
enthalten, werden aufgeführt.
2
Wählen Sie die Nummer (1 – 6) für
das Verzeichnis, das wiedergegeben
werden soll.
GE22-31SH9101[E_EX]f.p65 2/26/03, 10:10 AM28

30
DEUTSCH
Für Audio-CD und CD Text Discs:
Für MP3- und WMA-Discs:
Modus Wiederholt die Wiedergabe
Repeat Track : Aktueller (oder angegebener) Titel.
• leuchtet während
der Wiedergabe auf dem
Display auf
Repeat Folder
*:Alle Titel des aktuellen (oder
angegebenen) Verzeichnisses.
• leuchtet während
der Wiedergabe auf dem
Display auf
*„Repeat Folder“ kann nur bei einer MP3- oder
WMA-Disc angewendet werden.
Wählen Sie zum Deaktivieren der wiederholten
Wiedergabe „Repeat Off” aus, indem Sie
mehrmals die Zifferntaste 2 oder die Zifferntaste
4 in Schritt 2 drücken.
So spielen Sie Titel an (Intro Scan)
Die ersten 15 Sekunden aller Titel können
nacheinander wiedergegeben werden.
1Drücken Sie während der
Wiedergabe einer Disc MODE (M).
„Mode“ wird auf dem Display
angezeigt, und die Zifferntasten und
die Tasten 5 (aufwärts)/∞ (abwärts)
beginnen zu blinken.
2Drücken Sie die Zifferntaste 1, während
„Mode“ noch auf dem Display angezeigt wird.
Wiederholtes Drücken der Taste ändert den
Titelanspielungs-Modus wie folgt:
Repeat Off
Repeat Track
Repeat Off
Repeat FolderRepeat Track
Für Audio-CD und CD Text Discs:
Für MP3- und WMA-Discs:
Modus Spielt die Anfänge von
Intro Track : Alle Titel auf der Disc.
• leuchtet während
der Wiedergabe auf dem
Display auf
Intro Folder* : Die ersten Titel jedes
Verzeichnisses.
• leuchtet während
der Wiedergabe auf dem
Display auf
*„Intro Folder“ kann nur bei einer MP3- oder WMA-
Disc angewendet werden.
Wählen Sie zum Deaktivieren der
Titelanspielung „Intro Off” aus, indem Sie
mehrmals die Zifferntaste 1 oder die Zifferntaste
4 in Schritt 2 drücken.
Unterdrücken des Disc-Auswurfs
Sie können den Auswurf einer Disc blockieren
und eine Disc im Ladeschlitz verriegeln.
Drücken Sie SEL (Auswahl) und drücken
und halten Sie die Taste 0 länger als
zwei Sekunden gedrückt.
„No Eject“ wird etwa 5 Sekunden lang im Display
angezeigt. Die Disc ist damit verriegelt und kann
nicht ausgeworfen werden.
Disc-Auswurf wieder aktivieren und
Verriegelung der Disc aufheben
Drücken Sie SEL (Auswahl) und drücken und
halten Sie erneut die Taste 0 länger als zwei
Sekunden gedrückt.
„Eject OK“ blinkt etwa 5 Sekunden lang im
Display und die Verriegelung der Disc wird
aufgehoben.
345621
Intro Off
Intro Track
Intro Off
Intro FolderIntro Track
M
MODE
SEL
GE22-31SH9101[E_EX]f.p65 2/26/03, 10:10 AM30

31
DEUTSCH
D
DISP
Während der Wiedergabe einer MP3- oder
WMA-Disc:
•Grundanzeige:
•Albumname/Interpret oder
Verzeichnisname wird hervorgehoben:
•Titelname wird hervorgehoben:
•Uhrzeit wird hervorgehoben:
Hinweise:
*1Wenn „Tag“ auf „Off“ eingestellt ist (siehe Seite
49), werden Verzeichnisnamen mit angezeigt.
*2Wenn „Tag“ auf „Off“ eingestellt ist (siehe Seite
49), werden Titelnamen mit angezeigt. .
Displayanzeige:
•Wenn der Titel in der Mitte des Displays
hervorgehoben wird und nicht vollständig
angezeigt werden kann, läuft er durch das
Display. Sehen Sie auch „Wählen des Bildlauf-
Modus—Scroll“ auf Seite 48.
•Einige Zeichen oder Symbole werden nicht auf
dem Display dargestellt (sie werden als
Leerzeichen dargestellt oder durch andere
Zeichen ersetzt).
*2
*1
*2
*1
Display-Schema ändern
Sie können die Informationen auf dem Display
ändern, indem Sie die Taste DISP (D) drücken.
Bei jedem Tastendruck ändert sich das
Display-Schema wie folgt:
Während der Wiedergabe einer Audio CD oder
CD Text Disc:
•Grundanzeige:
•Disc-Name/Interpret Ihrer zugewiesenen
Disc wird hervorgehoben:
•Titelname wird hervorgehoben:
•Uhrzeit wird hervorgehoben:
Hinweise:
*1Wenn der Audio CD kein Name zugewiesen ist, bzw.
wenn auf der CD Text kein Discname/Interpret
aufgezeichnet ist, wird „No Name“ angezeigt.
Sehen Sie Seite 51, um einer Audio CD einen Namen
zuzuweisen.
*2„No Name“ wird für Audio CD angezeigt. Wenn kein
Titelname für CD Text aufgezeichnet wurde, wird
„No Name“ angezeigt.
GE22-31SH9101[E_EX]f.p65 2/26/03, 10:10 AM31

49
DEUTSCH
Auswahl des Display-Beleuchtungsschemas
—LCD Type
Sie können das Farbschema des Displays nach
Ihren Wünschen einstellen.
•Auto: Tagsüber erscheint die Anzeige im
Positivschema (abhängig von der
„Dimmer“-Einstellung). Bei
Dunkelheit wird jedoch die Anzeige
negativ dargestellt (abhängig von
der „Dimmer“-Einstellung).
•Positive: Es wird ein positives Display-
Schema dargestellt.
•Negative: Es wird ein negatives Display-
Schema dargestellt.
Auswahl der Schriftart auf dem Display
—Font Type
Sie können die Schriftart auf dem Display
auswählen. Wählen Sie entweder „1“ oder „2“ aus.
Aktivierung/Deaktivierung der Tag-Anzeige
—Tag
Ein MP3- und WMA-Titel kann Titelinformationen
(sogenannte
„
Tag
“
) beinhalten, in denen der
Name des Albums, Interpret, Titel usw.
gespeichert sind.
•On: Aktiviert während der Wiedergabe von
MP3- und WMA-Titeln die Tag-Anzeige.
• Wenn ein Titel keine Tags besitzt,
werden der Verzeichnis- und Titelname
angezeigt.
•Off: Deaktiviert während der Wiedergabe von
MP3- und WMA-Titeln die Tag-Anzeige.
(Es werden lediglich der Verzeichnis-
und Titelname angezeigt).
Hinweise:
•Wenn Sie während der Wiedergabe eines Titels die
Einstellung von „Off“ auf „On“ stellen, wird die Tag-
Anzeige mit der Wiedergabe des nächsten Titels aktiviert.
•Nur für MP3-Titel: Es gibt zwei Versionen—ID3v1 (ID3
Tag Version 1) und ID3v2 (ID3 Tag Version 2). Wenn
ID3v1 und ID3v2 aufgezeichnet wurden, wird ID3v2
angezeigt.
Änderung der Trennschärfe des FM-Tuners
—IF Filter
Es kann vorkommen, daß sich benachbarte
Sender gegenseitig stören. Bei einer Störung
sind u. U. Nebengeräusche zu hören.
•Auto: Bei einer derartigen Störung wird
automatisch die Trennschärfe des
Tuners verstärkt und die Störgeräusche
werden reduziert. (Der Stereoeffekt geht
jedoch verloren).
•Wide: Abhängig von der Störung eines
benachbarten Senders, aber die
Klangqualität und der Stereoeffekt
bleiben erhalten.
Ein- oder Ausschalten des Tastensignaltons
—Beep
Sie können den Tastensignalton deaktivieren,
wenn Sie nicht möchten, daß ein Signalton
ertönt, wenn Sie eine Taste drücken
•On: Der Tastensignalton wird aktiviert.
•Off: Der Tastensignalton wird deaktiviert.
So wählen Sie die Telefonstummschaltung
—Telephone
Dieser Modus wird verwendet, wenn ein
Funktelefon angeschlossen ist. Wählen Sie in
Abhängigkeit vom verwendeten Telefonsystem
entweder die Einstellung „Muting1“ oder
„Muting2“.
•Muting1: Wählen Sie diese Einstellung, wenn
hierdurch der Ton während der
Benutzung des Mobiltelefons
stummgeschaltet wird.
•Muting2: Wählen Sie diese Einstellung, wenn
hierdurch der Ton während der
Benutzung des Mobiltelefons
stummgeschaltet wird.
•Off: Die Telefonstummschaltung wird
deaktiviert.
Ein-/Ausschalten des Line In-Schalters
—Line In
Der Eingang „LINE IN“ kann ausgeschaltet
werden, wenn keine externe Komponente an die
LINE IN-Buchse angeschlossen ist.
•On: Sie können „LINE IN“ als
Wiedergabequelle auswählen.
•Off: Sie können „LINE IN“ nicht als
Wiedergabequelle auswählen.
Ein-/Ausschalten des Endstufenschalters
—PowerAmp
Sie können den eingebauten Verstärker
ausschalten und die Audio-Signale nur an die
externe Komponente senden, um ein klares
Klangbild zu erhalten und um eine interne
Wärmeentwicklung innerhalb des Geräts zu
verhindern.
•On: Wenn keine externen Verstärker
verwendet werden.
•Off: Wenn externe Verstärker verwendet
werden.
GE46-53SH9101[E_EX]f.p65 2/26/03, 10:14 AM49

61
DEUTSCH
BETRIEB MIT EXTERNEN KOMPONENTEN
SRC
ATT
3456 M21
D
SRC
DISP
ATT
SEL
T/P
MODE
3
Stellen Sie die Lautstärke ein.
4
Stellen Sie den DSP- und
Klangmodus nach Ihrem Ermessen
ein.
•Weitere Einzelheiten bzgl. DSP-Modi
finden Sie auf Seite 32.
•Weitere Einzelheiten bzgl. Klang-Modi
(iEQ) finden Sie auf Seite 35.
Hinweis:
Die Taste DISP (D) funktioniert nicht, wenn die
Signalquelle auf „LINE IN“ eingestellt ist.
Wiedergeben einer externen
Komponente
Sie können externe Komponenten an die LINE
IN-Buchsen auf der Geräterückseite anschließen.
•Wenn Sie „LINE IN“ nicht als Signalquelle
auswählen können, ändern Sie die Einstellung für
„Line In“ auf „On“. (Siehe Seite 49).
1
Wählen Sie die externe Komponente
(LINE IN) aus.
Jeder Druck auf diese Taste
ändert die Signalquelle wie
auf Seite 7 beschrieben.
Durch Auswahl einer
Signalquelle wird das Gerät
automatisch eingeschaltet.
2
Schalten Sie die angeschlossene
Komponente ein und starten Sie die
Wiedergabe der Signalquelle.
Wenn Sie der externen Komponente einen
anderen Namen zugewiesen haben, wird dieser
angezeigt.
GE61-61SH9101[E_EX]f.p65 2/26/03, 10:15 AM61

62
DEUTSCH
BETRIEB DES DAB-TUNERS
Einstellen eines Ensembles
und eines Dienstes
Ein typisches Ensemble enthält 6 oder mehr
Sendungen (Dienste), die gleichzeitig ausgestrahlt
werden. Nachdem Sie ein Ensemble eingestellt
haben, können Sie den Dienst wählen, den Sie
hören möchten.
1
Wählen Sie den DAB-Tuner.
Jeder Druck auf diese Taste ändert
die Signalquelle wie auf Seite 7
beschrieben. Durch Auswahl einer
Signalquelle wird das Gerät
automatisch eingeschaltet.
2
Wählen Sie das DAB-Frequenzband
(DAB1, DAB2 oder DAB3).
1Drücken und halten Sie die
Taste SRC länger als 1
Sekunde gedrückt.
Die Frequenzbandanzeige
auf dem Display beginnt zu
blinken.
2Drücken Sie innerhalb von 5
Sekunden (während die
Frequenzbandanzeige blinkt)
erneut die Taste SRC. Bei
jedem Tastendruck wird das
Band gewechselt.
Hinweis:
Dieser Receiver verfügt über drei DAB-Frequenzband
(DAB1, DAB2, DAB3). Sie können alle drei Bänder
verwenden, um ein Ensemble einzustellen.
Wir empfehlen Ihnen, den DAB-Tuner
KT-DB1500 oder KT-DB1000 (DAB: Digital Audio
Broadcasting = digitaler Rundfunk) zusammen mit
diesem Gerät zu verwenden.
Wenn Sie einen anderen DAB-Tuner besitzen,
setzen Sie sich mit Ihrem Fachhändler für JVC-
Fachhändler für Autostereoanlagen in Verbindung.
• Lesen Sie auch die Bedienungsanleitung des
DAB-Tuner.
Was ist das DAB-System?
DAB ist eines der digitalen Rundfunksysteme,
die heute angeboten werden. Sie können
Übertragungen in CD-Qualität empfangen, ohne
daß sie durch Störungen und
Signalverzerrungen beeinträchtigt werden.
Darüber hinaus können im digitalen Rundfunk
auch Text, Bilder und Daten gesendet werden.
Im Gegensatz zum UKW-Rundfunk, bei dem
jede Sendung auf einer eigenen Frequenz
übertragen wird, werden beim DAB-System
mehrere Sendungen („Dienste“ genannt)
kombiniert, um ein „Ensemble“ zu bilden.
Zusätzlich kann auch jeder „Dienst“, auch
„Primärdienst“ genannt, in Unterdienste,
sogenannte „Sekundärdienste“, unterteilt
werden.
Wenn Sie einen DAB-Tuner an dieses Gerät
angeschlossen haben, können Sie diese DAB-
Dienste empfangen.
3456 M21
D
SRC
DISP
ATT
SEL
T/P
MODE
SRC
SRC
DAB1
DAB2
DAB3
Das zuletzt empfangene Ensemble (Dienst) des
ausgewählten Frequenzbands wird eingestellt.
Kanalnummer
Ensemble-Anzeige
GE62-70SH9101[E_EX]f.p65 2/28/03, 3:40 PM62

63
DEUTSCH
3
Suchen Sie ein Ensemble.
Wenn ein Ensemble empfangen wird,
brechen Sie die Suche ab.
Wenn Sie die Suche abbrechen wollen,
bevor ein Ensemble empfangen wird,
drücken Sie erneut die Taste, die Sie zum
Start der Suche gedrückt haben.
4
Wählen Sie einen Dienst aus
(entweder primär oder sekundär),
den Sie hören möchten.
So stellen Sie ein bestimmtes Ensemble
ein, ohne es zu suchen
1Drücken Sie wiederholt auf die Taste SRC,
um den DAB-Tuner als Signalquelle
auszuwählen.
2Drücken und halten Sie die Taste SRC länger
als 1 Sekunde gedrückt.
3Drücken Sie wiederholt SRC, um das DAB-
Frequenzband (DAB1, DAB2 oder DAB3) zu
wählen.
4Drücken Sie die Taste ¢ oder 4
und halten Sie sie länger als 1 Sekunde
gedrückt.
5Drücken Sie gegebenenfalls Taste ¢
oder 4 bis das gewünschte Ensemble
eingestellt worden ist.
•Wenn Sie die Taste gedrückt halten, ändert
sich die Frequenz, bis Sie die Taste
loslassen.
6Drücken Sie 5 (aufwärts) oder ∞ (abwärts),
um einen Dienst (entweder primär oder
sekundär) zum Hören auszuwählen.
Wenn während des Betriebs Rauschen
auftritt, das die Wiedergabe beeinträchtigt
Wenn während des Betriebs störende
Umgebungsgeräusche auftreten, die die
Wiedergabequalität beeinträchtigen.Vor allem ist
der Klang des unteren Pegelbereichs schwer zu
hören.
In diesem Fall können Sie den Klang des
unteren Pegelbereichs verstärken, um die
Klangqualität zu verbessern.
Aus diesem Grund verfügen manche Dienste
zusätzlich zu den normalen Programmsignalen
über Steuersignale für den Dynamikbereich.
1Drücken Sie die Taste MODE (M),
während ein DAB-Dienst
wiedergegeben wird.
„Mode“ wird auf dem Display
angezeigt und die Zifferntasten
beginnen zu blinken.
2Drücken Sie mehrmals die Zifferntaste 1, um
die DRC-Funktion zu aktivieren, während
„Mode“ noch auf dem Display angezeigt wird.
Bei jedem Tastendruck ändert sich die DRC-
Funktion wie folgt:
Der DRC-Effekt verstärkt sich mit
zunehmendem Wert.
•Die DRC-Anzeige wird nur dann
hervorgehoben ( ), wenn das Gerät
DRC-Signale vom empfangenen Dienst
erhalten hat.
Wählen Sie „DRC Off“, um den DRC-Effekt
zu deaktivieren.
Drücken Sie die Taste
¢ um Suchen von
Ensembles mit höherer
Frequenz.
Drücken Sie die Taste
4 um Suchen von
Ensembles mit niedrigerer
Frequenz.
Drücken Sie die Taste 5
(aufwärts), um den nächsten
Dienst auszuwählen. (Wenn
ein Primärdienst auch einige
Sekundärdienste enthält,
werden diese vor der Auswahl
des nächsten primärdienstes
ausgewählt).
Drücken Sie die Taste ∞
(abwärts), um den vorherigen
Dienst auszuwählen (entweder
primär oder sekundär).
DRC 1 DRC 2
DRC Off
DRC 3
M
MODE
345621
Nach ca. 5
Sekunden
Das Display zeigt wieder die Signalquelle an.
DRC-Anzeige wird angezeigt
GE62-70SH9101[E_EX]f.p65 2/28/03, 3:40 PM63

70
DEUTSCH
Display-Schema ändern
Sie können die Informationen auf dem Display ändern, indem Sie die Taste DISP (D) drücken.
Bei jedem Tastendruck ändert sich das Display-Schema wie folgt:
D
DISP
*1
•Grundeinstellung des Darstellungsmodus:
•Die Ensemble-Anzeige (Name) wird
hervorgehoben
•Die Dienst-Anzeige (Name) wird
hervorgehoben
•Das Dynamic Label Segment (DLS)
erscheint auf dem Display
*1Die Ensemble-Anzeige (Primärdienst): Wenn der
Sekundärdienst ausgewählt ist, erscheint eine
andere Anzeige ( ).
*2 TEXT-Anzeige: geht davon aus, daß der aktuelle
Dienst, der empfangen wird, DLS (Dynamic Label
Segment—DAB-Radio-Textinformationen) sendet.
*3Jeder Dienst kann mehrere PTY-Codes haben.
Wenn ein Dienst mehrere PTY-Codes hat, werden
diese der Reihe nach angezeigt.
*3
*2
*1
GE62-70SH9101[E_EX]f.p65 2/28/03, 3:40 PM70

72
DEUTSCH
Was wie ein Problem aussieht, muß nicht immer eines sein. Die folgenden Punkte vor einem Anruf bei
einer Kundendienststelle überprüfen.
FEHLERSUCHE
Abhilfen
Unterbrechen Sie die Wiedergabe
auf schlechten Straßen.
Verwenden Sie eine andere Disc.
Prüfen Sie die Kabel und
Anschlüsse.
Stellen Sie auf „On“. (siehe Seite
49).
Prüfen Sie die Kabel und
Anschlüsse.
Legen Sie ordnungsgemäß die
Disc ein.
•Legen Sie eine finalisierte
CD-R/CD-RW ein.
•Finalisieren Sie die CD-R/
CD-RW mit der Komponente
finalisieren, mit der sie
aufgezeichnet wurde.
Heben Sie die Disc-Verriegelung
auf (siehe Seite 30).
Drücken Sie länger als
2 Sekunden, während Sie die
Taste 0 gedrückt halten.
Drücken Sie mit Hilfe eines
Kugelschreibers die auf dem
Bedienfeld befindliche Reset-
Taste (siehe Seite 2).
Drücken Sie mit Hilfe eines
Kugelschreibers die auf dem
Bedienfeld befindliche Reset-Taste
(siehe Seite 2). Wenn die Reset-
Taste nicht funktioniert. Prüfen Sie
die Montage. (Bsp.: Sie haben
Schrauben verwendet, die länger
sind, als angegeben wurde).
Stellen Sie den Ausgangspegel
an der externen Komponente
ein.
Entfernen Sie das Bedienfeld,
reinigen Sie die
Anschlusskontakte und bringen
Sie das Bedienfeld wieder an
(siehe Seite 53).
Speichern Sie manuell Sender.
Schließen Sie die Antenne fest
an.
Ursachen
Sie fahren auf schlechten
Straßen.
Die Disc ist verkratzt.
Die Anschlüsse sind nicht
ordnungsgemäß vorgenommen.
Die Einstellung für „PowerAmp“
ist auf „Off“ eingestellt.
Die Anschlüsse sind nicht
ordnungsgemäß vorgenommen.
Die Disc ist mit der falschen
Seite nach oben eingelegt.
CD-R/CD-RW wurde nicht
finalisiert.
Die Disc ist verriegelt.
Der CD-Spieler funktioniert
möglicherweise nicht
ordnungsgemäß.
Es liegt möglicherweise eine
Fehlfunktion des integrierten
Mikrocomputers aufgrund von
Störstrahlung usw. vor.
Die Bewegung des
Bedienfelds wird durch einen
Gegenstand blockiert.
Der Eingangspegel über die
externe Komponente (LINE
IN) ist zu hoch.
Das Bedienfeld ist falsch und
zu locker angebracht.
Signale sind zu schwach.
Die Antenne ist nicht
ordnungsgemäß angeschlossen.
Symptome
•Die Tonausgabe hat
Aussetzer.
•
Die Töne werden nicht über
die Lautsprecher ausgegeben.
•CD-R/CD-RW kann nicht
wiedergegeben werden.
•Titel auf einer CD-R/CD-RW
können nicht übersprungen
werden.
•Die Disc kann nicht
ausgeworfen werden.
•Die Disc wird nicht erkannt
(„No Disc“, „Loading Error“
oder „Eject Error“ blinkt).
•Das Gerät funktioniert nicht.
•Wenn „Reset P00“ bis
„Reset P44“ auf dem
Display angezeigt wird.
• (INPUT
OVER)-Anzeige wird auf
dem Display angezeigt.
•„Panel Connect Error“ wird
auf dem Display angezeigt.
•
SSM automatische
Speicherung funktioniert nicht.
•Während des
Radioempfangs ist ein
Rauschen zu hören.
FM/AM Allgemeine Wiedergabe
GE71-75SH9101[E_EX]f.p65 2/26/03, 10:16 AM72

2
FRANÇAIS
Attention:
Ce produit contient un composant laser de
classe laser supérieure à la Classe 1.
CLASS
LASER
1
PRODUCT
CAUTION: Invisible laser
radiation when open and
interlock failed or defeated.
AVOID DIRECT EXPOSURE
TO BEAM. (e)
ADVARSEL: Usynlig laser-
stråling ved åbning, når
sikkerhedsafbrydere er ude
af funktion. Undgåudsæt-
telse for stråling. (d)
VARNING: Osynlig laser-
strålning när denna del är
öppnad och spärren är
urkopplad. Betrakta ej
strålen. (s)
VARO: Avattaessa ja
suojalukitus ohitettaessa
olet alttiina näkymättö-
mälle lasersäteilylle.
Älä katso säteeseen. (f)
AVANT D’UTILISER L’APPAREIL
*
Par mesure de sécurité....
• N’augmentez pas trop le volume car cela bloquerait
les sons de l’extérieur rendant la conduite dangereuse.
• Arrêtez la voiture avant de réaliser toute opération
compliquée.
*
Température à l’intérieur de la voiture....
Si votre voiture est restée garée pendant longtemps
dans un environnement chaud ou froid, attendez que la
température à l’intérieur de la voiture redevienne
normale avant d’utiliser l’appareil.
Comment réinitialiser votre appareil
Appuyez sur la touche de réinitialisation sur le
panneau de commande avant en utilisant un
stylo-bille ou un objet similaire.
Cela réinitialisera le micro-
ordinateur intégré.
Remarque:
Les ajustements préréglés—tels que
les canaux préréglés ou les
ajustements sonores—seront aussi
effacés.
ATTENTION:
N’insérez
JAMAIS vos
doigts entre le
panneau de
commande et
l’appareil car ils
pourraient être pris dans
l’appareil ou vous pourriez
vous blesser.
(Voir la page 52).
56 M
BBE
MODE
Emplacement et reproduction des étiquettes
IMPORTANT POUR PRODUITS LASER
Précautions:
1.PRODUIT LASER CLASSE 1
2.ATTENTION: Radiation laser invisible quand l’appareil
est ouvert ou que le verrouillage est en panne ou
désactivé. Éviter une exposition directe au rayon.
3.ATTENTION: Ne pas ouvrir le volet supérieur. Il n’y a
pas de pièce réparable par l’utilisateur à l’intérieur.
Confier le service après-vente à un personnel qualifié.
4.ATTENTION: Ce lecteur CD utilise une radiation laser
invisible, toutefois, il est équipé de commutateurs de
sécurité qui empêchent l’émission de radiation en
retirant les disques. Il est dangereux de désactiver les
commutateurs de sécurité.
5.ATTENTION: L’utilisation des commandes des réglages
et effectuer des procédures autres que celles spécifiées
dans ce manuel peut provoquer une exposition aux
radiations dangereuses.
Panneau inférieur de l’appareil principal
Nom/plaque d’identification
Remarque:
Pour des raisons de sécurité, une carte d’identification numérotée est fournie avec cet appareil, et le même
numéro d’identification est imprimé sur le châssis de l’appareil. Conserver cette carte dans un endroit sûr,
elle pourra aider les autorités pour identifier votre appareil en cas de vol.
FR02-06SH9101[E_EX]f.p65 2/26/03, 9:28 AM2

4
FRANÇAIS
EMPLACEMENT DES TOUCHES
Panneau de commande
1Touche SRC (source)
2Touche DISP (D) (affichage)
3Touche 5 (haut)
4Touches 4/¢
5Fenêtre d’affichage
6•Touche 0 (éjection)
•Touche (angle)
7Touche T/P (émission d’informations routières/
type de programme)
Éclairage d’aide pour faciliter le fonctionnement:
Si vous appuyez sur MODE (M) ou SEL (sélection), l’affichage et certaines commandes (telles
que les touches numériques, 4/¢ , 5 / ∞ et la molette de commande) entrent dans le
mode de commande correspondant, puis clignotent pour vous indiquer qu’elles peuvent être utilisées
pour l’étape suivante de la procédure en cours. (Éclairage d’aide)
•L’affichage montre comment ces touches fonctionnent pendant cette période.
Ex. Quand vous appuyez sur la touche numérique 1 après avoir appuyé sur MODE (M), pour
commander le tuner FM.
Pour utiliser de nouveau ces commandes pour leurs fonctions d’origine, attendez, sans
toucher aucune commande, que les commandes s’arrêtent de clignoter.
•Appuyer de nouveau sur MODE (M) rétablit aussi les fonctions d’origines. Cependant, appuyer
sur SEL (sélection) fait entrer l’appareil dans un mode différent.
3456 M21
D
SRC
DISP
ATT
SEL
T/P
MODE
1 2 3 6
57
89 q er t
pw
4
8•Touche (attente/sous tension/
atténuateur)
•Molette de commande
9Capteur de télécommande
pTouche ∞ (bas)
qTouche SEL (sélection)
wTouches numériques
eTouche MODE (M)
rTouche (libération du panneau de
commande)
tTouche de réinitialisation
M
MODE
Indicateur de durée restante
345621
Apparaît uniquement quand
la bande FM
est choisie
FR02-06SH9101[E_EX]f.p65 2/26/03, 9:28 AM4

5
FRANÇAIS
Télécommande
1• Quand l’appareil est hors tension, appuyez
sur cette touche pour mettre l’appareil sous
tension.
• Maintenez pressée cette touche pendant
plusieurs secondes pour mettre l’appareil
hors tension.
• Appuyez brièvement sur cette touche pour
couper le son momentanément.
Appuyez de nouveau pour le rétablir.
2Change l’angle du panneau de commande sur
quatre positions.
3Saute à la racine du disque lors de l’écoute
d’un disque MP3.
4• CD: Choisit le lecteur CD.
• FM/DAB:
– Appuyez brièvement sur cette touche
pour choisir le tuner FM. Chaque fois que
vous appuyez sur la touche, la bande FM
(FM1, FM2 et FM3) change.
– Maintenez pressée cette touche pour
choisir le tuner DAB.*1 Chaque fois que
vous maintenez pressée la touche, la
bande DAB (DAB1, DAB2 et DAB3)
change.
• AM: Choisit le tuner AM.
• CH: Choisit le changeur de CD.*1
• AUX: Choisit l’appareil extérieur (LINE IN).*2
5 *3• Change le volume.
6Sélectionne le mode sonore (iEQ).
Chaque fois que vous appuyez sur la touche,
le mode sonore (iEQ) change.
7• Recherche des stations en écoutant la radio.
• Choisissez les ensembles pendant l’écoute
du tuner DAB.
• Fait défiler rapidement en avant ou en
inverse la plage si elle est maintenue
pressée en écoutant le disque.
• Saute au début de plage suivantes ou
revient au début des plages courante (ou
précédente) si elle est brièvement pressée
en écoutant le disque.
8• Choisissez les services pendant l’écoute du
tuner DAB.
• Change le numéro de disque lors de
l’écoute du changeur de CD. Chaque fois
que vous maintenez pressée la touche, le
numéro de disque change et le disque
choisi est reproduit.
• Saute à la première plage d’un dossier du
niveau de hiérarchie supérieur ou inférieur
si vous appuyez brièvement sur la touche
lors de l’écoute d’un disque MP3 ou WMA.
(Ne fonctionne pas pour les disques WMA
sur les changeurs de CD compatibles MP3).
• Ajuste le niveau du fader sur l’écran
d’ajustement du fader/balance.
9• Change le numéro de canal préréglé lors de
l’écoute de la radio (ou du tuner DAB).
Chaque fois que vous appuyez sur la touche,
le numéro de canal préréglé change et la
station (ou le service) choisie est accordée.
• Saute à la première plage du dossier
suivant ou du dossier précédent si vous
maintenez la touche pressée pendant
l’écoute d’un disque MP3 ou WMA.
• Saute à la première plage du dossier
suivant ou du dossier précédent du même
niveau de hiérarchie si vous appuyez
brièvement sur la touche lors de l’écoute
d’un disque MP3 ou WMA. (Ne fonctionne
pas pour les disques WMA sur les
changeurs de CD compatibles MP3).
• Ajuste le niveau de la balance sur l’écran
d’ajustement du fader/balance.
p *3Met en ou hors service l’écran d’ajustement
du fader/balance. Vous pouvez ensuite
ajuster ces réglages en utilisant les touches
présentées ci-dessus (8 et 9).
*1Sans connecter de tuner DAB ni de changeur
de CD, vous ne pouvez pas le choisir comme
source de lecture.
*2Si le réglage “Line In” est changé sur “Off”,
vous ne pouvez pas choisir “LINE IN”. (Voir
les pages 48 et 49).
*3Ces touches ne fonctionnement pas pour
l’ajustement de mode des réglages préférés
(PSM).
ANGLE
RM-RK100
CD
FM
AM
CH
AUX SEL
VOLUME
R D
ATT
DAB
DISC
PRESET PRESET
DISC
EQ
6
7
8
9
p
1
2
3
4
5
FR02-06SH9101[E_EX]f.p65 2/28/03, 9:22 PM5

8
FRANÇAIS
Annulation de la
démonstration des affichages
À l’expédition de l’usine, la démonstration des
affichages est en service et elle démarre
automatiquement quand aucune opération n’est
effectuée pendant environ 20 secondes.
•Il est recommandé d’annuler la démonstration
avant d’utiliser l’appareil pour la première fois.
Pour annuler la démonstration, suivez la
procédure ci-dessous.
1
Maintenez pressée SEL (sélection)
pendant plus de 2 secondes de façon
qu’un des réglages PSM apparaisse
sur l’affichage. (PSM: voir les pages
47 et 48.)
2
Appuyez sur la touche numérique 1
pour choisir “MOVIE”—Catégorie
“Movie” des réglages PSM.
L’écran de réglage “Graphics” apparaît sur
l’affichage.
3
Choisissez “Off”.
4
Terminez le réglage.
SEL
ATT
Pour mettre en service la démonstration des
affichages, répétez la même procédure et
choisissez “Int Demo” ou “All Demo” à l’étape
3
.
•Pour plus de détails, référez-vous à “Pour faire
apparaître les graphiques sur l’affichage—
Graphics” à la page 48.
Réglage de l’horloge
Vous pouvez aussi régler le système de l’horloge
sur 24 heures ou sur 12 heures.
1
Maintenez pressée SEL (sélection)
pendant plus de 2 secondes de façon
qu’un des réglages PSM apparaisse
sur l’affichage. (PSM: voir les pages
47 et 48.)
2
Appuyez sur la touche numérique 2
pour choisir “CLOCK”—catégorie
“Clock” des réglages PSM.
L’écran de réglage “Clock Hr” apparaît sur
l’affichage.
3
Ajustez les heures.
4
Réglez les minutes.
1Choisissez “Clock Min (minute)”.
2Ajustez les minutes.
SEL
ATT
SEL
12
ATT
345621
345621
FR07-09SH9101[E_EX]f.p65 2/26/03, 9:28 AM8

9
FRANÇAIS
5
Réglez le système de l’horloge.
1Choisissez “24H/12H”.
2Choisissez “24Hours” ou “12Hours”.
6
Terminez le réglage.
Pour vérifier l’heure actuelle quand l’appareil
est hors tension, appuyez sur DISP (D).
L’appareil se met sous tension et l’horloge
apparaît pendant environ 5 secondes, puis
l’appareil se met hors tension.
Sélection de l’affichage du
niveau sonore
Vous pouvez afficher le niveau sonore lors de la
lecture de n’importe quelle source. Cet appareil
possède trois modèles d’affichage du niveau
sonore.
1
Maintenez pressée SEL (sélection)
pendant plus de 2 secondes de façon
qu’un des réglages PSM apparaisse
sur l’affichage. (PSM: voir les pages
47 et 48.)
2
Appuyez sur la touche numérique 3
pour choisir “DISP”—catégorie
“Display” des réglages PSM.
3
Choisissez “Theme”.
ATT
12
SEL
4
Choisissez le modèle d’affichage du
niveau sonore souhaité.
Le modèle d’affichage du
niveau sonore change comme
suit quand vous tournez la
molette de commande:
5
Terminez le réglage.
Standard:
Le niveau sonore n’apparaît pas sur l’affichage
(réglage choisi initialement à l’expédition de l’usine).
Meter 1:
Les niveaux sonores gauche et droit apparaissent.
Meter 2:
Les nivéaux sonores fluctuent horizontalement
du centre vers les deux cotés au fur et à mesure
que le niveau sonore change.
Meter 3:
Des ondes de signal fluctuent à partir du centre
et s’étirent vers l’extérieur.
SEL
ATT
Meter 1
Standard
Meter 2
Meter 3
SEL
3
FR07-09SH9101[E_EX]f.p65 2/26/03, 9:28 AM9

10
FRANÇAIS
FONCTIONNEMENT DE LA RADIO
Ecoute de la radio
Vous pouvez utiliser la recherche automatique ou
l’accord manuel pour accorder une station
particulière.
Recherche d’une station
automatiquement: Recherche
automatique
1
Choisissez la bande (FM1 – 3, AM).
1Appuyez répétitivement sur
SRC (source) pour choisir le
tuner.
2Maintenez pressée SRC
pendant plus d’une seconde.
L’indication de la bande sur
l’affichage clignote.
3Avant 5 secondes (pendant
que l’indication de la bande
clignote), appuyez de
nouveau sur SRC.
Chaque fois que vous
appuyez sur la touche, la
bande change.
La dernière station reçue de la
dernière bande choisie est accordée.
3456 M21
D
SRC
DISP
ATT
SEL
T/P
MODE
SRC
S’allume lors de la réception d’une émission FM de
signal suffisamment fort.
Remarque:
Cet appareil a trois bandes FM (FM1, FM2,
FM3). Vous pouvez utiliser n’importe laquelle
pour écouter une émission FM.
2
Démarrez la recherche d’une station.
Quand une station est accordée, la recherche
s’arrête.
Pour arrêter la recherche avant qu’une station
ne soit accordée, appuyez sur la même touche
que vous avez utilisée pour la recherche.
Appuyez sur ¢ pour
rechercher des stations de
fréquences supérieures.
Appuyez sur 4 pour
rechercher des stations de
fréquences inférieures.
FM1
FM2FM3
AM
Ex.: Quand la bande FM est choisie.
Nom de la station (PS)
(voir page 14)
Type de programme
(PTY) (voir page 14)
FR10-14SH9101[E_EX]f.p65 2/27/03, 10:47 AM10

11
FRANÇAIS
Recherche d’une station
manuellement: Recherche manuelle
1
Choisissez la bande (FM1 – 3, AM).
1Appuyez répétitivement sur
SRC (source) pour choisir le
tuner.
2Maintenez pressée SRC
pendant plus d’une seconde.
3Avant 5 secondes, appuyez
de nouveau sur SRC.
Chaque fois que vous
appuyez sur la touche la
bande change.
Remarque:
Cet appareil a trois bandes FM (FM1, FM2,
FM3). Vous pouvez utiliser n’importe laquelle
pour écouter une station FM.
2
Maintenez pressée ¢ ou 4
jusqu’à ce que “Manual Search”
apparaisse sur l’affichage.
3
Accordez la station souhaitée
pendant que “Manual Search”
apparaît sur l’affichage.
•Si vous relâchez la touche, le mode
manuel est mis automatiquement hors
service après environ 5 secondes.
•Si vous maintenez la touche pressée, la
fréquence continue de changer (par
intervalle de 50 kHz pour la bande FM et
par intervalle de 9 kHz pour la bande
AM—PO/GO) jusqu’à ce que vous la
relâchiez.
Pour accorder uniquement les stations FM
avec un signal fort—LO/DX (Local/Distant)
Lors de la recherche de stations FM (y compris
SSM—voir page 12), cet appareil s’arrête chaque
fois qu’il détecte des signaux (mode DX:
l’indicateur DX est allumé—réglage initial). Si les
signaux reçus sont faibles, il se peut que vous
n’entendiez que du bruit.
En réglant LO/DX sur “Local”, cet appareil ne
détecte que les stations de signal suffisamment
fort.
1Appuyez sur MODE (M) lors de
l’écoute d’une émission FM.
“Mode” apparaît sur l’affichage et
les touches numériques clignotent.
2Appuyez sur la touche numérique 2 pendant
que “Mode” apparaît sur l’affichage.
Chaque fois que vous appuyez sur la touche, le
réglage “LO/DX” alterne entre “Local” et “DX”.
L’indicateur LO apparaît
Après environ 5
secondes
L’affichage retourne à l’écran d’indication de la
source.
SRC
FM1
FM2FM3
AM
M
MODE
345621
Voir page 40 pour cette fonction.
Appuyez sur ¢ pour
accorder des stations de
fréquences supérieures.
Appuyez sur 4 pour
accorder des stations de
fréquences inférieures.
FR10-14SH9101[E_EX]f.p65 2/26/03, 9:28 AM11

13
FRANÇAIS
Préréglage manuel
Vous pouvez prérégler manuellement un
maximum de 6 stations pour chaque bande
(FM1, FM2, FM3 et AM).
Ex.: Mémorisation de la station FM située à
92,5 MHz sur le numéro de préréglage 1 de
la bande FM1.
1
Choisissez la bande (FM1 – 3, AM)
où vous souhaitez mémoriser la
station (dans cet exemple, FM1).
1Appuyez répétitivement sur
SRC (source) pour choisir le
tuner.
2Maintenez pressée SRC
pendant plus d’une seconde.
3Avant 5 secondes, appuyez
de nouveau sur SRC.
Chaque fois que vous
appuyez sur la touche, la
bande change.
2
Accordez une station (dans cet
exemple, la station de fréquence
92,5 MHz).
3
Maintenez pressée une touche
numérique (dans cet exemple, 1)
pendant plus de 2 secondes.
4
Répétez la procédure ci-dessus pour
mémoriser d’autres stations sur
d’autres numéros de préréglage.
Le numéro préréglé choisi
clignote un instant.
SRC
1
FM1
FM2FM3
AM
SRC
FM1
FM2FM3
AM
345621
Remarques:
•La station précédemment préréglée est effacée
quand une nouvelle station est mémorisée sur le
même numéro de préréglage.
•Les stations préréglées sont effacées si l’alimentation
du circuit de mémoire est interrompue (par exemple,
pendant le changement de la batterie). Si cela se
produit, préréglez à nouveau les stations.
Accord d’une station préréglée
Vous pouvez accorder facilement une station
préréglée.
Rappelez-vous que vous devez d’abord
mémoriser les stations. Si vous ne les avez pas
encore mémorisées, référez-vous à “Mémorisation
des stations” aux pages 12 et 13.
Sélection directe d’une station
préréglée
1
Choisissez la bande (FM1 – 3, AM).
1Appuyez répétitivement sur
SRC (source) pour choisir le
tuner.
2Maintenez pressée SRC
pendant plus d’une seconde.
L’indication de la bande
clignote sur l’affichage.
3Avant 5 secondes (pendant
que l’indication de la bande
clignote), appuyez de
nouveau sur SRC.
Chaque fois que vous appuyez
sur la touche, la bande change.
2
Choisissez le numéro (1 – 6) de la
station préréglée souhaitée.
Appuyez sur ¢ pour
accorder des stations de
fréquences supérieures.
Appuyez sur 4 pour
accorder des stations de
fréquences inférieures.
FR10-14SH9101[E_EX]f.p65 2/26/03, 9:28 AM13

14
FRANÇAIS
Changement du modèle
d’affichage
En appuyant sur DISP (D), vous pouvez changer
les informations apparaissant sur l’affichage.
Chaque fois que vous appuyez sur la
touche, le modèle d’affichage change
comme suit:
•Modèle d’affichage initial:
•Le nom de la station (PS) est mis en valeur:
Sélection d’une station préréglée en
utilisant la liste des stations préréglées
Si vous avez oublié quelles stations sont
mémorisées sur les numéros de préréglage, vous
pouvez vérifier la liste des stations préréglées,
puis choisir celle que vous souhaitez sur la liste.
1
Choisissez la bande (FM1 – 3, AM).
1Appuyez répétitivement sur
SRC (source) pour choisir le
tuner.
2Maintenez pressée SRC
pendant plus d’une seconde.
3Avant 5 secondes, appuyez
de nouveau sur SRC.
Chaque fois que vous
appuyez sur la touche, la
bande change.
2
Maintenez pressée 5 (haut) ou
∞ (bas) jusqu’à ce que la liste des
stations préréglées pour la bande
actuelle (FM1, FM2, FM3 ou AM)
apparaisse sur l’affichage.
La station reçu actuellement est
mise en valeur sur l’affichage.
Remarques:
•Si une des listes de stations préréglées de
bande FM (FM1, FM2 ou FM3) apparaît sur
l’affichage, vous pouvez accéder aux autres
listes en appuyant sur 5 (haut) ou ∞ (bas).
•Si la station préréglée set une station FM RDS
avec un signal PS, le nom de la station (PS)
apparaît à la place de la fréquence de la
station.
3
Choisissez le numéro (1 – 6) de la
station préréglée souhaitée.
SRC
FM1
FM2FM3
AM
345621
D
DISP
*1“No Name” apparaît toujours pour les stations AM
ou FM non RDS (voir les pages suivantes).
*2Apparaît uniquement lors de la sélection d’une
station préréglée.
*3Le code PTY apparaît uniquement lors de la
réception d’une station RDS.
*2
*1
*3
FR10-14SH9101[E_EX]f.p65 2/26/03, 9:28 AM14

15
FRANÇAIS
FONCTIONNEMENT RDS
Présentation du RDS
Le RDS (Radio Data System) permet aux
stations FM d’envoyer un signal supplémentaire
en même temps que les signaux de leurs
programmes ordinaires. Par exemple, les
stations envoient leur nom, de même que des
informations sur le type de programme qu’elle
diffusent, comme par exemple du sport, de la
musique, etc.
Un autre avantage de la fonction RDS est appelé
“Enhanced Other Networks”. En utilisant les
données Enhanced Other Networks envoyées
d’une station, vous pouvez accorder une station
différente d’un autre réseau diffusant votre
programme favori ou des informations routières
pendant que vous écoutez un autre programme
ou une autre source, comme par exemple une
CD.
A l’aide des données RDS qu’il reçoit, c’est
appareil peut faire les choses suivantes:
•Localisation du même programme
automatiquement (Réception de suivi de
réseau)
•Attente de réception TA (Informations
routières) ou votre programme favori
•Recherche PTY (Type de programme)
•Recherche de programme
•Et quelques autres informations routières
Localisation du même programme
automatiquement (Réception de suivi
de réseau)
Lorsque vous travaillez dans une région où la
réception FM n’est pas bonne, le tuner intégré
dans cet appareil accorde automatiquement une
autre station RDS diffusant le même programme
mais avec un signal plus fort. De cette façon,
vous pouvez continuer à écouter le même
programme avec la meilleure réception possible,
où que vous alliez. (Voir l’illustration à la page
21).
Deux types de données RDS sont utilisés pour
que la réception de suivi de réseau fonctionne
correctement—les données PI (Identification de
programme) et AF (Fréquence alternative).
Si vous ne recevez pas ces données
correctement de la station RDS que vous
écoutez, la réception de suivi de réseau ne
fonctionnera pas.
Pour utiliser la réception de suivi de
réseau
Vous pouvez choisir un des différents modes de
poursuite en réseau pour continuer d’écouter le
même programme avec la meilleure réception
possible.
À l’expédition de l’usine, “AF” est choisi.
•AF: La réception de suivi en réseau est
en service sans régionalisation.
Avec ce réglage, l’appareil passe sur
une autre station dans le même
réseau quand le signal de réception
de la station actuelle devient faible.
(Dans ce mode, le programme peut
être différent du programme
actuellement reçu).
L’indicateur AF s’allume.
•AF Reg: La réception de suivi en réseau est
en service avec régionalisation.
Avec ce réglage, l’appareil passe sur
une autre station dans le même
réseau, diffusant le programme,
quand le signal de réception de la
station actuelle devient faible.
L’indicateur REG s’allume.
•Off: Le suivi de réseau est hors service.
Aucun des indicateurs AF et REG ne
s’allume.
Remarque:
Si un tuner DAB est connecté et que la réception
alternée (pour les services DAB) est en service, la
réception de suivi de réseau est aussi mise en service
(“AF”) automatiquement. Inversement, la réception
de suivi de réseau ne peut pas être mise hors service
sans mettre hors service la réception alternée.
(Voir la page 69).
L’indicateur AF ou REG s’allume.
FR15-21SH9101[E_EX]f.p65 2/26/03, 9:28 AM15

16
FRANÇAIS
SEL
ATT
SEL
T/P
345621
1
Maintenez pressée SEL (sélection)
pendant plus de 2 secondes de
façon qu’un des réglages PSM
apparaisse sur l’affichage. (PSM:
Voir les pages 47 et 48).
2
Appuyez sur la touche numérique 4
pour choisir “TUNER”—la catégorie
“Tuner” des réglages PSM.
L’écran de réglage “PTY Stnby” (attente)
apparaît sur l’affichage.
3
Choisissez “AF-Regn’l” (fréquence
alternative/réception régionale).
4
Choisissez le mode—“AF”,
“AF Reg” ou “Off”.
5
Terminez le réglage.
Utilisation de l’attente de réception TA
L’attente de réception TA permet à l’appareil de
commuter temporairement sur des informations
routières (TA) à partir de la source actuelle (une
autre station FM, une CD ou un autre appareil
connecté).
•L’attente de réception TA ne fonctionnera pas si
vous écoutez une station AM.
Appuyez sur T/P pour mettre en
service l’attente de réception TA.
Chaque fois que vous appuyez
sur la touche, cette fonction est
mise en et hors service
alternativement.
•Quand le tuner DAB est connecté, l’attente de
réception de flash d’informations routières est
aussi mise en et hors service (voir la page 66).
7Si la source actuelle est une station FM,
l’indicateur TP s’allume ou clignote.
•Si l’indicateur TP s’allume, l’attente de
réception TA est en service.
Si une station commence à diffuser des
informations routières, “Traffic Flash”
apparaît sur l’affichage et cet appareil
accorde automatiquement la station. Le
volume change sur le niveau de volume TA
préréglé (voir la page 20) et vous pouvez
écouter les informations routières.
•Si l’indicateur TP clignote, l’attente de
réception TA n’est pas encore en service car
la station reçue actuellement ne fourni pas
de signaux utilisés pour l’attente de réception
TA.
Pour mettre en service l’attente de réception
TA, vous devez accorder une autre station
fournissant ces signaux. Appuyez sur
¢ ou 4 pour rechercher une
telle station.
Quand une station fournissant ces signaux
est accordée, l’indicateur TP s’arrête de
clignoter et reste allumé. Maintenant,
l’attente de réception TA est en service.
L’indicateur TP apparaît
(il s’allume ou clignote)
FR15-21SH9101[E_EX]f.p65 2/26/03, 9:28 AM16

21
FRANÇAIS
Codes PTY
News: Information
Affairs: Programmes d’actualité sur les
affaires ou l’information courante
Info: Programmes qui communiquent
des conseils sur une grande
variété de sujets
Sport: Evénements sportifs
Educate: Programmes éducatifs
Drama: Pièces radio
Culture: Programmes culturels au niveau
régional ou national
Science: Programmes sur les sciences
naturelles et la technologie
Varied: Autres programmes comme des
comédies ou des cérémonies
Pop M: Musique Pop
Rock M: Musique de rock
Easy M: Musique d’écoute facile ou
musique douce
Light M: Musique légère
Classics: Musique classique
Other M: Autre musique
Weather: Informations météo
Finance: Rapports sur le commerce, les
affaires, la bourse, etc.
Children: Programmes de loisirs pour les
enfants
Social: Programmes sur des activités
sociales
Religion: Programmes traitant des aspects
de la foi ou de la croyance, de la
nature de la vie ou d’éthique
Phone In: Programmes où les gens peuvent
exprimer leurs opinions par
téléphone ou dans un forum
Travel: Programmes sur des destinations
de voyage, des voyages en
groupe et des idées et
opportunités de voyage
Leisure: Programmes concernés par des
activités récréatives comme le
jardinage, la cuisine, la pêche,
etc.
Jazz: Musique de jazz
Country: Musique régionale
Nation M: Musique populaire actuelle d’un
autre pays ou d’une autre région,
dans la langue de ce pays
Oldies: Musique pop classique
Folk M: Musique folklorique
Document: Programmes traitant de faits
réels, présentés dans un style
d’enquêtestyle
Le même programme peut être reçu sur différente fréquences.
Programme 1
émit sur la
fréquence A
Programme 1
émit sur la
fréquence E
Programme 1
émit sur la
fréquence B
Programme 1
émit sur la
fréquence D
Programme 1
émit sur la
fréquence C
FR15-21SH9101[E_EX]f.p65 2/26/03, 9:28 AM21

22
FRANÇAIS
FONCTIONNEMENT DU LECTEUR CD
Lecture d’un disque
1
Ouvrez le panneau de commande.
2
Insérez un disque dans la fente
d’insertion.
L’appareil tire le
disque, le panneau
de commande
retourne dans sa
position précédente
(voir la page 52) et la
lecture commence
automatiquement.
Toutes les plages sont reproduites répétitivement
jusqu’à ce que vous arrêtiez la lecture.
Remarques:
•Les disques MP3 ou WMA nécessite un temps
d’initialisation plus long. (Il diffère en fonction de
la complexité de la configuration dossiers/plages.)
•Pour les détails sur les disques reproductibles et
d’autres informations, référez-vous à la page 74.
Pour arrêter la lecture et éjecter le disque
Appuyez sur 0.
La lecture s’arrête, le panneau de commande
s’ouvre et le disque est éjecté automatiquement
de la fente d’insertion.
Si vous changez la source, la lecture du disque
s’arrête aussi (sans que le disque soit éjecté).
: Dossiers et leurs ordres de lecture
: Plages MP3/WMA et leurs ordres de
lectures
Cet appareil est conçu pour reproduire les CD,
CD-R (enregistrable), CD-RW (réinscriptible) et
les CD Text.
•Cet appareil est aussi compatible avec les
disques MP3 et WMA. Pour plus de détails à
propos de ces disques, référez-vous à “Un
guide du format MP3/WMA” (manuel
séparé).
À propos des disques MP3 et
WMA
Les “plages” MP3 et WMA (Windows Media®
Audio) (dans ce mode d’emploi, le mot “fichier”
n’est pas utilisé pour indiquer les fichiers MP3 ou
WMA, “plage” est utilisé à la place) sont
enregistrés dans des “dossiers”.
Pendant l’enregistrement, les plages et les
dossiers peuvent être de façon similaire à celle
des fichiers et des dossiers dans un ordinateur.
La “racine” est similaire à la racine d’un arbre.
Chaque plage et chaque dossier peuvent
conduire à la racine ou être reliée à partir d’elle.
3456 M21
D
SRC
DISP
ATT
SEL
T/P
MODE
1
1
2
3
10
11
12
4
5
6
7
8
9
01
01
05
02 03
04
Hiérarchie
ROOT
Niveau 1 Niveau 2 Niveau 3 Niveau 4 Niveau 5
•Microsoft et Windows Media est une marque déposée ou une marque de commerce de Microsoft Corporation
aux États-Unis et/ou dans les autres pays.
FR22-31SH9101[E_EX]f.p65 2/26/03, 9:28 AM22

23
FRANÇAIS
3
124
56
2
5
678
1
34
•Indications affichées lors de l’insertion
d’un disque MP3 ou WMA
1Nombre total de dossiers
2Nombre total de plages
3Type de disque—MP3 ou WMA
4Nom de l’album/interprète (ou nom du dossier
quand “Tag” est réglé sur “Off”—voir page 49, ou
quand aucune balise n’est enregistrée.)
5Titre de la plage (ou nom de la plage quand
“Tag” est réglé sur “Off”—voir page 49, ou quand
aucune balise n’est enregistrée.)
6Numéro du dossier actuel
7Numéro de la plage actuelle
8Durée de lecture écoulée de la plage actuelle
•Indications affichées lors de l’insertion
d’un CD audio ou d’un CD Text:
1Nombre total de plages
2Durée totale de lecture du disque
3Titre du disque/interprète (si aucun titre n’est
enregistré ou affecté*, “No Name” apparaît).
4Titre de la plage (si aucun titre n’est enregistré, “No
Name” apparaît).
5Numéro de la plage actuelle
6Durée de lecture écoulée de la plage actuelle
*Si un nom a été affecté au CD audio (voir page
51), il apparaît sur l’affichage.
Remarques:
•Quand un disque se trouve déjà dans la fente d’insertion, choisir “CD” comme source démarre la lecture
du disque.
•L’appareil ne peut pas lire ou reproduire une plage MP3 sans le code d’extension <mp3> et une plage
WMA sans le code d’extension <wma>.
•Quand un disque est inséré à l’envers, il est éjecté automatiquement.
•Si vous changez la source, la lecture s’arrête aussi (sans que le disque soit éjecté).
La prochaine fois que vous choisissez “CD” comme source, la lecture du disque démarre à partir du point
où elle a été interrompue précédemment.
Pour ramener le panneau de commande dans sa
position précédente, appuyez de nouveau sur 0.
•Si vous laissez le panneau de commande
ouvert pendant plus d’une minute, (un bip se
fait entendre si le réglage “Beep” est en service
“On”—voir page 49) il retourne
automatiquement dans sa position précédente.
Faites attention de ne pas coincer un disque ou
vos doigts entre le panneau de commande et
l’appareil.
Remarque:
Si le disque éjecté n’est pas retiré avant 15 secondes,
le disque est automatiquement réinséré dans la fente
d’insertion pour le protéger de la poussière. (Dans ce
cas, la lecture du disque ne commence pas.)
FR22-31SH9101[E_EX]f.p65 2/26/03, 9:28 AM23

24
FRANÇAIS
Appuyez brièvement sur
¢ pendant la lecture d’un
disque pour avancer au début
de la plage suivante.
Chaque fois que vous appuyez
consécutivement sur la touche,
le début de la plage suivante
est localisé et reproduit.
Appuyez brièvement sur 4 pendant la
lecture d’un disque pour revenir au début de la
plage actuelle.
Chaque fois que vous appuyez consécutivement
sur la touche, le début de la plage précédente
est localisé et reproduit.
Qu’est-ce que ImageLink
Quand un dossier MP3 ou WMA contient un
fichier image <jml> édité par Image Converter
(fourni dans le CD-ROM), vous pouvez afficher
l’image sur l’affichage pendant la lecture des
plages du dossier.
• Pendant la lecture d’un fichier image <jml>,
aucun son ne sort de l’appareil (l’image
préréglée d’une tasse de café apparaît sur
l’affichage pendant cette période).
Pour mettre en service ImageLink, suivez la
procédure ci-dessous.
• Référez-vous aussi à “Modification des
réglages généraux (PSM)” à la page 46.
1Maintenez pressée SEL (sélection) pendant
plus de 2 secondes de façon qu’un des
réglages PSM apparaisse sur l’affichage.
2Appuyez sur la touche numérique 1 pour
choisir “MOVIE”—la catégorie “Movie” des
réglages PSM.
L’écran de réglage “Graphics” apparaît sur
l’affichage.
3Tournez la molette de commande pour
choisir “ImageLink”.
4Appuyez sur SEL (sélection) pour terminer
le réglage.
ImageLink entre en service quand le
dossier suivant est reproduit.
Remarque:
ImageLink ne fonctionne pas dans les cas suivants:
• Si aucun fichier <jml> ne se trouve dans un
dossier MP3/WMA.
• Si Intro Scan est en service.
• Si la source a été changée sur autre chose que
“CD.”
• Si vous mettez l’appareil hors tension puis à
nouveau sous tension, l’image préréglée de la
tasse de cafée apparaît sur l’affichage.
Localisation d’un passage
particulier sur une plage
Pour avancer rapidement ou inverser la plage
Remarque:
Pendant cette opération sur un disque MP3 ou WMA,
vous n’entendez que des sons intermittents. (La durée
de lecture écoulée change aussi de façon intermittente
sur l’affichage.)
Pour aller aux plages suivantes ou
précédentes
Maintenez pressée ¢
pendant la lecture d’un disque,
pour avancer rapidement la plage.
Maintenez pressée 4
pendant la lecture d’un disque,
pour inverser la plage.
S’il y a plus d’un fichier <jml> dans un dossier, le
fichier <jml> avec l’ordre de lecture le plus récent
est affiché (dans l’exemple ci-dessus,
“Photo2.jml” est utilisé pour l’album 2).
Album 1
(Dossier 1)
Music001.mp3
Music002.mp3
Music003.mp3
Photo1.jml
Photo1.jml
Photo2.jml
Album 2
(Dossier 2)
Music004.wma
Music005.mp3
Music006.wma
Photo2.jml
Photo3.jml
Fenêtre d’affichage
Fenêtre d’affichage
FR22-31SH9101[E_EX]f.p65 2/27/03, 10:51 AM24

25
FRANÇAIS
Localisation d’une plage sur
un disque
Pour aller directement à une plage
particulière
(SEULEMENT pour les CD et CD Text)
Appuyez sur la touche numérique correspondant
au numéro de plage souhaité pour commencer
sa lecture.
•Pour choisir un numéro de plage de 1 à 6:
Appuyez brièvement sur 1 (7) – 6 (12).
•Pour choisir un numéro de plage de 7 à 12:
Maintenez pressée 1 (7) – 6 (12) pendant plus
d’une seconde.
Pour aller à une plage rapidement
1Appuyez sur MODE (M) pendant la
lecture d’un disque.
“Mode” apparaît sur l’affichage et les
touches numériques et les touches
5 (haut)/ ∞ (bas) clignotent.
Plage 36 \ 30 \ 20 \ 10 \ 9 \ 8
(Trois fois) (Deux fois)
M
MODE
M
MODE
Comment aller rapidement à la plage
souhaitée
• Ex. 1: Pour choisir la plage numéro 32 lors
de la lecture de la plage numéro 6
• Ex. 2 : Pour choisir la plage numéro 8 lors
de la lecture de la plage numéro 36
M
MODE
Numéro de la plage actuelle
Numéro de la plage
actuelle
Numéro du dossier actuel
345621
2Appuyez sur 5 (haut) ou ∞
(bas), pendant que “Mode”
apparaît sur l’affichage.
La première fois que vous
appuyez sur 5 (haut) ou ∞
(bas), l’appareil saute à la plage supérieure
ou inférieure suivante dont le numéro est un
multiple de dix (ex. 10e, 20e, 30e).
Puis, chaque fois que vous appuyez sur la
touche, vous pouvez sauter 10 plages (voir
“Comment aller rapidement à la plage
souhaitée” ci-après).
•Après la dernière plage, la première plage
est choisie, et vice versa.
•Lors de la lecture d’un disque MP3 ou
WMA, cette opération n’est possible que
dans un dossier.
Lors de la lecture d’un CD audio ou d’un CD Text:
Lors de la lecture d’un disque MP3 ou WMA:
Voir page 40 pour cette fonction.
Plage 6 \ 10 \ 20 \ 30 \ 31 \ 32
(Trois fois) (Deux fois)
FR22-31SH9101[E_EX]f.p65 2/26/03, 9:28 AM25

26
FRANÇAIS
345621
Localisation d’un dossier sur
un disque
Les opérations suivantes ne sont possibles
que lors de la lecture d’un disque MP3 ou WMA.
Pour aller directement à un dossier
IMPORTANT:
Pour choisir directement un dossier en utilisant
les touches numériques, il faut que le nom du
dossier commence par 2 chiffres. (Cela peut
être réalisé uniquement pendant
l’enregistrement du CD-R ou CD-RW.)
Ex.: Si le nom du dossier est “01 ABC”
=appuyez sur 1 pour aller au
dossier “01 ABC”.
Si le nom du dossier est “1 ABC”,
appuyer sur 1 ne fonctionne pas.
Si le nom du dossier est “12 ABC”
=maintenez pressée 6 (12) pour
aller directement au dossier
“12 ABC”.
Appuyez sur la touche numérique correspondant
au numéro du dossier pour démarrer la lecture
de la première plage du dossier choisi.
•Pour choisir un numéro de dossier de 01 à 06:
Appuyez brièvement sur 1 (7) – 6 (12).
•Pour choisir un numéro de dossier de 07 à 12:
Maintenez pressée 1 (7) – 6 (12) pendant plus
d’une seconde.
Remarques:
•Si le dossier ne contient pas de plages MP3 ou
WMA, la lecture ne démarre pas (“No Music”
apparaît sur l’affichage). Choisissez un autre
dossier.
•Vous ne pouvez pas choisir directement un dossier
avec un numéro supérieur à 12.
Pour choisir une plage particulière dans un
dossier, appuyez sur ¢ ou 4 après
avoir choisi le dossier.
Pour sauter au dossier suivant ou précédent
(dans le même ou un niveau de hiérarchie différent)
Sur le panneau de commande:
Sur la télécommande:
Maintenez pressée 3 (droit) lors
de la lecture d’un disque pour
sauter au dossier suivant.
Chaque fois que vous maintenez
pressée consécutivement sur la
touche, le dossier suivant est
localisé et la première plage du
dossier reproduite.
Appuyez sur 5 (haut) lors de la
lecture d’un disque pour sauter au
dossier suivant.
Chaque fois que vous appuyez
consécutivement sur la touche, le
dossier suivant est localisé et la
première plage du dossier
reproduite.
Appuyez sur ∞ (bas) lors de la lecture d’un
disque pour sauter au dossier précédent.
Chaque fois que vous appuyez consécutivement
sur la touche, le dossier précédent est localisé et
la première plage du dossier reproduite.
Maintenez pressée 2 (gauche) lors de la lecture
d’un disque pour sauter au dossier précédent.
Chaque fois que vous maintenez pressée
consécutivement sur la touche, le dossier
précédent est localisé et la première plage du
dossier reproduite.
Remarque:
Si le dossier ne contient pas de plage MP3 ou WMA, il
est sauté.
Référez-vous au diagramme des hiérarchies, page 22.
01 02 03 04
PRESET PRESET
FR22-31SH9101[E_EX]f.p65 2/26/03, 9:28 AM26

30
FRANÇAIS
Pour les CD audio et les CD Text:
Pour les disques MP3 et WMA:
Mode Reproduit répétitivement
Repeat Track : La plage actuelle (ou spécifiée).
•Pendant la lecture,
est allumé sur l’affichage.
Repeat Folder
*:Toutes les plages du dossier actuel
(ou spécifié).
•Pendant la lecture,
est allumé sur l’affichage.
*“Repeat Folder” peut uniquement être utilisé pour
les disques MP3 et WMA.
Pour annuler la lecture répétée, choisissez
“Repeat Off” en appuyant répétitivement sur la
touche numérique 2 ou en appuyant sur la
touche numérique 4 à l’étape 2.
Pour reproduire uniquement les introductions
(Balayage des introductions)
Vous pouvez reproduire les 15 premières
secondes de chaque plage, dans l’ordre.
1Appuyez sur MODE (M) pendant la
lecture d’un disque.
“Mode” apparaît sur l’affichage, puis
les touches numériques et les
touches 5 (haut)/∞ (bas) clignotent.
2Appuyez sur la touche numérique 1 pendant
que “Mode” apparaît sur l’affichage.
Chaque fois que vous appuyez sur la touche,
le mode de balayage des introductions
change comme suit:
Repeat Off
Repeat Track
Repeat Off
Repeat FolderRepeat Track
Pour les CD audio et les CD Text:
Pour les disques MP3 et WMA:
Mode Reproduit le début de
Intro Track : Toutes les plages du disque.
•Pendant la lecture,
est allumé sur l’affichage.
Intro Folder* : La première plage de tous les
dossiers.
•Pendant la lecture,
est allumé sur l’affichage.
*“Intro Folder” peut uniquement être utilisé pour les
disques MP3 et WMA.
Pour annuler la lecture des introductions,
choisissez “Intro Off” en appuyant répétitivement
sur la touche numérique 1 ou en appuyant sur la
touche numérique 4 à l’étape 2.
Interdiction de l’éjection du
disque
Vous pouvez interdire l’éjection du disque et le
verrouiller dans la fente d’insertion.
Tout en maintenant pressée SEL
(sélection), appuyez pendant plus de 2
secondes sur 0.
“No Eject” clignote sur l’affichage pendant
environ 5 secondes et le disque est verrouillé et
ne peut pas être éjecté.
Pour annuler l’interdiction et déverrouiller le
disque
Tout en maintenant pressée SEL (sélection),
appuyez de nouveau pendant plus de 2
secondes sur 0.
“Eject OK” clignote sur l’affichage pendant
environ 5 secondes et le disque est déverrouillé.
345621
Intro Off
Intro Track
Intro Off
Intro FolderIntro Track
M
MODE
SEL
FR22-31SH9101[E_EX]f.p65 2/26/03, 9:28 AM30

31
FRANÇAIS
Changement du modèle
d’affichage
En appuyant sur DISP (D), vous pouvez changer
les informations de l’affichage.
Chaque fois que vous appuyez sur la
touche, le modèle d’affichage change
comme suit:
Lors de la lecture d’un CD audio ou d’un CD Text:
•Affichage initial
•Le titre du disque/interprète ou le nom
du disque affecté est mis en valeur:
•Le titre de la plage est mis en valeur:
•L’horloge est mise en valeur:
Remarques:
*1Si aucun nom n’est affecté au CD audio, ou si aucun
titre de disque/interprète n’est enregistré pour le
CD Text, “No Name” apparaît.
Pour affecter un nom à un CD audio, voir page 51.
*2“No Name” apparaît pour un CD audio. Si aucun
titre de plage n’est enregistré pour un CD Text, “No
Name” apparaît aussi.
D
DISP
Lors de la lecture d’un disque MP3 ou WMA:
•Affichage initial
•Le nom de l’album/interprète ou le nom du
dossier est mis en valeur:
•Le titre de la plage ou le nom de la plage
est mis en valeur:
•L’horloge est mise en valeur:
Remarques:
*1Si “Tag” est réglé sur “Off” (voir page 49), le nom
du dossier apparaît avec .
*2Si “Tag” est réglé sur “Off” (voir page 49), le nom
de la plage apparaît avec .
Indication sur l’affichage:
•Quand le titre est mis en valeur au centre de
l’affichage, il est montré entièrement en défilant
s’il ne peut pas apparaître en une fois. Référez-
vous aussi à “Pour choisir le mode de défilement—
Scroll” à la page 48.
•Certains caractères ou symboles n’apparaissent
pas (ils apparaissent en blanc ou sont remplacés
par d’autres caractères).
*2
*1
*2
*1
FR22-31SH9101[E_EX]f.p65 2/26/03, 9:28 AM31

32
FRANÇAIS
UTILISATION DES MODES DSP
SEL
DSP
Annulé
iEQ SEL/BBE
1
Appuyez une fois sur SEL (sélection)
pour afficher l’écran de sélection du
mode DSP.
L’écran du dernier mode DSP
choisi apparaît.
•Si vous appuyez sur la touche deux fois ou
plus, l’appareil entre dans un mode
différent d’ajustement du son.
•Pour les réglages iEQ (mode sonore),
référez-vous aux pages 35 et 36.
•Pour les réglages SEL/BBE (réglage
sonore de base), référez-vous aux pages
37 et 38.
2
Appuyez sur une touche numérique
pour choisir un des modes DSP
apparaissant sur l’affichage.
•Cet appareil possède deux écrans de
sélection de mode DSP. Pour passer de l’un
à l’autre, appuyez sur 5 (haut) ou ∞ (bas).
Sélection des modes DSP
En utilisant les modes DSP (Digital Signal
Processor) intégrés à cet appareil, vous pouvez
créer un meilleur champ sonore acoustique dans
votre voiture.
Modes DSP disponibles:
THEATER: Donne l’impression d’une salle
de cinéma avec une reproduction
intense.
HALL: Donne l’impression d’une grande
salle de concert avec une
sensation de direct.
CLUB: Donne l’impression d’un club de
danse avec une reproduction
puissante.
DOME: Donne l’impression d’un dôme
avec un plafond haut.
STUDIO: Donne l’impression d’un son de
direct comme dans un studio
d’enregistrement.
V. CANCEL:Réduit les voix (Voice Cancel—
Suppression des voix). Convient
pour obtenir la bande son de vos
chansons favorites—Karaoke.
DEFEAT: Annule les modes DSP.
Remarque:
L’éfficacité de “V.CANCEL” dépend des conditions
d’enregistrement de la soruce. Et plus spécialement si
vous reproduisez les sources suivantes, vous ne pouvez
pas obtenir des résultats satisfaisants.
•Sources monaurales telles que des programmes AM
et FM monaurals.
•Sources sonores Multiplex.
•Sources enregistrées avec des duos, beaucoup
d’écho, un chœur ou seulement quelques
instruments.
Appuyez sur 5 (haut) ou
∞ (bas).
345621
345621
FR32-38SH9101[E_EX]f.p65 2/26/03, 9:29 AM32

37
FRANÇAIS
AJUSTEMENTS SONORES
Réalisation des réglages
sonores de base
Vous pouvez régler la balance de sortie des
enceintes, le niveau de sortie du caisson de
grave et le niveau d’entrée de chaque source.
•Il y a un temps limite pour réaliser la procédure
suivante. Si le réglage est annulé avant la fin,
recommencez à partir de l’étape
1
.
1
Appuyez répétitivement sur SEL
(sélection) pour afficher les écrans
des réglages sonores de base (SEL).
Chaque fois que vous appuyez
sur la touche le réglage ajustable
change comme suit:
•Pour le réglage des modes DSP, référez-
vous aux pages 32 à 34.
•Pour les réglages iEQ (mode sonore),
référez-vous aux pages 35 et 36.
Indication Pour: Plage
Fad Ajuster la balance R06 (Arrière
des enceintes | seulement)
avant et arrière. F06 (Avant
seulement)
Bal Ajuster la balance L06 (Gauche
des enceintes | seulement)
gauche et droite. R06 (Droite
seulement)
Sub Out Ajuster le niveau 00 (min.)
de sortie et de |
fréquence de 08 (max.)
coupure du Low/Mid/High
caisson de grave.
BBE Pour rendre le BBE Off, BBE 1,
son naturel. BBE 2, BBE 3
Vol Adj Ajuster et mémo- –05 (min.)
riser le niveau |
d’entrée de +05 (max.)
chaque source.
SEL
Réglages sonores
de base
Fad/Bal
Sub Out
Vol Adj BBE
DSP
Annulé
iEQ
Pour augmenter le niveau.
Pour diminuer le niveau.
ATT
2
Ajustez le niveau.
Pour ajuster le fader ou la balance—Fad,
Bal:
Réalisez ces deux ajustements en même
temps.
•Si vous utilisez un système à deux enceintes,
réglez le niveau du fader sur “00”.
•Appuyez sur 5 (haut) ou
∞ (bas) pour ajuster le
fader.
•Appuyez sur ¢ ou
4 pour ajuster la
balance.
Pour ajuster la sortie du caisson de
grave—Sub Out:
Ce réglage prend effet uniquement quand
un caisson de grave est connecté.
Vous pouvez aussi régler un niveau de
fréquence de coupure approprié en fonction
du caisson de grave connecté.
•Appuyez sur ¢ ou 4 pour
choisir “Low”, “Mid” ou “High”.
Low: Les fréquences supérieures à 50 Hz
sont coupées du caisson de grave.
Mid: Les fréquences supérieures à 80 Hz
sont coupées du caisson de grave.
High: Les fréquences supérieures à
115 Hz sont coupées du caisson de
grave.
FR32-38SH9101[E_EX]f.p65 2/26/03, 9:29 AM37

41
FRANÇAIS
Remarques:
• Sur cette liste, les dossiers contenant les
fichiers cible—fichiers <jml> pour “Picture”
et fichiers <jma> pour le reste—apparaissent.
• L’affichage peut afficher uniquement six noms
à la fois. Vous pouvez afficher les autres noms
en appuyant sur 5 (haut) ou ∞ (bas).
• Si un disque inséré ne contient pas de fichier
<jml> et <jma>, l’appareil émet un bip et
vous ne pouvez pas passer à l’étape suivante.
Si vous souhaitez annuler la procédure,
appuyez sur DISP (D).
7
Choisissez (mettez en valeur) le
dossier dans lequel se trouve le
fichier souhaité.
8
Affichez la liste des noms des fichiers
compris dans le dossier choisi.
Chaque fois que vous appuyez
sur la touche, la liste sur
l’affichage change comme suit:
Remarque:
L’affichage peut afficher uniquement six noms à
la fois. Vous pouvez afficher les autres noms en
appuyant sur 5 (haut) ou ∞ (bas).
1
345621
Ex. Quand “Picture” a été choisi à l’étape
5
.
Liste des noms
de dossier
Liste des noms
de fichier
5
Choisissez (mettez en valeur) la
mémoire dans laquelle vous
souhaitez transférer un fichier.
•PowerOn : Écran d’ouverture
Pour télécharger l’animation qui apparaîtra
après que l’appareil est mis sous tension.
(Vous ne pouvez mémoriser qu’une
animation composée de 30 images au
maximum.)
•PowerOff : Écran de fermeture
Pour télécharger l’animation qui apparaîtra
après que l’appareil est mis hors tension.
(Vous ne pouvez mémoriser qu’une
animation composée de 30 images au
maximum.)
•Picture : Écran graphique*
Pour télécharger une image fixe qui
apparaîtra lors de la lecture d’une source.
(Vous pouvez mémoriser 90 images
fixes—une image chacune.)
•Movie : Écran graphique*
Pour télécharger une animation qui
apparaîtra lors de la lecture d’une source.
(Vous ne pouvez mémoriser qu’une
animation composée de 90 images au
maximum.)
*L’écran graphique apparaît uniquement si
aucune opération n’est effectuée pendant
environ 20 secondes.
Si vous souhaitez annuler la procédure,
appuyez sur la touche numérique 5, l’écran
de sélection du transfert disparaît.
6
Affichez la liste des noms des dossiers
compris dans le CD-R inséré.
“File Check....” apparaît un
instant, puis la liste des dossiers
apparaît.
Le dossier actuellement choisi est mis en
valeur sur l’affichage.
SUITE À LA PAGE SUIVANTE
FR39-45SH9101[E_EX]f.p65 3/3/03, 11:34 AM41

42
FRANÇAIS
345621
Suppression des fichiers
indésirables
•Quand “BACK” apparaît sur l’affichage au
dessus de la touche numérique 5, vous pouvez
retourner à l’étape précédente en appuyant sur
la touche numérique 5.
Pour supprimer tous les fichiers
mémorisés en une fois
1Appuyez sur MODE (M) lors de la
lecture d’une source.
“Mode” apparaît sur l’affichage, puis
les touches numériques et les touches
5 (haut)/∞ (bas) clignotent.
2Appuyez sur la touche numérique 6
pour afficher l’écran de sélection du
transfert.
3Appuyez sur 5 (haut) ou ∞ (bas)
pour choisir (mettre en valeur)
tous les éléments de la liste.
4Appuyez sur la touche numérique 4.
L’appareil vous demande
confirmation, “All File Delete OK?”
5Appuyez de nouveau sur la touche
numérique 4.
“Now Deleting...” apparaît pendant
la suppression des fichiers. Quand
la suppression est terminée,
l’écran de sélection du transfert apparaît à
nouveau.
6Appuyez sur la touche numérique
5 pour retourner à l’écran
d’indication de la source.
1
9
Choisissez le fichier que vous
souhaitez transférer.
10
Si vous êtes d’accord, appuyez sur la
touche numéro 1 pour démarrer le
transfert.
Le transfert démarre et
“Downloading...” apparaît sur
l’affichage.
Une fois que le transfert est
terminé, la liste des noms
apparaît de nouveau.
Si vous n’êtes pas d’accord, appuyez sur la
touche numérique 5 et l’écran de sélection de
fichier apparaît à nouveau. Répétez l’étape
8
.
11
Répétez les étapes
8
à
10
si vous
transférez des fichiers pour “Picture”
et souhaitez en mémoriser plus.
12
Terminez la procédure de transfert.
Pour transférer un fichier pour une autre
mémoire de l’écran de sélection du transfert,
répétez la procédure à partir de l’étape
3
.
Remarques:
•Si vous mémorisez une 91e image pour l’écran
d’image, “Picture Full” apparaît et vous ne pouvez
pas commencer le transfert. Dans ce cas, supprimez
les fichiers indésirables avant le transfert.
•Si le nombre total d’images d’une animation
transférée dépasse le nombre suivant, les images en
trop sont ignorées.
–Pour les écrans d’ouverture et de fermeture: 30
–Pour l’écran “Movie”: 90
M
MODE
6
D
DISP
Le nom du fichier apparaît et l’appareil vous
demande une confirmation, “Download OK?”
4
4
5
FR39-45SH9101[E_EX]f.p65 2/26/03, 9:29 AM42

46
FRANÇAIS
Modification des réglages
généraux (PSM)
Vous pouvez modifier les réglages du tableau de
la page suivante en utilisant la commande PSM
(Preferred Setting Mode—Mode des réglages
préférés).
•Les réglages PSM sont groupés en cinq
catégories—MOVIE, CLOCK, DISP
(affichage), TUNER et AUDIO.
Procédure de base
Ex. Pour modifier “Contrast”
1
Maintenez pressée SEL (sélection)
pendant plus de 2 secondes de façon
qu’un des réglages PSM apparaisse
sur l’affichage. (Voir les pages 47 et
48).
Les touches numériques,
4 / ¢ et la molette
de commande clignotent pour
vous indiquer qu’elles peuvent
être utilisées pour les étapes
suivantes.
2
Appuyez sur une touche numérique
(dans cet exemple, 3) pour choisir
une des catégories PSM.
Le premier réglage de la catégorie choisie
apparaît.
3
Choisissez le réglage PSM que vous
souhaitez ajuster.
•En appuyant répétitivement sur ¢
ou 4 , vous pouvez aussi vous
déplacer sur une autre catégorie.
4
Ajustez le réglage PSM choisi.
5
Répétez, si nécessaire, les étapes
2
à
4
pour ajuster les autres réglages
PSM.
6
Terminez le réglage.
AUTRES FONCTIONS PRINCIPALES
SEL
ATT
SEL
Ex. Quand “Graphics” a été choisi précédemment
345621
FR46-53SH9101[E_EX]f.p65 2/26/03, 9:29 AM46

47
FRANÇAIS
*1S’affiche uniquement quand un fichier transférable est mémorisé.
*2S’affichage uniquement après qu’un fichier transférable a été mémorisé et pendant la sélection de
“UserPict.” pour “Graphics”.
*3S’affiche uniquement quand “Dimmer” est réglé sur “Time Set”.
*4S’affiche uniquement quand “DAB AF” est réglé sur “Off”.
Réglages du mode des réglages préférés (PSM)
Graphics
Démonstration des animations
KeyIn CFM Bip de confirmation
Opening*1 Animation d’ouverture
Ending*1 Animation de fermeture
UserPict.*2 Image personnalisée
Clock Hr Ajustement des heures
Clock Min Ajustement des minutes
24H/12H 24 heures ou 12 heures
Auto Adj Réglage automatique de
l’horloge
Scroll Mode de défilement
Dimmer Mode de gradateur
From– To*3 Minuterie du gradateur
Contrast Contraste
LCD Type Type d’affichage
Font Type
Type de police de caractères
Tag Affichage des balises
Theme
Thème—Indicateur de niveau
PTY Stnby Attente de programme
PTY
AF-Regn’lFréquence alternative/
réception régionale
TA Volume Volume des informations
routières
P-Search Recherche de programme
DISP (affichage)
Once Auto
Off
Auto Off
On
1 – 10
12
Off On
Auto Positive
Negative
TUNER
Once 48
Auto 50
548
Auto 49
149
On 49
Time Set
N’importe quelle heure –
N’importe quelle heure 18 – 750
CLOCK
12Hours 24Hours
8
8
12Hours 8,9
Standard Meter 1
Meter 2
Meter 3
MOVIE
Long Short
Off
Int Demo 48
Default User
Default User
Long 48
Default 44
Default 44
Standard 9
Indications Valeurs sélectionnables Réglage initial Page
Voir page 48.
À partir des fichiers en mémoire Premier mémorisé
45
On
Off On 20
Voir page 21. News 17
AF AF Reg
Off*4
Volume 0 — Volume 50
On
Off Off 20
Volume 20 20
AF 16
0 (0:00)
00 (0:00)
SUITE À LA PAGE SUIVANTE
0 – 23 (1 – 12)
00 – 59
FR46-53SH9101[E_EX]f.p65 2/26/03, 9:29 AM47

48
FRANÇAIS
Pour faire apparaître les graphiques sur
l’affichage—Graphics
Vous pouvez changer les graphiques
apparaissant sur l’affichage. Ces graphiques
apparaissent si aucune opération n’est réalisée
pendant environ 20 secondes (sauf pour
“ImageLink”).
• All Demo: La démonstration des affichages
(animations) apparaît (voir page 8).
• Int Demo: La démonstration des affichages
(animations) et l’indication de la
source de lecture apparaissent
alternativement (voir page 8).
•
UserMovie
: Votre animation personnelle
apparaît (voir les pages 44 et 45).
• UserSlide: Vos images fixes personnelles
apparaissent dans l’ordre (voir les
pages 44 et 45).
• UserPict.: Une de vos images fixes apparaît
(voir les pages 44 et 45).
• ImageLink: Pour afficher une image fixe lors de
la lecture des plages MP3/WMA
(voir page 24).
• Off: Annule tous les affichages
graphiques ci-dessus.
Remarque:
Vous pouvez choisir “UserMovie”, “UserSlide” et
“UserPict.” uniquement après avoir transféré les
fichiers appropriés en mémoire. (Voir page 40.)
Pour choisir l’animation de la source sur
l’affichage—KeyIn CFM
Lorsque vous changez la source, une animation
apparaît sur l’affichage. Vous pouvez choisir
l’animation de la source en fonction de vos
préférences.
• Long: Une longue animation de source
apparaît.
• Short: Une courte animation de source
apparaît.
• Off: L’animation de la source est annulée.
Pour choisir le mode de défilement—Scroll
Quand une information relative au disque est
mise en valeur au centre de l’affichage, elle
apparaît entièrement en défilant si elle ne peut
pas apparaître en une fois.
• Once: Défile une fois.
• Auto: Défile répétitivement (à 5 secondes
d’intervalle).
• Off: Le mode de défilement est annulé.
Remarque:
Même si le mode de défilement est réglé sur “Off”,
vous pouvez faire défiler l’affichage en appuyant sur
DISP (D) pendant plus d’une seconde.
Pour ajuster le niveau de contraste de
l’affichage—Contrast
Vous pouvez ajuster le niveau de contraste de
l’affichage entre 1 à 10.
Ajustez-le de façon que les indications de
l’affichage soient claires et lisibles.
IF Filter Filtre de fréquence
intermédiaire
DAB AF*5Recherche de fréquence
alternative
Announce*5Attente d’annonce
Beep Tonalité de touche
Line In*6
Commutateur d’entrée de ligne
Telephone Sourdine téléphonique
PowerAmp Commutateur de l’amplificateur
de puissance
Indications Valeurs sélectionnables Réglage initial Page
AUDIO
Off On
Off On
On 49
On 49
Off On On 49
TUNER
Off On On 69
Off Muting1
Muting2 Off 49
Voir page 68. Travel 66
*5S’affiche uniquement quand le tuner DAB est connecté.
*6N’est pas affiché quand la source actuelle est “LINE IN”.
Auto
Wide Auto 49
FR46-53SH9101[E_EX]f.p65 2/28/03, 9:31 PM48

49
FRANÇAIS
Pour choisir le modèle d’éclairage de
l’affichage—LCD Type
Vous pouvez choisir le modèle d’éclairage de
l’affichage selon vos préférences.
•Auto: Un modèle positif est choisi pendant
la journée (en fonction du réglage
“Dimmer”); inversement, un modèle
négatif est utilisé pendant la nuit (en
fonction du réglage “Dimmer”).
•Positive: Modèle positif (normal) de
l’affichage.
•Negative: Modèle négatif de l’affichage.
Sélection de la police de caractère de
l’affichage—Font Type
Vous pouvez changer la police de caractère
utilisée sur l’affichage.
Choisissez “1” ou “2” selon vos préférences.
Pour mettre en ou hors service l’affichage
des balises—Tag
Une plage MP3 et WMA peut contenir une plage
d’information appelé “balise” où le nom de
l’album, l’interprète, le titre de la plage, etc. sont
enregistrés.
•On: Met en service l’affichage des balises
lors de la lecture des plages MP3 ou
WMA.
•Si une plage n’a pas de balise, le nom
du dossier et le nom de la plage
apparaissent.
•Off: Met hors service l’affichage des balises
lors de la lecture des plages MP3 ou
WMA. (Seuls les noms du dossier et de
la plage apparaissent.)
Remarques:
•Si vous changez le réglage de “Off” sur “On”
pendant la lecture d’une plage, l’affichage des
balises se met en service au début de la lecture de
la plage suivante.
•Pour les plages MP3 uniquement: Il y a deux
versions des balises—ID3v1 (balises ID3 version 1)
et ID3v2 (balises ID3 version 2). Quand des balises
ID3v1 et ID3v2 sont enregistrées, les balises ID3v2
sont affichées.
Pour changer la sélectivité du tuner FM
—IF Filter
Dans certaines régions, les stations adjacentes
peuvent interférer entre elles. Si cela se produit,
du bruit peut être entendu.
•Auto: Quand ce type d’interférence se produit,
cet appareil augmente automatiquement
la sélectivité du tuner de façon que le
bruit d’interférence diminue. (Mais l’effet
stéréo est aussi perdu).
•Wide: Les interférences des stations
adjacentes demeurent mais la
qualité du son n’est pas dégradée et
l’effet stéréo n’est pas perdu.
Mise en/hors service de la tonalité de
touche—Beep
Vous pouvez mettre hors service la tonalité de
touche si vous ne souhaitez pas entendre un “bip”
sonore chaque fois que vous appuyez sur une
touche.
•On: Met en service la tonalité de touche.
•Off: Met hors service la tonalité de touche.
Sélection du silencieux téléphonique
—Telephone
Ce mode est utilisé quand un système de
téléphone cellulaire est connecté. Selon le système
de téléphone utilisé, choisissez “Muting1” ou
“Muting2”, celui qui atténue le son de cet appareil.
•Muting1: Choisissez ce réglage s’il peut
couper le son de l’appareil quand
vous utilisez un téléphone portable.
•Muting2: Choisissez ce réglage s’il peut
couper le son de l’appareil quand
vous utilisez un téléphone portable.
•Off: Met hors service le silencieux
téléphonique.
Pour mettre en/hors service le
commutateur d’entrée de ligne—Line In
Vous pouvez mettre l’entrée de ligne hors service
quand aucun appareil extérieur n’est connecté aux
fiches LINE IN.
•On: Vous pouvez choisir “LINE IN” comme
source de lecture.
•Off: Vous ne pouvez pas choisir “LINE IN”
comme source de lecture.
Pour mettre en/hors service
l’amplificateur de puissance—PowerAmp
Vous pouvez mettre hors service l’amplificateur
intégré et envoyer les signaux audio uniquement
vers un ou plusieurs amplificateurs extérieurs
afin d’obtenir un son plus clair et pour éviter tout
échauffement interne de l’appareil.
•On: Choisissez ce mode si vous n’utilisez
pas d’amplificateur extérieur.
•Off: Choisissez ce mode si vous utilisez un ou
plusieurs amplificateurs extérieurs.
FR46-53SH9101[E_EX]f.p65 2/26/03, 9:29 AM49

50
FRANÇAIS
Sélection du mode de gradateur
Vous pouvez assombrir l’affichage la nuit
automatiquement ou selon le réglage de la
minuterie.
À l’expédition de l’usine, le mode de gradateur
automatique est en service.
Remarque:
Le gradateur automatique équipant cet appareil peut
ne pas fonctionner correctement sur certains
véhicules, et en particulier sur ceux qui possèdent une
bague de commande de gradateur.
Dans ce cas, choisissez un autre réglage que “Auto”.
1
Maintenez pressée SEL (sélection)
pendant plus de 2 secondes de façon
qu’un des réglages PSM apparaisse
sur l’affichage. (PSM: voir les pages
47 et 48.)
2
Appuyez sur la touche numérique 3
pour choisir “DISP”—la catégorie
“Diplay” des réglages PSM.
3
Appuyez sur ¢ ou 4 pour
choisir “Dimmer”.
4
Réglez le mode de gradateur comme
vous le souhaitez.
• Auto: Met en service le gradateur
automatique.
Quand vous allumez les feux
de votre voiture, l’affichage
s’assombrit automatiquement.
• Off: Annule le gradateur
automatique.
• On: Assombrit toujours l’affichage.
• Time Set: Utilisez ce réglage pour régler
la minuterie du mode de
gradateur.
Remarque:
Choisir “Auto” ou “Time Set” peut changer le
modèle d’affichage sur “Negative” ou
“Positive” si “LCD Type” est réglé sur “Auto”.
• Si vous avez choisi “Time Set”, passez à
l’étape suivante pour régler la minuterie.
• Si vous avez choisi un autre réglage que
“Time Set”, allez à l’étape
7
pour terminer
le réglage.
5
Choisissez “From– To” pour régler la
minuterie du mode de gradateur.
6
Réglez la minuterie.
1Tournez la molette de commande pour
choisir l’heure de début.
2Appuyez une fois sur ¢ .
3Tournez la molette de commande pour
choisir l’heure de fin.
7
Terminez le réglage.
SEL
345621
ATT
SEL
FR46-53SH9101[E_EX]f.p65 2/27/03, 10:54 AM50

54
FRANÇAIS
FONCTIONNEMENT DU CHANGEUR DE CD
Nous vous recommandons d’utiliser un changeur
de CD JVC compatible MP3 avec votre appareil.
En utilisant ce changeur, vous pouvez reproduire
vos CD-R (enregistrables) et CD-RW
(réinscriptibles) enregistrés au format CD audio
ou au format MP3.
•Vous pouvez aussi connecter d’autres
changeurs de CD de la série CH-X (sauf les
CH-X99 et CH-X100). Cependant, ils ne sont
pas compatibles avec les disques MP3 et ne
peuvent donc pas les reproduire.
•Vous ne pouvez pas utiliser les changeurs de
CD de la série KD-MK avec cet appareil.
Avant d’utiliser votre changeur automatique de
CD:
•Référez-vous aussi aux instructions fournies
avec votre changeur de CD.
•Si aucun disque ne se trouve dans le
magasin du changeur de CD ou si les
disques ont été insérés à l’envers, “No Disc”
apparaît sur l’affichage. Si cela se produit,
retirez le magasin et placez les disques
correctement.
•Si aucun magasin n’est en place dans le
changeur de CD, “No Magazine” apparaît
sur l’affichage. Si cela se produit, insérez le
magasin dans le changeur de CD.
•Si “Reset 01” – “Reset 08” apparaît sur
l’affichage, c’est qu’il y a un problème avec
la connexion entre cet appareil et le
changeur de CD. Si cela se produit, vérifiez
la connexion, connectez le(s) cordon(s) de
connexion fermement si nécessaire, puis
appuyez sur la touche de réinitialisation du
changeur de CD.
Lecture des disques
Choisissez le changeur automatique de
CD (CD-CH).
Chaque fois que vous appuyez
sur la touche, la source change
de façon décrite à la page 7.
Quand vous choisissez une
source, l’appareil se met
automatiquement sous tension.
La lecture démarre à partir de la première plage
du premier disque et toutes les plages de tous
les disques sont reproduites.
•Si le disque actuel est un CD audio ou un
CD Text:
1Numéro du disque
2Titre du disque/interprète (si aucun titre n’est
enregistré ou affecté, “No Name” apparaît).
3Titre de la plage (si aucun titre n’est enregistré,
“No Name” apparaît).
4Numéro de la plage actuelle
5Durée de lecture écoulée de la plage actuelle
SRC
Remarque:
Vous ne pouvez pas commander et reproduire les
disques WMA sur le changeur de CD.
3456 M21
D
SRC
DISP
ATT
SEL
T/P
MODE
23
45
1
FR54-60SH9101[E_EX]f.p65 2/26/03, 9:29 AM54

55
FRANÇAIS
Pour aller directement à un disque particulier
Appuyez sur la touche numérique correspondant
au numéro de disque souhaité pour commencer
sa lecture (pendant que le changeur de CD est
en mode de lecture).
•Pour choisir un numéro de disque de 1 à 6:
Appuyez brièvement sur 1 (7) – 6 (12).
•Pour choisir un numéro de disque de 7 à 12:
Maintenez pressée 1 (7) – 6 (12) pendant plus
d’une seconde.
Pour avancer rapidement ou inverser la plage
Remarque:
Pendant cette opération sur un disque MP3, vous
pouvez entendre uniquement des sons intermittents.
(La durée de lecture écoulée change aussi de façon
intermittente sur l’affichage.)
Pour aller aux plages suivantes ou
précédentes
Appuyez brièvement sur
¢ pendant la lecture d’un
disque pour avancer au début
de la plage suivante. Chaque
fois que vous appuyez
consécutivement sur la touche,
le début de la plage suivante est
localisé et reproduit.
Appuyez brièvement sur 4 pendant la
lecture d’un disque pour revenir au début de la
plage actuelle. Chaque fois que vous appuyez
consécutivement sur la touche, le début de la
plage précédente est localisé et reproduit.
Maintenez pressée ¢
pendant la lecture d’un disque,
pour avancer rapidement la
plage.
Maintenez pressée 4
pendant la lecture d’un disque,
pour inverser la plage.
•Quand le disque actuel est un disque MP3:
1Numéro du disque
2Type du disque—MP3
3Titre de l’album/interprète (ou nom du dossier
quand “Tag” est réglé sur “Off”—voir page 49, ou
quand aucune balise n’est enregistrée)
4Titre de la plage (ou nom de la plage quand
“Tag” est réglé sur “Off”—voir page 49, ou quand
aucune balise n’est enregistrée)
5Numéro du dossier actuel
6Numéro de la plage actuelle
7Durée de lecture écoulée de la plage actuelle
Pour changer le modèle d’affichage
En appuyant sur DISP (D), vous pouvez changer
l’information apparaissant sur l’affichage.
Chaque fois que vous appuyez sur la
touche, le modèle d’affichage change.
•Pour plus de détails, référez-vous à
la page 31.
Si vous changez la source ou mettez
l’appareil hors tension
La lecture du disque s’arrête aussi.
La prochaine fois que vous choisissez “CD-CH”
comme source, la lecture de disque démarre à
partir du point où elle a été interrompue
précédemment.
345621
D
DISP
4
567
2 3
1
FR54-60SH9101[E_EX]f.p65 2/26/03, 9:29 AM55

56
FRANÇAIS
Comment aller rapidement à la plage
souhaitée
• Ex. 1: Pour choisir la plage numéro 32 lors
de la lecture de la plage numéro 6
• Ex. 2 : Pour choisir la plage numéro 8 lors de
la lecture de la plage numéro 36
Pour aller à une plage rapidement
Cette opération est possible uniquement lors
de l’utilisation du changeur de CD JVC
compatible MP3, CH-X1500.
1Appuyez sur MODE (M)
pendant la lecture d’un disque.
“Mode” apparaît sur l’affichage et
les touches numériques et les touches
5 (haut)/ ∞ (bas) clignotent.
2Appuyez sur 5 (haut) ou
∞ (bas), pendant que “Mode”
apparaît sur l’affichage.
La première fois que vous
appuyez sur 5 (haut) ou ∞ (bas),
l’appareil saute à la plage supérieure ou
inférieure suivante dont le numéro est un
multiple de dix (ex. 10e, 20e, 30e).
Puis, chaque fois que vous appuyez sur la
touche, vous pouvez sauter 10 plages (voir
“Comment aller rapidement à la plage
souhaitée” ci-après).
•Après la dernière plage, la première plage
est choisie, et vice versa.
•Lors de la lecture d’un disque MP3, cette
opération n’est possible que dans un dossier.
M
MODE
Plage 6 \ 10 \ 20 \ 30 \ 31 \ 32
(Trois fois) (Deux fois)
Plage 36 \ 30 \ 20 \ 10 \ 9 \ 8
(Trois fois) (Deux fois)
M
MODE
M
MODE
Numéro de la plage actuelle
Lors de la lecture d’un CD audio ou d’un CD Text:
Lors de la lecture d’un disque MP3:
Numéro de la plage
actuelle
Numéro du dossier actuel
Voir page 40 pour cette fonction.
FR54-60SH9101[E_EX]f.p65 2/26/03, 9:29 AM56

57
FRANÇAIS
Localisation d’un dossier dans
un disque
Les opérations suivantes sont possibles
uniquement lors de la lecture d’un disque MP3
en utilisant le changeur de CD JVC
compatible MP3, CH-X1500.
Pour sauter au dossier suivant ou précédent
(dans le même ou un niveau de hiérarchie différent)
Sur le panneau de commande:
Sur la télécommande:
Maintenez pressée 3 (droit) lors
de la lecture d’un disque pour
sauter au dossier suivant.
Chaque fois que vous maintenez
pressée consécutivement sur la
touche, le dossier suivant est
localisé et la première plage du
dossier reproduite.
Appuyez sur 5 (haut) lors de la
lecture d’un disque pour sauter au
dossier suivant.
Chaque fois que vous appuyez
consécutivement sur la touche, le
dossier suivant est localisé et la
première plage du dossier
reproduite.
Appuyez sur ∞ (bas) lors de la lecture d’un
disque pour sauter au dossier précédent.
Chaque fois que vous appuyez consécutivement
sur la touche, le dossier précédent est localisé et
la première plage du dossier reproduite.
Maintenez pressée 2 (gauche) lors de la lecture
d’un disque pour sauter au dossier précédent.
Chaque fois que vous maintenez pressée
consécutivement sur la touche, le dossier
précédent est localisé et la première plage du
dossier reproduite.
Remarque:
Si le dossier ne contient pas de plage MP3, il est
sauté.
Référez-vous au diagramme des hiérarchies, page 22.
01 02 03 04
PRESET PRESET
Pour sauter au dossier suivant ou
précédent dans un dossier (sur le même
niveau de hiérarchie)
Sur la télécommande UNIQUEMENT:
Référez-vous au diagramme des hiérarchies, page 22.
03 04 03 04
Appuyez sur 3 (droit) lors de la
lecture d’un disque pour sauter au
dossier suivant.
Chaque fois que vous appuyez
consécutivement sur la touche, le
dossier suivant compris dans le
même dossier (sur le même
niveau de hiérarchie) est localisé
(et la première plage du dossier
est reproduite, s’il y en a une).
Appuyez sur 2 (gauche) lors de la lecture d’un
disque pour sauter au dossier précédent.
Chaque fois que vous appuyez consécutivement
sur la touche, le dossier précédent compris dans
le même dossier (sur le même niveau de
hiérarchie) est localisé (et la première plage du
dossier est reproduite, s’il y en a une).
Remarque:
Si le dossier ne contient pas de plage MP3, la lecture
ne démarre pas (“No Music” apparaît sur
l’affichage). Choisissez un autre dossier.
Pour retourner directement à la racine,
appuyez sur R•D sur la télécommande. Vous
pouvez retourner à la racine à partir de n’importe
quel dossier.
•Si des plages sont enregistrés sur le disque
directement sans qu’ils se trouvent dans un
dossier, cet appareil reproduit ces plages.
01 05 01 05
Exemple 1
Exemple 2
PRESET PRESET
FR54-60SH9101[E_EX]f.p65 2/26/03, 9:29 AM57

59
FRANÇAIS
Sélection des modes de lecture
Pour reproduire les plages aléatoirement
(Lecture aléatoire)
Vous pouvez reproduire des plages d’un disque,
de tous les disques en place (ou d’un dossier
pour un disque MP3) aléatoirement.
1Appuyez sur MODE (M) pendant la
lecture d’un disque.
“Mode” apparaît sur l’affichage, puis
les touches numériques et les
touches 5 (haut)/∞ (bas) clignotent.
2Appuyez sur la touche numérique 3, pendant
que “Mode” apparaît sur l’affichage.
Chaque fois que vous appuyez sur la touche,
le mode de lecture aléatoire change comme
suit:
345621
Random Off
Random AllRandom Disc
Numéro de la plage actuelle
Lors de la lecture d’un CD audio ou d’un CD Text:
Lors de la lecture d’un disque MP3:
Numéro de la
plage actuelle
Numéro du dossier actuel
Pour les CD audio et les CD Text:
Pour les disques MP3:
Mode Reproduit aléatoirement
Random Folder
*:Toutes les plages du dossier
actuel, puis toutes les plages du
dossier suivant, etc.
•Pendant la lecture,
est allumé sur l’affichage.
Random Disc: Toutes les plages du disque.
•Pendant la lecture,
est allumé sur l’affichage.
Random All: Toutes les plages de tous les
disques insérés dans le magasin.
•Pendant la lecture,
est allumé sur l’affichage.
*“Random Folder” peut uniquement être utilisé pour
les disques MP3.
Pour annuler la lecture aléatoire, choisissez
“Random Off” en appuyant répétitivement sur la
touche numérique 3 ou en appuyant sur la
touche numérique 4 à l’étape 2.
M
MODE
Random All
Random DiscRandom Folder
Random Off
FR54-60SH9101[E_EX]f.p65 2/26/03, 9:29 AM59

61
FRANÇAIS
FONCTIONNEMENT DE L’APPAREIL EXTÉRIEUR
SRC
ATT
3456 M21
D
SRC
DISP
ATT
SEL
T/P
MODE
3
Ajustez le volume.
4
Choisissez le mode DSP et le mode
sonore souhaité.
•Pour les modes DSP, référez-vous à la
page 32.
•Pour les modes sonores (iEQ), référez-
vous à la page 35.
Remarque:
Quand la source est “LINE IN”, la touche DISP (D)
ne fonctionne pas.
Si vous avez affecté un nom différent à
l’appareil extérieur, il apparaît.
Lecture de l’appareil extérieur
Vous pouvez connecter un appareil extérieur aux
fichiers LINE IN à l’arrière de l’appareil.
•Si vous ne pouvez pas choisir “LINE IN” comme
source, changez le réglage “Line In” sur “On”.
(Voir page 49.)
1
Choisissez l’appareil extérieur
(LINE IN).
Chaque fois que vous appuyez
sur la touche, la source change
de façon décrite à la page 7.
Quand vous choisissez une
source, l’appareil se met
automatiquement sous tension.
2
Mettez l’appareil connecté sous
tension et démarrez la lecture de la
source.
FR61-61SH9101[E_EX]f.p65 2/26/03, 9:30 AM61

62
FRANÇAIS
Accord d’un ensemble et d’un
service
Typiquement, un ensemble diffuse au moins 6
programmes (services) en même temps. Après
avoir accordé un ensemble, vous pouvez choisir
le service que vous souhaitez écouter.
1
Choisissez le tuner DAB.
Chaque fois que vous appuyez
sur la touche, la source change
de façon décrite à la page 7.
Quand vous choisissez une
source, l’appareil se met
automatiquement sous tension.
2
Choisissez la bande DAB (DAB1,
DAB2 ou DAB3).
1Maintenez pressée SRC
pendant plus d’une seconde.
L’indication de la bande
clignote sur l’affichage.
2Avant environ 5 secondes
(pendant que l’indication de la
bande clignote), appuyez de
nouveau sur SRC. Chaque
fois que vous appuyez sur la
touche, la bande change.
Remarque:
Cet appareil possède trois bandes DAB (DAB1,
DAB2, DAB3). Vous pouvez utiliser n’importe
laquelle pour accorder un ensemble.
3456 M21
D
SRC
DISP
ATT
SEL
T/P
MODE
SRC
SRC
DAB1
DAB2
DAB3
FONCTIONNEMENT DU TUNER DAB
Nous recommandons que vous utilisiez un tuner
DAB (Digital Audio Broadcasting) KT-DB1500 ou
KT-DB1000 avec votre appareil.
Si vous possédez un autre tuner DAB, consultez
votre revendeur autoradio JVC.
•Référez-vous aussi au manuel d’instructions
fourni avec votre tuner DAB.
Qu’est-ce que le système DAB?
DAB est le seul système de diffusion radio
numérique disponible aujourd’hui. Il peut
délivrer un son de qualité CD sans aucune
interférence gênante et distorsion de signal.
De plus, il peut transporter des textes, des
images et des données.
Par opposition à la diffusion FM, où chaque
programme est transmis sur sa propre
fréquence, le système DAB réuni plusieurs
programmes (appelés “services”) qui forment
un “ensemble”.
De plus, chaque “service”—appelé “service
primaire”—peut aussi être divisé en
composants (appelés “service secondaire”).
Avec le tuner DAB connecté à cet appareil,
vous pouvez utiliser ces services DAB.
Le dernier ensemble (service) reçu de la
bande choisie est accordé.
Numéro de canal
Étiquette d’ensemble
FR62-70SH9101[E_EX]f.p65 2/28/03, 9:43 PM62

63
FRANÇAIS
3
Commencez la recherche d’un
ensemble.
Quand un ensemble est accordé, la
recherche s’arrête.
Pour arrêter la recherche avant qu’un
ensemble soit reçu, appuyez sur la même
touche que vous avez pressé pour
commencer la recherche.
4
Choisissez le service (primaire ou
secondaire) que vous souhaitez
écouter.
Pour accorder un ensemble particulier
sans recherch
1Appuyez répétitivement sur SRC pour choisir
le tuner DAB comme source.
2Maintenez pressée SRC pendant plus d’une
seconde.
3Appuyez répétitivement sur SRC pour choisir
la bande DAB (DAB1, DAB2 ou DAB3).
4Maintenez pressée ¢ ou 4
pendant plus d’une seconde.
5Appuyez répétitivement sur ¢ ou
4 jusqu’à que l’ensemble souhaité soit
atteint.
•Si vous maintenez la touche pressée, la
fréquence change d’une façon continue
jusqu’à ce que la touche soit relâchée.
6Appuyez sur 5 (haut) ou ∞ (bas) pour choisir
le service (primaire ou secondaire) que vous
souhaitez écouter.
Quand les bruits générés pendant la
conduite de votre voiture interfèrent avec
votre écoute
Pendant la conduite de votre voiture, des bruits
environnants interfèrent avec votre écoute.
Plus spécialement, les sons de faible niveau
seront difficiles à écouter.
Si cela se produit, vous pouvez renforcer les sont
de faible niveau pour améliorer votre écoute.
Dans ce but, certains services fournissent des
signaux de commande de la plage dynamique en
même temps que les signaux du programme
ordinaire.
1Appuyez sur MODE (M) pendant
l’écoute d’un service DAB.
“Mode” apparaît sur l’affichage et
les touches numériques clignotent.
2Appuyez répétitivement sur la
touche numérique 1 pour mettre en service la
fonction DRC pendant que “Mode” apparaît
sur l’affichage.
Chaque fois que vous appuyez sur la touche,
la fonction DRC est réglée comme suit:
Plus le nombre augmente, puis l’effet DRC est
élevé.
•L’indicateur DRC ( ) s’allume
uniquement quand l’appareil reçoit des
signaux DRC du service accordé.
Pour annuler l’effet DRC, choisissez
“DRC Off”.
Appuyez sur ¢ pour
rechercher un ensemble de
fréquence plus élevée.
Appuyez sur 4 pour
rechercher un ensemble de
fréquence moins élevée.
Appuyez sur 5 (haut) pour
choisir le service suivant. (Si
un service primaire possède
des services secondaires, ils
sont proposés avant que le
service primaire suivant soit
choisi).
Appuyez sur ∞ (bas) pour
choisir le service précédent
(primaire ou secondaire).
DRC 1 DRC 2
DRC Off
DRC 3
M
MODE
345621
Après environ
5 secondes
L’affichage retourne à l’écran d’indication de
la source.
L’indicateur DRC apparaît
FR62-70SH9101[E_EX]f.p65 2/28/03, 9:43 PM63

64
FRANÇAIS
Mémorisation des services
DAB
Vous pouvez présélectioner manuellement un
maximum de 6 services DAB dans chaque
bande DAB (DAB1, DAB2 et DAB3).
1
Choisissez le tuner DAB.
Chaque fois que vous appuyez
sur la touche, la source change
de façon décrite à la page 7.
Quand vous choisissez une
source, l’appareil se met
automatiquement sous tension.
2
Choisissez la bande DAB (DAB1,
DAB2 ou DAB3).
1Maintenez pressée SRC
pendant plus d’une seconde.
L’indication de la bande
clignote sur l’affichage.
2Avant environ 5 secondes
(pendant que l’indication de la
bande clignote), appuyez de
nouveau sur SRC. Chaque
fois que vous appuyez sur la
touche, la bande change.
3
Accordez l’ensemble que vous
souhaitez.
4
Choisissez le service souhaité de
l’ensemble.
Appuyez sur 5 (haut) pour
choisir le service suivant.
Appuyez sur ∞ (bas) pour
choisir le service précédent.
SRC
SRC
DAB1
DAB2
DAB3
1
SRC
5
Maintenez pressée pendant plus de
2 secondes la touche numérique
(dans cet exemple, 1) sur laquelle
vous souhaitez mémoriser le
service choisi.
6
Répétez la procédure ci-dessus pour
mémoriser d’autres services DAB sur
d’autres numéros de présélection.
Remarques:
• Vous pouvez uniquement prérégler les services DAB
primaires. Si vous essayez de mémoriser un service
secondaire, c’est le service primaire correspondant
qui est mémorisé à sa place.
• Un service DAB précédemment mémorisé est effacé
si un nouveau service DAB est mémorisé sur le
même numéro de présélection.
Accord d’un service DAB
présélectionné
Vous pouvez accorder facilement un service
DAB présélectionné. Rappelez-vous que vous
devez d’abord mémoriser d’abord les services.
Si vous ne les avez pas encore mémorisés,
Référez-vous à “Mémorisation des services
DAB”.
1
Choisissez le tuner DAB.
Chaque fois que vous appuyez
sur la touche, la source change
de façon décrite à la page 7.
Quand vous choisissez une
source, l’appareil se met
automatiquement sous tension.
Le modèle d’affichage change
automatiquement sur le modèle d’affichage
initial et le numéro préréglé clignote (puis le
modèle d’affichage précédent réapparaît).
FR62-70SH9101[E_EX]f.p65 2/28/03, 9:43 PM64

68
FRANÇAIS
L’indicateur ANN (annonce) s’allume ou clignote.
•Si l’indicateur ANN s’allume, c’est que l’attente
de réception d’annonce est en service.
Si un service comme à diffuser le type de
programme choisi, cet appareil accorder le
service.
•Si l’indicateur ANN clignote, c’est que l’attente
de réception d’annonce n’est pas encore en
service puisque le service reçu ne fourni pas
de signal utilisé pour l’attente de réception
d’annonce.
Pour mettre en service l’attente de réception
d’annonce, vous devez accorder un autre
service fournissant ce signal. Appuyez sur
¢ ou 4 pour rechercher un tel
service.
Quand un service fournissant ce signal est
accordé, l’indicateur ANN s’arrête de clignoter
et reste allumé. L’attente de réception
d’annonce est maintenant en service.
Remarque:
Après avoir mis en service l’attente de réception
d’annonce, vous pouvez changer la source sans
l’annuler. Dans ce cas, l’indicateur ANN s’arrête de
clignoter s’il clignotait. Si un service commencer à
diffuser le type d’annonce choisi, l’appareil change
automatiquement la source et accorde le service.
Fonctionnement de l’attente de réception
d’annonce:
Si un service du type d’annonce choisi
commence à être diffusé pendant que l’attente
de réception d’annonce est en service, le type
d’annonce choisi apparaît et l’appareil accorder
le service.
Announcement type
Travel: Programmes sur les destinations
de voyage, les tours organisés et
les idées et chances de voyage
Warning: Avertissements à propos des
tremblements de terre, des ras de
marée, etc.
News: Actualités
Weather: Informations météorologiques
Event: Informations sur les événements,
concerts, etc.
Special: Programmes spéciaux
prolongeant les affaires
courantes ou l’actualité
Rad Inf: Information radio
Sports: Évènements sportifs
Finance: Rapports sur le commerce et les
marchés boursiers
FR62-70SH9101[E_EX]f.p65 2/28/03, 9:43 PM68

69
FRANÇAIS
Utilisation de l’attente de réception
PTY
L’attente de réception PTY permet à l’appareil de
commuter temporairement sur votre programme
préféré (PTY: type de programme) à partir de
n’importe quelle source sauf les stations AM.
•Le fonctionnement est exactement le même
que celui expliqué aux pages 17 et 18 pour les
stations FM RDS. Vous ne pouvez pas utiliser
l’attente de réception PTY séparément pour le
tuner DAB et pour le tuner FM.
•L’attente de réception PTY fonctionne pour le
tuner DAB uniquement en utilisant un code
PTY dynamique, et non pas un code PTY
statique.
Pour choisir votre code PTY préféré pour
l’attente de réception PTY, référez-vous à la
page 17.
Pour régler l’attente de réception PTY, référez-
vous aux pages 17 et 18.
•Vous pouvez régler l’attente de réception PTY
quand la source et “FM” ou “DAB”.
Recherche de votre service préféré
Vous pouvez chercher n’importe quel code PTY
(PTY dynamique ou PTY statique).
De plus, vous pouvez mémoriser vos 6
programmes préférés sur les touches
numériques (voir la page 18).
•Le fonctionnement est exactement le même
que celui expliqué aux pages 18 et 19 pour les
stations FM RDS. Cependant vous ne pouvez
pas mémoriser les codes PTY sur les touches
numériques séparément pour le tuner DAB et
pour le tuner FM.
Pour mémoriser vos types programmes
(services) préférés, référez-vous aux pages 18
et 19.
Pour rechercher votre type de programme
(service) préféré, référez-vous à la page 19.
•La recherche est réalisée uniquement sur le
tuner DAB.
Suivi du même programme
automatiquement (Réception alternée)
Vous pouvez continuer d’écouter le même
programme.
•Lors de la réception d’un service DAB:
Lors que vous conduisez dans une région où
un service ne peut pas être reçu, cet appareil
accorde automatiquement un autre ensemble
ou une station FM RDS, diffusant le même
programme.
•Lors de la réception d’une station FM RDS:
Lors que vous conduisez dans une région où
un service DAB diffuse le même programme
que la station FM RDS que vous écoutez, cet
appareil accorde automatiquement ce service
DAB.
Pour utiliser la réception alternée
À l’expédition de l’usine, la réception alternée est
en service.
•Référez-vous aussi à “Modification des
réglages généraux (PSM)” aux page 46.
1Maintenez pressée SEL (sélection) pendant
plus de 2 secondes de façon qu’un des
réglages PSM apparaisse sur l’affichage.
2Appuyez sur la touche numérique 4 pour
choisir “TUNER”—la catégorie “Tuner” des
réglages PSM.
3Appuyez sur ¢ ou 4 pour choisir
“DAB AF” (fréquence alternative).
4Tournez la molette de commande pour choisir
le mode souhaité.
• On: Suit le programme parmi les services
DAB et les stations FM RDS
—réception alternée. L’indicateur AF
s’allume sur l’affichage (voir la page
15).
• Off: Met hors service la réception alternée.
5Appuyez sur SEL (sélection) pour terminer le
réglage.
Remarque:
Quand la réception alternée (pour les services DAB)
est mise ne service, la réception de suivi de réseau
(pour les stations RDS: voir la page 15) est aussi mise
en service automatiquement. Inversement, la
réception de suivi de réseau ne peut pas être mise
hors service sans mettre hors service la réception
alternée.
FR62-70SH9101[E_EX]f.p65 2/28/03, 9:43 PM69

70
FRANÇAIS
*1Indicateur de l’étiquette de l’ensemble (service
primaire): Un indicateur différent ( ) est
affiché quand un service secondaire est choisi.
*2Indicateur TEXT: indique que le service
actuellement reçu fourni le service DLS (Segment
d’étiquette dynamique—informations radiotexte
DAB).
*3Chaque service peut avoir plusieurs codes PTY. Si
un service a plusieurs codes PTY, ils apparaissent
l’un après l’autre.
D
DISP
*1
•Modèle d’affichage initial:
•L’étiquette de l’ensemble (nom) est mise
en valeur
•L’étiquette du service (nom) est mise en
valeur
•Le segment d’étiquette dynamique (DLS)
est affiché.
Changement du modèle d’affichage
En appuyant sur DISP (D), vous pouvez changer l’information apparaissant sur l’affichage.
Chaque fois que vous appuyez sur la touche, le modèle d’affichage change comme
suit:
*3
*2
*1
FR62-70SH9101[E_EX]f.p65 2/28/03, 9:59 PM70

71
FRANÇAIS
INFORMATIONS ADDITIONNELLES
Modes sonores (réglages du niveau de fréquence préréglée)
La liste ci-dessous montre les réglages du niveau de fréquence préréglé pour chaque mode sonore.
• Vous pouvez ajuster les modes sonores préréglés temporairement. Cependant, votre ajustement
temporaire est réinitialisé quand vous choisissez un autre mode sonore.
Caractères disponibles
En plus des alphabets (A – Z, a – z), vous pouvez utiliser les caractères suivants pour affecter un
nom aux CD et à l’appareil extérieur. (Voir page 51.)
• Ces caractères peuvent aussi être utilisés pour afficher des informations telles que titre du
disque/interprète et les données RDS et DAB sur l’affichage.
Chiffres et symboles
Modes Valeurs d’égalisation préréglées
sonores 60 Hz 150 Hz 400 Hz 1 kHz 2,4 kHz 6 kHz 12 kHz
Flat 00 00 00 00 00 00 00
Hard Rock +03 +03 +01 00 00 +02 +01
R & B +03 +02 +02 00 +01 +01 +03
Pop 00 +02 00 00 +01 +01 +02
Jazz +03 +02 +01 +01 +01 +03 +02
DanceMusic +04 +02 00 –02 –01 +01 +01
Country +02 +01 00 00 00 +01 +02
Reggae +03 00 00 +01 +02 +02 +03
Classic +02 +03 +01 00 00 +02 00
User 1 00 00 00 00 00 00 00
User 2 00 00 00 00 00 00 00
User 3 00 00 00 00 00 00 00
Espace
Espace
Espace
Lettres accentuées
Minuscules
Majuscules
FR71-75SH9101[E_EX]f.p65 2/27/03, 11:00 AM71

74
FRANÇAIS
ENTRETIEN
Manipulation des disques
Cet appareil est conçu pour reproduire les CD,
CD-R (enregistrable), CD-RW (réinscriptible) et
CD Text.
•Cet appareil est aussi compatible avec les
disques MP3 et WMA.
Manipulation des disques
Pour retirer un disque de son
boîtier, faites pression sur le
support central du boîtier et
retirez le disque en le tenant par ses arêtes.
•Tenez toujours le disque par ses arêtes. Ne
touchez pas la surface enregistrée.
Pour remettre un disque dans son boîtier,
insérez délicatement le disque autour du support
central (la surface imprimée dirigée vers le haut).
•Remettez les disques dans leur boîtier après
utilisation.
Pour garder propres vos disques
Un disque sale peut ne pas être
reproduit correctement. Si un
disque devient sale, essuyez-le
avec un chiffon doux, en ligne
droite, du centre vers les arêtes.
Avant de reproduire un disque neuf
Les disques neufs peuvent avoir
des ébarbures sur les arêtes
intérieures et extérieures. Si un tel
disque est utilisé, cet appareil
risque de rejeter le disque.
Pour retirer ces ébarbures, frottez
les arêtes avec un crayon, un stylo, etc.
Condensation d’humidité
De l’humidité peut se condenser sur la lentille à
l’intérieur du lecteur de CD dans les cas suivant:
•Après avoir mis le chauffage dans la voiture.
•Si l’intérieur de la voiture devient très humide.
Si cela se produit, le lecteur CD peut ne pas
fonctionner correctement. Dans ce cas, éjectez
le disque et laissez l’appareil sous tension
pendant quelques heures, jusqu’à ce que
l’humidité se soit évaporée.
Lors de la lecture d’un CD-R ou CD-RW
Avant de reproduire un CD-R ou CD-RW,
veuillez lire leurs instructions attentivement.
•Utilisez uniquement des CD-R ou CD-RW
“finalisés”.
•Certains CD-R ou CD-RW ne peuvent pas être
reproduits sur cet appareil à cause de leurs
caractéristiques et des raisons suivantes:
–Les disques sont sales ou rayés.
– De la condensation d’humidité s’est produite
sur la lentille à l’intérieur de l’appareil.
– La lentille à l’intérieur de l’appareil est sale.
•Les CD-RW peuvent demander un temps
d’analyse plus long à cause de leur indice de
réflexion inférieur à celui des CD ordinaires.
•Les CD-R et CD-RW sont sensibles aux
hautes températures et à l’humidité. Ne les
laissez pas à l’intérieur de votre voiture.
•N’utilisez pas les CD-R ou CD-RW suivants:
–Disques avec autocollants, étiquettes ou
sceau protecteur sur leur surface.
–Disques sur lesquels des étiquettes peuvent
être imprimées directement avec une
imprimante à jet d’encre.
L’utilisation de tels disques sous hautes
températures peut causer des mauvais
fonctionnements ou endommager les disques.
Par exemple,
–Les étiquettes ou autocollants peuvent
rétrécir et gondoler le disque.
–Les étiquettes ou autocollants peuvent se
décoller et les disques ne peuvent pas être
éjectés.
–L’impression sur les disques peut devenir
collante.
Lisez attentivement les instructions ou les
précautions sur les étiquettes et les disques
imprimables.
ATTENTION:
•N’insérez pas des disques de 8 cm (CD single)
dans la fente d’insertion. (De tels disques ne
peuvent pas être éjectés.)
•N’insérez pas des disques avec une forme
inhabituelle—comme le cœur d’une fleur; cela
pourrait causer un mauvais fonctionnement.
•N’exposez pas les disques à la lumière directe
du soleil ou à toute source de chaleur, ni ne les
placez pas dans un endroit soumis à des hautes
températures ou à l’humidité. Ne les laissez pas
dans la voiture.
•N’utilisez aucun solvant (comme par exemple:
un nettoyant pour disque analogique, un diluant en
bombe, de la benzine, etc.) pour nettoyer les disques.
Reste
d’étiquette Disque
Disque
gondolé
Support central
Autocollant Etiquette
spécialisée
FR71-75SH9101[E_EX]f.p65 2/26/03, 9:30 AM74

75
FRANÇAIS
SPÉCIFICATIONS
SECTION LECTEUR CD
Type: lecteur de disque compact
Système de détection de signal: Capteur sans
contact optique (semiconducteur laser)
Nombre de canaux: 2 canaux (stéréo)
Réponse en fréquence: 5 Hz à 20 000 Hz
Plage dynamique: 98 dB
Rapport signal sur bruit: 102 dB
Pleurage et scintillement: Inférieur à la limite
mesurable
MP3 (MPEG Audio Niveau 3)
Débit binaire max.: 320 Kbps
WMA (Windows Media® Audio)
Débit binaire max.: 192 Kbps
GENERAL
Alimentation:
Tension de fonctionnement: CC 14,4 V
(11 V à 16 V tolérés)
Système de mise à la masse: Masse négative
Température de fonctionnement admissible:
0°C à +40°C
Dimensions (L × H × P):
Taille d’installation:
182 mm × 52 mm × 161 mm
Taille du panneau:
188 mm × 58 mm × 17 mm
Masse: 1,8 kg
(sans les accessoires)
La conception et les spécifications sont sujettes à
changement sans notification.
SECTION AMPLIFICATEUR AUDIO
Puissance de sortie maximum:
Avant: 50 W par canal
Arrière: 50 W par canal
Puissance de sortie en mode continu (RMS):
Avant: 19 W par canal pour 4 Ω, 40 Hz
à 20 000 Hz à moins de 0,8% de
distorsion harmonique totale.
Arrière: 19 W par canal pour 4 Ω, 40 Hz
à 20 000 Hz à moins de 0,8% de
distorsion harmonique totale.
Impédance de charge: 4 Ω (4 Ω à 8 Ω tolérés)
Plage de commande de l’égaliseur:
Fréquences: 60 Hz, 150 Hz, 400 Hz, 1 kHz,
2,4 kHz, 6 kHz, 12 kHz
Niveau: ±10 dB
Réponse en fréquence: 40 Hz à 20 000 Hz
Rapport signal sur bruit: 70 dB
Niveau d’entrée de ligne/Impédance:
LINE IN: 1,5 V/20 kΩ en charge
Niveau de sortie de ligne/Impédance:
4,0 V/20 kΩ en charge (pleine échelle)
Impédance de sortie: 1 kΩ
SECTION TUNER
Plage de fréquence:
FM: 87,5 MHz à 108,0 MHz
AM: (PO) 522 kHz à 1 620 kHz
(GO) 144 kHz à 279 kHz
[Tuner FM]
Sensibilité utilisable: 11,3 dBf (1,0 µV/75 Ω)
Sensibilité utile à 50 dB: 16,3 dBf (1,8 µV/75 Ω)
Sélectivité de canal alterné (400 kHz): 65 dB
Réponse en fréquence: 40 Hz à 15 000 Hz
Séparation stéréo: 30 dB
Rapport de synchronisation: 1,5 dB
[Tuner PO]
Sensibilité: 20 µV
Sélectivité: 35 dB
[Tuner GO]
Sensibilité: 50 µV
FR71-75SH9101[E_EX]f.p65 2/26/03, 9:30 AM75

2
NEDERLANDS
ALVORENS HET APPARAAT TE GEBRUIKEN
*
Denk aan de veiligheid....
• Zet het volume onder het rijden niet te hard. Dit is
gevaarlijk, omdat u de geluiden buiten de auto niet
meer hoort.
• Zet de auto stil voordat u ingewikkelde handelingen
met het apparaat gaat verrichten.
*
Temperatuur binnen de auto....
Als de auto gedurende lange tijd in de kou of in de
warmte heeft gestaan, mag u het apparaat pas
gebruiken nadat de temperatuur in de auto weer
normaal waarden heet bereikt.
Het apparaat terugstellen
Druk vervolgens met een pen of dergelijk voorwerp
op de terugsteltoets op de bedieningspaneel.
De ingebouwde microcomputer
wordt hierdoor teruggesteld.
Opmerking:
De geheugeninstellingen—zoals de
voorkeurzenders en de
geluidsinstellingen—zullen eveneens
gewist worden.
LET OP:
Steek NOOIT
uw vinger
tussen het
bedieningspaneel
en de apparaat
aangezien u het risico
loopt vast te komen zitten
en u zichzelf zeer doet.
(Zie bladzijde 52).
56 M
T/P
MODE
Opmerking:
Voor de veiligheid is een genummerde identificatiekaart bij het apparaat geleverd. Het identificatienummer is
tevens op de behuizing van het apparaat gedrukt. Bewaar de kaart op een veilige plaats. Deze kaart is
belangrijk voor identificaatie indien het apparaat is gestolen.
Plaats en afbeelding van labels
Benaming/Spanningslabel
Onderpaneel van het hoofdapparaat
BELANGRIJK VOOR LASERPRODUKTEN
Voorzorgen:
1.KLASSE 1 LASERPRODUKT
2.LET OP: Onzichtbare laserstralen wanneer open en
interlock uitgeschakeld of defekt. Voorkom direkte
blootstelling aan de straal.
3.LET OP: Open de bovenafdekking niet. Het toestel
bevat geen door de gebruiker te repareren onderdelen.
Laat onderhoud en reparatie over aan erkend
onderthoudspersoneel.
4.LET OP: Deze CD-speler gebruikt onzichtbare
laserstralen maar is echter voorzien van
veiligheidsschakelaars die uitstraling dienen te stoppen
bij het verwijderen van CD’s. Het is uitermate gevaarlijk
deze schakelaars uit te schakelen.
5.LET OP: Het gebruik van regelaars en het maken van
instellingen ander dan in deze gebruiksaanwijzing
aangegeven resulteert mogelijk in blootstelling aan
gevaarlijke straling.
Let op:
Dit toestel heeft een laserkomponent met
een hogere klasse laserstraal dan Klasse 1.
CLASS
LASER
1
PRODUCT
CAUTION: Invisible laser
radiation when open and
interlock failed or defeated.
AVOID DIRECT EXPOSURE
TO BEAM. (e)
ADVARSEL: Usynlig laser-
stråling ved åbning, når
sikkerhedsafbrydere er ude
af funktion. Undgåudsæt-
telse for stråling. (d)
VARNING: Osynlig laser-
strålning när denna del är
öppnad och spärren är
urkopplad. Betrakta ej
strålen. (s)
VARO: Avattaessa ja
suojalukitus ohitettaessa
olet alttiina näkymättö-
mälle lasersäteilylle.
Älä katso säteeseen. (f)
NL02-06SH9101[E_EX]f.p65 2/26/2003, 10:01 AM2

3
NEDERLANDS
INHOUDSOPGAVE
Hartelijk dank voor d e aanschaf van dit JVC-product! Wij verzoeken u de gebruiksaanwijzing goed
door te lezen voordat u het apparaat gaat gebruiken. Zo krijgt u een volledig inzicht in de functies van
het apparaat en kunt u de mogelijkheden optimaal benutten.
Het apparaat terugstellen ............................. 2
PLAATSING VAN DE TOETSEN ............. 4
Bedieningspaneel ........................................ 4
Afstandsbediening ....................................... 5
De afstandsbediening voorbereiden ............ 6
BASISBEDIENING ............................ 7
De stroomtoevoer inschakelen .................... 7
Annuleren van de displaydemonstratie ........ 8
Klok instellen ................................................ 8
Kiezen van de niveaumeter ......................... 9
GEBRUIK VAN DE RADIO ................. 10
Naar de radio luisteren ............................... 10
Radiozenders in het geheugen vastleggen ....
12
Afstemmen op een voorkeuzezender ........ 13
Veranderen van het displaypatroon ........... 14
HET GEBRUIK VAN RDS................... 15
Wat u kunt doen met RDS ......................... 15
Andere nuttige RDS-functies en het
maken van aanpassingen ....................... 20
GEBRUIK VAN DE CD-SPELER ........... 22
Meer over MP3-discs en WMA-discs ......... 22
Weergave van een disc ............................. 22
Opzoeken van een bepaald gedeelte in
een track .................................................. 24
Opzoeken van een track op een disc ......... 25
Opzoeken van een map van een disc ........ 26
Kiezen van een map en een track met
gebruik van de naamlijsten ...................... 28
Kiezen van de weergavefuncties ...................
29
Voorkomen van het uitwerpen van een disc ....
30
Veranderen van het displaypatroon ........... 31
GEBRUIK VAN DSP ........................ 32
Kiezen van de DSP-functies ...................... 32
GEBRUIK VAN DE EQUALIZER ........... 35
Kiezen van de reeds vastgelegde
geluidsfuncties (iEQ: Intelligente Equalizer)
....
35
Vastleggen van uw eigen
geluidsinstellingen ................................... 36
LET OP bij het instellen van het volume:
Bij CD’s is in vergelijking tot andere
geluidsdragers nauwelijks sprake van
achtergrondruis. Wanneer het volume van
bijvoorbeeld de tuner wordt aangepast, kan het
gebeuren dat de luidsprekers door de plotselinge
toename van het geluid beschadigd raken.
Draai het volume daarom voordat u een CD
afspeelt eerst terug en pas het geluid daarna aan
uw wensen aan.
GELUIDSINSTELLINGEN .................. 37
Maken van de basisgeluidsinstellingen ...... 37
GRAFISCH DISPLAYS ..................... 39
Downloaden van beelden en animaties ..... 40
Wissen van ongewenste bestanden .......... 42
Activeren van de beelden en animaties
die u heeft gedownload ........................... 44
ANDERE BELANGRIJKE FUNCTIES ...... 46
Veranderen van de algemene instellingen
(PSM) ...................................................... 46
Kiezen van de dimmerfunctie ..................... 50
Invoeren van namen voor bronnen ............ 51
Veranderen van de hoek van het
bedieningspaneel .................................... 52
Bedieningspaneel verwijderen ................... 53
GEBRUIK VAN DE CD-WISSELAAR ...... 54
CD’s afspelen ............................................. 54
Opzoeken van een map van de disc .......... 57
Kiezen van een disc/map/track met gebruik
van de naamlijsten .....................................
58
Kiezen van de weergavefuncties ...................
59
BEDIENING VAN EEN EXTERN
COMPONENT .............................. 61
Weergave van een extern component ....... 61
BEDIENING VAN DE DAB-TUNER ........ 62
Afstemmen op een ensemble en op een
van de services ....................................... 62
DAB-frequenties in het geheugen opslaan ....
64
Afstemmen op een opgeslagen DAB-service...
64
Wat kunt u nog meer met DAB doen? ....... 66
Veranderen van het displaypatroon .......... 70
EXTRA INFORMATIE ....................... 71
PROBLEMEN OPLOSSEN ................. 72
ONDERHOUD ............................... 74
Omgaan met discs ..................................... 74
SPECIFICATIES ............................. 75
Let op:
Indien de temperatuur in de auto onder 0°C is,
wordt de beweging van de animatie en het rollen
van de tekst op het display gestopt om wazige
aanduidingen te voorkomen. (LOW TEMP.)
verschijnt op het display.
De aanduidingen zullen weer normaal zijn zodra de
temperatuur in de auto is gestegen en het toestel op
bedrijfstemperatuur is.
NL02-06SH9101[E_EX]f.p65 2/26/2003, 10:01 AM3

8
NEDERLANDS
SEL
ATT
Voor het weer activeren van de
displaydemonstratie, herhaalt u de hier
beschreven procedure maar kiest u “Int Demo” of
“All Demo” in stap
3
.
•Zie “Beelden op het display tonen—Graphics”
op bladzijde 48 voor details.
Klok instellen
Het is ook mogelijk de klok in te stellen op een
24-uurs of een 12-uurs aanduiding.
1
Houd SEL (selecteren) langer dan 2
seconden ingedrukt zodat een van
de PSM-onderdelen op het display
verschijnt. (PSM: zie bladzijden 47 en
48).
2
Druk op cijfertoets 2 om “CLOCK”—
Klokcategorie van de PSM-
instellingen te kiezen.
Het “Clock Hr” (uur) instelscherm verschijnt
op het display.
3
Stel het uur in.
4
Stel de minuten in.
1Kies “Clock Min” (minuten).
2Stel de minuten in.
SEL
ATT
SEL
345621
12
345621
ATT
Annuleren van de
displaydemonstratie
Bij het verlaten van de fabriek is de
displaydemonstratie geactiveerd en start deze
automatisch indien u gedurende ongeveer 20
seconden geen bediening uitvoert.
•Het wordt aanbevolen om de demonstratie te
annuleren alvorens het toestel werkelijk in
gebruik te nemen.
Voor het annuleren van de displaydemonstratie,
voert u de volgende handelingen uit:
1
Houd SEL (selecteren) langer dan 2
seconden ingedrukt zodat een van
de PSM-onderdelen op het display
verschijnt. (PSM: zie bladzijden 47
en 48).
2
Druk op cijfertoets 1 om “MOVIE”—
Filmcategorie van de PSM-
instellingen te kiezen.
Het “Graphics” instelscherm verschijnt op
het display.
3
Kies “Off”.
4
Voltooi de instelling.
NL07-09SH9101[E_EX]f.p65 2/27/03, 11:31 AM8
Specyfikacje produktu
| Marka: | JVC |
| Kategoria: | Radia samochodowe |
| Model: | kd-sh9101 |
Potrzebujesz pomocy?
Jeśli potrzebujesz pomocy z JVC kd-sh9101, zadaj pytanie poniżej, a inni użytkownicy Ci odpowiedzą
Instrukcje Radia samochodowe JVC

12 Stycznia 2025
15 Października 2024
13 Października 2024
30 Września 2024
20 Września 2024
15 Września 2024
15 Września 2024
13 Września 2024
11 Września 2024
11 Września 2024
Instrukcje Radia samochodowe
- Radia samochodowe Sony
- Radia samochodowe AEG
- Radia samochodowe LG
- Radia samochodowe Pioneer
- Radia samochodowe Fiat
- Radia samochodowe Philips
- Radia samochodowe SilverCrest
- Radia samochodowe Xblitz
- Radia samochodowe JBL
- Radia samochodowe Scott
- Radia samochodowe Opel
- Radia samochodowe Conceptronic
- Radia samochodowe Panasonic
- Radia samochodowe Norauto
- Radia samochodowe Muse
- Radia samochodowe Nedis
- Radia samochodowe Medion
- Radia samochodowe Boss
- Radia samochodowe Lenco
- Radia samochodowe Peiying
- Radia samochodowe Marquant
- Radia samochodowe Ford
- Radia samochodowe Majestic
- Radia samochodowe Jensen
- Radia samochodowe Mini
- Radia samochodowe Skoda
- Radia samochodowe Blaupunkt
- Radia samochodowe Volvo
- Radia samochodowe Dual
- Radia samochodowe Grundig
- Radia samochodowe Hyundai
- Radia samochodowe BLOW
- Radia samochodowe ECG
- Radia samochodowe Smart
- Radia samochodowe Kenwood
- Radia samochodowe Alpine
- Radia samochodowe Becker
- Radia samochodowe Ultimate
- Radia samochodowe Mercedes-Benz
- Radia samochodowe Biltema
- Radia samochodowe Auna
- Radia samochodowe Krüger&Matz
- Radia samochodowe OneConcept
- Radia samochodowe Renkforce
- Radia samochodowe Pure
- Radia samochodowe Zenec
- Radia samochodowe Clarion
- Radia samochodowe Fusion
- Radia samochodowe Magnat
- Radia samochodowe Manta
- Radia samochodowe Pyle
- Radia samochodowe VDO
- Radia samochodowe Harman Kardon
- Radia samochodowe Audio-Technica
- Radia samochodowe Maginon
- Radia samochodowe SPC
- Radia samochodowe Parrot
- Radia samochodowe Aiwa
- Radia samochodowe AKAI
- Radia samochodowe Sanyo
- Radia samochodowe Clatronic
- Radia samochodowe Telefunken
- Radia samochodowe Hifonics
- Radia samochodowe Kicker
- Radia samochodowe Deaf Bonce
- Radia samochodowe Elta
- Radia samochodowe Mac Audio
- Radia samochodowe McIntosh
- Radia samochodowe Denver
- Radia samochodowe Orion
- Radia samochodowe Hertz
- Radia samochodowe Trevi
- Radia samochodowe Technaxx
- Radia samochodowe Overmax
- Radia samochodowe Sencor
- Radia samochodowe Ground Zero
- Radia samochodowe Stinger
- Radia samochodowe Rockford Fosgate
- Radia samochodowe Nextbase
- Radia samochodowe Daewoo
- Radia samochodowe Kunft
- Radia samochodowe Crunch
- Radia samochodowe REVO
- Radia samochodowe Varta
- Radia samochodowe Audison
- Radia samochodowe Tevion
- Radia samochodowe Caliber
- Radia samochodowe Telestar
- Radia samochodowe Brigmton
- Radia samochodowe Xomax
- Radia samochodowe Audiosonic
- Radia samochodowe Vieta
- Radia samochodowe Audiovox
- Radia samochodowe MB Quart
- Radia samochodowe Tokai
- Radia samochodowe Naxa
- Radia samochodowe Boston Acoustics
- Radia samochodowe Farenheit
- Radia samochodowe Adcom
- Radia samochodowe Nikkei
- Radia samochodowe Autovision
- Radia samochodowe Lanzar
- Radia samochodowe Roadstar
- Radia samochodowe MT Logic
- Radia samochodowe Shuttle
- Radia samochodowe Axton
- Radia samochodowe Soundstream
- Radia samochodowe DLS
- Radia samochodowe VDO Dayton
- Radia samochodowe Macrom
- Radia samochodowe Watssound
- Radia samochodowe Tamashi
- Radia samochodowe Emphaser
- Radia samochodowe Scion
- Radia samochodowe Sendai
- Radia samochodowe Phonocar
- Radia samochodowe US Blaster
- Radia samochodowe Eltax
- Radia samochodowe RTO
- Radia samochodowe Sevic
- Radia samochodowe Cartronix
- Radia samochodowe Dension
- Radia samochodowe Spectron
- Radia samochodowe Mtx Audio
- Radia samochodowe Multilaser
- Radia samochodowe Raveland
- Radia samochodowe ESX
- Radia samochodowe RetroSound
- Radia samochodowe Lark
- Radia samochodowe Planet Audio
- Radia samochodowe VW
- Radia samochodowe Rodek
- Radia samochodowe Eclipse
- Radia samochodowe Voxx
- Radia samochodowe SoundMAX
- Radia samochodowe Impulse
- Radia samochodowe Twister
- Radia samochodowe Mystery
Najnowsze instrukcje dla Radia samochodowe

16 Stycznia 2025

16 Stycznia 2025
16 Stycznia 2025
16 Stycznia 2025
16 Stycznia 2025

15 Stycznia 2025
14 Stycznia 2025
14 Stycznia 2025

14 Stycznia 2025
13 Stycznia 2025