Instrukcja obsługi JVC Everio GZ-MG20
JVC
kamera wideo
Everio GZ-MG20
Przeczytaj poniżej 📖 instrukcję obsługi w języku polskim dla JVC Everio GZ-MG20 (64 stron) w kategorii kamera wideo. Ta instrukcja była pomocna dla 9 osób i została oceniona przez 2 użytkowników na średnio 4.5 gwiazdek
Strona 1/64

GZ-MG50U
GZ-MG40U
GZ-MG30U
GZ-MG20U
LYT1468-001C EN
ENGLISH
HARD DISK CAMCORDER
GETTING STARTED 7
VIDEO RECORDING &
PLAYBACK 22
MENU SETTINGS 48
52
To deactivate the demonstration,
set “DEMO MODE” to “OFF”.
( 墌 pg. 48)
For Customer Use:
Enter below the Model No.
(located on the bottom of the
camera) and Serial No. (located
on the battery pack mount of the
camera). Retain this information
for future reference.
Model No.
Serial No.
REFERENCES
INSTRUCTIONS
STILL IMAGE RECORDING
& PLAYBACK 28
ADVANCED OPERATIONS 31

2 EN
Built-in Hard Disk
This hard disk camera records images to a
large, built-in hard disk drive (HDD) instead of a
DV tape like conventional video cameras. This
enables extended hours of high-resolution,
MPEG2 video recording.
Various Recording Modes
You can select the most suitable recording mode
for picture quality, image size, recording time,
and computer environment. (墌pg. 62)
Enjoying Various Playback Features
Unlike tape operation, playback is simple and
easy in this camera since no time is needed for
rewinding or fast forward operations.
Playlist, playback effects,
and other functions are
also available for
enjoying many different
types of playback.
Editing Files on your PC
USB 2.0 enables the
smooth transfer of video
and still images to a
computer. With the
bundled image editing
software, you can easily
edit video and create your own DVDs. (Refer to
“Read this first!” and the software installation
and USB connection guide.)
Direct Printing
If your printer is
compatible with
PictBridge, still images
can be printed easily by
connecting the camera
with USB cable directly to the printer. (墌pg. 47)
Major Features of this Camera
ALL SCENES
01 NOV 10.05 11:30AM
02 NOV 15.05 11:00PM
03 NOV 25.05 11:00AM
PLAYLIST CONTENTS

EN 3
GETTING STARTED 7
Provided Accessories ...................................... 7
Index .............................................................. 10
Power ............................................................. 14
Operation Mode ............................................. 17
Language Setting .......................................... 18
Date/Time Settings ........................................ 18
Brightness Adjustment of the Display ............ 19
Grip Adjustment ............................................. 19
Tripod Mounting ............................................. 19
Inserting/Removing an SD Card .................... 20
Formatting a Recording Medium ................... 20
Selecting a Recording Medium ...................... 21
Remaining Space on the Recording Media ... 21
Drop Detection ............................................... 21
VIDEO RECORDING & PLAYBACK 22
Video Recording ............................................ 22
Zooming ..................................................... 23
Video Playback .............................................. 24
How to Use the Scroll Bar ......................... 25
Date Index Screen ..................................... 25
Various Playback Operations .................... 25
Playback Zoom .......................................... 25
Connecting to a TV, VCR or VDR .................. 26
Playback on a TV ...................................... 26
Dubbing to a VCR (or DVD Recorder) ....... 26
Playback Using the Remote Control .......... 27
STILL IMAGE RECORDING & PLAYBACK 28
Still Image Recording ..................................... 28
Zooming ..................................................... 28
Continuous Shooting ................................. 28
Still Image Playback ...................................... 29
Slide Show ................................................. 29
Index Screen of Still Image Files ............... 29
How to Use the Scroll Bar ......................... 30
Date Index Screen ..................................... 30
Image Rotation .......................................... 30
Playback Zoom .......................................... 30
ADVANCED OPERATIONS 31
RECORDING FEATURES ..................................... 31
Backlight Compensation ................................ 31
Spot Exposure Control ................................... 31
LED Light ....................................................... 31
Manual Settings in MSET Menu .................... 32
How to Select a Menu Item ....................... 32
Manual Exposure ....................................... 32
Manual Focus ............................................ 33
White Balance ........................................... 34
Shutter Speed ............................................ 35
Program AE ............................................... 36
Effect ......................................................... 36
PLAYBACK FEATURES ....................................... 37
Wipe or Fader Effects .................................... 37
Playback Effects ............................................ 37
MANAGING FILES ............................................. 38
Viewing File Information ................................ 38
Protecting Files .............................................. 38
Deleting Files ................................................. 39
Cleaning Up a Recording Medium ................. 40
Copying/Moving Still Image Files ................... 41
Resetting the File Number ............................. 42
Creating Play List ........................................... 42
Playing Back Play List ................................... 43
DPOF Print Setting ........................................ 46
Direct Printing with a PictBridge Printer ......... 47
MENU SETTINGS 48
Changing the Menu Settings ......................... 48
Common Menus for All Modes ...................... 48
Video Recording Menus ................................ 50
Video Playback Menus .................................. 50
Still Image Recording Menus ......................... 51
Still Image Playback Menus ........................... 51
REFERENCES 52
Troubleshooting ............................................. 52
Warning Indications ....................................... 54
Cleaning the Camera ..................................... 56
Cautions ......................................................... 57
Specifications ................................................. 60
TERMS ............................................... Back cover
Contents

4 EN
SAFETY PRECAUTIONS
Dear Customer,
Thank you for purchasing this hard disk camera.
Before use, please read the safety information
and precautions contained in the pages 4 – 5 to
ensure safe use of this product.
WARNING: TO PREVENT FIRE OR SHOCK
HAZARD, DO NOT EXPOSE THIS UNIT TO
RAIN OR MOISTURE.
CAUTIONS:
● This camera is designed to be used with
NTSC-type color television signals. It cannot
be used for playback with a television of a
different standard. However, live recording and
LCD monitor playback are possible anywhere.
● Use the JVC BN-VF707U battery pack and, to
recharge it or to supply power to the camera
from an AC outlet, use the provided multi-
voltage AC adapter. (An appropriate
conversion adapter may be necessary to
accommodate different designs of AC outlets in
different countries.)
CAUTION
RISK OF ELECTRIC SHOCK
DO NOT OPEN
CAUTION: TO REDUCE THE RI K OF ELECTRIC S SHOCK,
DO NOT REMOVE COVER (OR BACK).
NO U ERVICEABLE PARTSER-S S IN
SIDE.
REFER ONNEL. SERVICING TO QUALIFIED SERVICE PERS
The lightning fl h with as arrowhe d a sym n bol, within a
equilateral triangle, is intended to alert the er to the us
pre nin ngerosence of u sulated "da us voltage" within the
product' y gnit de s enclosure that ma be of sufficient ma u
to con tit te ri k of electric s u a s shock to persons.
The excl tion point within n ea ama quilateral tri ngle ia s
intended to er to the pre ence of importalert the us s ant
oper ting inten tra and ma ance (servicing) ins uctions in
the liter re ccomp nying the a uta a appli nce.a
NOTES:
● The rating plate and safety caution are on the
bottom and/or the back of the main unit.
● The serial number plate is on the battery pack
mount.
● The rating information and safety caution of the
AC adapter are on its upper and lower sides.
This product has a fluorescent lamp that contains
a small amount of mercury. Disposal of these
materials may be regulated in your community
due to environmental considerations.
For disposal or recycling information please
contact your local authorities, or the Electronics
Industries Alliance:
<http://www.eiae.org>
When the equipment is installed in a cabinet or
on a shelf, make sure that it has sufficient space
on all sides to allow for ventilation (10 cm (3-15/
16") or more on both sides, on top and at the
rear).
Do not block the ventilation holes.
(If the ventilation holes are blocked by a
newspaper, or cloth etc. the heat may not be able
to get out.)
No naked flame sources, such as lighted candles,
should be placed on the apparatus.
When discarding batteries, environmental
problems must be considered and the local rules
or laws governing the disposal of these batteries
must be followed strictly.
The apparatus shall not be exposed to dripping or
splashing.
Do not use this equipment in a bathroom or
places with water.
Also do not place any containers filled with water
or liquids (such as cosmetics or medicines, flower
vases, potted plants, cups etc.) on top of this unit.
(If water or liquid is allowed to enter this
equipment, fire or electric shock may be caused.)

EN 5
IMPORTANT SAFETY INSTRUCTIONS
1. Read these instructions.
2. Keep these instructions.
3. Heed all warnings.
4. Follow all instructions.
5. Do not use this apparatus near water.
6. Clean only with dry cloth.
7. Do not block any ventilation openings. Install in
accordance with the manufacturer’s instructions.
8. Do not install near any heat sources such as
radiators, heat registers, stoves, or other
apparatus (including amplifiers) that produce
heat.
9. Only use attachments/accessories specified by
the manufacturer.
10. Use only with the
cart, stand, tripod,
bracket, or table
specified by the
manufacturer, or
sold with the
apparatus. When a
cart is used, use
caution when
moving the cart/
apparatus combination to avoid injury from tip-
over.
11. Unplug this apparatus during lightning storms or
when unused for long periods of time.
12. Refer all servicing to qualified service
personnel. Servicing is required when the
apparatus has been damaged in any way, such
as power-supply cord or plug is damaged, liquid
has been spilled or objects have fallen into the
apparatus, the apparatus has been exposed to
rain or moisture, does not operate normally, or
has been dropped.
Do not point the lens directly into the sun. This
can cause eye injuries, as well as lead to the
malfunctioning of internal circuitry. There is also a
risk of fire or electric shock.
CAUTION!
The following notes concern possible physical
damage to the camera and to the user.
Carrying or holding the camera by the LCD
monitor can result in dropping the unit, or in a
malfunction.
Do not use a tripod on unsteady or unlevel
surfaces. It could tip over, causing serious
damage to the camera.
CAUTION!
Connecting cables (Audio/Video, S-Video, etc.) to
the camera and leaving it on top of the TV is not
recommended, as tripping on the cables will
cause the camera to fall, resulting in damage.

6 EN
Before Using this Camera
This camera records video in MPEG2 format
compliant with SD-VIDEO format.
Remember that this camera is not compatible
with other digital video formats.
Remember that this camera is intended for
private consumer use only.
Any commercial use without proper permission is
prohibited. (Even if you record an event such as a
show, performance or exhibition for personal
enjoyment, it is strongly recommended that you
obtain permission beforehand.)
Do not strike or shake the hard disk.
Before recording important video, be sure to
make a trial recording.
Play back your trial recording to make sure the
video and audio have been recorded properly.
Make a backup of important recorded data
Protect your important recorded data by copying the
files to PC. It is recommended to copy it from your
PC to a DVD or other recording media for storage.
Refer to the software installation and USB
connection guide.
Important notes when requesting repair or
inspection
When the camera is repaired or inspected, data
may be erased, and the hard disk may be formatted.
Back up all data before requesting repair or
inspection.
If a problem occurs with the SD Memory Card,
bring the card together with the camera.
When requesting repairs for breakdowns by your
dealer or JVC service center, be sure to bring your
camera together with the SD Memory Card. If one
of them is not included, the cause cannot be
diagnosed, and the repair cannot be made properly.
Important notes for destroying and disposing of
camera
When formatting or erasing data using the camera
or PC functions, only the file administration
information is changed. The data is not completely
erased from the hard disk. If you want to completely
erase all of the data, we recommend either using
commercially available software that is specially
designed for that purpose, or by physically
destroying the camera with a hammer etc.
Also read “Cautions” on pages 57 to 59.
● Manufactured under license from Dolby
Laboratories. “Dolby” and double-D symbol are
trademarks of Dolby Laboratories.
●
MascotCapsule is registered trademark of HI
CORPORATION in Japan.
Copyright © 2001 HI CORPORATION. All rights
reserved.
● Other product and company names included in
this instruction manual are trademarks and/or
registered trademarks of their respective holders.

EN 7
GETTING STARTED
GETTING STARTED
a AC Adapter AP-V14U
b Battery Pack BN-VF707U
c Audio/Video Cable
d USB Cable (Refer to the software installation
and USB connection guide.)
e Shoulder Strap (See page 8 for attachment)
f Lens Cap (See page 8 for attachment)
g CD-ROM
h Remote Control Unit RM-V730U
i Lithium Battery CR 2025* (for remote control
unit)
j Core Filter for Cables (See page 9 for
attachment)
Large-A (x 1): Audio/Video Cable
Large-B (x 2): USB/S-Video Cable
Small (x 1): DC Cord
* A lithium battery is pre-installed in the remote
control unit at time of shipment (with insulation
sheet). To use the remote control unit, remove the
insulation sheet.
NOTES:
● In order to maintain optimum performance of the
camera, provided cables may be equipped with
one or more core filter. If a cable has only one
core filter, the end that is closest to the filter
should be connected to the camera.
● Make sure to use the provided cables for
connections. Do not use any other cables.
Provided Accessories

8 EN
GETTING STARTED
Attaching the Shoulder Strap
Follow the illustration.
1 Open the velcro strip.
2 Thread the strap through the eyelet.
3 Fold it back and thread it through the strap
guide and the buckle.
● To adjust the length of the strap, loosen and then
tighten the strap in the buckle.
4 Slide the strap guide fully towards the eyelet.
5 Close the velcro strip.
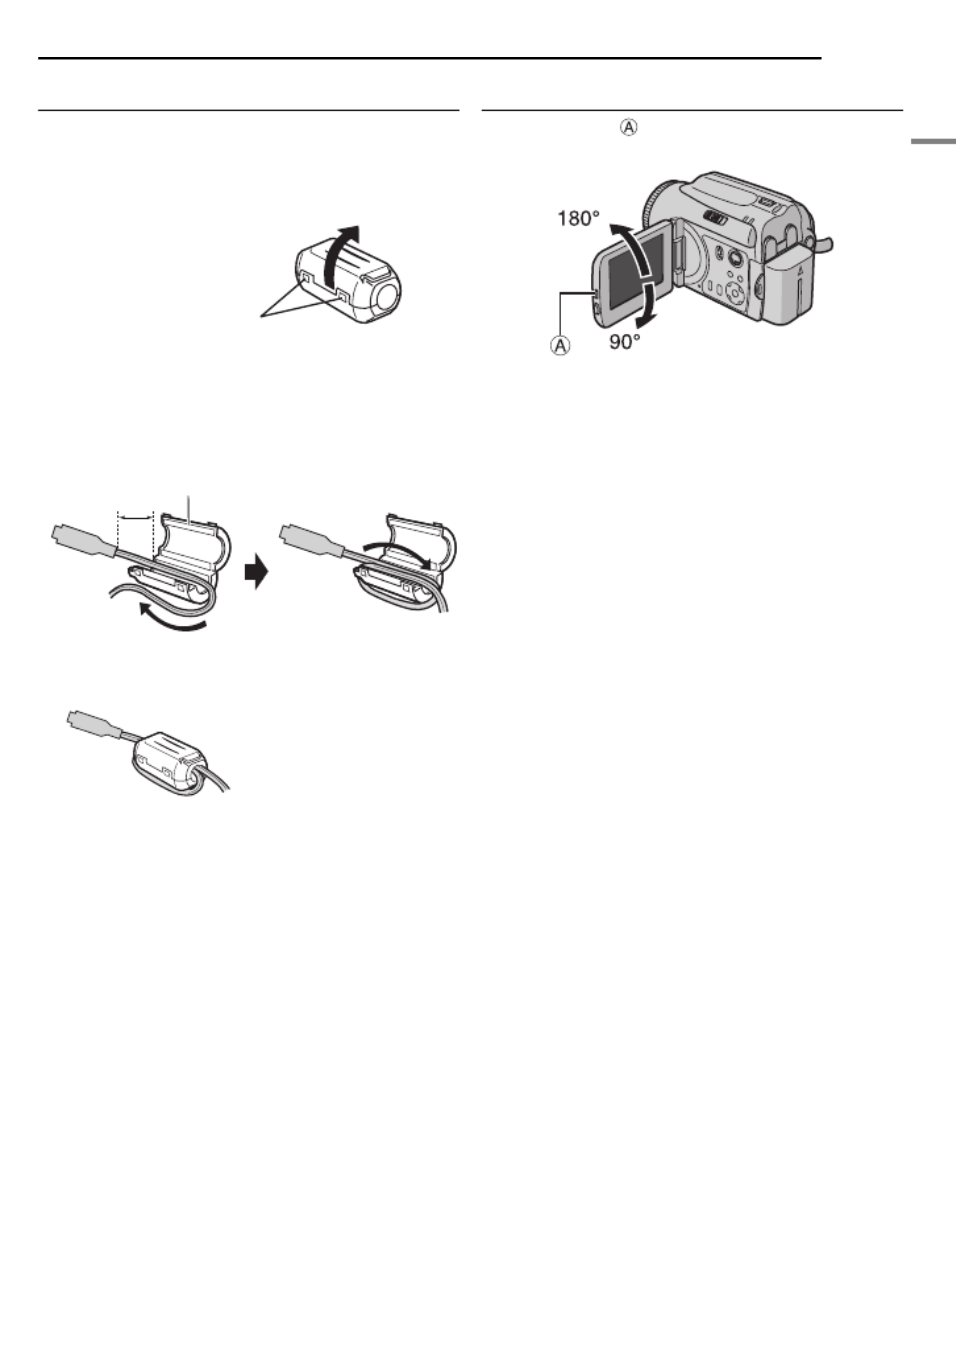
Attaching the Lens Cap
To protect the lens,
attach the provided lens
cap to the camera as
shown in the illustration.
NOTE:
To confirm the lens cap is
on correctly, make sure the
cap is flush to the camera.
1
4
5
2
3
Strap Guide
Buckle
Eyelet
Place here during
recording.
GETTING STARTED
EN 9
GETTING STARTED
Attaching the Core Filter
Attach the core filters to the cables. The core
filter reduces interference.
1 Release the stoppers on both ends of the
core filter.
2 Run the cable through the core filter, leaving
approx. 3 cm of cable between the cable plug
and the core filter.
Wind the cable once around the outside of the
core filter as shown in the illustration.
● Wind the cable so that it is not slack.
3 Close the core filter until it clicks shut.
NOTES:
● Take care not to damage the cable.
● When connecting a cable, attach the end with the
core filter to the camera.
LCD Monitor
Pull on the end of the LCD monitor and open
the LCD monitor fully. It can rotate 270°.
Stopper
Wind once.
Core Filter
3 cm (1-3/16")
10 EN
GETTING STARTED
Index
A
TTENTION:
● Be careful not to cover b, , c d, and e during
shooting.
● Be careful not to cover Y during playback.

GETTING STARTED
EN 11
GETTING STARTED
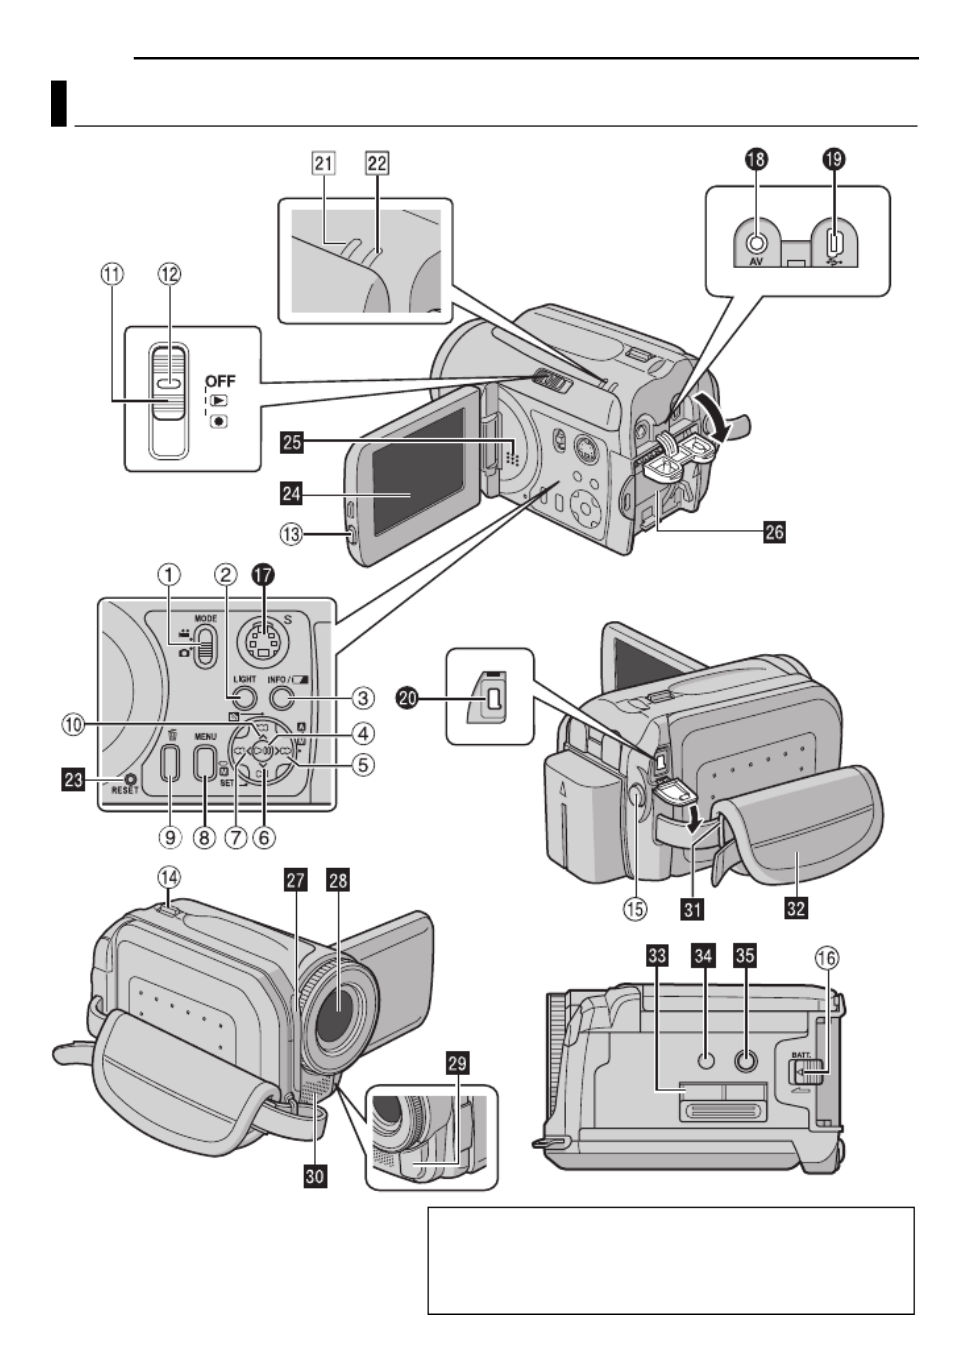
Controls
aMode Switch [MODE] (墌pg. 17)
bLight Button [LIGHT] (墌pg. 31)
cInformation Button [INFO/ ] (墌pg. 38)
dPlay/Pause Button [49] (墌pg. 24, 29)
eForward Search Button [ (
5
)] (墌pg. 25)/
Right Button [ ]/Auto/Manual Mode Switch
[/] (墌pg. 17)
fForward Skip Button [ ] (墌pg. 25)/Down
Button [ ]/Manual Set Button [ SET]
(墌pg. 32)
gReverse Search Button [ (
3
)] (墌pg. 25)/
Left Button [ ]
hMenu Button [MENU] (墌pg. 48)
iDelete Button [ ] (墌pg. 39)
jReverse Skip Button [ ] (墌pg. 25)/Up
Button [ ]/Backlight Compensation Button
[ ] (墌pg. 31)/Spot Exposure Control
Button (墌pg. 31)
kPower Switch [OFF, , ] (墌pg. 17)
lLock Button (墌pg. 17)
m LCD Lock Button
nZoom Lever [T/W] (墌pg. 23)
Speaker Volume Control (墌pg. 24)
oRecording Start/Stop Button (墌pg. 22, 28)
pBattery Release Button [BATT.] (墌pg. 14)
Connectors
The connectors are located beneath the covers.
QS-Video Output Connector [S] (墌pg. 26)
R Audio/Video Output Connector [AV]
S USB (Universal Serial Bus) Connector (Refer
to the software installation and USB
connection guide.)
TDC Input Connector [DC] (墌pg. 14)
Indicators
U Power/Charge Lamp [POWER/CHARGE]
(墌pg. 14, 17)
V Access Lamp [ACCESS] (Lights up or blinks
when you access to any files. Do not turn off
the power or remove the battery pack/AC
adapter while accessing to files during
recording or playback.)
Other Parts
WReset Hole [RESET] (墌pg. 52)
X LCD Monitor
YSpeaker (墌pg. 24)
aBattery Pack Mount (墌pg. 14)
bRemote Sensor (墌pg. 27)
Camera Sensor
c Lens
dLED Light (墌pg. 31)
e Stereo Microphone
fShoulder Strap Eyelet (墌pg. 8)
gGrip Strap (墌pg. 19)
hSD Card Cover (墌pg. 20)
iStud Hole (墌pg. 19)
jTripod Mounting Socket (墌pg. 19)

12 EN
GETTING STARTED
Indications on LCD Monitor
During both Video and Still Image Recording
aManual Mode Indicator (墌pg. 17)
: Auto Mode
: Manual Mode
bTele Macro Mode Indicator (墌pg. 50)
cApproximate Zoom Ratio (墌pg. 23, 50)
dZoom Indicator (墌pg. 23, 50)
eIris Lock Indicator (墌pg. 31, 32)
fWhite Balance Indicator (墌pg. 34)
gBrightness Control Indicator (墌pg. 19, 49)
hBattery Indicator (墌pg. 54)
iDate/Time (墌pg. 49)
jSelected Medium Indicator (墌pg. 21, 49)
kDrop Detection Indicator (墌pg. 21)
l Manual Focus Adjustment Indicator
(墌pg. 33)
mEffect Mode Indicator (墌pg. 36)
nProgram AE Mode Indicator (墌pg. 36)
oShutter Speed (墌pg. 35)
: Nightalive Indicator
pLight Indicator (墌pg. 31)
q±: Exposure Adjustment Indicator (墌pg. 32)
: Backlight Compensation Indicator
(墌pg. 31)
: Spot Exposure Control Indicator
(墌pg. 31)
During Video Recording only
aMode Indicator (墌pg. 17)
bWide Mode Indicator (墌pg. 50)
cWind Cut Indicator (墌pg. 50)
d Picture Quality: [U] (ultra fine), [F] (fine), [N]
(normal), [E] (economy) (墌pg. 50)
eRemaining Time (墌pg. 22, 62)
fCounter (墌pg. 49)
g 7REC: (Appears during recording.)
(墌pg. 22)
79: (Appears during record-standby mode.)
(墌pg. 22)
h Digital Image Stabilizer (DIS) Indicator
(墌pg. 50)
During Still Image Recording only
aMode Indicator (墌pg. 17)
bFocus Icon (墌pg. 28)
c Image Size: 1152 (1152 x 864)*, 1024 (1024 x
768)*, 640 (640 x 480) (墌pg. 51)
* Not available for GZ-MG30U/GZ-MG20U.
dPicture Quality: FINE (fine) or STD (standard)
(墌pg. 51)
eRemaining Number of Shots (墌pg. 63)
f : Continuous Shooting Mode Indicator
(墌pg. 28)
gShooting Icon (墌pg. 28)
hSelf-Timer Recording Indicator (墌pg. 51)
11: 0AM3
NOV 10. 2005
[0h56m]
FINE
PHOTO

GETTING STARTED
EN 13
GETTING STARTED
During Video Playback
aMode Indicator (墌pg. 17)
b Play List Playback Indicator (Appears when
play list is played back. 墌pg. 43)
c Picture Quality: [U] (ultra fine), [F] (fine), [N]
(normal), [E] (economy) (墌pg. 50)
dPlayback Mode (墌pg. 24)
U : Playback
9 : Pause
5
: Forward High-Speed Search
3
: Reverse High-Speed Search
9U : Forward Slow-Motion
Y9 : Reverse Slow-Motion
(The number on the left shows speed.)
eCounter (墌pg. 49)
f Volume Level Indicator
gBattery Indicator (墌pg. 54)
hDate (墌pg. 49)
iSelected Medium Indicator (墌pg. 21, 49)
jEffect Mode Indicator (墌pg. 37)
kWipe/Fader Effect Indicator (墌pg. 37, 50)
During Still Image Playback
aMode Indicator (墌pg. 17)
b Folder/File Number
cSlide Show Playback Indicator (墌pg. 29)
dBattery Indicator (墌pg. 54)
eDate/Time (墌pg. 49)
fSelected Medium Indicator (墌pg. 21, 49)
NOV 10. 2005
11: 0AM3
NOV 10. 2005

14 EN
GETTING STARTED
This camera’s 2-way power supply system lets
you choose the most appropriate source of
power. Do not use provided power supply units
with other equipment.
Charging the Battery Pack
1 Set the power switch to OFF.
2 With the arrow on the battery pack pointing
downward, push the battery pack slightly against
the battery pack mount.
● If the battery mount cover is attached, remove it
by sliding BATT.
3 Slide down the battery pack until it locks in
place.
4 Connect the AC adapter to the camera.
5 Plug the AC adapter into an AC outlet. The
power/charge lamp on the camera blinks to
indicate charging has started.
6 When the power/charge lamp goes out,
charging is finished. Unplug the AC adapter from
the AC outlet. Disconnect the AC adapter from
the camera.
To detach the battery pack
While sliding BATT., remove the battery pack.
* Provided
Power
To AC outlet
Power/Charge Lamp
Battery Pack Mount
AC Adapter
Open the cover.
Power Switch
To DC connector
Lock Button
BATT.
Arrow
Battery Pack
Required charging time
Battery pack Charging time
BN-VF707U* Approx. 1 hr. 30 min.
BN-VF714U Approx. 2 hr. 40 min.
BN-VF733U Approx. 5 hr. 40 min.

GETTING STARTED
EN 15
GETTING STARTED
NOTES:
● This product includes patented and other
proprietary technology and will operate only
with JVC Data Battery. Use the JVC BN-
VF707U/VF714U/VF733U battery packs. Using
generic non-JVC batteries can cause damage
to the internal charging circuitry.
● If the protective cap is attached to the battery
pack, remove it first.
● During charging, the camera cannot be operated.
● Charging is not possible if the wrong type of
battery is used.
● Make sure to use the battery pack with the arrow
( ) mark. The camera does not turn on with the
battery mount cover without the arrow ( ) mark.
● When charging the battery pack for the first time
or after a long storage period, the power/charge
lamp may not light. In this case, remove the
battery pack from the camera, then try charging
again.
● If the battery operation time remains extremely
short even after having been fully charged, the
battery is worn out and needs to be replaced.
Please purchase a new one.
● Since the AC adapter processes electricity
internally, it becomes warm during use. Be sure to
use it only in well-ventilated areas.
● Using the optional AA-VF7 battery charger, you
can charge the BN-VF707U/VF714U/VF733U
battery pack without the camera.
● After 5 minutes has elapsed in record-standby
mode, the camera will automatically turn off its
power supplied from the AC adapter. In this case,
the battery charge starts if the battery is attached
to the camera.
Using the Battery Pack
Perform steps 2 – 3 in “Charging the Battery
Pack”.
Maximum continuous recording time
* Provided
( ): When the LED light is on.
NOTES:
● Recording time is reduced significantly under the
following conditions:
• Zoom or record-standby mode is engaged
repeatedly.
• Playback mode is engaged repeatedly.
● Before extended use, it is recommended that you
prepare enough battery packs to cover 3 times the
planned recording time.
A
TTENTION:
● Before detaching the power source, make sure
that the camera’s power is turned off. Failure to do
so can result in a camera malfunction.
● If the camera is a subject to electrostatic
discharge, turn the power off before using it again.
Battery pack Recording time
BN-VF707U* Approx. 1 hr. 00 min.
(55 min.)
BN-VF714U Approx. 2 hr. 10 min.
(2 hr. 00 min.)
BN-VF733U Approx. 5 hr. 00 min.
(4 hr. 45 min.)

16 EN
GETTING STARTED
Data Battery System
You can check the remaining battery power and
the recordable time.
1 Make sure the battery is attached.
2 Open the LCD monitor fully.
3Press INFO/ repeatedly, and the battery
status screen appears.
● It is displayed for approx. 3 seconds if the
button is pressed and released quickly, and for
approx. 15 seconds if the button is pressed
and held for several seconds.
● If “COMMUNICATING ERROR” appears
instead of the battery status even though you
tried to press INFO/ several times, there
may be a problem with your battery. In such a
case, consult your nearest JVC dealer.
● The recordable time display should only be
used as a guide. It is displayed in 10 minute
units.
Using AC Power
Perform step 4 in “Charging the Battery Pack”.
NOTE:
The provided AC adapter features automatic voltage
selection in the AC range from 110 V to 240 V.
About Batteries
DANGER! Do not attempt to take the batteries
apart, or expose them to flame or excessive
heat, as it may cause a fire or explosion.
WARNING! Do not allow the battery or its
terminals to come in contact with metals, as this
can result in a short circuit and possibly start a
fire.
To resume the original function of the
accurate battery power indication
If the battery power indication differs from the
actual operating time, fully charge the battery,
and then run it down. However this function may
not turn back if the battery was used for a long
period of time under extremely high/low
temperature condition or charged too many
times.

GETTING STARTED
EN 17
GETTING STARTED
To turn on the camera, set the power switch to
or while pressing down the lock button
located on the switch.
● The power/charge lamp turns on.
To turn off the camera, set the power switch to
OFF.
Set the appropriate operation mode according to
your preference using the power and MODE
switches and ( / ) button.
1 Power Switch Position
Set the power switch for recording ( ) or
playback ( ) while pressing down the lock
button.
2 Recording/Playback Mode
Select the recording/playback mode using the
MODE switch.
: Video mode (墌pg. 22, 24)
: Still image mode (墌pg. 28, 29)
3 Auto/Manual Mode
Press and hold ( / ) to switch the auto/
manual recording mode. When manual mode is
selected, the indicator appears on the LCD
monitor.
To return to the auto recording mode
Press and hold ( / ) again so that the
indicator appears.
4 Power-Linked Operation
When the power switch is set to , you can
also turn on/off the camera by opening/closing
the LCD monitor.
Operation Mode
Power Switch
MODE Lock Button
Power/Charge Lamp
1
2
3
LCD Monitor
Power Switch
Power Off
Playback
Recording
Auto mode:
You can record using no special
effects or manual adjustments.
Manual mode:
Manual recording is possible by
setting various functions.
(墌pg. 31 – 37)

18 EN
GETTING STARTED
The language on the display can be changed.
(墌pg. 48, 49)
1Set the power switch to or .
2 Press MENU. The menu screen appears.
3Press / to
select [DISPLAY], then
press 49.
4Press / to
select [LANGUAGE],
then press 49.
5Press / to
select the desired
language, then press
49.
6 Press MENU to return to the normal screen.
The recording start date/time is recorded on the
video/still image file and it can be checked by
pressing INFO during playback. (墌pg. 24, 29)
In addition, you can find the desired file by the
date index screen. (墌pg. 30)
1Set the power switch to or .
2 Press MENU. The menu screen appears.
3Press / to
select [DISPLAY], then
press 49.
4Press / to
select [CLOCK
ADJUST], then press
49. The month is
highlighted.
5Press / to input
the month, then press
49. Repeat to input the
day, year, hour and
minute.
6 Press MENU to
return to the normal screen.
Built-in Clock’s Rechargeable Lithium
Battery
If the camera is not used for approx. 3 months,
the clock’s lithium battery will become
discharged and the date/time stored in memory
will be lost. When this occurs, first connect the
camera to an AC outlet using the AC adapter for
over 24 hours to charge the clock’s rechargeable
lithium battery. Then perform the date/time
setting before using the camera.
Note that the camera can be used without
setting the date/time.
Language Setting
CAMERA SETTING
BASIC SETTING
REC MEDIA SETTING
DISPLAY
QUALITY
WIDE MODE
WIND CUT
SCENE COUNTER
LANGUAGE
CLOCK ADJUST
BRIGHT
DATE/TIME
Date/Time Settings
CAMERA SETTING
BASIC SETTING
REC MEDIA SETTING
DISPLAY
QUALITY
WIDE MODE
WIND CUT
LANGUAGE
CLOCK ADJUST
BRIGHT
DATE/TIME
SCENE COUNTER
CLOCK ADJUST
JAN 31
AM
11 07:
DATE TIME
2005

GETTING STARTED
EN 19
GETTING STARTED
The brightness of the display can be adjusted.
1Set the power switch to or while
pressing down the lock button located on the
switch.
2Open the LCD monitor fully. (墌pg. 9)
3 Press MENU. The menu screen appears.
4Press / to select [DISPLAY], then press
49.
5Press / to select
[BRIGHT], and press 49.
The brightness control
indicator appears.
6Press / until the appropriate brightness
is reached.
7 Press 49 to clear the brightness control
indicator from the display.
1 Adjust the velcro strip.
2 Pass your right hand
through the loop and grasp
the grip.
3 Adjust your thumb and
fingers through the grip to
easily operate the
recording start/stop button,
power switch and zoom
lever. Be sure to fasten the
velcro strip to your
preference.
To attach the camera to a
tripod, align the direction
stud and screw to the
mounting socket and
stud hole on the camera.
Then tighten the screw
clockwise.
● Some tripods are not
equipped with studs.
Brightness Adjustment of the
Display
Grip Adjustment
Tripod Mounting

20 EN
GETTING STARTED
You can use an SD card as a recording medium
in the SD slot. See page 62 for the guaranteed
media to work with this camera.
1 Make sure the camera’s power is off.
2 Open the SD card cover.
3 To insert an SD card, firmly insert it with its
clipped edge first.
To remove an SD card, push it once. After the
SD card comes out of the camera, pull it out.
● Do not touch the terminal on the reverse side of
the label.
4 Close the SD card cover.
To protect valuable files
Slide the write/erase protection tab on the side
of the SD card in the direction of “LOCK”. This
prevents the SD card from being recorded over.
To record on this SD card, slide the tab back to
the position opposite to “LOCK” before inserting
it.
NOTE:
Before using a new SD card, it is necessary to
format the card. (墌pg. 20)
A
TTENTION:
Do not insert or remove the SD card while the
camera is turned on, as this may cause the SD card
to be corrupted or cause the camera to become
unable to recognize whether or not the SD card is
installed.
You can format (initialize) the built-in hard disk
(HDD) or SD cards. You have to format the
newly-purchased SD cards with this camera
before using them. This enables stable speeds
and operation when accessing the recording
medium. Be aware that all files and data
including protected files will be erased.
(墌pg. 38)
1Set the power switch to or .
2 Press MENU. The menu screen appears.
3Press / to select
[REC MEDIA SETTING],
then press 49.
4Press / to select
[FORMAT], then press
49.
5Press / to select
[HDD] or [SD], then
press 49.
6Press / to select [EXECUTE], then
press 49.
● By pressing the 49 button while selecting [HDD]
and holding down the button in step 5, you can
erase the data on the hard disk in a format that is
difficult to recover. Moreover, by repeating this
procedure, you can make the data even more
difficult to recover. When formatting in this way, a
formatting progress bar is displayed.
● To cancel the formatting, select [CANCEL], then
press 49.
CAUTION:
Do not remove the SD card or perform any other
operation (such as turning off the power) during
format. Also, be sure to use the provided AC
adapter, as the recording medium may be corrupted
if the battery becomes exhausted during format. If
the recording medium becomes corrupted, format it
again.
NOTE:
Do not format the recording medium on the PC.
Make sure to format the recording medium on the
camera.
Inserting/Removing an SD Card
SD Card (optional)
Clipped Edge
SD Card Cover
Label
Write/Erase
Protection Tab
SD Slot
Formatting a Recording Medium
DIS
CAMERA SETTING
BASIC SETTING
REC MEDIA SETTING
DISPLAY
QUALITY
WIDE MODE
VIDEO MODE
IMAGE MODE
FORMAT
CLEAN UP
COPY/MOVE

GETTING STARTED
EN 21
GETTING STARTED
Select the recording medium before starting
recording or playback. (墌pg. 48, 49)
Example: When recording still images to an SD
card
1Set the power switch to or .
2 Press MENU. The menu screen appears.
3Press / to select
[REC MEDIA SETTING],
then press 49.
4Press / to select
[IMAGE MODE], then
press 49.
5Press / to select
[SD], then press 49.
6 Press MENU to return
to the normal screen.
This enables you to check the remaining space
on the recording media and the available
recording time for each picture quality mode.
Before checking, set the recording media that
you want to check in [REC MEDIA SETTING].
(墌pg. 48, 49)
Example: When checking the HDD space
1Set the power switch to .
2 Press INFO
/ . The
MAX RECORDING TIME
screen appears.
Displayed picture
quality mode
: ULTRA FINE
: FINE
: NORMAL
: ECONOMY
For details on the picture quality, see page 50.
To return to the normal screen
Press INFO/ repeatedly.
This function turns off the power automatically to
prevent HDD damage when the camera is
accidentally dropped. This function is set to on
at time of shipment.
If the power is turned off due to the drop
detection function, set the power switch to OFF,
and turn the power on again.
To turn off this function
Set [DROP DETECTION] to [OFF]. The
indicator appears. (墌pg. 49)
CAUTION:
Setting this function to off increases the chances of
damaging the internal hard disk if the camera is
accidentally dropped.
NOTES:
● This function cannot protect the hard disk every
single time it is dropped.
●The indicator is only displayed when this
function is set to [OFF]. For normal use, set this
function to [ON].
● If the drop detection function operates when the
camera has not been dropped, set the function to
[OFF] to continue use.
● If a drop is detected during shooting, the file being
shot when the camera was dropped may be saved
in the [EXTMOV] folder. (墌pg. 22)
Selecting a Recording Medium
Remaining Space on the Recording
Media
DIS
CAMERA SETTING
BASIC SETTING
REC MEDIA SETTING
DISPLAY
QUALITY
WIDE MODE
NO. RESET
VIDEO MODE
IMAGE MODE
FORMAT
CLEAN UP
MAX RECORDING TIME
FREE
USED
Drop Detection
22 EN
VIDEO RECORDING & PLAYBACK
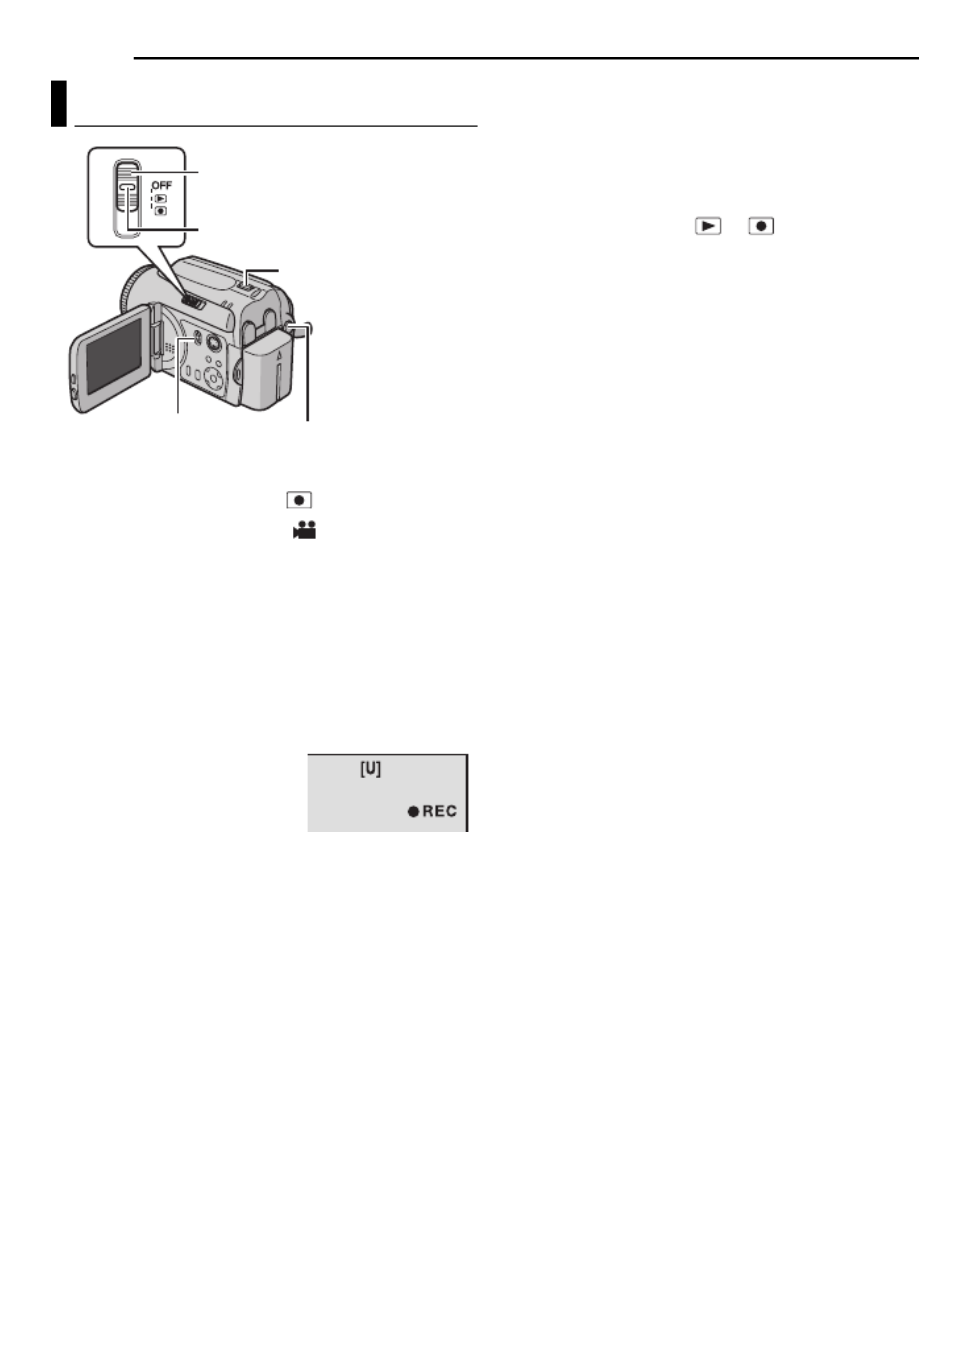
1Set the power switch to .
2Set the MODE switch to .
● The camera is programmed to record videos on
the built-in hard disk by the factory-preset. To
switch the recording medium, see pages 21, 48
and 49.
● To change the picture quality, see pages 48 and
50.
● To use the light, see page 31.
3 Press the recording start/stop button to start
recording.
● Approximate remaining time
for recording appears on
the display.
4 To stop recording, press
the recording start/stop button again.
NOTES:
● If the camera is left without any operation during
recording or playback (video or still image) for
5 minutes when using the battery pack, the
camera is turned off automatically to conserve
power. To turn the camera on again, set the power
switch to OFF, then to or . When using the
AC adapter, the camera enters the sleep mode
(the access lamp lights and the LCD monitor turns
off). To cancel the sleep mode, perform any
operation such as zooming.
● When the camera heats up, the 7REC indicator
flashes. If the camera continues to heat up,
shooting may be stopped to protect the recording
medium. In this case, turn off the camera power,
and then wait until the camera cools down.
(墌pg. 55)
● If data cannot be recorded or saved properly, the
video files are not saved to the [SD_VIDEO] folder
for regular video. Instead, the files are saved to
the [EXTMOV] folder. To play back these files, see
“To play back files in the [EXTMOV] folder”
(墌pg. 24).
● There may be differences in the brightness
between the recorded video and still image, even
if the same subject is shot.
● Video file names are assigned as sequential
hexadecimal numbers. For example, starts from 1
to 9 followed by A to F.
● To turn the operation sounds off, see page 48.
● For approximate recording time, see page 62.
● After recording video for 12 consecutive hours, the
recording will be stopped automatically.
● When recording video, a new file will be created
for every 4 GB of contiuous shooting.
Video Recording
Power Switch
Recording Start/Stop
Button
Zoom Lever
MODE
Lock Button
[0h56m]

VIDEO RECORDING & PLAYBACK
EN 23
VIDEO RECORDING & PLAYBACK
Zooming
Use the zoom function for close-up or wide-
angle shooting. You can zoom in up to 15x* by
using the optical zoom.
To zoom in
Slide the zoom lever towards T (telephoto).
To zoom out
Slide the zoom lever towards W (wide-angle).
● The further you slide the zoom lever, the quicker
the zoom action.
● Zoom magnification over 15x* is done through
digital image processing, and is therefore called
digital zoom. Digital zooming is possible up to
700x*. Set [ZOOM] to [60X] or [700X]*. (墌pg. 50)
* For GZ-MG30U/GZ-MG20U optical zoom can go
up to 25x, digital zoom – up to 800x, and [ZOOM]
can be set to [100X] or [800X].
NOTES:
● The S-Video cable is optional. Be sure to use the
YTU94146A S-Video cable. Consult the JVC
Service Center described on the sheet included in
the package for details on its availability. Make
sure to connect the end with a core filter to the
camera. The core filter reduces interference.
● Focusing may become unstable during zooming.
In this case, set the zoom before recording and
lock the focus by using the manual focus
(墌pg. 33), then zoom in or out during recording.
● During digital zoom, the quality of image may
suffer.
● Macro shooting is possible as close as approx.
5 cm (2") to the subject when the zoom lever is set
all the way to W.
● When you zoom into a subject close to the lens,
the camera may automatically zoom out
depending on the distance to the subject. In this
case, set [TELE MACRO] to [ON]. (墌pg. 50)
Deleting Files
If you press during recording mode, the file
recorded most recently will be deleted.
(墌pg. 39)
● However, if the recording mode (video or still
image) is switched or the power is turned off and
on again after recording, you cannot delete the
file.
Digital zoom zone
T: Telephoto
15x* (Optical) zoom
zone
Approximate zoom
ratio
W: Wide angle

24 EN
VIDEO RECORDING & PLAYBACK
1Set the power switch to .
2Set the MODE switch to .
● The index screen for videos appears. The image
on the index screen shows the first part of the
shooting.
● If the power is turned off while video playback is
paused, the camera memorizes the scene where
the video was stopped. In this case, the stopped
scene is displayed when the power is turned back
on again.
●
To switch the medium to be played back, see pages
21, 48 and 49.
3Press / / / to select the video file
you want to play back.
4 Press 49 to start playback.
5 To pause playback, press 49 again.
To return to the index screen
Slide the zoom lever to W when playback is
paused.
To adjust the speaker volume
During playback slide the zoom lever towards T
to turn up the volume, or towards W to turn down
the volume.
To turn on/off the date display
Set [DATE/TIME] to [ON], [AUTO] or [OFF].
(墌pg. 48, 49)
To turn on/off the on-screen display
Press INFO/ repeatedly.
To check the file information
Press INFO/ when playback is paused.
(墌pg. 38)
To play back files in the [EXTMOV] folder
If the data cannot be recorded properly, the
video files are saved to the [EXTMOV] folder.
(墌pg. 22)
To play back the files in the [EXTMOV] folder,
press the recording start/stop button or START/
STOP button on the remote control while the
index screen is displayed in step 2, and then
proceed to step 3 after [MPG] is displayed.
To return to the index screen, press the
recording start/stop button or START/STOP
button on the remote control again.
● The file information and playlist creation functions
are not available for files in the [EXTMOV] folder.
● When you delete the files in the [EXTMOV] folder,
perform it on the PC.
NOTES:
● The playback picture can be viewed in the LCD
monitor or on a connected TV. (墌pg. 26)
● At the junctions between scenes, the image may
stop momentarily or the sound may be
interrupted. However, this is not a malfunction.
● The date and counter can be displayed during
playback. (墌pg. 49)
● When the camera heats up, the U indicator
flashes. If the camera continues to heat up,
playback may be stopped to protect the recording
medium. In this case, turn off the camera power,
and then wait until the camera cools down.
(墌pg. 55)
● When a cable is connected to the AV connector,
the sound is not heard from the speaker.
Video Playback
Power Switch
Lock Button
49
Zoom Lever
INFO/
MODE
Speaker

VIDEO RECORDING & PLAYBACK
EN 25
VIDEO RECORDING & PLAYBACK
How to Use the Scroll Bar
You can use the vertical scroll bar on the index
screen to find the desired files quickly. The scroll
bar is useful when deleting files (墌pg. 39),
creating play list (墌pg. 42), etc.
1 Slide the zoom lever
towards W to select the
scroll bar on the index
screen.
2Press / to
display the next or
previous page.
●If you press and hold /
, the high speed search starts.
● If you find the desired file, slide the zoom lever
towards T, then select the file.
Date Index Screen
You can also find the desired file by the date
index screen. The files are sorted according to
their recorded date.
1 Slide the zoom lever
twice towards W. The
date index screen
appears.
2Press / to select
the desired date. The
files recorded on the selected date are displayed
on the right side of the screen.
● To display the next or previous date, select the
scroll bar by sliding the zoom lever towards W,
and press / .
3 Press 49. The files recorded on the
selected date are displayed in the index screen.
Various Playback Operations
Still playback (Pause)
Press 49 during normal playback.
● To resume normal playback, press 49 again.
Search playback
During normal playback, press for forward
search, or for reverse search.
● Pressing or repeatedly increases the
search speed for each direction. (–60x to
+60x)
● To resume normal playback, press 49.
Locating the start point of the file or skip the
file
Press to locate the start point of the next file.
Pressing repeatedly skips files in forward
direction.
Press to locate the start point of the current
file. Pressing repeatedly skips files in reverse
direction.
●If you press or during normal playback
or search, playback resumes after locating the
start point of a file.
Frame-by-frame playback
While playback is paused, press or .
●Pressing or repeatedly advances or
reverses the still picture frame by frame.
● To resume normal playback, press 49.
Slow motion playback
While playback is paused, press and hold or
for over 2 seconds.
● To stop slow motion playback, press 49.
Playback Zoom
You can magnify the playback image up to 5x.
1 During normal playback, at the point you want
to zoom in, press 49 to pause playback.
2 Slide the zoom lever towards T to zoom in.
● The full view of the image is displayed in the small
screen on the lower right side. The mark
indicates the center point of the magnified area.
3Press / / / to move to the magnified
area you want to view.
4 To zoom out, slide the zoom lever towards W.
● When the zoom is set all the way to W (wide-
angle) side, sliding the zoom lever to W switches
the display to the index screen. (墌pg. 25)
Deleting Video Files
Press , then press / to select
[EXECUTE] and press 49.
●
You can select the desired file to be deleted by
pressing / .
● To delete multiple files at once, see page 39.
VIDEO 7/53
Scroll bar
DATE INDEX
AUG 20 2005
AUG 23 2005
SEP 02 2005
AUG 13 2005
JUL 07 2005
26 EN
VIDEO RECORDING & PLAYBACK
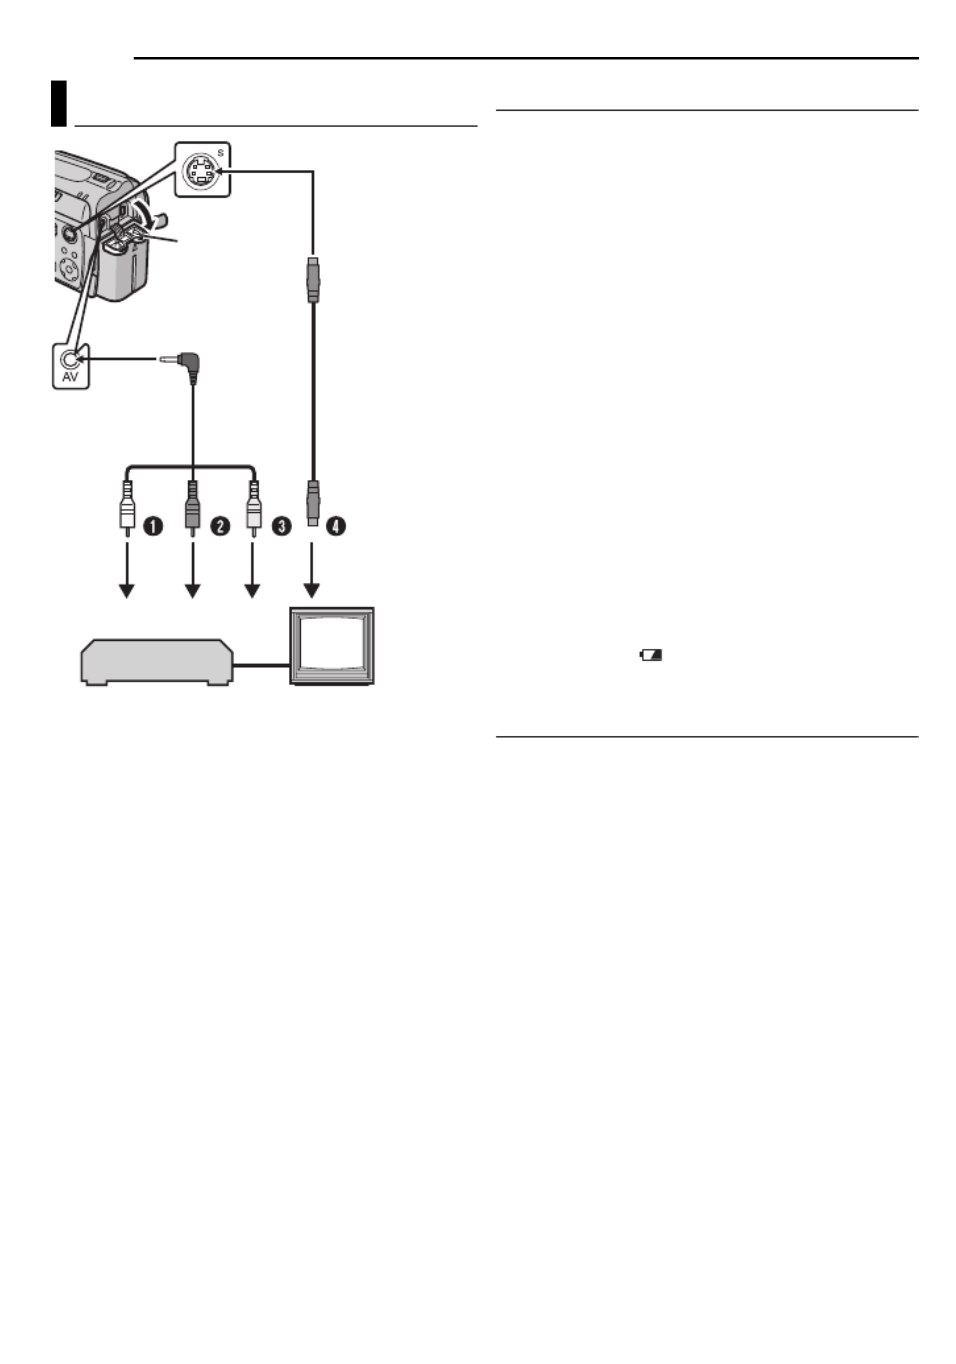
A White to AUDIO L IN*
B Red to AUDIO R IN*
C Yellow to VIDEO IN (Connect when your TV/
VCR/VDR has only A/V input connectors.)
D Black to S-VIDEO IN (Connect when your TV/
VCR/VDR has S-VIDEO IN and A/V input
connectors. In this case, it is not necessary to
connect the yellow video cable.)
* Not required for watching still images only.
NOTES:
● The S-Video cable is optional. Be sure to use
the YTU94146A S-Video cable. Consult the
JVC Service Center described on the sheet
included in the package for details on its
availability. Make sure to connect the end with
a core filter to the camera. The core filter
reduces interference.
● It is recommended to use the AC adapter as
the power supply instead of the battery pack.
(墌pg. 16)
● Make sure you adjust the TV sound volume to its
minimum level to avoid a sudden burst of sound
when the camera is turned on.
● To connect the camera to a PC, refer to the
software installation and USB connection guide.
Playback on a TV
1 Make sure all units are turned off.
2 Connect the camera to a TV, VCR or VDR as
shown in the illustration.
If using a VCR or VDR, go to step 3.
If not, go to step 4.
3 Connect the VCR/VDR output to the TV
input, referring to your VCR/VDR’s instruction
manual.
4 Turn on the camera, the VCR/VDR and the
TV.
5 Set the VCR/VDR to its AUX input mode, and
set the TV to its VIDEO mode.
6Start playback on the camera. (墌pg. 24)
To choose whether or not the following
displays appear on the connected TV
● Date/Time
Set [DATE/TIME] to [AUTO], [ON] or [OFF].
(墌pg. 48, 49)
● Counter
Set [SCENE COUNTER] to [ON] or [OFF].
(墌pg. 48, 49)
(Pressing INFO/ button also turns on/off the
displays.)
Dubbing to a VCR (or DVD Recorder)
The following explains how to dub to a VCR.
When dubbing to a DVD recorder, refer to its
instruction manual.
1 Perform steps 1 to 6
above.
2 At the point you want to start dubbing, start
recording on the VCR. (Refer to the VCR’s
instruction manual.)
3 To stop dubbing, stop recording on the VCR,
then stop playback on the camera.
Connecting to a TV, VCR or VDR
TV
VCR/VDR
Open the
cover.
To S connector
AV Cable
(provided)
S Cable
(optional)
To AV connector

VIDEO RECORDING & PLAYBACK
EN 27
VIDEO RECORDING & PLAYBACK
The full-function remote control unit can operate
this camera from a distance as well as the basic
operations (playback, stop, pause, fast-forward
and rewind) of your VCR.
Installing the Battery
The remote control uses
one lithium battery
(CR2025).
1 Pull out the battery
holder by pushing the lock
tab.
2 Insert the battery in the
holder, and be sure to have the “+” mark visible.
3 Slide the holder back in until you hear a click.
Beam Effective Area
When using the remote
control, be sure to point it at
the remote sensor. The
transmitted beam’s
approximate effective
distance for indoor use is 5 m
(16 ft).
Use the remote control in
front of the camera facing
toward the lens.
NOTE:
The transmitted beam may not be effective or may
cause incorrect operation when the remote sensor
is directly exposed to sunlight or powerful lighting.
Buttons and Functions
A Infrared Beam Transmitting Window
● Transmits the beam signal.
B ZOOM (T/W) Buttons
Zoom In/Out (墌pg. 23)
C Up Button
Rotate Button (clockwise) (墌pg. 30)
D Skip Backward Button
E Left Button
F Back Button
GPLAYLIST Button (墌pg. 42)
H START/STOP Button
ISNAPSHOT Button (墌pg. 28)
JINFO Button (墌pg. 38)
K Skip Forward Button
L PLAY/PAUSE Button
M Right Button
N Next Button
O Down Button
Rotate Button (counterclockwise) (墌pg. 30)
P INDEX Button
Q DATE Button
Playback Using the Remote Control
1
1
2
Lock tab
Remote sensor

28 EN
STILL IMAGE RECORDING & PLAYBACK
1Set the power switch to .
2Set the MODE switch to .
● The camera is programmed to record still images
on the built-in hard disk by the factory-preset. To
switch the recording medium, see pages 21, 48
and 49.
● To change the picture quality, see pages 48 and
51.
● To use the light, see page 31.
3 Press the recording start/stop button. PHOTO
indicator appears during shooting. The still
image is recorded.
● To check how the image looks before recording,
press the recording start/stop button halfway and
hold. The indicator appears and stops blinking
when the captured image is focused. To cancel
the recording, release the recording start/stop
button. To record it on the recording medium,
press the recording start/stop button fully.
NOTES:
● There may be differences in the brightness
between the recorded video and still image, even
if the same subject is shot.
● To turn the shutter sound off, see page 48.
● For approximate number of storable images, see
page 63.
Zooming
Use the zoom function for close-up or wide-
angle shooting. For details, see page 23.
Continuous Shooting
If the continuous shooting mode is set to on,
keeping the recording start/stop button pressed
in step 3 in “Still Image Recording” (墌pg. 28)
provides an effect similar to serial photography.
(Interval between still images: approx. 0.5
seconds)
To use this function, set the [CONTINUOUS
SHOOTING] to [ON]. (墌pg. 51) The
indicator appears on the display.
● To turn off this function, set [CONTINUOUS
SHOOTING] to [OFF].
● Continuous shooting may not work well depending
on the recording medium.
● The continuous shooting speed will drop when
repeatedly making continuous shots.
Deleting Files
If you press during recording mode, the file
recorded most recently will be deleted.
(墌pg. 39)
● However, if the recording mode (video or still
image) is switched or the power is turned off and
on again after recording, you cannot delete the
file.
Still Image Recording
Power Switch
Recording Start/Stop
Button
Zoom Lever
MODE
Lock Button

STILL IMAGE RECORDING & PLAYBACK
EN 29
STILL IMAGE RECORDING & PLAYBACK
1Set the power switch to .
2Set the MODE switch to .
● The most recently shot still image is displayed.
● To switch the medium to be played back, see
pages 21, 48 and 49.
3Press to display the previous file. Press
to display the next file.
To turn on/off the date/time display
Set [DATE/TIME] to [ON], [AUTO] or [OFF].
(墌pg. 48, 49)
To turn on/off the on-screen display / To
check the file information (墌pg. 38)
Press INFO/ repeatedly.
NOTES:
● Images shot and stored on the recording media
with another device may not be played back
correctly.
● You can zoom in/out or rotate still images.
(墌pg. 30)
Slide Show
You can playback all the images stored in
recording media automatically.
1Set the power switch to .
2Set the MODE switch to .
● A still image is displayed.
● To switch the medium to be played back, see
pages 21, 48 and 49.
3 Press 49 to start the slide show.
●If you press during the slide show, files are
displayed in descending order.
●If you press during the slide show, files are
displayed in ascending order.
● To end the slide show, press 49 again.
Index Screen of Still Image Files
You can view multiple files stored in a recording
medium at a time. This browsing capability
makes it easy to locate a particular file you want.
1 Slide the zoom lever
to W when a recorded
image is displayed.
● The display switches to
the index screen.
2Press / / / to
move the frame to the
desired file.
3 Press 49. The selected file is displayed.
Still Image Playback
Power Switch
Lock Button
49
Zoom Lever
INFO/
MODE
To display the next
image
To display the
previous image
Slide Show
Normal Playback
STILL IMAGE 7/53
Specyfikacje produktu
| Marka: | JVC |
| Kategoria: | kamera wideo |
| Model: | Everio GZ-MG20 |
Potrzebujesz pomocy?
Jeśli potrzebujesz pomocy z JVC Everio GZ-MG20, zadaj pytanie poniżej, a inni użytkownicy Ci odpowiedzą
Instrukcje kamera wideo JVC

10 Października 2024
20 Września 2024
17 Września 2024
16 Września 2024
13 Września 2024
12 Września 2024
9 Września 2024
8 Września 2024
8 Września 2024
8 Września 2024
Instrukcje kamera wideo
- kamera wideo Sony
- kamera wideo Samsung
- kamera wideo Leica
- kamera wideo Logitech
- kamera wideo Xiaomi
- kamera wideo Sharp
- kamera wideo Braun
- kamera wideo Voltcraft
- kamera wideo Milwaukee
- kamera wideo Philips
- kamera wideo SilverCrest
- kamera wideo Xblitz
- kamera wideo Panasonic
- kamera wideo Canon
- kamera wideo Mio
- kamera wideo Viewsonic
- kamera wideo Nedis
- kamera wideo Medion
- kamera wideo OK
- kamera wideo Lenco
- kamera wideo Fujifilm
- kamera wideo Toshiba
- kamera wideo Hazet
- kamera wideo Garmin
- kamera wideo Salora
- kamera wideo Evolveo
- kamera wideo HP
- kamera wideo Soundmaster
- kamera wideo Hyundai
- kamera wideo SJCAM
- kamera wideo Creative
- kamera wideo Swann
- kamera wideo Nikon
- kamera wideo Kodak
- kamera wideo Cisco
- kamera wideo SBS
- kamera wideo Kenwood
- kamera wideo DJI
- kamera wideo Gembird
- kamera wideo Minox
- kamera wideo Cobra
- kamera wideo Trust
- kamera wideo Linksys
- kamera wideo Thinkware
- kamera wideo AgfaPhoto
- kamera wideo Vimar
- kamera wideo Ricoh
- kamera wideo Renkforce
- kamera wideo Rollei
- kamera wideo Marshall
- kamera wideo Trotec
- kamera wideo Uniden
- kamera wideo DataVideo
- kamera wideo Pyle
- kamera wideo Zoom
- kamera wideo Midland
- kamera wideo Speco Technologies
- kamera wideo Samson
- kamera wideo ARRI
- kamera wideo Olympus
- kamera wideo Navitel
- kamera wideo GoClever
- kamera wideo ION
- kamera wideo Maginon
- kamera wideo Intenso
- kamera wideo Polaroid
- kamera wideo Prestigio
- kamera wideo Konica Minolta
- kamera wideo Sanyo
- kamera wideo Oregon Scientific
- kamera wideo Bresser
- kamera wideo Jay-Tech
- kamera wideo Hama
- kamera wideo GoPro
- kamera wideo Insignia
- kamera wideo Extech
- kamera wideo TomTom
- kamera wideo Denver
- kamera wideo Bushnell
- kamera wideo Berger & Schröter
- kamera wideo Hitachi
- kamera wideo Tracer
- kamera wideo RCA
- kamera wideo Klein Tools
- kamera wideo Genius
- kamera wideo BenQ
- kamera wideo Trevi
- kamera wideo Magellan
- kamera wideo Lexibook
- kamera wideo Overmax
- kamera wideo Sencor
- kamera wideo Insta360
- kamera wideo EasyMaxx
- kamera wideo Blackmagic Design
- kamera wideo DOD
- kamera wideo Steinberg
- kamera wideo Best Buy
- kamera wideo Lamax
- kamera wideo Transcend
- kamera wideo Elmo
- kamera wideo Vitek
- kamera wideo Laserliner
- kamera wideo Vivitar
- kamera wideo Quintezz
- kamera wideo Aiptek
- kamera wideo AEE
- kamera wideo Airis
- kamera wideo ATN
- kamera wideo Activeon
- kamera wideo Energy Sistem
- kamera wideo Easypix
- kamera wideo Nilox
- kamera wideo Flir
- kamera wideo Coby
- kamera wideo Envivo
- kamera wideo TacTic
- kamera wideo Macally
- kamera wideo Bauer
- kamera wideo Naxa
- kamera wideo Mamiya
- kamera wideo Ricatech
- kamera wideo Konig
- kamera wideo Tronje
- kamera wideo Mpman
- kamera wideo Nikkei
- kamera wideo T'nB
- kamera wideo Ematic
- kamera wideo Minolta
- kamera wideo Zagg
- kamera wideo Veho
- kamera wideo Dnt
- kamera wideo Zorki
- kamera wideo Contour
- kamera wideo Iget
- kamera wideo RunCam
- kamera wideo Drift
- kamera wideo SeaLife
- kamera wideo Sakar
- kamera wideo Jobo
- kamera wideo Dragon Touch
- kamera wideo Mediacom
- kamera wideo Kreator
- kamera wideo Contax
- kamera wideo EE
- kamera wideo Traveler
- kamera wideo Contour Design
- kamera wideo Kaiser Baas
- kamera wideo Bluetech
- kamera wideo Braun Phototechnik
- kamera wideo Spypoint
- kamera wideo Kitvision
- kamera wideo Praktica
- kamera wideo MMTC
- kamera wideo Flip
- kamera wideo Kogan
- kamera wideo BlackVue
- kamera wideo Brinno
- kamera wideo DXG
- kamera wideo Storex
- kamera wideo MD 80
- kamera wideo Vupoint Solutions
- kamera wideo Leotec
- kamera wideo Skytronic
- kamera wideo Whistler
- kamera wideo Curve
- kamera wideo PCE Instruments
- kamera wideo CamOne
- kamera wideo Mobius
- kamera wideo ISAW
- kamera wideo Beaulieu
- kamera wideo Revier Manager
- kamera wideo Kobian
- kamera wideo FHD 1080P
- kamera wideo RSC
- kamera wideo Stealth Cam
- kamera wideo Aqua-Vu
- kamera wideo Hamlet
- kamera wideo Qoltec
- kamera wideo Replay
- kamera wideo Akaso
- kamera wideo Hamilton Buhl
- kamera wideo Aida
- kamera wideo Rexing
- kamera wideo IOPLEE
- kamera wideo Moultrie
- kamera wideo Microtek
- kamera wideo Teslong
- kamera wideo Izzo
Najnowsze instrukcje dla kamera wideo

30 Marca 2025
30 Marca 2025
30 Marca 2025
30 Marca 2025
28 Marca 2025
28 Marca 2025
28 Marca 2025
27 Marca 2025
14 Marca 2025
12 Marca 2025