Instrukcja obsługi HP Performance ZR2040w
Przeczytaj poniżej 📖 instrukcję obsługi w języku polskim dla HP Performance ZR2040w (42 stron) w kategorii monitor. Ta instrukcja była pomocna dla 4 osób i została oceniona przez 2 użytkowników na średnio 4.5 gwiazdek
Strona 1/42

HP ZR2040w, ZR2240w, ZR2440w and
ZR2740w LCD Monitors
User Guide

© 2011, 2012 Hewlett-Packard
Development Company, L.P.
Microsoft, Windows, and Windows Vista are
either trademarks or registered trademarks
of Microsoft Corporation in the United
States and/or other countries.
The only warranties for HP products and
services are set forth in the express
warranty statements accompanying such
products and services. Nothing herein
should be construed as constituting an
additional warranty. HP shall not be liable
for technical or editorial errors or omissions
contained herein.
This document contains proprietary
information that is protected by copyright.
No part of this document may be
photocopied, reproduced, or translated to
another language without the prior written
consent of Hewlett-Packard Company.
First Edition (September 2011)
Second Edition (April 2012)
Document Part Number: 647215-002

About This Guide
This guide provides information on setting up the monitor and technical specifications.
WARNING! Text set off in this manner indicates that failure to follow directions could result in bodily
harm or loss of life.
CAUTION: Text set off in this manner indicates that failure to follow directions could result in
damage to equipment or loss of information.
NOTE: Text set off in this manner provides important supplemental information.
iii

iv About This Guide

Table of contents
1 Product Features ............................................................................................................................................ 1
ZR2040w Model ................................................................................................................................... 1
ZR2240w Model ................................................................................................................................... 2
ZR2440w Model ................................................................................................................................... 2
ZR2740w Model ................................................................................................................................... 4
2 Setting Up the Monitor ................................................................................................................................... 5
Installing the Pedestal .......................................................................................................................... 5
Rear Components ................................................................................................................................ 6
ZR2040w Model ................................................................................................................... 6
ZR2240w Model ................................................................................................................... 7
ZR2440w Model ................................................................................................................... 8
ZR2740w Model ................................................................................................................. 10
Routing and Connecting the Cables ................................................................................................... 11
ZR2040w Model ................................................................................................................. 11
ZR2240w, ZR2440w, and ZR2740w Models ..................................................................... 13
Mounting the Monitor to User-Supplied Support Hardware ................................................................ 14
Mounting the ZR2040w Panel ........................................................................................... 15
Mounting a Quick-Release Panel ...................................................................................... 16
Locating the Information Card (Select Models) .................................................................................. 18
Installing a Cable Lock ....................................................................................................................... 19
Turning on the Monitor ....................................................................................................................... 19
Adjusting the Monitor .......................................................................................................................... 20
Portrait Orientation ............................................................................................................. 22
3 Operating the Monitor .................................................................................................................................. 23
Overview of Operation ........................................................................................................................ 23
ZR2040w and ZR2240w Model ......................................................................................... 23
ZR2440w Model ................................................................................................................. 25
ZR2740w Model ................................................................................................................. 26
Using the On-Screen Display Menu (Select Models) ........................................................ 27
4 Locating Additional Information .................................................................................................................. 28
Appendix A Technical Specifications ............................................................................................................ 29
ZR2040w Model ................................................................................................................................. 29
v

ZR2240w Model ................................................................................................................................. 30
ZR2440w Model ................................................................................................................................. 31
ZR2740w Model ................................................................................................................................. 32
Preset Display Resolutions ................................................................................................................ 33
ZR2040w Model Preset Modes ......................................................................................... 33
ZR2240w Model Preset Modes ......................................................................................... 33
ZR2440w Model Preset Modes ......................................................................................... 34
ZR2740w Model Preset Modes ......................................................................................... 36
Energy Saver Feature ........................................................................................................................ 36
vi

1 Product Features
The LCD (liquid crystal display) monitors have an active matrix of thin-film transistors (TFT). All
models have the following features:
●Mercury-free LED backlight
●Wide viewing angle to allow viewing from a sitting or standing position, or moving side-to-side
●Removable pedestal and VESA-standard mounting holes for flexible mounting solutions
●Support for the optional HP speaker bar (purchased separately)
●Plug and play capability when supported by the operating system
●Security slot provision on rear of monitor for optional cable lock
●Cable management feature for placement of cables and cords
●HDCP (High-Bandwidth Digital Content Protection) copy protection on all digital inputs
●Software and documentation CD that includes monitor drivers, utilities, and product
documentation
●Energy saver feature to meet requirements for reduced power consumption
●Intelligent Management AssetControl
●Compliant with the European Union RoHS Directive
ZR2040w Model
Features of the ZR2040w model include:
●50.8 cm (20-inch) diagonal viewable area display with 1600 × 900 resolution, plus full-screen
support for lower resolutions
●Video signal input to support VGA analog with VGA signal cable provided
●Video signal input to support DVI digital with DVI-D signal cable provided
●Video signal input to support DisplayPort digital with DisplayPort signal cable provided
●Landscape and portrait orientations
●Tilt adjustment
●On-Screen Display (OSD) adjustments in several languages for ease of setup and screen
optimization
●HP Display Assistant utility software for adjusting monitor settings and enabling the theft
deterrence feature
●Auto-adjustment Pattern Utility
●Privacy filter slots to insert filters (purchased separately) to block side screen viewing
●Energy Star Qualified and meets TCO Requirements
ZR2040w Model 1

ZR2240w Model
Features of the ZR2240w model include:
●54.72 cm (21.5-inch) diagonal viewable area display with 1920 × 1080 resolution, plus full-
screen support for lower resolutions
●Video signal input to support VGA analog with VGA signal cable provided
●Video signal input to support DVI digital with DVI-D signal cable provided
●Video signal input to support HDMI digital
●Dynamic Contrast Ratio: 2,000,000:1
●Video signal input to support DisplayPort digital with DisplayPort signal cable provided
●USB 2.0 hub with one upstream (connects to the computer) and four downstream (connect to
USB devices) ports
●USB cable included to connect to the monitor's USB hub and to a USB connector on a computer
●8-way comfort adjust including Height, Tilt, Pivot and Swivel adjustments
●HP Quick Release 2 is now a flush mount solution that lets you quickly install the panel with a
simple click and remove it with the convenient sliding tab release
●Easy access pull-out information card with the information needed for a support call
●On-Screen Display (OSD) adjustments in several languages for ease of setup and screen
optimization
●HP Display Assistant utility software for adjusting monitor settings and enabling the theft
deterrence feature
●Auto-adjustment Pattern Utility
●Privacy filter slots to insert filters (purchased separately) to block side screen viewing
●Energy Star Qualified and meets TCO Requirements
ZR2440w Model
Features of the ZR2440w model include:
●61.13 cm (24-inch) diagonal viewable area display with 1920 × 1200 resolution, plus full-screen
support for lower resolutions
●Video signal input to support DisplayPort digital with DisplayPort signal cable provided
●Video signal input to support HDMI digital
●Video signal input to support DVI digital with DVI-D signal cable provided
●Dynamic Contrast Ratio: 2,000,000:1
●USB 2.0 hub with one upstream (connects to the computer) and four downstream (connect to
USB devices) ports
●USB cable included to connect to the monitor's USB hub and to a USB connector on a computer
●SPDIF Digital Audio Output signal
●Analog audio output signal to support 2.0 Sound
2 Chapter 1 Product Features

●8-way comfort adjust including Height, Tilt, Pivot and Swivel adjustments
●HP Quick Release 2 is now a flush mount solution that lets you quickly install the panel with a
simple click and remove it with the convenient sliding tab release
●Easy access pull-out information card with the information needed for a support call
●On-Screen Display (OSD) adjustments in several languages for ease of setup and screen
optimization
●HP Display Assistant utility software for adjusting monitor settings and enabling the theft
deterrence feature
●Privacy filter slots to insert filters (purchased separately) to block side screen viewing
●Energy Star Qualified and meets TCO Requirements
ZR2440w Model 3

ZR2740w Model
Features of the ZR2740w model include:
●68.74 cm (27-inch) diagonal viewable area display with 2560 x 1440 resolution
●Video signal input to support DVI digital with DVI-Dual Link signal cable provided
●Video signal input to support DisplayPort digital with DisplayPort signal cable provided
●USB 2.0 hub with one upstream (connects to the computer) and four downstream (connect to
USB devices) ports
●USB cable included to connect to the monitor's USB hub and to a USB connector on a computer
●8-way comfort adjust including Height, Tilt, Pivot and Swivel adjustments
●HP Quick Release 2 is now a flush mount solution that lets you quickly install the panel with a
simple click and remove it with the convenient sliding tab release
●Easy access pull-out information card with the information needed for a support call
4 Chapter 1 Product Features

2 Setting Up the Monitor
To set up the monitor, ensure that the power is turned off to the monitor, computer system, and other
attached devices, then follow the instructions below.
NOTE: Be sure the master power switch, located on the rear panel of the monitor, is in the off
position. The master power switch turns off all power to the monitor.
Installing the Pedestal
NOTE: Do not install the pedestal if the monitor will be used on a wall, swing arm, or other mounting
fixture; instead see Mounting the Monitor to User-Supplied Support Hardware on page 14 in this
chapter.
CAUTION: Whenever you handle the monitor, take care not to touch the surface of the LCD panel.
Pressure on the panel may cause non-uniformity of color or disorientation of the liquid crystals. If this
occurs the screen will not recover to its normal condition.
To assemble the ZR2040w, slide the pedestal upright into its base, as shown on the following page.
Figure 2-1 Assembling the ZR2040w pedestal
Installing the Pedestal 5

Models ZR2240w, ZR2440w, and ZR2740w use the HP Quick Release 2 mechanism for easy moving
of the monitor. To mount the panel onto the pedestal:
1. Slide the mounting plate on the pedestal under the upper lip of the recess in the back of the
panel.
2. Lower the pedestal into the recess until it snaps into place.
3. The HP Quick Release 2 latch pops up when the monitor is locked in place.
Figure 2-2 Mounting the Panel onto the HP Quick Release 2
Rear Components
ZR2040w Model
Figure 2-3 ZR2040w Rear Components
Component Function
1 AC Power Connector Connects the AC power cord to the monitor.
2 Cable Lock Provision Provides slot for use with cable security locks.
3 DisplayPort Connector Connects the DisplayPort cable to the monitor.
4 DVI-D Connector Connects the DVI-D cable to the monitor.
5 VGA Connector Connects the VGA cable to the monitor.
6 Chapter 2 Setting Up the Monitor

ZR2240w Model
Figure 2-4 ZR2240w Rear Components
2
2
2
2
21
1
1
11
2
2
2
22
3
3
3
33
2
2
2
22
4
4
4
44
2
2
2
22
5
5
5
55
2
2
2
22
6
6
6
66
2
2
2
22
7
7
7
778
8
8
889
9
9
99
11
11
11
11
11
10
10
10
10
10
Component Function
1 Cable Lock Provision Provides slot for use with cable security locks.
2 Master Power Switch Turns off all power to the monitor.
NOTE: Putting the switch in the Off position will yield the
lowest power state for the monitor when not in use.
3 AC Power Connector Connects the AC power cord to the monitor.
4 DisplayPort Connector Connects the DisplayPort cable to the monitor.
5 HDMI Connector Connects an HDMI cable to the monitor.
6 DVI-D Connector Connects the DVI-D cable to the monitor.
7 VGA Connector Connects the VGA cable to the monitor
8 USB Upstream Connector Connects the monitor USB hub cable to a host USB port/
hub.
9 USB Downstream Connectors Connects optional USB devices to the monitor.
Rear Components 7
Component Function
10 Information Card Provides information needed for a support call.
11 USB Downstream Connectors
(side panel)
Connects optional USB devices to the monitor.
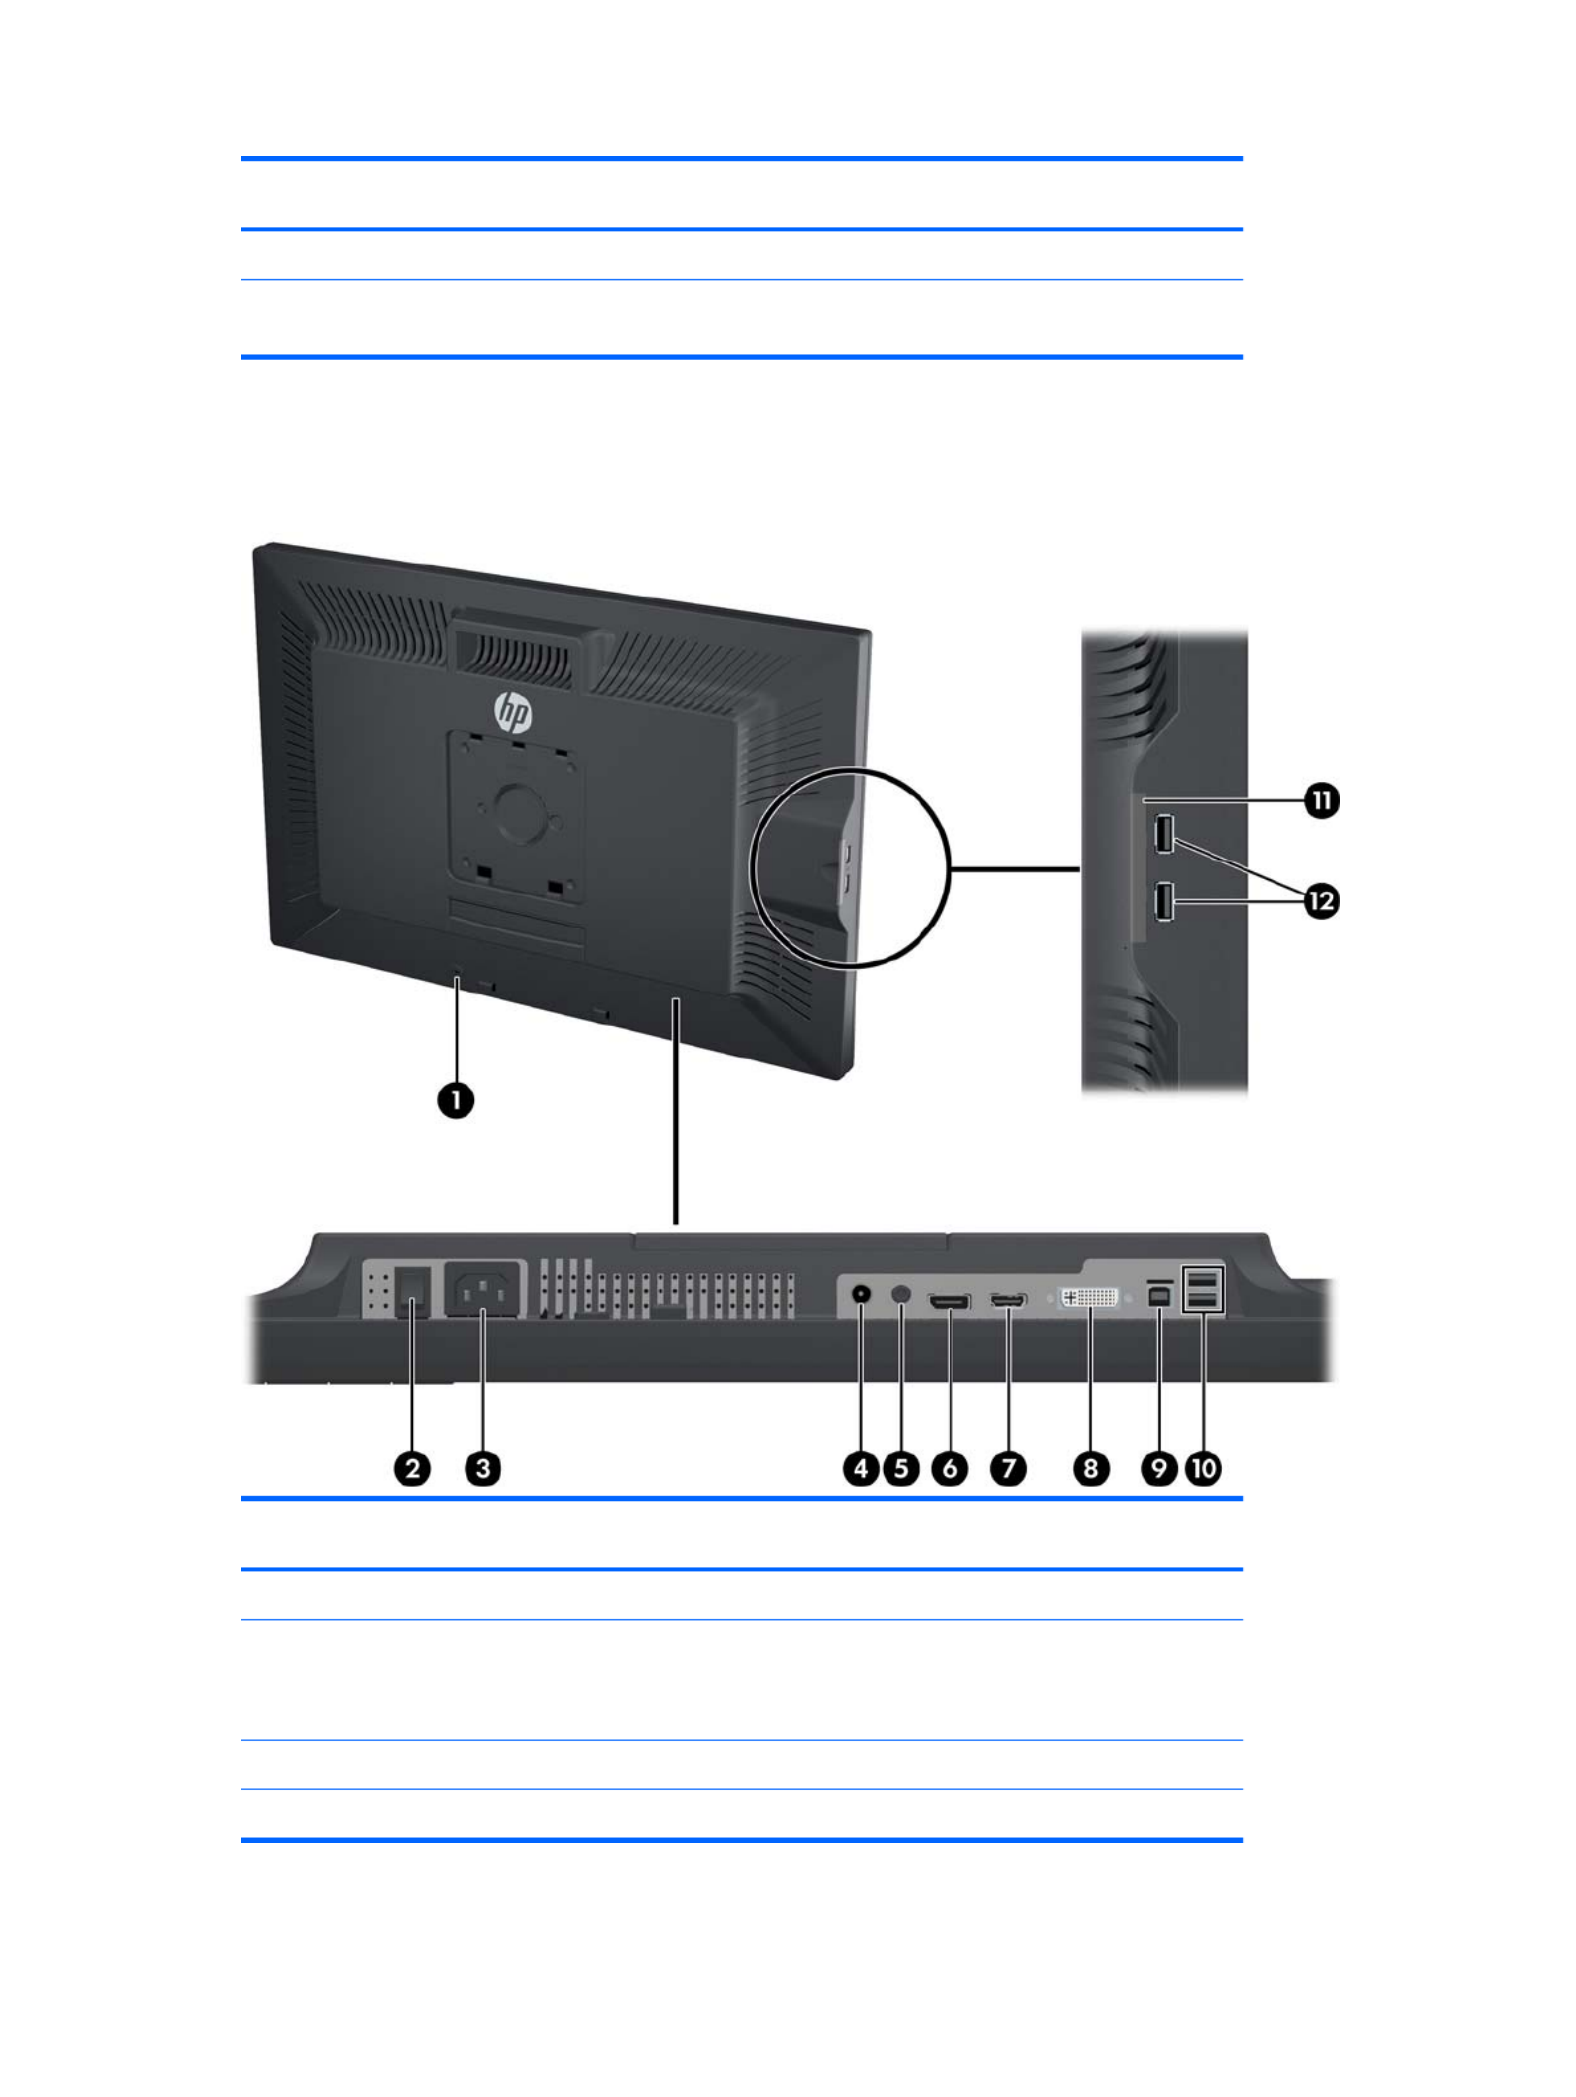
ZR2440w Model
Figure 2-5 ZR2440w Rear Components
Component Function
1 Cable Lock Provision Provides slot for use with cable security locks.
2 Master Power Switch Turns off all power to the monitor.
NOTE: Putting the switch in the Off position will yield the
lowest power state for the monitor when not in use.
3 AC Power Connector Connects the AC power cord to the monitor.
4 Digital Audio Output Connects an audio cable with RCA plug to the monitor.
8 Chapter 2 Setting Up the Monitor

Component Function
5 Analog Audio Output Connects an audio cable with 3.5 mm L/R mini-plug to the
monitor.
6 DisplayPort Connector Connects the DisplayPort cable to the monitor.
7 HDMI Connector Connects an HDMI cable to the monitor.
8 DVI-D Connector Connects the DVI-D cable to the monitor.
9 USB Upstream Connector Connects the monitor USB hub cable to a host USB port/
hub.
10 USB Downstream Connectors Connects optional USB devices to the monitor.
11 Information Card Provides information about the monitor.
12 USB Downstream Connectors
(side panel)
Connects optional USB devices to the monitor.
Rear Components 9

ZR2740w Model
Figure 2-6 ZR2740w Rear Components
Component Function
1 Cable Lock Provision Provides slot for use with cable security locks.
2 Master Power Switch Turns off all power to the monitor.
NOTE: Putting the switch in the Off position will yield the
lowest power state for the monitor when not in use.
3 AC Power Connector Connects the AC power cord to the monitor.
4 DisplayPort Connector Connects the DisplayPort cable to the monitor.
5 DVI-D Connector Connects the DVI-D cable to the monitor.
6 USB Upstream Connector Connects the monitor USB hub cable to a host USB port/
hub.
7 USB Downstream Connectors Connects optional USB devices to the monitor.
8 Information Card Provides information needed for a support call.
9 USB Downstream Connectors
(side panel)
Connects optional USB devices to the monitor.
10 Chapter 2 Setting Up the Monitor

Routing and Connecting the Cables
Place the monitor in a convenient, well-ventilated location near the computer.
ZR2040w Model
The cable-restraining bar on the pedestal of the ZR2040w is held in place by four tabs.
Figure 2-7 Cable-Restraining Bar
1. To remove the bar, first pull one end of the bar away from the pedestal (1). When it is free, the
bar can be removed (2).
2. Connect the video cables provided to the connectors shown in ZR2040w Model on page 6. You
do not have to connect them all.
3. For each cable you've attached, plug the other end into the appropriate connector on the
computer.
Routing and Connecting the Cables 11

4. Connect the AC power cord and plug it into the wall outlet.
WARNING! To reduce the risk of electric shock or damage to the equipment:
Do not disable the power cord grounding plug. The grounding plug is an important safety
feature.
Plug the power cord into a grounded (earthed) electrical outlet that is easily accessible at all
times.
Disconnect power from the equipment by unplugging the power cord from the electrical outlet.
For your safety, do not place anything on power cords or cables. Arrange them so that no one
may accidentally step on or trip over them. Do not pull on a cord or cable. When unplugging from
the electrical outlet, grasp the cord by the plug.
5. Gather the video cables and replace the cable-restraining bar so as to contain the cables.
Figure 2-8 ZR2040w Model Cable Routing
12 Chapter 2 Setting Up the Monitor

ZR2240w, ZR2440w, and ZR2740w Models
1. Remove the cable routing cover by pulling it straight off the front of the column.
Figure 2-9 Cable Routing Cover
2. Before connecting the cables, route them through the cable routing hole in the column (1) and
replace the cable routing cover (2).
Figure 2-10 Cable Routing
Routing and Connecting the Cables 13

3. Connect the desired signal sources. Refer to the drawings in (Rear Components on page 6) to
identify the connectors on your monitor. For each one, plug in one end of the appropriate cable.
Attach the other end to your computer or other video source.
The ZR2440w model supports audio output from the HDMI and DisplayPort inputs. Use the RCA
jack for digital output and the 3.5 mm mini-jack for analog 2.0 Sound.
NOTE: It is not necessary to connect all the connectors to video sources.
4. If you will be using USB devices (such as a digital camera, USB keyboard, or USB mouse),
connect one end of the provided USB cable to the USB hub connector on the rear panel of the
computer, and the other end to the upstream USB connector on the monitor. The four
downstream USB ports (two on the rear and two on the side) are now available for your devices.
Figure 2-11 Connecting USB Cables
5. Connect one end of the power cable to the AC power connector on the back of the monitor, and
the other end to an electrical wall outlet.
WARNING! To reduce the risk of electric shock or damage to the equipment:
Do not disable the power cord grounding plug. The grounding plug is an important safety feature.
Plug the power cord into a grounded (earthed) electrical outlet that is easily accessible at all times.
Disconnect power from the equipment by unplugging the power cord from the electrical outlet.
For your safety, do not place anything on power cords or cables. Arrange them so that no one may
accidentally step on or trip over them. Do not pull on a cord or cable. When unplugging from the
electrical outlet, grasp the cord by the plug.
Mounting the Monitor to User-Supplied Support Hardware
The monitor can be installed to any support that meets the VESA standards.
NOTE: This apparatus is intended to be supported by a UL or CSA Listed wall mount bracket.
14 Chapter 2 Setting Up the Monitor

CAUTION: The HP Quick Release 2 can be installed directly to a wall to mount the monitor panel. It
is designed to support a maximum of up to 10.9 kg (24 lbs). If you are mounting to a wall, HP
recommends that you consult with a qualified engineering, architectural, or construction professional
to determine the appropriate type and quantity of mounting fasteners required for your application
and to ensure that the mounting solution is properly installed to support applied loads.
The weight for your model can be found in Technical Specifications on page 29.
Before you begin, make sure the monitor is turned off and the power and signal cables are
disconnected. Also disconnect any USB cables. To protect the panel, lay it face down on a soft, flat
surface.
Mounting the ZR2040w Panel
1. Remove the four screws holding the panel to the pedestal.
2. To mount the panel, use the four holes surrounding the HP logo on the back of the monitor.
Figure 2-12 Mounting the ZR2040w Model
CAUTION: This monitor supports the VESA industry standard 100 mm mounting holes. To
attach a third-party mounting solution to the monitor, four 4 mm, 0.7 pitch, and 10 mm long
screws are required. Longer screws must not be used because they may damage the monitor. It
is important to verify that the manufacturer’s mounting solution is compliant with the VESA
standard and is rated to support the weight of the monitor display panel. For best performance, it
is important to use the power and video cables provided with the monitor.
3. If you mount the panel in portrait orientation, you will need to rotate the image to match. See
Portrait Orientation on page 22 for instructions.
Mounting the Monitor to User-Supplied Support Hardware 15

Mounting a Quick-Release Panel
The ZR2240w, ZR2440w and ZR2740w support mounting to VESA-compliant hardware in two ways:
●Remove the HP stand and use the 4 VESA mount threaded holes (100 x 100 pattern) that are in
the Quick Release 2 recess. Screws of the appropriate length are provided.
Figure 2-13 Mounting a VESA Arm
●Alternatively, follow the instructions below to use the HP Quick Release 2 feature with your
VESA mounting hardware.
Start by removing the pedestal.
Figure 2-14 Removing the Pedestal
1. Press down on the latch near the bottom center of the monitor to unlock the HP Quick Release
2.
2. Swing the bottom of the pedestal up until the mounting plate clears the recess in the panel.
16 Chapter 2 Setting Up the Monitor

3. Slide the pedestal out of the recess.
4. Remove four screws holding the mounting plate to the head of the pedestal:
Figure 2-15 Removing the Mounting Plate from the Pedestal
5. Remove four screws to separate the mounting plate from its cover:
Figure 2-16 Removing the Cover from the Mounting Plate
Mounting the Monitor to User-Supplied Support Hardware 17

6. Attach the mounting plate to the wall or swing arm of your choice.
Figure 2-17 Installing the Mounting Plate
CAUTION: This monitor supports the VESA industry standard 100 mm mounting holes. To
attach a third-party mounting solution to the monitor, four 4 mm, 0.7 pitch, and 10 mm long
screws are required. Longer screws must not be used because they may damage the monitor. It
is important to verify that the manufacturer’s mounting solution is compliant with the VESA
standard and is rated to support the weight of the monitor display panel. For best performance, it
is important to use the power and video cables provided with the monitor.
7. Place the panel on the mounting bracket you've installed by aligning its recess with the mounting
bracket, then sliding it down over the top of the bracket and pressing it back into place against
the bracket. The release latch on the monitor will pop up when the monitor is safely locked in
place.
Locating the Information Card (Select Models)
Figure 2-18 The Pull-out Information Card
The ZR2240w, ZR2440w, and ZR2740w models provide a card with the information you will need
when contacting HP for support. The card pulls out from behind the USB connectors on the left side
of the panel.
18 Chapter 2 Setting Up the Monitor

Identifying information is located on the pull-out card (instead of on labels on the back of the monitor).
Warranty support information (model number, serial number, product number) is printed on the front
of the card and regulatory information is printed on the back of the card.
Installing a Cable Lock
You can secure the monitor to a fixed object with an optional cable lock available from HP.
Figure 2-19 Installing a Cable Lock
Turning on the Monitor
1. If your monitor has a master power switch (located on the rear of the monitor), put it in the On
position (I) .
2. Press the power button on the computer to turn it on.
3. Press the power button on the front of the monitor to turn it on.
CAUTION: Burn-in image damage may occur on monitors that display the same static image on
screen for a prolonged period of time (12 consec To avoid burn-in imageutive hours of non-use).
damage on the monitor screen, you should always activate a screen saver application or sleep timer,
or turn off the monitor when it is unused for a long time. Image retention is a condition that may occur
on all LCD screens. Monitors with a “burned-in image” are not covered under the HP warranty.
NOTE: If pressing the power button has no effect, the Power Button Lockout feature may be
enabled. To disable this feature, press and hold the monitor power button for 10 seconds.
You may see a status message or an image on the screen. The LED on the front panel will turn blue.
If the monitor is not receiving any input, it will soon go into low-power mode, indicated by the LED
turning amber.
Installing a Cable Lock 19

Adjusting the Monitor
1. Tilt the monitor's panel forward or backward to set it to a comfortable eye level.
Figure 2-20 Adjusting the Tilt
2. If your monitor has the ability to swivel, adjust it to the left or right for the best viewing angle.
Figure 2-21 Adjusting the Viewing Angle (Select Models)
3. Models ZR2240w, ZR2440w, and ZR2740w provide for height adjustment. Adjust the monitor's
height so that it is parallel to your eye height for a comfortable viewing position. A lock-down/
release button on the back of the column prevents the display head from sliding up when the
20 Chapter 2 Setting Up the Monitor
Specyfikacje produktu
| Marka: | HP |
| Kategoria: | monitor |
| Model: | Performance ZR2040w |
Potrzebujesz pomocy?
Jeśli potrzebujesz pomocy z HP Performance ZR2040w, zadaj pytanie poniżej, a inni użytkownicy Ci odpowiedzą
Instrukcje monitor HP

26 Lutego 2025
26 Lutego 2025
12 Lutego 2025
30 Grudnia 2025
30 Grudnia 2025
30 Grudnia 2025
30 Grudnia 2025
30 Grudnia 2025
30 Grudnia 2025
21 Grudnia 2024
Instrukcje monitor
- monitor Sony
- monitor Yamaha
- monitor Samsung
- monitor PeakTech
- monitor UPERFECT
- monitor LG
- monitor Xiaomi
- monitor Joy-It
- monitor Sharp
- monitor Huawei
- monitor TCL
- monitor Pioneer
- monitor Lenovo
- monitor Philips
- monitor Plantronics
- monitor SilverCrest
- monitor Gigabyte
- monitor Acer
- monitor Bosch
- monitor Epson
- monitor JBL
- monitor Hikvision
- monitor Fujitsu
- monitor HyperX
- monitor LC-Power
- monitor Hisense
- monitor Panasonic
- monitor Promethean
- monitor Canon
- monitor Crestron
- monitor Viewsonic
- monitor Behringer
- monitor Asus
- monitor AG Neovo
- monitor Allen & Heath
- monitor IK Multimedia
- monitor Medion
- monitor Boss
- monitor Marquant
- monitor MSI
- monitor Toshiba
- monitor Tesla
- monitor Westinghouse
- monitor Jensen
- monitor Yealink
- monitor Ring
- monitor Garmin
- monitor Blaupunkt
- monitor Salora
- monitor Iiyama
- monitor Citizen
- monitor APC
- monitor Haier
- monitor Hyundai
- monitor Honeywell
- monitor Chauvet
- monitor Tripp Lite
- monitor Shure
- monitor Cisco
- monitor Xerox
- monitor Smart
- monitor Cooler Master
- monitor Alpine
- monitor Godox
- monitor Dynaudio
- monitor Deltaco
- monitor JVC
- monitor V7
- monitor Dell
- monitor IFM
- monitor Corsair
- monitor Alesis
- monitor Vimar
- monitor Dahua Technology
- monitor Schneider
- monitor Eurolite
- monitor Ricoh
- monitor SMART Technologies
- monitor NZXT
- monitor Emos
- monitor Renkforce
- monitor Marshall
- monitor Viessmann
- monitor Omron
- monitor Thomson
- monitor Velleman
- monitor Neumann
- monitor DataVideo
- monitor Danfoss
- monitor Pyle
- monitor Apple
- monitor Newline
- monitor Waeco
- monitor AOC
- monitor Peerless-AV
- monitor Speco Technologies
- monitor Samson
- monitor PreSonus
- monitor ARRI
- monitor Kindermann
- monitor Olympus
- monitor Mitsubishi
- monitor Fluid
- monitor Razer
- monitor ART
- monitor Continental Edison
- monitor RCF
- monitor NEC
- monitor Brandson
- monitor Prestigio
- monitor OSEE
- monitor Sanyo
- monitor Elvid
- monitor Optoma
- monitor Focal
- monitor Asrock
- monitor Monkey Banana
- monitor Abus
- monitor AMCV
- monitor Jay-Tech
- monitor Mackie
- monitor Palmer
- monitor Barco
- monitor Insignia
- monitor AVer
- monitor Akuvox
- monitor 3M
- monitor Element
- monitor Denver
- monitor Marshall Electronics
- monitor Orion
- monitor Hitachi
- monitor Postium
- monitor Kali Audio
- monitor IStarUSA
- monitor Seiki
- monitor Ernitec
- monitor Wohler
- monitor SmallHD
- monitor AJA
- monitor KRK
- monitor BenQ
- monitor Atlona
- monitor Thermaltake
- monitor Simrad
- monitor Hanwha
- monitor Odys
- monitor Elo
- monitor Ikan
- monitor BOOX
- monitor JUNG
- monitor Burg Wächter
- monitor Eizo
- monitor Monacor
- monitor Aputure
- monitor Daewoo
- monitor Tannoy
- monitor GVision
- monitor Positivo
- monitor Adj
- monitor Freedom Scientific
- monitor SPL
- monitor Qian
- monitor I3-Technologies
- monitor Stairville
- monitor Vitek
- monitor Planar
- monitor Mobile Pixels
- monitor REVO
- monitor Atomos
- monitor Newstar
- monitor SWIT
- monitor Kramer
- monitor RGBlink
- monitor AMX
- monitor Midas
- monitor Alienware
- monitor Archos
- monitor Acti
- monitor Emachines
- monitor Caliber
- monitor Maxdata
- monitor Sunstech
- monitor GlobalTronics
- monitor Sunny
- monitor BlueBuilt
- monitor Da-Lite
- monitor ProXtend
- monitor Kubo
- monitor GeoVision
- monitor LaCie
- monitor InFocus
- monitor Festo
- monitor Konig
- monitor Swissonic
- monitor IHealth
- monitor Peaq
- monitor QSC
- monitor Hannspree
- monitor ESI
- monitor Avocor
- monitor Vivitek
- monitor Genelec
- monitor Interlogix
- monitor Vorago
- monitor EverFocus
- monitor POSline
- monitor Peerless
- monitor M-Audio
- monitor Mad Catz
- monitor Krom
- monitor Monoprice
- monitor Eve Audio
- monitor Yorkville
- monitor HoverCam
- monitor Voxicon
- monitor Sonifex
- monitor TV One
- monitor Fostex
- monitor Prowise
- monitor Terra
- monitor Neets
- monitor Soundstream
- monitor Xoro
- monitor HKC
- monitor CTOUCH
- monitor Ozone
- monitor Ibm
- monitor Maxell
- monitor Packard Bell
- monitor Provision ISR
- monitor Mybeo
- monitor CSL
- monitor Bearware
- monitor Drawmer
- monitor Blue Sky
- monitor Zalman
- monitor Iadea
- monitor Advantech
- monitor Hercules
- monitor Avantone Pro
- monitor Ganz
- monitor TVLogic
- monitor Gamber-Johnson
- monitor Extron
- monitor Neat
- monitor Legamaster
- monitor Belinea
- monitor Adam
- monitor Triton
- monitor ITek
- monitor Kogan
- monitor Posiflex
- monitor Antelope Audio
- monitor MicroTouch
- monitor X-Rite
- monitor EKO
- monitor ONYX
- monitor IBoardTouch
- monitor Mirai
- monitor Elite Screens
- monitor Hollyland
- monitor Mitsai
- monitor Christie
- monitor Skytronic
- monitor Enttec
- monitor Feelworld
- monitor Phoenix Contact
- monitor COMMBOX
- monitor Yiynova
- monitor Alogic
- monitor Pelco
- monitor Lilliput
- monitor LightZone
- monitor AOpen
- monitor Planet Audio
- monitor EC Line
- monitor Datacolor
- monitor HELGI
- monitor Desview
- monitor Syscom
- monitor Allsee
- monitor Night Owl
- monitor ProDVX
- monitor Varad
- monitor PureTools
- monitor DoubleSight
- monitor CTL
- monitor Game Factor
- monitor Nixeus
- monitor Chimei
- monitor Blue Sea
- monitor Faytech
- monitor Hamlet
- monitor Wyse - Dell
- monitor Approx
- monitor Bauhn
- monitor GeChic
- monitor Oecolux
- monitor ADS-TEC
- monitor Satco
- monitor Casalux
- monitor Jupiter
- monitor Transvideo
- monitor Innocn
- monitor KeepOut
- monitor Shimbol
- monitor Raysgem
- monitor Motrona
- monitor Ikegami
- monitor AORUS
- monitor Portkeys
- monitor Mimo Monitors
- monitor American Dynamics
- monitor AIS
- monitor Wortmann AG
- monitor Viotek
- monitor Vidi-Touch
- monitor KTC
- monitor CoolerMaster
- monitor Atlantis Land
- monitor HEDD
- monitor Colormetrics
- monitor IOIO
- monitor DTEN
- monitor Cocopar
- monitor Titan Army
- monitor Xenarc
- monitor Delvcam
- monitor Wimaxit
- monitor BookIT
- monitor SideTrak
- monitor TRIUMPH BOARD
- monitor Japannext
Najnowsze instrukcje dla monitor

8 Kwietnia 2025

8 Kwietnia 2025

8 Kwietnia 2025
7 Kwietnia 2025

5 Kwietnia 2025

4 Kwietnia 2025

4 Kwietnia 2025
3 Kwietnia 2025
2 Kwietnia 2025

2 Kwietnia 2025