Instrukcja obsługi HP LaserJet Tank MFP 1604
Przeczytaj poniżej 📖 instrukcję obsługi w języku polskim dla HP LaserJet Tank MFP 1604 (114 stron) w kategorii drukarka. Ta instrukcja była pomocna dla 13 osób i została oceniona przez 2 użytkowników na średnio 4.5 gwiazdek
Strona 1/114


HP comp
HP comp
HP comp
HP compHP company notic
any notic
any notic
any noticany notices
es
es
eses
Cop
Cop
Cop
CopCopyright and License
yright and License
yright and License
yright and Licenseyright and License
THE INFORMATION CONTAINED HEREIN IS
SUBJECT TO CHANGE WITHOUT NOTICE.
ALL RIGHTS RESERVED. REPRODUCTION,
ADAPTATION, OR TRANSLATION OF THIS
MATERIAL IS PROHIBITED WITHOUT PRIOR
WRITTEN PERMISSION OF HP, EXCEPT AS
ALLOWED UNDER THE COPYRIGHT LAWS. THE
ONLY WARRANTIES FOR HP PRODUCTS AND
SERVICES ARE SET FORTH IN THE EXPRESS
WARRANTY STATEMENTS ACCOMPANYING SUCH
PRODUCTS AND SERVICES. NOTHING HEREIN
SHOULD BE CONSTRUED AS CONSTITUTING AN
ADDITIONAL WARRANTY. HP SHALL NOT BE
LIABLE FOR TECHNICAL OR EDITORIAL ERRORS
OR OMISSIONS CONTAINED HEREIN.
© Copyright 2022 HP Development Company,
L.P.
Trademark Cr
Trademark Cr
Trademark Cr
Trademark CrTrademark Credits
edits
edits
editsedits
Microsoft and Windows are either registered
trademarks or trademarks of Microsoft
Corporation in the United States and/or other
countries.
Mac, OS X, macOS, and AirPrint are trademarks
of Apple Inc., registered in the U.S. and other
countries.
ENERGY STAR and the ENERGY STAR mark
are registered trademarks owned by the U.S.
Environmental Protection Agency.
Android and Chromebook are trademarks of
Google LLC.
iOS is a trademark or registered trademark of
Cisco in the U.S. and other countries and is used
under license.
Safety informa
Safety informa
Safety informa
Safety informaSafety information
tion
tion
tiontion
Always follow basic safety precautions when
using this product to reduce risk of injury from
re or electric shock.
- Read and understand all instructions in the
documentation that comes with the printer.
- Observe all warnings and instructions marked
on the product.
- Unplug this product from wall outlets before
cleaning.
- Do not install or use this product near water, or
when you are wet.
- Install the product securely on a stable surface.
- Install the product in a protected location
where no one can step on or trip over the line
cord, and the line cord cannot be damaged.
- If the product does not operate normally, see
Solv
Solv
Solv
SolvSolve a probl
e a probl
e a probl
e a proble a problem
em
em
emem in this guide.
- There are no user-serviceable parts inside.
Refer servicing to service personnel.qualied

T
T
T
TTabl
abl
abl
ablable o
e o
e o
e oe of c
f c
f c
f cf contents
ontents
ontents
ontentsontents
1Get started
1Get started
1Get started
1Get started1Get started ...................................................................................................................................................................................................
...................................................................................................................................................................................................
...................................................................................................................................................................................................
......................................................................................................................................................................................................................................................................................................................................................................................................1
1
1
11
Printer parts and locations (dn/dw/w/USB)........................................................................................................................................1
Printer parts and locations (sdn/sdw).................................................................................................................................................2
Printer parts rear....................................................................................................................................................................................3
Control panel features (dn/dw/w/USB)...............................................................................................................................................4
Control panel features (sdn/sdw)........................................................................................................................................................6
Control panel display features .............................................................................................................................................................8
Use the HP Smart app to print, scan, and manage...........................................................................................................................9
2Connect y
2Connect y
2Connect y
2Connect y2Connect your printer................................................................................................................................................................................
our printer................................................................................................................................................................................
our printer................................................................................................................................................................................
our printer................................................................................................................................................................................our printer................................................................................................................................................................................ 11
11
11
1111
Connect your printer to a Wi-Fi network using HP Smart............................................................................................................. 11
Connect your printer to a Wi-Fi network using Wi-Fi Protected Setup (WPS)........................................................................... 11
Connect your printer to an Ethernet network ................................................................................................................................ 12
Connect your printer using a USB cable .......................................................................................................................................... 13
Change wireless settings ................................................................................................................................................................... 13
Change the connection type (network models)............................................................................................................................. 15
3Load media
3Load media
3Load media
3Load media3Load media ...............................................................................................................................................................................................
...............................................................................................................................................................................................
...............................................................................................................................................................................................
.............................................................................................................................................................................................................................................................................................................................................................................................. 16
16
16
1616
Load paper ........................................................................................................................................................................................... 16
Load envelopes ................................................................................................................................................................................... 18
Load labels........................................................................................................................................................................................... 19
Load an original on the scanner glass............................................................................................................................................. 20
Load an original in the document feeder (some models only) ................................................................................................... 21
4Print
4Print
4Print
4Print4Print............................................................................................................................................................................................................
............................................................................................................................................................................................................
............................................................................................................................................................................................................
........................................................................................................................................................................................................................................................................................................................................................................................................................ 23
23
23
2323
Print from a Windows computer....................................................................................................................................................... 23
Print from a Mac computer................................................................................................................................................................ 23
Print with mobile devices................................................................................................................................................................... 24
5Cop
5Cop
5Cop
5Cop5Copy and scan...........................................................................................................................................................................................
y and scan...........................................................................................................................................................................................
y and scan...........................................................................................................................................................................................
y and scan...........................................................................................................................................................................................y and scan........................................................................................................................................................................................... 26
26
26
2626
Make a copy.......................................................................................................................................................................................... 26
Copy an (ID) card.......................................................................................................................................................... 26identication
Scan using HP Smart (iOS/Android, Windows 10, and macOS).................................................................................................... 28
Scan using the HPScan software (Windows 7).............................................................................................................................. 28
6
6
6
66Congur
Congur
Congur
CongurCongure
e
e
ee y
y
y
y your printer
our printer
our printer
our printerour printer.............................................................................................................................................................................
.............................................................................................................................................................................
.............................................................................................................................................................................
.......................................................................................................................................................................................................................................................................................................................................................... 29
29
29
2929
Use Web Services ................................................................................................................................................................................ 29
iii

Update the printer............................................................................................................................................................................... 30
Congure the printer using EWS....................................................................................................................................................... 30
7Manage toner
7Manage toner
7Manage toner
7Manage toner7Manage toner
, media, and parts
, media, and parts
, media, and parts
, media, and parts, media, and parts............................................................................................................................................................
............................................................................................................................................................
............................................................................................................................................................
........................................................................................................................................................................................................................................................................................................................ 34
34
34
3434
Check and rell the toner................................................................................................................................................................... 34
Replace the imaging drum................................................................................................................................................................. 39
Order supplies, accessories, and parts............................................................................................................................................ 39
8Solv
8Solv
8Solv
8Solv8Solve probl
e probl
e probl
e proble problems.........................................................................................................................................................................................
ems.........................................................................................................................................................................................
ems.........................................................................................................................................................................................
ems.........................................................................................................................................................................................ems......................................................................................................................................................................................... 41
41
41
4141
HP support ........................................................................................................................................................................................... 41
Interpreting Error Codes..................................................................................................................................................................... 42
Print reports......................................................................................................................................................................................... 49
Restore original factory defaults and settings............................................................................................................................... 50
Printer does not pick up paper or misfeeds.................................................................................................................................... 51
Clear paper jams.................................................................................................................................................................................. 54
Improve print quality .......................................................................................................................................................................... 61
Resolving print quality problems...................................................................................................................................................... 64
Improve copy and scan image quality ............................................................................................................................................. 69
Solve wireless network problems .................................................................................................................................................... 71
Solve Ethernet connection problems............................................................................................................................................... 74
Appendix AT
Appendix AT
Appendix AT
Appendix ATAppendix ATechnical information
echnical information
echnical information
echnical informationechnical information............................................................................................................................................................
............................................................................................................................................................
............................................................................................................................................................
........................................................................................................................................................................................................................................................................................................................ 75
75
75
7575
Printer specications .......................................................................................................................................................................... 75
Service and support............................................................................................................................................................................ 78
Environmental product stewardship program ............................................................................................................................... 96
Regulatory information....................................................................................................................................................................103
iv

Get start
Get start
Get start
Get startGet started
ed
ed
eded
1
1
1
11
This section describes the printer parts, control panel features, and other printer functionalities.
Print
Print
Print
PrintPrinter parts and l
er parts and l
er parts and l
er parts and ler parts and locations (
ocations (
ocations (
ocations (ocations (dn/
dn/
dn/
dn/dn/dw
dw
dw
dwdw/
/
/
//w
w
w
ww/USB)
/USB)
/USB)
/USB)/USB)
Part names and their locations on the front and top of the printer.
T
T
T
TTable 1-1
able 1-1
able 1-1
able 1-1able 1-1 Printer parts and l
Printer parts and l
Printer parts and l
Printer parts and lPrinter parts and locations
ocations
ocations
ocationsocations
Featur
Featur
Featur
FeaturFeature
e
e
ee Description
Description
Description
DescriptionDescription
1
1
1
11 Scanner lid
2
2
2
22 Scanner glass
3
3
3
33 Control panel
4
4
4
44 Output tray extender
5
5
5
55 Toner access door / Output tray
6
6
6
66 Paper tray cover
7
7
7
77 Paper tray
8
8
8
88 Rell toner indicator
Get started 1

T
T
T
TTable 1-1
able 1-1
able 1-1
able 1-1able 1-1 Printer parts and l
Printer parts and l
Printer parts and l
Printer parts and lPrinter parts and locations
ocations
ocations
ocationsocations (continued)
(continued)
(continued)
(continued)(continued)
Featur
Featur
Featur
FeaturFeature
e
e
ee Description
Description
Description
DescriptionDescription
9 Toner gauge
Print
Print
Print
PrintPrinter parts and l
er parts and l
er parts and l
er parts and ler parts and locations (sdn/
ocations (sdn/
ocations (sdn/
ocations (sdn/ocations (sdn/sdw)
sdw)
sdw)
sdw)sdw)
Part names and their locations on the front and top of the printer.
T
T
T
TTable 1-2
able 1-2
able 1-2
able 1-2able 1-2 Printer parts and l
Printer parts and l
Printer parts and l
Printer parts and lPrinter parts and locations
ocations
ocations
ocationsocations
Featur
Featur
Featur
FeaturFeature
e
e
ee Description
Description
Description
DescriptionDescription
1
1
1
11 Document feeder
2
2
2
22 Document feeder door
3
3
3
33 Toner access door/Output tray
4
4
4
44 Output tray extender
5
5
5
55 Control panel
6
6
6
66 Power button/light
7
7
7
77 Rell toner indicator
8
8
8
88 Toner gauge
9
9
9
99 Scanner lid
10
10
10
1010 Scanner glass
11
11
11
1111 Paper tray cover
2 Chapter 1Get started
T
T
T
TTable 1-2
able 1-2
able 1-2
able 1-2able 1-2 Printer parts and l
Printer parts and l
Printer parts and l
Printer parts and lPrinter parts and locations
ocations
ocations
ocationsocations (continued)
(continued)
(continued)
(continued)(continued)
Featur
Featur
Featur
FeaturFeature
e
e
ee Description
Description
Description
DescriptionDescription
12
12
12
1212 Paper tray
Print
Print
Print
PrintPrinter parts r
er parts r
er parts r
er parts rer parts rear
ear
ear
earear
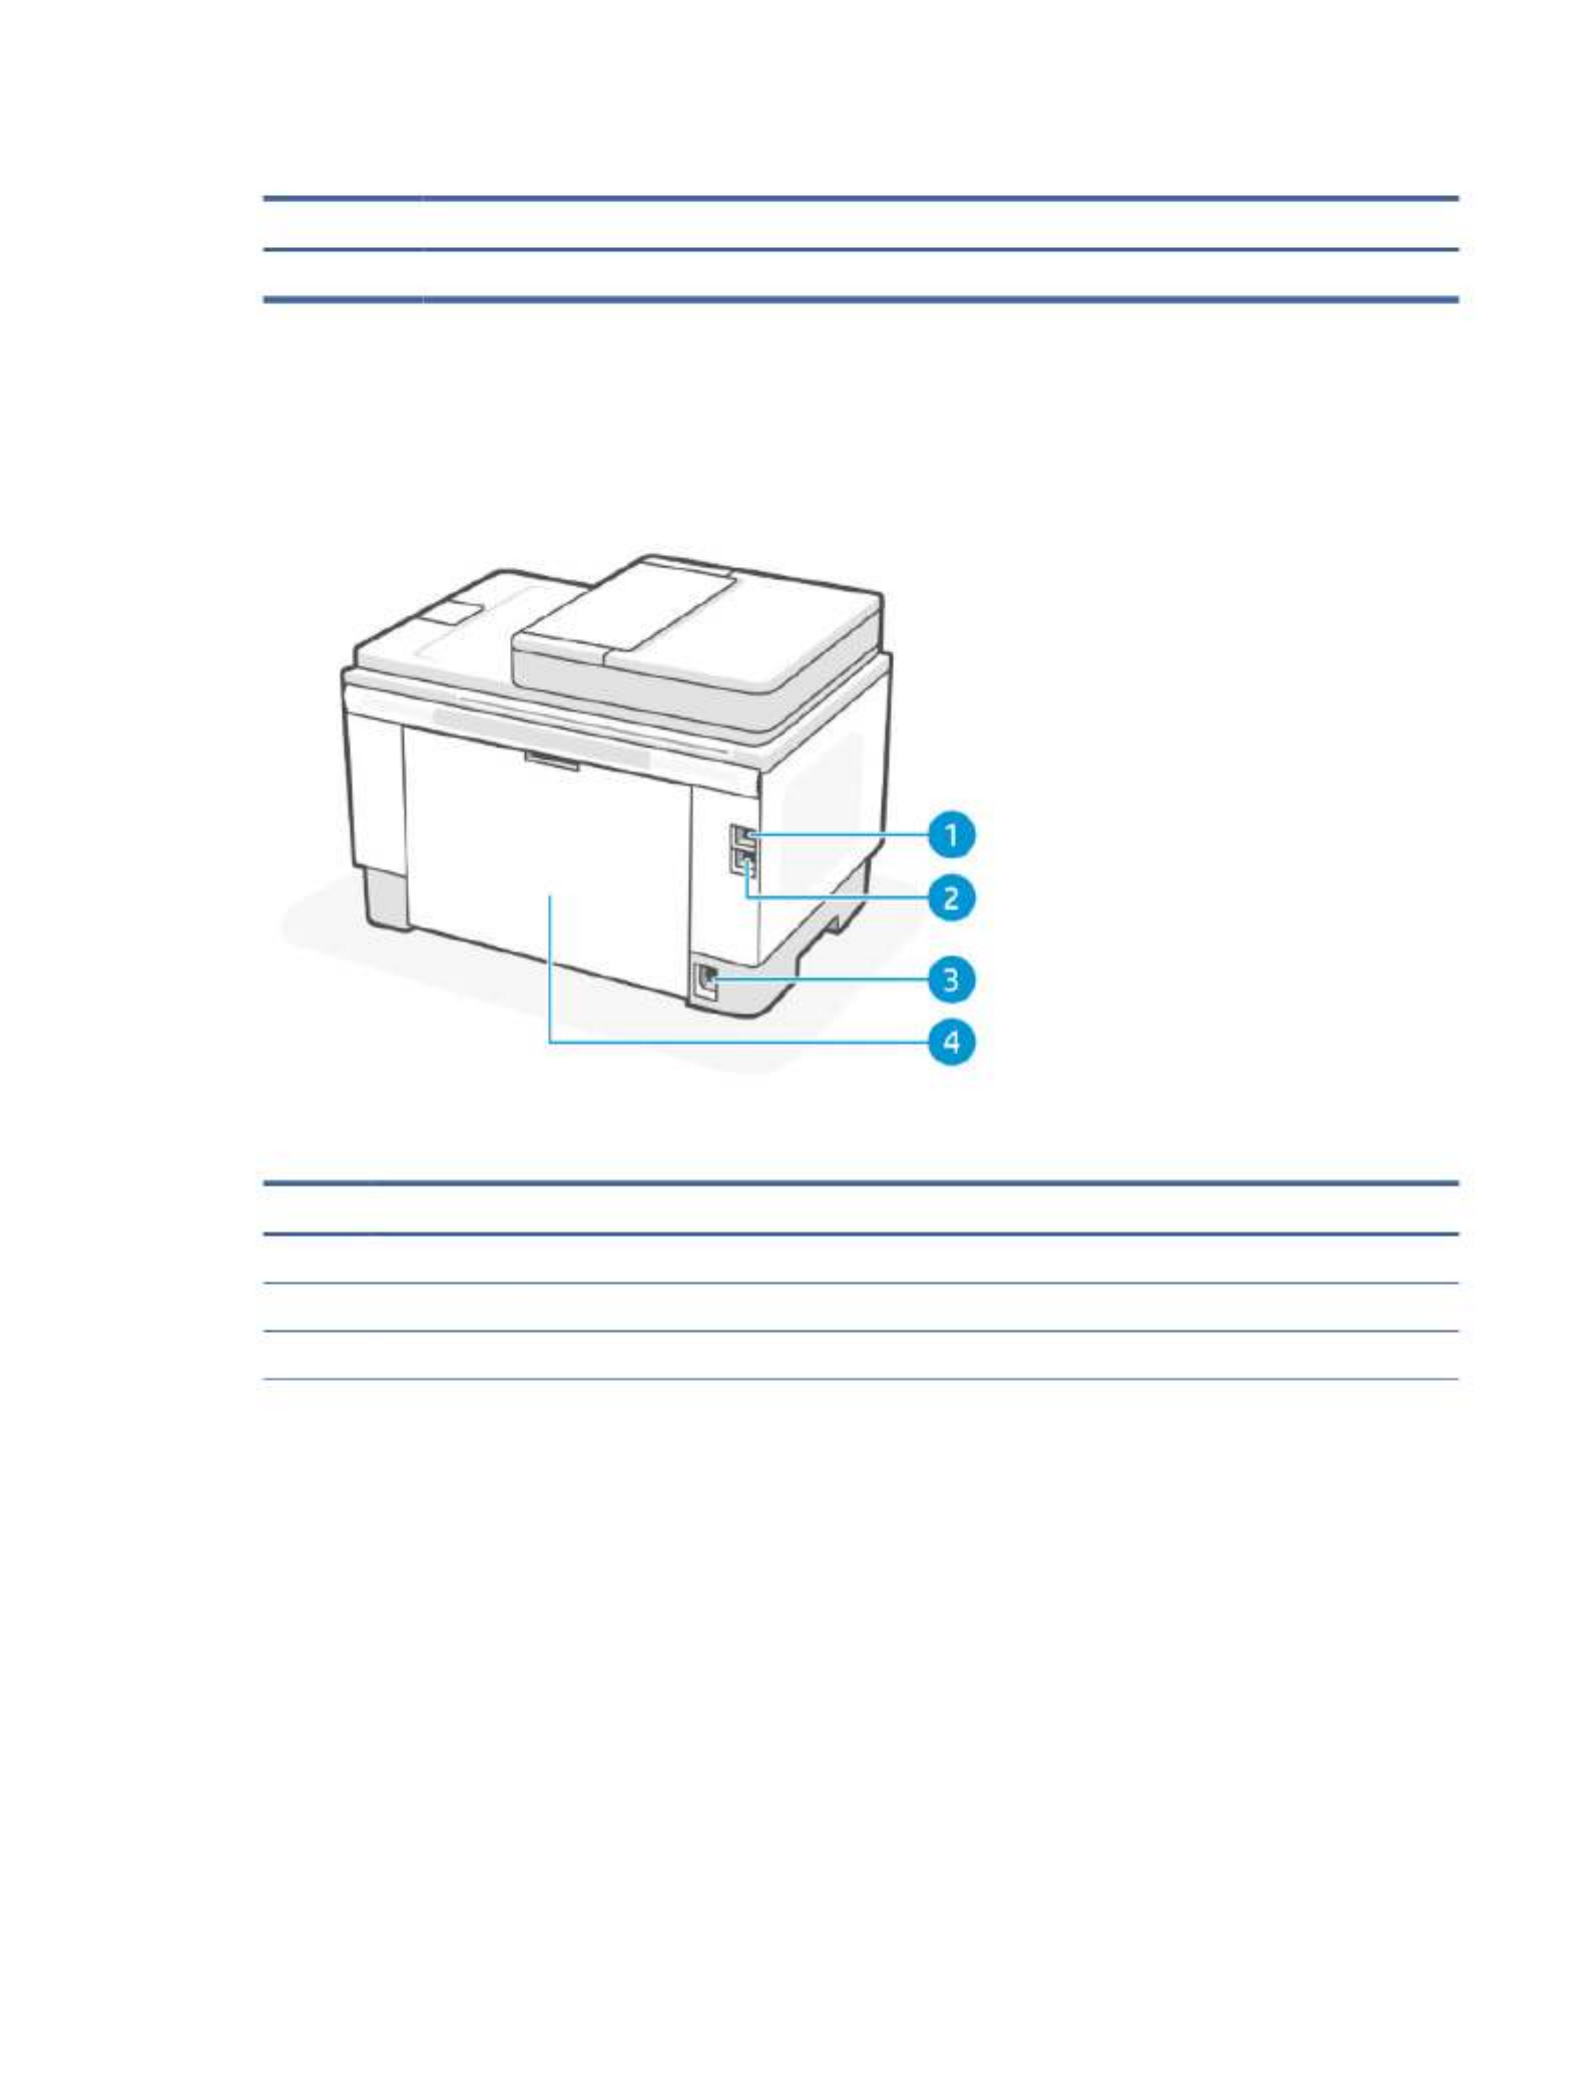
Part names and their locations on the back of the printer.
T
T
T
TTable 1-3
able 1-3
able 1-3
able 1-3able 1-3 Printer parts r
Printer parts r
Printer parts r
Printer parts rPrinter parts rear
ear
ear
earear
Featur
Featur
Featur
FeaturFeature
e
e
ee Description
Description
Description
DescriptionDescription
1
1
1
11 USB port
2
2
2
22 Ethernet port (some models only)
3
3
3
33 Power input
Printer parts rear 3
T
T
T
TTable 1-3
able 1-3
able 1-3
able 1-3able 1-3 Printer parts r
Printer parts r
Printer parts r
Printer parts rPrinter parts rear
ear
ear
earear (continued)
(continued)
(continued)
(continued)(continued)
Featur
Featur
Featur
FeaturFeature
e
e
ee Description
Description
Description
DescriptionDescription
4
4
4
44 Rear access door
C
C
C
CContr
ontr
ontr
ontrontrol panel f
ol panel f
ol panel f
ol panel fol panel fea
ea
ea
eaeatur
tur
tur
turtures (
es (
es (
es (es (dn/
dn/
dn/
dn/dn/dw
dw
dw
dwdw/
/
/
//w
w
w
ww/USB)
/USB)
/USB)
/USB)/USB)
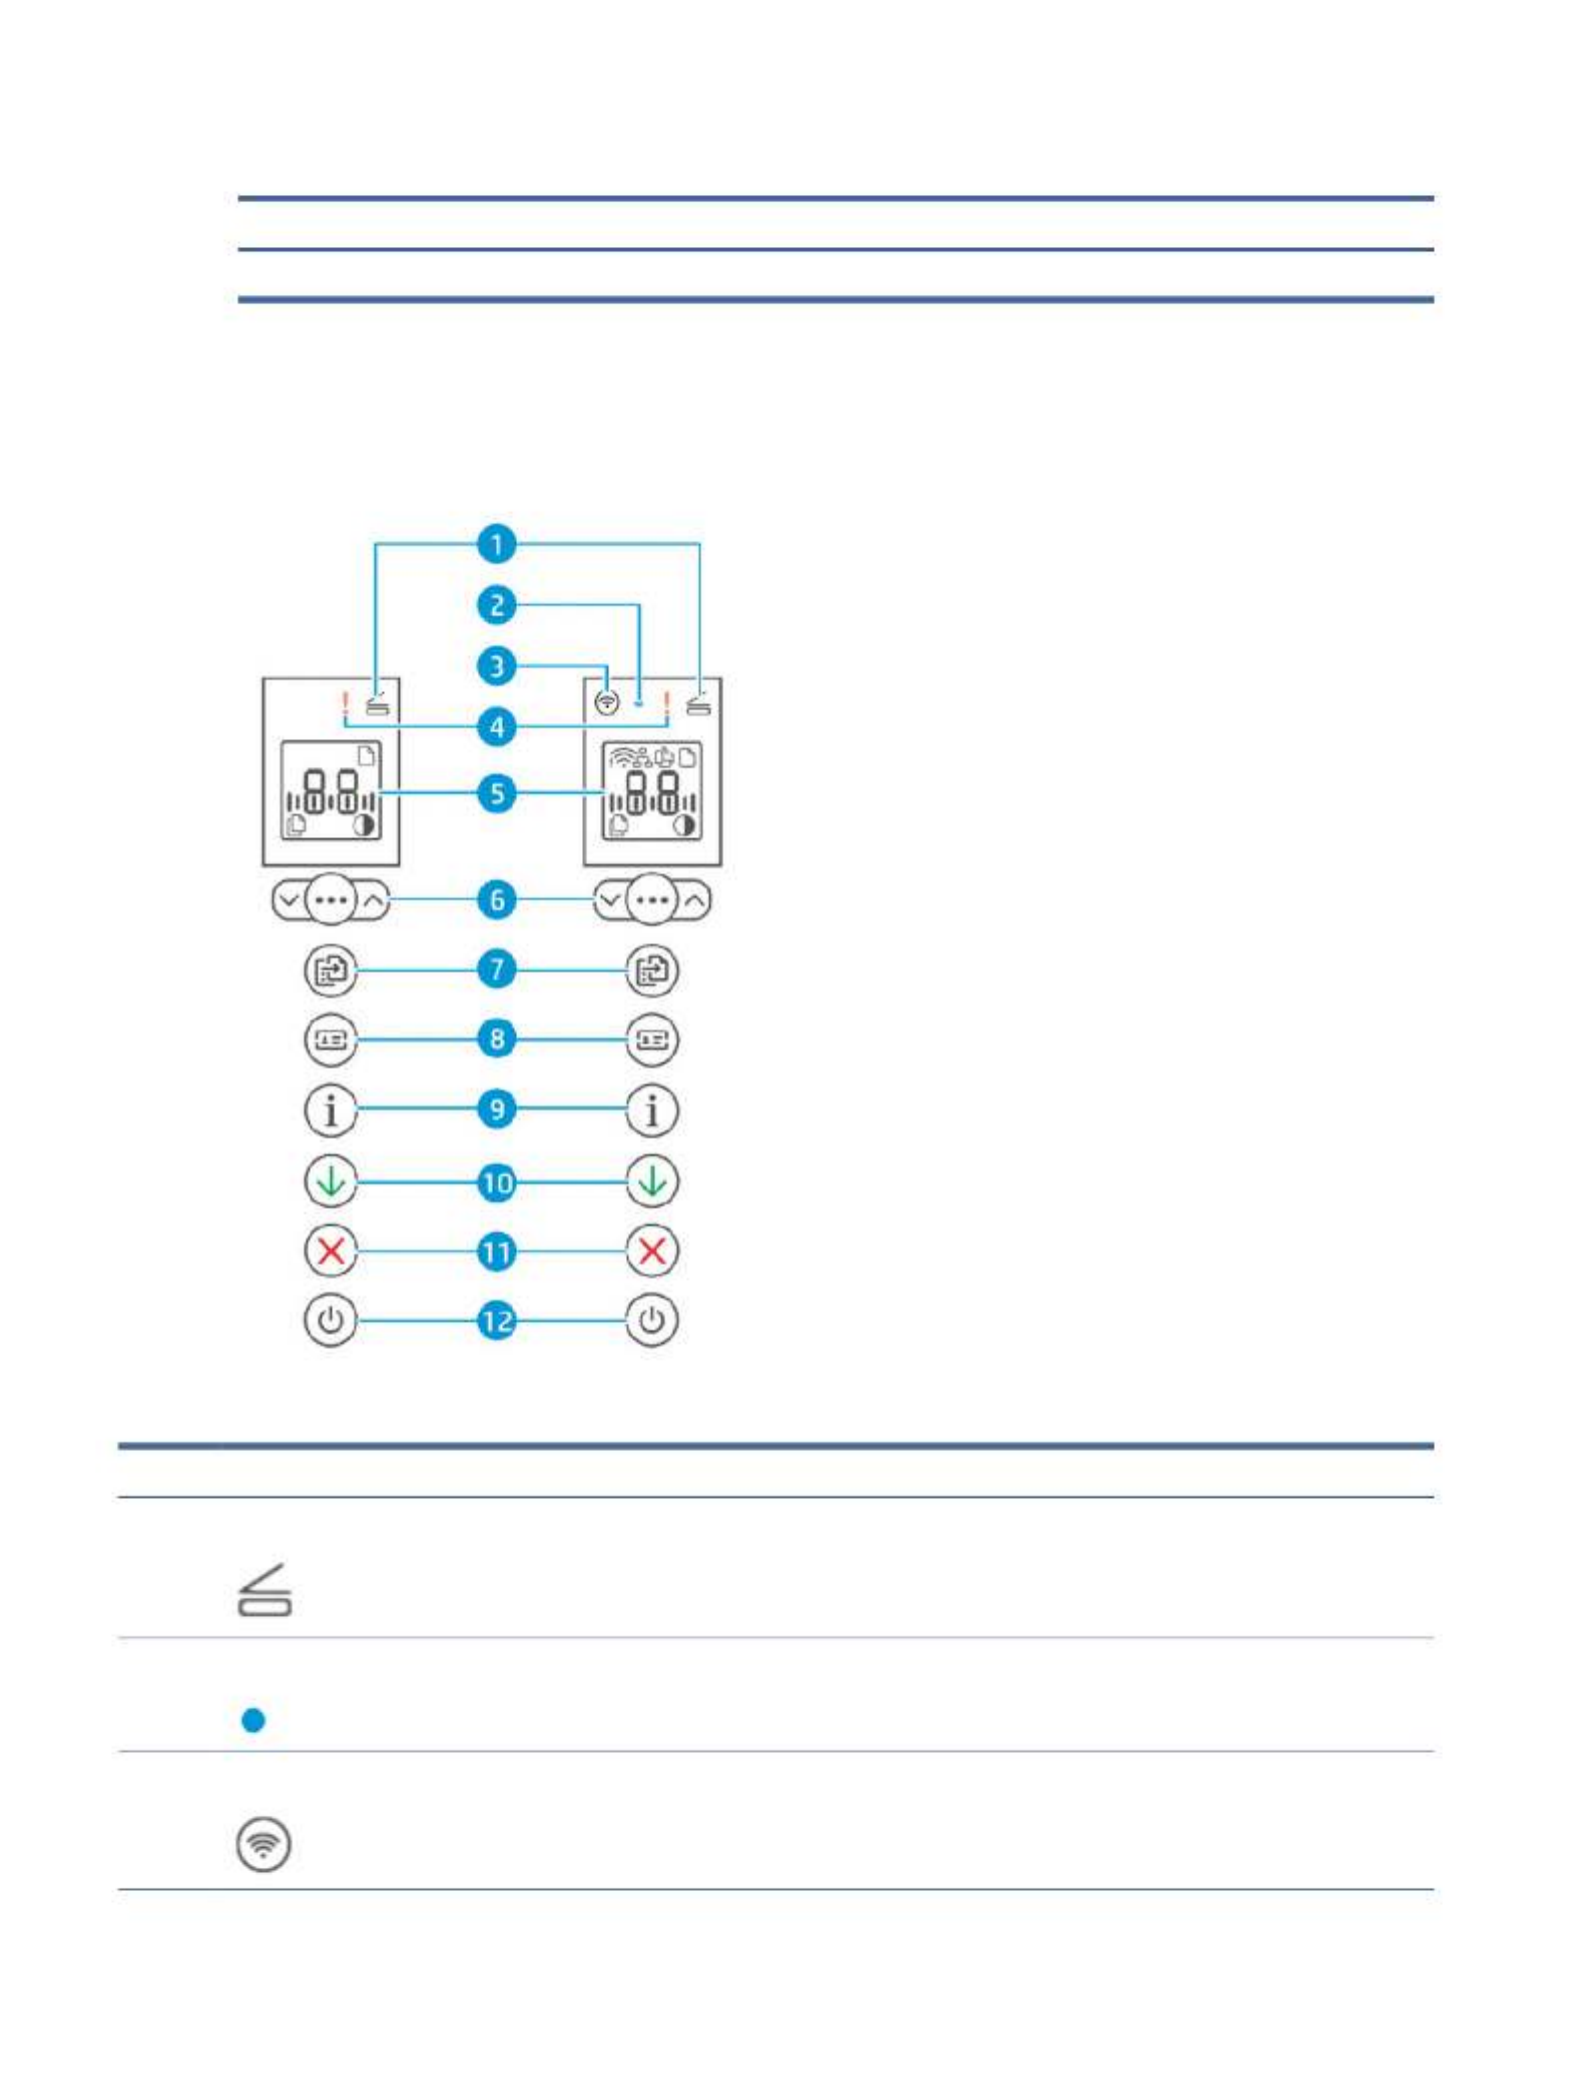
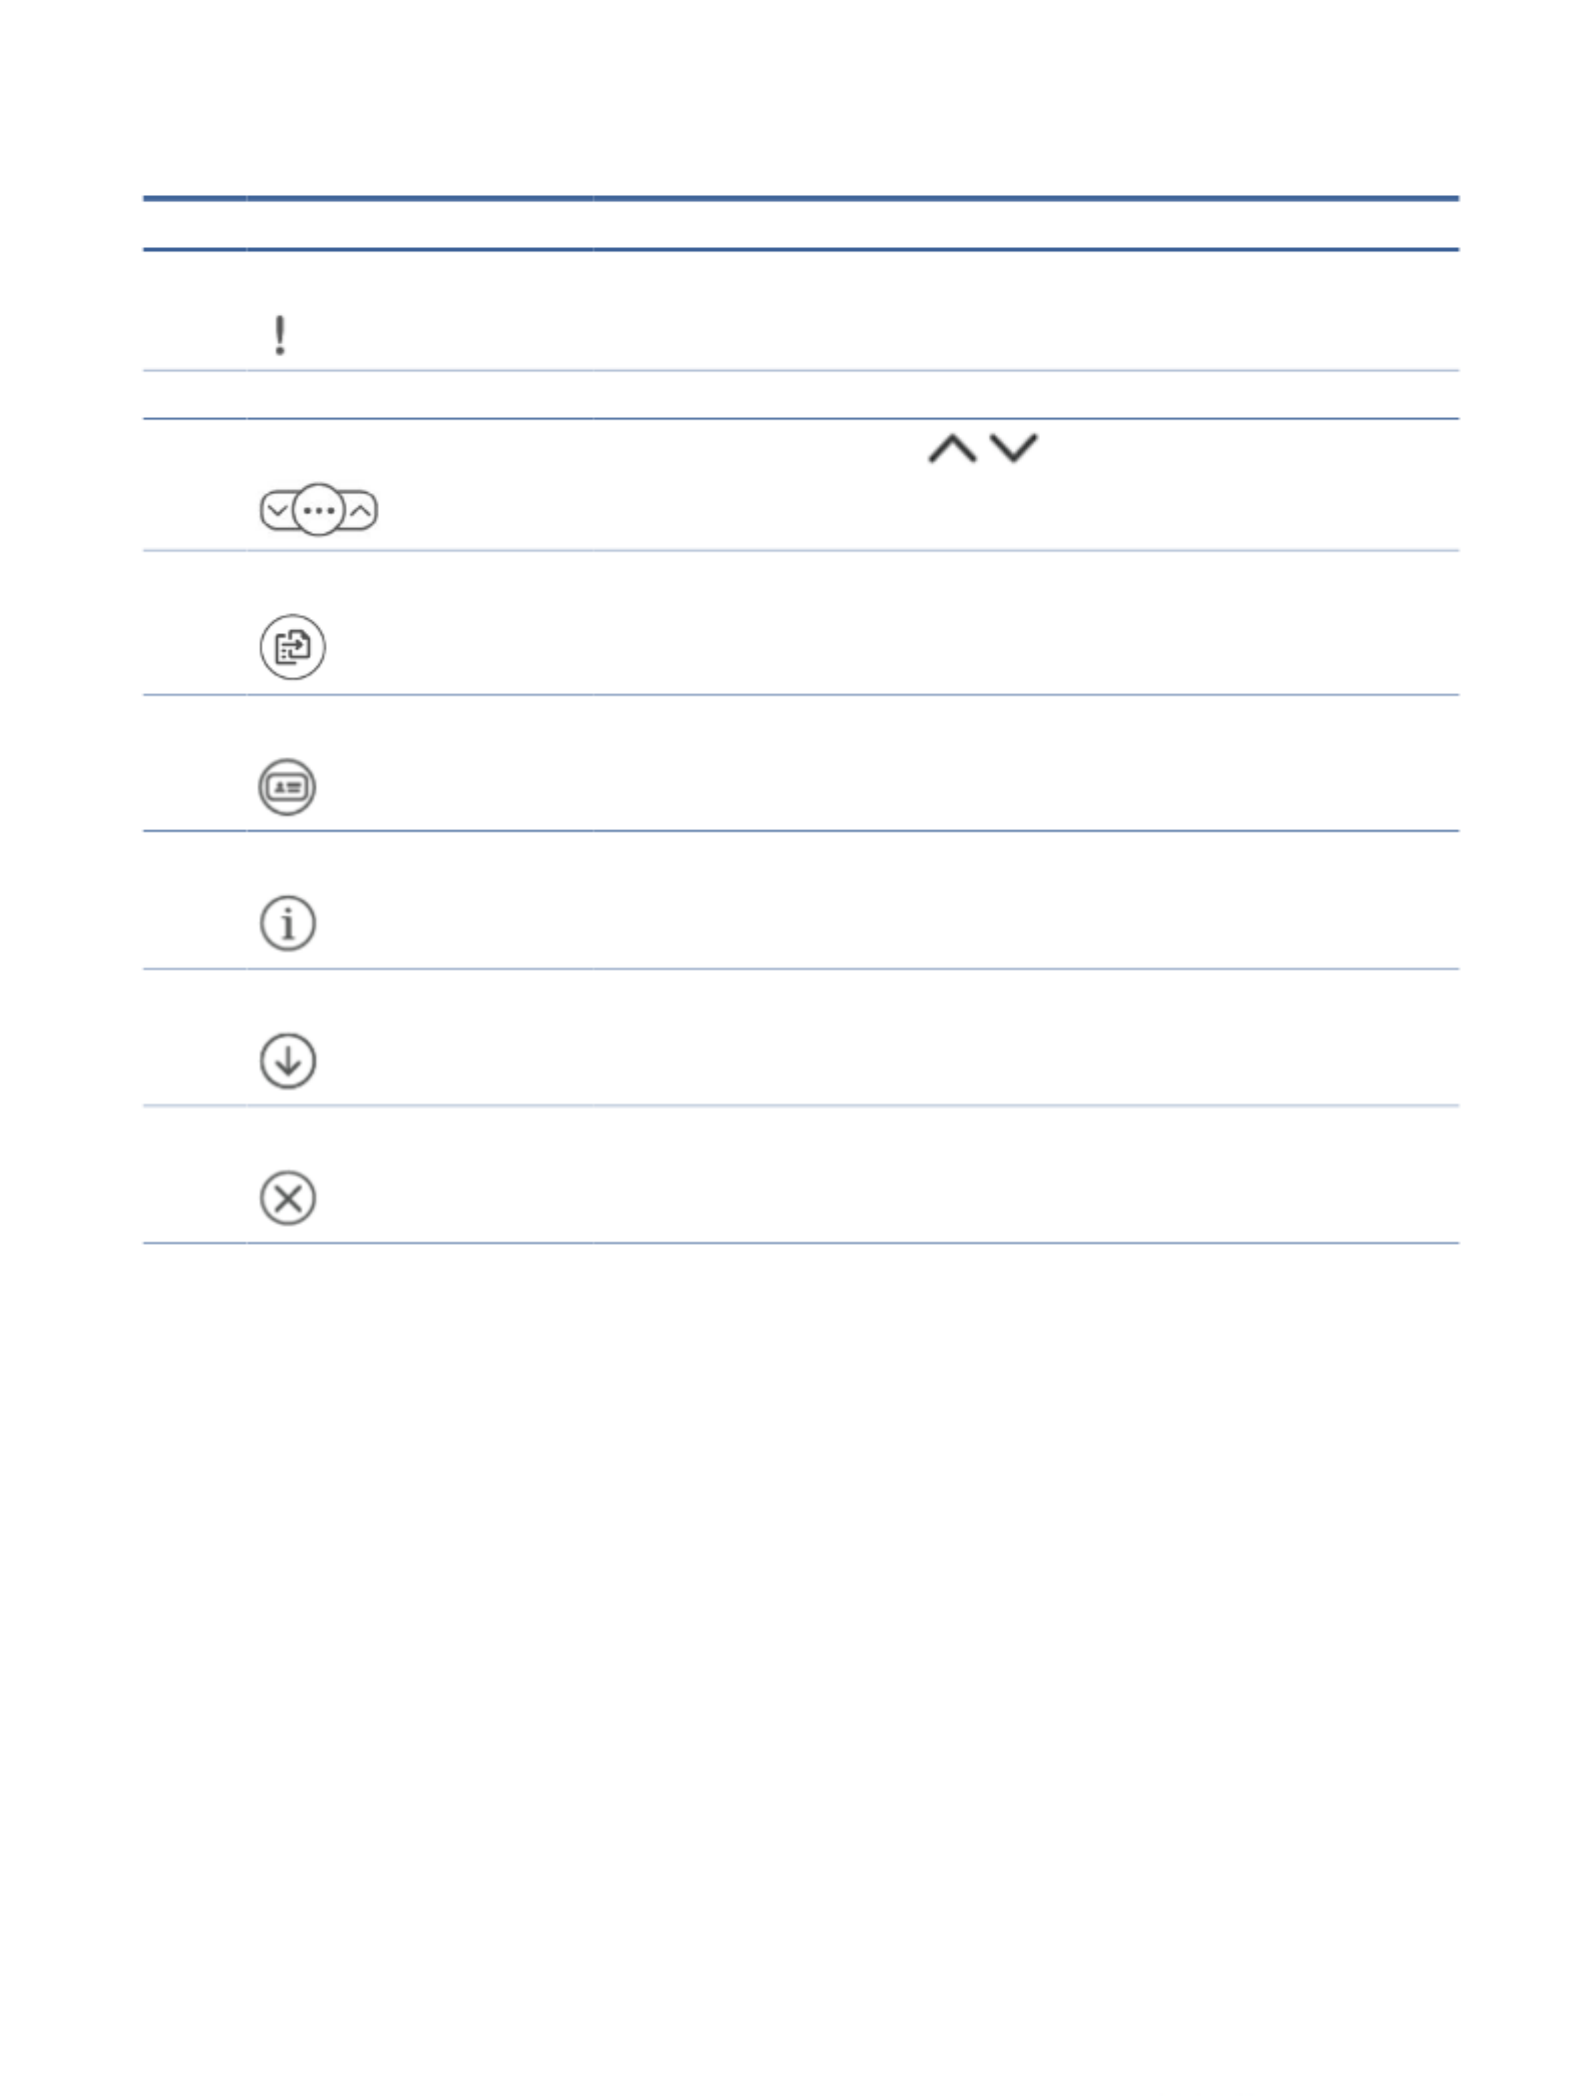
Features and functions of the printer control panel.
T
T
T
TTable 1-4
able 1-4
able 1-4
able 1-4able 1-4 Contr
Contr
Contr
ContrControl panel fe
ol panel fe
ol panel fe
ol panel feol panel features
atures
atures
aturesatures
Featur
Featur
Featur
FeaturFeature
e
e
ee Buttons/Lights
Buttons/Lights
Buttons/Lights
Buttons/LightsButtons/Lights Description
Description
Description
DescriptionDescription
1 Open Lid light A light indicating the scanner lid is open. This light during the ID Card Copy mode.ashes
2 Wireless light A small LED light to indicate the status of the Wi-Fi connection. This light blinks when connecting to
Wi-Fi and is on when connected.
3 Wireless button (some models only) A button to turn on or the Wi-Fi connection to the printer.o
4 Chapter 1Get started
T
T
T
TTable 1-4
able 1-4
able 1-4
able 1-4able 1-4 Contr
Contr
Contr
ContrControl panel fe
ol panel fe
ol panel fe
ol panel feol panel features
atures
atures
aturesatures (c
(c
(c
(c(continued)
ontinued)
ontinued)
ontinued)ontinued)
Featur
Featur
Featur
FeaturFeature
e
e
ee Buttons/Lights
Buttons/Lights
Buttons/Lights
Buttons/LightsButtons/Lights Description
Description
Description
DescriptionDescription
4 Attention light A light that is on or blinks when the printer requires attention.
5 Control panel display An LCD display to display errors, number of copies and the status of other printer functions.
6 Copy Options A Menu button with Up/Down buttons / to adjust the number of copies to be printed, or
to adjust the contrast of the document copied.
7 Copy button/light A button to execute a copy job. This light blinks when you are copying and stops when complete.
8 ID Card copy button/light A button to execute a copy job for a two-sided card or similar document.identication
9 Information button/light A button to print a summary of printer settings and status. The button lights up or blinks when a
printer error occurs.
10 Resume button/light A button to acknowledge and resume printing. If the light on this button is on, the printer needs
attention.
11 Cancel button/light A button to cancel a job.
Control panel features (dn/dw/w/USB) 5

T
T
T
TTable 1-4
able 1-4
able 1-4
able 1-4able 1-4 Contr
Contr
Contr
ContrControl panel fe
ol panel fe
ol panel fe
ol panel feol panel features
atures
atures
aturesatures (c
(c
(c
(c(continued)
ontinued)
ontinued)
ontinued)ontinued)
Featur
Featur
Featur
FeaturFeature
e
e
ee Buttons/Lights
Buttons/Lights
Buttons/Lights
Buttons/LightsButtons/Lights Description
Description
Description
DescriptionDescription
12 Power button/light A button to turn the printer on or o.
C
C
C
CContr
ontr
ontr
ontrontrol panel f
ol panel f
ol panel f
ol panel fol panel fea
ea
ea
eaeatur
tur
tur
turtures (sdn/
es (sdn/
es (sdn/
es (sdn/es (sdn/sdw)
sdw)
sdw)
sdw)sdw)
Features and functions of the printer control panel.
T
T
T
TTable 1-5
able 1-5
able 1-5
able 1-5able 1-5 Contr
Contr
Contr
ContrControl panel fe
ol panel fe
ol panel fe
ol panel feol panel features
atures
atures
aturesatures
Featur
Featur
Featur
FeaturFeature
e
e
ee Buttons/lights
Buttons/lights
Buttons/lights
Buttons/lightsButtons/lights Description
Description
Description
DescriptionDescription
1
1
1
11 Power button/light A button to turn the printer on or o.
2
2
2
22 Attention light A light that is on or blinks when the printer requires attention.
3 Open Lid light A light indicating the scanner lid is open. This light during the ID Card Copy mode.ashes
4
4
4
44 Control panel display An LCD display to display errors, number of copies and the status of other printer
functions.
6 Chapter 1Get started

T
T
T
TTable 1-5
able 1-5
able 1-5
able 1-5able 1-5 Contr
Contr
Contr
ContrControl panel fe
ol panel fe
ol panel fe
ol panel feol panel features
atures
atures
aturesatures (c
(c
(c
(c(continued)
ontinued)
ontinued)
ontinued)ontinued)
Featur
Featur
Featur
FeaturFeature
e
e
ee Buttons/lights
Buttons/lights
Buttons/lights
Buttons/lightsButtons/lights Description
Description
Description
DescriptionDescription
5
5
5
55 Copy Options A Menu button with Up/Down buttons / to adjust the number of copies to
print or to adjust the contrast of the document copied.
6
6
6
66 ID Card copy button/light A button to execute a copy job for a two-sided card or similar document.identication
7
7
7
77 Copy button/light A button to execute a copy job. This light starts to blink when you are copying and stops
when complete.
8
8
8
88 Cancel button/light A button to cancel a job.
9
9
9
99 Information button/light A button to print a summary of printer settings and status. The button lights up or blinks
when a printer error occurs.
10
10
10
1010 Wireless button (some models
only)
A button to turn on or the Wi-Fi connection to the printer.o
Control panel features (sdn/sdw) 7

T
T
T
TTable 1-5
able 1-5
able 1-5
able 1-5able 1-5 Contr
Contr
Contr
ContrControl panel fe
ol panel fe
ol panel fe
ol panel feol panel features
atures
atures
aturesatures (c
(c
(c
(c(continued)
ontinued)
ontinued)
ontinued)ontinued)
Featur
Featur
Featur
FeaturFeature
e
e
ee Buttons/lights
Buttons/lights
Buttons/lights
Buttons/lightsButtons/lights Description
Description
Description
DescriptionDescription
11
11
11
1111 Resume button/light A button to acknowledge and resume printing. If the light on this button is on or blinking,
the printer needs attention.
C
C
C
CContr
ontr
ontr
ontrontrol panel dis
ol panel dis
ol panel dis
ol panel disol panel display f
play f
play f
play fplay fe
e
e
eeatur
atur
atur
aturatures
es
es
eses
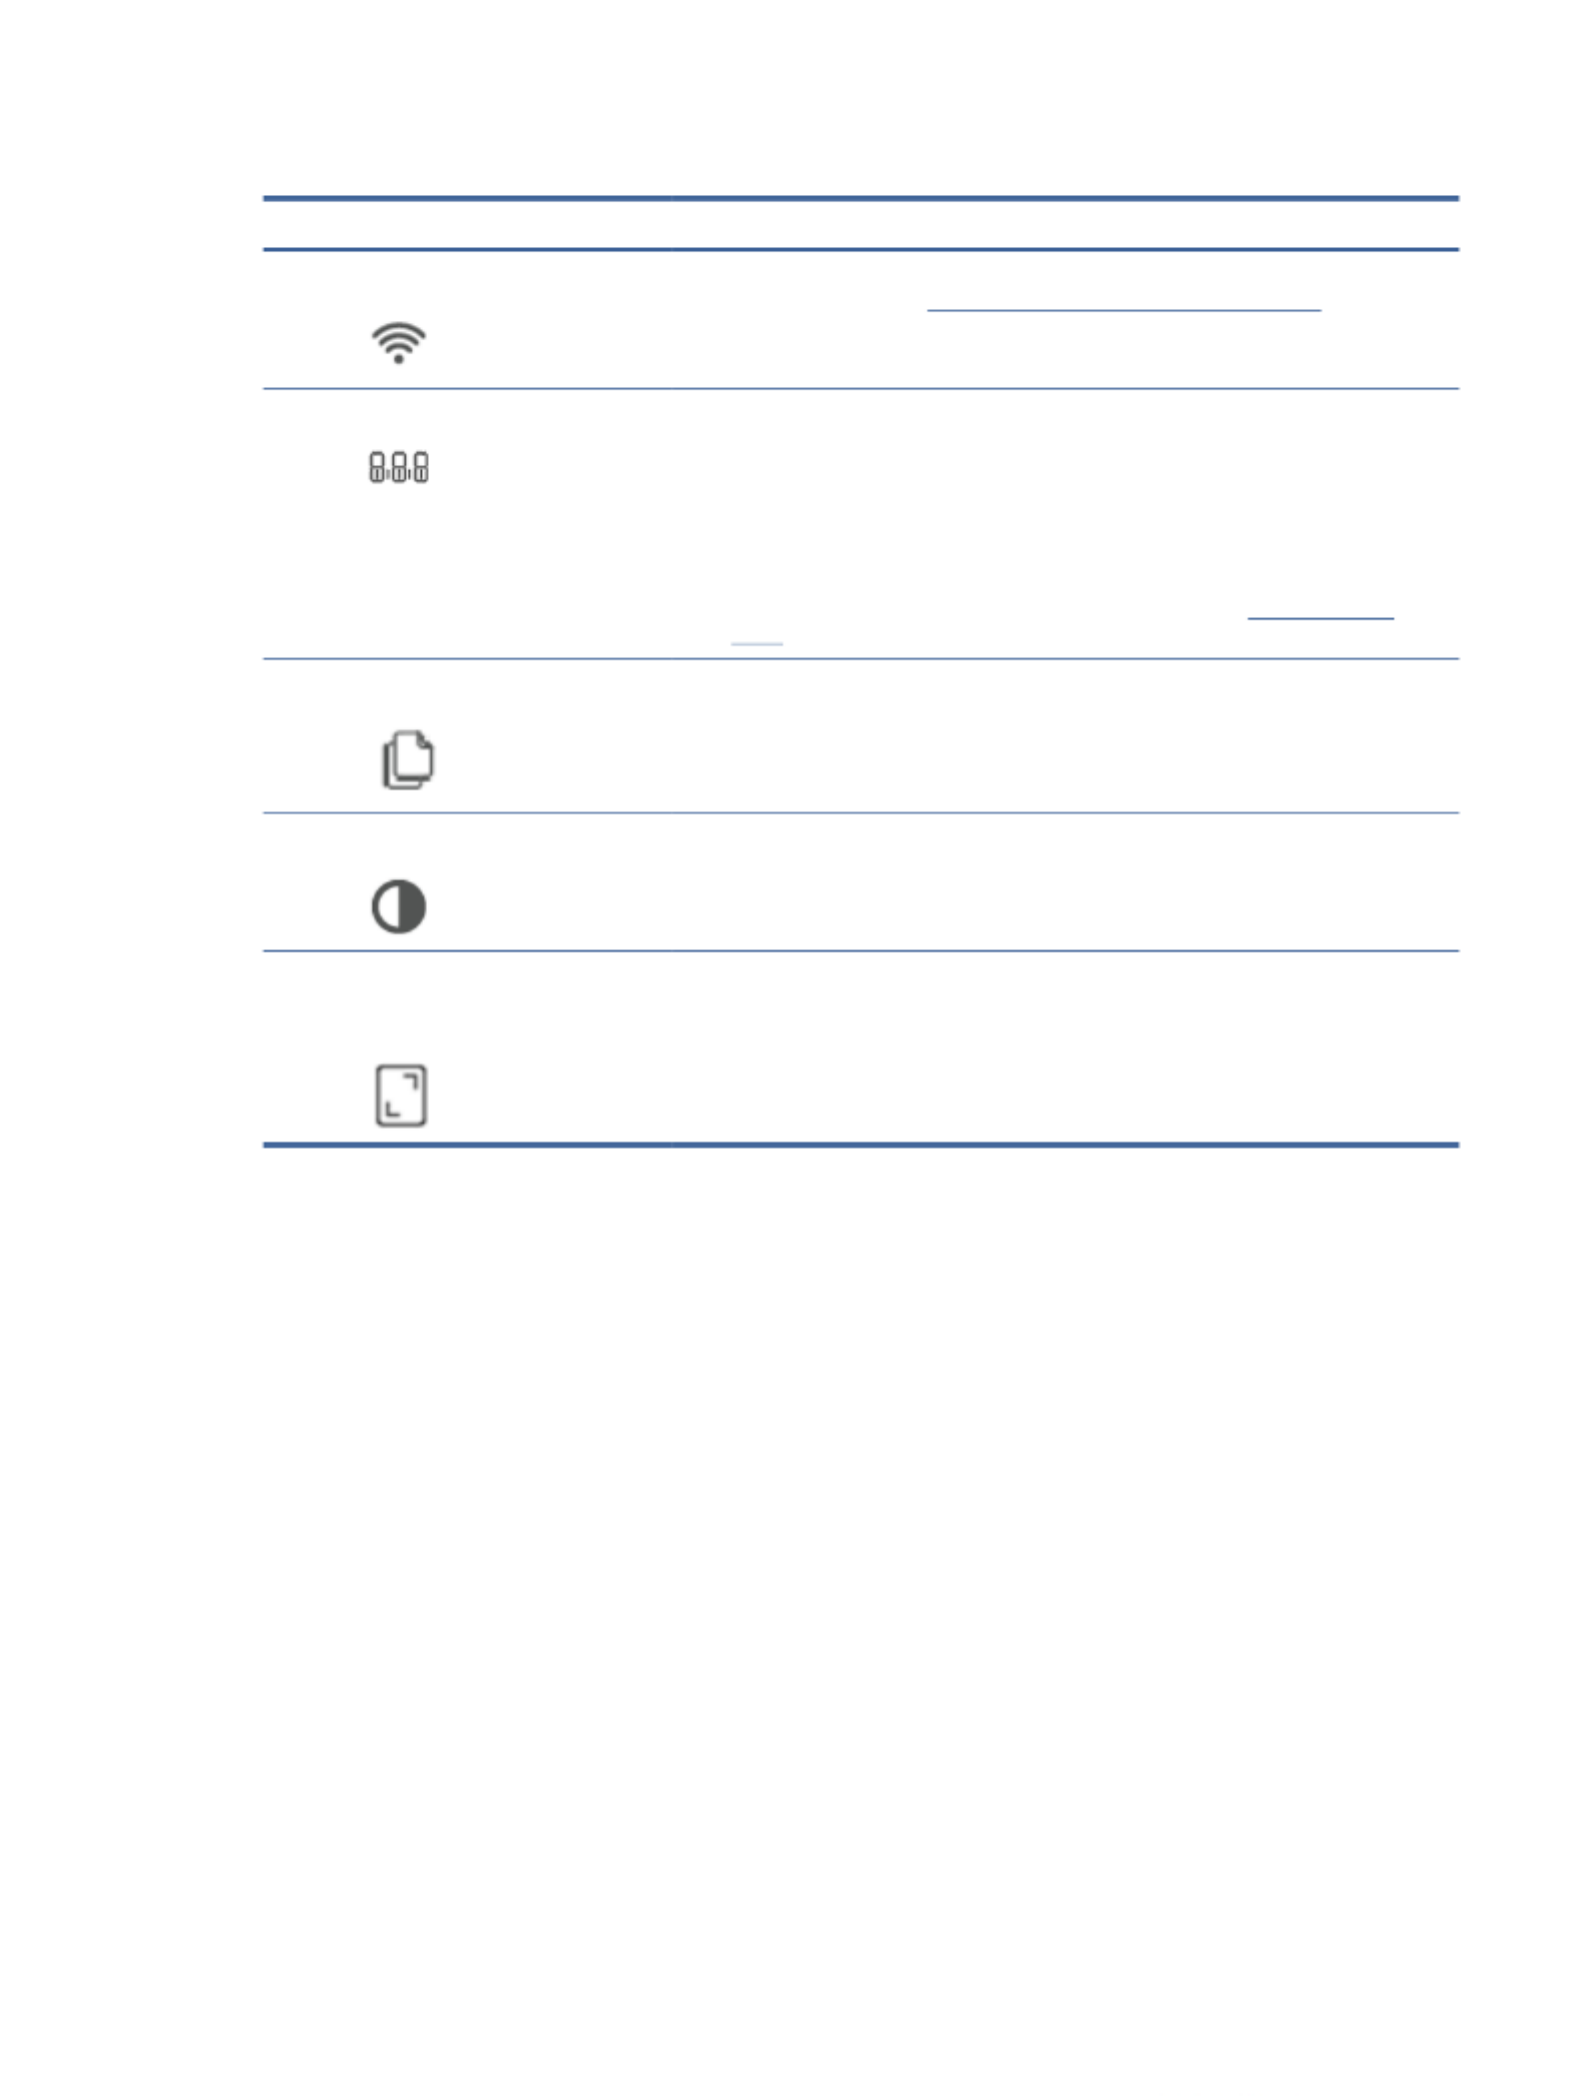
Features and functions of the control panel display.
T
T
T
TTable 1-6
able 1-6
able 1-6
able 1-6able 1-6 Contr
Contr
Contr
ContrControl panel el
ol panel el
ol panel el
ol panel elol panel elements
ements
ements
ementsements
Featur
Featur
Featur
FeaturFeature
e
e
ee Icon/Button
Icon/Button
Icon/Button
Icon/ButtonIcon/Button Description
Description
Description
DescriptionDescription
1
1
1
11 Paper icon Blinks when the input tray is out of paper, or when there is a paper error.
2
2
2
22 Wi-Fi Direct icon (wireless model
only)
Indicates that Wi-Fi Direct is on.
You can connect any device (for example: smart phones, tablets, or computers) that
support directly to the printer without using a wireless router.Wi-
3
3
3
33 Ethernet icon This indicates the printer is connected through a wired (Ethernet) connection.
8 Chapter 1Get started
T
T
T
TTable 1-6
able 1-6
able 1-6
able 1-6able 1-6 Contr
Contr
Contr
ContrControl panel el
ol panel el
ol panel el
ol panel elol panel elements
ements
ements
ementsements (c
(c
(c
(c(continued)
ontinued)
ontinued)
ontinued)ontinued)
Featur
Featur
Featur
FeaturFeature
e
e
ee Icon/Button
Icon/Button
Icon/Button
Icon/ButtonIcon/Button Description
Description
Description
DescriptionDescription
4
4
4
44 Wireless icon (some models only) This indicates that there is a stable wireless connection. If an exclamation icon appears
beside the wireless icon, see Wireless status of the printer (dw models only).
5
5
5
55 Character display The characters display the following:
●Number of copies being printed
●Copy settings (contrast and the reduce/enlarge setting)
●Animation to show that the device is busy
●Error and status codes. For a list of printer display codes, see Interpreting Error
Codes.
6
6
6
66 Number of Copies icon Shows the number of copies currently selected for printing.
7
7
7
77 Lighter/Darker (contrast) icon Shows the contrast setting (as a bar graphic).
8
8
8
88 Reduce/Enlarge (scale) icon
(sdn/sdw models only)
Shows the current scaling factor (in percent).
Use the HP Smart app t
Use the HP Smart app t
Use the HP Smart app t
Use the HP Smart app tUse the HP Smart app to print, scan, and m
o print, scan, and m
o print, scan, and m
o print, scan, and mo print, scan, and manage
anage
anage
anageanage
The HP Smart app can help you perform many dierent printer tasks, including the following:
●Set up and connect your printer.
●Print and scan documents and photos.
●Share documents through email and other applications.
●Manage printer settings, check printer status, print reports, and order supplies.
Use the HP Smart app to print, scan, and manage 9

HP Smart is supported on mobile devices and computers running on Android OS 7.0 or later, iOS 12.0 or later,
iPadOS, Windows 10 and above, and macOS 10.14 and later.
NO
NO
NO
NONOTE:
TE:
TE:
TE:TE: At this time, the HP Smart app might not be available in all languages. Some features are available only
on printers or models. HP Smart does not support all specic le formats. For more information, see Get more
information about HP Smart.
T
T
T
TTo install HP Smart and open the ap
o install HP Smart and open the ap
o install HP Smart and open the ap
o install HP Smart and open the apo install HP Smart and open the app
p
p
pp
1.
1.
1.
1.1. Visit to download and install HP Smart on your device.123.hp.com
NO
NO
NO
NONOTE:
TE:
TE:
TE:TE:
●iOS, Andr
iOS, Andr
iOS, Andr
iOS, AndriOS, Android, Windows 10 and abov
oid, Windows 10 and abov
oid, Windows 10 and abov
oid, Windows 10 and abovoid, Windows 10 and above, and macOS:
e, and macOS:
e, and macOS:
e, and macOS:e, and macOS: You can also download HP Smart from the respective
app stores for the device.
●Windows 7:
Windows 7:
Windows 7:
Windows 7:Windows 7: You can download the HP Easy Start from , install the software, and connect
123.hp.com
the printer wirelessly using the software.
NO
NO
NO
NONOTE:
TE:
TE:
TE:TE: Windows 7 Service Pack1 (SP1) is required to install the HP Smart app.
2.
2.
2.
2.2. Open HP Smart after installation.
●iOS/
iOS/
iOS/
iOS/iOS/Android:
Android:
Android:
Android:Android: From the mobile device desktop or app menu, tap HP Smart.
●Windows 10 and abov
Windows 10 and abov
Windows 10 and abov
Windows 10 and abovWindows 10 and above:
e:
e:
e:e: From the computer desktop, click , and then select from the app
Start
Start
Start
StartStart HP Smart
HP Smart
HP Smart
HP Smart HP Smart
list.
●macOS:
macOS:
macOS:
macOS:macOS: From the Launchpad, select HP Smart.
3.
3.
3.
3.3. Connect your printer wirelessly using HP Smart. See Get more information about HP Smart.
4.
4.
4.
4.4. If prompted, create an HP account and register the printer.
Get mor
Get mor
Get mor
Get morGet more information abo
e information abo
e information abo
e information aboe information about HP Smart
ut HP Smart
ut HP Smart
ut HP Smartut HP Smart
To learn how to connect, print, and scan using HP Smart, visit the website for your device:
●iOS/iP
iOS/iP
iOS/iP
iOS/iPiOS/iPadOS/
adOS/
adOS/
adOS/adOS/Android
Android
Android
AndroidAndroid: www.hp.com/go/hpsmart-help
●Windows 10 and abov
Windows 10 and abov
Windows 10 and abov
Windows 10 and abovWindows 10 and above
e
e
ee: www.hp.com/go/hpsmartwin-help
●macOS
macOS
macOS
macOSmacOS: www.hp.com/go/hpsmartmac-help
10 Chapter 1Get started

C
C
C
CConnect y
onnect y
onnect y
onnect yonnect your print
our print
our print
our printour printer
er
er
erer
2
2
2
22
This section describes dierent ways to connect your printer.
C
C
C
CConnect yo
onnect yo
onnect yo
onnect yoonnect your printer t
ur printer t
ur printer t
ur printer tur printer to a Wi-Fi network using HP Smart
o a Wi-Fi network using HP Smart
o a Wi-Fi network using HP Smart
o a Wi-Fi network using HP Smarto a Wi-Fi network using HP Smart
Install the HP Smart app on your computer or mobile device and use the app to set up or connect the printer to
your Wi-Fi network.
NO
NO
NO
NONOTE:
TE:
TE:
TE:TE: This section is applicable to wireless printers only.
For information about HP Smart including where to download the app, see Use the HP Smart app to print, scan,
and manage.
1.
1.
1.
1.1. Make sure your computer or mobile device is connected to your Wi-Fi network. On your mobile device, turn
on Bluetooth and location services.
NO
NO
NO
NONOTE:
TE:
TE:
TE:TE: HP Smart uses Bluetooth for printer setup. It does not support Print using Bluetooth.
2.
2.
2.
2.2. If your printer Wi-Fi was previously turned make sure to turn it on. For more information about wireless o,
status, see Change wireless settings.
3.
3.
3.
3.3. If the printer is no longer in wireless setup mode, restore the printer network settings. See Restore network
settings to default.
4.
4.
4.
4.4. Open the HP Smart app on your computer or mobile device. See Use the HP Smart app to print, scan, and
manage.
5.
5.
5.
5.5. From HP Smart, click or tap the Plus icon or , and then choose the option to select or add a
Add Printer
Add Printer
Add Printer
Add PrinterAdd Printer
printer. If prompted, allow Bluetooth and location permissions.
Follow the instructions to add the printer to your network.
6.
6.
6.
6.6. When prompted, create an HP account and register the printer.
NO
NO
NO
NONOTE:
TE:
TE:
TE:TE: When the printer is connected successfully, the Wireless light stops blinking and remains lit (for all
Wireless models). See Change wireless settings.
C
C
C
CConnect yo
onnect yo
onnect yo
onnect yoonnect your printer t
ur printer t
ur printer t
ur printer tur printer to a Wi-Fi network using Wi-Fi Pr
o a Wi-Fi network using Wi-Fi Pr
o a Wi-Fi network using Wi-Fi Pr
o a Wi-Fi network using Wi-Fi Pro a Wi-Fi network using Wi-Fi Pro
o
o
oot
t
t
ttected Setup
ected Setup
ected Setup
ected Setup ected Setup
(WPS)
(WPS)
(WPS)
(WPS)(WPS)
This topic describes how to connect your printer to a Wi-Fi network using WPS.
This wireless setup method can be used if your router has a WPS button. If the router does not have this button,
it is recommended that you connect the printer using the HP Smart app. See Get more information about HP
Smart.
1.
1.
1.
1.1. Make sure your router and printer are not too far from each other.
Connect your printer 11

2.
2.
2.
2.2. From the printer control panel, press and hold the Wireless button for at least 5 seconds to start
WPS. The Wireless light/icon blinks.
3.
3.
3.
3.3. Press the WPS button on your router.
NO
NO
NO
NONOTE:
TE:
TE:
TE:TE:
●Be sure to press the WPS button on the router within 2 minutes.
●When the printer is connected successfully, the Wireless light/icon stops blinking and remains lit (for all
Wireless models).
4.
4.
4.
4.4. Open the HP Smart app on your computer or mobile device. See Use the HP Smart app to print, scan, and
manage.
5.
5.
5.
5.5. From HP Smart, click or tap the Plus icon or , and then choose the option to select or add a
Add Printer
Add Printer
Add Printer
Add PrinterAdd Printer
printer.
Follow the instructions to add the printer to your network.
6.
6.
6.
6.6. When prompted, create an HP account and register the printer.
C
C
C
CConnect yo
onnect yo
onnect yo
onnect yoonnect your printer t
ur printer t
ur printer t
ur printer tur printer to an Ethernet network
o an Ethernet network
o an Ethernet network
o an Ethernet networko an Ethernet network
This topic describes how to connect your printer to an Ethernet network.
If your Ethernet network does not have an Internet connection, connect the printer wirelessly to the HP Smart
app. See Get more information about HP Smart.
1.
1.
1.
1.1. Make sure your computer is connected to the router.
2.
2.
2.
2.2. Connect your printer and router using an Ethernet cable (Ethernet cable sold separately).
NO
NO
NO
NONOTE:
TE:
TE:
TE:TE:
●The Wi-Fi connection is automatically disabled when you connect the Ethernet cable.
●To connect the printer wirelessly, disconnect the Ethernet cable and connect the printer to your wireless
network using HP Smart. See Get more information about HP Smart.
3.
3.
3.
3.3. Open the HP Smart app on your computer or mobile device. See Use the HP Smart app to print, scan, and
manage.
4.
4.
4.
4.4. From HP Smart, click or tap the Plus icon or , and then choose the option to select or add a
Add Printer
Add Printer
Add Printer
Add PrinterAdd Printer
printer.
Follow the instructions to add the printer to your network.
12 Chapter 2Connect your printer

5.
5.
5.
5.5. When prompted, create an HP account and register the printer.
C
C
C
CConnect yo
onnect yo
onnect yo
onnect yoonnect your print
ur print
ur print
ur printur printer using a USB cabl
er using a USB cabl
er using a USB cabl
er using a USB cabler using a USB cable
e
e
ee
This topic describes how to connect your printer using a USB cable.
1.
1.
1.
1.1. Connect the printer and computer using a USB cable.
2.
2.
2.
2.2. Open the HP Smart app on your computer. See Use the HP Smart app to print, scan, and manage.
3.
3.
3.
3.3. From HP Smart, click or tap the Plus icon or , and then choose the option to select or add a
Add Printer
Add Printer
Add Printer
Add PrinterAdd Printer
printer.
Follow the instructions to add the printer.
4.
4.
4.
4.4. When prompted, create an HP account and register the printer.
Change wir
Change wir
Change wir
Change wirChange wirel
el
el
eleles
es
es
esess settings
s settings
s settings
s settingss settings
You can set up and manage the wireless connection for your printer. This includes printing information about
network settings, turning the wireless function on or o, and restoring wireless settings.
Wir
Wir
Wir
WirWirel
el
el
eleless s
ess s
ess s
ess sess status of the print
tatus of the print
tatus of the print
tatus of the printtatus of the printer (dw models onl
er (dw models onl
er (dw models onl
er (dw models onler (dw models only)
y)
y)
y)y)
T
T
T
TTabl
abl
abl
ablable 2-1
e 2-1
e 2-1
e 2-1e 2-1 Wirel
Wirel
Wirel
WirelWireless status of the print
ess status of the print
ess status of the print
ess status of the printess status of the printer - dw models only
er - dw models only
er - dw models only
er - dw models onlyer - dw models only
Wirel
Wirel
Wirel
WirelWireless button
ess button
ess button
ess buttoness button Wirel
Wirel
Wirel
WirelWireless light
ess light
ess light
ess lightess light Wi-Fi Status
Wi-Fi Status
Wi-Fi Status
Wi-Fi StatusWi-Fi Status
O No light on the
control panel
The printer is not connected to the network.
To turn on wireless, press the Wireless button .
To connect the printer to a Wi-Fi network, see Connect your printer to a Wi-Fi network using HP
Smart Connect your printer to a Wi-Fi network using Wi-Fi Protected Setup (WPS)
or .
On
Solid blue light
is lit on the
control panel.
The printer is connected to the network.
On
The blue light
blinks in sync
with the
wireless icon.
The printer is trying to connect to a wireless network.
Connect your printer using a USB cable 13

T
T
T
TTable 2-1
able 2-1
able 2-1
able 2-1able 2-1 Wirel
Wirel
Wirel
WirelWireless sta
ess sta
ess sta
ess staess status of the printer - dw models onl
tus of the printer - dw models onl
tus of the printer - dw models onl
tus of the printer - dw models onltus of the printer - dw models only
y
y
yy (c
(c
(c
(c(continued)
ontinued)
ontinued)
ontinued)ontinued)
Wirel
Wirel
Wirel
WirelWireless butt
ess butt
ess butt
ess buttess button
on
on
onon Wirel
Wirel
Wirel
WirelWireless light
ess light
ess light
ess lightess light Wi-Fi Status
Wi-Fi Status
Wi-Fi Status
Wi-Fi StatusWi-Fi Status
On
The blue light
blinks in sync
with the
wireless icon.
The printer is unable to connect to a wireless network.
If the printer is unable to connect to a wireless network, the Wireless icon blinks and
Er/61 appears on the control panel. Press the Cancel button to continue and then
try connecting the printer to the wireless network again. See Connect your printer to a Wi-Fi
network using HP Smart.
If problem persists, try connecting using the HP Smart app. See Connect your printer to a Wi-Fi
network using Wi-Fi Protected Setup (WPS).
Wir
Wir
Wir
WirWirele
ele
ele
eleeless status o
ss status o
ss status o
ss status oss status of the printer (
f the printer (
f the printer (
f the printer (f the printer (sdw models only
sdw models only
sdw models only
sdw models onlysdw models only)
)
)
))
T
T
T
TTable 2-2
able 2-2
able 2-2
able 2-2able 2-2 Wirel
Wirel
Wirel
WirelWireless sta
ess sta
ess sta
ess staess status of the printer (sdw models onl
tus of the printer (sdw models onl
tus of the printer (sdw models onl
tus of the printer (sdw models onltus of the printer (sdw models only)
y)
y)
y)y)
Wirel
Wirel
Wirel
WirelWireless icon
ess icon
ess icon
ess iconess icon Wi-Fi Status
Wi-Fi Status
Wi-Fi Status
Wi-Fi StatusWi-Fi Status
O The printer is not connected to the network.
To turn on wireless, press the Wireless button .
To connect the printer to a Wi-Fi network, see Connect your printer to a Wi-Fi network using HP Smart or
Connect your printer to a Wi-Fi network using Wi-Fi Protected Setup (WPS).
On
The printer is connected to the network.
On (signal bar cycles)
The printer is trying to connect to a wireless network.
On (signal bar cycles)
The printer is unable to connect to a wireless network.
If the printer is unable to connect to a wireless network, (the Wireless icon) blinks and Er/61 appears
on the control panel. Press (the Cancel button) to continue and then try connecting the printer to the
wireless network again. See Connect your printer to a Wi-Fi network using Wi-Fi Protected Setup (WPS).
If problem persists, try connecting using the HP Smart app. See Connect your printer to a Wi-Fi network using
HP Smart.
Res
Res
Res
ResRestor
tor
tor
tortore network settings t
e network settings t
e network settings t
e network settings te network settings to defaul
o defaul
o defaul
o defaulo default
t
t
tt
1.
1.
1.
1.1. Press and hold the Information button for 5 seconds, and then release the button. All control panel
buttons light up.
14 Chapter 2Connect your printer

2.
2.
2.
2.2. Press and hold the Wireless button and the Cancel button . The printer restarts and the Wireless
light starts blinking. This indicates that the printer is in wireless setup mode. You can now set up a wireless
connection between the printer and your device.
NO
NO
NO
NONOTE:
TE:
TE:
TE:TE: Use the HP Smart app to connect the printer wirelessly.
Change the c
Change the c
Change the c
Change the cChange the connection type (network models)
onnection type (network models)
onnection type (network models)
onnection type (network models)onnection type (network models)
This topic describes how to change the way to connect your printer.
USB to a wir
USB to a wir
USB to a wir
USB to a wirUSB to a wireles
eles
eles
eleseless c
s c
s c
s cs connection
onnection
onnection
onnectiononnection
Perform the following steps to convert your HP printer from a USB to a wireless connection in Windows/macOS.
Windows 10/
Windows 10/
Windows 10/
Windows 10/Windows 10/macOS
macOS
macOS
macOSmacOS
1.
1.
1.
1.1. Unplug the USB cable from the printer.
2.
2.
2.
2.2. Make sure your computer or mobile device is connected to your Wi-Fi network. On your mobile device, turn
on Bluetooth and location services.
3.
3.
3.
3.3. If your printer Wi-Fi was previously turned make sure to turn it on. For more information about wireless o,
status, see Change wireless settings.
4.
4.
4.
4.4. If the printer is no longer in wireless setup mode, restore the printer network settings. See Restore network
settings to default.
5.
5.
5.
5.5. Open the HP Smart app on your computer or mobile device. See Use the HP Smart app to print, scan, and
manage.
6.
6.
6.
6.6. When prompted, create an HP account and register the printer.
7.
7.
7.
7.7. Follow the on-screen instructions to connect the printer to your Wi-Fi network.
Wir
Wir
Wir
WirWirel
el
el
eleles
es
es
esess t
s t
s t
s ts to a USB connection
o a USB connection
o a USB connection
o a USB connectiono a USB connection
This topic describes how to change the connection from Wireless to USB.
Windows/
Windows/
Windows/
Windows/Windows/macOS
macOS
macOS
macOSmacOS
1.
1.
1.
1.1. Connect the printer and computer using a USB cable.
2.
2.
2.
2.2. Open the HP Smart app on your computer. See Use the HP Smart app to print, scan, and manage.
3.
3.
3.
3.3. From HP Smart, click or tap the Plus icon or , and then choose the option to select or add
Add Printer
Add Printer
Add Printer
Add PrinterAdd Printer
a printer. Follow the instructions to add the printer.
4.
4.
4.
4.4. When prompted, create an HP account and register the printer.
Change the connection type (network models) 15

Lo
Lo
Lo
LoLoad media
ad media
ad media
ad mediaad media
3
3
3
33
This section helps you load dierent media into the printer.
Lo
Lo
Lo
LoLoad paper
ad paper
ad paper
ad paperad paper
This topic describes how to load paper into the input tray.
NO
NO
NO
NONOTE:
TE:
TE:
TE:TE: To avoid paper jams:
●Never add or remove paper from the input tray during printing.
●Before loading the input tray, remove all of the paper from the input tray and straighten the stack.
●Use paper that is not wrinkled, folded, or damaged.
●Always use 1 size paper. For example, do not place A5 paper over A4 size paper.
●Always push the paper guides to ensure paper does not slant/skew while picking up by printer.
T
T
T
TTo l
o l
o l
o lo load paper
oad paper
oad paper
oad paperoad paper
1.
1.
1.
1.1. Lift the tray cover and remove paper from the input tray, if any.
TIP:
TIP:
TIP:
TIP:TIP: To load Legal-size paper, lift the printer cover and, if necessary, leave it open. Depending on your
printer model, you might also need to lower the tray door.
16 Chapter 3Load media

2.
2.
2.
2.2. Slide the paper guides to the edges of the input tray.
3.
3.
3.
3.3. Insert the stack of paper into the input tray with the top forward and the side to be printed on facing up.
To load paper 17

4.
4.
4.
4.4. Slide the paper guides until they touch the edges of the media.
5.
5.
5.
5.5. Lower the tray cover and extend the output tray.
Lo
Lo
Lo
LoLoad envel
ad envel
ad envel
ad envelad envelopes
opes
opes
opesopes
This topic describes how to load envelopes into the input tray.
For a list of supported sizes and tray capacity, visit HP support website. Click Product information, and then click
the product specications for your printer.
For more information about product specic support links, see .HP support
T
T
T
TTo l
o l
o l
o lo load env
oad env
oad env
oad envoad envel
el
el
elelopes
opes
opes
opesopes
1.
1.
1.
1.1. Remove all paper from the input tray.
2.
2.
2.
2.2. Insert envelope into the middle of the input tray. Place the top edge of the envelope toward the back of the
tray and the side to be printed on should face up.
18 Chapter 3Load media

3.
3.
3.
3.3. Slide the paper guides until they touch the edges of the media.
4.
4.
4.
4.4. Lower the tray cover and extend the output tray.
Lo
Lo
Lo
LoLoad labels
ad labels
ad labels
ad labelsad labels
This topic describes how to load labels into the input tray.
For a list of supported sizes and tray capacity, visit HP support website. Click Product information, and then click
the product specications for your printer.
For more information about product specic support links, see .
HP support
T
T
T
TTo l
o l
o l
o lo load labels
oad labels
oad labels
oad labelsoad labels
1.
1.
1.
1.1. Remove all paper from the input tray.
2.
2.
2.
2.2. Insert the sheet of labels into the middle of the input tray. Place the top edge of the sheet toward the back
of the tray and the side to be printed on should face up.
3.
3.
3.
3.3. Slide the paper guides until they touch the edges of the media.
Load labels 19

4.
4.
4.
4.4. Lower the tray cover and extend the output tray.
Lo
Lo
Lo
LoLoad an original on the scanner glas
ad an original on the scanner glas
ad an original on the scanner glas
ad an original on the scanner glasad an original on the scanner glass
s
s
ss
This topic describes how to load an original on the scanner glass.
You can copy or scan originals by loading them on the scanner glass.
NO
NO
NO
NONOTE:
TE:
TE:
TE:TE:
●The scanner might not work correctly if the scanner glass and lid backing are not clean.
●Remove all originals from the document feeder tray before lifting the lid on the printer.
T
T
T
TTo l
o l
o l
o lo load an original on the scanner glas
oad an original on the scanner glas
oad an original on the scanner glas
oad an original on the scanner glasoad an original on the scanner glass
s
s
ss
1.
1.
1.
1.1. Lift the scanner lid.
2.
2.
2.
2.2. Load your original print-side down and align it with the marking on the rear left corner of the glass.
TIP:
TIP:
TIP:
TIP:TIP: For more help on loading an original, refer to the engraved guides along the edge of the scanner
glass.
20 Chapter 3Load media

3.
3.
3.
3.3. Close the lid.
Lo
Lo
Lo
LoLoad an original in the document f
ad an original in the document f
ad an original in the document f
ad an original in the document fad an original in the document feeder (some models onl
eeder (some models onl
eeder (some models onl
eeder (some models onleeder (some models only
y
y
yy)
)
)
))
This topic describes how to load an original in the document feeder.
You can copy or scan a document by placing it in the document feeder.
CAUTION:
CAUTION:
CAUTION:
CAUTION:CAUTION: Do not load photos in the document feeder, this might cause damage to your photos. Use only
paper that is supported by the document feeder.
NO
NO
NO
NONOTE:
TE:
TE:
TE:TE: Some features, such as the Fit to P
Fit to P
Fit to P
Fit to PFit to Page
age
age
ageage copy feature, do not work when you load your originals in the
document feeder. For those features to work, load your originals on the scanner glass.
T
T
T
TTo l
o l
o l
o lo load an original in the document f
oad an original in the document f
oad an original in the document f
oad an original in the document foad an original in the document feeder
eeder
eeder
eedereeder
1.
1.
1.
1.1. Load your original print-side up into the document feeder.
a.
a.
a.
a.a. If you are loading an original printed in portrait orientation, place the pages so that the top edge of the
document goes in If you are loading an original printed in landscape orientation, place the pages rst.
so that the left edge of the document goes in rst.
b.
b.
b.
b.b. Slide the paper into the document feeder until you hear a tone.
TIP:
TIP:
TIP:
TIP:TIP: For more help on loading originals in the document feeder, refer to the diagram on the document
feeder tray.
Load an original in the document feeder (some models only) 21

2.
2.
2.
2.2. Slide the paper-width guides inward until they stop at the left and right edges of the paper.
22 Chapter 3Load media

Print
Print
Print
PrintPrint
4
4
4
44
This printer is designed to work with the HP Smart app, a software application that makes it easy to print, scan,
and manage your printer from a smartphone, laptop, desktop computer, or other devices. The HP Smart app is
compatible with iOS, Android, Windows 10, and Mac.
Learn more about printing with the HP Smart app as well as printing from other software applications using the
HP printer driver. Also basic instructions for printing with Apple AirPrint on a Mac and printing from mobile nd
devices using the print commands provided in the device software.
Be sure to check out tips for successful printing to ensure you get the best results every time you print.
Print fr
Print fr
Print fr
Print frPrint from a Windows c
om a Windows c
om a Windows c
om a Windows com a Windows comput
omput
omput
omputomputer
er
er
erer
This topic describes how to print from a Windows computer.
1.
1.
1.
1.1. Make sure you have installed the HP Smart app. See Use the HP Smart app to print, scan, and manage.
2.
2.
2.
2.2. Open the document you wish to print.
3.
3.
3.
3.3. From the Fil
Fil
Fil
FilFile
e
e
ee menu in your software program, select the option.
Print
Print
Print
PrintPrint
4.
4.
4.
4.4. Click the button that opens the dialog box.
Properties
Properties
Properties
PropertiesProperties
Depending on your software application, this button might be called Pr
Pr
Pr
PrProperties
operties
operties
opertiesoperties Options
Options
Options
OptionsOptions Setup
Setup
Setup
SetupSetup, , , or
Pref
Pref
Pref
PrefPreferenc
erenc
erenc
erencerences
es
es
eses.
5.
5.
5.
5.5. Make sure your printer is selected.
6.
6.
6.
6.6. Change any print settings, and Click .
OK
OK
OK
OKOK
7.
7.
7.
7.7. Click or the button to print the job.
Print
Print
Print
PrintPrint OK
OK
OK
OKOK
Print fr
Print fr
Print fr
Print frPrint from a Mac c
om a Mac c
om a Mac c
om a Mac com a Mac comput
omput
omput
omputomputer
er
er
erer
This topic describes how to print from a Mac computer.
1.
1.
1.
1.1. Make sure you have installed the HP Smart app. See Use the HP Smart app to print, scan, and manage.
2.
2.
2.
2.2. From the computer, open S
S
S
SSystem Pr
ystem Pr
ystem Pr
ystem Prystem Prefer
efer
efer
efereference
ence
ence
enceence, and select Print
Print
Print
PrintPrinters and Scanners
ers and Scanners
ers and Scanners
ers and Scannersers and Scanners.
3.
3.
3.
3.3. Click the Add button , select the printer from the printer list, and then click .
+
+
+
++ Add
Add
Add
AddAdd
4.
4.
4.
4.4. Once connected, open the document you wish to print and use the command.
Print
Print
Print
PrintPrint
5.
5.
5.
5.5. Make sure the desired printer is selected.
6.
6.
6.
6.6. Change any print settings.
Print 23

7.
7.
7.
7.7. Click to print the document.
Print
Print
Print
PrintPrint
Print with mobil
Print with mobil
Print with mobil
Print with mobilPrint with mobile devic
e devic
e devic
e device devices
es
es
eses
This topic describes how to print from mobile devices.
You can use the HP Smart app to print documents and photos from your mobile device, social media account, or
cloud storage. For more information, see Use the HP Smart app to print, scan, and manage.
You can also print directly from your mobile devices using AirPrint (iOS) or HP Print Service Plugin (Android):
●iOS:
iOS:
iOS:
iOS:iOS: Devices running iOS 4.2 or later have AirPrint pre-installed.
●Android:
Android:
Android:
Android:Android: Download the HP Print Service Plugin from the Google Play Store or your favorite app store, and
then enable it on your device.
NO
NO
NO
NONOTE:
TE:
TE:
TE:TE: You can print using HP Smart or AirPrint/HP Print Service Plugin when the mobile device is on the same
network as the printer or a dierent network (using Wi-Fi Direct).
Print whil
Print whil
Print whil
Print whilPrint while connect
e connect
e connect
e connecte connected to same Wi-Fi network
ed to same Wi-Fi network
ed to same Wi-Fi network
ed to same Wi-Fi networked to same Wi-Fi network
You can print documents and photos from your mobile device when the device is on the same Wi-Fi network as
the printer.
Visit www.hp.com/go/mobileprinting for more information on mobile printing.
NO
NO
NO
NONOTE:
TE:
TE:
TE:TE: Make sure your mobile device and printer are connected to the same Wi-Fi network. See Connect your
printer to a Wi-Fi network using HP Smart.
Print without c
Print without c
Print without c
Print without cPrint without connecting to same Wi-Fi network (Wi-Fi Dir
onnecting to same Wi-Fi network (Wi-Fi Dir
onnecting to same Wi-Fi network (Wi-Fi Dir
onnecting to same Wi-Fi network (Wi-Fi Dironnecting to same Wi-Fi network (Wi-Fi Direct)
ect)
ect)
ect)ect)
With Wi-Fi Direct, you can directly connect your computer or mobile device to the printer and print wirelessly—
without connecting your computer or mobile device to an existing wireless network.
Visit www.hp.com/go/widirectprinting for more information on Wi-Fi Direct.
NO
NO
NO
NONOTE:
TE:
TE:
TE:TE:
●Make sure Wi-Fi Direct on your printer is turned on. If Wi-Fi Direct is turned on, the Wi-Fi Direct icon
appears on the control panel display.
●Up to 5 computers and mobile devices can connect to the printer using Wi-Fi Direct connection.
T
T
T
TTo turn Wi-Fi Dir
o turn Wi-Fi Dir
o turn Wi-Fi Dir
o turn Wi-Fi Diro turn Wi-Fi Direct on or
ect on or
ect on or
ect on or ect on or from the contr
from the contr
from the contr
from the contr from the control panel
ol panel
ol panel
ol panelol panel
o
o
o
oo :
1.
1.
1.
1.1. Press and hold the Information button for three seconds and then release the button.
All control panel buttons will light up.
24 Chapter 4Print

2.
2.
2.
2.2. Press the Resume button and the Wireless button at the same time.
TIP:
TIP:
TIP:
TIP:TIP: Press the Information button to print a report to check Wi-Fi Direct status and password.
Print without connecting to same Wi-Fi network (Wi-Fi Direct) 25

C
C
C
CCop
op
op
opopy and scan
y and scan
y and scan
y and scany and scan
5
5
5
55
This section describes how to use the copy and scan features.
Mak
Mak
Mak
MakMake a c
e a c
e a c
e a ce a copy
opy
opy
opyopy
Follow these steps to make a copy from the scanner glass:
1.
1.
1.
1.1. Load the document on the scanner glass according to the indicators on the printer.
2.
2.
2.
2.2. Press the Menu button to choose any of the following copy settings.
●Use the Up button and the Down button to adjust the number of copies to print.
●Select the Lighter/Darker setting, and then use the Up button and the Down button to
adjust the darkness setting for the current copy job.
3.
3.
3.
3.3. Press the Copy button to start copying.
TIP:
TIP:
TIP:
TIP:TIP: If your device has a camera, you can use the HP Smart app to scan a printed document or photo with
the device camera. You can then use HP Smart to edit, save, print, or share the image.
C
C
C
CCopy an
opy an
opy an
opy an opy an identication
identication
identication
identicationidentication (ID
(ID
(ID
(ID (ID) car
) car
) car
) car) card
d
d
dd
Use the ID Copy feature to copy both sides of identication card, or other small-size documents, onto the same
side of one sheet of paper. The printer prints both images at the same time.
1.
1.
1.
1.1. Open the scanner lid and place the ID card on the top half of the scanner glass as shown.
26 Chapter 5Copy and scan

2.
2.
2.
2.2. Close the scanner lid and press the ID Copy button to start copying.
When the copying is done, the Open Lid light is lit and "P2" appears on the display.
3.
3.
3.
3.3. Open the scanner lid, over the ID card and place on the same area of the scanner glass.ip
Copy an (ID) card 27identication

4.
4.
4.
4.4. Close the scanner lid and press the Resume button to start scanning the second side and print.
Scan using HP Smart (iOS
Scan using HP Smart (iOS
Scan using HP Smart (iOS
Scan using HP Smart (iOSScan using HP Smart (iOS/
/
/
//Andr
Andr
Andr
AndrAndroid, Windows 10, and macO
oid, Windows 10, and macO
oid, Windows 10, and macO
oid, Windows 10, and macOoid, Windows 10, and macOS)
S)
S)
S)S)
You can use the HP Smart app to scan documents or photos from the printer's scanner, and you can also scan
using your device camera. HP Smart includes editing tools that allow you to adjust the scanned image before
saving or sharing.
You can print, save your scans locally or in cloud storage, and share them via email, SMS, Facebook, Instagram,
etc. To scan with HP Smart, follow the instructions provided in the appropriate section below, depending on the
type of device you are using.
●iOS/
iOS/
iOS/
iOS/iOS/Android
Android
Android
AndroidAndroid: www.hp.com/go/hpsmart-help
●Windows 10
Windows 10
Windows 10
Windows 10Windows 10: www.hp.com/go/hpsmartwin-help
●macOS
macOS
macOS
macOSmacOS: www.hp.com/go/hpsmartmac-help
Scan using the HPScan softw
Scan using the HPScan softw
Scan using the HPScan softw
Scan using the HPScan softwScan using the HPScan software (Windo
are (Windo
are (Windo
are (Windoare (Windows 7)
ws 7)
ws 7)
ws 7)ws 7)
Use the HP Scan software to initiate scanning from software on your computer. You can save the scanned image
as a or send it to another software application.le
1.
1.
1.
1.1. Load the document on the scanner glass according to the indicators on the printer.
2.
2.
2.
2.2. Open the HP Printer software. From the computer desktop, click S
S
S
SStart
tart
tart
tarttart Al
Al
Al
AlAll Programs
l Programs
l Programs
l Programsl Programs HP
HP
HP
HPHP, select , click , click the
folder for the printer, and then select the printer name.
3.
3.
3.
3.3. Select Scan
Scan
Scan
ScanScan, and then select Scan a Document or Phot
Scan a Document or Phot
Scan a Document or Phot
Scan a Document or PhotScan a Document or Photo
o
o
oo.
4.
4.
4.
4.4. Adjust the settings if necessary.
5.
5.
5.
5.5. Click .
Scan
Scan
Scan
ScanScan
28 Chapter 5Copy and scan

C
C
C
CCongur
ongur
ongur
ongurongure
e
e
ee y
y
y
y your print
our print
our print
our printour printer
er
er
erer
6
6
6
66
This section describes how to congure your printer.
Use W
Use W
Use W
Use WUse Web Service
eb Service
eb Service
eb Serviceeb Services
s
s
ss
The printer innovative, cloud-based solutions, such as print anywhere, scan-and-save to cloud, and other oers
services (including supplies auto replenishment).
For more information, visit the HP Smart website http://
http://
http://
http://http://www.hpsmart.com
www.hpsmart.com
www.hpsmart.com
www.hpsmart.comwww.hpsmart.com.
NO
NO
NO
NONOTE:
TE:
TE:
TE:TE: To use these cloud-based solutions, the printer must be connected to the Internet. Unless otherwise
agreed, HP can modify or cancel these cloud-based solution at its discretion.oerings
Set up W
Set up W
Set up W
Set up WSet up Web Services
eb Services
eb Services
eb Serviceseb Services
1.
1.
1.
1.1. Before you set up Web Services, make sure your printer is connected to the Internet.
2.
2.
2.
2.2. Open the printer home page (the embedded web server or EWS). See To open EWS using HP Smart (iOS,
Android, and Windows 10) .
3.
3.
3.
3.3. Click the HP Web Service
HP Web Service
HP Web Service
HP Web ServiceHP Web Services
s
s
ss tab.
4.
4.
4.
4.4. In Web Service
Web Service
Web Service
Web ServiceWeb Services Settings
s Settings
s Settings
s Settingss Settings Enable
Enable
Enable
EnableEnable, click , and follow the on-screen instructions to accept the terms of use.
5.
5.
5.
5.5. If prompted, choose to allow the printer to check for and install printer updates.
NO
NO
NO
NONOTE:
TE:
TE:
TE:TE:
●If prompted for a password, enter the PIN from the label on your printer. See Things to note when
accessing EWS.
●If prompted for proxy settings and if your network uses proxy settings, follow the on-screen
instructions to set up a proxy server. If you do not have the details, contact your network administrator
or the person who set up the network.
●If a printer update is available, the printer downloads and installs the update and then restarts
automatically. Repeat the instructions above to set up .
HP Web Services
HP Web Services
HP Web Services
HP Web ServicesHP Web Services
6.
6.
6.
6.6. After the printer is connected to the HP server, the printer prints an information sheet. Follow the
instructions on the information sheet to setting up Web Services.nish
Remo
Remo
Remo
RemoRemove W
ve W
ve W
ve Wve Web Services
eb Services
eb Services
eb Serviceseb Services
1.
1.
1.
1.1. Open the printer home page (the embedded web server or EWS). See To access and use EWS.
2.
2.
2.
2.2. Click the HP Web Service
HP Web Service
HP Web Service
HP Web ServiceHP Web Services
s
s
ss tab.
Congure your printer 29

3.
3.
3.
3.3. In Web Service
Web Service
Web Service
Web ServiceWeb Services Settings
s Settings
s Settings
s Settingss Settings Disabl
Disabl
Disabl
DisablDisable Web Service
e Web Service
e Web Service
e Web Servicee Web Services
s
s
ss, click .
Updat
Updat
Updat
UpdatUpdate the print
e the print
e the print
e the printe the printer
er
er
erer
HP periodic printer updates to improve printer performance, issues, or protect your printer against oers x
potential security threats.
If your printer is connected to a Wi-Fi or Ethernet network with Internet access, you can update the printer using
HP Smart. See Use the HP Smart app to print, scan, and manage.
You can change the setting to auto update from the embedded web server (EWS). From EWS Home page, click
Device S
Device S
Device S
Device SDevice Status
tatus
tatus
tatustatus Print
Print
Print
PrintPrinter Updates
er Updates
er Updates
er Updateser Updates tab, click at the bottom, and select the desired options.
C
C
C
CCongur
ongur
ongur
ongurongure
e
e
ee the print
the print
the print
the print the printer using EWS
er using EWS
er using EWS
er using EWSer using EWS
Use EWS to manage printing functions from your computer.
●View printer status information
●Check the information and status of the printing supplies
●Receive notication of printer and supplies events
●View and change the network and the printer settings
T
T
T
TTo acc
o acc
o acc
o acco access and use EWS
ess and use EWS
ess and use EWS
ess and use EWSess and use EWS
You can open EWS using one of the following:
●HP Smart app
●HP printer software
●Web browser using IP address
●Web browser using Wi-Fi Direct connection
Things to no
Things to no
Things to no
Things to noThings to note when ac
te when ac
te when ac
te when acte when accessing EWS
cessing EWS
cessing EWS
cessing EWScessing EWS
If the web browser displays a message indicating that the website is unsafe, select the option to continue.
●Accessing the website will not harm your device.
●If prompted, enter the default user name and password of the printer.
–Username:
Username:
Username:
Username: Username: admin
–Passw
Passw
Passw
PasswPassword:
ord:
ord:
ord: ord: Open the toner access door, and look for the PIN number on the label inside the printer.
30 Chapter 6Congure your printer

●Depending on how the printer is connected, some features in EWS might not be available.
●EWS is not accessible beyond the network rewall.
T
T
T
TTo open EWS using HP Smart (iOS
o open EWS using HP Smart (iOS
o open EWS using HP Smart (iOS
o open EWS using HP Smart (iOSo open EWS using HP Smart (iOS, Android, and Windo
, Android, and Windo
, Android, and Windo
, Android, and Windo, Android, and Windows 10)
ws 10)
ws 10)
ws 10)ws 10)
1.
1.
1.
1.1. Open the HP Smart app on your computer or mobile device. For more information, see Use the HP Smart
app to print, scan, and manage.
2.
2.
2.
2.2. From HP Smart, select your printer, and then click or tap Advanc
Advanc
Advanc
AdvancAdvanced Settings.
ed Settings.
ed Settings.
ed Settings.ed Settings.
T
T
T
TTo open EWS using an IP addr
o open EWS using an IP addr
o open EWS using an IP addr
o open EWS using an IP addro open EWS using an IP address (Wi-Fi or Ethernet c
ess (Wi-Fi or Ethernet c
ess (Wi-Fi or Ethernet c
ess (Wi-Fi or Ethernet cess (Wi-Fi or Ethernet connection)
onnection)
onnection)
onnection)onnection)
1.
1.
1.
1.1. Find out the IP address. Press the Information button on the printer to print an information page.
2.
2.
2.
2.2. Open a web browser, type the IP address or hostname in the address bar, and then click or tap .
Enter
Enter
Enter
EnterEnter
T
T
T
TTo open EWS using an IP addr
o open EWS using an IP addr
o open EWS using an IP addr
o open EWS using an IP addro open EWS using an IP address (Wi-Fi Dir
ess (Wi-Fi Dir
ess (Wi-Fi Dir
ess (Wi-Fi Diress (Wi-Fi Direct connection)
ect connection)
ect connection)
ect connection)ect connection)
Perform the following step:
1.
1.
1.
1.1. Make sure your device and the printer are connected using Wi-Fi Direct. See Print without connecting to
same Wi-Fi network (Wi-Fi Direct).
2.
2.
2.
2.2. Open a web browser, type the following IP address or hostname of the printer in the address bar, and then
click or tap .
Enter
Enter
Enter
EnterEnter
IP Addre
IP Addre
IP Addre
IP AddreIP Address:
ss:
ss:
ss: ss: 192.168.223.1
T
T
T
TTo open EWS using HP Printer so
o open EWS using HP Printer so
o open EWS using HP Printer so
o open EWS using HP Printer soo open EWS using HP Printer softwar
ftwar
ftwar
ftwarftware (Windows 7)
e (Windows 7)
e (Windows 7)
e (Windows 7)e (Windows 7)
1.
1.
1.
1.1. From the computer desktop, click S
S
S
SStart
tart
tart
tarttart Al
Al
Al
AlAll Programs
l Programs
l Programs
l Programsl Programs HP
HP
HP
HPHP, select , click , click the folder for the printer, select
the icon with the printer's name, and then open HP Printer As
HP Printer As
HP Printer As
HP Printer AsHP Printer Assistant
sistant
sistant
sistantsistant.
2.
2.
2.
2.2. In the HP Printer Assis
HP Printer Assis
HP Printer Assis
HP Printer AssisHP Printer Assistant
tant
tant
tanttant Print
Print
Print
PrintPrint, select tab.
To open EWS using HP Smart (iOS, Android, and Windows 10) 31

3.
3.
3.
3.3. Select Printer Home P
Printer Home P
Printer Home P
Printer Home PPrinter Home Page (EWS)
age (EWS)
age (EWS)
age (EWS)age (EWS).
Congur
Congur
Congur
CongurCongure
e
e
ee IP netw
IP netw
IP netw
IP netw IP network settings
ork settings
ork settings
ork settingsork settings
Use the following sections to congure the printer network settings.
View or change network settings
View or change network settings
View or change network settings
View or change network settingsView or change network settings
Use EWS to view or change IP conguration settings.
1.
1.
1.
1.1. Open EWS. For more information, see To access and use EWS.
2.
2.
2.
2.2. Click the tab to obtain network information. Change settings as needed.
Networking
Networking
Networking
NetworkingNetworking
Rename the print
Rename the print
Rename the print
Rename the printRename the printer on a network
er on a network
er on a network
er on a networker on a network
To rename the printer on a network so that it can be uniquely use the Embedded Web Server.identied,
1.
1.
1.
1.1. Open EWS. For more information, see To access and use EWS.
2.
2.
2.
2.2. Open the Syst
Syst
Syst
SystSystem
em
em
emem tab.
3.
3.
3.
3.3. On the Device Inf
Device Inf
Device Inf
Device InfDevice Information
ormation
ormation
ormationormation page, the default printer name is in the De
De
De
DeDevice Descrip
vice Descrip
vice Descrip
vice Descripvice Description
tion
tion
tiontion eld. You can change
this name to uniquely identify this printer.
NO
NO
NO
NONOTE:
TE:
TE:
TE:TE: Completing the other elds on this page is optional.
4.
4.
4.
4.4. Click the Appl
Appl
Appl
ApplApply
y
y
yy button to save the changes.
Manuall
Manuall
Manuall
ManuallManually
y
y
y y congur
congur
congur
congurcongure
e
e
ee IPv4 T
IPv4 T
IPv4 T
IPv4 T IPv4 TCP
CP
CP
CPCP/IP par
/IP par
/IP par
/IP par/IP parameters
ameters
ameters
ametersameters
Use EWS to manually set an IPv4 address, subnet mask, and default gateway.
1.
1.
1.
1.1. Open EWS. For more information, see To access and use EWS.
2.
2.
2.
2.2. On the tab, click in the left navigation pane.
Networking
Networking
Networking
NetworkingNetworking IPv4
IPv4
IPv4
IPv4 IPv4 Conguration
Conguration
Conguration
CongurationConguration
3.
3.
3.
3.3. From the IP Pr
IP Pr
IP Pr
IP PrIP Pref
ef
ef
efeferred A
erred A
erred A
erred Aerred Addre
ddre
ddre
ddreddress Method
ss Method
ss Method
ss Methodss Method drop-down menu, select , and then edit the IPv4
Manual
Manual
Manual
ManualManual
conguration settings.
4.
4.
4.
4.4. Click the Appl
Appl
Appl
ApplApply
y
y
yy button.
Assign or change the sys
Assign or change the sys
Assign or change the sys
Assign or change the sysAssign or change the syst
t
t
ttem passw
em passw
em passw
em passwem passwor
or
or
orord using EWS
d using EWS
d using EWS
d using EWSd using EWS
Assign an administrator password for access to the printer and EWS so that unauthorized users cannot change
the printer settings.
1.
1.
1.
1.1. Open EWS. For more information, see To access and use EWS.
2.
2.
2.
2.2. On the Syst
Syst
Syst
SystSystem
em
em
emem tab, click the Adminis
Adminis
Adminis
AdminisAdministration
tration
tration
trationtration link in the left navigation pane.
3.
3.
3.
3.3. In the area labeled Pr
Pr
Pr
PrProduct Security
oduct Security
oduct Security
oduct Securityoduct Security, enter the password in the P
P
P
PPasswor
asswor
asswor
assworassword
d
d
dd eld.
4.
4.
4.
4.4. Re-enter the password in the C
C
C
CConrm
onrm
onrm
onrmonrm Pas
Pas
Pas
Pas Passwor
swor
swor
sworsword
d
d
dd eld.
32 Chapter 6Congure your printer

5.
5.
5.
5.5. Click the Appl
Appl
Appl
ApplApply
y
y
yy button.
NO
NO
NO
NONOTE:
TE:
TE:
TE:TE: Make note of the password and store it in a safe place.
Change ener
Change ener
Change ener
Change enerChange energy-conservation settings
gy-conservation settings
gy-conservation settings
gy-conservation settingsgy-conservation settings
The printer includes several economy features to conserve energy and supplies.
Set the Sl
Set the Sl
Set the Sl
Set the SlSet the Sleep
eep
eep
eepeep/
/
/
//Auto
Auto
Auto
Auto Auto A
A
A
A After Inactivity setting
fter Inactivity setting
fter Inactivity setting
fter Inactivity settingfter Inactivity setting
O
O
O
OO
Use EWS to set the amount of idle time before the printer enters sleep mode.
Complete the following procedure to change the Sleep/Auto After Inactivity setting:O
1.
1.
1.
1.1. Open EWS. For more information, see To access and use EWS.
2.
2.
2.
2.2. Click the Syst
Syst
Syst
SystSystem
em
em
emem tab, and then select .
Energy Settings
Energy Settings
Energy Settings
Energy SettingsEnergy Settings
3.
3.
3.
3.3. From the Sl
Sl
Sl
SlSleep
eep
eep
eepeep/
/
/
//Auto
Auto
Auto
Auto Auto A
A
A
A After Inactivity
fter Inactivity
fter Inactivity
fter Inactivityfter Inactivity
O
O
O
OO drop-down menu, select the time for the delay.
4.
4.
4.
4.4. Click the Appl
Appl
Appl
ApplApply
y
y
yy button.
Set the Shut Down Aft
Set the Shut Down Aft
Set the Shut Down Aft
Set the Shut Down AftSet the Shut Down After Inactivity delay and
er Inactivity delay and
er Inactivity delay and
er Inactivity delay and er Inactivity delay and congur
congur
congur
congurcongure
e
e
ee the print
the print
the print
the print the printer to use 1 w
er to use 1 w
er to use 1 w
er to use 1 wer to use 1 watt or l
att or l
att or l
att or latt or les
es
es
esess of po
s of po
s of po
s of pos of power
wer
wer
werwer
Use EWS to set the amount of time before the printer shuts down.
NO
NO
NO
NONOTE:
TE:
TE:
TE:TE: After the printer shuts down, the power consumption is 1 watt or less.
Complete the following procedure to change the Shut Down After Inactivity setting:
1.
1.
1.
1.1. Open EWS. For more information, see To access and use EWS.
2.
2.
2.
2.2. Click the Syst
Syst
Syst
SystSystem
em
em
emem tab, and then select .
Energy Settings
Energy Settings
Energy Settings
Energy SettingsEnergy Settings
3.
3.
3.
3.3. From the Shut Do
Shut Do
Shut Do
Shut DoShut Down After Inactivity
wn After Inactivity
wn After Inactivity
wn After Inactivitywn After Inactivity drop-down list, select the time for the delay.
NO
NO
NO
NONOTE:
TE:
TE:
TE:TE: The default value is .
4 hours
4 hours
4 hours
4 hours4 hours
4.
4.
4.
4.4. Click the Appl
Appl
Appl
ApplApply
y
y
yy button.
Set the Delay Shut Down setting
Set the Delay Shut Down setting
Set the Delay Shut Down setting
Set the Delay Shut Down settingSet the Delay Shut Down setting
Use the EWS to delay the printer shutdown when the Power button is pressed.
1.
1.
1.
1.1. Open EWS. For more information, see To access and use EWS.
2.
2.
2.
2.2. Click the Syst
Syst
Syst
SystSystem
em
em
emem tab, and then select .
Energy Settings
Energy Settings
Energy Settings
Energy SettingsEnergy Settings
3.
3.
3.
3.3. Select or clear the Delay when ports ar
Delay when ports ar
Delay when ports ar
Delay when ports arDelay when ports are active
e active
e active
e activee active option.
NO
NO
NO
NONOTE:
TE:
TE:
TE:TE: When this option is selected the printer will not shut down unless all ports are inactive. An active
network link will prevent the printer from shutting down.
Change energy-conservation settings 33

Manage t
Manage t
Manage t
Manage tManage toner
oner
oner
oneroner
, media, and parts
, media, and parts
, media, and parts
, media, and parts, media, and parts
7
7
7
77
This section describes how to check toner level, the toner, replace drum, and order supplies, accessories, rell
and parts.
Check and
Check and
Check and
Check and Check and r
r
r
rrell
ell
ell
ellell the t
the t
the t
the t the toner
oner
oner
oneroner
The printer is pre-lled with toner at purchase. The value of bars on the toner gauge are estimated toner levels
and may vary slightly from the actual toner level.
NO
NO
NO
NONOTE:
TE:
TE:
TE:TE: The printer only works with original HP toner rell kits. If original HP toner is not installed in the printer,
the printer will not work as expected.
T
T
T
TTypes of t
ypes of t
ypes of t
ypes of types of toner
oner
oner
oner oner rel
rel
rel
relrell
l
l
ll kit
kit
kit
kit kit
HP toner rell kits (TRK) are available in two options and depending on the requirement you can purchase anyone
of the TRK.
●High Capacity TRK - order this TRK when the toner is completely empty and no more printing can be done.
34 Chapter 7Manage toner, media, and parts

●Standard TRK - order this TRK when the toner is partly depleted.
NO
NO
NO
NONOTE:
TE:
TE:
TE:TE: You can identify the TRK with letter "X" (for High capacity) and letter "A" (for Standard) on the TRK.
For ordering the TRK, see Order supplies, accessories, and parts.
T
T
T
TToner l
oner l
oner l
oner loner lev
ev
ev
evevel indicator s
el indicator s
el indicator s
el indicator sel indicator state
tate
tate
tatetates
s
s
ss
Check the toner level indicator before ordering the TRK.
T
T
T
TTable 7-1
able 7-1
able 7-1
able 7-1able 7-1 T
T
T
TToner le
oner le
oner le
oner leoner level indicator s
vel indicator s
vel indicator s
vel indicator svel indicator states
tates
tates
tatestates
T
T
T
TToner lev
oner lev
oner lev
oner levoner level
el
el
elel Description
Description
Description
DescriptionDescription
Three lights indicate that toner is full and you cannot add toner anymore.
Two lights indicate that toner is partly depleted and you can add toner if required.
NO
NO
NO
NONOTE:
TE:
TE:
TE:TE: One Standard TRK can be added. For more information, see Types of toner kitrell .
Toner level indicator states 35

T
T
T
TTable 7-1
able 7-1
able 7-1
able 7-1able 7-1 T
T
T
TToner le
oner le
oner le
oner leoner level indicat
vel indicat
vel indicat
vel indicatvel indicator state
or state
or state
or stateor states
s
s
ss (continued)
(continued)
(continued)
(continued)(continued)
T
T
T
TToner lev
oner lev
oner lev
oner levoner level
el
el
elel Description
Description
Description
DescriptionDescription
One light (the bottom light) indicate that toner is at reserve, but you can still continue to print.
The toner level indicator glows steadily with amber light indicating reserve level.
NO
NO
NO
NONOTE:
TE:
TE:
TE:TE: One High Capacity TRK or two Standard TRK can be added. For more information, see Types of toner rell
kit.
One light (the bottom light) glows steadily and the toner level indicator also blinks continuously with amber light. It
indicates that toner is very low and no more printing can be done.
NO
NO
NO
NONOTE:
TE:
TE:
TE:TE: One High Capacity TRK or two Standard TRK must be added. For more information, see Types of toner rell
kit.
T
T
T
TTo
o
o
o o r
r
r
rrell
ell
ell
ellell the t
the t
the t
the t the toner
oner
oner
oneroner
When the toner levels show low on the toner level indicator, follow these steps to rell the toner.
1.
1.
1.
1.1. Make sure the printer is powered on, and then open the toner access door.
NO
NO
NO
NONOTE:
TE:
TE:
TE:TE: The port indicator will only display the Unlock icon if a toner rell is possible.
36 Chapter 7Manage toner, media, and parts

2.
2.
2.
2.2. Shake the toner pack for a few seconds and remove the cap.
3.
3.
3.
3.3. Open the toner access door, and then insert the toner pack until it clicks into place. Ensure that the toner
pack is fully inserted into the port.
4.
4.
4.
4.4. Rotate the rell lock ring counterclockwise until it stops.
To rell the toner 37

5.
5.
5.
5.5. Gently squeeze the toner pack to empty it into the tank.
6.
6.
6.
6.6. Turn the lock ring lever clockwise back to its original position.
7.
7.
7.
7.7. Remove the toner pack from the port and close the toner access door. Recycle the toner pack, visit
www.hp.com/recycle.
NO
NO
NO
NONOTE:
TE:
TE:
TE:TE: After emptying the toner pack, the printer might take a few minutes to be ready for use.
38 Chapter 7Manage toner, media, and parts

Repl
Repl
Repl
ReplReplac
ac
ac
acace the imaging drum
e the imaging drum
e the imaging drum
e the imaging drume the imaging drum
When the imaging drum has surpassed 50,000 prints and print quality becomes poor, the printer is past its
service life and requires authorized service maintenance.
When the toner drum reaches its end of service life, the toner level indicator light (Amber) blinks continuously.
You can print an information report to check the status of the drum. If the information report shows error "Er/32"
then it indicates the drum has reached end of its life. You can contact HP support for more information.
Disclaimer
Disclaimer
Disclaimer
DisclaimerDisclaimer: The yield of imaging drum is approximately 50,000 single-sided pages (letter or A4 size paper). There
are many factors that determine the actual drum useful life, such as temperature, humidity, type of paper, type of
toner used and other variables. The imaging drum unit is replaceable through authorized service provider.
Or
Or
Or
OrOrder supplies, ac
der supplies, ac
der supplies, ac
der supplies, acder supplies, acces
ces
ces
cescessories, and parts
sories, and parts
sories, and parts
sories, and partssories, and parts
This section describes how to order supplies and manage accessories.
Or
Or
Or
OrOrder
der
der
derder
T
T
T
TTabl
abl
abl
ablable 7-2
e 7-2
e 7-2
e 7-2e 7-2 Order
Order
Order
OrderOrder
Description
Description
Description
DescriptionDescription URL Links
URL Links
URL Links
URL LinksURL Links
Order supplies and paper www.hp.com/go/suresupply
Order genuine HPparts or accessories www.hp.com/buy/parts
Order through service or support providers Contact an HP-authorized service or support provider.
Replace the imaging drum 39
Specyfikacje produktu
| Marka: | HP |
| Kategoria: | drukarka |
| Model: | LaserJet Tank MFP 1604 |
Potrzebujesz pomocy?
Jeśli potrzebujesz pomocy z HP LaserJet Tank MFP 1604, zadaj pytanie poniżej, a inni użytkownicy Ci odpowiedzą
Instrukcje drukarka HP

2 Kwietnia 2025
2 Kwietnia 2025
2 Kwietnia 2025
2 Kwietnia 2025
17 Lutego 2025
7 Lutego 2025
29 Stycznia 2025
17 Stycznia 2025
17 Stycznia 2025
17 Stycznia 2025
Instrukcje drukarka
- drukarka Sony
- drukarka Samsung
- drukarka LG
- drukarka Xiaomi
- drukarka Sharp
- drukarka Huawei
- drukarka Lenovo
- drukarka Epson
- drukarka Fujitsu
- drukarka Roland
- drukarka Panasonic
- drukarka StarTech.com
- drukarka Canon
- drukarka Fujifilm
- drukarka MSI
- drukarka Toshiba
- drukarka D-Link
- drukarka Citizen
- drukarka Brother
- drukarka Honeywell
- drukarka Kodak
- drukarka Testo
- drukarka Primera
- drukarka Xerox
- drukarka Godex
- drukarka Olivetti
- drukarka Zebra
- drukarka Dell
- drukarka Digitus
- drukarka AgfaPhoto
- drukarka Kyocera
- drukarka Ricoh
- drukarka Seiko
- drukarka Renkforce
- drukarka Thomson
- drukarka AVM
- drukarka Velleman
- drukarka Dymo
- drukarka Panduit
- drukarka Olympus
- drukarka OKI
- drukarka Mitsubishi
- drukarka Intermec
- drukarka NEC
- drukarka Polaroid
- drukarka Konica Minolta
- drukarka Bixolon
- drukarka Pantum
- drukarka Olympia
- drukarka Datamax O'Neil
- drukarka DNP
- drukarka Equip
- drukarka ZKTeco
- drukarka TSC
- drukarka HiTi
- drukarka Microboards
- drukarka Triumph-Adler
- drukarka Fargo
- drukarka Entrust
- drukarka Kern
- drukarka Brady
- drukarka Tomy
- drukarka Lexmark
- drukarka Sagem
- drukarka Nilox
- drukarka Argox
- drukarka Royal Sovereign
- drukarka Minolta
- drukarka Oce
- drukarka Paxar
- drukarka IDP
- drukarka Metapace
- drukarka Ultimaker
- drukarka Ibm
- drukarka CSL
- drukarka Toshiba TEC
- drukarka Frama
- drukarka Builder
- drukarka Kogan
- drukarka Star Micronics
- drukarka Posiflex
- drukarka Dascom
- drukarka GG Image
- drukarka Vupoint Solutions
- drukarka Elite Screens
- drukarka DTRONIC
- drukarka Phoenix Contact
- drukarka Videology
- drukarka Epson 7620
- drukarka Star
- drukarka EC Line
- drukarka Colop
- drukarka Approx
- drukarka Fichero
- drukarka Raspberry Pi
- drukarka Unitech
- drukarka Middle Atlantic
- drukarka Evolis
- drukarka Tally Dascom
- drukarka Custom
- drukarka Nisca
- drukarka Sawgrass
- drukarka Mutoh
Najnowsze instrukcje dla drukarka

4 Kwietnia 2025

3 Kwietnia 2025
3 Kwietnia 2025

3 Kwietnia 2025

2 Kwietnia 2025
2 Kwietnia 2025

2 Kwietnia 2025

1 Kwietnia 2025

31 Marca 2025
29 Marca 2025