Instrukcja obsługi HP LaserJet Enterprise M605x
Przeczytaj poniżej 📖 instrukcję obsługi w języku polskim dla HP LaserJet Enterprise M605x (140 stron) w kategorii drukarka. Ta instrukcja była pomocna dla 6 osób i została oceniona przez 2 użytkowników na średnio 4.5 gwiazdek
Strona 1/140

User Guide
LaserJet Enterprise M604, M605, M606
www.hp.com/support/ljM604
www.hp.com/support/ljM605
www.hp.com/support/ljM606
M604n
M605n
M604dn
M605dn
M606dn
M605x
M606x
3
3
3
3


HP LaserJet Enterprise M604, M605, M606
User Guide

Cop
Cop
Cop
CopCopyright and License
yright and License
yright and License
yright and Licenseyright and License
© Copyright 2017 HP Development Company,
L.P.
Reproduction, adaptation, or translation without
prior written permission is prohibited, except as
allowed under the copyright laws.
The information contained herein is subject to
change without notice.
The only warranties for HP products and
services are set forth in the express warranty
statements accompanying such products and
services. Nothing herein should be construed as
constituting an additional warranty. HP shall not
be liable for technical or editorial errors or
omissions contained herein.
Edition 2, 8/2017
Trademark Cr
Trademark Cr
Trademark Cr
Trademark CrTrademark Credits
edits
edits
editsedits
Adobe®, Adobe Photoshop®, Acrobat®, and
PostScript® are trademarks of Adobe Systems
Incorporated.
Apple and the Apple logo are trademarks of
Apple Computer, Inc., registered in the U.S. and
other countries. iPod is a trademark of Apple
Computer, Inc. iPod is for legal or rightholder-
authorized copying only. Don't steal music.
Microsoft®, Windows®, Windows® XP, and
Windows Vista® are U.S. registered trademarks
of Microsoft Corporation.
UNIX® is a registered trademark of The Open
Group.

T
T
T
TTabl
abl
abl
ablable o
e o
e o
e oe of c
f c
f c
f cf contents
ontents
ontents
ontentsontents
1 Product o
1 Product o
1 Product o
1 Product o1 Product overview ......................................................................................................................................................................................
verview ......................................................................................................................................................................................
verview ......................................................................................................................................................................................
verview ......................................................................................................................................................................................verview ...................................................................................................................................................................................... 1
1
1
1 1
Product views ............................................................................................................................................................................ 2
Product front view ............................................................................................................................................... 2
Product back view ................................................................................................................................................ 3
Interface ports ...................................................................................................................................................... 4
Control-panel view (4-line control panel, n and dn models only) ................................................................ 5
Control-panel view (touchscreen control panel, x models only) .................................................................. 6
Product .............................................................................................................................................................. 8specications
Technical specications ....................................................................................................................................... 8
Supported operating systems ........................................................................................................................... 9
Mobile printing solutions .................................................................................................................................. 11
Product dimensions .......................................................................................................................................... 12
Dimensions for the products, as sold ........................................................................................ 12
Dimensions for the input and output accessories ................................................................... 14
Dimensions for sample combinations of the products and optional accessories .............. 18
Combination one ...................................................................................................... 18
Combination two ...................................................................................................... 19
Combination three ................................................................................................... 19
Power consumption, electrical and acoustic emissions .................................................... 20specications,
Operating-environment range ........................................................................................................................ 21
Product hardware setup and software installation .......................................................................................................... 22
2 Paper tr
2 Paper tr
2 Paper tr
2 Paper tr2 Paper trays ..............................................................................................................................................................................................
ays ..............................................................................................................................................................................................
ays ..............................................................................................................................................................................................
ays ..............................................................................................................................................................................................ays .............................................................................................................................................................................................. 23
23
23
23 23
Load Tray 1 ............................................................................................................................................................................. 24
Introduction ........................................................................................................................................................ 24
Tray 1 paper orientation ................................................................................................................................... 26
Load Tray 2 and the 500-sheet trays ................................................................................................................................. 27
Introduction ........................................................................................................................................................ 27
Tray 2 and the 500-sheet trays paper orientation ...................................................................................... 29
Load the optional 1,500-sheet high-capacity tray ........................................................................................................... 30
Introduction ........................................................................................................................................................ 30
Load the tray ...................................................................................................................................................... 30
ENWW iii

Load the optional custom media tray ................................................................................................................................. 32
Introduction ........................................................................................................................................................ 32
Congure the product for the custom media tray ....................................................................................... 32
Load paper into the custom media tray ......................................................................................................... 33
Custom media tray paper orientation ............................................................................................................ 34
Load envelopes ...................................................................................................................................................................... 35
Introduction ........................................................................................................................................................ 35
Envelope orientation ......................................................................................................................................... 36
3 Supplies, ac
3 Supplies, ac
3 Supplies, ac
3 Supplies, ac3 Supplies, accessorie
cessorie
cessorie
cessoriecessories, and parts ..........................................................................................................................................................
s, and parts ..........................................................................................................................................................
s, and parts ..........................................................................................................................................................
s, and parts ..........................................................................................................................................................s, and parts .......................................................................................................................................................... 37
37
37
37 37
Order supplies, accessories, and parts ............................................................................................................................... 38
Ordering .............................................................................................................................................................. 38
Supplies and accessories ................................................................................................................................. 38
Customer self-repair parts ............................................................................................................................... 39
Replace the toner cartridge .................................................................................................................................................. 41
Introduction ........................................................................................................................................................ 41
Toner-cartridge information ............................................................................................................................ 41
Remove and replace the cartridge .................................................................................................................. 42
Replace the staple cartridge ................................................................................................................................................. 46
Introduction ........................................................................................................................................................ 46
Remove and replace the staple cartridge ...................................................................................................... 46
4 Print ..........................................................................................................................................................................................................
4 Print ..........................................................................................................................................................................................................
4 Print ..........................................................................................................................................................................................................
4 Print ..........................................................................................................................................................................................................4 Print .......................................................................................................................................................................................................... 47
47
47
47 47
Print tasks (Windows) ............................................................................................................................................................ 48
How to print (Windows) .................................................................................................................................... 48
Automatically print on both sides (Windows) ............................................................................................... 50
Manually print on both sides (Windows) ........................................................................................................ 50
Print multiple pages per sheet (Windows) .................................................................................................... 51
Select the paper type (Windows) .................................................................................................................... 51
Additional print tasks ........................................................................................................................................ 52
Print tasks (OS X) .................................................................................................................................................................... 53
How to print (OS X) ............................................................................................................................................ 53
Automatically print on both sides (OS X) ....................................................................................................... 53
Manually print on both sides (OS X) ................................................................................................................ 53
Print multiple pages per sheet (OS X) ............................................................................................................ 53
Select the paper type (OS X) ............................................................................................................................ 54
Additional print tasks ........................................................................................................................................ 54
Store print jobs on the product to print later ..................................................................................................................... 55
Introduction ........................................................................................................................................................ 55
Create a stored job (Windows) ......................................................................................................................... 55
Create a stored job (OS X) ................................................................................................................................. 56
iv ENWW

Print a stored job ............................................................................................................................................... 57
Delete a stored job ............................................................................................................................................ 57
Mobile printing ........................................................................................................................................................................ 59
Introduction ........................................................................................................................................................ 59
Wi-Fi Direct and NFC Printing ........................................................................................................................... 59
HP ePrint via email ............................................................................................................................................ 59
HP ePrint software ............................................................................................................................................ 60
AirPrint ................................................................................................................................................................. 60
Android embedded printing ............................................................................................................................. 61
Print from the USB port ........................................................................................................................................................ 62
Introduction ........................................................................................................................................................ 62
Enable the USB port for printing ..................................................................................................................... 62
Print USB documents ........................................................................................................................................ 63
5 Manage the pr
5 Manage the pr
5 Manage the pr
5 Manage the pr5 Manage the product ...............................................................................................................................................................................
oduct ...............................................................................................................................................................................
oduct ...............................................................................................................................................................................
oduct ...............................................................................................................................................................................oduct ............................................................................................................................................................................... 65
65
65
65 65
Advanced with HP Embedded Web Server (EWS) .................................................................................... 66conguration
Introduction ........................................................................................................................................................ 66
How to access the HP Embedded Web Server (EWS) .................................................................................. 66
HP Embedded Web Server features ............................................................................................................... 67
Information tab ............................................................................................................................. 67
General tab .................................................................................................................................... 68
Print tab .......................................................................................................................................... 68
Troubleshooting tab ..................................................................................................................... 69
Security tab .................................................................................................................................... 69
HP Web Services tab ..................................................................................................................... 70
Networking tab .............................................................................................................................. 70
Other Links list ............................................................................................................................... 71
Advanced with HP Utility for OS X ............................................................................................................... 72conguration
Open HP Utility ................................................................................................................................................... 72
HP Utility features ............................................................................................................................................. 72
Congure IP network settings .............................................................................................................................................. 74
Printer sharing disclaimer ................................................................................................................................ 74
View or change network settings ................................................................................................................... 74
Rename the product on a network ................................................................................................................. 74
Manually IPv4 TCP/IP parameters from the control panel ........................................................ 75congure
Manually IPv6 TCP/IP parameters from the control panel ........................................................ 75congure
Link speed and duplex settings ....................................................................................................................... 76
Product security features ..................................................................................................................................................... 78
Introduction ........................................................................................................................................................ 78
Security statements .......................................................................................................................................... 78
IP Security ........................................................................................................................................................... 78
ENWW v

Assign or change the system password using the Embedded Web Server ............................................. 78
Sign in to the product ........................................................................................................................................ 79
Encryption support: HP High Performance Secure Hard Disks .................................................................. 79
Lock the formatter ............................................................................................................................................ 79
Economy settings .................................................................................................................................................................. 80
Introduction ........................................................................................................................................................ 80
Print with EconoMode ....................................................................................................................................... 80
Set the sleep timer and congure the product to use 1 watt or less of power ....................................... 80
HP Web Jetadmin ................................................................................................................................................................... 82
Software and updates .......................................................................................................................................... 83rmware
6 Solv
6 Solv
6 Solv
6 Solv6 Solve probl
e probl
e probl
e proble problems .......................................................................................................................................................................................
ems .......................................................................................................................................................................................
ems .......................................................................................................................................................................................
ems .......................................................................................................................................................................................ems ....................................................................................................................................................................................... 85
85
85
85 85
Customer support .................................................................................................................................................................. 86
Control panel help system .................................................................................................................................................... 87
Restore factory-set defaults ................................................................................................................................................ 88
Introduction ........................................................................................................................................................ 88
Restore factory settings from the product control panel ........................................................................... 88
Restore factory settings from the HP Embedded Web Server (network-connected products
only) ..................................................................................................................................................................... 88
A “Cartridge is low” or “Cartridge is very low” message displays on the printer control panel ................................. 89
Change the “Very Low” settings ...................................................................................................................... 89
For products with fax capability ................................................................................................. 89
Order supplies .................................................................................................................................................... 90
Product does not pick up paper or misfeeds ..................................................................................................................... 91
Introduction ........................................................................................................................................................ 91
The product does not pick up paper ............................................................................................................... 91
The product picks up multiple sheets of paper ............................................................................................ 91
Clear paper jams ..................................................................................................................................................................... 92
Introduction ........................................................................................................................................................ 92
Jam locations ..................................................................................................................................................... 93
Auto-navigation for clearing jams .................................................................................................................. 93
Experiencing frequent or recurring paper jams? .......................................................................................... 93
Clear paper jams in Tray 1 ................................................................................................................................ 95
Clear paper jams in Tray 2 and the 500-sheet trays ................................................................................... 96
Clear paper jams in the optional 1,500-sheet high-capacity tray ............................................................. 98
Clear paper jams in the toner-cartridge area .............................................................................................. 100
Clear paper jams in the rear output bin ....................................................................................................... 103
Clear paper jams in the fuser area ............................................................................................................... 104
Clear paper jams in the output bin ............................................................................................................... 109
Clear paper jams in the duplexer .................................................................................................................. 110
Clear paper jams in the envelope feeder ..................................................................................................... 112
vi ENWW

Clear paper jams in the 5-bin mailbox ......................................................................................................... 114
Clear jams in the stacker or stapler/stacker ................................................................................................ 116
Clear paper jams in the stacker or stapler/stacker ................................................................ 116
Clear staple jams in the stapler/stacker .................................................................................. 117
Improve print quality ........................................................................................................................................................... 119
Introduction ...................................................................................................................................................... 119
Print from a software program .................................................................................................... 119dierent
Check the paper-type setting for the print job ........................................................................................... 119
Check the paper type setting (Windows) ................................................................................ 119
Check the paper type setting (OS X) ........................................................................................ 119
Check toner-cartridge status ........................................................................................................................ 120
Clean the product ............................................................................................................................................ 120
Print a cleaning page .................................................................................................................. 120
Visually inspect the toner cartridge ............................................................................................................. 121
Check paper and the printing environment ................................................................................................ 121
Step one: Use paper that meets HP ............................................................... 121specications
Step two: Check the environment ............................................................................................ 121
Step three: Set the individual tray alignment ........................................................................ 122
Try a print driver .............................................................................................................................. 122dierent
Solve wired network problems .......................................................................................................................................... 124
Introduction ...................................................................................................................................................... 124
Poor physical connection ............................................................................................................................... 124
The computer is using the incorrect IP address for the product ............................................................. 124
The computer is unable to communicate with the product ..................................................................... 124
The product is using incorrect link and duplex settings for the network ............................................... 125
New software programs might be causing compatibility problems ....................................................... 125
The computer or workstation might be set up incorrectly ....................................................................... 125
The product is disabled, or other network settings are incorrect ........................................................... 125
Index ...........................................................................................................................................................................................................
Index ...........................................................................................................................................................................................................
Index ...........................................................................................................................................................................................................
Index ...........................................................................................................................................................................................................Index ........................................................................................................................................................................................................... 127
127
127
127 127
ENWW vii

viii ENWW

1
1
1
11 Pr
Pr
Pr
PrProduct o
oduct o
oduct o
oduct ooduct overview
verview
verview
verviewverview
●Product views
●Product specications
●Product hardware setup and software installation
For mor
For mor
For mor
For morFor more information:
e information:
e information:
e information:e information:
Go to , , .www.hp.com/support/ljM604 www.hp.com/support/ljM605 www.hp.com/support/ljM606
HP's all-inclusive help for the product includes the following information:
●Install and congure
●Learn and use
●Solve problems
●Download software updates
●Join support forums
●Find warranty and regulatory information
ENWW 1

Pr
Pr
Pr
PrProduct views
oduct views
oduct views
oduct viewsoduct views
●Product front view
●Product back view
●Interface ports
●Control-panel view (4-line control panel, n and dn models only)
●Control-panel view (touchscreen control panel, x models only)
Pr
Pr
Pr
PrProduct front vie
oduct front vie
oduct front vie
oduct front vieoduct front view
w
w
ww
3
3
3
3
1 2 3 9
4
5
7
8
6
10
1 Standard output bin
2 Top cover (access to the toner cartridge)
3 4-line LCD control panel with keypad (n and dn models only)
4 Easy-access USB port
Insert a USB drive for printing without a computer or to update the product ash rmware.
NO
NO
NO
NONOTE:
TE:
TE:
TE:TE: An administrator must enable this port before use.
5 buttonOn/o
6 Tray 2
7 Model name
8 Tray 1
9 Control panel with color touchscreen display (x models only)
10 1 x 500-sheet feeder (included with the x model, optional for the other models)
NO
NO
NO
NONOTE:
TE:
TE:
TE:TE: The product accepts up to four 1 x 500-sheet feeders, or three 1 x 500-sheet feeders and one 1,500-sheet high-
capaciy input tray.
2 Chapter 1 Product overview ENWW

Pr
Pr
Pr
PrProduct back view
oduct back view
oduct back view
oduct back viewoduct back view
1 2
49
7
8
56
3
1 Output-accessory cover
2 Rear output bin
3 Serial number and product number label
4 Duplex accessory cover (n model only)
5 Power connection
6 Formatter (contains the interface ports)
7 Formatter cover
8 Hardware integration pocket (for connecting accessory and third-party devices)
9 Automatic duplex printing accessory (included with the dn and x models, optional for the n model)
ENWW Product views 3

Interf
Interf
Interf
InterfInterface ports
ace ports
ace ports
ace portsace ports
1
2
3
4
1 Slot for a cable-type security lock
2 Local area network (LAN) Ethernet (RJ-45) network port
3 Hi-Speed USB 2.0 printing port
4 USB port for connecting external USB devices (this port might be covered)
NO
NO
NO
NONOTE:
TE:
TE:
TE:TE: For easy-access USB printing, use the USB port near the control panel.
4 Chapter 1 Product overview ENWW

Contr
Contr
Contr
ContrControl
ol
ol
olol-panel view (4-line contr
-panel view (4-line contr
-panel view (4-line contr
-panel view (4-line contr-panel view (4-line control panel, n and dn models onl
ol panel, n and dn models onl
ol panel, n and dn models onl
ol panel, n and dn models onlol panel, n and dn models only)
y)
y)
y)y)
Use the control panel to obtain product and job status information and to the product.congure
1
2
7
8
9
10
11
3
456
1 Control-panel display Shows status information, menus, help information, and error messages
2 Numeric keypad Enter numeric values
3 Clear button Returns values to their defaults and closes the help screen
4 Folder button Provides quick access to the menuRetrieve Job
5 Home button Opens and closes the menus
6 Back button Backs up one level in the menu tree or backs up one numeric entry
7 Down arrow Navigates to the next item in the list, or decreases the value of numeric items
8 Stop button Cancels the current print job and clears the pages from the product
9 buttonOK ●Saves the selected value for an item
●Performs the action that is associated with the item that is highlighted on the control-panel
display
●Clears an error condition when the condition is clearable
10 Help button Provides information about the message on the control-panel display
11 Up arrow Navigates to the previous item in the list, or increases the value of numeric items
ENWW Product views 5

Contr
Contr
Contr
ContrControl
ol
ol
olol-panel view (to
-panel view (to
-panel view (to
-panel view (to-panel view (touchscreen c
uchscreen c
uchscreen c
uchscreen cuchscreen control panel, x models onl
ontrol panel, x models onl
ontrol panel, x models onl
ontrol panel, x models onlontrol panel, x models only)
y)
y)
y)y)
NO
NO
NO
NONOTE:
TE:
TE:
TE:TE: Tilt the control panel for easier viewing.
The Home screen provides access to the product features and indicates the current status of the product.
Return to the Home screen at any time by touching the Home button. Touch the Home button on the
lower edge of the product control panel, or touch the Home button in the upper-left corner of most screens.
NO
NO
NO
NONOTE:
TE:
TE:
TE:TE: The features that appear on the Home screen can vary, depending on the product conguration.
2 3 4 5 6 7 8
9
1
1011
1 Product status The status line provides information about the overall product status.
2 HP logo or Home button On any screen other than the Home screen, the HP logo changes to a Home button. Touch the
Home button to return to the Home screen.
3 Stop button Touch the Stop button to pause the current job. The Job Status screen opens and provides options to
cancel or continue the job.
4 or button Touch the button to access secured features.Sign In Sign Out Sign In
Touch the button to sign out of the product. The product restores all options to the default Sign Out
settings.
5 Language Selection
button
Touch the Language Selection button to select the language for the control-panel display.
6 Sleep button Touch the Sleep button to put the product into Sleep mode.
7 Network button Touch the Network button to information about the network connection.nd
8 Help button Touch the Help button to open the embedded help system.
9 Scroll bar Use the scroll bar to see the complete list of available features.
6 Chapter 1 Product overview ENWW

10 Features Depending on the product the features that appear in this area can include any of the conguration,
following items:
●Save to Device Memory
●Retrieve from USB
●Retrieve from Device Memory
●Job Status
●Supplies
●Trays
●Administration
●Device Maintenance
11 Home button Touch the Home button to return to the product Home screen at any time.
ENWW Product views 7

Pr
Pr
Pr
PrProduct
oduct
oduct
oduct oduct specications
specications
specications
specicationsspecications
IMPORT
IMPORT
IMPORT
IMPORTIMPORTANT
ANT
ANT
ANTANT:
:
:
:: The following are correct at the time of publication, but they are subject to change. specications
For current information, see www.hp.com/support/ljM604 www.hp.com/support/ljM605 www.hp.com/, ,
support/ljM606.
●Technical specications
●Supported operating systems
●Mobile printing solutions
●Product dimensions
●Power consumption, electrical and acoustic emissionsspecications,
●Operating-environment range
T
T
T
TTechnical
echnical
echnical
echnical echnical specications
specications
specications
specicationsspecications
Model name
Model name
Model name
Model nameModel name
Product number
Product number
Product number
Product numberProduct number
M604n, M605n
M604n, M605n
M604n, M605n
M604n, M605nM604n, M605n
E6B67A, E6B69A
E6B67A, E6B69A
E6B67A, E6B69A
E6B67A, E6B69AE6B67A, E6B69A
M604dn, M605dn,
M604dn, M605dn,
M604dn, M605dn,
M604dn, M605dn, M604dn, M605dn,
M606dn
M606dn
M606dn
M606dnM606dn
E6B68A, E6B70A,
E6B68A, E6B70A,
E6B68A, E6B70A,
E6B68A, E6B70A, E6B68A, E6B70A,
E6B72A
E6B72A
E6B72A
E6B72AE6B72A
M605x, M606x
M605x, M606x
M605x, M606x
M605x, M606xM605x, M606x
E6B71A, E6B73A
E6B71A, E6B73A
E6B71A, E6B73A
E6B71A, E6B73AE6B71A, E6B73A
Paper handling
Paper handling
Paper handling
Paper handlingPaper handling Tray 1 (100-sheet capacity)
Tray 2 (500-sheet capacity)
1 x 500-sheet paper feeder
NO
NO
NO
NONOTE:
TE:
TE:
TE:TE: The product supports up to
four optional paper feeders.
Optional Optional
1,500-sheet high-capacity feeder
NO
NO
NO
NONOTE:
TE:
TE:
TE:TE: This accessory can be
combined with up the three 1 x
500-sheet paper feeders.
Optional Optional Optional
Printer stand Optional Optional Optional
Automatic duplex printing Optional
Envelope feeder for printing up to
75 envelopes
Optional Optional Optional
Custom media tray for printing
small-size paper (replaces the
standard Tray 2)
Optional Optional Optional
500-sheet stapler/stacker Optional Optional Optional
500-sheet stacker Optional Optional Optional
500-sheet 5-bin mailbox Optional Optional Optional
Connectivity
Connectivity
Connectivity
ConnectivityConnectivity 10/100/1000 Ethernet LAN
connection with IPv4 and IPv6
Hi-Speed USB 2.0
8 Chapter 1 Product overview ENWW

Model name
Model name
Model name
Model nameModel name
Product number
Product number
Product number
Product numberProduct number
M604n, M605n
M604n, M605n
M604n, M605n
M604n, M605nM604n, M605n
E6B67A, E6B69A
E6B67A, E6B69A
E6B67A, E6B69A
E6B67A, E6B69AE6B67A, E6B69A
M604dn, M605dn,
M604dn, M605dn,
M604dn, M605dn,
M604dn, M605dn, M604dn, M605dn,
M606dn
M606dn
M606dn
M606dnM606dn
E6B68A, E6B70A,
E6B68A, E6B70A,
E6B68A, E6B70A,
E6B68A, E6B70A, E6B68A, E6B70A,
E6B72A
E6B72A
E6B72A
E6B72AE6B72A
M605x, M606x
M605x, M606x
M605x, M606x
M605x, M606xM605x, M606x
E6B71A, E6B73A
E6B71A, E6B73A
E6B71A, E6B73A
E6B71A, E6B73AE6B71A, E6B73A
Easy-access USB port for printing
without a computer and upgrading
the rmware
Hardware Integration Pocket for
connecting accessory and third-
party devices
HP Internal USB Ports Optional Optional Optional
HP Jetdirect 3000w NFC/Wireless
Accessory for printing from mobile
devices
Optional Optional Not supported
Integrated HP near-eld
communication (NFC) and Wi-Fi
Direct functionality for printing from
mobile devices
Not supported Not supported
HP Jetdirect 2900nw Print Server
accessory for wireless connectivity
Optional Optional Optional
Memory
Memory
Memory
MemoryMemory 512 MB base memory, expandable
to 1.0 GB or 1.5 GB by adding DIMM
memory modules
HP Secure High-Performance Hard
Disk
Optional Optional Optional
Security
Security
Security
SecuritySecurity HP Trusted Platform Module for
encrypting all data that passes
through the product
Optional Optional Optional
Contr
Contr
Contr
ContrControl-panel dis
ol-panel dis
ol-panel dis
ol-panel disol-panel display and input
play and input
play and input
play and inputplay and input 4-line graphical display with 10-key
keypad
Not supported
Constant-view, color touchscreen
control panel
Not supported Not supported
Print
Print
Print
PrintPrint Prints 50 pages per minute (ppm)
on A4 and 52 ppm on letter-size
paper
M604n M604dn
Prints 56 ppm on A4 and 58 ppm on
letter-size paper
M605n M605dn M605x
Prints 63 ppm on A4 and 65 ppm on
letter-size paper
M606dn M606x
Easy-access USB printing (no
computer required)
Supported o
Supported o
Supported o
Supported oSupported operating sys
perating sys
perating sys
perating sysperating syst
t
t
ttems
ems
ems
emsems
The following information applies to the Windows PCL 6 and OS X print drivers and to the in-box Product-Specic
software installation CD.
ENWW Product 9specications

Windows:
Windows:
Windows:
Windows:Windows: The HP Software Installer CD installs the “HP PCL.6” or “HP PCL 6” version 3 driver, depending on the
Windows operating system, along with optional software when using the full software installer. Download the
“HP PCL-6” version 4 print driver from the product-support Web site for this product: www.hp.com/support/
ljM604 www.hp.com/support/ljM605 www.hp.com/support/ljM606, , .
Mac comput
Mac comput
Mac comput
Mac computMac computers and OS X:
ers and OS X:
ers and OS X:
ers and OS X:ers and OS X: Mac computers and Apple mobile devices are supported with this product. The OS X
print driver and print utility are available for download from hp.com and may also be available via Apple Software
Update. The HP installer software for OS X is not included in the in-box CD. Follow these steps to download the
OS X installer software:
1.
1.
1.
1.1. Go to , , .www.hp.com/support/ljM604 www.hp.com/support/ljM605 www.hp.com/support/ljM606
2.
2.
2.
2.2. Select , and then under
Support Options
Support Options
Support Options
Support OptionsSupport Options Downl
Downl
Downl
DownlDownload Options
oad Options
oad Options
oad Optionsoad Options select Drivers, Softwar
Drivers, Softwar
Drivers, Softwar
Drivers, SoftwarDrivers, Software & Firmwar
e & Firmwar
e & Firmwar
e & Firmware & Firmware
e
e
ee.
3.
3.
3.
3.3. Click the operating system version, and then click the Downl
Downl
Downl
DownlDownload
oad
oad
oadoad button.
Operating syst
Operating syst
Operating syst
Operating systOperating system
em
em
emem Driver instal
Driver instal
Driver instal
Driver instalDriver installed
led
led
ledled Note
Note
Note
NoteNotes
s
s
ss
Windows® XP SP3, 32-bit The “HP PCL.6” print driver product-specic
is installed for this operating system as part
of the basic software installation. The basic
installer installs the driver only.
The full software installer is not supported
for this operating system.
Use UPD drivers for 64-bit operating
systems.
Microsoft retired mainstream support for
Windows XP in April 2009. HP will continue
to provide best support for the eort
discontinued XP operating system.
Windows Vista®, 32-bit The “HP PCL.6” print driver product-specic
is installed for this operating system as part
of the basic software installation. The basic
installer installs the driver only.
The full software installer is not supported
for this operating system.
Use UPD drivers for 64-bit operating
systems.
Windows Server 2003 SP2, 32-bit The “HP PCL.6” print driver product-specic
is installed for this operating system as part
of the basic software installation. The basic
installer installs the driver only.
The full software installer is not supported
for this operating system.
Use UPD drivers for 64-bit operating
systems.
Microsoft retired mainstream support for
Windows Server 2003 in July 2010. HP will
continue to provide best support for eort
the discontinued Server 2003 operating
system.
Windows 7 SP1, 32-bit and 64-bit The “HP PCL 6” print driver product-specic
is installed for this operating system as part
of the full software installation.
Windows 8, 32-bit and 64-bit The “HP PCL 6” print driver product-specic
is installed for this operating system as part
of the full software installation.
Windows 8 RT support is provided through
Microsoft IN OS Version 4, 32- bit driver.
Windows 8.1, 32-bit and 64-bit The “HP PCL 6” print driver product-specic
is installed for this operating system as part
of the full software installation.
Windows 8.1 RT support is provided through
Microsoft IN OS Version 4, 32- bit driver.
Windows Server 2008 SP2, 32-bit The “HP PCL.6” print driver product-specic
is installed for this operating system as part
of the basic software installation. The basic
installer installs the driver only
The full software installer is not supported
for this operating system.
10 Chapter 1 Product overview ENWW

Operating syst
Operating syst
Operating syst
Operating systOperating system
em
em
emem Driver instal
Driver instal
Driver instal
Driver instalDriver installed
led
led
ledled Note
Note
Note
NoteNotes
s
s
ss
Windows Server 2008 SP2, 64-bit The “HP PCL 6” print driver product-specic
is installed for this operating system as part
of the full software installation.
Windows Server 2008 R2, SP 1, 64-bit The “HP PCL 6” print driver product-specic
is installed for this operating system as part
of the full software installation.
Windows Server 2012, 64-bit The software installer does not support
Windows Server 2012 but the “HP PCL 6”
version 3 and “HP PCL-6” version 4 product-
specic print drivers do support it.
Download the driver from the HP Web site,
and use the Windows Add Printer tool to
install it.
Windows Server 2012 R2, 64 bit The software installer does not support
Windows Server 2012 but the “HP PCL 6”
and “HP PCL-6” version 4 product-specic
print drivers do support it.
Download the driver from the HP Web site,
and use the Windows Add Printer tool to
install it.
OS X 10.7 Lion, OS X 10.8 Mountain Lion,
and OS X 10.9 Mavericks
The OS X print driver and print utility are
available for download from hp.com and
may also be available via Apple Software
Update. The HP installer software for OS X is
not included in the in-box CD.
For OS X, download the full installer from
the support Web site for this product.
1.
1.
1.
1.1. Go to , www.hp.com/support/ljM604
www.hp.com/support/ljM605,
www.hp.com/support/ljM606.
2.
2.
2.
2.2. Select Support Op
Support Op
Support Op
Support OpSupport Options
tions
tions
tionstions, and then
under Downl
Downl
Downl
DownlDownload Options
oad Options
oad Options
oad Optionsoad Options select
Drivers, Softwar
Drivers, Softwar
Drivers, Softwar
Drivers, SoftwarDrivers, Software & Firmwar
e & Firmwar
e & Firmwar
e & Firmware & Firmware
e
e
ee.
3.
3.
3.
3.3. Click the operating system version,
and then click the Downl
Downl
Downl
DownlDownload
oad
oad
oadoad button.
NO
NO
NO
NONOTE:
TE:
TE:
TE:TE: For a current list of supported operating systems, go to , www.hp.com/support/ljM604 www.hp.com/
support/ljM605 www.hp.com/support/ljM606, for HP's all-inclusive help for the product.
NO
NO
NO
NONOTE:
TE:
TE:
TE:TE: For details on client and server operating systems and for HP UPD PCL6, UPD PCL 5, and UPD PS driver
support for this product, go to www.hp.com/go/upd. Under Additional inf
Additional inf
Additional inf
Additional infAdditional information
ormation
ormation
ormationormation Link to Sup
Link to Sup
Link to Sup
Link to SupLink to Supported
ported
ported
ported ported , click
products
products
products
productsproducts.
Mobil
Mobil
Mobil
MobilMobile printing solutions
e printing solutions
e printing solutions
e printing solutionse printing solutions
The product supports the following software for mobile printing:
●HP ePrint software
NO
NO
NO
NONOTE:
TE:
TE:
TE:TE: The HP ePrint Software supports the following operating systems: Windows 7 SP 1 (32-bit and 64-
bit); Windows 8 (32-bit and 64-bit); Windows 8.1 (32-bit and 64-bit); and OS X versions 10.6 Snow
Leopard, 10.7 Lion, 10.8 Mountain Lion, and 10.9 Mavericks.
●HP ePrint via email (Requires HP Web Services to be enabled and the product to be registered with HP
Connected)
●HP ePrint app (Available for Android, iOS, and Blackberry)
●ePrint Enterprise app (Supported on all products with ePrint Enterprise Server Software)
●HP Home and Biz app (Available for Symbian/Nokia devices)
ENWW Product 11specications

●Google Cloud Print 1.0 (Requires the product to be registered with HP Connected and then registered with
Google Cloud)
●AirPrint
●Android Printing
Pr
Pr
Pr
PrProduct dimensions
oduct dimensions
oduct dimensions
oduct dimensionsoduct dimensions
The following illustrations show the dimensions for the products as sold, for the optional input and output
accessories, and for several sample of the product combined with optional accessories.congurations
Dimensions for the pr
Dimensions for the pr
Dimensions for the pr
Dimensions for the prDimensions for the products, as sold
oducts, as sold
oducts, as sold
oducts, as soldoducts, as sold
Figure 1-1
Figure 1-1
Figure 1-1
Figure 1-1Figure 1-1 Dimensions for the n models
1
2
3
1
2
3
Product ful
Product ful
Product ful
Product fulProduct fully closed
ly closed
ly closed
ly closedly closed Product ful
Product ful
Product ful
Product fulProduct fully opened
ly opened
ly opened
ly openedly opened
1. Height 399 mm (15.7 in) 574 mm (22.5 in)
2. Depth 451 mm (17.8 in) 754 mm (29.7 in)
3. Width 425 mm (16.7 in) 425 mm (16.7 in)
Weight 22.6 kg (49.7 lb)
12 Chapter 1 Product overview ENWW

Figure 1-2
Figure 1-2
Figure 1-2
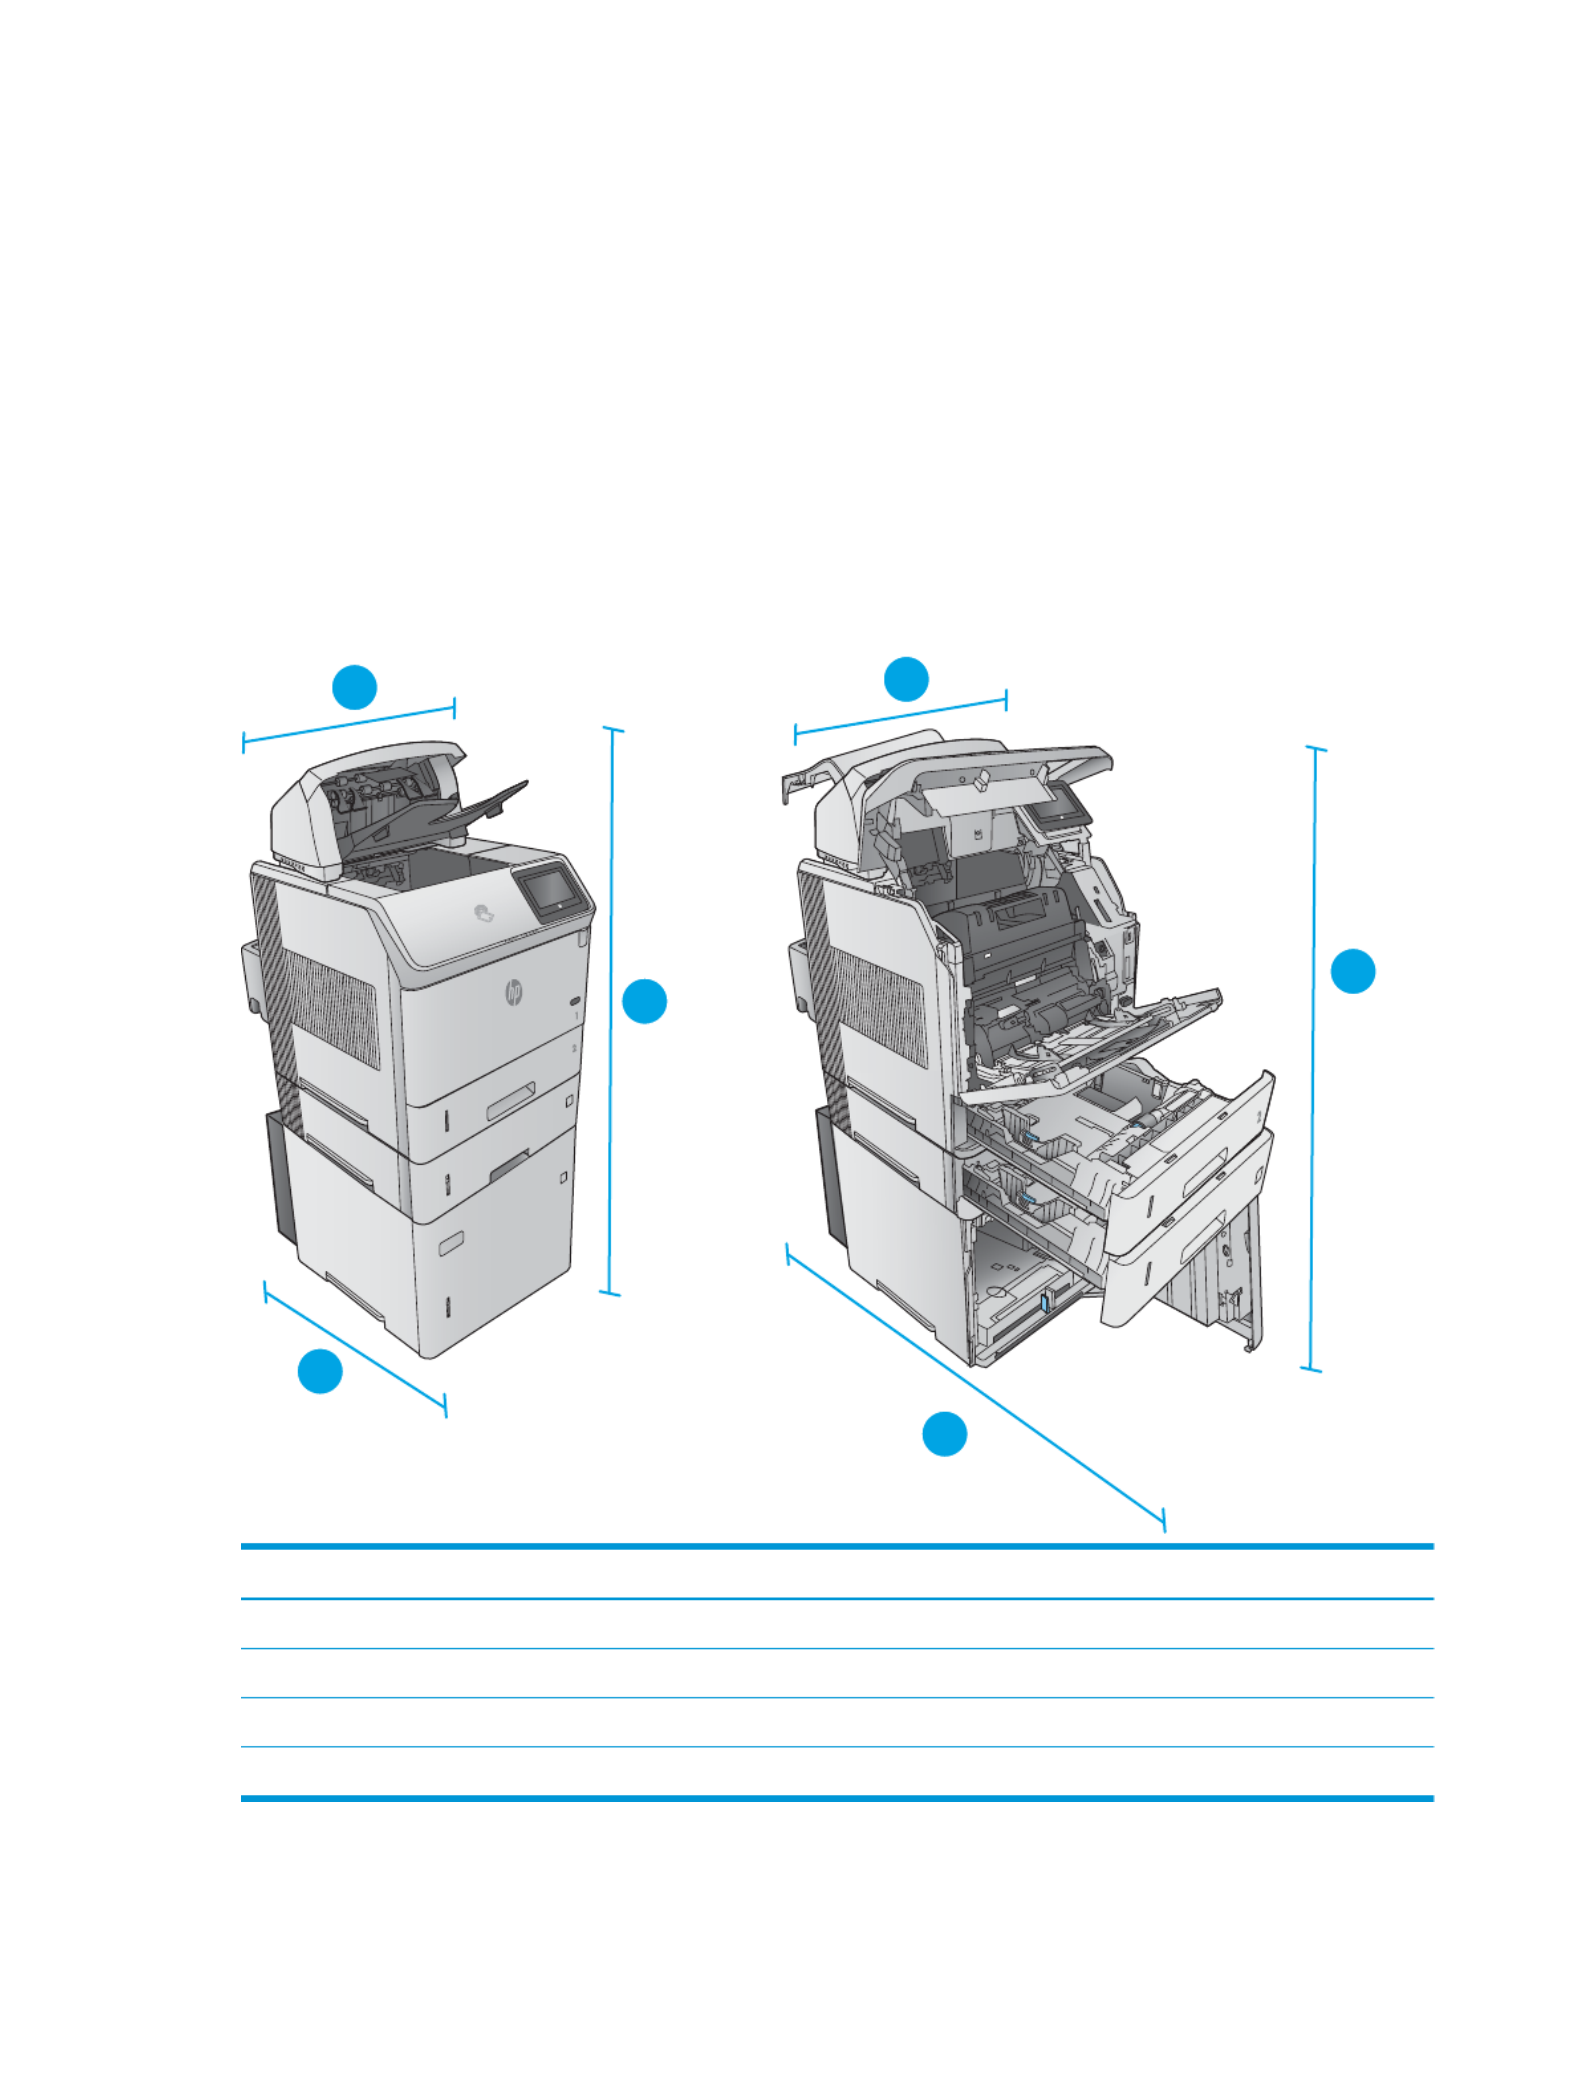
Figure 1-2Figure 1-2 Dimensions for the dn models
1
2
3
1
2
3
Product ful
Product ful
Product ful
Product fulProduct fully cl
ly cl
ly cl
ly clly closed
osed
osed
osedosed Product ful
Product ful
Product ful
Product fulProduct fully opened
ly opened
ly opened
ly openedly opened
1. Height 399 mm (15.7 in) 574 mm (22.5 in)
2. Depth 537 mm (21.1 in) 840 mm (33 in)
3. Width 425 mm (16.7 in) 425 mm (16.7 in)
Weight 25.9 kg (57 lb)
ENWW Product 13specications

Figure 1-3
Figure 1-3
Figure 1-3
Figure 1-3Figure 1-3 Dimensions for the x models
3
3
3
3
3
3
3
3
3
3
3
3
1
2
3
1
2
3
Product ful
Product ful
Product ful
Product fulProduct fully cl
ly cl
ly cl
ly clly closed
osed
osed
osedosed Product ful
Product ful
Product ful
Product fulProduct fully opened
ly opened
ly opened
ly openedly opened
1. Height 521 mm (20.5 in) 695 mm (27.4 in)
2. Depth 537 mm (21.1 in) 840 mm (33 in)
3. Width 425 mm (16.7 in) 425 mm (16.7 in)
Weight 32.5 kg (71.5 lb)
Dimensions for the inp
Dimensions for the inp
Dimensions for the inp
Dimensions for the inpDimensions for the input and output ac
ut and output ac
ut and output ac
ut and output acut and output acces
ces
ces
cescessories
sories
sories
soriessories
Figure 1-4
Figure 1-4
Figure 1-4
Figure 1-4Figure 1-4 Dimensions for the 1 x 500-sheet paper feeder
3
3
3
3
3
3
3
3
1
2
3
1. Height 121 mm (4.8 in)
14 Chapter 1 Product overview ENWW

2. Depth Tray closed: 448 mm (17.7 in)
Tray opened: 864 mm (34 in)
3. Width 415 mm (16.3 in)
Weight 6.7 kg (14.7 lb)
Figure 1-5
Figure 1-5
Figure 1-5
Figure 1-5Figure 1-5 Dimensions for the 1,500-sheet high-capacity input tray
1
2
3
1. Height 264 mm (10.4 in)
2. Depth Door closed: 448 mm (17.7 in)
Door opened: 902 mm (35.5 in)
3. Width 415 mm (16.3 in)
Weight 13 kg (14.7 lb)
ENWW Product 15specications

Figure 1-6
Figure 1-6
Figure 1-6
Figure 1-6Figure 1-6 Dimensions for the stacker
1
2
3
1. Height 304 mm (12 in)
2. Depth 430 mm (16.9 in)
3. Width 378 mm (14.9 in)
Weight 3.2 kg (7.1 lb)
Figure 1-7
Figure 1-7
Figure 1-7
Figure 1-7Figure 1-7 Dimensions for the stapler/stacker
1
2
3
1. Height 371 mm (14.6 in)
2. Depth 430 mm (16.9 in)
3. Width 387 mm (15.2 in)
Weight 4.2 kg (9.3 lb)
16 Chapter 1 Product overview ENWW
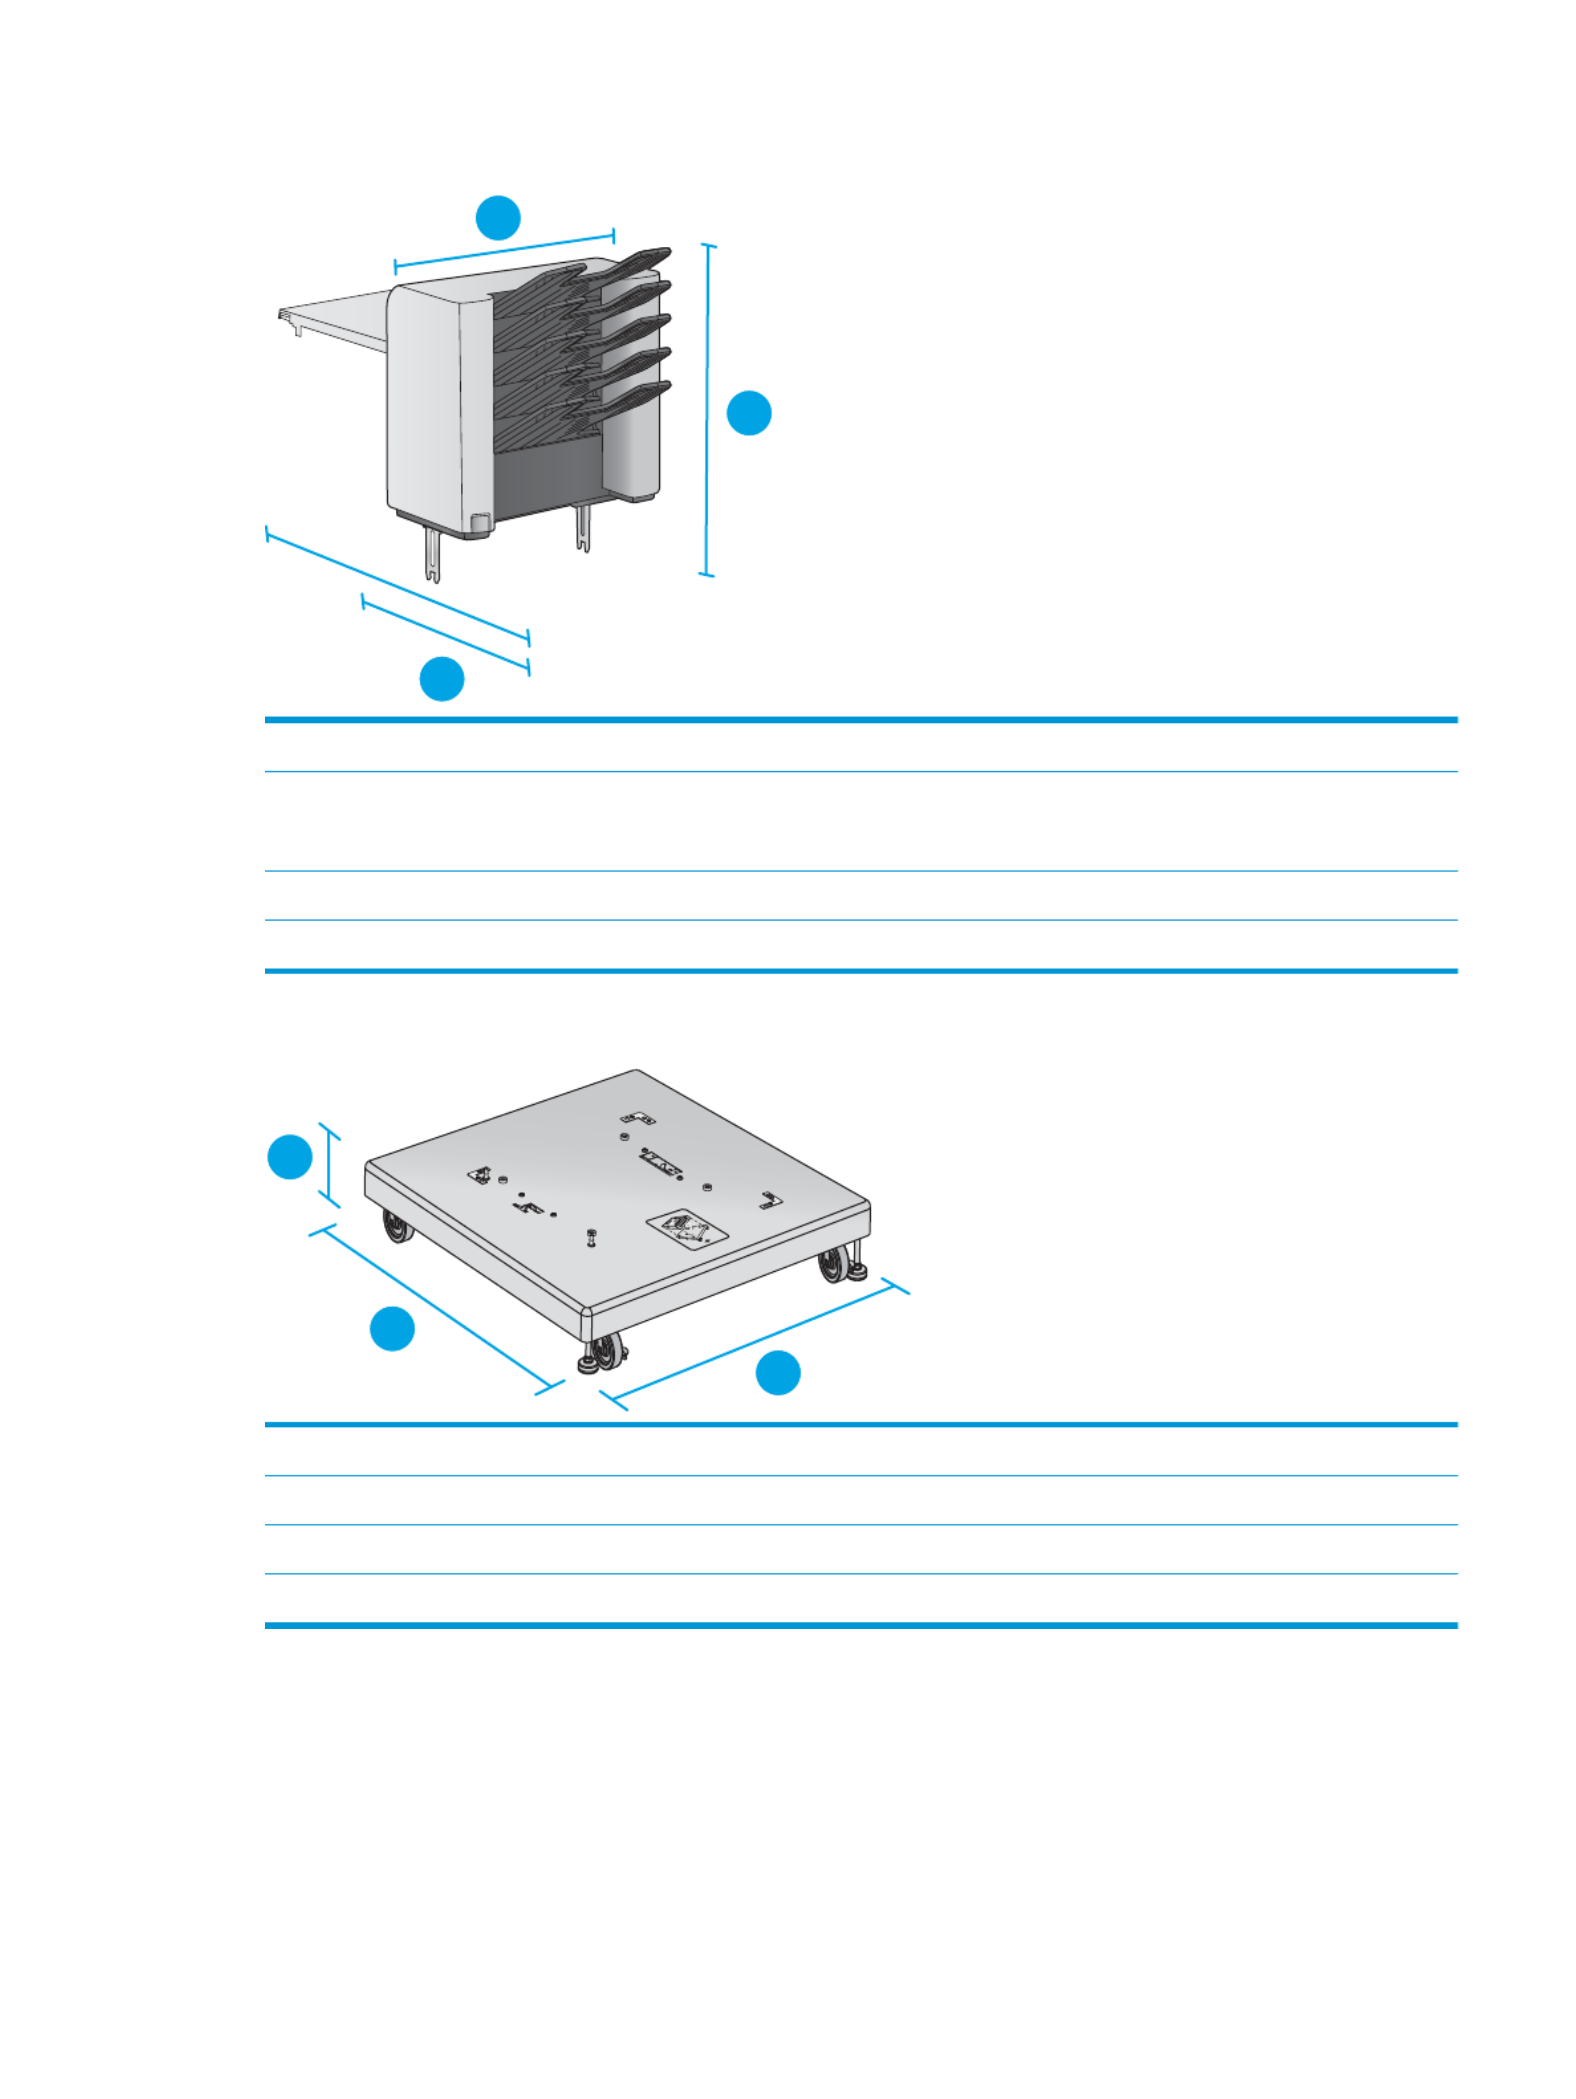
Figure 1-8
Figure 1-8
Figure 1-8
Figure 1-8Figure 1-8 Dimensions for the 5-bin mailbox
1
2
3
1. Height 522 mm (20.6 in)
2. Depth Rear door closed: 306 mm (12 in)
Rear door opened: 589 mm (23.2 in)
3. Width 353 mm (13.9 in)
Weight 7.0 kg (15.4 lb)
Figure 1-9
Figure 1-9
Figure 1-9
Figure 1-9Figure 1-9 Dimensions for the printer stand
1
2
3
1. Height 114 mm (4.5 in)
2. Depth 653 mm (25.7 in)
3. Width 663 mm (26.1 in)
Weight 13.6 kg (30 lb)
ENWW Product 17specications
Dimensions for sampl
Dimensions for sampl
Dimensions for sampl
Dimensions for samplDimensions for sample combinations o
e combinations o
e combinations o
e combinations oe combinations of the products and op
f the products and op
f the products and op
f the products and opf the products and optional acce
tional acce
tional acce
tional accetional accessories
ssories
ssories
ssoriesssories
The following information is for samples of various combinations of the product and accessories. Several other
combinations are possible. Use the information for the individual accessories to calculate dimensions for other
combinations.
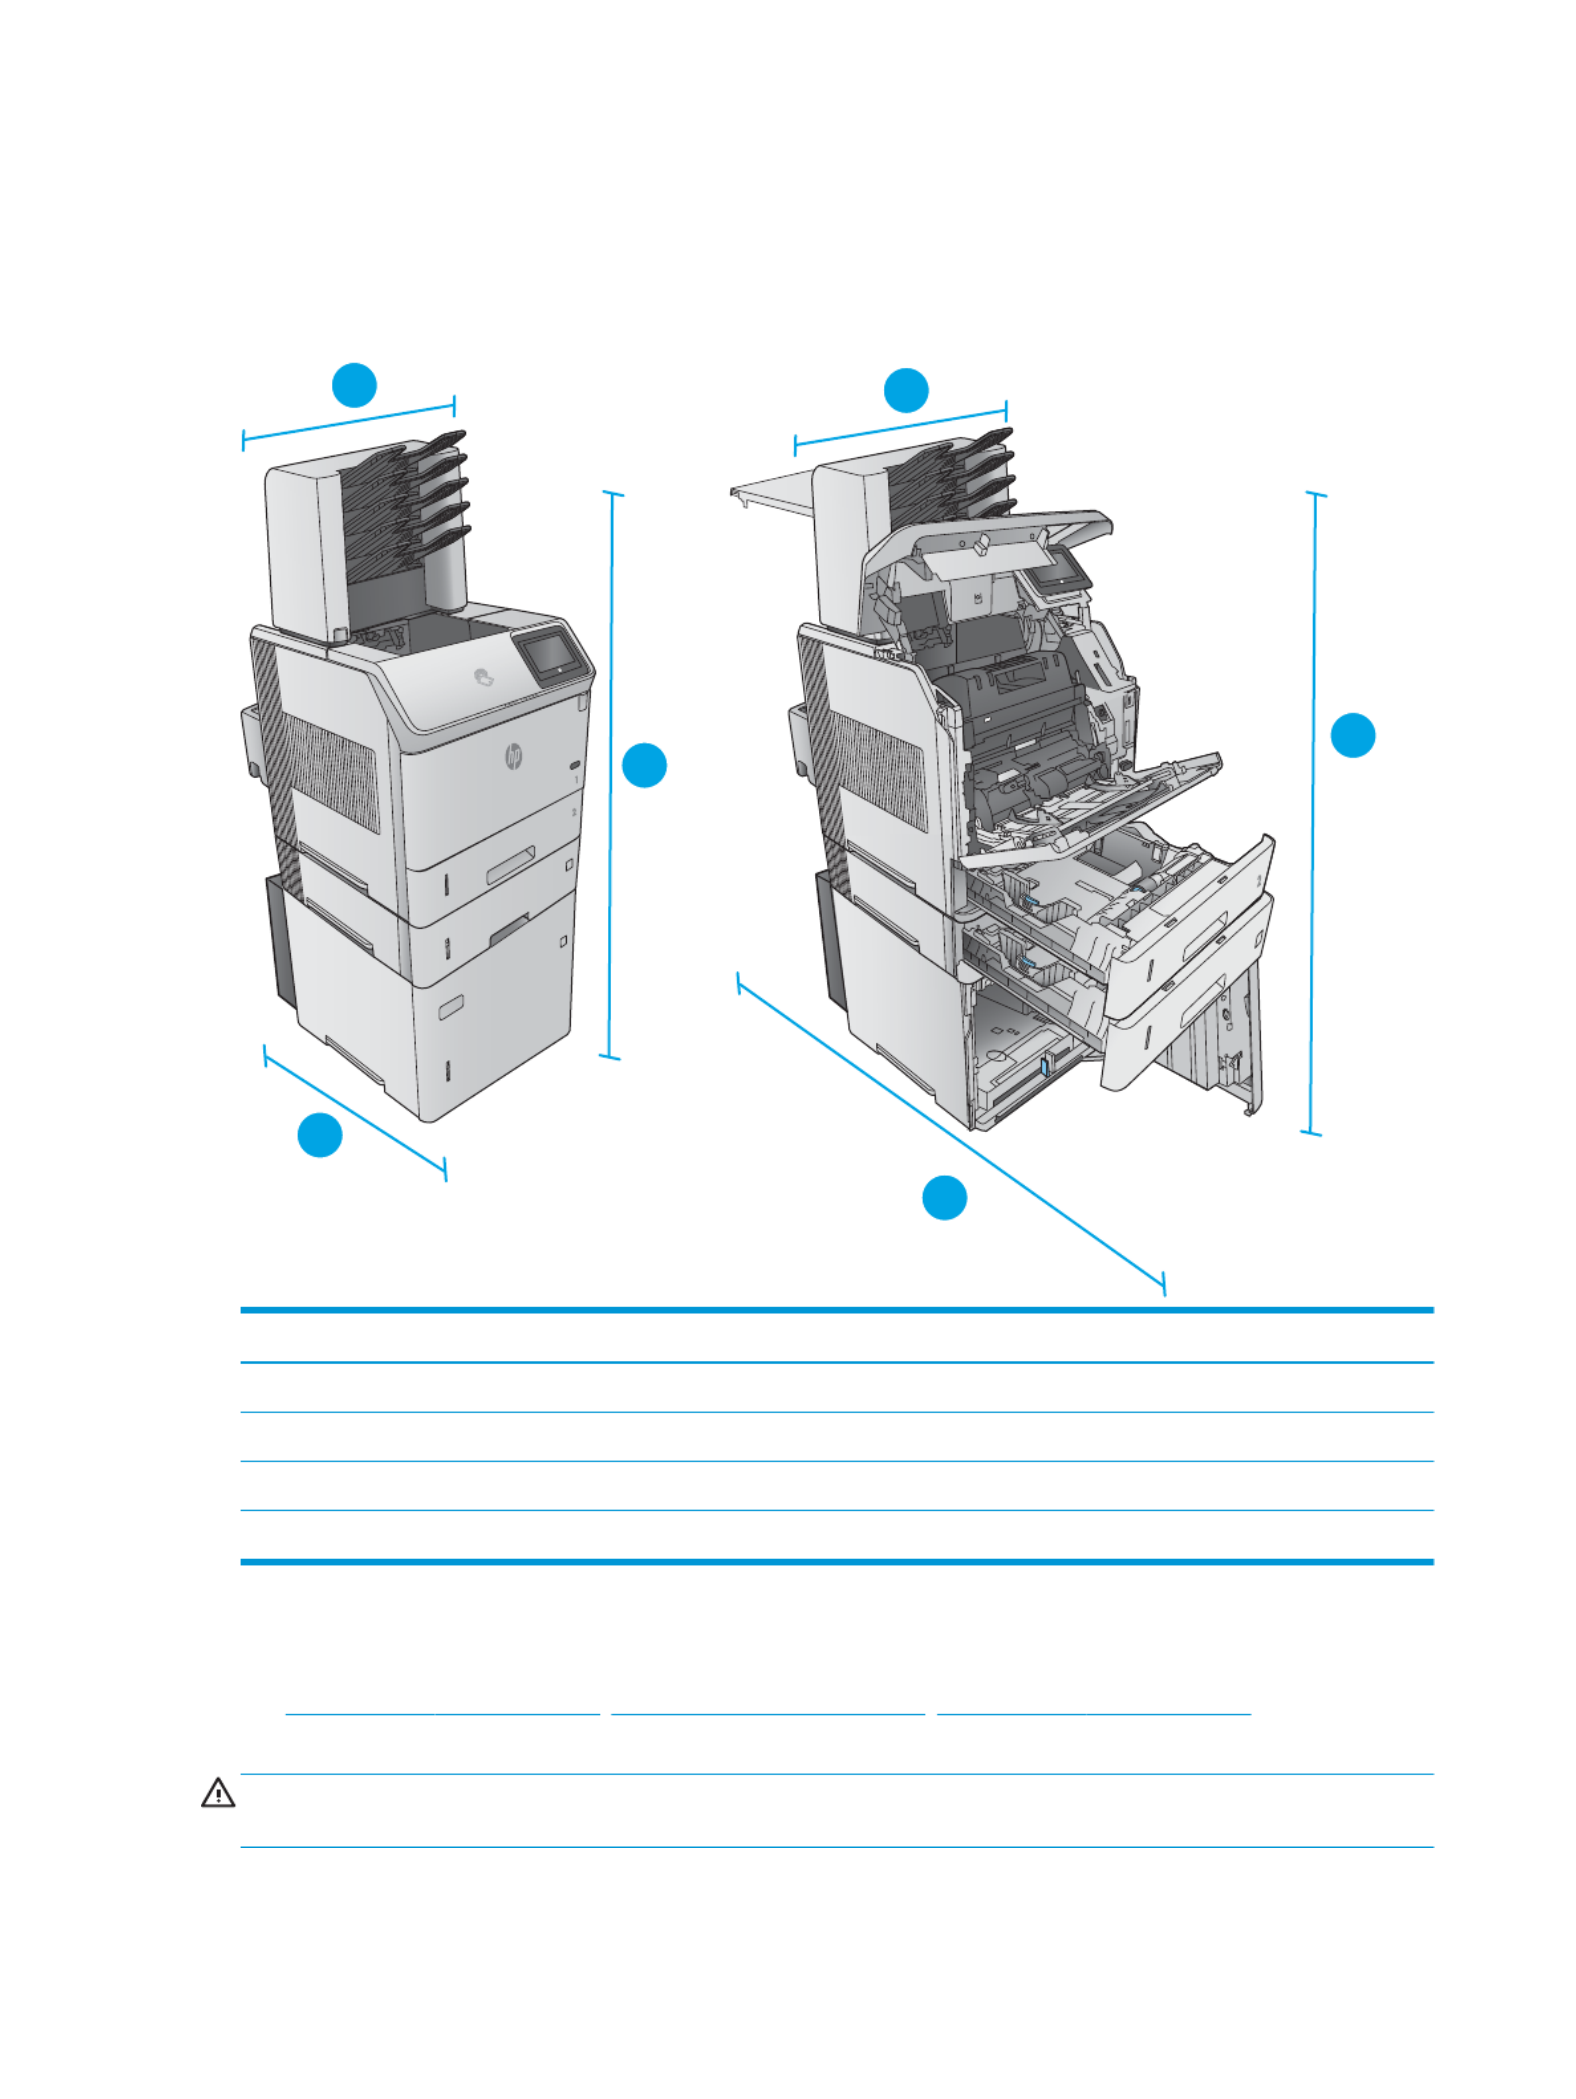
Combination one
Combination one
Combination one
Combination oneCombination one
Includes the product plus these accessories:
●One 1 x 500-sheet paper feeder
●The 1,500-sheet high-capacity tray
●The stacker output accessory
Figure 1-10
Figure 1-10
Figure 1-10
Figure 1-10Figure 1-10 Dimensions for Combination one
3
3
3
3
3
3
3
3
3
3
3
3
3
3
3
3
1
2
1
2
3
3
Product and ac
Product and ac
Product and ac
Product and acProduct and accessories cl
cessories cl
cessories cl
cessories clcessories closed
osed
osed
osedosed Product and ac
Product and ac
Product and ac
Product and acProduct and accessories full
cessories full
cessories full
cessories fullcessories fully opened
y opened
y opened
y openedy opened
1. Height 1089 mm (42.9 in) 1089 mm (42.9 in)
2. Depth 537 mm (21.1 in) 902 mm (35.5 in)
3. Width 425 mm (16.7 in) 425 mm (16.7 in)
Weight 48.7 kg (107.4 lb)
18 Chapter 1 Product overview ENWW
Combination two
Combination two
Combination two
Combination twoCombination two
Includes the product plus these accessories:
●One 1 x 500-sheet paper feeder
●The 1,500-sheet high-capacity tray
●The stapler/stacker output accessory
Figure 1-11
Figure 1-11
Figure 1-11
Figure 1-11Figure 1-11 Dimensions for Combination two
3
3
3
3
3
3
3
3
3
3
3
3
3
3
3
3
1
2
1
2
3
3
Product and ac
Product and ac
Product and ac
Product and acProduct and accessories cl
cessories cl
cessories cl
cessories clcessories closed
osed
osed
osedosed Product and ac
Product and ac
Product and ac
Product and acProduct and accessories ful
cessories ful
cessories ful
cessories fulcessories fully opened
ly opened
ly opened
ly openedly opened
1. Height 1156 mm (45.5 in) 1156 mm (45.5 in)
2. Depth 537 mm (21.1 in) 902 mm (35.5 in)
3. Width 425 mm (16.7 in) 425 mm (16.7 in)
Weight 49.7 kg (109.6 lb)
Combination thr
Combination thr
Combination thr
Combination thrCombination three
ee
ee
eeee
Includes the product plus these accessories:
ENWW Product 19specications
●One 1 x 500-sheet paper feeder
●The 1,500-sheet high-capacity tray
●The 5-bin mailbox output accessory
Figure 1-12
Figure 1-12
Figure 1-12
Figure 1-12Figure 1-12 Dimensions for Combination three
3
3
3
3
3
3
3
3
3
3
3
3
3
3
3
3
1
2
1
2
3
3
Product and ac
Product and ac
Product and ac
Product and acProduct and accessorie
cessorie
cessorie
cessoriecessories closed
s closed
s closed
s closeds closed Product and ac
Product and ac
Product and ac
Product and acProduct and accessorie
cessorie
cessorie
cessoriecessories full
s full
s full
s fulls fully opened
y opened
y opened
y openedy opened
1. Height 1367 mm (53.8 in) 1367 mm (53.8 in)
2. Depth 537 mm (21.1 in) 1468 mm (57.8 in)
3. Width 425 mm (16.7 in) 425 mm (16.7 in)
Weight 52.5 kg (115.7 lb)
Po
Po
Po
PoPower c
wer c
wer c
wer cwer consumption, el
onsumption, el
onsumption, el
onsumption, elonsumption, electrical
ectrical
ectrical
ectrical ectrical and aco
and aco
and aco
and aco and acoustic emissions
ustic emissions
ustic emissions
ustic emissionsustic emissions
specications,
specications,
specications,
specications,specications,
See , , for current www.hp.com/support/ljM604 www.hp.com/support/ljM605 www.hp.com/support/ljM606
information.
CAUTION:
CAUTION:
CAUTION:
CAUTION:CAUTION: Power requirements are based on the country/region where the product is sold. Do not convert
operating voltages. This will damage the product and void the product warranty.
20 Chapter 1 Product overview ENWW

Operating-envir
Operating-envir
Operating-envir
Operating-envirOperating-environment range
onment range
onment range
onment rangeonment range
T
T
T
TTable 1-1
able 1-1
able 1-1
able 1-1able 1-1 Oper
Oper
Oper
Oper Operating-environment
ating-environment
ating-environment
ating-environment ating-environment specications
specications
specications
specicationsspecications
Environment
Environment
Environment
EnvironmentEnvironment Recommended
Recommended
Recommended
RecommendedRecommended All
All
All
AllAllowed
owed
owed
owedowed
Temperature 7.5° to 32.5°C (45.5° to 90.5°F) 0° to 35°C (32° to 95°F)
Relative humidity 5% to 90% relative humidity (RH) 35% to 85% RH
Altitude Not applicable 0 to 3048 m (0 to 10,000 ft)
ENWW Product 21specications

Pr
Pr
Pr
PrProduct har
oduct har
oduct har
oduct haroduct hardwar
dwar
dwar
dwardware setup and so
e setup and so
e setup and so
e setup and soe setup and softwar
ftwar
ftwar
ftwarftware ins
e ins
e ins
e inse install
tall
tall
talltallation
ation
ation
ationation
For basic setup instructions, see the Hardware Installation Guide that came with the product. For additional
instructions, go to HP support on the Web.
Go to , , for HP's all-www.hp.com/support/ljM604 www.hp.com/support/ljM605 www.hp.com/support/ljM606
inclusive help for the product. Find the following support:
●Install and congure
●Learn and use
●Solve problems
●Download software updates
●Join support forums
●Find warranty and regulatory information
22 Chapter 1 Product overview ENWW

2
2
2
22 P
P
P
PPaper trays
aper trays
aper trays
aper traysaper trays
●Load Tray 1
●Load Tray 2 and the 500-sheet trays
●Load the optional 1,500-sheet high-capacity tray
●Load the optional custom media tray
●Load envelopes
For mor
For mor
For mor
For morFor more information:
e information:
e information:
e information:e information:
Go to , , .www.hp.com/support/ljM604 www.hp.com/support/ljM605 www.hp.com/support/ljM606
HP's all-inclusive help for the product includes the following information:
●Install and congure
●Learn and use
●Solve problems
●Download software updates
●Join support forums
●Find warranty and regulatory information
ENWW 23

Lo
Lo
Lo
LoLoad Tray 1
ad Tray 1
ad Tray 1
ad Tray 1ad Tray 1
Intr
Intr
Intr
IntrIntroduction
oduction
oduction
oductionoduction
The following information describes how to load paper in Tray 1.This tray holds up to 100 sheets of 75 g/m2 (20
lb) paper.
CAUTION:
CAUTION:
CAUTION:
CAUTION:CAUTION: To avoid jams, never add or remove paper from Tray 1 during printing.
1.
1.
1.
1.1. Grasp the handle on either side of Tray 1, and pull
it forward to open it.
2.
2.
2.
2.2. Pull out the tray extension to support the paper.
24 Chapter 2 Paper trays ENWW

3.
3.
3.
3.3. Load paper in the tray. For information about how
to orient the paper, see Tray 1 paper orientation
on page 26.
4.
4.
4.
4.4. Make sure that the paper under the line on ts ll
the paper guides.
NO
NO
NO
NONOTE:
TE:
TE:
TE:TE: The maximum stack height is 10 mm (0.4
in), or approximately 100 sheets of 75g paper.
5.
5.
5.
5.5. Adjust the side guides so that they lightly touch the
paper stack, but do not bend it.
ENWW Load Tray 1 25

Tray 1 paper orienta
Tray 1 paper orienta
Tray 1 paper orienta
Tray 1 paper orientaTray 1 paper orientation
tion
tion
tiontion
If a duplexer is installed, or if a stapler/stacker is installed, the product alters the way the images for each page
are arranged. When using paper that requires a orientation, load it according to the information in the specic
following table.
Paper type
Paper type
Paper type
Paper typePaper type Single-sided printing, no
Single-sided printing, no
Single-sided printing, no
Single-sided printing, no Single-sided printing, no
stapl
stapl
stapl
staplstapler
er
er
erer/s
/s
/s
/s/stack
tack
tack
tacktacker
er
er
erer
Duplex printing, no s
Duplex printing, no s
Duplex printing, no s
Duplex printing, no sDuplex printing, no stapler
tapler
tapler
taplertapler/
/
/
//
stack
stack
stack
stackstacker
er
er
erer
Single-sided printing, with
Single-sided printing, with
Single-sided printing, with
Single-sided printing, with Single-sided printing, with
the stapl
the stapl
the stapl
the staplthe stapler
er
er
erer/s
/s
/s
/s/stack
tack
tack
tacktacker
er
er
erer
Duplex printing, with the
Duplex printing, with the
Duplex printing, with the
Duplex printing, with the Duplex printing, with the
stapl
stapl
stapl
staplstapler
er
er
erer/s
/s
/s
/s/stack
tack
tack
tacktacker
er
er
erer
Letterhead, preprinted, or
prepunched
Face-up
Top edge leading into the
product
Face-down
Bottom edge leading into
the product
Face-up
Bottom edge leading into
the product
Face-down
Top edge leading into the
product
26 Chapter 2 Paper trays ENWW

Lo
Lo
Lo
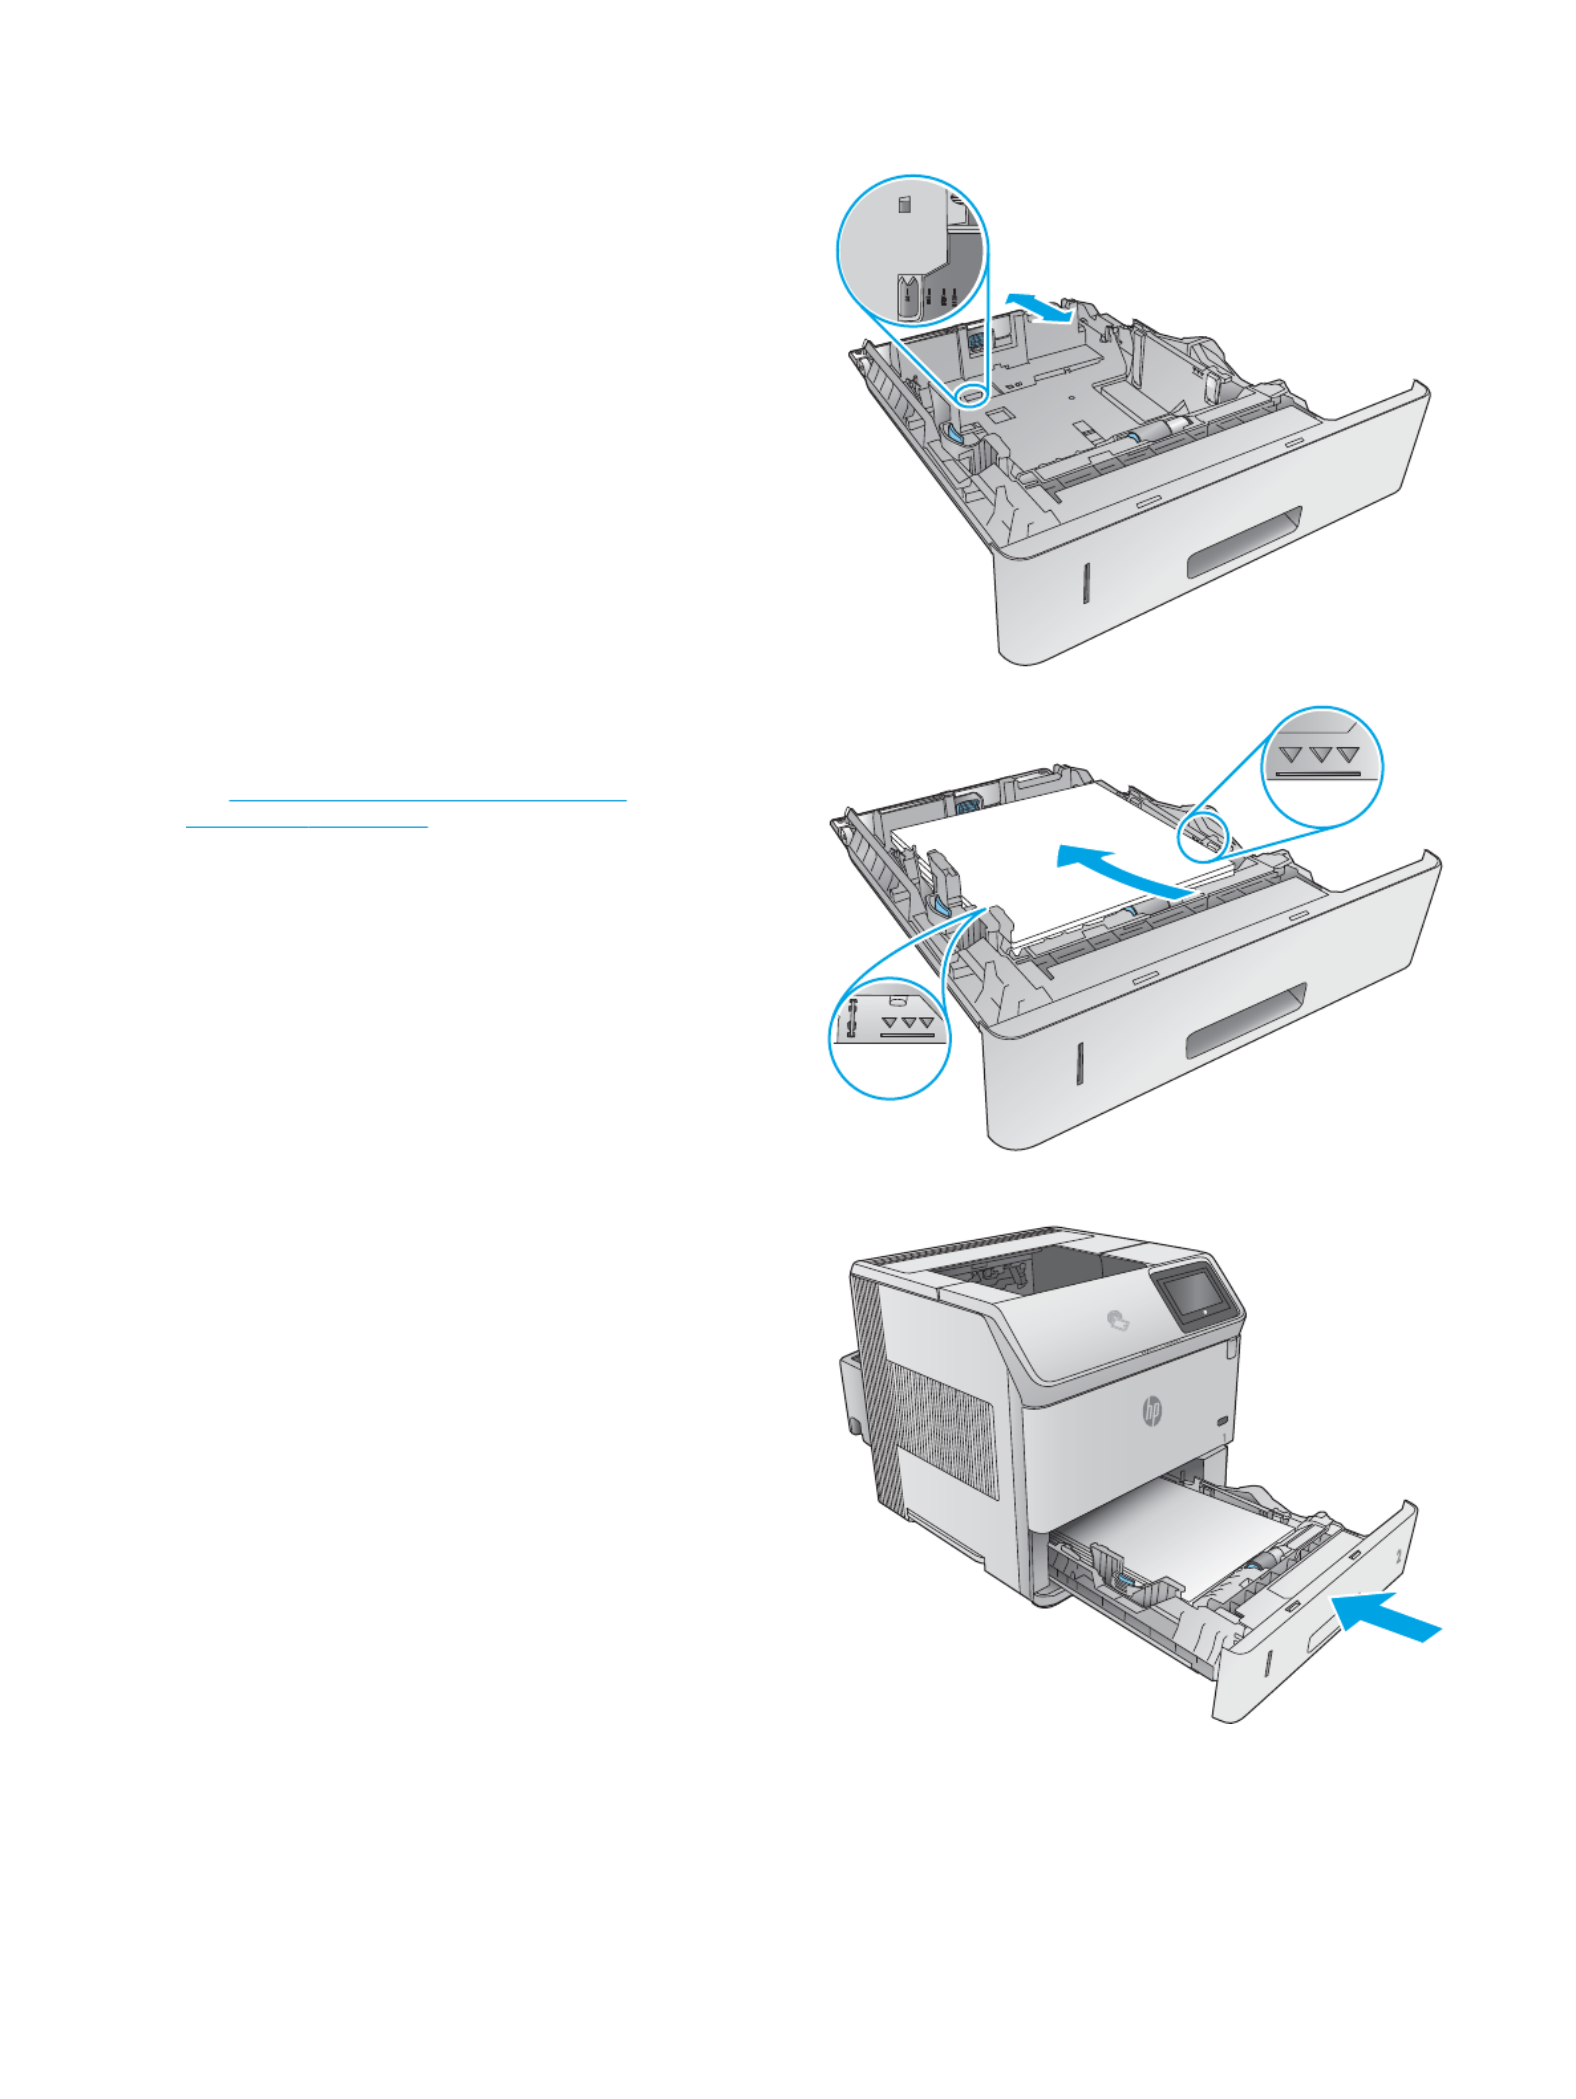
LoLoad Tray 2 and the 500-sheet tr
ad Tray 2 and the 500-sheet tr
ad Tray 2 and the 500-sheet tr
ad Tray 2 and the 500-sheet trad Tray 2 and the 500-sheet trays
ays
ays
aysays
Intr
Intr
Intr
IntrIntroduction
oduction
oduction
oductionoduction
The following information describes how to load paper in Tray 2 and the optional 500-sheet trays (part number
F2G68A). These trays hold up to 500 sheets of 75 g/m2 (20 lb) paper.
NO
NO
NO
NONOTE:
TE:
TE:
TE:TE: The procedure to load paper for the 500-sheet trays is the same as for Tray 2. Only Tray 2 is shown
here.
1.
1.
1.
1.1. Open the tray.
NO
NO
NO
NONOTE:
TE:
TE:
TE:TE: Do not open this tray while it is in use.
2.
2.
2.
2.2. Before loading paper, adjust the paper-width
guides by squeezing the adjustment latches and
sliding the guides to the size of the paper being
used.
2
2
2
2
X
A5
JIS B5
EXEC
A4
LGL/LTR
ENWW Load Tray 2 and the 500-sheet trays 27
3.
3.
3.
3.3. Adjust the paper-length guide by squeezing the
adjustment latch and sliding the guide to the size
of the paper being used.
2
2
2
2
4.
4.
4.
4.4. Load paper into the tray. Check the paper to verify
the guides lightly touch the stack, but do not bend
it. For information about how to orient the paper,
see Tray 2 and the 500-sheet trays paper
orientation on page 29.
NO
NO
NO
NONOTE:
TE:
TE:
TE:TE: To prevent jams, adjust the paper guides
to the correct size and do not the tray. Be overll
sure that the top of the stack is below the tray full
indicator.
2
2
2
2
5.
5.
5.
5.5. Close the tray.
28 Chapter 2 Paper trays ENWW

6.
6.
6.
6.6. The tray message displays on the conguration
product control panel.
7.
7.
7.
7.7. If the paper size and type shown is not correct,
select to choose a paper size or Modify dierent
type.
For custom-size paper, specify the X and Y
dimensions for the paper when the prompt
displays on the product control panel.
2
2
2
2
Y
X
Tray 2 and the 500-sheet tr
Tray 2 and the 500-sheet tr
Tray 2 and the 500-sheet tr
Tray 2 and the 500-sheet trTray 2 and the 500-sheet trays paper orientation
ays paper orientation
ays paper orientation
ays paper orientationays paper orientation
If a duplexer is installed, or if a stapler/stacker is installed, the product alters the way the images for each page
are arranged. When using paper that requires a orientation, load it according to the information in the specic
following table.
Paper type
Paper type
Paper type
Paper typePaper type Single-sided printing, no
Single-sided printing, no
Single-sided printing, no
Single-sided printing, no Single-sided printing, no
stapl
stapl
stapl
staplstapler
er
er
erer/s
/s
/s
/s/stack
tack
tack
tacktacker
er
er
erer
Duplex printing, no s
Duplex printing, no s
Duplex printing, no s
Duplex printing, no sDuplex printing, no stapler
tapler
tapler
taplertapler/
/
/
//
stack
stack
stack
stackstacker
er
er
erer
Single-sided printing, with
Single-sided printing, with
Single-sided printing, with
Single-sided printing, with Single-sided printing, with
the stapl
the stapl
the stapl
the staplthe stapler
er
er
erer/s
/s
/s
/s/stack
tack
tack
tacktacker
er
er
erer
Duplex printing, with the
Duplex printing, with the
Duplex printing, with the
Duplex printing, with the Duplex printing, with the
stapl
stapl
stapl
staplstapler
er
er
erer/s
/s
/s
/s/stack
tack
tack
tacktacker
er
er
erer
Letterhead, preprinted, or
prepunched
Face-down
Top edge at the front of the
tray
2
2
2
2
Face-up
Bottom edge at the front of
the tray
2
2
2
2
Face-down
Bottom edge at the front of
the tray
2
2
2
2
Face-up
Top edge at the front of the
tray
2
2
2
2
ENWW Load Tray 2 and the 500-sheet trays 29

Lo
Lo
Lo
LoLoad the op
ad the op
ad the op
ad the opad the optional 1,500-sheet high-capacity tray
tional 1,500-sheet high-capacity tray
tional 1,500-sheet high-capacity tray
tional 1,500-sheet high-capacity traytional 1,500-sheet high-capacity tray
Intr
Intr
Intr
IntrIntroduction
oduction
oduction
oductionoduction
The following information describes how to load paper in the optional 1,500 sheet high-capacity tray (part
number F2G73A). This tray adjusts for Letter, A4, and Legal sizes.
CAUTION:
CAUTION:
CAUTION:
CAUTION:CAUTION: To avoid jams, do not load trays while the product is printing.
Load the tr
Load the tr
Load the tr
Load the trLoad the tray
ay
ay
ayay
1.
1.
1.
1.1. Press the release and open the door of the 1,500-
sheet tray.
3
3
3
3
2.
2.
2.
2.2. Pinch the guides at the front of the tray and slide
them to the correct paper size.
NO
NO
NO
NONOTE:
TE:
TE:
TE:TE: If paper is in the tray, remove it. When
paper is in the tray, the guides cannot be adjusted.
A4
LGL
LTR
30 Chapter 2 Paper trays ENWW

3.
3.
3.
3.3. Load the paper into the tray. To prevent jams, load
complete reams at one time. Do not divide reams
into smaller sections.
4.
4.
4.
4.4. Make sure that the paper does not exceed the ll
marks on the paper guides, and that the front edge
of the stack is aligned with the arrows.
5.
5.
5.
5.5. Close the door on the tray.
ENWW Load the optional 1,500-sheet high-capacity tray 31

Lo
Lo
Lo
LoLoad the op
ad the op
ad the op
ad the opad the optional cust
tional cust
tional cust
tional custtional custom media tr
om media tr
om media tr
om media trom media tray
ay
ay
ayay
Intr
Intr
Intr
IntrIntroduction
oduction
oduction
oductionoduction
The following information describes the product to use the optional custom media tray (part number conguring
F2G75A) and loading paper into this tray. The custom media tray into the Tray 2 position only, and it holds ts
smaller size paper than the standard tray in the Tray 2 position. It supports these paper sizes:
●Statement
●5 x 7
●5 x 8
●A5
●A6
●B6 (JIS)
●Double Japan Postcard Rotated
●Double Postcard (JIS)
NO
NO
NO
NONOTE:
TE:
TE:
TE:TE: The stapler does not support any of the paper sizes that the custom media tray supports. The
automatic duplexer supports A5 size when paper is loaded with the short-edge but it does not support any rst,
of the other sizes that the custom media tray supports.
Congure
Congure
Congure
CongureCongure the pr
the pr
the pr
the pr the product for the cus
oduct for the cus
oduct for the cus
oduct for the cusoduct for the cust
t
t
ttom media tray
om media tray
om media tray
om media trayom media tray
1.
1.
1.
1.1. Press the Home button on the product control panel.
2.
2.
2.
2.2. Open the following menus:
●Administration
●Manage Trays
●Tray 2 Model
3.
3.
3.
3.3. Select Custom Tray.
4.
4.
4.
4.4. Press .OK
32 Chapter 2 Paper trays ENWW

Load p
Load p
Load p
Load pLoad paper into the cus
aper into the cus
aper into the cus
aper into the cusaper into the cust
t
t
ttom media tray
om media tray
om media tray
om media trayom media tray
1.
1.
1.
1.1. Open the tray.
2.
2.
2.
2.2. Open the paper-width guides at the side of the
tray.
3.
3.
3.
3.3. Open the paper-length guide at the rear of the
tray.
ENWW Load the optional custom media tray 33

4.
4.
4.
4.4. Load paper into the tray. Check the paper to verify
the guides lightly touch the stack, but do not bend
it. For information about how to orient the paper,
see Custom media tray paper orientation
on page 34.
5.
5.
5.
5.5. Close the tray.
Cust
Cust
Cust
CustCustom media tray paper orienta
om media tray paper orienta
om media tray paper orienta
om media tray paper orientaom media tray paper orientation
tion
tion
tiontion
When using paper that requires a orientation, load it according to the information in the following table.specic
Paper type
Paper type
Paper type
Paper typePaper type Single-sided printing
Single-sided printing
Single-sided printing
Single-sided printingSingle-sided printing Duplex printing
Duplex printing
Duplex printing
Duplex printingDuplex printing
Letterhead, preprinted, or prepunched Face-down
Top edge at the front of the tray
2
2
2
2
Face-up
Bottom edge at the front of the tray
2
2
2
2
34 Chapter 2 Paper trays ENWW

Lo
Lo
Lo
LoLoad envel
ad envel
ad envel
ad envelad envelopes
opes
opes
opesopes
Intr
Intr
Intr
IntrIntroduction
oduction
oduction
oductionoduction
The following information describes how to load envelopes. Use only Tray 1 or the optional envelope feeder (part
number F2G74A) to print on envelopes. Tray 1 holds up to 10 envelopes. The optional envelope feeder holds up
to 75 envelopes.
NO
NO
NO
NONOTE:
TE:
TE:
TE:TE: Select the correct paper type in the print driver before printing.
For best performance, print envelopes to the rear output bin by opening the rear bin.
ENWW Load envelopes 35
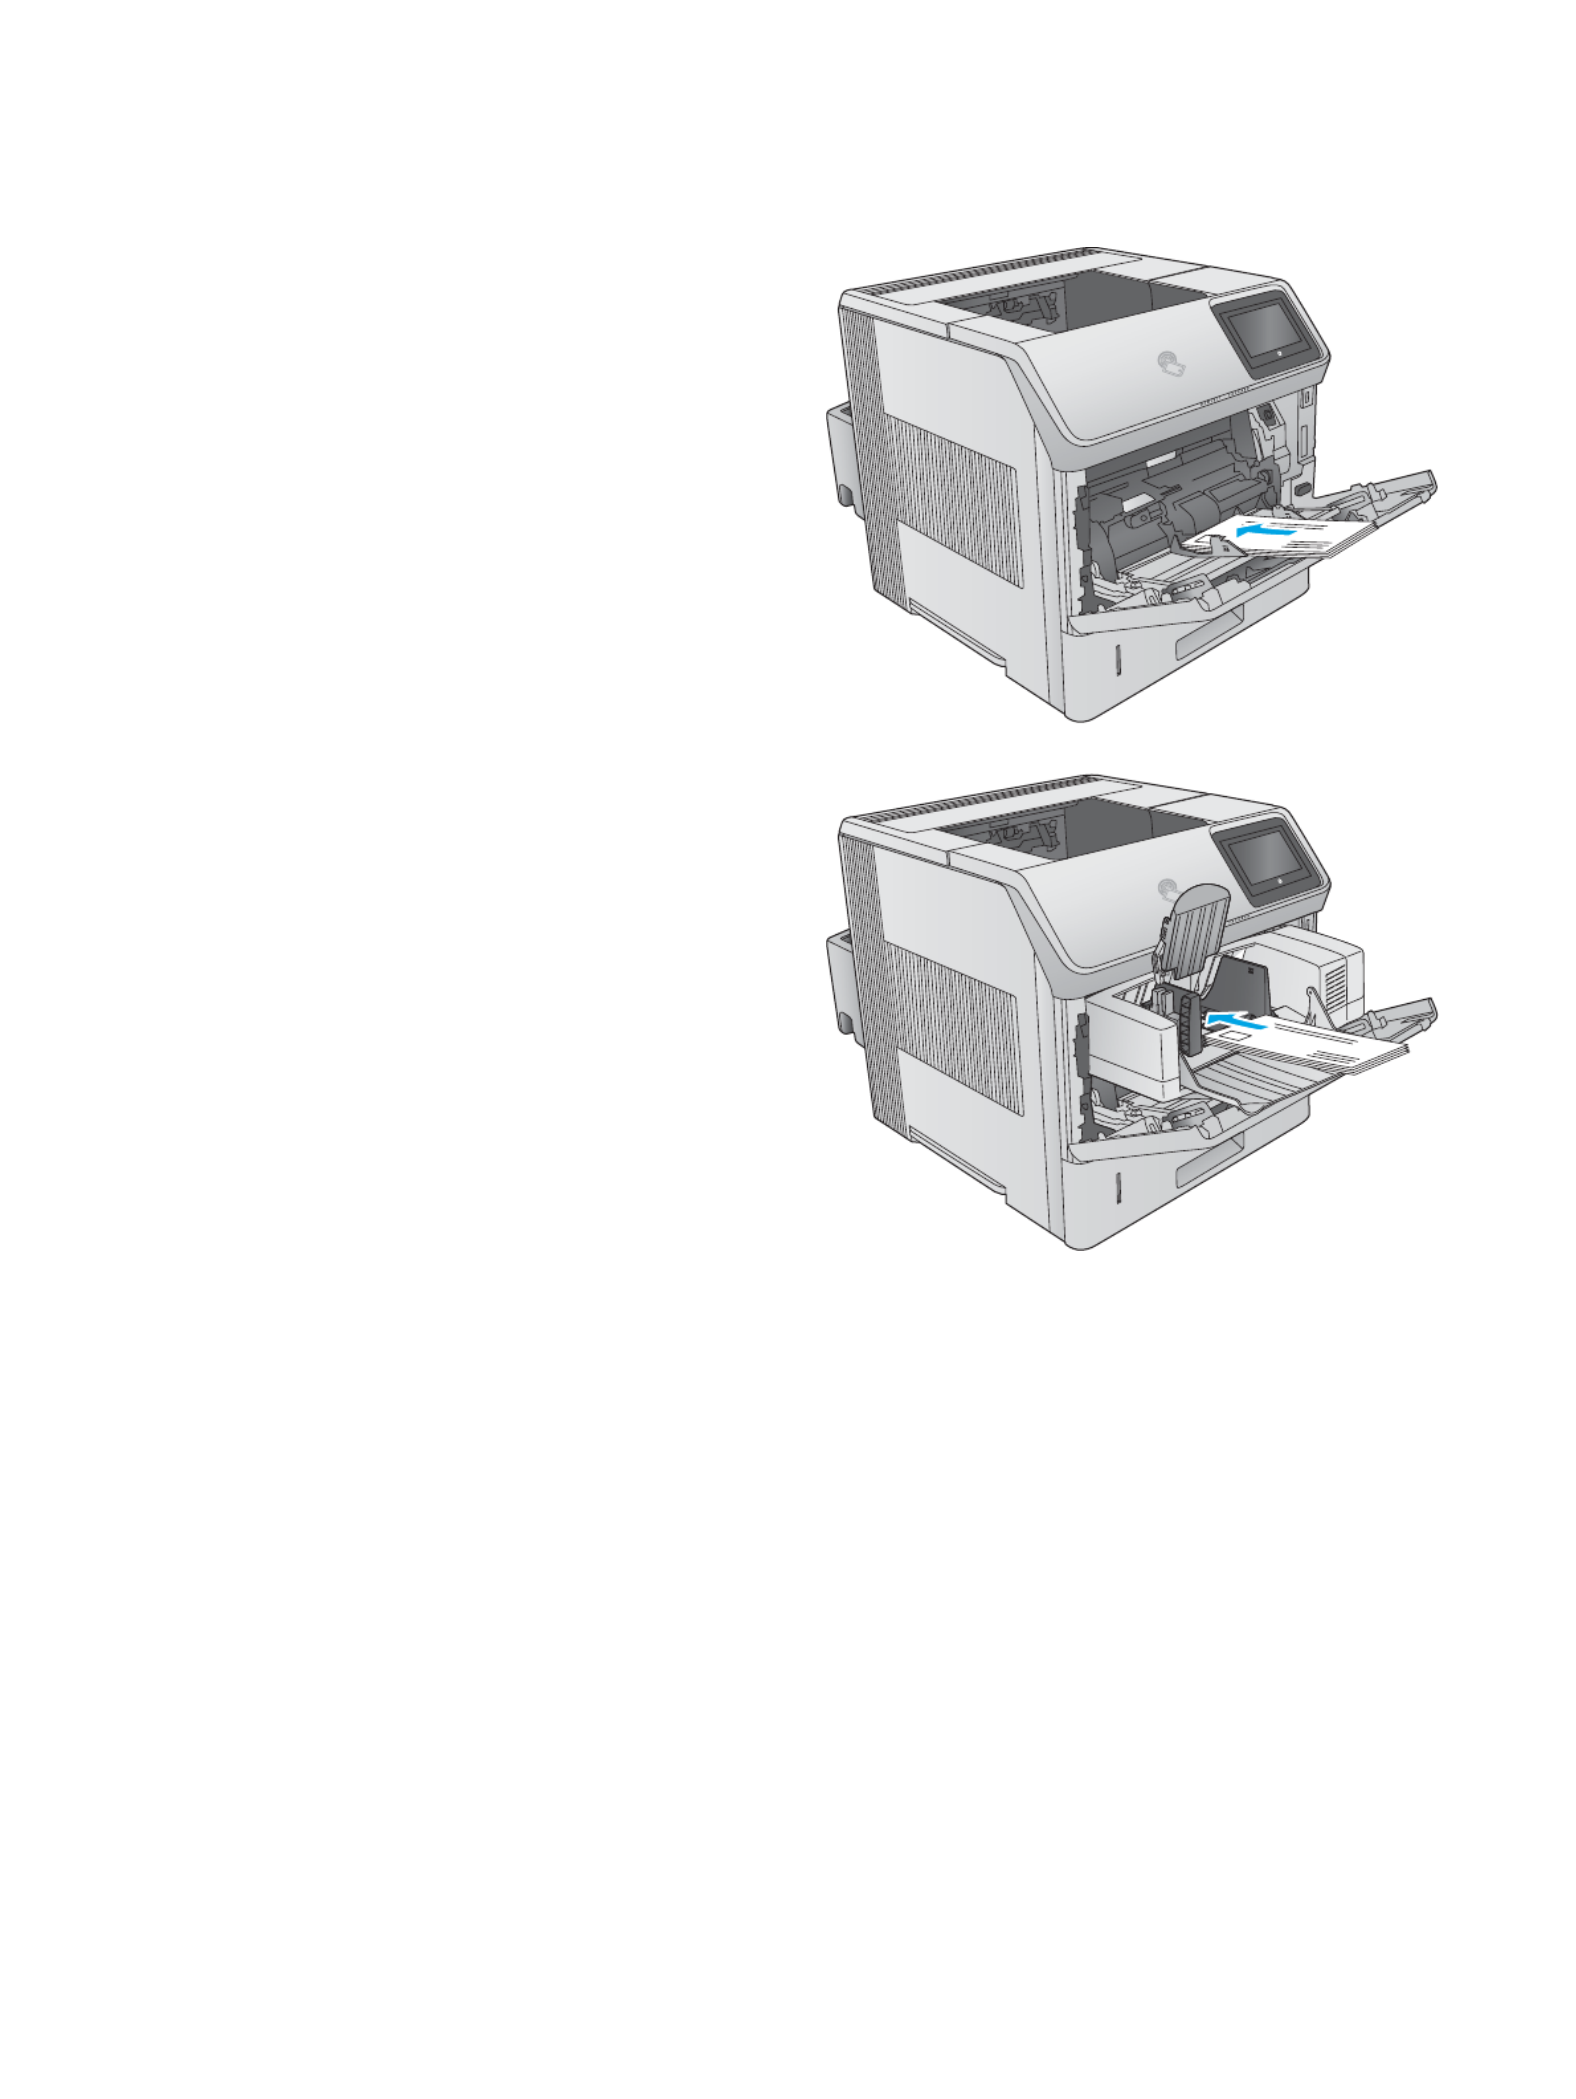
Envel
Envel
Envel
EnvelEnvelope orientation
ope orientation
ope orientation
ope orientationope orientation
1.
1.
1.
1.1. In Tray 1, load envelopes with the front of the
envelope facing up, and the short, postage-edge
leading into the product.
2.
2.
2.
2.2. In the optional envelope feeder, lift the pressure
plate, and load envelopes with the front of the
envelope facing up, and the short, postage-edge
leading into the product. Lower the pressure plate
onto the stack of envelopes before printing.
36 Chapter 2 Paper trays ENWW

3
3
3
33 Supplies, ac
Supplies, ac
Supplies, ac
Supplies, acSupplies, acc
c
c
ccessories, and p
essories, and p
essories, and p
essories, and pessories, and parts
arts
arts
artsarts
●Order supplies, accessories, and parts
●Replace the toner cartridge
●Replace the staple cartridge
For mor
For mor
For mor
For morFor more informa
e informa
e informa
e informae information:
tion:
tion:
tion:tion:
Go to , , .www.hp.com/support/ljM604 www.hp.com/support/ljM605 www.hp.com/support/ljM606
HP's all-inclusive help for the product includes the following information:
●Install and congure
●Learn and use
●Solve problems
●Download software updates
●Join support forums
●Find warranty and regulatory information
ENWW 37

Or
Or
Or
OrOrder supplies, ac
der supplies, ac
der supplies, ac
der supplies, acder supplies, acc
c
c
cces
es
es
esessories, and parts
sories, and parts
sories, and parts
sories, and partssories, and parts
Or
Or
Or
OrOrdering
dering
dering
deringdering
Order supplies and paper www.hp.com/go/suresupply
Order genuine HP parts or accessories www.hp.com/buy/parts
Order through service or support providers Contact an HP-authorized service or support provider.
Order using the HP Embedded Web Server (EWS) To access, in a supported Web browser on your computer, enter the
product IP address or host name in the address/URL The EWS eld.
contains a link to the HP SureSupply Web site, which provides
options for purchasing Original HP supplies.
Supplies and ac
Supplies and ac
Supplies and ac
Supplies and acSupplies and acce
ce
ce
cecessories
ssories
ssories
ssoriesssories
Item
Item
Item
ItemItem Description
Description
Description
DescriptionDescription Part number
Part number
Part number
Part numberPart number
Supplies
Supplies
Supplies
SuppliesSupplies
HP 81X High Yield Black Original LaserJet Toner
Cartridge
NO
NO
NO
NONOTE:
TE:
TE:
TE:TE: M605 and M606 models only
High-capacity replacement toner cartridge CF281X
HP 81A Black Original LaserJet Toner Cartridge Standard-capacity replacement toner cartridge CF281A
HP Staple Cartridge Includes three 1,000-staple cartridges Q3216ARell
Preventive maintenance kit Replacement rollers for all trays, replacement transfer roller, and
replacement fuser
Includes installation instructions
F2G76A (110–127 Volt)
F2G77A (220–240 Volt)
Acc
Acc
Acc
AccAccessories
essories
essories
essoriesessories
Automatic duplex assembly Duplexer
Includes installation instructions
F2G69A
Envelope feeder Optional envelope feeder that holds up to 75 envelopes
Includes installation instructions
F2G74A
Custom media tray Optional tray that holds small-size paper. Replaces the standard
tray in the Tray 2 position.
Includes installation instructions
F2G75A
500-sheet paper feeder Optional 500-sheet paper feeder (included with the x models)
Includes installation instructions
NO
NO
NO
NONOTE:
TE:
TE:
TE:TE: The product supports up to four 500-sheet paper
feeders. When combined with the 1,500-sheet high-capacity
paper feeder, the product supports up to three 500-sheet paper
feeders.
F2G68A
1,500-sheet high-capacity paper feeder Optional 1,500 sheet paper feeder
Includes installation instructions
F2G73A
38 Chapter 3 Supplies, accessories, and parts ENWW

Item
Item
Item
ItemItem Description
Description
Description
DescriptionDescription Part number
Part number
Part number
Part numberPart number
Printer stand Optional stand with casters to support the printer
Recommended when using multiple optional paper feeders.
Includes installation instructions
F2G70A
Stacker Optional paper-stacker output accessory
Includes installation instructions
F2G71A
Stapler/Stacker Optional stapler/stacker output accessory
Includes installation instructions
F2G72A
Multi-bin mailbox Optional 5-bin mailbox output accessory
Includes installation instructions
F2G81A
1 GB DIMM Optional DIMM to increase the product memory
Includes installation instructions
NO
NO
NO
NONOTE:
TE:
TE:
TE:TE: The product supports one optional DIMM.
G6W84A
HP Secure High-Performance Hard Disk Drive Optional Hard Drive
Includes installation instructions
B5L29A
Two Internal USB ports Two optional USB ports for connecting third-party devices
Includes installation instructions
B5L28A
HP Trusted Platform Module Automatically encrypts all data that passes through the product
Includes installation instructions
F5S62A
HP Jetdirect 2900nw Print Server USB wireless print server accessory J8031A
HP Jetdirect 3000w NFC/Wireless Accessory Wi-Fi direct accessory for “touch” printing from mobile devices
NO
NO
NO
NONOTE:
TE:
TE:
TE:TE: Supported for the n and dn models only. The functionality
is already integrated in the x models.
J8030A
Cust
Cust
Cust
CustCustomer sel
omer sel
omer sel
omer selomer self
f
f
ff-r
-r
-r
-r-repair parts
epair parts
epair parts
epair partsepair parts
Customer Self-Repair (CSR) parts are available for many HP LaserJet products to reduce repair time. More
information about the CSR program and can be found at benets www.hp.com/go/csr-support and
www.hp.com/go/csr-faq.
Genuine HP replacement parts can be ordered at www.hp.com/buy/parts or by contacting an HP-authorized
service or support provider. When ordering, one of the following will be needed: part number, serial number
(found on back of printer), product number, or product name.
●Parts listed as self-replacement are to be installed by customers, unless you are willing to pay
Mandatory
Mandatory
Mandatory
MandatoryMandatory
HP service personnel to perform the repair. For these parts, on-site or return-to-depot support is not
provided under the HP product warranty.
●Parts listed as self-replacement can be installed by HP service personnel at your request for no
Optional
Optional
Optional
OptionalOptional
additional charge during the product warranty period.
ENWW Order supplies, accessories, and parts 39

NO
NO
NO
NONOTE:
TE:
TE:
TE:TE: The following information is subject to change. For the current list of customer self-repair parts for this
product, go to , , .www.hp.com/support/ljM604 www.hp.com/support/ljM605 www.hp.com/support/ljM606
Item
Item
Item
ItemItem Description
Description
Description
DescriptionDescription Self
Self
Self
SelfSelf-r
-r
-r
-r-replacement options
eplacement options
eplacement options
eplacement optionseplacement options Part number
Part number
Part number
Part numberPart number
Transfer roller Replacement transfer roller
Includes installation instructions
Mandatory E6B67-67904
Cassette Replacement paper cassette for
Tray 2
Includes installation instructions
Mandatory E6B67-67913
Tray 1 roller kit Replacement rollers for Tray 1
Includes installation instructions
Optional E6B67-67906
Tray 2 through X roller kit Replacement rollers for Tray 2,
the optional 500-sheet paper
feeders, and the optional 1,500-
sheet high-capacity paper
feeder
Includes installation instructions
Mandatory E6B67-67905
Fuser kit (110 volt) Replacement fuser
Includes installation instructions
Mandatory E6B67-67901
Fuser kit (220 volt) Replacement fuser
Includes installation instructions
Mandatory E6B67-67902
Torque Limiter kit Replacement Torque Limiter
Includes installation instructions
Mandatory E6B67-67926
Output accessory cover Replacement output accessory
cover
Mandatory RL2-1404-000CN
Formatter cover Replacement formatter cover Mandatory RC4-5802-000CN
Duplexing cover Replacement duplexer cover Mandatory RM2-6310-000CN
Legal cover Replacement dust cover for
loading legal-size paper in Tray
2
Mandatory RC4-5872-000CN
HIP cover Replacement cover for the
Hardware Integration Pocket
(HIP)
Mandatory RC4-5803-000CN
Envelope feeder cover Replacement cover for the
envelope feeder slot
Mandatory RL1-1667-000CN
40 Chapter 3 Supplies, accessories, and parts ENWW

Repl
Repl
Repl
ReplReplac
ac
ac
acace the toner cartridge
e the toner cartridge
e the toner cartridge
e the toner cartridgee the toner cartridge
Intr
Intr
Intr
IntrIntroduction
oduction
oduction
oductionoduction
The following information provides details about the toner cartridge for the product, and it includes instructions
to replace it.
●Toner-cartridge information
●Remove and replace the cartridge
T
T
T
TToner
oner
oner
oneroner-cartridge information
-cartridge information
-cartridge information
-cartridge information-cartridge information
This product indicates when the toner cartridge level is low and very low. The actual toner cartridge life
remaining can vary. Consider having a replacement cartridge available to install when print quality is no longer
acceptable.
Continue printing with the current cartridge until redistributing the toner no longer yields acceptable print quality.
To redistribute the toner, remove the toner cartridge from the printer and gently rock the cartridge back and forth
about its horizontal axis. For graphical representation, see cartridge replacement instructions. Reinsert the toner
cartridge into the printer and close the cover.
To purchase cartridges or check cartridge compatibility for the product, go to HP SureSupply at www.hp.com/go/
suresupply. Scroll to the bottom of the page and verify that the country/region is correct.
Capacity
Capacity
Capacity
CapacityCapacity Cartridge number
Cartridge number
Cartridge number
Cartridge numberCartridge number Part number
Part number
Part number
Part numberPart number
HP 81A Black Original LaserJet Toner
Cartridge
81A CF281A
HP 81X High Yield Black Original LaserJet
Toner Cartridge
NO
NO
NO
NONOTE:
TE:
TE:
TE:TE: M605 and M606 models only
81X CF281X
NO
NO
NO
NONOTE:
TE:
TE:
TE:TE: High-yield toner cartridges contain more toner than standard cartridges for increased page yield. For
more information, go to www.hp.com/go/learnaboutsupplies.
Do not remove the toner cartridge from its package until it is time to replace it.
CAUTION:
CAUTION:
CAUTION:
CAUTION:CAUTION: To prevent damage to the toner cartridge, do not expose it to light for more than a few minutes.
Cover the green imaging drum if the toner cartridge must be removed from the product for an extended period
of time.
The following illustration shows the toner-cartridge components.
ENWW Replace the toner cartridge 41

14
3
2
1 Plastic shield
2 Memory chip
3 Sealing tape
4 Imaging drum
CAUTION:
CAUTION:
CAUTION:
CAUTION:CAUTION: Do not touch the imaging drum. Fingerprints can cause print-quality problems.
CAUTION:
CAUTION:
CAUTION:
CAUTION:CAUTION: If toner gets on clothing, wipe it by using a dry cloth and wash the clothes in cold water. Hot water o
sets toner into fabric.
NO
NO
NO
NONOTE:
TE:
TE:
TE:TE: Information about recycling used toner cartridges is in the toner-cartridge box.
Remo
Remo
Remo
RemoRemove and r
ve and r
ve and r
ve and rve and replac
eplac
eplac
eplaceplace the cartridge
e the cartridge
e the cartridge
e the cartridgee the cartridge
1.
1.
1.
1.1. Open the top cover.
42 Chapter 3 Supplies, accessories, and parts ENWW
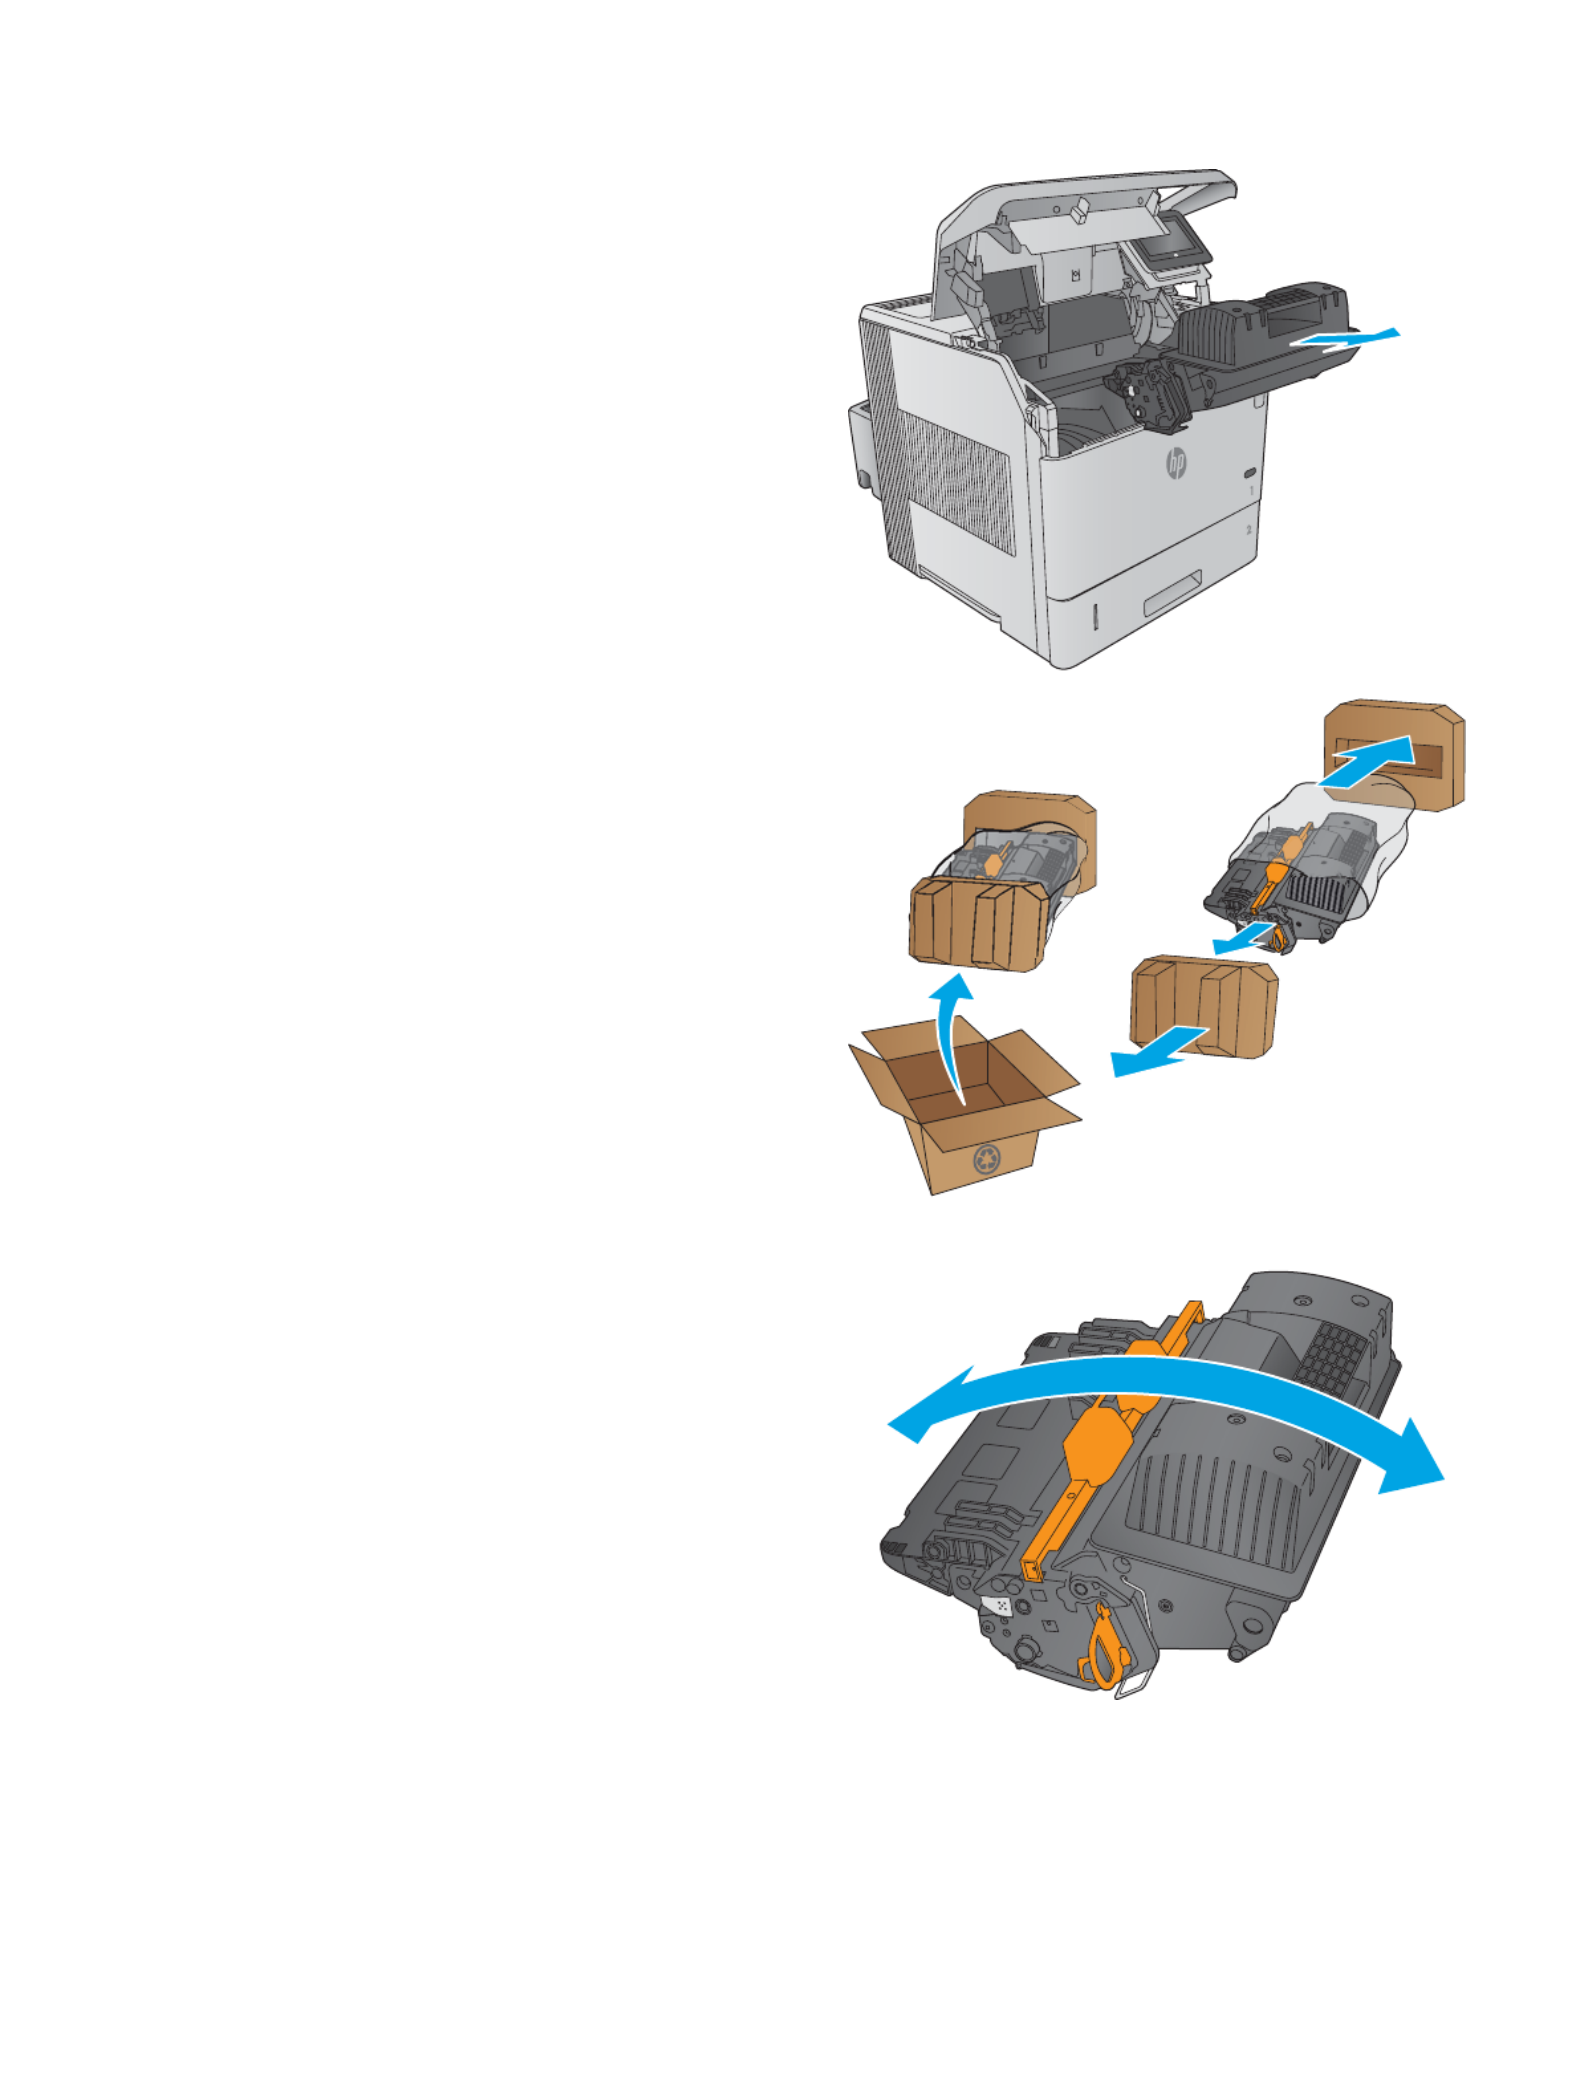
2.
2.
2.
2.2. Grasp the handle of the used toner cartridge and
pull out to remove it.
3.
3.
3.
3.3. Remove the new toner cartridge from its protective
bag. Save all packaging for recycling the used
toner cartridge.
4.
4.
4.
4.4. Hold both ends of the toner cartridge and rock it
5-6 times.
ENWW Replace the toner cartridge 43
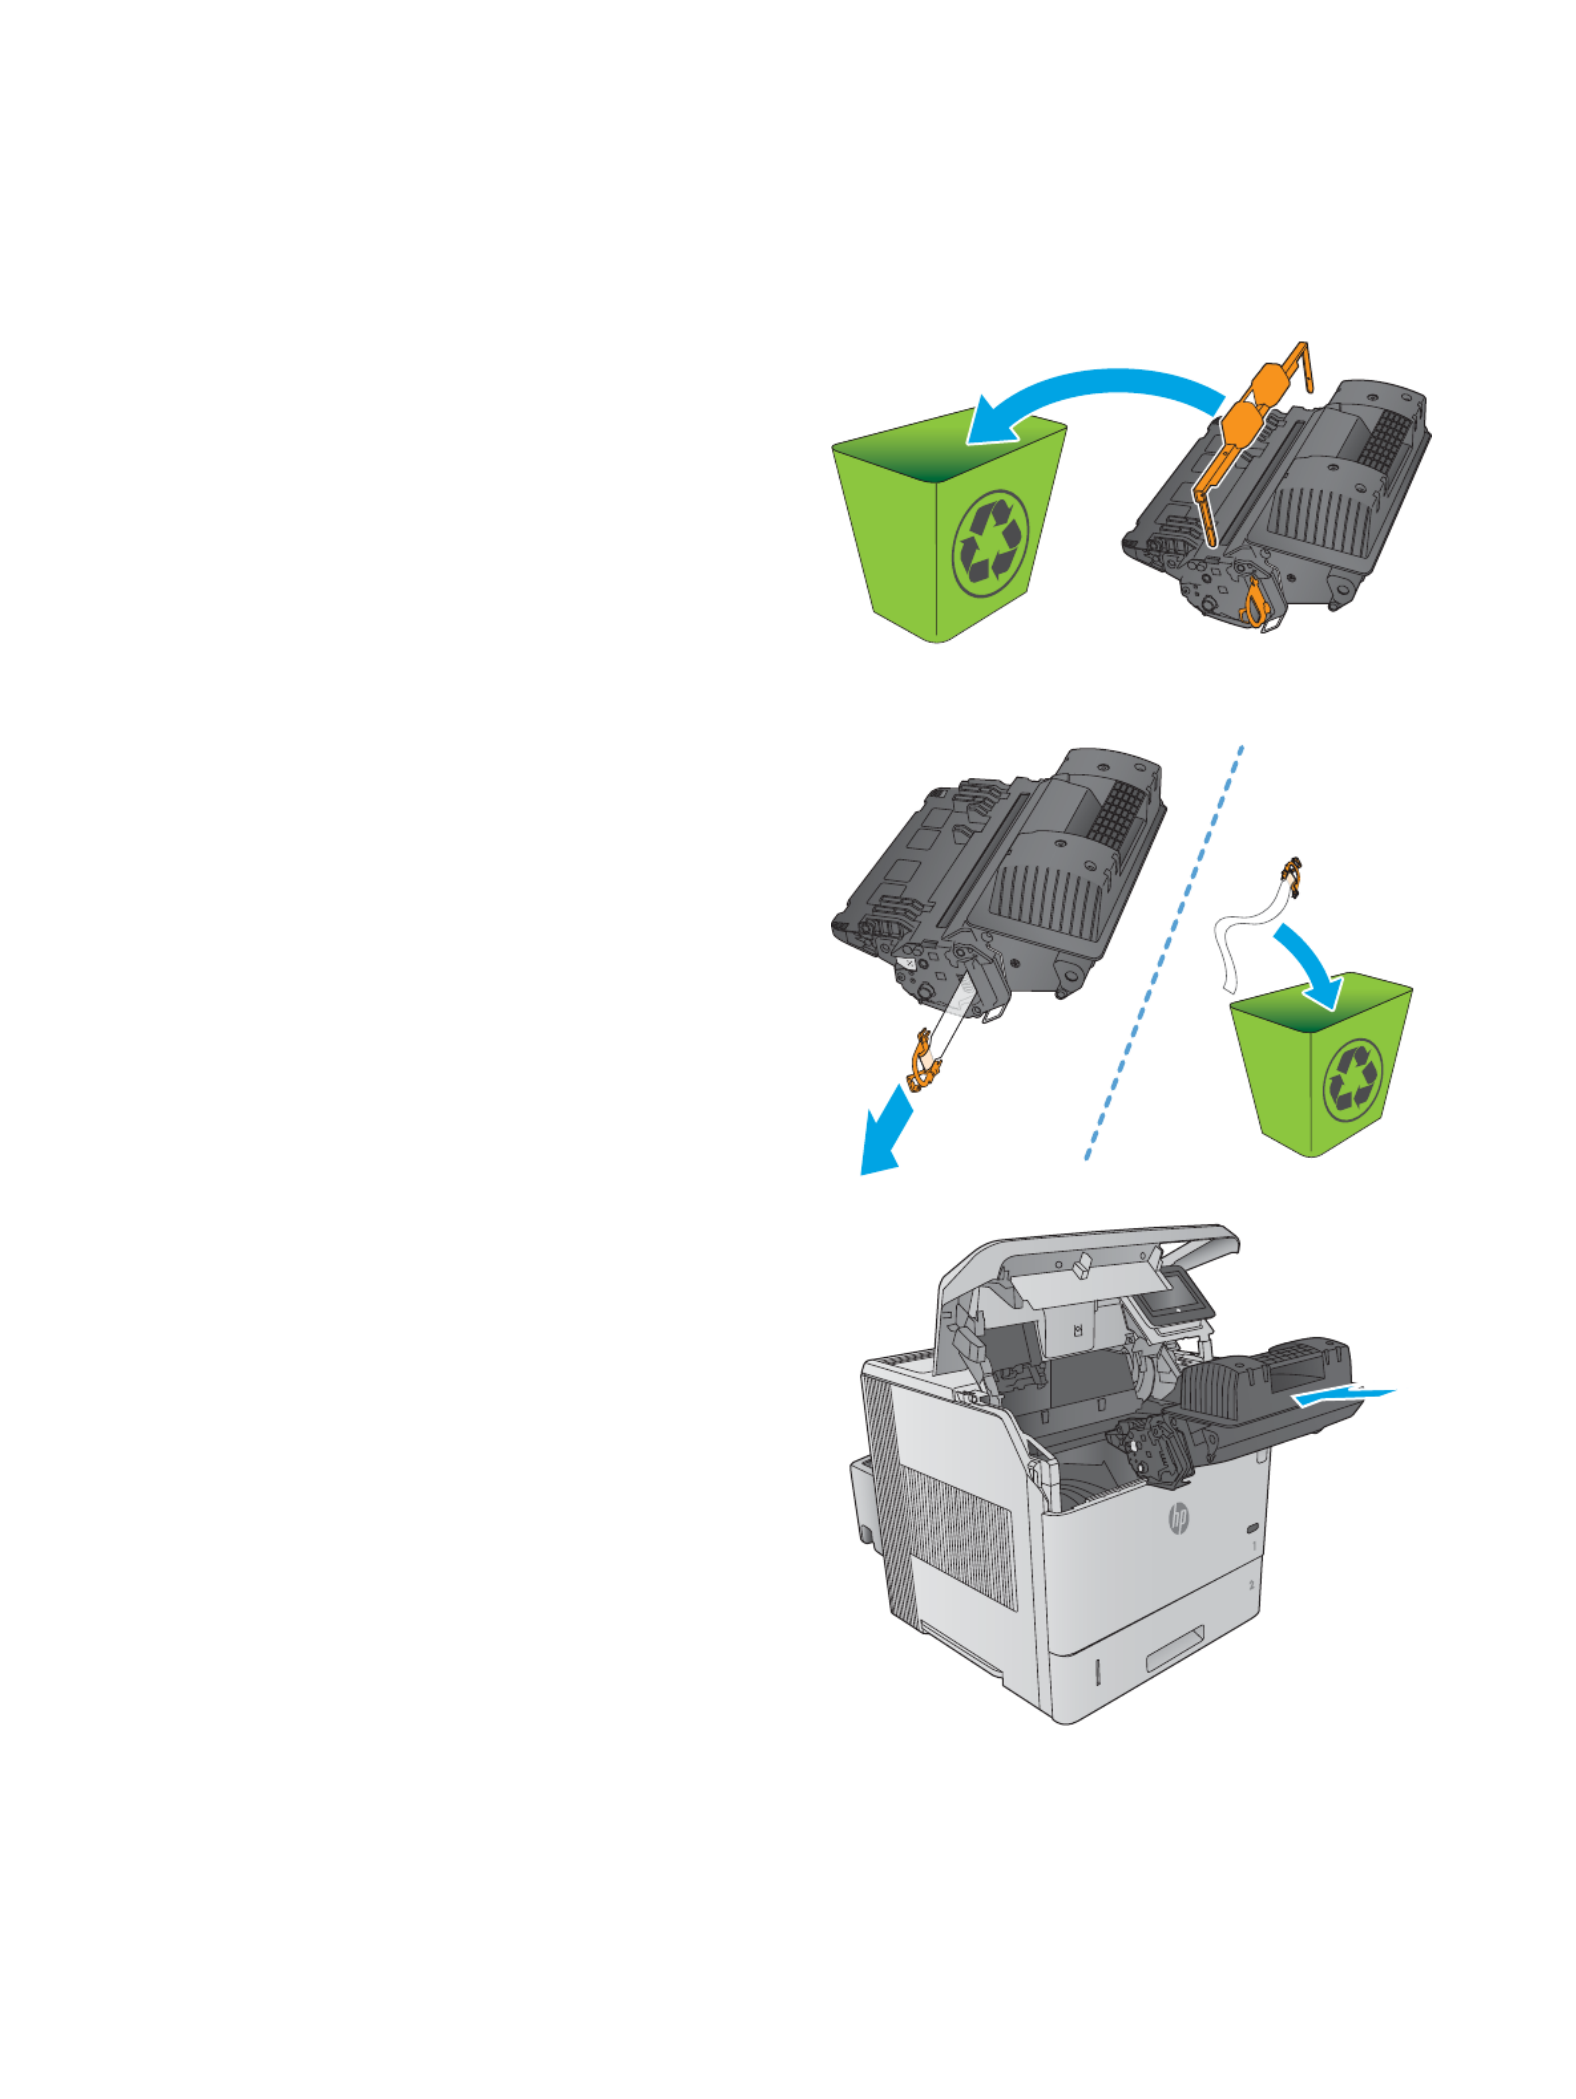
5.
5.
5.
5.5. Remove the protective shield from the toner
cartridge.
6.
6.
6.
6.6. Pull on the orange tab to remove the toner sealing
tape. Completely remove the sealing tape from the
cartridge.
7.
7.
7.
7.7. Align the toner cartridge with its slot, and then
insert the toner cartridge into the product.
44 Chapter 3 Supplies, accessories, and parts ENWW

8.
8.
8.
8.8. Close the top cover.
9.
9.
9.
9.9. Pack the used toner cartridge, the protective
shield, and the sealing tape into the box that the
new cartridge came in.
In the U.S. and Canada, a pre-paid shipping label is
included in the box. In other countries/regions, go
to www.hp.com/recycle to print a pre-paid
shipping label.
Adhere the pre-paid shipping label to the box, and
return the used cartridge to HP for recycling.
ENWW Replace the toner cartridge 45

Repl
Repl
Repl
ReplReplac
ac
ac
acace the stapl
e the stapl
e the stapl
e the staple the staple cartridge
e cartridge
e cartridge
e cartridgee cartridge
Intr
Intr
Intr
IntrIntroduction
oduction
oduction
oductionoduction
If the stapler runs out of staples, jobs continue to print to the stapler/stacker, but they are not stapled.
To purchase staple cartridges, go to the HP Parts Store at www.hp.com/buy/parts.
T
T
T
TTabl
abl
abl
ablable 3-1
e 3-1
e 3-1
e 3-1e 3-1 Stapl
Stapl
Stapl
Stapl Staple cartridge information
e cartridge information
e cartridge information
e cartridge informatione cartridge information
Item
Item
Item
ItemItem Description
Description
Description
DescriptionDescription Part number
Part number
Part number
Part numberPart number
1,000-staple cartridge Provides three staple cartridges Q3216A
Remo
Remo
Remo
RemoRemove and r
ve and r
ve and r
ve and rve and replac
eplac
eplac
eplaceplace the stapl
e the stapl
e the stapl
e the staple the staple car
e car
e car
e care cartridge
tridge
tridge
tridgetridge
1.
1.
1.
1.1. On the right side of the stapler/stacker, turn the
stapler unit toward the front of the product until
the unit clicks into the open position. Grasp the
blue staple-cartridge handle and pull the cartridge
out of the stapler unit.
2.
2.
2.
2.2. Insert the new staple cartridge into the stapler unit
and rotate the stapler unit toward the rear of the
product until the unit snaps into place.
46 Chapter 3 Supplies, accessories, and parts ENWW

4
4
4
44 Print
Print
Print
PrintPrint
●Print tasks (Windows)
●Print tasks (OS X)
●Store print jobs on the product to print later
●Mobile printing
●Print from the USB port
For mor
For mor
For mor
For morFor more inform
e inform
e inform
e informe information:
ation:
ation:
ation:ation:
Go to , , .www.hp.com/support/ljM604 www.hp.com/support/ljM605 www.hp.com/support/ljM606
HP's all-inclusive help for the product includes the following information:
●Install and congure
●Learn and use
●Solve problems
●Download software updates
●Join support forums
●Find warranty and regulatory information
ENWW 47

Print tasks (Windo
Print tasks (Windo
Print tasks (Windo
Print tasks (WindoPrint tasks (Windows)
ws)
ws)
ws)ws)
How t
How t
How t
How tHow to print (Windows
o print (Windows
o print (Windows
o print (Windowso print (Windows)
)
)
))
The following procedure describes the basic printing process for Windows.
1.
1.
1.
1.1. From the software program, select the option.
Print
Print
Print
PrintPrint
2.
2.
2.
2.2. Select the product from the list of printers. To change settings, click or tap the Pro
Pro
Pro
ProProperties
perties
perties
pertiesperties Pref
Pref
Pref
PrefPrefer
er
er
ererences
ences
ences
ences ences or
button to open the print driver.
NO
NO
NO
NONOTE:
TE:
TE:
TE:TE: The name of the button varies for software programs.dierent
NO
NO
NO
NONOTE:
TE:
TE:
TE:TE: To access these features from a Windows 8 or 8.1 Start screen, select Devic
Devic
Devic
DevicDevices
es
es
eses, select , and
Print
Print
Print
PrintPrint
then select the printer.
3.
3.
3.
3.3. Click or tap the tabs in the print driver to the available options. For example, set the paper congure
orientation on the tab, and set the paper source, paper type, paper size, and quality settings on
Finishing
Finishing
Finishing
FinishingFinishing
the Paper
Paper
Paper
PaperPaper/
/
/
//Quality
Quality
Quality
QualityQuality tab.
48 Chapter 4 Print ENWW

4.
4.
4.
4.4. Click or tap the button to return to the dialog box. Select the number of copies to print from this
OK
OK
OK
OKOK Print
Print
Print
PrintPrint
screen.
5.
5.
5.
5.5. Click or tap the button to print the job.
OK
OK
OK
OKOK
ENWW Print tasks (Windows) 49

Aut
Aut
Aut
AutAutomatical
omatical
omatical
omaticalomaticall
l
l
lly print on bo
y print on bo
y print on bo
y print on boy print on both sides (Windows
th sides (Windows
th sides (Windows
th sides (Windowsth sides (Windows)
)
)
))
Use this procedure for products that have an automatic duplexer installed. If the product does not have an
automatic duplexer installed, or to print on paper types that the duplexer does not support, you can print on
both sides manually.
1.
1.
1.
1.1. From the software program, select the option.
Print
Print
Print
PrintPrint
2.
2.
2.
2.2. Select the product from the list of printers, and then click or tap the Pr
Pr
Pr
PrProperties
operties
operties
opertiesoperties Pr
Pr
Pr
PrPrefer
efer
efer
efereferenc
enc
enc
encences
es
es
eses or button to
open the print driver.
NO
NO
NO
NONOTE:
TE:
TE:
TE:TE: The name of the button varies for software programs.dierent
NO
NO
NO
NONOTE:
TE:
TE:
TE:TE: To access these features from a Windows 8 or 8.1 Start screen, select De
De
De
DeDevices
vices
vices
vicesvices, select , and
Print
Print
Print
PrintPrint
then select the printer.
3.
3.
3.
3.3. Click or tap the tab.
Finishing
Finishing
Finishing
FinishingFinishing
4.
4.
4.
4.4. Select the Print on both sides
Print on both sides
Print on both sides
Print on both sidesPrint on both sides check box. Click the button to close the
OK
OK
OK
OKOK Document Pr
Document Pr
Document Pr
Document PrDocument Properties
operties
operties
opertiesoperties dialog box.
5.
5.
5.
5.5. In the dialog box, click the button to print the job.
Print
Print
Print
PrintPrint OK
OK
OK
OKOK
Manuall
Manuall
Manuall
ManuallManually print on bo
y print on bo
y print on bo
y print on boy print on both sides (Windo
th sides (Windo
th sides (Windo
th sides (Windoth sides (Windows)
ws)
ws)
ws) ws)
Use this procedure for products that do not have an automatic duplexer installed or to print on paper that the
duplexer does not support.
1.
1.
1.
1.1. From the software program, select the option.
Print
Print
Print
PrintPrint
2.
2.
2.
2.2. Select the product from the list of printers, and then click or tap the Pr
Pr
Pr
PrProperties
operties
operties
opertiesoperties Pr
Pr
Pr
PrPrefer
efer
efer
efereferenc
enc
enc
encences
es
es
eses or button to
open the print driver.
NO
NO
NO
NONOTE:
TE:
TE:
TE:TE: The name of the button varies for software programs.dierent
NO
NO
NO
NONOTE:
TE:
TE:
TE:TE: To access these features from a Windows 8 or 8.1 Start screen, select De
De
De
DeDevices
vices
vices
vicesvices, select , and
Print
Print
Print
PrintPrint
then select the printer.
3.
3.
3.
3.3. Click or tap the tab.
Finishing
Finishing
Finishing
FinishingFinishing
4.
4.
4.
4.4. Select the Print on both sides (manual
Print on both sides (manual
Print on both sides (manual
Print on both sides (manualPrint on both sides (manuall
l
l
lly)
y)
y)
y)y) OK
OK
OK
OKOK check box. Click the button to print the side of the job.rst
5.
5.
5.
5.5. Retrieve the printed stack from the output bin, and place it in Tray 1.
6.
6.
6.
6.6. If prompted, touch the appropriate control panel button to continue.
50 Chapter 4 Print ENWW

Print mul
Print mul
Print mul
Print mulPrint multipl
tipl
tipl
tipltiple pages per sheet (Windo
e pages per sheet (Windo
e pages per sheet (Windo
e pages per sheet (Windoe pages per sheet (Windows)
ws)
ws)
ws)ws)
1.
1.
1.
1.1. From the software program, select the option.
Print
Print
Print
PrintPrint
2.
2.
2.
2.2. Select the product from the list of printers, and then click or tap the or
Properties
Properties
Properties
PropertiesProperties Pr
Pr
Pr
PrPrefer
efer
efer
efereference
ence
ence
enceences
s
s
ss button to
open the print driver.
NO
NO
NO
NONOTE:
TE:
TE:
TE:TE: The name of the button varies for software programs.dierent
NO
NO
NO
NONOTE:
TE:
TE:
TE:TE: To access these features from a Windows 8 or 8.1 Start screen, select Devic
Devic
Devic
DevicDevices
es
es
eses, select , and
Print
Print
Print
PrintPrint
then select the printer.
3.
3.
3.
3.3. Click or tap the tab.
Finishing
Finishing
Finishing
FinishingFinishing
4.
4.
4.
4.4. Select the number of pages per sheet from the Page
Page
Page
PagePages per sheet
s per sheet
s per sheet
s per sheets per sheet drop-down list.
5.
5.
5.
5.5. Select the correct Print p
Print p
Print p
Print pPrint page borders
age borders
age borders
age bordersage borders P
P
P
PPage or
age or
age or
age orage order
der
der
derder Orientation
Orientation
Orientation
OrientationOrientation OK
OK
OK
OKOK, , and options. Click the button to close the
Document Properties
Document Properties
Document Properties
Document PropertiesDocument Properties dialog box.
6.
6.
6.
6.6. In the dialog box, click the button to print the job.
Print
Print
Print
PrintPrint OK
OK
OK
OKOK
Sel
Sel
Sel
SelSelect the paper type (Windows)
ect the paper type (Windows)
ect the paper type (Windows)
ect the paper type (Windows)ect the paper type (Windows)
1.
1.
1.
1.1. From the software program, select the option.
Print
Print
Print
PrintPrint
2.
2.
2.
2.2. Select the product from the list of printers, and then click or tap the or
Properties
Properties
Properties
PropertiesProperties Pr
Pr
Pr
PrPrefer
efer
efer
efereference
ence
ence
enceences
s
s
ss button to
open the print driver.
NO
NO
NO
NONOTE:
TE:
TE:
TE:TE: The name of the button varies for software programs.dierent
NO
NO
NO
NONOTE:
TE:
TE:
TE:TE: To access these features from a Windows 8 or 8.1 Start screen, select Devic
Devic
Devic
DevicDevices
es
es
eses, select , and
Print
Print
Print
PrintPrint
then select the printer.
3.
3.
3.
3.3. Click or tap the Paper
Paper
Paper
PaperPaper/Quality
/Quality
/Quality
/Quality/Quality tab.
4.
4.
4.
4.4. From the P
P
P
PPaper type
aper type
aper type
aper typeaper type drop-down list, click the option.
More...
More...
More...
More...More...
5.
5.
5.
5.5. Expand the list of T
T
T
TType is:
ype is:
ype is:
ype is:ype is: options.
6.
6.
6.
6.6. Expand the category of paper types that best describes your paper.
7.
7.
7.
7.7. Select the option for the type of paper you are using, and then click the button.
OK
OK
OK
OKOK
8.
8.
8.
8.8. Click the button to close the dialog box. In the dialog box, click the button
OK
OK
OK
OKOK Document Properties
Document Properties
Document Properties
Document PropertiesDocument Properties Print
Print
Print
PrintPrint OK
OK
OK
OKOK
to print the job.
If the tray needs to be a tray message displays on the product control panel.congured, conguration
9.
9.
9.
9.9. Load the tray with the type and size of paper, and then close the tray.specied
10.
10.
10.
10.10. Touch the button to accept the detected type and size, or touch the button to choose a OK Modify dierent
paper size or type.
11.
11.
11.
11.11. Select the correct type and size, and then touch the button.OK
ENWW Print tasks (Windows) 51

Additional print tasks
Additional print tasks
Additional print tasks
Additional print tasksAdditional print tasks
Go to , , .www.hp.com/support/ljM604 www.hp.com/support/ljM605 www.hp.com/support/ljM606
Instructions are available for performing print tasks, such as the following:specic
●Create and use printing shortcuts or presets
●Select the paper size, or use a custom paper size
●Select the page orientation
●Create a booklet
●Scale a document to a paper sizet specic
●Print the or last pages of the document on paperrst dierent
●Print watermarks on a document
52 Chapter 4 Print ENWW

Print tasks (
Print tasks (
Print tasks (
Print tasks (Print tasks (OS X)
OS X)
OS X)
OS X)OS X)
How t
How t
How t
How tHow to print (OS X)
o print (OS X)
o print (OS X)
o print (OS X)o print (OS X)
The following procedure describes the basic printing process for OS X.
1.
1.
1.
1.1. Click the Fil
Fil
Fil
FilFile
e
e
ee Print
Print
Print
PrintPrint menu, and then click the option.
2.
2.
2.
2.2. Select the product.
3.
3.
3.
3.3. Click , and then select other menus to adjust the print settings.
Show Details
Show Details
Show Details
Show DetailsShow Details
4.
4.
4.
4.4. Click the button.
Print
Print
Print
PrintPrint
Aut
Aut
Aut
AutAutomatical
omatical
omatical
omaticalomaticall
l
l
lly print on both sides (
y print on both sides (
y print on both sides (
y print on both sides (y print on both sides (OS X)
OS X)
OS X)
OS X)OS X)
NO
NO
NO
NONOTE:
TE:
TE:
TE:TE: This information applies to products that include an automatic duplexer.
NO
NO
NO
NONOTE:
TE:
TE:
TE:TE: This feature is available if you install the HP print driver. It might not be available if you are using AirPrint.
1.
1.
1.
1.1. Click the Fil
Fil
Fil
FilFile
e
e
ee Print
Print
Print
PrintPrint menu, and then click the option.
2.
2.
2.
2.2. Select the product.
3.
3.
3.
3.3. Click , and then click the
Show Details
Show Details
Show Details
Show DetailsShow Details Layo
Layo
Layo
LayoLayout
ut
ut
utut menu.
4.
4.
4.
4.4. Select a binding option from the T
T
T
TTwo-
wo-
wo-
wo-wo-Sided
Sided
Sided
SidedSided drop-down list.
5.
5.
5.
5.5. Click the button.
Print
Print
Print
PrintPrint
Manuall
Manuall
Manuall
ManuallManually print on bo
y print on bo
y print on bo
y print on boy print on both sides (O
th sides (O
th sides (O
th sides (Oth sides (OS X)
S X)
S X)
S X)S X)
NO
NO
NO
NONOTE:
TE:
TE:
TE:TE: This feature is available if you install the HP print driver. It might not be available if you are using AirPrint.
1.
1.
1.
1.1. Click the Fil
Fil
Fil
FilFile
e
e
ee Print
Print
Print
PrintPrint menu, and then click the option.
2.
2.
2.
2.2. Select the product.
3.
3.
3.
3.3. Click , and then click the
Show Details
Show Details
Show Details
Show DetailsShow Details Manual Dupl
Manual Dupl
Manual Dupl
Manual DuplManual Duplex
ex
ex
exex menu.
4.
4.
4.
4.4. Click the Manual Dupl
Manual Dupl
Manual Dupl
Manual DuplManual Duplex
ex
ex
exex box, and select a binding option.
5.
5.
5.
5.5. Click the button.
Print
Print
Print
PrintPrint
6.
6.
6.
6.6. Go to the product, and remove any blank paper that is in Tray 1.
7.
7.
7.
7.7. Retrieve the printed stack from the output bin and place it with the printed-side facing down in the input
tray.
8.
8.
8.
8.8. If prompted, touch the appropriate control panel button to continue.
ENWW Print tasks (OS X) 53

Print mul
Print mul
Print mul
Print mulPrint multipl
tipl
tipl
tipltiple pages per sheet (
e pages per sheet (
e pages per sheet (
e pages per sheet (e pages per sheet (OS X)
OS X)
OS X)
OS X)OS X)
1.
1.
1.
1.1. Click the Fil
Fil
Fil
FilFile
e
e
ee Print
Print
Print
PrintPrint menu, and then click the option.
2.
2.
2.
2.2. Select the product.
3.
3.
3.
3.3. Click , and then click the
Show Details
Show Details
Show Details
Show DetailsShow Details Layo
Layo
Layo
LayoLayout
ut
ut
utut menu.
4.
4.
4.
4.4. From the P
P
P
PPages per Sheet
ages per Sheet
ages per Sheet
ages per Sheetages per Sheet drop-down list, select the number of pages that you want to print on each sheet.
5.
5.
5.
5.5. In the Layout Dir
Layout Dir
Layout Dir
Layout DirLayout Direction
ection
ection
ectionection area, select the order and placement of the pages on the sheet.
6.
6.
6.
6.6. From the Bor
Bor
Bor
BorBorders
ders
ders
dersders menu, select the type of border to print around each page on the sheet.
7.
7.
7.
7.7. Click the button.
Print
Print
Print
PrintPrint
Sel
Sel
Sel
SelSelect the paper type (OS X)
ect the paper type (OS X)
ect the paper type (OS X)
ect the paper type (OS X)ect the paper type (OS X)
1.
1.
1.
1.1. Click the Fil
Fil
Fil
FilFile
e
e
ee Print
Print
Print
PrintPrint menu, and then click the option.
2.
2.
2.
2.2. Select the product.
3.
3.
3.
3.3. Click , and then click the menu or the
Show Details
Show Details
Show Details
Show DetailsShow Details Media & Quality
Media & Quality
Media & Quality
Media & QualityMedia & Quality Paper
Paper
Paper
PaperPaper/
/
/
//Quality
Quality
Quality
QualityQuality menu.
4.
4.
4.
4.4. Select a type from the drop-down list.
Media-type
Media-type
Media-type
Media-typeMedia-type
5.
5.
5.
5.5. Click the button.
Print
Print
Print
PrintPrint
Additional print tasks
Additional print tasks
Additional print tasks
Additional print tasksAdditional print tasks
Go to , , .www.hp.com/support/ljM604 www.hp.com/support/ljM605 www.hp.com/support/ljM606
Instructions are available for performing print tasks, such as the following:specic
●Create and use printing shortcuts or presets
●Select the paper size, or use a custom paper size
●Select the page orientation
●Create a booklet
●Scale a document to a paper sizet specic
●Print the or last pages of the document on paperrst dierent
●Print watermarks on a document
54 Chapter 4 Print ENWW

S
S
S
SSt
t
t
ttor
or
or
orore print jobs on the pr
e print jobs on the pr
e print jobs on the pr
e print jobs on the pre print jobs on the product t
oduct t
oduct t
oduct toduct to print l
o print l
o print l
o print lo print lat
at
at
atater
er
er
erer
Intr
Intr
Intr
IntrIntroduction
oduction
oduction
oductionoduction
The following information provides procedures for creating and printing documents that are stored on the
product. This feature is enabled on the product by default.
●Create a stored job (Windows)
●Create a stored job (OS X)
●Print a stored job
●Delete a stored job
Cr
Cr
Cr
CrCreat
eat
eat
eateate a s
e a s
e a s
e a se a stor
tor
tor
tortored job (Windo
ed job (Windo
ed job (Windo
ed job (Windoed job (Windows)
ws)
ws)
ws)ws)
You can store jobs on the product so you can print them at any time.
NO
NO
NO
NONOTE:
TE:
TE:
TE:TE: Your print driver might look than what is shown here, but the steps are the same.dierent
1.
1.
1.
1.1. From the software program, select the option.
Print
Print
Print
PrintPrint
2.
2.
2.
2.2. Select the product from the list of printers, and then select or
Properties
Properties
Properties
PropertiesProperties Pref
Pref
Pref
PrefPreferences
erences
erences
erenceserences (the name varies for
dierent software programs).
NO
NO
NO
NONOTE:
TE:
TE:
TE:TE: To access these features from a Windows 8 or 8.1 Start screen, select Devic
Devic
Devic
DevicDevices
es
es
eses, select , and
Print
Print
Print
PrintPrint
then select the printer.
ENWW Store print jobs on the product to print later 55

3.
3.
3.
3.3. Click the Job St
Job St
Job St
Job StJob Storage
orage
orage
orageorage tab.
4.
4.
4.
4.4. Select a J
J
J
JJob Stor
ob Stor
ob Stor
ob Storob Storage Mode
age Mode
age Mode
age Modeage Mode option.
●Proo
Proo
Proo
ProoProof and Hold
f and Hold
f and Hold
f and Holdf and Hold: Print and proof one copy of a job, and then print more copies.
●Personal Job
Personal Job
Personal Job
Personal JobPersonal Job: The job does not print until you request it at the product control panel. For this job-
storage mode, you can select one of the Mak
Mak
Mak
MakMake Job Private/
e Job Private/
e Job Private/
e Job Private/e Job Private/Secure
Secure
Secure
SecureSecure options. If you assign a personal
identication number (PIN) to the job, you must provide the required PIN at the control panel. If you
encrypt the job, you must provide the required password at the control panel.
●Quick Cop
Quick Cop
Quick Cop
Quick CopQuick Copy
y
y
yy: Print the requested number of copies of a job and store a copy of the job in the product
memory so you can print it again later.
●St
St
St
StStored Job
ored Job
ored Job
ored Jobored Job: Store a job on the product and allow other users to print the job at any time. For this job-
storage mode, you can select one of the Mak
Mak
Mak
MakMake Job Private/
e Job Private/
e Job Private/
e Job Private/e Job Private/Secure
Secure
Secure
SecureSecure options. If you assign a personal
identication number (PIN) to the job, the person who prints the job must provide the required PIN at
the control panel. If you encrypt the job, the person who prints the job must provide the required
password at the control panel.
5.
5.
5.
5.5. To use a custom user name or job name, click the button, and then enter the user name or the job
Custom
Custom
Custom
CustomCustom
name.
Select which option to use if another stored job already has that name:
●Use Job Name + (1-99)
Use Job Name + (1-99)
Use Job Name + (1-99)
Use Job Name + (1-99)Use Job Name + (1-99): Append a unique number to the end of the job name.
●Replac
Replac
Replac
ReplacReplace Existing Fil
e Existing Fil
e Existing Fil
e Existing File Existing File
e
e
ee: Overwrite the existing stored job with the new one.
6.
6.
6.
6.6. Click the button to close the
OK
OK
OK
OKOK Document Pr
Document Pr
Document Pr
Document PrDocument Properties
operties
operties
opertiesoperties dialog box. In the dialog box, click the button
Print
Print
Print
PrintPrint OK
OK
OK
OKOK
to print the job.
Cr
Cr
Cr
CrCreat
eat
eat
eateate a st
e a st
e a st
e a ste a stored job (
ored job (
ored job (
ored job (ored job (OS X)
OS X)
OS X)
OS X)OS X)
You can store jobs on the product so you can print them at any time.
1.
1.
1.
1.1. Click the Fil
Fil
Fil
FilFile
e
e
ee Print
Print
Print
PrintPrint menu, and then click the option.
2.
2.
2.
2.2. In the menu, select the product.
Printer
Printer
Printer
PrinterPrinter
56 Chapter 4 Print ENWW

3.
3.
3.
3.3. By default, the print driver displays the Co
Co
Co
CoCopies & Pag
pies & Pag
pies & Pag
pies & Pagpies & Pages
es
es
eses menu. Open the menus drop-down list, and then
click the Job St
Job St
Job St
Job StJob Storag
orag
orag
oragorage
e
e
ee menu.
4.
4.
4.
4.4. In the drop-down list, select the type of stored job.
Mode
Mode
Mode
ModeMode
●Proo
Proo
Proo
ProoProof and Hol
f and Hol
f and Hol
f and Holf and Hold
d
d
dd: Print and proof one copy of a job, and then print more copies.
●Personal Job
Personal Job
Personal Job
Personal JobPersonal Job: The job does not print until you request it at the product control panel. If you assign a
personal number (PIN) to the job, you must provide the required PIN at the control identication
panel.
●Quick Cop
Quick Cop
Quick Cop
Quick CopQuick Copy
y
y
yy: Print the requested number of copies of a job and store a copy of the job in the product
memory so you can print it again later.
●St
St
St
StStored J
ored J
ored J
ored Jored Job
ob
ob
obob: Store a job on the product and allow other users to print the job at any time. If you assign
a personal number (PIN) to the job, the person who prints the job must provide the identication
required PIN at the control panel.
5.
5.
5.
5.5. To use a custom user name or job name, click the Cust
Cust
Cust
CustCustom
om
om
omom button, and then enter the user name or the job
name.
Select which option to use if another stored job already has that name.
●Use Job Name + (1-99)
Use Job Name + (1-99)
Use Job Name + (1-99)
Use Job Name + (1-99)Use Job Name + (1-99): Append a unique number to the end of the job name.
●Replac
Replac
Replac
ReplacReplace Existing Fil
e Existing Fil
e Existing Fil
e Existing File Existing File
e
e
ee: Overwrite the existing stored job with the new one.
6.
6.
6.
6.6. If you selected the St
St
St
StStor
or
or
orored Job
ed Job
ed Job
ed Jobed Job P
P
P
PPersonal Job
ersonal Job
ersonal Job
ersonal Jobersonal Job or option in step 3, you can protect the job with a PIN. Type a 4-
digit number in the When other people attempt to print this job, the product prompts
Use PIN to Print
Use PIN to Print
Use PIN to Print
Use PIN to PrintUse PIN to Print eld.
them to enter this PIN number.
7.
7.
7.
7.7. Click the button to process the job.
Print
Print
Print
PrintPrint
Print a st
Print a st
Print a st
Print a stPrint a stor
or
or
orored job
ed job
ed job
ed jobed job
Use the following procedure to print a job that is stored in the product memory.
1.
1.
1.
1.1. Touch or press the Home button on the product control panel.
2.
2.
2.
2.2. Select Retrieve from Device Memory.
3.
3.
3.
3.3. Select the name of the folder where the job is stored.
4.
4.
4.
4.4. Select the name of the job. If the job is private or encrypted, enter the PIN or password.
5.
5.
5.
5.5. Adjust the number of copies, and then touch the Start button or press the button to print the job.OK
Del
Del
Del
DelDelet
et
et
etete a st
e a st
e a st
e a ste a stor
or
or
orored job
ed job
ed job
ed jobed job
When you send a stored job to the product memory, the product overwrites any previous jobs with the same
user and job name. If a job is not already stored under the same user and job name, and the product needs
additional space, the product might delete other stored jobs starting with the oldest. You can change the number
of jobs that the product can store from the General Settings menu on the product control panel.
Use this procedure to delete a job that is stored in the product memory.
1.
1.
1.
1.1. Touch or press the Home button on the product control panel.
2.
2.
2.
2.2. Select Retrieve from Device Memory.
ENWW Store print jobs on the product to print later 57

3.
3.
3.
3.3. Select the name of the folder where the job is stored.
4.
4.
4.
4.4. Select the name of the job, and then select the Delete button.
5.
5.
5.
5.5. If the job is private or encrypted, enter the PIN or the password, and then select the Delete button.
58 Chapter 4 Print ENWW

Mobil
Mobil
Mobil
MobilMobile printing
e printing
e printing
e printinge printing
Intr
Intr
Intr
IntrIntroduction
oduction
oduction
oductionoduction
HP multiple Mobile and ePrint solutions to enable wireless printing to an HP printer from a laptop, tablet, oers
smartphone, or other mobile device. To see the full list and to determine the best choice, go to www.hp.com/go/
LaserJetMobilePrinting (English only).
●Wi-Fi Direct and NFC Printing
●HP ePrint via email
●HP ePrint software
●AirPrint
●Android embedded printing
Wi-Fi Dir
Wi-Fi Dir
Wi-Fi Dir
Wi-Fi DirWi-Fi Direct and NFC Printing
ect and NFC Printing
ect and NFC Printing
ect and NFC Printingect and NFC Printing
HP provides Wi-Fi and NFC (Near Field Communication) printing for printers with a supported HP Jetdirect NFC &
Wireless Accessory. This accessory is available as an option for HP LaserJet printers that include a hardware-
integration pocket (HIP).
Use a wireless accessory to print wirelessly from the following devices:
●iPhone, iPad, or iPod touch using Apple AirPrint or the HP ePrint app
●Android mobile devices using the HP ePrint App or the Android embedded print solution
●PC and Mac devices using the HP ePrint Software
For more information on HP Wireless printing, go to www.hp.com/go/wirelessprinting.
HP ePrint via email
HP ePrint via email
HP ePrint via email
HP ePrint via emailHP ePrint via email
Use HP ePrint to print documents by sending them as an email attachment to the product's email address from
any email enabled device.
NO
NO
NO
NONOTE:
TE:
TE:
TE:TE: The product might require a update to use this feature.rmware
To use HP ePrint, the product must meet these requirements:
●The product must be connected to a wired or wireless network and have Internet access.
●HP Web Services must be enabled on the product, and the product must be registered with HP Connected
or HP ePrint Center.
Follow this procedure to enable HP Web Services and register with HP Connected or HP ePrint Center:
1.
1.
1.
1.1. Open the HP Embedded Web Server (EWS):
a.
a.
a.
a.a. 4-line contr
4-line contr
4-line contr
4-line contr4-line control panels:
ol panels:
ol panels:
ol panels:ol panels: View the control-panel display to see the IP address.
T
T
T
TTouchscr
ouchscr
ouchscr
ouchscrouchscreen control panels:
een control panels:
een control panels:
een control panels:een control panels: From the Home screen on the product control panel, touch the Network
button to display the IP address or host name.
ENWW Mobile printing 59

●iBooks
●Select third-party applications
To use AirPrint, the product must be connected to the same wireless network as the Apple device. For more
information about using AirPrint and about which HP products are compatible with AirPrint, go to the support
Web site for this product:
www.hp.com/support/ljM604 www.hp.com/support/ljM605 www.hp.com/support/ljM606, ,
NO
NO
NO
NONOTE:
TE:
TE:
TE:TE: AirPrint does not support USB connections.
Andr
Andr
Andr
AndrAndroid embedded printing
oid embedded printing
oid embedded printing
oid embedded printingoid embedded printing
HP's built-in print solution for Android and Kindle enables mobile devices to automatically and print to HP nd
printers that are either on a wireless network or within wireless range for wireless printing. The print solution is
built into the supported operating systems, so installing drivers or downloading software is not necessary.
For more information on how to use Android embedded printing and which Android devices are supported, go to
www.hp.com/support/ljM604 www.hp.com/support/ljM605 www.hp.com/support/ljM606, , .
ENWW Mobile printing 61

Print fr
Print fr
Print fr
Print frPrint from the USB port
om the USB port
om the USB port
om the USB portom the USB port
Intr
Intr
Intr
IntrIntroduction
oduction
oduction
oductionoduction
This product features easy-access USB printing, for quickly printing without sending them from a computer. les
The product accepts standard USB drives in the USB port near the control panel. It supports the following ash
types of les:
●.pdf
●.prn
●.pcl
●.ps
●.cht
Enabl
Enabl
Enabl
EnablEnable the USB port for printing
e the USB port for printing
e the USB port for printing
e the USB port for printinge the USB port for printing
The USB port is disabled by default. Before using this feature, enable the USB port. Use one of the the following
procedures to enable the port:
Enabl
Enabl
Enabl
EnablEnable the USB port from the product c
e the USB port from the product c
e the USB port from the product c
e the USB port from the product ce the USB port from the product control
ontrol
ontrol
ontrolontrol-panel menus
-panel menus
-panel menus
-panel menus-panel menus
1.
1.
1.
1.1. Press the Home button on the product control panel.
2.
2.
2.
2.2. Open the following menus:
●Administration
●General Settings
●Enable Retrieve from USB
3.
3.
3.
3.3. Select the Enabled option, and then touch the Save button or press the button.OK
Enable the USB port fr
Enable the USB port fr
Enable the USB port fr
Enable the USB port frEnable the USB port from the HP Embedded Web server (netw
om the HP Embedded Web server (netw
om the HP Embedded Web server (netw
om the HP Embedded Web server (netwom the HP Embedded Web server (network
ork
ork
orkork-connect
-connect
-connect
-connect-connected products onl
ed products onl
ed products onl
ed products onled products only)
y)
y)
y)y)
1.
1.
1.
1.1. Open the HP Embedded Web Server (EWS):
a.
a.
a.
a.a. 4-line contr
4-line contr
4-line contr
4-line contr4-line control panels:
ol panels:
ol panels:
ol panels:ol panels: View the control-panel display to see the IP address.
T
T
T
TTouchscr
ouchscr
ouchscr
ouchscrouchscreen contr
een contr
een contr
een contreen control panels:
ol panels:
ol panels:
ol panels:ol panels: From the Home screen on the product control panel, touch the Network
button to display the IP address or host name.
b.
b.
b.
b.b. Open a Web browser, and in the address line, type the IP address or host name exactly as it displays
on the product control panel. Press the Enter key on the computer keyboard. The EWS opens.
NO
NO
NO
NONOTE:
TE:
TE:
TE:TE: If the Web browser displays a There is a pr
There is a pr
There is a pr
There is a prThere is a problem with this w
oblem with this w
oblem with this w
oblem with this woblem with this website
ebsite
ebsite
ebsiteebsite’
’
’
’’s security
s security
s security
s security s security certicate
certicate
certicate
certicatecerticate
message when attempting to open the EWS, click C
C
C
CContinue to this websit
ontinue to this websit
ontinue to this websit
ontinue to this websitontinue to this website (not r
e (not r
e (not r
e (not re (not recommended)
ecommended)
ecommended)
ecommended)ecommended).
Choosing Continue t
Continue t
Continue t
Continue tContinue to this website (no
o this website (no
o this website (no
o this website (noo this website (not rec
t rec
t rec
t rect recommended)
ommended)
ommended)
ommended)ommended) will not harm the computer while navigating
within the EWS for the HP product.
2.
2.
2.
2.2. Open the tab.
Print
Print
Print
PrintPrint
62 Chapter 4 Print ENWW

3.
3.
3.
3.3. On the left side of the screen, click R
R
R
RRetrieve fr
etrieve fr
etrieve fr
etrieve fretrieve from USB Setup
om USB Setup
om USB Setup
om USB Setupom USB Setup.
4.
4.
4.
4.4. Select the Enable R
Enable R
Enable R
Enable REnable Retrieve fr
etrieve fr
etrieve fr
etrieve fretrieve from USB
om USB
om USB
om USBom USB check box.
5.
5.
5.
5.5. Click Appl
Appl
Appl
ApplApply
y
y
yy.
Print USB documents
Print USB documents
Print USB documents
Print USB documentsPrint USB documents
1.
1.
1.
1.1. Insert the USB drive into the easy-access USB port.ash
NO
NO
NO
NONOTE:
TE:
TE:
TE:TE: The port might be covered. For some products, the cover open. For other products, pull the ips
cover straight out to remove it.
2.
2.
2.
2.2. The product detects the USB drive. Touch or press the button to access the drive, or, if prompted, ash OK
select the Retrieve from USB option from the list of available applications. The Retrieve from USB screen
opens.
3.
3.
3.
3.3. Select the name of the document to print.
NO
NO
NO
NONOTE:
TE:
TE:
TE:TE: The document might be in a folder. Open folders as necessary.
4.
4.
4.
4.4. To adjust the number of copies, select Copies, and then use the keypad to change the number of copies.
5.
5.
5.
5.5. Touch the Start button or press the button to print the document.OK
ENWW Print from the USB port 63

5
5
5
55 Manage the pr
Manage the pr
Manage the pr
Manage the prManage the product
oduct
oduct
oductoduct
●Advanced with HP Embedded Web Server (EWS)conguration
●Advanced with HP Utility for OS Xconguration
●Congure IP network settings
●Product security features
●Economy settings
●HP Web Jetadmin
●Software and updatesrmware
For mor
For mor
For mor
For morFor more informa
e informa
e informa
e informae information:
tion:
tion:
tion:tion:
Go to , , .www.hp.com/support/ljM604 www.hp.com/support/ljM605 www.hp.com/support/ljM606
HP's all-inclusive help for the product includes the following information:
●Install and congure
●Learn and use
●Solve problems
●Download software updates
●Join support forums
●Find warranty and regulatory information
ENWW 65

Adv
Adv
Adv
AdvAdvanc
anc
anc
ancanced
ed
ed
ed ed with HP Embedded W
with HP Embedded W
with HP Embedded W
with HP Embedded W with HP Embedded Web Server (EWS
eb Server (EWS
eb Server (EWS
eb Server (EWSeb Server (EWS)
)
)
))
conguration
conguration
conguration
congurationconguration
Intr
Intr
Intr
IntrIntroduction
oduction
oduction
oductionoduction
●How to access the HP Embedded Web Server (EWS)
●HP Embedded Web Server features
Use the HP Embedded Web Server to manage printing functions from a computer instead of the product control
panel.
●View product status information
●Determine the remaining life for all supplies and order new ones
●View and change tray congurations
●View and change the product control-panel menu conguration
●View and print internal pages
●Receive of product and supplies eventsnotication
●View and change network conguration
The HP Embedded Web Server works when the product is connected to an IP-based network. The HP Embedded
Web Server does not support IPX-based product connections. Internet access is not needed to open and use the
HP Embedded Web Server.
When the product is connected to the network, the HP Embedded Web Server is automatically available.
NO
NO
NO
NONOTE:
TE:
TE:
TE:TE: The HP Embedded Web Server is not accessible beyond the network rewall.
How t
How t
How t
How tHow to acc
o acc
o acc
o acco acce
e
e
eess the HP Embedded W
ss the HP Embedded W
ss the HP Embedded W
ss the HP Embedded Wss the HP Embedded Web Server (EWS
eb Server (EWS
eb Server (EWS
eb Server (EWSeb Server (EWS)
)
)
))
1.
1.
1.
1.1. 4-line contr
4-line contr
4-line contr
4-line contr4-line control panels:
ol panels:
ol panels:
ol panels:ol panels: View the control-panel display to see the IP address.
T
T
T
TTouchscr
ouchscr
ouchscr
ouchscrouchscreen contr
een contr
een contr
een contreen control panels:
ol panels:
ol panels:
ol panels:ol panels: From the Home screen on the product control panel, touch the Network
button to display the IP address or host name.
2.
2.
2.
2.2. Open a Web browser, and in the address line, type the IP address or host name exactly as it displays on the
product control panel. Press the Enter key on the computer keyboard. The EWS opens.
NO
NO
NO
NONOTE:
TE:
TE:
TE:TE: If the Web browser displays a Ther
Ther
Ther
TherThere is a pr
e is a pr
e is a pr
e is a pre is a problem with this w
oblem with this w
oblem with this w
oblem with this woblem with this website
ebsite
ebsite
ebsiteebsite’
’
’
’’s security
s security
s security
s security s security certicate
certicate
certicate
certicatecerticate message
when attempting to open the EWS, click C
C
C
CContinue to this websit
ontinue to this websit
ontinue to this websit
ontinue to this websitontinue to this website (not r
e (not r
e (not r
e (not re (not rec
ec
ec
ececommended)
ommended)
ommended)
ommended)ommended).
Choosing Continue t
Continue t
Continue t
Continue tContinue to this website (no
o this website (no
o this website (no
o this website (noo this website (not r
t r
t r
t rt recommended)
ecommended)
ecommended)
ecommended)ecommended) will not harm the computer while navigating within
the EWS for the HP product.
To use the HP Embedded Web Server, the browser must meet the following requirements:
●Windows: Microsoft Internet Explorer 5.01 or later or Netscape 6.2 or later
●Mac OS X: Safari or Firefox using Bonjour or an IP address
66 Chapter 5 Manage the product ENWW

General tab
General tab
General tab
General tabGeneral tab
T
T
T
TTable 5-2
able 5-2
able 5-2
able 5-2able 5-2 HP Embedded W
HP Embedded W
HP Embedded W
HP Embedded W HP Embedded Web Server General tab
eb Server General tab
eb Server General tab
eb Server General tabeb Server General tab
Menu
Menu
Menu
MenuMenu Description
Description
Description
DescriptionDescription
Al
Al
Al
AlAlerts
erts
erts
ertserts Setup email alerts for various product and supplies events.
Contr
Contr
Contr
ContrControl Panel Administration Menu
ol Panel Administration Menu
ol Panel Administration Menu
ol Panel Administration Menuol Panel Administration Menu Shows the menu structure of the menu on the control panel.Administration
NO
NO
NO
NONOTE:
TE:
TE:
TE:TE: Congure settings on this screen, or the HP Embedded Web Server provides more
advanced options than are available through the menu.conguration Administration
AutoSend
AutoSend
AutoSend
AutoSendAutoSend Congure the product to send automated emails regarding product and conguration
supplies to email addresses.specic
Edit Other Links
Edit Other Links
Edit Other Links
Edit Other LinksEdit Other Links Add or customize a link to another Web site. This link displays in the area on all
Other Links
Other Links
Other Links
Other LinksOther Links
HP Embedded Web Server pages.
Ordering Inf
Ordering Inf
Ordering Inf
Ordering InfOrdering Information
ormation
ormation
ormationormation Enter information about ordering replacement toner cartridges. This information displays
on the supplies status page.
Device Inf
Device Inf
Device Inf
Device InfDevice Information
ormation
ormation
ormationormation Name the product and assign an asset number to it. Enter the name of the primary contact
who will receive information about the product.
Language
Language
Language
LanguageLanguage Set the language in which to display the HP Embedded Web Server information.
Date and Time
Date and Time
Date and Time
Date and TimeDate and Time Set the date and time or synchronize with a network time server.
Energy Settings
Energy Settings
Energy Settings
Energy SettingsEnergy Settings Set or edit a wake time, sleep time, and sleep delay for the product. Set a schedule dierent
for each day of the week and for holidays.
Set which interactions with the product cause it to wake from sleep mode.
Backup and Res
Backup and Res
Backup and Res
Backup and ResBackup and Restore
tore
tore
toretore Create a backup that contains product and user data. If necessary, use this to restore le le
data to the product.
Rest
Rest
Rest
RestRestore F
ore F
ore F
ore Fore Factory Settings
actory Settings
actory Settings
actory Settingsactory Settings Restore product settings to the factory defaults.
Solution Instal
Solution Instal
Solution Instal
Solution InstalSolution Installer
ler
ler
lerler Install third-party software programs that can enhance the product functionality.
Firmwar
Firmwar
Firmwar
FirmwarFirmware Upgrade
e Upgrade
e Upgrade
e Upgradee Upgrade Download and install product upgrade rmware les.
Statistics Servic
Statistics Servic
Statistics Servic
Statistics ServicStatistics Services
es
es
eses Provides connection information about third-party job-statistics services.
Print tab
Print tab
Print tab
Print tabPrint tab
T
T
T
TTable
able
able
able able 5-3
5-3
5-3
5-35-3 HP Embedded Web Server Print tab
HP Embedded Web Server Print tab
HP Embedded Web Server Print tab
HP Embedded Web Server Print tab HP Embedded Web Server Print tab
Menu
Menu
Menu
MenuMenu Description
Description
Description
DescriptionDescription
Retrieve fr
Retrieve fr
Retrieve fr
Retrieve frRetrieve from USB Setup
om USB Setup
om USB Setup
om USB Setupom USB Setup Enable or disable the Retrieve from USB menu on the control panel.
Manage St
Manage St
Manage St
Manage StManage Stored Jobs
ored Jobs
ored Jobs
ored Jobsored Jobs Enable or disable the ability to store jobs in the product memory.
Congure job-storage options.
Adjust Paper T
Adjust Paper T
Adjust Paper T
Adjust Paper TAdjust Paper Types
ypes
ypes
ypesypes Override the factory-default mode settings if print quality problems occur when using a
specic paper type.
Restrict C
Restrict C
Restrict C
Restrict CRestrict Color
olor
olor
olorolor
(Color products only)
Permit or restrict color printing.
Specify permissions for individual users or for jobs that are sent from software specic
programs.
68 Chapter 5 Manage the product ENWW

T
T
T
TTable 5-7
able 5-7
able 5-7
able 5-7able 5-7 HP Embedded W
HP Embedded W
HP Embedded W
HP Embedded W HP Embedded Web Server Networking tab (c
eb Server Networking tab (c
eb Server Networking tab (c
eb Server Networking tab (ceb Server Networking tab (continued)
ontinued)
ontinued)
ontinued)ontinued)
Menu
Menu
Menu
MenuMenu Description
Description
Description
DescriptionDescription
Authorization
Authorization
Authorization
AuthorizationAuthorization Control management and use of this product, including the following:conguration
●Set or change the administrator password to control access to conguration
parameters.
●Request, install, and manage digital on the HP Jetdirect print server.certicates
●Limit host access to this product through an Access Control List (ACL) (for selected
print servers on IPv4 networks only).
Mgmt. Pro
Mgmt. Pro
Mgmt. Pro
Mgmt. ProMgmt. Protocols
tocols
tocols
tocolstocols Congure and manage security protocols for this product, including the following:
●Set the security management level for the HP Embedded Web Server, and control
traic over HTTP and HTTPS.
●Congure the SNMP (Simple Network Management Protocol) operation. Enable or
disable the SNMP v1/v2c or SNMP v3 agents on the print server.
●Control access through protocols that may not be secure, such as printing protocols,
print services, discovery protocols, name resolution services, and conguration-
management protocols.
802.1X Authentication
802.1X Authentication
802.1X Authentication
802.1X Authentication802.1X Authentication
(For selected HP Jetdirect models only)
Congure 802.1X authentication settings on the Jetdirect print server as required for client
authentication on the network, and reset the 802.1X authentication settings to factory-
default values.
CAUTION:
CAUTION:
CAUTION:
CAUTION:CAUTION: When changing the 802.1X authentication settings; the product might lose its
connection. To reconnect, it might be necessary to reset the print server to a factory-
default state and reinstall the product.
IPsec/Fire
IPsec/Fire
IPsec/Fire
IPsec/FireIPsec/Firewall
wall
wall
wallwall
(For selected HP Jetdirect models only)
View or a Firewall policy or an IPsec/Firewall policy.congure
Announcement Ag
Announcement Ag
Announcement Ag
Announcement AgAnnouncement Agent
ent
ent
entent
(For selected HP Jetdirect models only)
Enable or disable the HP Device Announcement Agent, set the server, and conguration
congure certicates. mutual authentication using
Network Statis
Network Statis
Network Statis
Network StatisNetwork Statistics
tics
tics
ticstics Display network statistics that are collected and stored on the HP Jetdirect print server.
Pro
Pro
Pro
ProProtocol Info
tocol Info
tocol Info
tocol Infotocol Info View a list of settings on the HP Jetdirect print server for each network-conguration
protocol.
Conguration
Conguration
Conguration
CongurationConguration Page
Page
Page
Page Page View the HP Jetdirect page, which contains status and conguration conguration
information.
Other Links list
Other Links list
Other Links list
Other Links listOther Links list
NO
NO
NO
NONOTE:
TE:
TE:
TE:TE: Congure which links display in the list by using the
Other Links
Other Links
Other Links
Other LinksOther Links E
E
E
EEdit Other Links
dit Other Links
dit Other Links
dit Other Linksdit Other Links General
General
General
General General menu on the
tab. The following are the default links.
T
T
T
TTable 5-8
able 5-8
able 5-8
able 5-8able 5-8 HP Embedded W
HP Embedded W
HP Embedded W
HP Embedded W HP Embedded Web Server Other Links list
eb Server Other Links list
eb Server Other Links list
eb Server Other Links listeb Server Other Links list
Menu
Menu
Menu
MenuMenu Description
Description
Description
DescriptionDescription
Product Support
Product Support
Product Support
Product SupportProduct Support Connect to the support site for the product to search for help on various topics.
Shop for Supplies
Shop for Supplies
Shop for Supplies
Shop for SuppliesShop for Supplies Connect to the HP SureSupply Web site for information on purchasing original HP supplies,
such as toner cartridges and paper.
HP Instant Support
HP Instant Support
HP Instant Support
HP Instant SupportHP Instant Support Connect to the HP Web site to solutions to product problems.nd
ENWW Advanced with HP Embedded Web Server (EWS) 71conguration
Specyfikacje produktu
| Marka: | HP |
| Kategoria: | drukarka |
| Model: | LaserJet Enterprise M605x |
Potrzebujesz pomocy?
Jeśli potrzebujesz pomocy z HP LaserJet Enterprise M605x, zadaj pytanie poniżej, a inni użytkownicy Ci odpowiedzą
Instrukcje drukarka HP

2 Kwietnia 2025
2 Kwietnia 2025
2 Kwietnia 2025
2 Kwietnia 2025
17 Lutego 2025
7 Lutego 2025
29 Stycznia 2025
17 Stycznia 2025
17 Stycznia 2025
17 Stycznia 2025
Instrukcje drukarka
- drukarka Sony
- drukarka Samsung
- drukarka LG
- drukarka Xiaomi
- drukarka Sharp
- drukarka Huawei
- drukarka Lenovo
- drukarka Epson
- drukarka Fujitsu
- drukarka Roland
- drukarka Panasonic
- drukarka StarTech.com
- drukarka Canon
- drukarka Fujifilm
- drukarka MSI
- drukarka Toshiba
- drukarka D-Link
- drukarka Citizen
- drukarka Brother
- drukarka Honeywell
- drukarka Kodak
- drukarka Testo
- drukarka Primera
- drukarka Xerox
- drukarka Godex
- drukarka Olivetti
- drukarka Zebra
- drukarka Dell
- drukarka Digitus
- drukarka AgfaPhoto
- drukarka Kyocera
- drukarka Ricoh
- drukarka Seiko
- drukarka Renkforce
- drukarka Thomson
- drukarka AVM
- drukarka Velleman
- drukarka Dymo
- drukarka Panduit
- drukarka Olympus
- drukarka OKI
- drukarka Mitsubishi
- drukarka Intermec
- drukarka NEC
- drukarka Polaroid
- drukarka Konica Minolta
- drukarka Bixolon
- drukarka Pantum
- drukarka Olympia
- drukarka Datamax O'Neil
- drukarka DNP
- drukarka Equip
- drukarka ZKTeco
- drukarka TSC
- drukarka HiTi
- drukarka Microboards
- drukarka Triumph-Adler
- drukarka Fargo
- drukarka Entrust
- drukarka Kern
- drukarka Brady
- drukarka Tomy
- drukarka Lexmark
- drukarka Sagem
- drukarka Nilox
- drukarka Argox
- drukarka Royal Sovereign
- drukarka Minolta
- drukarka Oce
- drukarka Paxar
- drukarka IDP
- drukarka Metapace
- drukarka Ultimaker
- drukarka Ibm
- drukarka CSL
- drukarka Toshiba TEC
- drukarka Frama
- drukarka Builder
- drukarka Kogan
- drukarka Star Micronics
- drukarka Posiflex
- drukarka Dascom
- drukarka GG Image
- drukarka Vupoint Solutions
- drukarka Elite Screens
- drukarka DTRONIC
- drukarka Phoenix Contact
- drukarka Videology
- drukarka Epson 7620
- drukarka Star
- drukarka EC Line
- drukarka Colop
- drukarka Approx
- drukarka Fichero
- drukarka Raspberry Pi
- drukarka Unitech
- drukarka Middle Atlantic
- drukarka Evolis
- drukarka Tally Dascom
- drukarka Custom
- drukarka Nisca
- drukarka Sawgrass
- drukarka Mutoh
Najnowsze instrukcje dla drukarka

4 Kwietnia 2025

3 Kwietnia 2025
3 Kwietnia 2025

3 Kwietnia 2025

2 Kwietnia 2025
2 Kwietnia 2025

2 Kwietnia 2025

1 Kwietnia 2025

31 Marca 2025
29 Marca 2025