Instrukcja obsługi HP LaserJet 2200dt
Przeczytaj poniżej 📖 instrukcję obsługi w języku polskim dla HP LaserJet 2200dt (172 stron) w kategorii drukarka. Ta instrukcja była pomocna dla 11 osób i została oceniona przez 2 użytkowników na średnio 4.5 gwiazdek
Strona 1/172
hp color LaserJet xxxx
hp LaserJet 2200
user guide


hp LaserJet 2200 series printers
User Guide

Hewlett-Packard Company
11311 Chinden Boulevard
Boise, Idaho 83714 U.S.A.
Copyright and License
Copyright Hewlett-Packard
Company 2001
All Rights Reserved. Except
as allowed by copyright laws
or herein, reproduction,
adaptation, or translation
without prior written
permission is prohibited.
A user of the Hewlett-Packard
printer associated with this user
guide is granted a license to:
a) print hard copies of this
user guide for PERSONAL,
INTERNAL or COMPANY use
subject to the restriction not
to sell, re-sell or otherwise
distribute the hard copies; and
b) place an electronic copy of
this user guide on a network
server, provided access to the
electronic copy is limited to
PERSONAL, INTERNAL users
of the Hewlett-Packard printer
associated with this user guide.
Part number:C7058-90956
Second Edition, October 2001
Warranty
The information contained in
this document is subject to
change without notice.
Hewlett-Packard makes no
warranty of any kind with
respect to this information.
HEWLETT-PACKARD
SPECIFICALLY DISCLAIMS
THE IMPLIED WARRANTY
OF MERCHANTABILITY
AND FITNESS FOR A
PARTICULAR PURPOSE.
Hewlett-Packard shall not be
liable for any direct, indirect,
incidental, consequential, or
other damage alleged in
connection with the furnishing
or use of this information.
Trademark Credits
Adobe®, Acrobat®, PostScript®,
and Adobe Photoshop® are
trademarks of Adobe Systems
Incorporated which
may be registered in
certain jurisdictions.
Arial®, Monotype®, and
Times New Roman® are
U.S. registered trademarks of
the Monotype Corporation.
CompuServe™ is a U.S.
trademark of CompuServe, Inc.
Helvetica™, Palatino™, Times™,
and Times Roman™ are
trademarks of Linotype AG
and/or its subsidiaries in the
U.S. and other countries.
Microsoft®, MS Windows,
Windows®, Windows NT
®,
and MS-DOS® are
U.S. registered trademarks
of Microsoft Corporation.
LaserWriter® is a
registered trademark of
Apple Computer, Inc.
TrueType™ is a U.S. trademark
of Apple Computer, Inc.
ENERGY STAR® is a
U.S. registered service
mark of the U.S. EPA.
Netscape is a U.S. trademark
of Netscape Communications
Corporation.
Unix® is a registered trademark
of The Open Group.

ENWW iii
HP Customer Care (Service and Support)
HP Customer Care (Service and Support)
Online Services: for 24-hour
access to information over
your modem, we suggest
these services:
World Wide Web URL
- Printer drivers, updated HP printer software,
plus product and support information may be obtained from the
following URLs:
English language site http://www.hp.com/go/support
in the U.S. http://www.hp.com
in Europe http://www2.hp.com
Printer drivers may be obtained from the following sites:
in Japan ftp://www.jpn.hp.com/drivers/
in Korea http://www.hp.co.kr
in Taiwan http://www.hp.com.tw
or the local driver website http://www.dds.com.tw

iv ENWW

ENWW v
Contents
HP Customer Care (Service and Support) . . . . . . . . . . . . . . . . . . . . iii
1 Printer Basics
Getting to Know the Printer . . . . . . . . . . . . . . . . . . . . . . . . . . . . . . . . 1
Printer Configurations . . . . . . . . . . . . . . . . . . . . . . . . . . . . . . . . . . . . 2
Printer Features. . . . . . . . . . . . . . . . . . . . . . . . . . . . . . . . . . . . . . . . . 3
Printer Software. . . . . . . . . . . . . . . . . . . . . . . . . . . . . . . . . . . . . . . . . 5
Windows Installation . . . . . . . . . . . . . . . . . . . . . . . . . . . . . . . . . . 7
Software for Windows. . . . . . . . . . . . . . . . . . . . . . . . . . . . . . . . 12
Macintosh Installation . . . . . . . . . . . . . . . . . . . . . . . . . . . . . . . . 14
Software For Macintosh Computers . . . . . . . . . . . . . . . . . . . . . 15
Software for Networked Computers . . . . . . . . . . . . . . . . . . . . . 18
Software Installation Tips . . . . . . . . . . . . . . . . . . . . . . . . . . . . . 20
Control Panel Buttons . . . . . . . . . . . . . . . . . . . . . . . . . . . . . . . . . . 22
Printing with the Fast Infrared Port (Wireless Printing) . . . . . . . . . 23
Wireless Printing Instructions . . . . . . . . . . . . . . . . . . . . . . . . . . 24
Interface Ports . . . . . . . . . . . . . . . . . . . . . . . . . . . . . . . . . . . . . . . . 25
Accessories and Ordering Information . . . . . . . . . . . . . . . . . . . . . . 26
2 Printing Tasks
Overview . . . . . . . . . . . . . . . . . . . . . . . . . . . . . . . . . . . . . . . . . . . . . 31
Purchasing Paper and Other Media . . . . . . . . . . . . . . . . . . . . . . . . 32
Media Input Options . . . . . . . . . . . . . . . . . . . . . . . . . . . . . . . . . . . . 33
Tray 2 and Optional 250-sheet Tray 3 Paper Sizes . . . . . . . . . 34
Optional 500-sheet Tray 3 Paper Sizes . . . . . . . . . . . . . . . . . . 35
Loading Media into Tray 1. . . . . . . . . . . . . . . . . . . . . . . . . . . . . . . . 36
Loading Media into Tray 2 or Optional 250-sheet Tray 3 . . . . . . . . 37
Loading Media into Optional 500-sheet Tray 3 . . . . . . . . . . . . . . . . 39
Media Output Options . . . . . . . . . . . . . . . . . . . . . . . . . . . . . . . . . . . 40
Printing Tasks . . . . . . . . . . . . . . . . . . . . . . . . . . . . . . . . . . . . . . . . . 41
Printing on Labels . . . . . . . . . . . . . . . . . . . . . . . . . . . . . . . . . . . 43
Printing on Transparencies. . . . . . . . . . . . . . . . . . . . . . . . . . . . 44
Printing on Custom-Sized Media or Cardstock . . . . . . . . . . . . . 45
Printing on Both Sides of Paper (Duplexing) . . . . . . . . . . . . . . 46
Printing on Letterhead or Preprinted Forms . . . . . . . . . . . . . . . 49
Canceling a Print Job . . . . . . . . . . . . . . . . . . . . . . . . . . . . . . . . . . . 51
Software Features. . . . . . . . . . . . . . . . . . . . . . . . . . . . . . . . . . . . . . 52
Features in the HP LaserJet Device
Configuration and HP LaserJet Utility. . . . . . . . . . . . . . . . . . . . 58

vi ENWW
3 Printer Tips and Maintenance
Overview . . . . . . . . . . . . . . . . . . . . . . . . . . . . . . . . . . . . . . . . . . . . . 61
Managing the UltraPrecise Toner Cartridge . . . . . . . . . . . . . . . . . . 62
Redistributing the Toner . . . . . . . . . . . . . . . . . . . . . . . . . . . . . . . . . 63
Cleaning the Printer. . . . . . . . . . . . . . . . . . . . . . . . . . . . . . . . . . . . . 65
Internal Cleaning Procedure . . . . . . . . . . . . . . . . . . . . . . . . . . 67
4 Problem Solving
Overview . . . . . . . . . . . . . . . . . . . . . . . . . . . . . . . . . . . . . . . . . . . . . 69
Troubleshooting Checklist . . . . . . . . . . . . . . . . . . . . . . . . . . . . . . . 70
Troubleshooting General Printing Problems . . . . . . . . . . . . . . . . . . 72
Printing Special Pages . . . . . . . . . . . . . . . . . . . . . . . . . . . . . . . . . . 77
Clearing Paper Jams . . . . . . . . . . . . . . . . . . . . . . . . . . . . . . . . . . . 78
Solving Print Quality Problems . . . . . . . . . . . . . . . . . . . . . . . . . . . . 84
Image Defect Examples . . . . . . . . . . . . . . . . . . . . . . . . . . . . . . 85
Wireless Printing Problems . . . . . . . . . . . . . . . . . . . . . . . . . . . . . . 90
Troubleshooting Control Panel Messages . . . . . . . . . . . . . . . . . . . 92
Control Panel Error Messages . . . . . . . . . . . . . . . . . . . . . . . . . 93
Secondary Light Patterns . . . . . . . . . . . . . . . . . . . . . . . . . . . . . 96
Network Printing Problems . . . . . . . . . . . . . . . . . . . . . . . . . . . . . . 101
Common Windows Problems . . . . . . . . . . . . . . . . . . . . . . . . . . . . 102
Common Macintosh Problems . . . . . . . . . . . . . . . . . . . . . . . . . . . 104
Selecting an Alternate PostScript Printer Description (PPD) . 108
Troubleshooting PostScript (PS) Errors . . . . . . . . . . . . . . . . . . . . 109
5 Service and Support
Availability . . . . . . . . . . . . . . . . . . . . . . . . . . . . . . . . . . . . . . . . . . . 111
HP Express Exchange . . . . . . . . . . . . . . . . . . . . . . . . . . . . . . . . . 111
Guidelines for Repacking the Printer. . . . . . . . . . . . . . . . . . . . . . . 112
Service Information Form . . . . . . . . . . . . . . . . . . . . . . . . . . . . . . . 113
Hewlett-Packard Limited Warranty Statement . . . . . . . . . . . . . . . 115
Limited Warranty for Toner Cartridge Life. . . . . . . . . . . . . . . . . . . 117
Appendix A Specifications
Printer Specifications. . . . . . . . . . . . . . . . . . . . . . . . . . . . . . . . . . . 119
FCC Regulations. . . . . . . . . . . . . . . . . . . . . . . . . . . . . . . . . . . . . . 121
Environmental Product Stewardship Program . . . . . . . . . . . . . . . 122
Regulatory Statements . . . . . . . . . . . . . . . . . . . . . . . . . . . . . . . . . 125
Laser Statement for Finland . . . . . . . . . . . . . . . . . . . . . . . . . . 128

ENWW vii
Appendix B Media Specifications
Overview . . . . . . . . . . . . . . . . . . . . . . . . . . . . . . . . . . . . . . . . . . . . 129
Supported Sizes of Paper . . . . . . . . . . . . . . . . . . . . . . . . . . . . . . . 130
Guidelines for Using Paper . . . . . . . . . . . . . . . . . . . . . . . . . . . . . . 133
Printing and Paper Storage Environment . . . . . . . . . . . . . . . . . . . 135
Envelopes . . . . . . . . . . . . . . . . . . . . . . . . . . . . . . . . . . . . . . . . . . . 136
Envelopes with Double Side Seams. . . . . . . . . . . . . . . . . . . . 137
Envelope Margins . . . . . . . . . . . . . . . . . . . . . . . . . . . . . . . . . . 138
Labels . . . . . . . . . . . . . . . . . . . . . . . . . . . . . . . . . . . . . . . . . . . . . . 139
Transparencies . . . . . . . . . . . . . . . . . . . . . . . . . . . . . . . . . . . . . . . 140
Appendix C Printer Memory and Expansion
Overview . . . . . . . . . . . . . . . . . . . . . . . . . . . . . . . . . . . . . . . . . . . . 141
Printer Memory . . . . . . . . . . . . . . . . . . . . . . . . . . . . . . . . . . . . . . . 142
Installing Memory . . . . . . . . . . . . . . . . . . . . . . . . . . . . . . . . . . . . 143
Checking Memory Installation . . . . . . . . . . . . . . . . . . . . . . . . . . . . 145
Installing an HP JetDirect EIO Card . . . . . . . . . . . . . . . . . . . . . . . 146
Appendix D Printer Commands
Overview . . . . . . . . . . . . . . . . . . . . . . . . . . . . . . . . . . . . . . . . . . . . 147
Understanding PCL Printer Command Syntax . . . . . . . . . . . . . . . 149
Combining Escape Sequences . . . . . . . . . . . . . . . . . . . . . . . . . . . 150
Index

viii ENWW

ENWW Chapter 1 Printer Basics 1
1Printer
Basics
Getting to Know the Printer
This chapter provides information in the following areas:
zPrinter Configurations
zPrinter Features
zPrinter Software
zControl Panel Buttons
zPrinting with the Fast Infrared Port (Wireless Printing)
zInterface Ports
zAccessories and Ordering Information

2 Chapter 1 Printer Basics ENWW
Printer Configurations
Congratulations on your purchase of the HP LaserJet 2200
series printer!
HP LaserJet 2200d
The HP LaserJet 2200d printer is a 19 pages-per-minute (ppm) laser
printer (19 ppm with letter-size paper/18 ppm with A4-size paper) that
comes with a built-in 250-sheet tray (Tray 2), and a built-in duplexer,
for automatically printing on both sides of paper. It has parallel, Fast
Infrared (FIR), and universal serial bus (USB) ports. 8 MB of Random
Access Memory (RAM) are standard, and the printer is expandable,
with 1 available Enhanced Input Output (EIO) slot for connecting to a
network, and 2 Dual In-line Memory Module (DIMM) slots for adding
fonts and memory.
HP LaserJet 2200dt
The HP LaserJet 2200dt printer is the same as the 2200d model,
with an additional 250-sheet tray (Tray 3).
HP LaserJet 2200dn
The HP LaserJet 2200dn printer is the same as the 2200d model,
except that the printer is designed for network users. It comes with
a full-featured HP JetDirect EIO print server card (J4169A) for
connecting to a 10/100 Base-TX network.
HP LaserJet 2200dtn
The HP LaserJet 2200dtn printer is the same as the 2200d model,
with an additional 500-sheet tray (Tray 3) that supports letter and
A4 sizes. The printer is designed for network users and comes with
a full-featured HP JetDirect EIO print server card (J4169A) for
connecting to a 10/100 Base-TX network.
HP LaserJet 2200
The HP LaserJet 2200 is the same as the 2200d model, but with
manual rather than automatic duplexing. Availability of this product
will vary depending on your location.
The illustrations in this guide will be based on the HP LaserJet 2200d
base printer model unless otherwise stated.

ENWW Chapter 1 Printer Basics 3
Printer Features
Fast Print
Speed
zPrints letter-size paper 19 pages-per-minute (ppm) or A4-size
paper 18 ppm (with Motorola RISC-based formatter).
Built-in Duplexing zPrinting on both sides of paper (two-sided printing) is a standard
feature of the printer. (See Printing on Both Sides of Paper
(Duplexing).)
Excellent Print
Quality
zTrue 1200 x 1200 dots per inch (dpi) text and graphics.
zResolution Enhancement technology (REt) adjusts the size
and placement of each dot on the page to produce smooth
angles, curves, and edges (300 and 600 dpi only).
zAdjustable settings to optimize print quality.
zThe HP UltraPrecise toner cartridge has a finer toner formulation
which provides sharper text and graphics.
Flexible Paper
Handling
zAdjustable Tray 1 (pull-down) for letterhead, envelopes, labels,
transparencies, custom-sized media, postcards, and heavy paper.
See Loading Media into Tray 1.
zAdjustable Tray 2 or an Optional 250-sheet Tray (Tray 3) for
standard sizes of paper. See Loading Media into Tray 2 or Optional
250-sheet Tray 3.
zOptional 500-sheet Tray (Tray 3) for letter and A4-size paper.
See Loading Media into Optional 500-sheet Tray 3.
zTwo output bins: select either the top output bin or the rear
output bin for the most convenient output location.
zStraight-through paper path capability from Tray 1 to the rear
output bin.
zBuilt-in duplexing. (See Printing on Both Sides of Paper
(Duplexing).)
Expandability zOptional Tray 3 (250-sheet or 500-sheet), so you will not have to
add paper as often.
zEnhanced Input Output (EIO) cards. See Interface Ports.
zDual In-line Memory Module (DIMM) slots for adding memory
and fonts.
PCL Printer
Language and Fonts
zFast printing performance, built-in Intellifont and TrueType scaling
technologies, built-in HP-GL/2 vector graphics, and advanced
imaging capabilities are benefits of the PCL 6 printer language.
PCL 6 also includes 45 scalable TrueType fonts and one
bitmapped Line Printer Font.

4 Chapter 1 Printer Basics ENWW
PS Language and
Fonts
zPostScript Level 2 emulation with 35 built-in PS language
fonts included.
Automatic Language
Switching
zWhen optional printer languages (such as PostScript Level 2
emulation) are installed, the printer automatically determines
and switches to the appropriate language for the print job.
Wireless Printing zThe printer supports wireless printing from an IrDA-compliant
device, such as a notebook computer, camera, cell phone,
or a Personal Digital Assistant (PDA).
zIrReady 2000
Interface Connections zBidirectional ECP type-B parallel port (IEEE-1284 compliant)
zUSB port
zEIO slot
zWireless Fast Infrared port (IrDA compliant)
Networking zThe printer provides an EIO slot for HP JetDirect EIO print servers
for fast and easy connectivity.
Enhanced Memory
and Memory
Expansion
zThe HP LaserJet 2200 series printers come with 8 MB of memory
and can be expanded to 72 MB with the two available memory
(DIMM) slots. (The HP LaserJet 2200dtn has 16 MB and one
available DIMM slot.) Most documents can be printed using the
standard amount of printer memory through the aid of Memory
Enhancement technology (MEt). MEt automatically compresses
data, virtually doubling the printer’s memory and allowing more
complex printing with available memory.
Energy Savings zThe printer automatically conserves electricity by substantially
reducing power consumption when not printing.
zAs an ENERGY STAR partner, Hewlett-Packard Company has
determined that this product meets ENERGY STAR guidelines
for energy efficiency.
Economical Printing zN-up printing and two-sided printing with the built-in duplexer saves
paper. (See Printing on Both Sides of Paper (Duplexing) and
Printing Multiple Pages on One Sheet of Paper (N-up Printing).)
zEconoMode saves toner.
zFor tips on reducing the amount of paper use or extending the life of
the toner cartridge, see Printing Tasks.

ENWW Chapter 1 Printer Basics 5
Printer Software
The printer comes with helpful software including printer drivers and
optional software. For easy printer setup and access to the full
range of printer features, it is strongly advised that you install the
software provided.
This section provides information in the following areas:
zPrinter Software Installation Instructions
zOverview of Printing System Components
zPrinter Software Installation Tips
Once you have followed the installation instructions and loaded
the software, refer to Software Features to get the most out of
your printer.
Note HP software is not available in all languages.
Check the ReadMe file provided on the HP LaserJet 2200 CD for
additional software included and supported languages. The most
recent drivers, additional drivers, and other software are available from
the Internet and other sources. If you do not have access to the Internet,
see the HP Customer Care (Service and Support) pages at the front
of this user guide to obtain the most recent software.
The HP LaserJet 2200 series printer comes with printer software for
the following operating systems:
zMicrosoft Windows 3.1x (driver only), 95, 98, 2000, Millennium, NT
4.0, and XP. For installation instructions, see Windows Installation.
zMacintosh System 7.5.5 and above. For installation instructions,
see Macintosh Installation.
For software installation on a networked computer, see Network
Installation.

6 Chapter 1 Printer Basics ENWW
The following table lists the available software for your printing system.
Note Software for DOS is not included with this printer.
*Available only on the World Wide Web.
Windows XP
At the time of this publication, Windows XP was not released. Please
go to http://www.hp.com/support/lj2200_xpinfo for Windows XP
information and installation instructions.
Windows
3.x
Windows
9x/Millen
Windows
NT 4.0
Windows
2000
Macintosh UNIX/
LINUX
OS/2
Windows
Installer
9 9 9
PCL 6 9*9 9 9
PCL 5e 9 9 9 9
PostScript
Emulation
9*9 9 9
HP LaserJet
Device
Configuration
9 9 9
HP Web
JetAdmin*
9 9 9
Macintosh
Installer
9
Macintosh
PPD
9
IBM drivers* 9
Model
scripts*
9

ENWW Chapter 1 Printer Basics 7
Windows Installation
There are different Windows installation methods, depending on the
type of cable you connected:
zIf you connected a parallel cable, see the section below.
zIf you connected a USB cable, see If You Connected a USB Cable.
zIf you connected a network cable, see Network Installation.
If You Connected a Parallel Cable
Note The following software installation instructions assume that your
computer was turned OFF when the printer cable was connected.
If your computer was ON, and has not been restarted, the printer
software can still be installed, but the steps will be slightly different than
below. Use the Windows NT 4.0 instructions for your installation.
1. Turn your computer on and quit any open programs.
2. Follow the steps for your Windows version:
Windows 3.1x
(driver only)
a. Select Main, Control Panel, Printers.
b. In the Printers window, click Add. In the drop-down menu,
select Install Unlisted or Updated Printer, then click Install.
c. Place the HP LaserJet 2200 CD in the CD-ROM drive.
d. Click Browse. Browse to “D:\English\Drivers\Win3x” (where D
is the letter of your CD-ROM drive). Select “oemsetup.inf” and
click OK.
e. Select the HP LaserJet 2200 series driver. Click OK.
f. Close all windows and then restart your computer.
g. To verify that the installation has been completed
successfully, open a software application of your choice
and open or create a simple document.
h. Make sure the correct printer name appears, and print the
document.
i. If the document prints correctly, installation is complete.
If nothing prints or if the document does not print correctly,
see the Troubleshooting Checklist.

8 Chapter 1 Printer Basics ENWW
Windows 95 a. The “Update Device Driver Wizard” window should appear on
the computer display.
b. Place the HP LaserJet 2200 CD in the CD-ROM drive.
c. Depending on the version of Windows 95:
•Click Next> (if available) and then skip to step 3 below.
- or -
•Click OK and then continue to step d below.
d. On the line provided, type D:\9xME_LPT (where D is the
letter of your CD-ROM drive), and then click OK.
Windows 98 a. The “Add New Hardware Wizard” window should appear on
the computer display. Click Next>.
b. Select “Search for the best driver for your device.
(Recommended)” and then click Next>.
c. Click the boxes as needed so that there is a check mark next
to “Specify a location:” (and NO check marks next to “Floppy
disk drives” and “CD-ROM drive”).
d. Place the HP LaserJet 2200 CD in the CD-ROM drive.
e. Under “Specify a location:”, type D:\9xME_LPT (where D is
the letter of your CD-ROM drive). Click Next>.
Windows 2000 a. The “Found New Hardware Wizard” window should appear on
the computer display. Click Next>.
b. Select “Search for a suitable driver for my device
(recommended)” and then click Next>.
c. Under “Optional search locations:”, click the locations as
needed so that there is a check mark next to “Specify a
location:” (and NO check marks next to “Floppy disk drives”
and “CD-ROM drives”). Click Next>.
d. Place the HP LaserJet 2200 CD in the CD-ROM drive.
e. Under “Copy manufacturer’s files from:”, type D:\2000
(where D is the letter of your CD-ROM drive) and then
click OK.
f. The Wizard should display a window indicating that it has
found the driver; click Next>.

ENWW Chapter 1 Printer Basics 9
3. Follow the instructions on the screen to install the software.
Note Before installation is complete, make sure that there is a check mark
next to “Print a test page” (when the prompt appears).
In Windows 2000, if the “Found New Hardware Wizard” window
reappears before installation is complete, click Cancel.
4. Click Finish.
5. If you are prompted to restart your computer, click Yes. The test
page should print after your computer restarts. If you are not
prompted to restart your computer, a test page should print
immediately. (If you have Windows NT 4.0 you do not need to
restart your computer.)
Windows
Millennium
a. The “Add New Hardware Wizard” window should appear on
the computer display.
b. Select “Specify the location of the driver (Advanced)” and
then click Next>.
c. Select “Search for the best driver for your device.
(Recommended)” and then click the boxes as needed so that
there is a check mark next to “Specify a location:” (and NO
check mark next to “Removable Media”).
d. Place the HP LaserJet 2200 CD in the CD-ROM drive.
e. Under “Specify a location:”, type D:\9xME_LPT (where D is
the letter of your CD-ROM drive). Click Next>.
Windows
NT 4.0
To install the software on Windows NT 4.0, you must have
administrator privileges (on start and restart).
a. Place the HP LaserJet 2200 CD in the CD-ROM drive.
b. When the welcome screen appears, follow the directions on
the screen. If the welcome screen does not appear: click
Start, click Run, type D:\SETUP (where D is the letter of your
CD-ROM drive), and then click OK.
c. Click the button next to Install Printer.
Windows XP At the time of this publication, Windows XP was not released. Please
go to http://www.hp.com/support/lj2200_xpinfo for Windows XP
information and installation instructions.

10 Chapter 1 Printer Basics ENWW
6. If the test page printed correctly, installation is complete.
(If nothing prints or if the test page does not print correctly,
see the Troubleshooting Checklist.)
If You Connected a USB Cable
Note Windows 3.1x, 95, and NT 4.0 do not support USB cable connections.
The following instructions are for computers running Windows 98,
2000, or Millennium. If you want to connect a USB cable to your
Macintosh, see Macintosh Installation.
1. If your computer is off, turn it on now. Quit any open programs.
2. Follow the steps for your Windows version:
Windows 98 a. The “Add New Hardware Wizard” window should appear on
the computer display. Click Next>.
b. Select “Search for the best driver for your device.
(Recommended)” and then click Next>.
c. Click the boxes as needed so that there is a check mark next
to “Specify a location:” (and NO check marks next to “Floppy
disk drives” and “CD-ROM drive”).
d. Place the HP LaserJet 2200 CD in the CD-ROM drive.
e. Under “Specify a location:”, type D:\98ME_USB (where D is
the letter of your CD-ROM drive). Click Next>.
Windows 2000 a. The “Found New Hardware Wizard” window should appear on
the computer display. Click Next>.
b. Select “Search for a suitable driver for my device
(recommended)” and then click Next>.
c. Under “Optional search locations:”, click the locations as
needed so that there is a check mark next to “Specify a
location:” (and NO check marks next to “Floppy disk drives”
and “CD-ROM drives”). Click Next>.
d. Place the HP LaserJet 2200 CD in the CD-ROM drive.
e. Under “Copy manufacturer’s files from:”, type D:\2000
(where D is the letter of your CD-ROM drive) and then
click OK.
f. The Wizard should display a window indicating that it has
found the driver; click Next>.

ENWW Chapter 1 Printer Basics 11
3. Follow the instructions on the screen to install the software.
Note Before installation is complete, make sure that there is a check mark
next to “Print a test page” (when the prompt appears).
In Windows 2000, if the “Found New Hardware Wizard” window
reappears before installation is complete, click Cancel.
4. Click Finish.
5. If you are prompted to restart your computer, click Yes. The
test page should print after your computer restarts. If you are
not prompted to restart your computer, a test page should
print immediately.
6. If the test page printed correctly, installation is complete. Click Yes
when prompted to restart your computer. (If nothing prints or if
the test page does not print correctly, see the Troubleshooting
Checklist.)
Windows
Millennium
a. The “Add New Hardware Wizard” window should appear on
the computer display.
b. Select “Specify the location of the driver (Advanced)” and
then click Next>.
c. Select “Search for the best driver for your device.
(Recommended)” and then click the boxes as needed so that
there is a check mark next to “Specify a location:” (and NO
check mark next to “Removable Media”).
d. Place the HP LaserJet 2200 CD in the CD-ROM drive.
e. Under “Specify a location:”, type D:\98ME_USB (where D is
the letter of your CD-ROM drive). Click Next>.
Windows XP At the time of this publication, Windows XP was not released. Please
go to http://www.hp.com/support/lj2200_xpinfo for Windows XP
information and installation instructions.

12 Chapter 1 Printer Basics ENWW
Software for Windows
Printer Drivers
Printer drivers access the printer’s features and allow the computer to
communicate with the printer. Choose a printer driver based on the
way you use the printer.
zUse the PCL 6 driver to take full advantage of the printer’s
features. Unless complete backward compatibility with previous
PCL drivers or older printers is necessary, the PCL 6 driver is
recommended.
zUse the PCL 5e driver if you need print results to look consistent
with those from older HP LaserJet printers. Certain features are
not available in this driver. (Do not use the PCL 5e driver provided
with this printer with older printers.)
zUse the PS driver for compatibility with PS needs. Certain printer
features are not available in this driver.
Note The printer automatically switches between PostScript Level 2
emulation and PCL printer languages depending on the driver
you have selected.
If you need help accessing your printer driver, see Accessing the
Printer Driver.
Each printer driver has help screens that can be activated from the
Help button, the F1 key, or a question mark symbol in the upper right
corner of the printer driver (depending on the Windows operating
system used). These help screens give detailed information about
the specific driver. Printer driver help is separate from the software
application help.
Note For driver only or Add Printer setup, see the Readme on the HP
LaserJet 2200 CD. For Windows 3.1x, this is the only installation option
available. See Windows 3.1x (driver only).

14 Chapter 1 Printer Basics ENWW
Macintosh Installation
Note The Apple LaserWriter 8 driver must be installed to use the PPD.
Use the Apple LaserWriter 8 driver that came with your Macintosh.
Before beginning installation, turn off virus protection.
1. Run the install program by placing the HP LaserJet 2200 CD
in the CD-ROM drive. The installation window will appear on
the desktop.
2. Select the correct language and double-click the installer icon.
3. Follow the on-screen instructions.
Note The HP LaserJet 2200 CD contains software for many languages.
Once you select the installation language and double-click Install in the
desired language, the installation screen will appear in that language.
4. To verify that the installation has been completed successfully,
open a software application of your choice and open or create
a simple document.
5. Make sure the correct printer name appears, and print the
document.
6. If the document prints correctly, installation is complete.
(If nothing prints or if the document does not print correctly,
see the Troubleshooting Checklist.)
If You Connected a USB Cable
1. Open Apple’s Desktop Printer Utility.
2. Select “Printer (USB)” and click OK.
3. Under USB Printer Selection, click Change.
4. Select the HP LaserJet 2200 printer and click OK.
5. Under “PPD” click Auto Setup.
6. Make sure you save your changes before you close the window.

ENWW Chapter 1 Printer Basics 15
Software For Macintosh Computers
PostScript Printer Description Files (PPDs)
PPDs, in combination with the LaserWriter driver, access the printer
features and allow the computer to communicate with the printer.
An installation program for the PPDs is provided on the HP LaserJet
2200 CD.
HP LaserJet Utility
HP LaserJet Utility allows control over features that are not available
in the driver. The illustrated screens make selecting printer features
from the Macintosh computer easier than ever. Use the HP LaserJet
Utility to do the following:
zName the printer, assign it to a zone on the network, download
files and fonts, and change most of the printer settings. See the
HP LaserJet Utility help.
zFrom the computer, lock out functions on the printer to prevent
unauthorized access.

ENWW Chapter 1 Printer Basics 17
To Install the Printer Software
Note The following instructions are for Windows computers only. If you
connected a network cable to your Macintosh, see Macintosh
Installation.
1. Place the HP LaserJet 2200 CD in the CD-ROM drive.
2. When the welcome screen appears, follow the directions on the
screen. If the welcome screen does not appear: click Start, click
Run, type D:\SETUP (where D is the letter of your CD-ROM
drive), and then click OK.
3. Click the button next to Install Printer and then follow the
instructions on the screen to install the software.
Note Before installation is complete, make sure that there is a check mark
next to “Print a test page” (when the prompt appears).
In Windows 2000, if the “Found New Hardware Wizard” window
reappears before installation is complete, click Cancel.
4. Click Finish.
5. If the test page printed correctly, installation is complete.
(If nothing prints or if the test page does not print correctly,
see the Troubleshooting Checklist.)
Networking the Printer using Windows Sharing
If the printer is directly connected to a computer using a parallel
cable, you can share the printer on the network so other network
users can print to it.
See your Windows documentation to enable Windows sharing. Once
the printer is shared, install the printer software on all computers that
need to share the printer.
Note Network computers running Windows 3.1x can access the shared
printer, but the computer directly connected to the printer must be
running Windows 9x, NT 4.0, 2000, or Millennium.

18 Chapter 1 Printer Basics ENWW
Software for Networked Computers
HP Web JetAdmin
HP Web JetAdmin is intended for printer management in commercial
and enterprise networks. This browser-based software can be
installed on a supported server platform.
The following systems are supported:
zMicrosoft Windows NT 4.0 or Windows 2000
zHP-UX
zSun Solaris
zRed Hat Linux
zSuSE Linux
Once installed, HP Web JetAdmin allows any client PC with a
supported web browser to administer the printer.
HP Web JetAdmin is not available on the HP LaserJet 2200 CD. If you
have internet access, you can download HP Web JetAdmin software,
obtain supporting documentation, and find the latest list of supported
server platforms and web browsers at
http://www.hp.com/go/webjetadmin.
Note The HP Web JetAdmin web site allows access to HP Web JetAdmin in
many languages.
Windows XP
At the time of this publication, Windows XP was not released. Please
go to http://www.hp.com/support/lj2200_xpinfo for Windows XP
information and installation instructions.

ENWW Chapter 1 Printer Basics 19
How to Access HP Web JetAdmin
Once the HP Web JetAdmin software has been installed on the
supported server platform, you can access HP Web JetAdmin in a
supported web browser from a client workstation by entering one of
the following URLs:
zhttp://server.domain:port/
where server.domain is your server’s hostname and port is the
port number that you entered during the installation (the default
port is 8000). This information is available in the url.txt file, which
is stored in the directory where HP Web JetAdmin is installed.
zhttp://ipaddress:port/
where ipaddress is the IP address of the machine where HP Web
JetAdmin is located.
Note For non-Windows operating systems, the settings in HP Web JetAdmin
may not be overridden by the printer driver settings, if the features in
HP Web JetAdmin do not exist in the printer driver. Printer driver
settings override settings in HP Web JetAdmin for those settings which
appear in both places.
HP JetDirect Embedded Web Server
The HP JetDirect Embedded Web Server provides a solution for
those who choose not to implement device management applications,
such as HP Web JetAdmin.
With the HP JetDirect Embedded Web Server, you can access
JetDirect print servers directly from a web browser (such as Netscape
Navigator or Microsoft's Internet Explorer) without installing any
software. You can use the Embedded Web Server to configure
JetDirect print servers, or view status information for the JetDirect
print server and the connected peripheral.
The JetDirect device is mapped to a unique URL and is accessible
from a web browser using the JetDirect IP address or hostname (this
can be bookmarked for easy continued access to the Embedded Web
Server’s home page).
Access the Embedded Web Server by going to:
http://www.hp.com/go/jetdirect.

20 Chapter 1 Printer Basics ENWW
Software Installation Tips
If you have internet access, you can download drivers from the
World Wide Web or HP’s FTP servers. The driver web page is:
http://www.hp.com/cposupport/cspt/lj2200_spt/ (click on Downloads
and Drivers)
If you do not have internet access or a CD-ROM drive, install the
HP LaserJet 2100 driver off of your Windows operating system,
or contact HP Customer Care (Service and Support).
Note If you install the HP LaserJet 2100 driver you will be able to print,
however, many of the features of the HP LaserJet 2200 will not be
available.
How do I access printer features?
Some printer features, such as custom paper sizes and page
orientation, may be available through your application settings.
Use application settings, if available, because they override
printer driver settings.
Access advanced printer features through your printer driver.
See Software Features for instructions on using specific printer
driver features.
What additional drivers and software upgrades are
available to me?
The latest printer drivers and printing software for HP LaserJet printers
are available on the World Wide Web (http://www.software.hp.com).
Check the “Readme” file for additional release information.

ENWW Chapter 1 Printer Basics 23
Printing with the Fast Infrared Port
(Wireless Printing)
The fast infrared (FIR) port is located on the lower right corner of the
printer. This port is compliant with the specifications determined by
the Infrared Data Association (IrDA). On the right side of the FIR port
is a status light that indicates when the port is active. The FIR port
transmits data at speeds of up to 4 MB per second. When the IR
connection is established, the FIR status light comes on. If the
connection is broken, or when the print job is complete, the FIR
status light goes off.
To use the FIR port, you need the following:
zA computer or Personal Digital Assistant (PDA) equipped with an
IrDA-compliant IR port.
zAn infrared port driver that allows printing from the computer
to the printer using the FIR port and the IrDA communication
protocol.
zA printer driver to generate data that the printer can print.
Note Check with your hardware or operating system manufacturer for the
correct port driver.
FIR Status Light
FIR Port
24 Chapter 1 Printer Basics ENWW
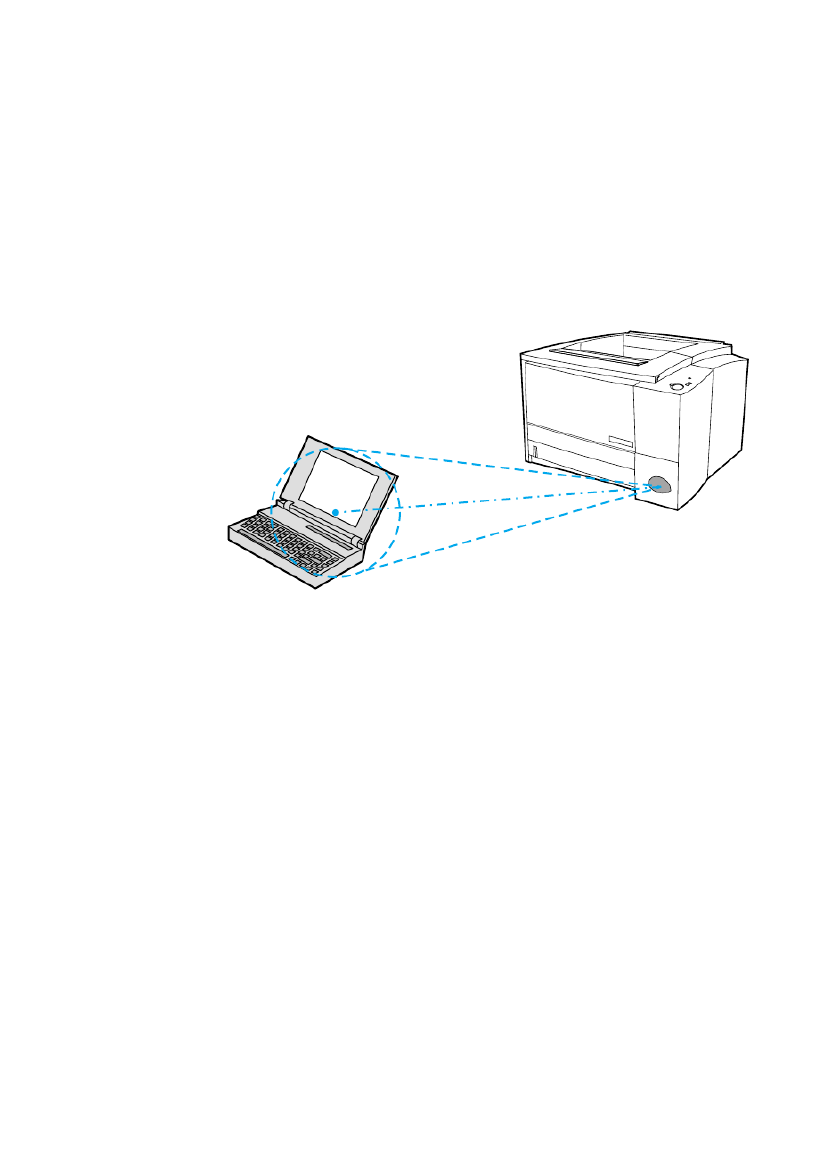
Wireless Printing Instructions
1. Make sure the printer is in ready state (Ready light on).
2. Align an IrDA-compliant computer within 1 meter (3 feet) of the
FIR port. Ensure that the ports are facing each other with no
more than a 15° angle to either the left and right or above and
below. Send the print job from the computer. The FIR status light
will turn on when the connection has been made.

ENWW Chapter 1 Printer Basics 25
Interface Ports
The HP LaserJet 2200 printer includes two interface ports: an
IEEE-1284B parallel port and a USB port.
The HP LaserJet 2200dn and 2200dtn printers also include an
HP JetDirect EIO print server card (J4169A) that includes a 10/100
Base-TX port. You can purchase an HP JetDirect EIO print server
card for the other HP LaserJet 2200 series printer. See Accessories
and Ordering Information, or contact your local HP dealer.
RJ-45 port
(EIO)
Parallel port
(IEEE-1284B)
USB port

26 Chapter 1 Printer Basics ENWW
Accessories and Ordering Information
The following list of accessories was current at the time of printing.
Ordering information and availability of the accessories may change
during the life of the printer. For the most current ordering information,
go to http://www.hp.com/go/lj2200.
Accessories
Option Description or Use Part Number
Toner Cartridge
Toner cartridge UltraPrecise toner cartridge C4096A
Memory
Memory upgrades
(DIMMs)
The HP LaserJet 2200 series printer
comes with 8 MB of memory and can be
expanded to 72 MB with the 2 available
memory (DIMM) slots. (The HP
LaserJet 2200dtn printer has 16 MB
and one available DIMM slot.)
8 MB C7842A
16 MB C7843A
32 MB C7845A

ENWW Chapter 1 Printer Basics 27
Cable and Interface Accessories
Enhanced I/O cards HP JetDirect print server multi-protocol
EIO network cards:
zHP JetDirect 600N Ethernet
(10Base-T RJ-45 only)
zHP JetDirect 600N Ethernet
(10Base-T RJ-45, 10Base-2 BNC)
zHP JetDirect 610N Fast Ethernet
(10/100Base-TX RJ-45 only)
HP JetDirect Connectivity card for:
zUSB, Serial, and LocalTalk
J3110A
J3111A
J4169A
J4135A
Parallel cables (IEEE-1284) 2-meter (6-foot)
3-meter (9-foot)
C2950A
C2951A
USB cable 2-meter standard USB-compatible
device connector
C6518A
Paper Handling Accessories
Note : The printer supports either a 250-sheet or 500-sheet Tray 3, but not both.
250-sheet Tray (Tray 3) and
Feeder Unit
Tray (for Letter, Executive, Legal, A4,
A5, B5 (ISO), B5 (JIS), and 8.5 by 13
inch paper sizes)
C4793A
500-sheet Tray (Tray 3) and
Feeder Unit
Tray (for Letter and A4 paper sizes) C7065A
Accessories (continued)
Option Description or Use Part Number

ENWW Chapter 1 Printer Basics 29
Supplementary Documentation (continued)
hp LaserJet 2200 series
printers User Guide
A printed copy of this user guide. English C7058-90956
Arabic C7058-90952
Czech C7058-90953
Danish C7058-90954
Dutch C7058-90955
Finnish C7058-90957
French C7058-90958
German C7058-90959
Greek C7058-90960
Hebrew C7058-90961
Hungarian C7058-90962
Italian C7058-90963
Korean C7058-90964
Norwegian C7058-90965
Portuguese Brazilian
C7058-90966
Polish C7058-90967
Russian C7058-90968
Simplified Chinese
C7058-90969
Slovak C7058-90970
Spanish Castilian C7058-90971
Swedish C7058-90972
Traditional Chinese
C7058-90973
Thai C7058-90974
Turkish C7058-90975
Vietnamese C7058-90976
hp LaserJet 2200 series
printers Getting Started Guide
An additional copy of the getting
started guide.
C7058-90944 (English version)
hp LaserJet 2200 series
printers CD-ROM
English, German, Dutch, French,
Spanish Castilian, Italian, Portuguese
Brazilian, Finnish, Swedish, Norwegian,
Danish, Arabic, Turkish, Russian,
Hungarian, Polish, Czech
C7058-60106
hp LaserJet 2200 series
printers CD-ROM
English, Turkish, Russian, Hungarian,
Polish, Czech, Hebrew, Greek, Slovak
C7058-60108
hp LaserJet 2200 series
printers CD-ROM
English, Thai, Korean, Simplified
Chinese, Traditional Chinese
C7058-60107
Accessories (continued)
Option Description or Use Part Number

30 Chapter 1 Printer Basics ENWW

ENWW Chapter 2 Printing Tasks 31
2Printing
Tasks
Overview
This chapter explains your printing options and gives common
printing tasks:
zPurchasing Paper and Other Media
zMedia Input Options
zLoading Media into Tray 1
zLoading Media into Tray 2 or Optional 250-sheet Tray 3
zLoading Media into Optional 500-sheet Tray 3
zMedia Output Options
zPrinting Tasks
zCanceling a Print Job
zSoftware Features

32 Chapter 2 Printing Tasks ENWW
Purchasing Paper and Other Media
HP LaserJet printers produce excellent print quality documents. You
can print on a variety of print media, such as paper (including up to
100% recycled fiber content paper), envelopes, labels, overhead
transparencies, and custom-sized media. Properties such as weight,
grain, and moisture content are important factors affecting printer
performance and output quality.
To achieve the best possible print quality, use only high-quality,
copier-grade paper. See Media Specifications for more details.
Note Always test a sample of paper before purchasing large quantities.
Your paper supplier should understand the requirements specified
in the HP LaserJet Printer Family Print Media Guide. See Media
Specifications for more information. For ordering information, see
Supplementary Documentation, or go to http://www.hp.com/ljsupplies.

34 Chapter 2 Printing Tasks ENWW
Tray 2 and Optional 250-sheet Tray 3
Paper Sizes
Tray 2 and optional 250-sheet Tray 3 have settings for the following
paper sizes:
zA4
zA5
zB5 (ISO and JIS)
zLetter
zLegal
zExecutive
z8.5 by 13 in.
See Loading Media into Tray 2 or Optional 250-sheet Tray 3 to change
the paper size. See Supported Sizes of Paper for specific dimensions.
CAUTION Load only paper in Tray 2 or optional Tray 3. Other types of printable
media, such as labels or transparencies, may jam if printed from Tray 2
or optional Tray 3.

ENWW Chapter 2 Printing Tasks 35
Optional 500-sheet Tray 3 Paper Sizes
The optional 500-sheet Tray 3 has settings for the following
paper sizes:
zA4
zLetter
See Loading Media into Optional 500-sheet Tray 3 to change the
paper size. See Supported Sizes of Paper for specific dimensions.
CAUTION Load only paper in optional Tray 3. Other types of printable media, such
as labels or transparencies, may jam if printed from optional Tray 3.

ENWW Chapter 2 Printing Tasks 37
Loading Media into Tray 2 or Optional 250-sheet
Tray 3
1Pull the desired tray out of the
printer and remove any paper.
2Move the side width guides outward
to match the desired paper size.
3On the rear paper length guide,
press on the blue tab and adjust it
so the pointer matches the desired
paper size.
Continued on the next page.
1
2
3

38 Chapter 2 Printing Tasks ENWW
4Add the media and make sure it is
flat in the tray at all four corners.
Keep the media below the height
tabs on the paper length guide in
the rear of the tray.
5Push down on the metal paper lift
plate to lock it in place.
6Slide the tray back into the printer.
Note
Whenever you remove a 250-sheet tray
from the printer, always push down the
metal paper lift plate before you put it
back. The metal paper lift plate will
release and lift the paper up when you
push the tray into the printer.
4
5
6

ENWW Chapter 2 Printing Tasks 39
Loading Media into Optional 500-sheet Tray 3
Note
The Optional 500-sheet Tray 3 supports
only A4 and letter-size paper.
1Pull the tray out of the printer and
remove any paper.
2To adjust for letter-size paper, pull
up on the rear stop, or to adjust for
A4-size paper, push the rear paper
stop down.
3For letter-size paper, move the side
width guides outward as far as
possible, or for A4-size paper, move
the side width guides inward as far
as possible.
4Add the media and make sure that
it is flat in the tray. Keep the media
below the hooks on the side and
rear of the tray.
5Slide the tray back into the printer.
1
2
3
4
5
40 Chapter 2 Printing Tasks ENWW
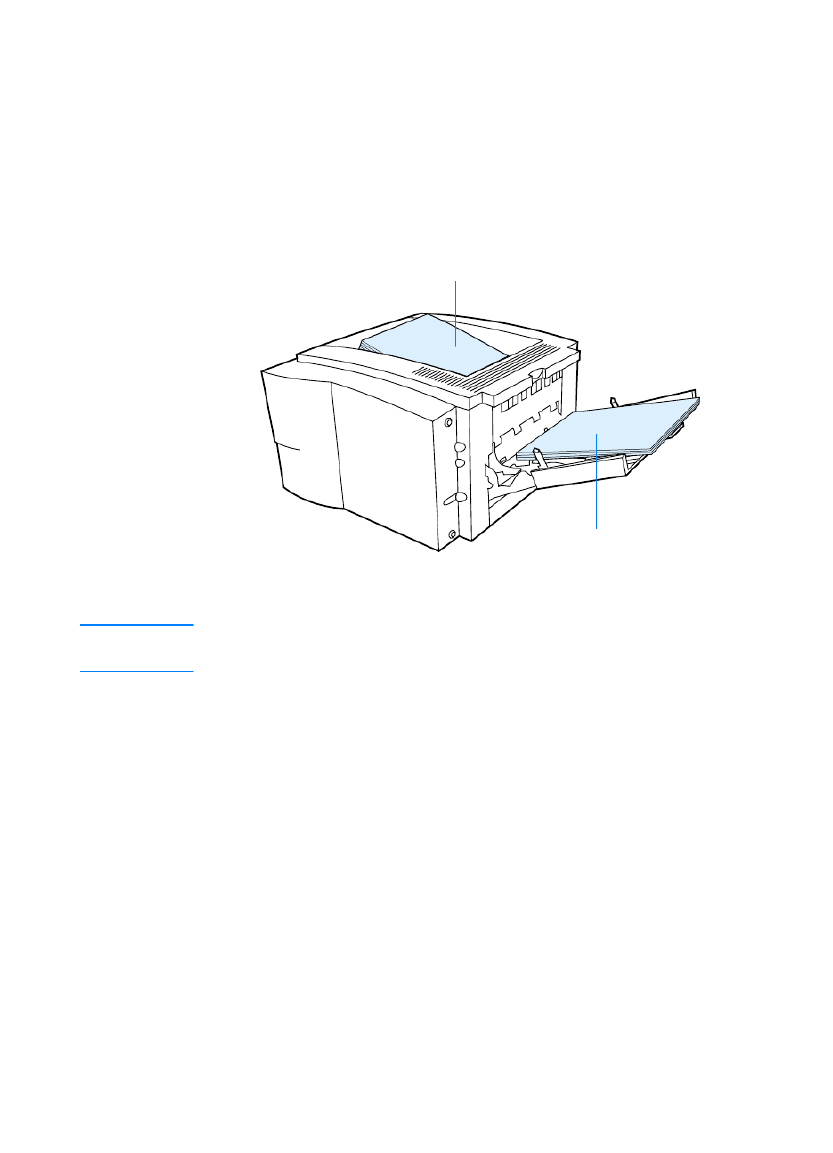
Media Output Options
The printer comes with two output bins. The top output bin is used
when the rear output bin is closed. The rear output bin is used when
the rear output bin is open.
Note When Tray 1 and the rear output bin are used together, they provide a
straight-through paper path for your print job.
Top output bin
Rear output bin

ENWW Chapter 2 Printing Tasks 41
Printing Tasks
Note
Printing speeds may be automatically
reduced when printing special-sized
media.
Printing on Envelopes
CAUTION
Before you load envelopes in Tray 1,
make sure they are undamaged and are
not stuck together. Never use envelopes
with clasps, snaps, windows, coated
linings, self-stick adhesives, or other
synthetic materials. For more
information, see Media Specifications.
1Open Tray 1 by pulling the front
cover down.
2Open the rear output bin by pulling
down on the top section of the bin.
Slide out the extender until it
extends fully.
Note
Using the rear output bin reduces
envelope curl.
3Slide the width guides on Tray 1
outward slightly wider than the
media.
Continued on the next page.
1
2
3

42 Chapter 2 Printing Tasks ENWW
4Place the envelopes into the tray
short-edge in, print-side up. The
stamp end must enter the printer
first.
5Slide the width guides inward until
they lightly touch the envelope stack
without bending it. The envelopes
should be centered between the
paper guides and under the tabs on
the paper width guides.
Note
If the envelope has a flap on the short
edge, this edge must enter the printer
first.
You may experience some paper jams
when using any media with a length
less than 178 mm (7 in.). This may be
caused by paper that has been affected
by environmental conditions. For
optimum performance, make sure you
are storing and handling the paper
correctly (see Printing and Paper
Storage Environment). Using media
from another manufacturer may
also help.
4
5

44 Chapter 2 Printing Tasks ENWW
Printing on Transparencies
Only use transparencies recommended for use in HP LaserJet
printers, such as HP transparency film. For ordering information,
see HP LaserJet Transparency. For transparency specifications,
see Transparencies.
zPrint transparencies from Tray 1.
zUse the top output bin to reduce curling (this is for transparencies
only; for other media use the rear output bin to reduce curling).
zTo prevent transparencies from sticking together, remove any
transparencies in the output bin as they are printed.
zPlace transparencies on a flat surface after removing them from
the printer.
zIn the printer driver select Optimize for: and choose
transparencies in the drop-down box (see Optimizing for Media
Types). For non-Windows operating systems, this feature may be
available through HP Web JetAdmin (see HP Web JetAdmin).
zFor Macintosh, go to the HP LaserJet Utility, and choose
transparencies.

ENWW Chapter 2 Printing Tasks 45
Printing on Custom-Sized Media or Cardstock
Postcards, 3 by 5 in. (index) cards, and other custom-sized media
can be printed from Tray 1. The minimum media size is 76 by
127 mm (3 by 5 in.) and the maximum media size is 216 by 356 mm
(8.5 by 14 in.).
Note You may experience some paper jams when using any media with a
length less than 178 mm (7 in.). This may be caused by paper that has
been affected by environmental conditions. For optimum performance,
make sure you are storing and handling the paper correctly (see
Printing and Paper Storage Environment). Using media from another
manufacturer may also help.
Custom-Sized Media and Cardstock Guidelines:
zAlways insert the short-edge first into Tray 1. If you want to print
in landscape mode, make this selection through your software.
Inserting paper long-edge first may cause a paper jam.
zUse the rear output bin to reduce curl.
zDo not print on media smaller than 76 mm wide (3 in.) or 127 mm
(5 in.) long.
zIn your software application, set margins at least 6.4 mm (.25 in.)
away from the edges of the media.
See Media Specifications for more information.

46 Chapter 2 Printing Tasks ENWW
Printing on Both Sides of Paper (Duplexing)
The HP LaserJet 2200d, 2200dt, 2200dn, and 2200dtn printers can
automatically print on both sides of paper. This is called duplexing or
two-sided printing. (The HP LaserJet 2200 printer supports manual
duplexing.)
The duplexer supports letter, A4, 8.5 x 13, and legal paper sizes.
If you want to duplex paper other than the supported sizes or weights
(for example, paper heavier than 105 g/m2 (28 lb) or very thin paper),
you will have to go to the printer and reinsert the paper manually after
the first side has printed. You will also have to reinsert the paper
manually if you select Straight Paper Path in your printer driver.
Follow the instructions in the driver.
CAUTION Do not print on both sides of labels, transparencies, or vellum.
Damage to the printer and paper jamming might result.
Automatic Duplexing (Printing Both Sides of Paper)
To print on both sides of paper, make the selection from your software
application or printer driver (select Print on Both Sides from the
Finishing tab). For non-Windows operating systems, this feature
may be available through HP Web JetAdmin (see HP Web JetAdmin).
Note When using the built-in duplexer, the paper you are printing will partially
come out of the top output bin. Do not grab the paper until duplexing
is complete.
Note For automatic duplexing, the duplexer will not function if the rear output
bin is open.
ENWW Chapter 2 Printing Tasks 47
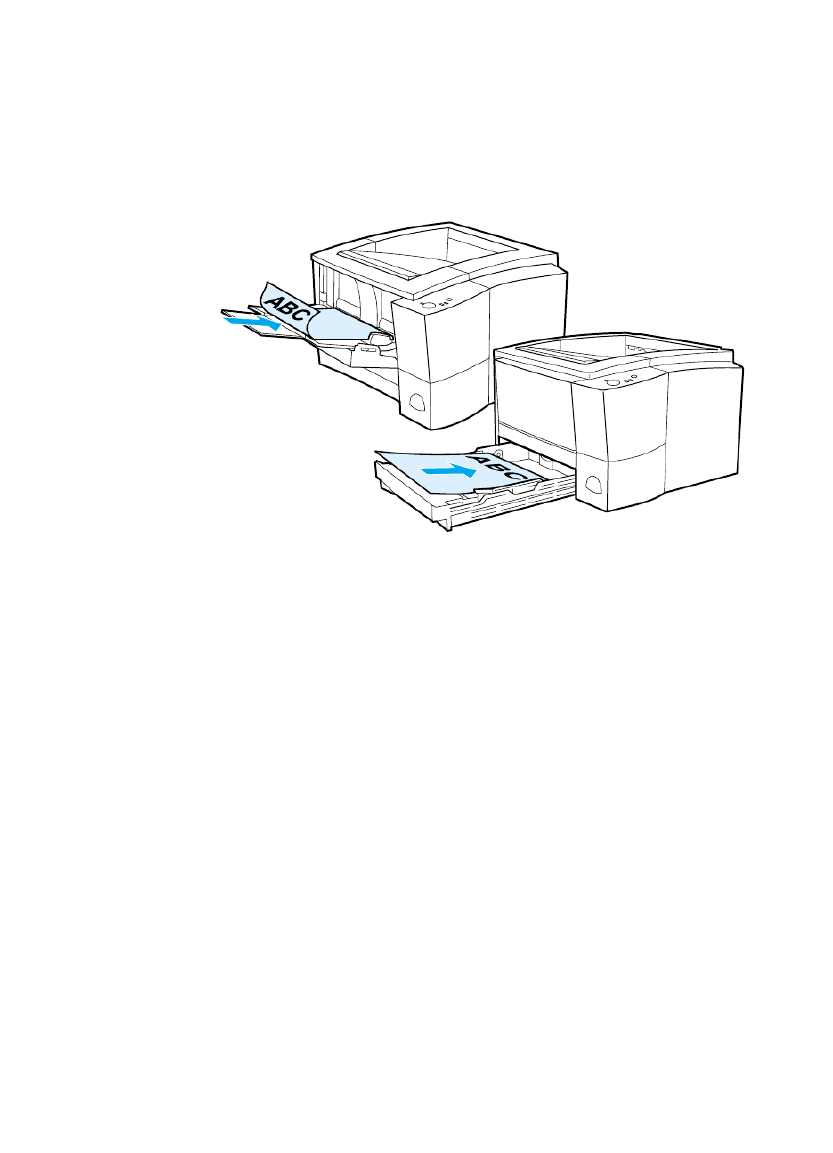
Manual Duplexing (Printing Both Sides of Paper)
The duplexer prints the second side of paper first. Paper needs to be
oriented as shown in the illustration below.
zFor Tray 1, load the first side facing down with the bottom,
short edge toward the printer.
zFor all other trays, load the first side facing up with the top,
short edge toward the printer.
To print on both sides of paper, make the following selections in your
software application or printer driver:
1. In the Configure tab, select "Allow Manual Duplex."
2. In the Paper tab, select "Print on Both Sides."
3. Select a duplexing option for your print job from these options:
•Flip Page Up
•Straight Paper Path
•Booklet Printing
Tray 1
All other trays

48 Chapter 2 Printing Tasks ENWW
Layout Options for Printing Both Sides of Paper
The four print orientation options are shown below. These options are
available when Print on Both Sides is selected from the Finishing tab
in the printer driver.
Note For non-Windows operating systems, this feature may be available
through HP Web JetAdmin (see HP Web JetAdmin).
1. Flip Pages Up
(long-edge
landscape)
4. Flip Pages Sideways
(long-edge portrait)
3. Flip Pages Up
(short-edge
portrait)
2. Flip Pages Sideways
(short-edge landscape)
1. Flip Pages Up
(long-edge landscape)
This layout is often used in accounting, data processing,
and spreadsheet applications. Every other printed image is
oriented upside-down. Facing pages are read continuously
from top to bottom.
2. Flip Pages Sideways
(short-edge landscape)
Each printed image is oriented right-side up. Facing pages
are read from top to bottom on the left page, then from top
to bottom on the right page.
3. Flip Pages Up
(short-edge portrait)
This layout is often used with clipboards. Every other
printed image is oriented upside-down. Facing pages are
read continuously from top to bottom.
4. Flip Pages Sideways
(long-edge portrait) This is the default and most common layout, with every
printed image oriented right-side up. Facing pages are read
from top to bottom on the left page, then from top to bottom
on the right page.

ENWW Chapter 2 Printing Tasks 49
Printing on Letterhead or Preprinted Forms
Note This section describes letterhead or preprinted forms orientation for
single-sided printing. For duplex (two-sided printing) orientation, see
paper orientation for Printing on Both Sides of Paper (Duplexing).
Tray 1 letterhead orientation: print-side up, top-edge toward
the printer.
Tray 2 or optional 250- or 500-sheet Tray 3 letterhead orientation:
print-side down, top-edge toward you.

50 Chapter 2 Printing Tasks ENWW
Note Do not use letterhead paper that is printed with low-temperature
inks, such as those used in some types of thermography.
Do not use raised or embossed letterhead.
The printer uses heat and pressure to fuse toner to the paper. Make
sure that any colored paper or preprinted forms use inks that are
compatible with this fusing temperature (200° ° C or 392 F for
0.1 second).

52 Chapter 2 Printing Tasks ENWW
Software Features
This section lists the common printing features that are controlled
through the printer software.
Note For non-Windows operating systems, some of these features are
available through HP Web JetAdmin (see HP Web JetAdmin).
Features in the Printer Driver
Some printer drivers do not support all printer features. Use the
PCL 6 printer driver to take full advantage of all the printer’s
features, including:
Accessing the Printer Driver
After installation, you can access the printer driver through the
operating system or from your software application. Although access
to the printer driver may vary from one software application to
another, the printer driver can usually be accessed from the
File menu (choose Print or Print Setup).
Note The method for accessing a printer driver is the same, no matter which
printer driver you are using.
zUsing the Printer Driver Help
(Windows Only)
zUsing Reduce/Enlarge
Options
zCreating and Using
Watermarks
zSelecting a Paper Source
zPrinting Multiple Pages on
One Sheet of Paper
(N-up Printing)
zOptimizing for Media Types
zSetting a Custom Paper Size zRestoring Default Printer
Driver Settings
zCreating and Using Quick
Sets
zPrinting on Different Paper for
the First Page
zUsing EconoMode or Draft
Printing
zPrinting on Both Sides of
Paper (Duplexing)
zChoosing Print Quality
Settings
zResolution Options: (to
maximize print quality and
speed)

54 Chapter 2 Printing Tasks ENWW
Creating and Using Watermarks
The Watermark options allow you to specify that text be placed
“ ”underneath (in the background) of an existing document. For
example, you may want to have large gray letters reading “ ”draft or
“confidential” placed diagonally across the first page or all pages of a
document. For Windows, access the Watermark options from the
Effects tab in your printer driver. For Macintosh computers, access
the Watermark options from the watermark/overlay drop-down menu
in your printer driver.
Note If you are using Windows NT 4.0 or Windows 2000, you must have
administrator privileges to create watermarks.
Printing Multiple Pages on One Sheet of Paper
(N-up Printing)
You can select the number of pages you want to print on a single
sheet of paper. If you choose to print more than one page per sheet,
the pages will appear decreased in size and arranged on the sheet.
You can specify up to 9 pages. Access N-up printing from the
Finishing tab in your printer driver.

ENWW Chapter 2 Printing Tasks 55
Setting a Custom Paper Size
Use the Custom Paper feature to print on paper sizes other than
standard sizes. Access the Custom Paper feature from the Paper tab
in your printer driver.
For Macintosh computers, go to File Menu, select Page Setup, and
from the Page Attributes drop down menu, select Custom Page Size.
Click New to create a named custom page size. The new custom
page will automatically be added to the Page Size menu in
Page Setup.
Creating and Using Quick Sets
Quick Sets allow you to save the current driver settings (for
example, page orientation, n-up printing or paper source) for reuse.
For convenience, Quick Sets can be selected and saved from most
printer driver tabs. You can also restore printer driver default settings
by selecting Defaults from the Quick Sets drop-down list. Access
Quick Sets from the Finishing tab in your printer driver.
Note If you are using Windows NT 4.0 or Windows 2000, you must have
administrator privileges to save Quick Sets.
Using EconoMode or Draft Printing
EconoMode (or draft printing) allows the printer to use less toner
on each page. Selecting this option may extend the life of your toner
cartridge and reduce your cost per page, but will reduce print quality.
Access EconoMode from the Finishing tab in your printer driver.
Note For non-Windows operating systems, this feature is available through
HP Web JetAdmin (see HP Web JetAdmin).

56 Chapter 2 Printing Tasks ENWW
Choosing Print Quality Settings
If you need advanced print quality, you can choose custom settings.
Access the print quality settings from the Finishing tab in your printer
driver.
Resolution Options:
zBest Quality - ProRes 1200 for the best print quality.
zFaster Printing - FastRes 1200, alternate resolution for complex
graphics or faster output.
zCustom - Allows you to specify print quality settings.
Note Changing resolution may change the formatting of your text.
Using Reduce/Enlarge Options
Reduce/Enlarge options allow you to scale your document to a percent
of its normal size. You can also choose to scale your document to fit on
any size of paper supported by the printer. Access Reduce/Enlarge
options from the Effects tab in your printer driver.
Selecting a Paper Source
If your application supports printing paper by source, make the
selections from your application. Application settings override printer
driver settings. To select a paper source from your printer driver,
access Source from the Paper tab. For Macintosh computers, select a
paper source from the General options in your printer driver.
Optimizing for Media Types
If you are printing on thin or heavy paper, transparencies, or labels,
optimize the printer for these media types. Access the optimizing
feature from the Paper tab in your printer driver. For Macintosh
computers, access the optimizing feature from the General options
in your printer driver.
Note For non-Windows operating systems, this feature may be available
through HP Web JetAdmin (see HP Web JetAdmin).
Restoring Default Printer Driver Settings
To restore default printer driver settings, click Defaults in the Quick
Sets box of your printer driver.

ENWW Chapter 2 Printing Tasks 57
Printing on Different Paper for the First Page
Printing on different paper for the first page of a print job is available
only with the HP PCL 6 printer driver and the Macintosh LaserWriter
driver. Access this feature from the Paper tab in your printer driver.
For Macintosh computers, access this feature from the General
options in your printer driver.
Some applications may also have this feature. Check with the
application’s help.
Note The paper size for all pages of the print job must be the same in the
driver. However, if the application supports printing on different paper
for the first page, the settings in the application will override the driver.

ENWW Chapter 2 Printing Tasks 59
Language
Click the down arrow, then select the language (for example; English,
French, German) that you want used in device generated reports,
such as the configuration report and the demo page.
Tray Lock
Tray Lock is a feature that allows you to “lock” a tray so that the only
time the printer will draw from that tray is when it is specifically
requested, or if a tray override was requested and all unlocked trays
are empty. This is useful when you want to put special paper in a tray,
such as letterhead. For example, if you are using “First Available
Tr ay, ” for the paper source and you lock Tray 1, the printer will only
draw from the remaining trays, either Tray 2 or optional Tray 3, if it is
installed. You can still print from the locked tray, but you must specify
the source. See Selecting a Paper Source.
Note The feature will not allow you to lock all the trays. One tray must be
“unlocked.”
Windows
1. Run the HP LaserJet Device Configuration or HP Web JetAdmin.
2. From the Tray Setup tab, select the tray you wish to lock.
Macintosh
For Macintosh computers, this setting is available in the
HP LaserJet Utility. (See Accessing the HP LaserJet Device
Configuration or HP LaserJet Utility).

60 Chapter 2 Printing Tasks ENWW
Printing by Size of Paper
Note For printing by type of paper, see Tray Lock.
You can configure the printer to select paper by size (such as letter or
A4), as opposed to source (a paper tray).
If you frequently use several different sizes of paper, once trays are
set up correctly using the HP LaserJet Device Configuration, you do
not have to check which size is loaded in each tray before you print.
To print by size of paper, do the following:
1. Be sure to adjust and load the trays correctly. (See the sections
on loading paper, starting with Loading Media into Tray 1.)
2. From the Tray Setup tab in the HP LaserJet Device Configuration,
select the paper size for each tray.
3. From the software or printer driver, select the desired size of
paper. From a Windows application, click File and select Page
Setup (software) or click File and select Print and then Properties
(printer driver).
Note The size settings may also be configured from HP Web JetAdmin.
See HP Web JetAdmin.
Settings in the printer driver and software application override printer
settings made in the configuration utility. (Software application settings
override printer driver settings.)
Save Settings to a File
This feature allows the current device settings to be easily saved to a
file and later restored if desired. Click this button to save the currently
displayed settings on all of the tabs to a file.
Retrieve Settings from a File
Click this button to retrieve a set of previously stored device settings
from a file. After retrieving these settings, click OK or Apply to update
all of the settings on the device with the retrieved values.

ENWW Chapter 3 Printer Tips and Maintenance 61
3Printer Tips and
Maintenance
Overview
This chapter provides suggestions for high-quality and economical
printing. It also lists special maintenance tasks for the toner cartridge
and the printer.
zManaging the UltraPrecise Toner Cartridge
zRedistributing the Toner
zCleaning the Printer

62 Chapter 3 Printer Tips and Maintenance ENWW
Managing the UltraPrecise Toner Cartridge
HP Policy on Non-HP Toner Cartridges
Hewlett-Packard Company cannot recommend use of non-HP toner
cartridges, either new, refilled, or remanufactured. Because they
are not HP products, HP cannot influence their design or control
their quality.
Toner Cartridge Storage
Do not remove the toner cartridge from its package until you are
ready to use it. The shelf life of a cartridge in an unopened package
is approximately 2.5 years. The shelf life of a cartridge in an opened
package is approximately 6 months.
CAUTION To prevent damage to the toner cartridge, do not expose it to light for
more than a few minutes.
Toner Cartridge Life Expectancy
The life of the toner cartridge depends on the amount of toner that
print jobs require. When printing text at 5% coverage, an HP LaserJet
2200 series toner cartridge lasts an average of 5,000 pages.
This assumes the print density is set to 3 and EconoMode is off.
(These are the default settings.)
Recycling Toner Cartridges
To install a new HP toner cartridge and recycle the used cartridge,
follow the instructions included in the new toner cartridge box.
See HP LaserJet Printing Supplies for more information on recycling
toner cartridges.

64 Chapter 3 Printer Tips and Maintenance ENWW
4Reinsert the toner cartridge into the
printer and close the top cover.
If the print remains light, install a new
toner cartridge. (Follow the instructions
provided with the new toner cartridge.)
4

ENWW Chapter 3 Printer Tips and Maintenance 65
Cleaning the Printer
To maintain print quality, follow the cleaning procedure on the
following pages every time the toner cartridge is changed or
whenever print quality problems occur. As much as possible,
keep the printer free from dust and debris.
zClean the outside of the printer with a lightly water-dampened
cloth.
zClean the inside with a dry, lint-free cloth.
CAUTION Do not use ammonia-based cleaners on or around the printer. While
cleaning the printer, be careful not to touch the transfer roller (located
underneath the toner cartridge). Skin oils on the roller can cause print
quality problems.
Using the Printer Cleaning Process
During the printing process, paper, toner and dust particles can
accumulate inside the printer. Over time, this buildup can cause print
quality problems such as toner specks or smearing. This printer has a
cleaning mode that can correct and prevent these types of problems.
Engine Cleaning
This process uses a transparency from Tray 1 to remove dust and
toner from the paper path. Use this process if toner specks or dots
appear on printouts. This process will provide a blank page which
should be discarded.

ENWW Chapter 3 Printer Tips and Maintenance 67
Internal Cleaning Procedure
Over time, particles of toner and paper
will begin to accumulate inside the
printer. This may cause print quality
problems during printing. Cleaning the
printer will eliminate or reduce these
problems.
WARNING!
Before cleaning the printer, turn the
printer off and unplug the power cable.
1Open the top cover.
2Remove the toner cartridge.
CAUTION
To prevent damage, do not expose the
toner cartridge to light. Place a piece of
paper over the top of the toner cartridge
to shield it while it is out of the printer.
3With a dry, lint-free cloth, wipe any
residue from the paper path area
and the toner cartridge cavity.
4Replace the toner cartridge
and close the top cover. Plug in
the power cable, and turn the
printer on.
2
3
1
4

68 Chapter 3 Printer Tips and Maintenance ENWW

70 Chapter 4 Problem Solving ENWW
Troubleshooting Checklist
If the printer is not responding properly, complete the following
checklist in order. If the printer does not pass a step, follow the
corresponding troubleshooting suggestions.
Troubleshooting Checklist
Make sure the printer
Ready light is on.
If no lights are on, check the power cord
connections. Check the power switch. Check the
power source by plugging into another outlet.
If other lights are on, go to Troubleshooting Control
Panel Messages or use the control panel simulator.
Press GO to print a
demo page to verify
that the printer is
feeding paper correctly.
If a demo page does not print, check the paper
supply in Tray 2 or Tray 3.
Check for paper left in the duplexer. See Duplexer
Area for instructions on clearing paper from
the duplexer.
If the page jams in the printer, go to Clearing Paper
Jams.
If the printer prints, but the status lights are
blinking, go to Troubleshooting Control Panel
Messages or use the control panel simulator.
Check the demo page
to see if it printed
correctly.
If there is a print quality problem, go to Solving
Print Quality Problems.

ENWW Chapter 4 Problem Solving 71
Print a short document
from a software
application to verify the
computer and printer
are connected and are
communicating
correctly.
If the page does not print, check the cable
connection between the printer and computer.
Make sure you are using the proper cable.
Check the print queue or print spooler (print
monitor in Mac) to see if the printer has been
paused.
Verify that you have installed the HP LaserJet 2200
series printer driver.
Check the software application to make sure you
are using an HP LaserJet 2200 series printer driver
and port.
If the page is interrupted during printing, go to
Troubleshooting General Printing Problems.
If completing the
checklist did not
diagnose the problem
with the printer, check
the following
troubleshooting
sections:
Troubleshooting General Printing Problems
Wireless Printing Problems
Troubleshooting Control Panel Messages
Secondary Light Patterns
Network Printing Problems
Common Windows Problems
Common Macintosh Problems
Troubleshooting PostScript (PS) Errors
Printing Special Pages
Troubleshooting Checklist (continued)

72 Chapter 4 Problem Solving ENWW
Troubleshooting General Printing Problems
Troubleshooting General Printing Problems
Symptom Possible Cause Solution
Printer selects media from the
wrong tray. The tray selection in the
software application may be
incorrect.
The configured size does not
match the size of the media
loaded in the tray.
For many software
applications, the paper tray
selection is found under the
Page Setup menu within the
application.
Remove any media in other
trays to make the printer select
from the desired tray.
For Macintosh, use the
HP LaserJet Utility to change
the priority of the tray.
Change the configured size to
match the size of the media
loaded in the tray through the
printer driver or the
HP LaserJet Device
Configuration (Windows
users). For non-Windows
users, configure the size
through HP Web JetAdmin.
Printer does not pull paper
from Tray 2 or Optional Tray 3.
The rear paper length guide is
set incorrectly (Tray 2 or
Optional 250-sheet Tray 3).
The rear paper stop is set
incorrectly (Optional 500-sheet
Tray 3).
To properly set the rear
guides, see Loading Media
into Tray 2 or Optional 250-
sheet Tray 3 or Loading Media
into Optional 500-sheet Tray 3.

ENWW Chapter 4 Problem Solving 73
Print job is extremely slow. The job may be very complex.
The maximum speed of 19
pages-per-minute (letter-size
paper, or 18 ppm with A4-size
paper) cannot be exceeded
even when more memory is
added.
Printing speeds may be
automatically reduced when
printing special-sized media.
In the printer driver, Optimize
for: is set to cardstock, heavy,
rough or bond paper.
Reduce the complexity of the
page or try adjusting the print
quality settings. If this problem
occurs frequently, add memory
to the printer.
In the printer driver, set
Optimize for: to plain paper.
See Optimizing for Media
Types. Choose Start,
Settings, Printers, right click
on the icon and select Set
Defaults (Windows NT) or
Properties (Windows 9x).
Select the Paper tab and set
Optimize for: to plain paper.
Note: If you change Optimize
for: to plain, the print job will
print faster. However, if you are
using heavy media, for best
results leave Optimize for: set
to heavy even though it may
print slower.
Print job prints on both sides
of the paper.
Duplex may be selected in the
printer driver.
See Accessing the Printer
Driver to find out how to
access your printer driver or
refer to your online help.
Pages print, but are totally
blank. The sealing tape may still be in
the toner cartridge. Remove the toner cartridge
and pull out the sealing tape.
Re-install the toner cartridge.
Check the printer by pressing
GO to print a demo page.
The file may have blank
pages.
Check file to make sure that it
does not contain blank pages.
Troubleshooting General Printing Problems (continued)
Symptom Possible Cause Solution

74 Chapter 4 Problem Solving ENWW
The printer prints, but the text
is wrong, garbled, or
incomplete.
The printer cable is loose or
defective.
Disconnect the printer cable
and reconnect it. Try a print job
you know works. If possible,
attach the cable and printer to
another computer and try a
print job that you know works.
Finally, try a new cable.
The printer is on a network or
sharing device and is not
receiving a clear signal.
Disconnect the printer from
the network and attach it
directly to a computer with a
parallel or USB cable. Print a
job that you know works.
The wrong driver was selected
in the software. Check the software’s printer
selection menu to make sure
that the HP LaserJet 2200 is
selected.
The software application is
malfunctioning. Try printing a job from another
application.
The operating system is
malfunctioning.
If printing from Windows (any
version), exit to a DOS prompt
and verify functionality with the
following command: At a
C:\prompt, type Dir LPT1
then press enter. (This
assumes the printer is
connected to LPT1). If the Go
light comes on, press the GO
button to print and eject the
page. If the page prints
correctly, then the operating
system is malfunctioning.
The printer does not respond
when “print” is selected in the
software.
The printer may be in manual
feed mode (Attention light
blinking and Go light on).
Add paper to Tray 1 if empty. If
paper is already added, press
and release the GO button.
Troubleshooting General Printing Problems (continued)
Symptom Possible Cause Solution

ENWW Chapter 4 Problem Solving 75
The printer does not respond
when “print” is selected in the
software (continued).
The cable between the
computer and the printer is not
connected properly.
Disconnect and reconnect the
cable.
The printer cable is defective. If possible, attach the cable to
another computer and print a
job you know works. You may
also try using a different cable.
The wrong printer was
selected in the software.
Check the software printer
selection menu to make sure
that the HP LaserJet 2200 is
selected.
There may be a paper jam. Clear any paper jams, paying
careful attention to the
duplexer area. See Clearing
Paper Jams.
. The software for the printer is
not configured for the printer
port.
Check the software’s printer
selection menu to make sure it
is accessing the correct port. If
the computer has more than
one port, make sure the printer
is attached to the correct one.
The printer is on a network
and is not receiving a signal.
Disconnect the printer from
the network and attach it
directly to a computer with a
parallel or USB cable.
Reinstall the printing software.
Print a job you know works.
Clear any stopped jobs from
the print queue.
The printer is not receiving
power. If no lights are on, check the
power cord connections.
Check the power switch.
Check the power source.
Troubleshooting General Printing Problems (continued)
Symptom Possible Cause Solution

76 Chapter 4 Problem Solving ENWW
The printer does not respond
when “print” is selected in the
software (continued).
The printer is malfunctioning. Check the lights on the printer
to determine if the printer is
indicating an error. See
Troubleshooting Control Panel
Messages or use the control
panel simulator.
Paper curls when exiting the
printer.
The paper curls when exiting
the top output bin.
Open the rear output bin to
allow the paper to exit in a
straight path through the
printer.
Turn over the paper that you
are printing on .
Troubleshooting General Printing Problems (continued)
Symptom Possible Cause Solution

ENWW Chapter 4 Problem Solving 77
Printing Special Pages
There are special pages within the memory of the printer that will help
you to diagnose and learn about problems with your printer.
Note If your printer’s language was not automatically or correctly set
during installation, and you do not have the HP LaserJet Device
Configuration, you can set the language manually. Place the
HP LaserJet 2200 CD in the CD-ROM drive and from a DOS prompt
type: [copy x:\DOS\french.pjl LPT1
], where x is your CD-ROM
drive, french is your desired language, and LPT1 is the port your
printer is connected to.
Demo Page
To print the demo page, press the GO button when the printer is ready
(Ready light is on).
Self Test/Configuration Page
The self test/configuration page lists many of the current settings and
properties of the printer. To print the self test/configuration page,
press and release the GO and JOB CANCEL buttons simultaneously
when the printer is ready (Ready light is on). If you have an EIO print
server card installed, a second page, the JetDirect Page, will print
listing all of the HP JetDirect information.
Note The demo and self test/configuration pages can also be printed from
the HP LaserJet Device Configuration Reports page.
Cleaning Process
The printer has an Engine cleaning process that cleans internal areas
including the paper path area. The Engine cleaning process produces
a blank page that should be discarded. See Using the Printer
Cleaning Process.
Font List
To print a font list, use either the HP LaserJet Device Configuration
(Windows) or the HP LaserJet Utility (Macintosh).

78 Chapter 4 Problem Solving ENWW
Clearing Paper Jams
Occasionally, paper can become jammed during a print job. Some of
the causes include:
zPaper trays loaded improperly or overfilled.
zTray 2 or optional Tray 3 is removed during a print job.
zTop cover is opened during a print job.
zMedia that does not meet HP specifications is used. See Media
Specifications.
zMedia that is outside of the supported size range is used.
See Media Specifications.
Find and remove the jammed paper using the instructions on the
following pages. If the location of the paper jam is not obvious, look
first in the toner cartridge area.
Note Be sure to remove all torn pieces of paper left in the printer.
Paper jams can occur at four locations:
zToner Cartridge Area.
zTray 2 or Optional Tray 3 Paper Feed Area.
zOutput Areas.
zDuplexer Area
Note Loose toner may remain in the printer after a paper jam. This should
clear after a few sheets have printed. See Loose Toner.

ENWW Chapter 4 Problem Solving 79
Toner Cartridge Area
1Open the top cover.
CAUTION
Paper jams in this area may result in
loose toner on the page. If you get any
toner on your clothes or hands, wash
them in cold water. (Hot water will set
the toner into the fabric.)
2Remove the toner cartridge.
CAUTION
To prevent damage, do not expose the
toner cartridge to light for more than a
few minutes. Place a piece of paper over
the top of the toner cartridge to shield it
while it is out of the printer.
3Carefully lift up the registration
plate (A). If the leading edge of the
paper (B) is visible, gently pull the
paper toward the rear of the printer
to remove it from the printer.
Continued on the next page.
3
1
2

80 Chapter 4 Problem Solving ENWW
Note
If the paper is too difficult to remove or
has already entered the output area,
remove the jam as described in Output
Areas.
4When the jammed paper has been
removed, gently flip down the
registration plate. Replace the toner
cartridge and shut the top cover.
Note
If the toner cartridge is difficult to re-
install, make sure the registration plate
has been flipped back down into
position.
If the Attention light does not go out,
there is still jammed paper inside the
printer. Check the paper feed, rear
output, and duplexer areas for
paper jams.
4

ENWW Chapter 4 Problem Solving 81
Tray 2 or Optional Tray 3
Paper Feed Area
Note
If paper has entered the toner cartridge
area, follow the instructions in Toner
Cartridge Area. It is easier to remove
paper from the toner cartridge area than
the paper feed area.
1Slide out Tray 2 to expose the
jammed paper.
2Remove any misfed paper by
pulling it out by the visible edge.
Make sure that all of the paper is
aligned in the tray (see Loading
Media into Tray 2 or Optional 250-
sheet Tray 3). If Tray 3 is installed,
remove any misfed paper and make
sure that all of the paper is aligned
in that tray.
3If the paper is jammed in the paper
feed area and cannot be accessed
from the toner cartridge area, grasp
the paper and carefully pull it free
from the printer.
4For the 250-sheet tray, push the
paper down to lock the metal paper
lift plate into place and slide the tray
back into the printer.
Note
To reset the printer and continue
printing, open the top cover all the
way, then close it.
If the Attention light does not go out,
there is still jammed paper inside the
printer. Check the toner cartridge,
rear output, and duplexer areas for
paper jams.
1
2
3
4
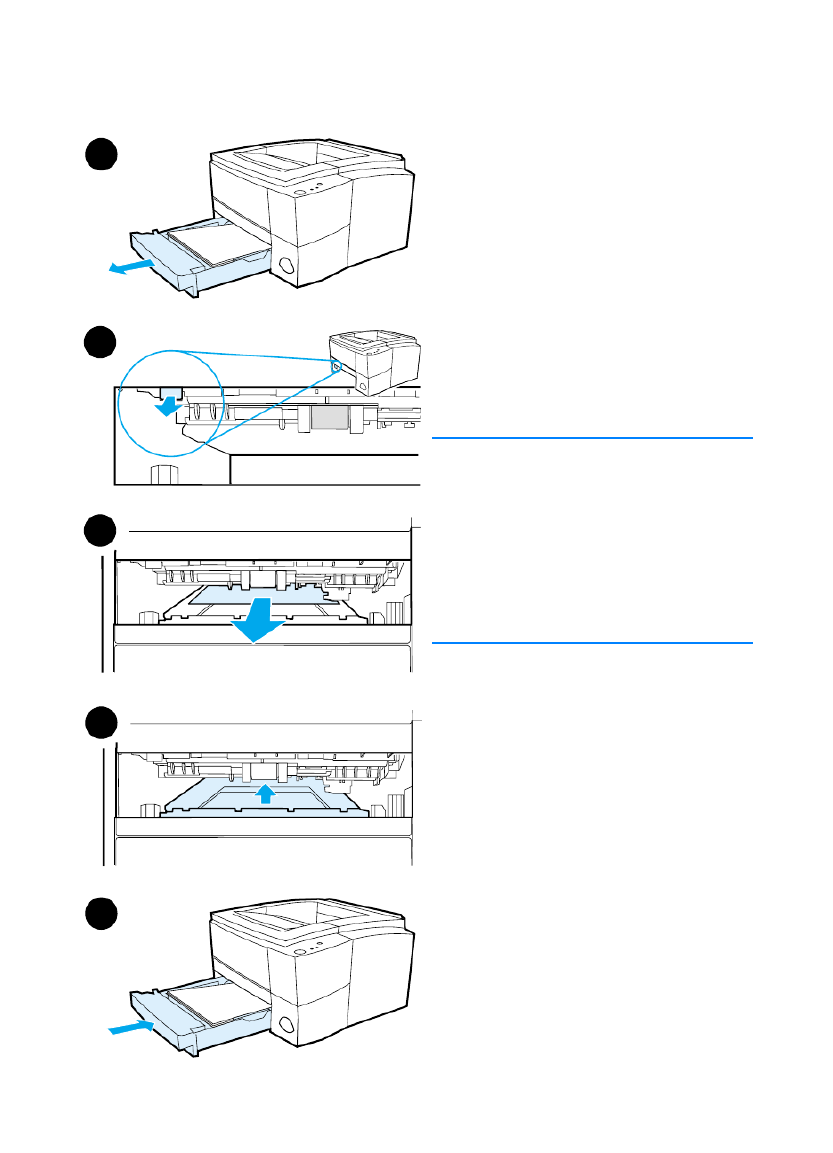
ENWW Chapter 4 Problem Solving 83
Duplexer Area
1Slide out Tray 2 from the printer.
2Pull the green lever on the left front
of the printer to open the bottom of
the duplexer.
3Reach in and pull out the
jammed paper.
4Push the bottom of the duplexer
back up until it clicks into place.
5Slide Tray 2 back into the printer.
Note
To reset the printer and continue
printing, open the top cover all
the way and close it.
If the Attention light does not go out,
there is still jammed paper inside the
printer. Check the paper feed, toner
cartridge, and output areas for
paper jams.
1
2
3
4
5

84 Chapter 4 Problem Solving ENWW
Solving Print Quality Problems
Print Quality Checklist
General print quality problems can be solved by following the
checklist below.
zCheck the printer driver to make sure you are using the
best available print quality option (see Choosing Print Quality
Settings).
zPrint using a different HP LaserJet 2200 printer driver.
zRedistribute the toner in the toner cartridge (see Redistributing
the Toner).
zClean the inside of the printer (see Cleaning the Printer).
zCheck the paper type and quality (see Media Specifications).
zCheck to make sure EconoMode is off in the software (see Using
EconoMode or Draft Printing).
zTroubleshoot general printing problems (see Troubleshooting
General Printing Problems).
zInstall a new HP toner cartridge, then check print quality again.
(See instructions provided with the toner cartridge.)
Note If the page is totally blank (all white) check to make sure the sealing
tape is removed from the toner cartridge and ensure that the toner
cartridge is installed correctly.
Note Newer printers have been optimized to print characters more
accurately. This may result in characters looking lighter or thinner
than you are used to having them print on your older printer.
Note If the page is printing images darker than on an older printer, and you
want the images to match the older printer, in your printer driver, select
the Finishing tab, choose Print Quality, choose Custom, click on Details,
and deselect Print Images Lighter.

ENWW Chapter 4 Problem Solving 85
Image Defect Examples
The examples below depict letter-size paper that has passed through
the printer short-edge first. The following pages list the typical cause
and solution for each of these examples.
Light Print or Fade
Vertical Repetitive Defects
Misformed Characters
Vertical Lines
Toner SmearGray Background
Dropouts
Page Skew
Toner Specks
Curl or Wave Wrinkles or Creases
Loose Toner
Toner Scatter Outline Random Image
Repetition (light) Random Image
Repetition (dark)
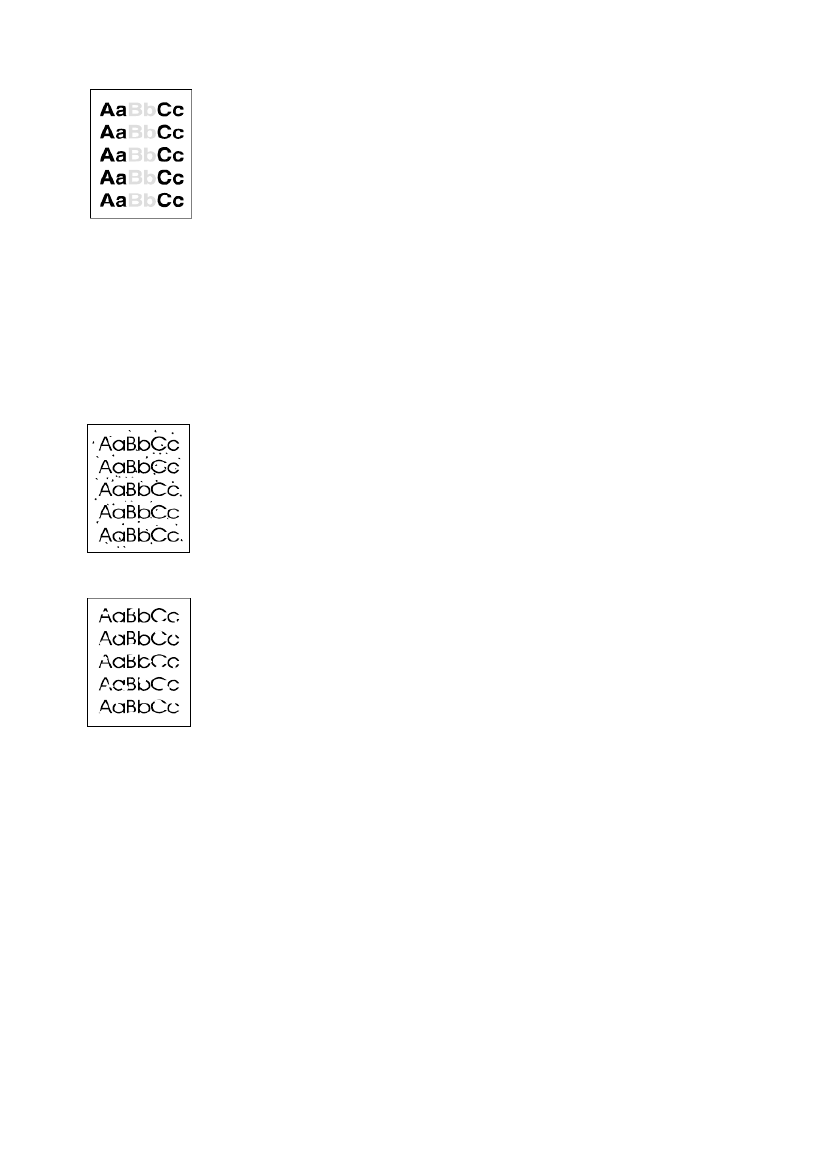
86 Chapter 4 Problem Solving ENWW
Light Print or Fade
If a vertical white streak or faded area appears on the page:
zThe toner supply is low. You may be able to temporarily extend
the toner cartridge life. See Redistributing the Toner. If this does
not improve the print quality, install a new HP toner cartridge.
zThe paper may not meet HP’s paper specifications (for example,
the paper is too moist or too rough). See Media Specifications.
zIf the whole page is light, the print density adjustment is too light
or EconoMode may be on. Adjust the print density and
EconoMode within the software driver. See Using EconoMode or
Draft Printing. For non-Windows operating systems, this feature
is also available in HP Web JetAdmin.
Toner Specks
zThe paper may not meet HP’s paper specifications (for example,
the paper is too moist or too rough). See Media Specifications.
zThe transfer roller may be dirty. See Internal Cleaning Procedure.
zThe paper path may need cleaning. See Engine Cleaning.
Dropouts
If faded areas, generally rounded, occur randomly on the page:
zA single sheet of paper may be defective. Try reprinting the job.
zThe moisture content of the paper is uneven or the paper has
moist spots on its surface. Try paper from a different source.
See Media Specifications.
zThe paper lot is bad. The manufacturing processes can cause
some areas to reject toner. Try a different kind or brand of paper.
See Media Specifications.
zThe toner cartridge may be defective. See Vertical Repetitive
Defects.
zIf these steps do not correct the problem, contact an HP-
authorized dealer or service representative. See HP Customer
Care (Service and Support).

ENWW Chapter 4 Problem Solving 87
Vertical Lines
If black or white vertical streaks appear on the page:
zThe photosensitive drum inside the toner cartridge has probably
been scratched or is worn out. Install a new HP toner cartridge.
Gray Background
If the amount of background toner shading becomes unacceptable,
the procedures described below may help to clear the condition:
zDecrease the density setting through the HP LaserJet Device
Configuration (Windows) or from the HP LaserJet Utility
(Macintosh). This will decrease the amount of background
shading.
zChange the paper to a lighter basis weight. See Media
Specifications.
zCheck the printer’s environment; very dry (low humidity)
conditions can increase the amount of background shading.
zInstall a new HP toner cartridge.
Toner Smear
zIf toner smears appear on the leading edge of the paper, the
paper guides are dirty. See Internal Cleaning Procedure.
zCheck the paper type and quality. See Media Specifications.
zTry installing a new HP toner cartridge.
Loose Toner
zClean the inside of the printer. See Internal Cleaning Procedure.
zCheck the paper type and quality. See Media Specifications.
zTry installing a new HP toner cartridge.
zIn the printer driver, select the Paper tab and set Optimize for:
to match the type of paper you are printing. Print speed may be
slower if you are using heavy paper. For non-Windows operating
systems, this feature is also available in HP Web JetAdmin.
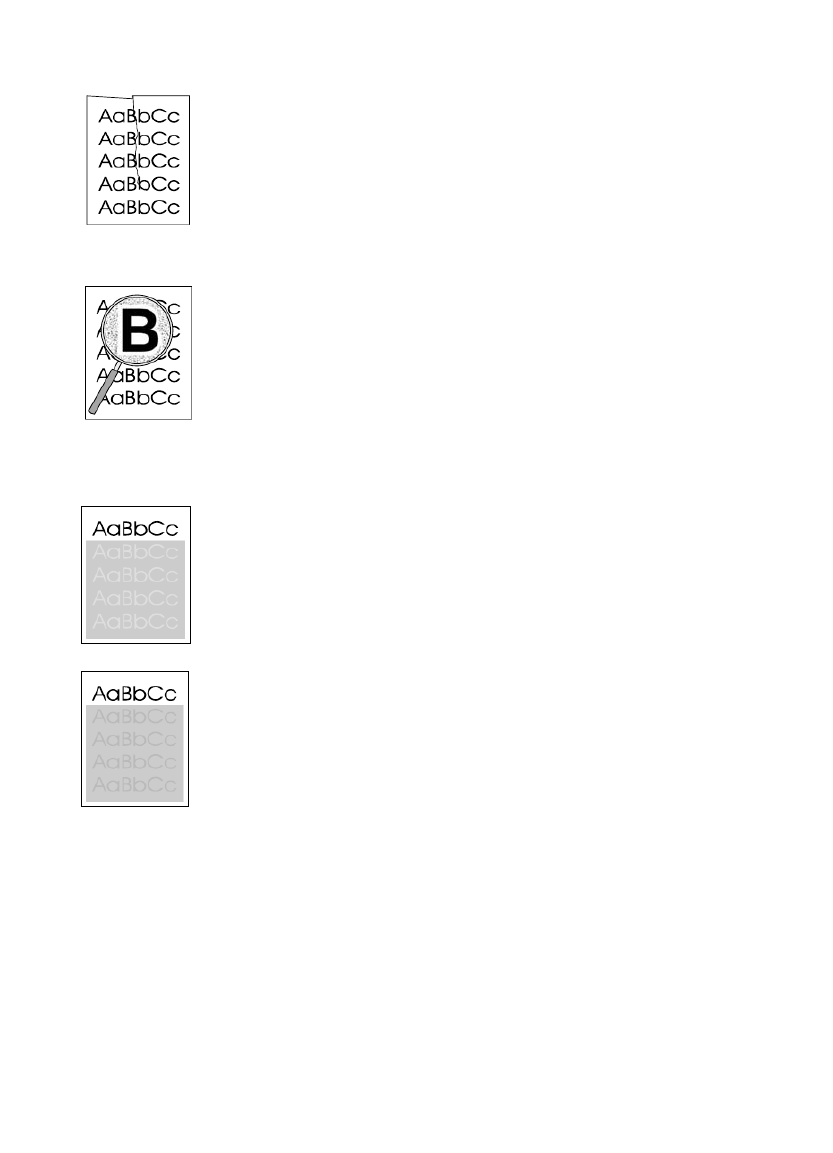
ENWW Chapter 4 Problem Solving 89
Wrinkles or Creases
zMake sure that paper is loaded properly.
zCheck the paper type and quality. See Media Specifications.
zOpen the rear door and try printing to the rear output bin.
zTurn over the stack of paper in the tray or try rotating the paper
180° in the input tray.
Toner Scatter Outline
zIf large amounts of toner have scattered around the characters,
the paper may have high resistivity. (Small amounts of toner
scatter is normal for laser printing.) Try a different paper type.
See Media Specifications.
zTurn over the stack of paper in the tray.
zUse paper designed for laser printers. See Media Specifications.
Random Image Repetition
If an image that appears at the top of the page (in solid black) repeats
further down the page (in gray field), the toner may not have been
completely erased from the last job. (The repeated image may be
lighter or darker than the field it appears in.)
zChange the tone (darkness) of the field that the repeated image
appears in.
zChange the order in which the images are printed. For example,
have the lighter image at the top of the page, and the darker
image further down the page.
zFrom your software application, rotate the whole page 180° to
print the lighter image first.
zIf the defect occurs later in a print job, turn the printer off for ten
minutes, and then turn the printer on to restart the print job.

ENWW Chapter 4 Problem Solving 91
The connection cannot be
established or the
transmission seems to be
taking longer than usual
(continued).
Bright lights are interfering
with the signal.
Make sure that no bright light
is shining directly into either IR
port. Bright light of any kind
(sunlight, incandescent light,
fluorescent light, or light from
an infrared remote control,
such as those used for TVs
and VCRs) shining directly into
one of the IR ports may cause
interference. Position the
device closer to the IR port on
the printer.
The printer prints only part of a
page or document.
The connection has been
interrupted during
transmission.
IrDA-compliant devices are
designed to recover from
temporary connection
interruptions. Re-establish the
connection. (Depending on the
device you are using, it can
take anywhere from 3 to 40
seconds to re-establish the
connection.)
The print job has been
properly sent to the printer, but
the printer will not print.
The connection may have
been disrupted or broken.
If the connection is broken
before the print job has
started, the printer may not
print any of the job. If the
Ready (middle) light is on,
press JOB CANCEL to clear the
printer memory. Position the
device within the range of
operation and print the job
again.
The FIR status light turns off
during transmission.
The connection may have
been broken.
If the Ready (middle) light is
on, press JOB CANCEL to clear
the printer memory. Position
the device within the range of
operation and print the job
again.
Wireless Printing Problems (continued)
Symptom Possible Cause Solution

94 Chapter 4 Problem Solving ENWW
Attention with the Ability to Continue
The Attention (red) light is blinking and the GO (green) light is on. An
error has occurred that has caused the printer to halt the current print
job. There are three possible causes for the Attention with the Ability
to Continue message:
zManual feed with pause
Press GO to print from Tray 1 or from another tray if Tray 1 is
empty.
zPaper out (requested tray)
Add paper to the requested tray to cause the printer to start the
print job from that tray. Press GO to print from another tray.
zContinuable error
Press GO to cause the printer to attempt to recover from the error
and print whatever data it can. If the attempt to recover from the
error is successful, the Ready light will blink while the printer
completes the job. If the printer cannot recover, it will display the
Attention with the Ability to Continue message.
Press and hold GO and JOB CANCEL simultaneously to display a
secondary light pattern that will indicate the error code corresponding
to the current error condition. Release both buttons to display the
Attention with the Ability to Continue message. See Continuable
Attention Errors.
Pressing JOB CANCEL will cancel the print job and the printer will
return to the ready state (Ready light on) if the cause of the error has
been fixed.
Note The printer can be configured to automatically recover from an error
using the Input Auto Continue settings in the HP LaserJet Device
Configuration.
Service Error
All lights are on. An error has occurred that has caused the printer to
halt the current print job. Pressing GO or JOB CANCEL with this
message has no effect.
To clear the error, turn the printer off and then on again. If the problem
persists, leave the printer off for 15 minutes to reset the formatter. If
the problem continues, contact HP Service. See HP Customer Care
(Service and Support).
Specyfikacje produktu
| Marka: | HP |
| Kategoria: | drukarka |
| Model: | LaserJet 2200dt |
Potrzebujesz pomocy?
Jeśli potrzebujesz pomocy z HP LaserJet 2200dt, zadaj pytanie poniżej, a inni użytkownicy Ci odpowiedzą
Instrukcje drukarka HP

2 Kwietnia 2025
2 Kwietnia 2025
2 Kwietnia 2025
2 Kwietnia 2025
17 Lutego 2025
7 Lutego 2025
29 Stycznia 2025
17 Stycznia 2025
16 Stycznia 2025
16 Stycznia 2025
Instrukcje drukarka
- drukarka Sony
- drukarka Samsung
- drukarka LG
- drukarka Xiaomi
- drukarka Sharp
- drukarka Huawei
- drukarka Lenovo
- drukarka Epson
- drukarka Fujitsu
- drukarka Roland
- drukarka Panasonic
- drukarka StarTech.com
- drukarka Canon
- drukarka Fujifilm
- drukarka MSI
- drukarka Toshiba
- drukarka D-Link
- drukarka Citizen
- drukarka Brother
- drukarka Honeywell
- drukarka Kodak
- drukarka Testo
- drukarka Primera
- drukarka Xerox
- drukarka Godex
- drukarka Olivetti
- drukarka Zebra
- drukarka Dell
- drukarka Digitus
- drukarka AgfaPhoto
- drukarka Kyocera
- drukarka Ricoh
- drukarka Seiko
- drukarka Renkforce
- drukarka Thomson
- drukarka AVM
- drukarka Velleman
- drukarka Dymo
- drukarka Panduit
- drukarka Olympus
- drukarka OKI
- drukarka Mitsubishi
- drukarka Intermec
- drukarka NEC
- drukarka Polaroid
- drukarka Konica Minolta
- drukarka Bixolon
- drukarka Pantum
- drukarka Olympia
- drukarka Datamax O'Neil
- drukarka DNP
- drukarka Equip
- drukarka ZKTeco
- drukarka TSC
- drukarka HiTi
- drukarka Microboards
- drukarka Triumph-Adler
- drukarka Fargo
- drukarka Entrust
- drukarka Kern
- drukarka Brady
- drukarka Tomy
- drukarka Lexmark
- drukarka Sagem
- drukarka Nilox
- drukarka Argox
- drukarka Royal Sovereign
- drukarka Minolta
- drukarka Oce
- drukarka Paxar
- drukarka IDP
- drukarka Metapace
- drukarka Ultimaker
- drukarka Ibm
- drukarka CSL
- drukarka Toshiba TEC
- drukarka Frama
- drukarka Builder
- drukarka Kogan
- drukarka Star Micronics
- drukarka Posiflex
- drukarka Dascom
- drukarka GG Image
- drukarka Vupoint Solutions
- drukarka Elite Screens
- drukarka DTRONIC
- drukarka Phoenix Contact
- drukarka Videology
- drukarka Epson 7620
- drukarka Star
- drukarka EC Line
- drukarka Colop
- drukarka Approx
- drukarka Fichero
- drukarka Raspberry Pi
- drukarka Unitech
- drukarka Middle Atlantic
- drukarka Evolis
- drukarka Tally Dascom
- drukarka Custom
- drukarka Nisca
- drukarka Sawgrass
- drukarka Mutoh
Najnowsze instrukcje dla drukarka

4 Kwietnia 2025

3 Kwietnia 2025
3 Kwietnia 2025

3 Kwietnia 2025

2 Kwietnia 2025
2 Kwietnia 2025

2 Kwietnia 2025

1 Kwietnia 2025

31 Marca 2025
29 Marca 2025