Instrukcja obsługi Hotpoint Ariston OS 89D IX /HA
Hotpoint Ariston
piekarnik
OS 89D IX /HA
Przeczytaj poniżej 📖 instrukcję obsługi w języku polskim dla Hotpoint Ariston OS 89D IX /HA (76 stron) w kategorii piekarnik. Ta instrukcja była pomocna dla 10 osób i została oceniona przez 2 użytkowników na średnio 4.5 gwiazdek
Strona 1/76

OS 89D IX/HA
OS 99D C IX/HA
OS 997D C IX/HA
OS 992D C IX/HA
OS 99D C /HA
OSQ 99D C /HA
IT
FORNO
Sommario
Installazione, 2-3
Posizionamento
Collegamento elettrico
Dati tecnici
Descrizione dellapparecchio, 4
Vista dinsieme
Pannello di controllo
Display
Struttura del forno, 5
Avvio e utilizzo, 6-12
Impostare lorologio
Impostare il contaminuti
ExtraLarge Space
Small Space
Main Space
Utilizzo contemporaneo Small Space e Main Space
Programmare la cottura
Consigli pratici di cottura
Tabella cottura ExtraLarge Space
Tabella cottura Small Space
Tabella cottura Main Space
Tabella cottura contemporanea Small Space e Main
Space
Precauzioni e consigli, 13
Sicurezza generale
Smaltimento
Risparmiare e rispettare lambiente
Manutenzione e cura, 14
Escludere la corrente elettrica
Pulire lapparecchio
Pulire la porta
Sostituire la lampadina
Montaggio del Kit Guide Scorrevoli
Assistenza, 15
Assistenza attiva 7 giorni su 7
Italiano, 1 Français, 31
Espanol, 46 Portuges, 61
English,16
GB
IT
FR
ES PT
Istruzioni per luso

2
IT
Aerazione
Per garantire una buona aerazione è necessario
eliminare la parete posteriore del vano. È preferibile
installare il forno in modo che appoggi su due listelli in
legno oppure su piano continuo che abbia unapertura
di almeno 45 x 560 mm (vedi figure).
Centraggio e fissaggio
Regolare i 4 tacchetti posti lateralmente al forno, in
corrispondenza dei 4 fori sulla cornice perimetrale, in
base allo spessore della fiancata del mobile:
spessore di 20 mm: rimuovere
la parte mobile del tacchetto
(vedi figura);
spessore di 18 mm: utilizzare
la prima scanalatura, come già
predisposto dal fabbricante
(vedi figura);
spessore di 16 mm: utilizzare
la seconda scanalatura
(vedi figura).
Per fissare lapparecchio al mobile: aprire la porta del
forno e avvitare 4 viti a legno nei 4 fori posti sulla
cornice perimetrale.
! Tutte le parti che assicurano la protezione debbono
essere fissate in modo tale da non poter essere tolte
senza laiuto di qualche utensile.
! È importante conservare questo libretto per poterlo
consultare in ogni momento. In caso di vendita, di
cessione o di trasloco, assicurarsi che resti insieme
allapparecchio per informare il nuovo proprietario sul
funzionamento e sui relativi avvertimenti.
! Leggere attentamente le istruzioni: ci sono importanti
informazioni sullinstallazione, sulluso e sulla
sicurezza.
Posizionamento
! Gli imballaggi non sono giocattoli per bambini e
vanno eliminati secondo le norme per la raccolta
differenziata (vedi Precauzioni e consigli).
! Linstallazione va effettuata secondo queste
istruzioni e da personale professionalmente
qualificato. Una errata installazione può causare danni
a persone, animali o cose.
Incasso
Per garantire un buon funzionamento dellapparecchio
è necessario che il mobile abbia le caratteristiche
adatte:
i pannelli adiacenti il forno devono essere di
materiale resistente al calore;
nel caso di mobili in legno impiallacciato, le colle
devono essere resistenti alla temperatura di 100°C;
per lincasso del forno, sia nel caso di inserimento
sottotavolo (vedi figura) che a colonna, il mobile
deve avere le seguenti dimensioni:
! Una volta incassato lapparecchio non debbono
essere possibili contatti con le parti elettriche.
Le dichiarazioni di consumo indicate in targhetta
caratteristiche sono state misurate con questo tipo di
installazione
595 mm.
595 mm.
24 mm.
545 mm.
5 mm.
576 mm.
23 mm.
593 mm.
45 mm.
558 mm.
547 mm. min.
Installazione
560 mm.
45 mm.

3
IT
Collegamento elettrico
! I forni dotati di cavo di alimentazione tripolare sono
predisposti per il funzionamento con corrente
alternata, con tensione e frequenza indicate nella
targhetta caratteristiche posta sullapparecchio (vedi
sotto).
Montaggio del cavo di alimentazione
1. Aprire la morsettiera
facendo leva con un
cacciavite sulle
linguette laterali del
coperchio: tirare e
aprire il coperchio
(vedi figura).
2. Mettere in opera il
cavo di alimentazione:
svitare la vite del
serracavo e le tre viti
dei contatti L-N- e
poi fissare i cavetti
sotto
le teste delle viti
rispettando i colori Blu
(N) Marrone (L) Giallo-
Verde (vedi figura).
3. Fissare il cavo
nellapposito
fermacavo.
4. Chiudere il coperchio della morsettiera.
Allacciamento del cavo di alimentazione alla rete
Montare sul cavo una spina normalizzata per il
carico indicato nella targhetta caratteristiche (vedi a
fianco).
In caso di collegamento diretto alla rete è necessario
interporre tra lapparecchio e la rete un interruttore
onnipolare con apertura minima fra i contatti di 3 mm
dimensionato al carico e rispondente alle norme in
vigore (il filo di terra non deve essere interrotto
dallinterruttore). Il cavo di alimentazione deve
essere posizionato in modo tale che in nessun punto
superi di 50°C la temperatura ambiente.
! Linstallatore è responsabile del corretto
collegamento elettrico e dellosservanza delle norme
di sicurezza.
Prima di effettuare lallacciamento accertarsi che:
la presa abbia la messa a terra e sia a norma di
legge;
la presa sia in grado di sopportare il carico
massimo di potenza della macchina, indicato
nella targhetta caratteristiche (vedi sotto);
la tensione di alimentazione sia compresa nei
valori nella targhetta caratteristiche (vedi sotto);
la presa sia compatibile con la spina
dellapparecchio. In caso contrario sostituire la
presa o la spina; non usare prolunghe e multiple.
! Ad apparecchio installato, il cavo elettrico e la presa
della corrente devono essere facilmente raggiungibili.
! Il cavo non deve subire piegature o compressioni.
! Il cavo deve essere controllato periodicamente e
sostituito solo da tecnici autorizzati (vedi Assistenza).
!Lazienda declina ogni responsabilità qualora
queste norme non vengano rispettate.
N
L
TARGHETTA CARATTERISTICHE
Dimensioni
extralar
g
e
space
larghezza cm 43,4
altezza cm 39,5
profondità cm 40,8
Volume
extralar
g
e
space
lt. 70
ENERGY
LABEL
extralar
g
e
space
Direttiva 2002/40/CE
sulletichetta dei forni elettrici.
Norma EN 50304
Consumo energia dichiarazione
Classe convezione Forzata -
funzione di
riscaldamento: Gratin.
Colle
g
amenti
elettrici
tensione a 220-240V~ 50Hz
potenza massima assorbita
2600W (vedi targhetta
caratteristiche)
Questa apparecchiatura è
conforme alle seguenti Direttive
Comunitarie: 2006/95/CEE del
12/12/06 (Bassa Tensione) e
successive modificazioni -
2004/108/CEE del
15/12/04(Compatibilità
Elettromagnetica) e successive
modificazioni - 93/68/CEE del
22/07/93 e successive
modificazioni.
2002/96/CEE e uccessive
modificazioni.
1275/2008 stand-by/off mode.

4
IT
Pannello di controllo
Ripiano GRIGLIA
Ripiano LECCARDA
GUIDE di
scorrimento dei
ripiani
posizione 5
posizione 4
posizione 3
posizione 7
posizione 6
posizione Divider "D"
posizione 2
posizione 1
Ripiano DIVIDER
Descrizione
dellapparecchio
Vista dinsieme
Pannello di controllo
Display
Manopola
FUNZIONI
EXTRALARGE SPACE
Manopola
IMPOSTAZIONE
TEMPERATURA/TEMPI
DISPLAY
Tasto
IMPOSTAZIONE
TEMPI
Tasto
SELEZIONE CAVITA'
Manopola
FUNZIONI
MAIN SPACE
Manopola
FUNZIONI
SMALL SPACE
¡•OC
•• ••
:
¡•OC
•• ••
:
Digit numerici TEMPERATURA
e TEMPI
Icona
FINE COTTURA
Icona
DURATA
Icona
CONTAMINUTI
Icona
CAVITA'
SELEZIONATA
5
IT
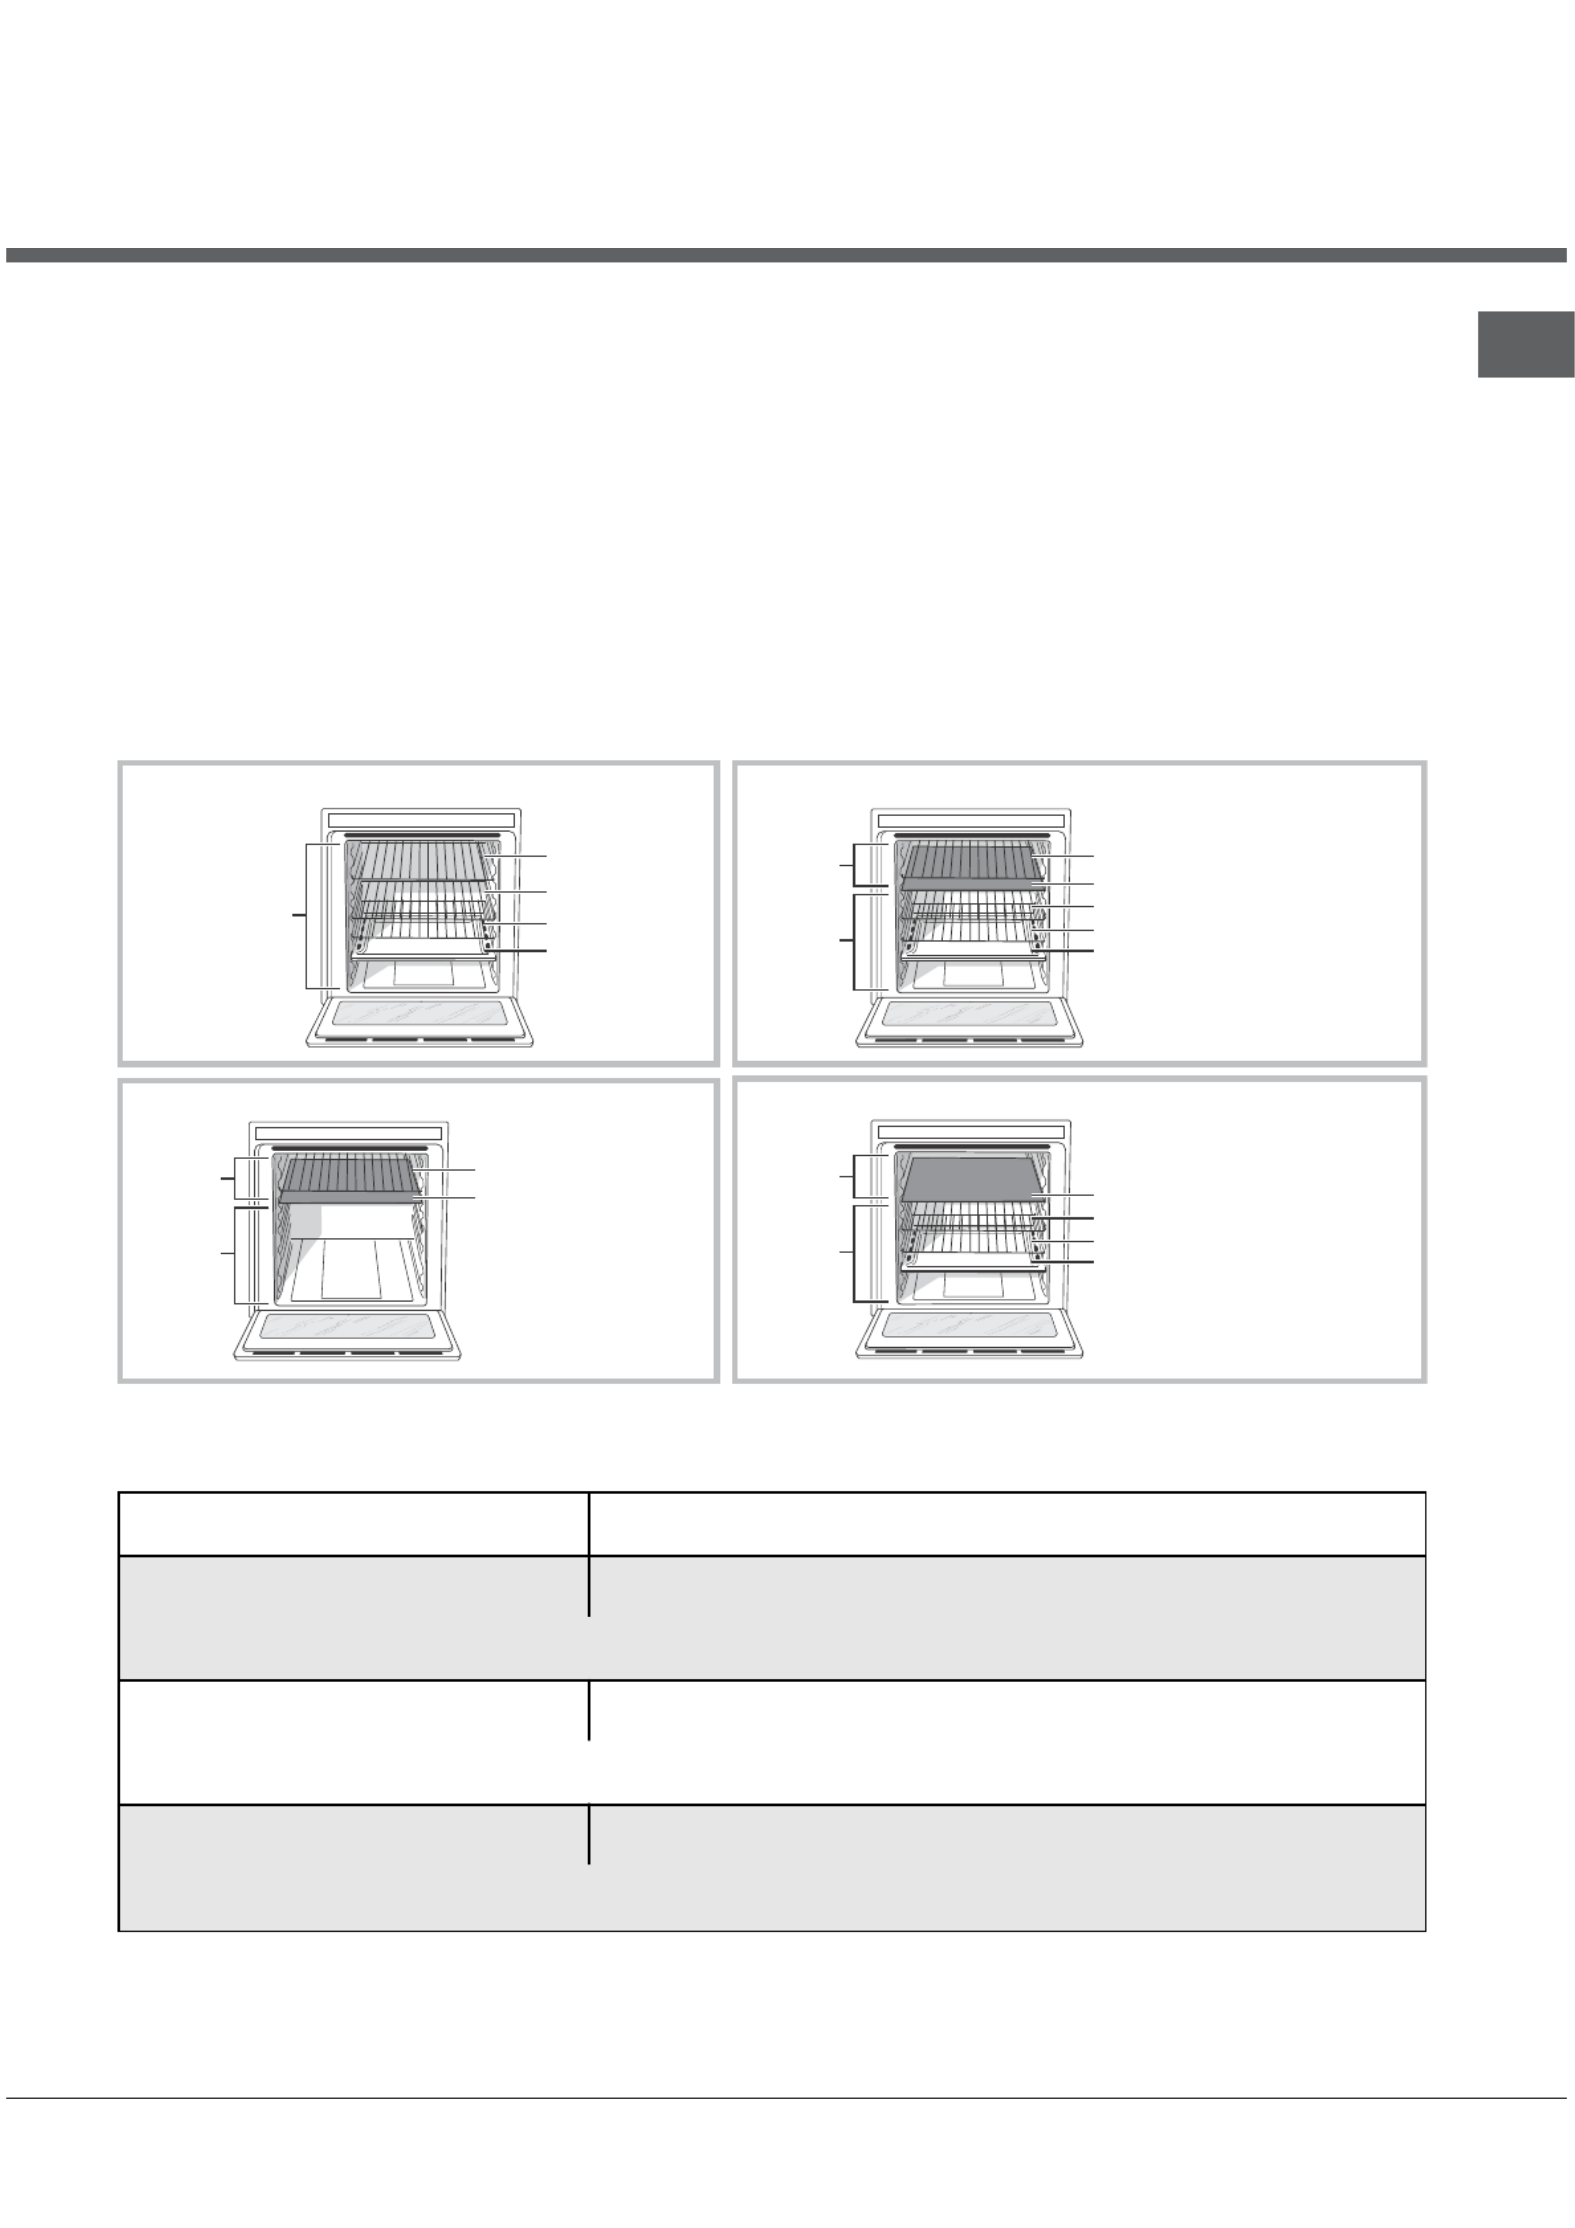
Struttura del forno
GRIGLIA
LECCARDA
GRIGLIA
GRIGLIA
EXTRALARGE
SPACE
ExtraLarge Space: cottura su 4 livelli
GRIGLIA o LECCARDA
LECCARDA
(cottura su 3 livelli)
Divider "D" (posizione fissa)
GRIGLIA (cottura su 3 livelli)
GRIGLIA (cottura su 3 livelli)
SMALL
SPACE
MAIN
SPACE
LECCARDA
(cottura su 3 livelli)
Divider "D" (posizione fissa)
GRIGLIA (cottura su 3 livelli)
GRIGLIA (cottura su 3 livelli)
SMALL
SPACE
MAIN
SPACE
Main e Small Space: cottura contemporanea
GRIGLIA o LECCARDA
Divider "D"
(posizione fissa)
SMALL
SPACE
MAIN
SPACE
Cottura solo nella Small Space Cottura solo nella Main Space: cottura su 3 livelli
La tabella riportata di seguito descrive i possibili
valori di temperatura impostabili. Il display
Temperatura nella prima cavità
(Main o Small Space)
Temperatura nella seconda cavità
(Small o Main Space)
Da 40°C a 150°C La differenza di tem
p
eratura ris
p
etto alla
p
rima cavità selezionata è massimo 50°C
Esem
p
io: im
p
osti 90°C su una cavità;
nell'altra
p
uoi im
p
ostare un valore tra 40°C (90°C-50°C) e 140°C (90°C+50°C).
Da 155°C a 200°C La differenza di tem
p
eratura ris
p
etto alla
p
rima cavità selezionata è massimo 70°C
Esem
p
io: im
p
osti 180°C su una cavità;
nell'altra
p
uoi im
p
ostare un valore tra 110°C (180°C-70°C) e 250°C (180°C+70°C).
Da 205°C a 250°C La differenza di tem
p
eratura ris
p
etto alla
p
rima cavità selezionata è massimo 100°C
Esem
p
io: im
p
osti 210°C su una cavità;
nell'altra
p
uoi im
p
ostare un valore tra 110°C (210°C-100°C) e 250°C max tem
p
eratura im
p
ostabile.
Il forno Openspace offre 70lt di capacità e la
possibilità di cucinare pietanze su 4 livelli
contemporaneamente o cucinare porzioni abbondanti,
che non starebbero in un forno tradizionale.
Grazie alla ExtraLarge Space, Openspace offre 10
funzioni di cottura, di cui 6 universali, utilizzabili per
qualsiasi preparazione, e 4 programmi automatici, che
assicurano risultati perfetti per qualsiasi ricetta.
Openspace offre inoltre il massimo del comfort per
qualsiasi esigenza e lo fa con 4 diverse possibilità
duso: il forno è unico ma è divisibile in spazi di
dimensioni differenti, ciascuna con regolazioni
indipendenti di temperatura e tempi.
Questo è possibile grazie al DIVIDER termoisolante,
che permette di dividere lintera ExtraLarge Space in
due spazi di grandezze diverse: Main Space e Small
Space.
Le due Main e Small Space si possono usare
contemporaneamente, per cucinare diverse
preparazioni in meno tempo, oppure separatamente,
per utilizzare solo lo spazio che serve.
Quando le due cavità sono utilizzate insieme è
possibile regolare le temperature di cottura tra 50° e
250°, ed avere una differenza di temperatura fino a
100° tra le due zone, per realizzare ricette anche molto
diverse tra loro senza che sapori ed odori si
mescolino.
intelligente ti guiderà nella corretta regolazione delle
temperature delle due cavità.
Per annullare qualunque impostazione è sufficiente ruotare la manopola Funzioni Small Space o Main
Space sulla posizione 0.

6
IT
! Alla prima accensione fare funzionare il forno a
vuoto per almeno unora con il termostato al
massimo e a porta chiusa. Poi spegnere, aprire la
porta del forno e aerare il locale. Lodore che si
avverte è dovuto allevaporazione delle sostanze
usate per proteggere il forno.
! Non appoggiare mai oggetti sul fondo del forno
perché si rischiano danni allo smalto.
! Porre sempre i recipienti di cottura sulle griglie in
dotazione.
! Durante luso si consiglia di rimuovere eventuali
stoviglie o cibi delicati dalla cavità spente.
! Nel caso di cotture per le quali è prevista la
lievitazione si raccomanda di non aprire la porta per
non comprometterne il risultato.
! Se la porta viene sollecitata con forza
ripetutamente il divider potrebbe uscire dalla sua
sede. In tal caso sul display comparirà lora.
Accertarsi che il divider sia inserito correttamente e
riavviare la cottura.
Ventilazione di raffreddamento
Per ottenere una riduzione delle temperature esterne,
una ventola di raffreddamento genera un getto daria
che esce tra il pannello di controllo e la porta del
forno.
! A fine cottura la ventola si attiva e disattiva
automaticamente finché il forno non è
sufficientemente freddo.
Impostare lorologio
Si può impostare solo quando il forno è spento.
1. Premere il tasto finchè non lampeggia il primo
digit numerico sul DISPLAY e le icone , ,
sono spente;
2. ruotare la manopola IMPOSTAZIONE TEMPI verso
il + e - per regolare lora;
3. premere di nuovo il tasto finchè non
lampeggiano gli altri due digit numerici sul
DISPLAY;
4. ruotare la manopola IMPOSTAZIONE TEMPI verso
il + e - per regolare i minuti;
5. premere nuovamente il tasto per confermare.
Impostare il contaminuti
Questa funzione non interrompe la cottura e
prescinde dallutilizzo del forno; permette solo di
azionare il segnale acustico allo scadere dei minuti
impostati.
1. Premere il tasto finchè non lampeggiano
licona e i tre digit numerici sul DISPLAY;
2. ruotare la manopola IMPOSTAZIONE TEMPI verso
il + e - per regolare i minuti;
3. premere nuovamente il tasto per confermare.
Seguirà la visualizzazione del conto alla rovescia al
termine del quale si azionerà il segnale acustico.
ExtraLarge Space
Avviare il forno
1. Selezionare la funzione di cottura desiderata
ruotando la manopola FUNZIONI EXTRALARGE
SPACE. Licona accesa sul display indica che è
selezionata la ExtraLarge Space ed è quindi
possibile agire solo sulle impostazioni della
ExtraLarge Space.
2. Il forno entra nella fase di preriscaldamento. È
possibile modificare la temperatura ruotando la
manopola TEMPERATURA. Durante la fase di
preriscaldamento licona lampeggia;
3. Alla fine della fase di preriscaldamento licona
si fissa e si avverte un segnale acustico. E ora
possibile introdurre gli alimenti;
4. Durante la cottura è sempre possibile:
- modificare la funzione di cottura agendo sulla
manopola FUNZIONI EXTRALARGE SPACE;
- modificare la temperatura agendo sulla manopola
TEMPERATURA (solo per le cotture universali);
- pianificare la durata (solo per le cotture universali)
e lora di fine della cottura;
- interrompere la cottura riportando la manopola
FUNZIONI EXTRALARGE SPACE in posizione 0.
5. In caso di black-out, se la temperatura del forno
non si è abbassata troppo, lapparecchio è dotato di
un sistema che riattiva la funzione dal punto in cui è
stato interrotto. Le pianificazioni in attesa di avvio,
invece, non vengono ripristinate al ritorno della
corrente e devono essere riprogrammate.
! Nella configurazione ExtraLarge non è possibile
utilizzare le Main e Small Space: le manopole
FUNZIONI SMALL SPACE e MAIN SPACE sono
disabilitate.
Funzioni di cottura universali
Tutti le funzioni hanno una temperatura di cottura
preimpostata. Essa può essere regolata
manualmente, impostandola a piacere tra 40°C e
250°C.
Nella funzione BARBECUE il valore preimpostato è
un livello di potenza espresso in %. Anchesso può
essere regolato manualmente.
Avvio e utilizzo

7
IT
posteriore del forno;
3. azionare il girarrosto selezionando le funzioni
o .
Funzioni di cottura automatiche
La temperatura e la durata di cottura sono
prestabilite tramite il sistema C.O.P.® (Cottura
Ottimale Programmata) che garantisce
automaticamente un risultato perfetto. La cottura si
interrompe automaticamente e il forno avvisa
quando la pietanza è cotta. La durata di cottura può
essere modificata di alcuni minuti, come di seguito
specificato nella descrizione delle singole funzioni.
Funzione CARNE
Utilizzare questa funzione per cuocere carni di
vitello, maiale, agnello e manzo. Infornare a forno
freddo. E comunque possibile infornare anche a
forno caldo. E possibile modificare solo la durata di
-10/+10 minuti.
Funzione DOLCI
Questa funzione è ideale per la cottura di dolci.
Infornare a forno freddo. E comunque possibile
infornare anche a forno caldo. E possibile
modificare solo la durata di -10/+15 minuti.
Funzione PANE
Utilizzare questa funzione per realizzare del pane. Fare
riferimento al capitolo seguente per la ricetta e dettagli.
Per ottenere i migliori risultati vi consigliamo di seguire
attentamente le indicazioni sotto riportate:
rispettare la ricetta;
non dimenticare di mettere 150gr (1.5 dl) di acqua
fredda sulla leccarda alla posizione 7;
Infornare a forno freddo. Nel caso in cui si desideri
infornare a forno caldo, a seguito di una cottura che
ha raggiunto alte temperature, il display visualizzerà
la scritta Hot fino a quando la temperatura del
forno raggiungerà 40°. A questo punto sarà
possibile infornare il pane.
Funzione PIZZA
Utilizzare questa funzione per realizzare della pizza. Fare
riferimento al capitolo seguente per la ricetta e dettagli. E
possibile modificare solo la durata di -5/+12 minuti.
Per ottenere i migliori risultati vi consigliamo di seguire
attentamente le indicazioni sotto riportate:
rispettare la ricetta;
il peso dellimpasto deve essere da 350g a 500g.
ungere leggermente la leccarda e le teglie.
Funzione MULTICOTTURA
Si attivano tutti gli elementi riscaldanti ed entra in funzione
la ventola. Poiché il calore è costante in tutto il forno, laria
cuoce e rosola il cibo in modo uniforme. È possibile
utilizzare fino a un massimo di quattro ripiani
contemporaneamente. Nal caso di utilizzo di più ripiani
contemporaneamente ti raccomandiamo di posizionare
sempre la leccarda sul ripiano inferiore. Nel caso di
cottura su 4 livelli contemporaneamente ti raccomandiamo
di posizionare le griglie sui ripiani 3, 5 e 6 la leccarda sul
ripiano 1.
Funzione GRATIN
Si attiva lelemento riscaldante superiore e durante
una parte del ciclo anche lelemento riscaldante
circolare, entrano in funzione la ventola e il girarrosto
(ove presente). Unisce allirradiazione termica
unidirezionale la circolazione forzata dellaria
allinterno del forno.
Ciò impedisce la bruciatura superficiale degli
alimenti aumentando il potere di penetrazione del
calore. Effettuare le cotture con la porta del forno
chiusa.
Funzione BARBECUE
Si attiva lelemento riscaldante superiore e il girarrosto
(ove presente). Ruotando la manopola
TEMPERATURA, il display indicherà livelli di
potenza impostabili, che vanno da 5% fino a 100%.
La temperatura elevata e diretta del grill è
consigliata per gli alimenti che necessitano di unalta
temperatura superficiale. Effettuare le cotture con la
porta del forno chiusa.
Funzione BASSA TEMPERATURA
Questo tipo di cottura consente di lievitare,
scongelare, di preparare lo yogurth, riscaldare più o
meno rapidamente, cuocere lentamente a bassa
temperatura. Le temperature selezionabili sono: 40,
65, 90 °C.
Girarrosto (solo in alcuni modelli)
Per azionare il girarrosto
(vedi figura) procedere
come segue:
1. mettere la leccarda
in posizione 1;
2. mettere il sostegno
del girarrosto in
posizione 3 e inserire lo
spiedo nellapposito
foro posto sulla parete

8
IT
Infornare a forno freddo. Nel caso in cui si desideri
infornare a forno caldo, a seguito di una cottura che
ha raggiunto alte temperature, il display visualizzerà
la scritta Hot fino a quando la temperatura del
forno raggiungerà 120°. A questo punto sarà
possibile infornare la pizza.
Ricetta per la PIZZA :
Ricetta per 3 o 4 pizze: 1000g Farina, 500g Acqua, 20g
Sale, 20g Zucchero, 10cl Olio di Oliva, 20g lievito fresco
(oppure 2 bustini in polvere)
Lievitazione nell ambiente : 1 ora o funzione manuale
BASSA TEMPERATURA a 40° e lasciar lievitare
per circa 30/45 minuti.
Infornare a forno freddo.
Lanciare la cottura PIZZA.
Ricetta per il PANE (impasto massimo):
Ingredienti:
1,3 Kg di farina
700 gr di acqua
25 gr di sale
50 gr di lievito fresco per panificazione o 4
bustine di lievito in polvere.
Preparazione:
Mescolare la farina ed il sale in un grande
recipiente.
Diluire il lievito nellacqua leggermente tiepida
(circa 35 gradi).
Aprire la farina a fontana.
Versare il composto di acqua e lievito.
Lavorare limpasto fino ad ottenere un impasto
omogeneo e poco colloso, stirandolo con il palmo
della mano e ripiegandolo su se stesso per 10
minuti.
Formare una palla, mettere limpasto in una ciotola
e ricoprirla con pellicola trasparente per evitare
che la superficie dellimpasto si secchi. Mettere la
ciotola nel forno alla funzione manuale BASSA
TEMPERATURA a 40°e lasciar lievitare per circa
30/45 minuti o a temperatura ambiente per circa 1
ora (il volume dellimpasto deve raddoppiare).
Rompere limpasto lavorandolo delicatamente e
dividerlo per ottenere i diversi pani.
Disporli sulla griglia (o su 2 o 3 griglie se desideri
cuocere i pani su più livelli) con la carta forno
(tagliata della stessa misura interna della
leccarda) e cospargerli di farina.
Praticare alcune incisioni con una lama affilata.
Infornare la griglia al ripiano 2 per la cottura su un
solo livello, o le due griglie ai ripiani 1 e 4 per la
cottura su due livelli e 1-3-5 per la cottura su tre
livelli.
Posizionare la leccarda al ripiano 7 e versarvi
150 gr di acqua fredda.
Infornare a forno freddo.
Avviare la funzione automatica PANE.
A fine cottura, lasciar riposare i pani sulla griglia
fino a completo raffreddamento.
Small Space
Avviare il forno
1. Inserire il DIVIDER sul ripiano DIVIDER D con il
perno e le frecce rivolte verso la parte posteriore del
forno. A seguito del corretto inserimento è possibile
leggere la scritta OPENSPACE sulla parte anteriore
della cornice del DIVIDER. Il forno emette un
segnale acustico a conferma del corretto inserimento
del DIVIDER e permette lutilizzo delle due Main e
Small Space speratamente o contemporaneamente.
La manopola FUNZIONI EXTRALARGE SPACE
viene disabilitata.
2. Selezionare la funzione di cottura desiderata
ruotando la manopola FUNZIONI SMALL SPACE.
3. Il forno entra nella fase di preriscaldamento. È
possibile modificare la temperatura ruotando la
manopola TEMPERATURA.Durante la fase di
preriscaldamento licona lampeggia.
4. Alla fine della fase di preriscaldamento licona
si fissa e si avverte un segnale acustico. E ora
possibile introdurre gli alimenti.
5. Durante la cottura è sempre possibile:
- modificare la funzione di cottura agendo sulla
manopola FUNZIONI SMALL SPACE;
- modificare la temperatura agendo sulla manopola
TEMPERATURA;
- pianificare la durata e lora di fine della cottura;
- interrompere la cottura riportando la manopola
FUNZIONI SMALL SPACE in posizione 0.
6. In caso di black-out, se la temperatura del forno
non si è abbassata troppo, lapparecchio è dotato di
un sistema che riattiva la funzione dal punto in cui è
stato interrotto. Le pianificazioni in attesa di avvio,
invece, non vengono ripristinate al ritorno della
corrente e devono essere riprogrammate.
Funzioni di cottura
Funzione GRILL
Si attiva lelemento riscaldante superiore. Ruotando la
manopola TEMPERATURA, il display indicherà livelli
di potenza impostabili, che vanno da 5% fino a
100%. La temperatura elevata e diretta del grill è
consigliata per gli alimenti che necessitano di unalta

9
IT
temperatura superficiale. Questa funzione è indicata
per: rosolatura, gratin, colorazione meringhe, toast,
piccole grigliate con carne magre e sottili. Effettuare
le cotture con la porta del forno chiusa.
Funzione FAST COOKING
La funzione necessita di preriscaldamento. Questo
funzione è particolarmente indicata per cotture veloci
di cibi preconfezionati (surgelati o precotti).
Main Space
Avviare il forno
1. Inserire il DIVIDER sul ripiano DIVIDER D con il
perno e le frecce rivolte verso la parte posteriore del
forno. A seguito del corretto inserimento è possibile
leggere la scritta OPENSPACE sulla parte anteriore
della cornice del DIVIDER. Il forno emette un
segnale acustico a conferma del corretto inserimento
del DIVIDER e permette lutilizzo delle due Main e
Small Space speratamente o contemporaneamente.
La manopola FUNZIONI EXTRALARGE SPACE
viene disabilitata.
2. Selezionare la funzione di cottura Universale
ruotando la manopola FUNZIONI MAIN SPACE.
3. Il forno entra nella fase di preriscaldamento. È
possibile modificare la temperatura ruotando la
manopola TEMPERATURA.Durante la fase di
preriscaldamento licona lampeggia.
4. Alla fine della fase di preriscaldamento licona
si fissa e si avverte un segnale acustico. E ora
possibile introdurre gli alimenti.
5. Durante la cottura è sempre possibile:
- modificare la temperatura agendo sulla manopola
TEMPERATURA;
- pianificare la durata e lora di fine della cottura;
- interrompere la cottura riportando la manopola
FUNZIONI MAIN SPACE in posizione 0.
6. In caso di black-out, se la temperatura del forno
non si è abbassata troppo, lapparecchio è dotato di
un sistema che riattiva la funzione dal punto in cui è
stato interrotto. Le pianificazioni in attesa di avvio,
invece, non vengono ripristinate al ritorno della
corrente e devono essere riprogrammate.
Funzioni di cottura
Funzione UNIVERSALE
Si attivano tutti gli elementi riscaldanti ed entra in funzione
la ventola. Poiché il calore è costante in tutto il forno, laria
cuoce e rosola il cibo in modo uniforme. È possibile
utilizzare fino a un massimo di tre ripiani
contemporaneamente. Nal caso di utilizzo di più ripiani
contemporaneamente ti raccomandiamo di posizionare
sempre la leccarda sul ripiano 1. Nel caso di cottura su 3
livelli contemporaneamente ti raccomandiamo di
posizionare le griglie sui ripiani 3 e 5 e la leccarda sul
ripiano 1.
Utilizzo contemporaneo Small Space e
Main Space
Avviare il forno
1. Inserire il DIVIDER sul ripiano DIVIDER D con il
perno e le frecce rivolte verso la parte posteriore del
forno. A seguito del corretto inserimento è possibile
leggere la scritta OPENSPACE sulla parte anteriore
della cornice del DIVIDER. Il forno emette un
segnale acustico a conferma del corretto inserimento
del DIVIDER e permette lutilizzo delle due Main e
Small Space speratamente o contemporaneamente.
La manopola FUNZIONI EXTRALARGE SPACE
viene disabilitata.
! Per migliorare lefficienza energetica, il tempo di
presiscaldamento della cavità SMALL SPACE è di
circa 15 minuti.
Se la MAIN SPACE è impostata ad una
temperatura inferiore a 150°C il grill, per
salvaguardare il risultato di cottura, non entrerà in
funzione: sul display comparirà quindi la scritta OFF.
2. Selezionare la funzione di cottura desiderato per
ogni cavità ruotando le manopole FUNZIONI SMALL
SPACE e/o FUNZIONI MAIN SPACE. Licona
indica che è selezionata la Small Space ed è quindi
possibile agire sulle impostazioni della Small Space,
licona accesa sul display indica che è
selezionata la Main Space ed è quindi possibile
agire sulle impostazioni della Main Space.
3. Entrambi i forni entrano nella fase di
preriscaldamento. È possibile modificare la
temperatura ruotando la manopola TEMPERATURA.
Durante la fase di preriscaldamento licona
lampeggia.
4. Alla fine della fase di preriscaldamento licona
si fissa e si avverte un segnale acustico. E ora
possibile introdurre gli alimenti.
5. La maggiore luminosità dei digit sul display
indica la cavità su cui si sta agendo. per modificare
le impostazioni dellaltra cavità premere il tasto .
Durante la cottura contemporanea è infatti possibile

10
IT
DISPLAY;
5. ruotare la manopola IMPOSTAZIONE TEMPI verso
il + e - per regolare i minuti;
6. premere nuovamente il tasto per confermare;
7. a tempo scaduto, sul DISPLAY compare la scritta
END, il forno termina la cottura e viene emesso un
segnale acustico.
Le icone e accese segnalano che è stata
effettuata una programmazione. Sul DISPLAY vengono
visualizzate alternativamente lora di fine cottura e la
durata.
Per annullare una programmazione ruotare la
manopola FUNZIONI in posizione 0.
Consigli pratici di cottura
MULTICOTTURA
Utilizzare le posizioni 1-3-5-6.
Disporre la leccarda in basso e le griglie in alto.
BARBECUE
Preriscaldare il forno per 5 minuti.
Effettuare la cottura a porta chiusa.
Disporre la leccarda alla posizione 3. Inserire la
griglia in posizione dal 4 al 7 in funzione dello
spessore del cibo, disporre gli alimenti al centro
della griglia. Esempi: costata di manzo al ripiano
4 e bacon al ripiano 6 o 7.
PIZZA o FOCACCE
Utilizzare una teglia in alluminio leggero di un
diametro massimo di 30cm, appoggiandola sulla
griglia in dotazione.
Nel caso di pizze molto farcite è consigliabile
inserire la mozzarella a metà cottura.
GRILL
Preriscaldare il forno per 5 minuti.
Inserire il DIVIDER sul ripiano DIVIDER D.
Effettuare la cottura a porta chiusa.
Inserire la griglia in posizione 7, disporre gli
alimenti al centro della griglia. Disporre la
leccarda alla posizione 6.
Questa funzione è indicata per: rosolatura, gratin,
colorazione meringhe, toast, piccole grigliate con
carne magre e sottili.
Si consiglia di impostare il livello di energia al
massimo. Non allarmarsi se la resistenza
superiore non resta costantemente accesa: il suo
funzionamento è controllato da un termostato.
modificare le impostazioni sia della Small Space sia
della Main Space:
- modificare la funzione di cottura agendo sulla
manopola FUNZIONI SMALL SPACE e/o FUNZIONI
MAIN SPACE;
- modificare la temperatura agendo sulla manopola
TEMPERATURA;
- pianificare la durata e lora di fine della cottura;
- interrompere la cottura riportando la manopola
FUNZIONI SMALL SPACE e/o FUNZIONI MAIN
SPACE in posizione 0.
6. In caso di black-out, se la temperatura del forno
non si è abbassata troppo, lapparecchio è dotato di
un sistema che riattiva la funzione dal punto in cui è
stato interrotto. Le pianificazioni in attesa di avvio,
invece, non vengono ripristinate al ritorno della
corrente e devono essere riprogrammate.
Programmare la cottura
La programmazione è possibile solo dopo aver
selezionato una funzione di cottura.
La programmazione è attivabile in tutte le
configurazioni possibili: EXTRALARGE, MAIN e
SMALL SPACE anche in funzionamento
contemporaneo.
Programmare la durata di cottura
1. Premere più volte il tasto finchè non
lampeggiano licona e i tre digit numerici sul
DISPLAY;
2. ruotare la manopola IMPOSTAZIONE TEMPI verso
il + e - per regolare il tempo desiderato;
3. premere nuovamente il tasto per confermare;
4. a tempo scaduto, sul DISPLAY compare la scritta
END, il forno termina la cottura e viene emesso un
segnale acustico.
Esempio: sono le 9:00 e viene programmata una
durata di 1 ora e 15 minuti. La funzione si arresta
automaticamente alle 10:15.
Programmare la fine di una cottura
La programmazione della fine di una cottura è
possibile solo dopo aver impostato una durata di
cottura.
1. Seguire la procedura da 1 a 3 descritta per la
durata;
2. poi premere il tasto finchè non lampeggiano
licona e i due digit numerici sul DISPLAY;
3. ruotare la manopola IMPOSTAZIONE TEMPI verso
il + e - per regolare lora;
4. premere di nuovo il tasto finchè non
lampeggiano gli altri due digit numerici sul

11
IT
Tabella cottura cavità ExtraLarge Space
Funzioni Alimenti Peso
(Kg)
Cottura
su n.
ripiani
Posizione dei ripiani Preriscaldamento Temperatura
consigliata
(°C)
Durata
cottura
(minuti)
N. Leccarda Griglia 1 Griglia 2 Griglia 3
Multicottura* Crostate 1
2
3
4
2 o 3
1 a 2
1
1
3 a 5
3
3
5
5
6
Si
Si
Si
Si
190
180
180
180
25-30
35-45
40-50
45-55
Bignè 1
2
3
4
2 o 3
1 a 2
1
1
3 a 5
3
3
5
5
6
Si
Si
Si
Si
190
190
190
190
25-35
25-35
30-40
30-40
Pizza 1
2
3
4
2 o 3
1 a 2
1
1
3 a 5
3
3
5
5
6
Si
Si
Si
Si
220
220
220
220
15-25
20-30
25-35
30-40
Biscotti 1
2
3
4
2 o 3
1 a 2
1
1
3 a 5
3
3
5
5
6
Si
Si
Si
Si
180
180
180
180
15-25
15-25
20-30
20-30
Pasticci 1
2
3
2 o 3
2
1
5
4
6
Si
SI
Si
200
200
200
30-40
35-45
40-50
Crème Caramel (bagno
maria)
1
2
3
2 o 3
2
1
5
4
6
Si
Si
Si
170
170
170
35-45
35-45
40-50
Panettone 1 1 o 2 Si 160 45-60
Plumcake 1
2
2 o 3
1
4 o 5
Si
Si
160
160
60-75
60-75
Pan di spagna 1
2
3
2 o 3
2
1
5
4
6
Si
Si
Si
190
190
190
30-35
35-40
40-45
Grosso pezzo di carne 1 1 2 Si 160 90-240
Gratin* Arrosto di carne 1 2 3 No 200 35-75
Gratin 1 3 o 4 No 190 40-60
Grosso arrosto 1 1 2 No 200 90-120
Grosso volatile arrosto 1 1 2 No 200 90-120
Barbecue* Costata di manzo 1 3 4 o 5 Si 100% 20-30
Salsicce 1 3 5 a 7 Si 100% 10-20
Costata di maiale 1 3 5 a 7 Si 100% 15-25
Bacon 1 3 5 a 7 Si 100% 3-6
Bassa
temperatura
Lievitazione/
Scongelamento
1 2 No 40
Meringhe bianche 4 1 3 5 6 No 65 8-12 ore**
Carne/Pesce 3 1 3 5 No 90 90-180**
Pane
automatico
Pane (vedi ricetta) 2
2
2
1
2
3
7***
7***
7***
2
1
1
4
3
5
No
No
No
Carne
automatico
Arrosti 1 2 3 No 60-90**
Dolci
automatico
Dolci 1
2
2
2
5
No
No
35-60**
35-60**
Pizza
automatica
Pizza (vedi ricetta) 1
2
3
4
2
2
1
1
5
3
3
5
5
6
No
No
No
No
23-30**
25-35**
30-35**
35-40**
* I tempi di cottura sono indicativi e possono essere modificati in base ai proprio gusti personali. I tempi di preriscaldamento del forno sono preimpostati e non
modificabili manualmente.
** Le durate delle cotture automatiche sono preimpostate. I valori in tabella si riferiscono ai valori di durata minima e massima, modificabile dallutente a partire
dalla durata preimpostata.
*** Come da ricetta, aggiungere 1 50 gr di acqua nella leccarda.
FAST COOKING
Preriscaldare il forno con la leccarda al ripiano 6.
Per le cotture di cibi surgelati fare riferimento alle
indicazioni sulla confezione.

12
IT
Tabella cottura Small Space
Funzioni Alimenti Peso
(Kg)
Cottura
su n.
ripiani
Posizione dei ripiani Preriscaldamento Temperatura
consigliata
(°C)
Durata cottura
(minuti)
N. Leccarda Griglia 1 Divider
Fast
cooking*
Filetti di pesce 1 6 D Si 180-200 20-30
Filetti di carne 1 6 D Si 180-200 30-40
Pizza surgelata 1 6 D Si
Preparazione surgelati 1 6 D Si
Grill Toast 1 - 6-7 D Si 100% 3-5
Bacon 1 6 7 D Si 100% 3-6
Bistecca di maiale 1 6 7 D Si 100% 15-25
* I tempi di cottura s ono indicativi e possono essere modificati in base ai proprio gusti personali. I tempi di preriscaldamento del forno sono preimpostati e non
modificabili manualmente.
Tabella cottura Main Space
Funzioni Alimenti Peso
(Kg)
Cottura
su n.
ripiani
Posizione dei ripiani Preriscaldamento Temperatura
consigliata
(°C)
Durata cottura
(minuti)
N. Leccarda Griglia 1 Divider
Universale* Crostate 1
2
2
1
3
D
D
Si
Si
200
200
30-40
35-45
Bignè 1
2
2
1
3
D
D
Si
Si
190
190
25-35
25-35
Pizza 1
2
2
1
3
D
D
Si
Si
220
220
15-25
20-30
Biscotti 1
2
2
1
3
D
D
Si
Si
180
180
15-25
15-25
Pasticci 1
2
2
1
3
D
D
Si
Si
200
200
30-40
35-45
Crème Caramel (bagno
maria)
1 2 D Si 170 35-45
Plumcake 1 2 D Si 160 60-75
Pan di spagna 1
2
2
1
3
D
D
Si
Si
190
190
30-35
35-40
Piccoli arrosti 1 2 3 D Si 210 30-60
* I tempi di cottura sono indicativi e possono essere modificati in base ai proprio gusti personali. I tempi di preriscaldamento del forno sono preimpostati e non
modificabili manualmente.
Tabella cottura contemporanea Small Space e Main Space
Small Space
Funzioni Alimenti Peso
(Kg)
Cottura
su n.
ripiani
Posizione dei ripiani Preriscaldamento Temperatura
consigliata
(°C)
Durata
cottura
(minuti)
N. Leccarda Griglia 1 Divider
Fast
cooking*
Filetti di pesce 1 6 D Si 200-220 20-30
Filetti di carne 1 6 D Si 200-220 30-40
Pizza surgelata 1 6-7 D Si
Preparazioni surgelati 1 6-7 D Si
Riso pilaf 1 6 D Si 180-200 30-45
Grill Rosolatura 1 6-7 D Si 100% 3-6
Main Space
Funzioni Alimenti Peso
(Kg)
Cottura
su n.
ripiani
Posizione dei ripiani Preriscaldamento Temperatura
consigliata
(°C)
Durata
cottura
(minuti)
N. Leccarda Griglia 1 Divider
Universale* Torte, crostate 1
2
2
1 e 2
3 a 5
D
D
Si
Si
200
200
30-40
35-45
Biscotti 1
2
2
1 e 2
3 a 5
D
D
Si
Si
180
180
15-25
15-25
Crème caramel (bagno
maria)
1 2 D Si 160 45
Pizza 1
2
2
1 e 2
3 a 5
D
D
Si
Si
220
220
15-25
20-30
Gratin di patate 1 2 D Si 200 60
Arrosto 1 2 D Si 200 60-90
Pietanze in crosta 1 2 D Si 200 35-45
* I tempi di cottura sono indicativi e possono essere modificati in base ai proprio gusti personali. I tempi di preriscaldamento del forno sono preimpostati e non
modificabili manualmente.

13
IT
Precauzioni e consigli
! Lapparecchio è stato progettato e costruito in conformità
alle norme internazionali di sicurezza. Queste avvertenze sono
fornite per ragioni di sicurezza e devono essere lette
attentamente.
Sicurezza generale
Lapparecchio è stato concepito per un uso di tipo non
professionale allinterno dellabitazione.
Lapparecchio non va installato allaperto, nemmeno se lo
spazio è riparato, perché è molto pericoloso lasciarlo
esposto a pioggia e temporali.
Per movimentare lapparecchio servirsi sempre delle
apposite maniglie poste sui fianchi del forno.
Non toccare la macchina a piedi nudi o le mani o i piedi
bagnati o umidi.
Lapparecchio deve essere usato per cuocere alimenti,
solo da persone adulte e secondo le istruzioni riportate in
questo libretto.
Durante l'uso dell'apparecchio gli elementi
riscaldanti e alcune parti della porta forno
diventano molto calde. Fare attenzione a non
toccarle e tenere i bambimi a distanza.
Evitare che il cavo di alimentazione di altri elettrodomestici
entri in contatto con parti calde del forno.
Non ostruire le aperture di ventilazione e di smaltimento di
calore.
Impugnare la maniglia di apertura della porta al centro: ai
lati potrebbe essere calda.
Utilizzare sempre guanti da forno per inserire o estrarre
recipienti.
Non rivestire il fondo del forno con fogli di alluminio.
Non riporre materiale infiammabile nel forno: se
lapparecchio viene messo inavvertitamente in funzione
potrebbe incendiarsi.
Assicurarsi sempre che le manopole siano nella posizione
l/¡ quando lapparecchio non è utilizzato.
Non staccare la spina dalla presa della corrente tirando il
cavo, bensì afferrando la spina.
Non fare pulizia o manutenzione senza aver prima staccato
la spina dalla rete elettrica.
In caso di guasto, in nessun caso accedere ai meccanismi
interni per tentare una riparazione. Contattare lAssistenza
(vedi Assistenza).
Non appoggiare oggetti pesanti sulla porta del forno
aperta.
Non è previsto che l'apparecchio venga utilizzato da
persone (bambini compresi) con ridotte capacità fisiche,
sensoriali o mentali, da persone inesperte o che non
abbiano familiarità con il prodotto, a meno che non
vengano sorvegliate da una persona responsabile della
loro sicurezza o non abbiano ricevuto istruzioni preliminari
sull'uso dell'apparecchio.
Evitare che i bambini giochino con l'apparecchio.
Smaltimento
Smaltimento del materiale di imballaggio: attenersi alle
norme locali, così gli imballaggi potranno essere riutilizzati.
La direttiva Europea 2002/96/CE sui rifiuti di
apparecchiature elettriche ed elettroniche (RAEE), prevede
che gli elettrodomestici non debbano essere smaltiti nel
normale flusso dei rifiuti solidi urbani. Gli apparecchi
dismessi devono essere raccolti separatamente per
ottimizzare il tasso di recupero e riciclaggio dei materiali
che li compongono ed impedire potenziali danni per la
salute e lambiente. Il simbolo del cestino barrato è
riportato su tutti i prodotti per ricordare gli obblighi di
raccolta separata.
Per ulteriori informazioni, sulla corretta dismissione degli
elettrodomestici, i detentori potranno rivolgersi al servizio
pubblico preposto o ai rivenditori.
Risparmiare e rispettare lambiente
Azionando il forno negli orari che vanno dal tardo
pomeriggio fino alle prime ore del mattino si collabora a
ridurre il carico di assorbimento delle aziende elettriche. Le
opzioni di pianificazione dei programmi, in particolar modo
la cottura ritardata (vedi Programmi) e la pulizia
automatica ritardata (vedi Manutenzione e cura),
permettono di organizzarsi in tal senso.
Si raccomanda di effettuare sempre le cotture al
BARBECUE e GRATIN a porta chiusa: sia per ottenere
migliori risultati che per un sensibile risparmio di energia
(10% circa).
Mantenere efficienti e pulite le guarnizioni, in modo che
aderiscano bene alla porta e non procurino dispersioni di
calore.
! Questo prodotto soddisfa i requisiti imposti dalla
nuova Direttiva Europea sulla limitazione dei
consumi energetici in standby.
Se non si eseguono operazioni per 2 minuti,
lapparecchio si dispone automaticamente in
modalità standby.
La modalità standby è visualizzata con Icona
Orologio in alta luminosità.
Non appena si interagisce nuovamente con
lapparecchio, il sistema ritorna in modalità
operativa.

14
IT
Manutenzione e cura
Escludere la corrente elettrica
Prima di ogni operazione isolare lapparecchio dalla
rete di alimentazione elettrica.
Pulire lapparecchio
Le parti esterne smaltate o inox e le guarnizioni in
gomma possono essere pulite con una spugnetta
imbevuta di acqua tiepida, e sapone neutro. Se le
macchie sono difficili da asportare usare prodotti
specifici. Si consiglia di sciacquare
abbondantemente e di asciugare dopo la pulizia.
Non usare polveri abrasive o sostanze corrosive.
Linterno del forno va pulito preferibilmente ogni
volta dopo luso, quando è ancora tiepido. Usare
acqua calda e detersivo, risciaquare e asciugare
con un panno morbido. Evitare gli abrasivi.
Gli accessori possono essere lavati come normali
stoviglie, anche in lavastoviglie ad eccezione
delle guide scorrevoli.
Non utilizzare mai pulitori a vapore o ad alta
pressione per la pulizia dellapparecchio.
Pulire la porta
Pulire il vetro della porta con spugne e prodotti non
abrasivi e asciugare con un panno morbido; non
usare materiali ruvidi abrasivi o raschietti metallici
affilati che possono graffiare la superficie e causare
la frantumazione del vetro.
Per una pulizia più accurata è possibile smontare
la porta del forno:
1. aprire completamente la porta (vedi figura);
2. servendosi di un cacciavite, alzare e ruotare le
levette F poste sulle due cerniere (vedi figura);
3. afferrare la porta ai due lati
esterni, richiudendola
lentamente ma non del tutto.
Poi tirare la porta verso di sé
estraendola dalle cerniere
(vedi figura). Rimontare la
porta seguendo il
procedimento in senso
contrario.
Controllare le guarnizioni
Controllare periodicamente lo stato della guarnizione
attorno alla porta del forno. In caso risulti
danneggiata rivolgersi al Centro Assistenza più
vicino (vedi Assistenza). È consigliabile non usare il
forno
fino allavvenuta riparazione.
Sostituire la lampadina
Per sostituire la
lampadina di
illuminazione del
forno:
1. Togliere il
coperchio in vetro
del portalampada.
2. Estrarre la
lampadina e
sostituirla con una
analoga: lampada
alogena tensione 230V, potenza 25 W, attacco G 9.
3. Rimontare il coperchio (vedi figura).
Non toccare direttamente con le mani la lampadina.
Montaggio del Kit Guide Scorrevoli
Per montare le guide
scorrevoli:
1. Togliere i due telai
estraendoli dai distanzieri A
(vedi figura).
2. Scegliere il ripiano in cui
inserire la guida scorrevole.
Facendo attenzione al verso di
estrazione della guida stessa,
posizionare sul telaio prima
lincastro B e poi lincastro C.
3. Fissare i due telai con le
guide montate negli appositi
fori posti sulle pareti del forno
(vedi figura). I fori per il telaio
sinistro sono posizionati in
alto, mentre i fori per quello
destro sono in basso.
4. Infine incastrare i telai sui distanzieri A.
F
A
B
C
Guida
sinistra
Guida
destra
Verso di
estrazione
D
coperchio
lampadina
cavità

15
IT
Attenzione:
Lapparecchio è dotato di un sistema di diagnostica automatica che consente di rilevare eventuali
malfunzionamenti. Questi vengono comunicati dal display tramite messaggi del tipo: F seguito da numeri.
In questi casi è necessario lintervento dellassistenza tecnica.
Non ricorrere mai a tecnici non autorizzati.
Comunicare:
Il tipo di anomalia;
Il modello della macchina (Mod.)
Il numero di serie (S/N)
Queste ultime informazioni si trovano sulla targhetta caratteristiche posta sullapparecchio
Assistenza attiva 7 giorni su 7
In caso di necessità dintervento chiamare il Numero Unico Nazionale 199.199.199*.
Un operatore sarà a completa disposizione per fissare un appuntamento con il Centro Assistenza Tecnico
Autorizzato più vicino al luogo da cui si chiama.
È attivo 7 giorni su 7, sabato e domenica compresi, e non lascia mai inascoltata una richiesta.
*Al costo di 14,26 centesimi di Euro al minuto(iva inclusa) dal Lun. al Ven. dalle 08:00 alle 18:30, il Sab. dalle 08:00 alle
13:00 e di 5,58 centesimi di Euro al minuto (iva inclusa) dal Lun. al Ven. dalle 18:30 alle 08:00, il Sab. dalle 13:00 alle
08:00 e i giorni festivi, per chi chiama da telefono fisso.
Per chi chiama da radiomobile le tariffe sono legate al piano tariffario delloperatore telefonico utilizzato.
Le suddette tariffe potrebbero essere soggette a variazione da parte delloperatore telefonico; per maggiori informazioni
consultare il sito www.aristonchannel.com.
Assistenza

OS 89D IX/HA
OS 99D C IX/HA
OS 997D C IX/HA
OS 992D C IX/HA
OS 99D C /HA
OSQ 99D C /HA
Contents
Installation, 17-18
Positioning
Electrical connection
Technical data
Description of the appliance, 19
Overall view
Control panel
Display
Oven structure, 20
Start-up and use, 21-27
Setting the clock
Setting the timer
ExtraLarge Space
Small Space
Main Space
Using the Small Space and Main Space at the same
time
Programming cooking
Practical cooking advice
Cooking advice table for ovens with the ExtraLarge
Space feature
Cooking advice table for the Small Space feature
Cooking advice table for the Main Space feature
Cooking advice table for using the Small Space and
Main Space at the same time
Precautions and tips, 28
General safety
Disposal
Respecting and conserving the environment
Care and maintenance, 29
Switching the appliance off
Cleaning the appliance
Cleaning the oven door
Replacing the light bulb
Assembling the sliding rack kit
Assistance, 30
Operating Instructions
OVEN
GB
Italiano, 1 Français, 31
Espanol, 46 Portuges, 61
English,16
IT
GB
FR
ES PT

17
GB
Ventilation
To ensure adequate ventilation is provided, the back
panel of the cabinet must be removed. It is
advisable to install the oven so that it rests on two
strips of wood, or on a completely flat surface with
an opening of at least 45 x 560 mm (see diagrams).
Centring and fixing
Position the 4 tabs on the side of the oven so that
they are aligned with the 4 holes on the outer frame.
Adjust the tabs in accordance with the thickness of
the cabinet side panel, as shown below:
20 mm thick: take off the
removable part of the tab (see
diagram).
18 mm thick: use the first
groove, which has already
been set in the factory (see
diagram).
16 mm thick: use the second
groove (see diagram).
Secure the appliance to the cabinet by opening the
oven door and inserting 4 screws into the 4 holes on
the outer frame.
All parts which ensure the safe operation of the
appliance must not be removable without the aid of
a tool.
Before operating your new appliance please read
this instruction booklet carefully. It contains
important information concerning the safe operation,
installation and maintenance of the appliance.
Please keep these operating instructions for future
reference. Pass them on to any new owners of the
appliance.
Positioning
Keep all packaging material out of reach of
children. It may present a choking or suffocation
hazard (see Precautions and tips).
The appliance must be installed by a qualified
professional in accordance with the instructions
provided. Incorrect installation may damage
property or cause harm to people or animals.
Built-in appliance
Use a suitable cabinet to ensure that the appliance
functions properly.
The panels adjacent to the oven must be made of
heat-resistant material.
Cabinets with a veneer exterior must be
assembled with glues which can withstand
temperatures of up to 100°C.
To install the oven under the counter (see
diagram) or in a kitchen unit, the cabinet must
have the following dimensions:
The appliance must not come into contact with
electrical parts once it has been installed.
The indications for consumption given on the data
plate have been calculated for this type of
installation.
595 mm.
595 mm.
24 mm.
545 mm.
5 mm.
576 mm.
23 mm.
593 mm.
45 mm.
558 mm.
547 mm. min.
Installation
560 mm.
45 mm.

18
GB
Electrical connection
Ovens equipped with a three-pole power supply
cable are designed to operate with alternating
current at the voltage and frequency indicated on
the data plate located on the appliance (see below).
Fitting the power supply cable
1. Open the terminal
board by inserting a
screwdriver into the
side tabs of the cover.
Use the screwdriver as
a lever by pushing it
down to open the cover
(see diagram).
2. Install the power
supply cable by
loosening the cable
clamp screw and the
three wire contact
screws L-N- .
Connect the wires to
the corresponding
terminals: the Blue wire
to the terminal marked
(N), the Brown wire to
the terminal marked (L)
and the Yellow/Green
wire to the terminal
marked (see diagram).
3. Secure the cable by fastening the clamp screw.
4. Close the cover of the terminal board.
Connecting the electricity supply cable to the
mains
Install a standardised plug corresponding to the
load indicated on the data plate (see table).
The appliance must be directly connected to the mains
using an omnipolar switch with a minimum contact
opening of 3 mm installed between the appliance and
the mains. The switch must be suitable for the charge
indicated and must comply with current electrical
regulations (the earthing wire must not be interrupted
by the switch). The supply cable must be positioned
so that it does not come into contact with temperatures
higher than 50°C at any point.
The installer must ensure that the correct electrical
connection has been made and that it is fully
compliant with safety regulations.
Before connecting the appliance to the power
supply, make sure that:
The appliance is earthed and the plug is compliant
with the law.
The socket can withstand the maximum power of
the appliance, which is indicated on the data
plate (see below).
The voltage is in the range between the values
indicated on the data plate (see below).
The socket is compatible with the plug of the
appliance. If the socket is incompatible with the
plug, ask an authorised technician to replace it.
Do not use extension cords or multiple sockets.
Once the appliance has been installed, the power
supply cable and the electrical socket must be
easily accessible.
The cable must not be bent or compressed.
The cable must be checked regularly and replaced
by authorised technicians only (see Assistance).
The manufacturer declines any liability should
these safety measures not be observed.
N
L
APPLIANCE SPECIFICATIONS
ExtraLarge
Space
dimensions
width 43.4 cm
height 39.5 cm
depth 40.8 cm
ExtraLarge
Space volume
70 l
ExtraLarge
Space
ENERGY
LABEL
Directive 2002/40/EC on the label of
electric ovens.
Standard EN 50304
Declared energy consumption for
Forced convection Class – heating
mode:
Gratin.
Electrical
connections
voltage: 220 - 240 V~ 50 Hz maximum
power absorbed 2600 W (see data
plate)
This appliance conforms to the
following European Economic
Community directives: 2006/95/EEC
dated 12/12/06 (Low Voltage) and
subsequent amendments -
2004/108/EEC dated 15/12/04
(Electromagnetic Compatibility) and
subsequent amendments - 93/68/EEC
dated 22/07/93 and subsequent
amendments. 2002/96/EEC and
subsequent amendments.
1275/2008 stand-by/off mode.

19
GB
Control panel
RACK shelf
DRIPPING PAN shelf
GUIDE RAILS
for the sliding racks
position 5
position 4
position 3
position 7
position 6
Divider "D" position
position 2
position 1
DIVIDER shelf
Description of
the appliance
Overall view
Control panel
Display
EXTRALARGE
SPACE FUNCTION
knob
SET
TEMPERATURE/TIMER
knob
DISPLAY
SET TIMER
button
SELECT RECESS
button
MAIN SPACE
FUNCTION
knob
SMALL SPACE
FUNCTION
knob
¡•OC
•• ••
:
¡•OC
•• ••
:
TEMPERATURE and
TIME numerical digits
END OF COOKING
icon
DURATION
icon
TIMER icon
RECESS
SELECTED
icon

20
GB
The Openspace oven has a capacity of 70 litres and
offers users the option of cooking on 4 shelves at
the same time or cooking large quantities, which
would not necessarily be possible in a traditional
oven.
Thanks to the ExtraLarge Space, Openspace offers
10 cooking functions, 6 of which are universal and
suitable for any type of cooking, while the remaining
4 are automatic programmes which can be used to
achieve perfect results for any recipe.
Openspace also offers maximum comfort for all
requirements, with 4 different operating options: the
oven is one large compartment but can be divided
into separate spaces of various sizes, each with its
Oven structure
own independent temperature and duration controls.
This is made possible thanks to the heat-insulating
DIVIDER, which divides the whole ExtraLarge Space
into two different-sized spaces: the Main Space and
the Small Space.
The two Main and Small Space compartments may
be used at the same time to cook different dishes
more quickly, or they may be used separately so
that only the space necessary is used.
When the two compartments are used at the same
time, the cooking temperature of each may be
adjusted to a value between 50° and 250°. There
may be a difference in temperature of 100° between
the two zones, which means it is possible to cook
very different dishes without any flavours or aromas
intermingling.
RACK
DRIPPING PAN
RACK
RACK
EXTRALARGE
SPACE
ExtraLarge Space: cooking on 4 shelf levels
RACK or DRIPPING PAN
DRIPPING PAN
(cooking on 3 shelves)
Divider "D" (fixed position)
RACK (cooking on 3 shelves)
RACK (cooking on 3 shelves)
SMALL
SPACE
MAIN
SPACE
DRIPPING PAN
(cooking on 3 shelves)
Divider "D" (fixed position)
RACK (cooking on 3 shelves)
RACK (cooking on 3 shelves)
SMALL
SPACE
MAIN
SPACE
Main and Small Space: simultaneous operation
RACK or DRIPPING PAN
Divider "D"
(fixed position)
SMALL
SPACE
MAIN
SPACE
Cooking using the Small Space only Cooking using the Main Space only: cooking on 3 shelf levels
The table below lists the possible temperature
values which may be set. The intelligent display will
guide you through the correct procedure used to
adjust the temperature of the two recesses.
To cancel any of the settings, simply turn the Small Space or Main Space function knob to the "0"
position.
Temperature in the first cavity
(Main or Small Space)
Temperature in the second cavity
(Small or Main Space)
Between 40°C and 150°C The temperature difference in relation to the first recess
selected is no greater than 50°C
For example: if you set one recess to 90°C,
you may set a value of between 40°C (90°C-50°C) and 140°C (90°C+50°C) for the other.
Between 155°C and 200°C The temperature difference in relation to the first recess
selected is no greater than 70°C
For example: if you set one recess to 180°C,
you may set a value of between 110°C (180°C-70°C) and 250°C (180°C+70°C) for the other.
Between 205°C and 250°C The temperature difference in relation to the first recess
selected is no greater than 100°C
For example: if you set one recess to 210°C,
you may set a value of between 110°C (210°C-100°C) and 250°C (maximum temperature setting) for the other.

21
GB
The first time you use your appliance, heat the empty
oven with its door closed at its maximum temperature for
at least half an hour. Make sure that the room is well
ventilated before switching the oven off and opening the
oven door. The appliance may emit a slightly unpleasant
odour caused by protective substances used during the
manufacturing process burning away.
Never put objects directly on the bottom of the oven; this
will prevent the enamel coating from being damaged.
Always place cookware on the racks provided.
During use, we suggest removing any crockery or
delicate foodstuffs from the recesses not in function.
We suggest not opening the door when cooking
foodstuffs which require leavening, so as to not
compromise cooking results.
If the door is subject to repeated jerking, the divider may
come out of its housing. If this happens, the time will
appear on the display. Make sure that the divider is
correctly installed then re-start cooking.
Cooling ventilation
In order to cool down the external temperature of the oven,
a cooling fan blows a stream of air between the control
panel and the oven door.
Once cooking is completed, the cooling fan activates
and deactivates automatically until the oven has cooled
down sufficiently.
Setting the clock
This may only be set while the oven is switched off.
1. Press the button until the first numerical digit flashes
on the display and the , and icons are switched
off.
2. Turn the TIMER KNOB towards + and - to adjust
the hour value.
3. Press the button again so that the other two
numerical digits on the DISPLAY begin to flash.
4. Turn the TIMER KNOB towards + and - to adjust
the minute value.
5. Press the button again to confirm.
Setting the timer
This function does not interrupt cooking and does not
affect the oven; it is simply used to activate the buzzer
when the set amount of time has elapsed.
1. Press the button until the icon and the three
digits on the DISPLAY begin to flash.
2. Turn the TIMER KNOB towards + and - to adjust
the minute value.
3. Press the button again to confirm.
The display will then show the time as it counts down.
When this period of time has elapsed the buzzer will be
activated.
ExtraLarge Space
Starting the oven
1. Select the desired cooking function by turning the
EXTRALARGE SPACE FUNCTION knob. If the icon
on the display is lit, this indicates that the ExtraLarge
Space has been selected and therefore that only the
settings corresponding to the ExtraLarge Space may be
used.
2. The oven will begin its preheating stage. The
temperature may be changed by turning the
TEMPERATURE knob. The indicator light flashes
during the pre-heating stage.
3. Once the pre-heating stage is completed, the icon
stops flashing (becomes fixed) and a buzzer sounds. It is
now possible to introduce foodstuffs into the oven.
4. During cooking it is always possible to:
- Change the cooking function by turning the
EXTRALARGE SPACE FUNCTION knob.
- Adjust the temperature using the TEMPERATURE knob
(for the universal cooking functions only).
- Set a duration (for universal cooking functions only) and
the cooking end time.
- Stop cooking by turning the EXTRALARGE SPACE
FUNCTION knob to the 0 position.
5. If a blackout occurs while the oven is already in
operation, an automatic system within the appliance will
reactivate the cooking function from the point at which it
was interrupted, as long as the temperature has not
dropped below a certain level. Programmed cooking
modes which have not started will not be restored and
must be reprogrammed.
When using the oven in its ExtraLarge configuration, it
will not be possible to use the Main and Small Space
features: the SMALL SPACE and MAIN SPACE
FUNCTION knobs will be disabled.
Universal cooking functions
All functions have a default cooking temperature which
may be adjusted manually to a value between 40°C and
250°C as desired.
For the BARBECUE function, the default power level value
is indicated as a percentage (%) and may also be
adjusted manually.
Start-up and use

22
GB
Automatic cooking functions
The temperature and cooking duration are pre-set
values, guaranteeing a perfect result every time -
automatically. These values are set using the C.O.P.®
(Programmed Optimal Cooking) system. The cooking
cycle stops automatically and the oven indicates when
the dish is cooked. The cooking duration may be modified
by a period of several minutes, as specified in the
description of the individual functions below.
ROAST function
Use this function to cook veal, pork, lamb and beef. Place
the food inside the oven while it is still cold. The dish may
also be placed in a preheated oven. It will only be
possible to adjust the duration by -10/+10 minutes.
BAKED CAKES function
This function is ideal for baking cakes. Place the food
inside the oven while it is still cold. The dish may also be
placed in a preheated oven. It will only be possible to
adjust the duration by -10/+15 minutes.
BREAD function
Use this function to make bread. Please see the following
chapter for the recipe and further details.
To achieve the best possible results, we recommend that
you carefully observe the instructions below:
Follow the recipe.
Remember to pour 150 g (150 ml) of cold water into
the baking tray, which should be placed in position
7.
Place the food inside the oven while it is still cold. If you
wish to place the food in the oven after it has been
preheated, immediately following a high-temperature
cooking programme, the text Hot will appear on the
display until the temperature of the oven has fallen to 40°.
At this point it will be possible to place the bread in the
oven.
PIZZA function
Use this function to make pizza. Please see the following
chapter for further details. It will only be possible to adjust
the duration by -5/+12 minutes.
To achieve the best possible results, we recommend that
you carefully observe the instructions below:
Follow the recipe.
The weight of the dough should be between 350 g and
500 g.
Lightly grease the dripping pan and the baking trays.
Place the food inside the oven while it is still cold. If you
wish to place the food in the oven after it has been
preheated, immediately following a high-temperature
MULTILEVEL function
All heating elements and the fan are activated. Since the heat
remains constant throughout the oven, the air cooks and
browns food in a uniform manner. A maximum of four racks
may be used at the same time. If you are using several
racks at the same time, we recommend you place the
dripping pan on the lower rack. If you are cooking on 4 levels
at the same time, we recommend you place the shelves on
racks 3, 5 and 6 and the dripping pan on rack 1.
GRATIN function
The top heating element and the rotisserie spit (where
present) are activated and the fan begins to operate.
During part of the cycle the circular heating element is
also activated. This combination of features increases the
effectiveness of the unidirectional thermal radiation
provided by the heating elements through the forced
circulation of the air throughout the oven.
This helps prevent food from burning on the surface and
allows the heat to penetrate right into the food. Always
cook in this mode with the oven door closed.
BARBECUE function
The top heating element and the rotisserie spit (where
present) are activated. By turning the TEMPERATURE
knob, the different power levels which may be set will
appear on the display; these range between 5% and
100%. The high and direct temperature of the grill is
recommended for food which requires a high surface
temperature. Always cook in this mode with the oven door
closed.
LOW TEMPERATURE function
This type of cooking can be used for proving, defrosting,
preparing yoghurt, heating dishes at the required speed
and slow cooking at low temperatures. The temperature
options are: 40, 65 and 90 °C.
Spit roast (only available in certain models)
To operate the spit roast
function (see diagram)
proceed as follows:
1. Place the dripping pan
in position 1.
2. Place the rotisserie
support in position 3 and
insert the spit in the hole
provided on the back
panel of the oven.
3. Begin spit roast
operation by selecting the or functions.

23
GB
cooking programme, the text Hot will appear on the
display until the temperature of the oven has fallen to
120°. At this point it will be possible to place the pizza in
the oven.
Recipe for PIZZA:
Makes 3 or 4 pizzas: 1000 g flour, 500 ml water, 20 g salt,
20 g sugar, 100 ml olive oil, 20 g fresh yeast (or 2 sachets
of powder yeast)
Leavening at room temperature: 1 hour, or LOW
TEMPERATURE manual function set to 40°. Leave to
rise for approximately 30-45 minutes.
Place the food inside the oven while it is still cold.
Start the PIZZA cooking mode.
Recipe for BREAD (maximum amount of dough):
Ingredients:
1.3 kg flour
700 g water
25 g salt
50 g fresh bakers yeast or 4 sachets dried yeast
powder.
Method:
Mix the flour and salt in a large bowl.
Dilute the yeast in lukewarm water (approximately 35
degrees).
Make a small well in the mound of flour.
Pour in the water and yeast mixture.
Knead the dough by stretching and folding it over itself
with the palm of your hand for 10 minutes, until it has a
uniform consistency and is not too sticky.
Form the dough into a ball shape, place it in a large
bowl and cover it with transparent plastic wrap to
prevent the surface of the dough from drying out. Place
the bowl in the oven, set to 40° using the LOW
TEMPERATURE manual function, and leave to rise for
approximately 3045 minutes. Alternatively, leave at
room temperature for approximately 1 hour (until the
dough has doubled in volume).
Break up the dough, kneading gently, and divide it to
create several loaves.
Place them on a sheet of baking paper (cut to the same
size as the inside of the dripping pan) on top of the
rack (or on 2 or 3 racks if you wish to cook the loaves
on different shelves) and dust them lightly with flour.
Make a few incisions in the top using a sharp blade.
Place the rack in the oven, on shelf level 2 if using only
one level, or place two racks on shelf levels 1 and 4 if
using two levels, or place three racks on shelf levels 1,
3 and 5 if using three levels.
Place the dripping pan on shelf level 7 and pour in
150 g cold water.
Place the food inside the oven while it is still cold.
Start the automatic function BREAD.
When the cooking process has finished, leave the
loaves to rest on the rack until they have completely
cooled.
Small Space
Starting the oven
1. Fit the DIVIDER to the DIVIDER shelf "D" using the pin,
with the arrows turned towards the rear part of the oven.
After it has been fitted correctly, you will be able to read
the text OPENSPACE on the front part of the DIVIDER
frame. A buzzer will sound to confirm that the DIVIDER
has been fitted correctly; it will then be possible to use the
two Main and Small space compartments separately or at
the same time.
The EXTRALARGE SPACE FUNCTION knob will be
disabled.
2. Select the desired cooking function by turning the
SMALL SPACE FUNCTION knob.
3. The oven will begin its preheating stage. The
temperature may be changed by turning the
TEMPERATURE knob. The indicator light flashes
during the pre-heating stage.
4. Once the pre-heating stage is completed, the icon
stops flashing (becomes fixed) and a buzzer sounds. It is
now possible to introduce foodstuffs into the oven.
5. During cooking it is always possible to:
- Change the cooking function by turning the SMALL
SPACE FUNCTION knob.
- Change the temperature by turning the TEMPERATURE
knob.
- Set the cooking duration in addition to the cooking end
time.
- Stop cooking by turning the SMALL SPACE FUNCTION
knob to the 0 position.
6. If a blackout occurs while the oven is already in
operation, an automatic system within the appliance will
reactivate the cooking function from the point at which it
was interrupted, as long as the temperature has not
dropped below a certain level. Programmed cooking
modes which have not started will not be restored and
must be reprogrammed.
Cooking functions
GRILL function
The top heating element is activated. By turning the
TEMPERATURE knob, the different power levels which
may be set will appear on the display; these range
between 5% and 100%. The high and direct temperature

24
GB
of the grill is recommended for food which requires a high
surface temperature. This function is particularly suitable
for browning food, cooking gratins, colouring meringues,
making toasted sandwiches and grilling small quantities
of thin, lean meat. Always cook in this mode with the oven
door closed.
FAST COOKING function
This function requires the oven to be preheated. This
function is particularly suitable for cooking pre-packed
food quickly (frozen or pre-cooked).
Main Space
Starting the oven
1. Fit the DIVIDER to the DIVIDER shelf "D" using the pin,
with the arrows turned towards the rear part of the oven.
After it has been fitted correctly, you will be able to read
the text OPENSPACE on the front part of the DIVIDER
frame. A buzzer will sound to confirm that the DIVIDER
has been fitted correctly; it will then be possible to use the
two Main and Small space compartments separately or at
the same time.
The EXTRALARGE SPACE FUNCTION knob will be
disabled.
2. Select the desired cooking function by turning the
MAIN SPACE FUNCTION knob.
3. The oven will begin its preheating stage. The
temperature may be changed by turning the
TEMPERATURE knob. The indicator light flashes
during the pre-heating stage.
4. Once the pre-heating stage is completed, the icon
stops flashing (becomes fixed) and a buzzer sounds. It is
now possible to introduce foodstuffs into the oven.
5. During cooking it is always possible to:
- Change the temperature by turning the TEMPERATURE
knob.
- Set the cooking duration in addition to the cooking end
time.
- Stop cooking by turning the MAIN SPACE FUNCTION
knob to the 0 position.
6. If a blackout occurs while the oven is already in
operation, an automatic system within the appliance will
reactivate the cooking function from the point at which it
was interrupted, as long as the temperature has not
dropped below a certain level. Programmed cooking
modes which have not started will not be restored and
must be reprogrammed.
Cooking functions
UNIVERSAL function
All heating elements and the fan are activated. Since the
heat remains constant throughout the oven, the air cooks
and browns food in a uniform manner. A maximum of
three racks may be used at the same time. If you are using
several racks at the same time, we recommend you place
the dripping pan on shelf level 1. If you are cooking on 3
levels at the same time, we recommend you place the
shelves on racks 3 and 5, and the dripping pan on rack 1.
Using the Small Space and Main Space at the
same time
Starting the oven
1. Fit the DIVIDER to the DIVIDER shelf "D" using the pin,
with the arrows turned towards the rear part of the oven.
After it has been fitted correctly, you will be able to read
the text OPENSPACE on the front part of the DIVIDER
frame. A buzzer will sound to confirm that the DIVIDER
has been fitted correctly; it will then be possible to use the
two Main and Small space compartments separately or at
the same time.
The EXTRALARGE SPACE FUNCTION knob will be
disabled.
In order to improve the ovens energy efficiency, the pre-
heating time of the SMALL SPACE cavity lasts about 15
minutes.
If the MAIN SPACE is set at a temperature below 150°C,
in order to safeguard the cooking results, the grill function
will not start: the display will visualise OFF.
2. Select the desired cooking function for each recess by
turning the SMALL SPACE FUNCTION and/or MAIN
SPACE FUNCTION knobs. The icon indicates that the
Small Space has been selected and that it is therefore
possible to adjust the Small Space settings; the icon
lit up on the display indicates that the Main Space has
been selected and that it is therefore possible to adjust
the Main Space settings.
3. Both ovens will begin the preheating stage. The
temperature may be changed by turning the
TEMPERATURE knob. The indicator light flashes
during the pre-heating stage.
4. Once the pre-heating stage is completed, the icon
stops flashing (becomes fixed) and a buzzer sounds. It is
now possible to introduce foodstuffs into the oven.
5. The digits on the display become brighter to indicate
which recess you are adjusting. To modify the settings for
the other recess, press the button. The Small Space
and Main Space settings may actually be changed during
simultaneous cooking:

25
GB
6. Press the button again to confirm.
7. When the set time has elapsed, the text END appears
on the DISPLAY, the oven will stop cooking and a buzzer
sounds.
Programming has been set when the and icons
flash. The DISPLAY shows the cooking end time and the
cooking duration alternately.
To cancel programming, turn the FUNCTION knob to the
0 position.
Practical cooking advice
MULTILEVEL
Use positions 1, 3, 5 and 6.
Place the dripping pan at the bottom and the rack at
the top.
BARBECUE
Preheat the oven for 5 minutes.
Keep the oven door closed when cooking in this mode.
Place the dripping pan on shelf level 3. Place the rack
in a position between 4 and 7, depending on how bulky
the food is, and make sure the food is in the centre of
the rack. Examples: beef ribs should be cooked on
shelf level 4 and bacon on shelf level 6 or 7.
PIZZA or FOCACCIA
Use a light aluminium tray with a maximum diameter of
30 cm, placing it on top of the rack supplied.
If the pizza has a lot of toppings, we recommend
adding the mozzarella cheese on top of the pizza
halfway through the cooking process.
GRILL
Preheat the oven for 5 minutes.
Fit the DIVIDER to the DIVIDER rack D.
Keep the oven door closed when cooking in this mode.
Place the rack in position 7. Position the food in the
centre of the rack. Position the dripping pan on shelf
level 6.
This function is particularly suitable for browning food,
cooking gratins, colouring meringues, making toasted
sandwiches and grilling small quantities of thin, lean
meat.
We recommend that the power level is set to
maximum. The top heating element is regulated by a
thermostat and may not always operate constantly.
- Change the cooking function by turning the SMALL
SPACE FUNCTION and/or MAIN SPACE FUNCTION
knob.
- Change the temperature by turning the TEMPERATURE
knob.
- Set the cooking duration in addition to the cooking end
time.
- Stop cooking by turning the SMALL SPACE FUNCTION
and/or MAIN SPACE FUNCTION knob to the 0 position.
6. If a blackout occurs while the oven is already in
operation, an automatic system within the appliance will
reactivate the cooking function from the point at which it
was interrupted, as long as the temperature has not
dropped below a certain level. Programmed cooking
modes which have not started will not be restored and
must be reprogrammed.
Programming cooking
A cooking function must be selected before
programming can take place.
Programming is possible in all oven configurations:
EXTRALARGE, MAIN and SMALL SPACE, even if the
latter two are being used simultaneously.
Programming the cooking duration
1. Press the button several times until the icon and
the three digits on the DISPLAY begin to flash.
2. Turn the TIMER KNOB towards + and - to adjust the
duration.
3. Press the button again to confirm.
4. When the set time has elapsed, the text END appears
on the DISPLAY, the oven will stop cooking and a buzzer
sounds.
For example: it is 9:00 a.m. and a time of 1 hour and 15
minutes is programmed. The function will stop
automatically at 10:15 a.m.
Setting the end time for a cooking mode
A cooking duration must be set before the cooking end
time can be scheduled.
1. Follow steps 1 to 3 to set the duration as detailed
above.
2. Next, press the button until the icon and the
three numerical digits on the DISPLAY begin to flash.
3. Turn the TIMER KNOB towards + and - to adjust
the hour value.
4. Press the button again so that the other two
numerical digits on the DISPLAY begin to flash.
5. Turn the TIMER KNOB towards + and - to adjust
the minute value.

26
GB
Cooking advice table for ovens with an ExtraLarge Space cavity
Cook on
no. of
shelves
Rack position
Function Foods Weight
(in kg)
No. Dripping
pan Rack 1 Rack 2 Rack 3
Preheating Recommended
temperature
(°C)
Cooking
duration
(minutes)
Pies / Tarts
1
2
3
4
2 or 3
1 to 2
1
1
3 to 5
3
3
5
5
6
Yes
Yes
Yes
Yes
180
180
180
180
30-40
35-45
40-50
45-55
Cream puffs
1
2
3
4
2 or 3
1 to 2
1
1
3 to 5
3
3
5
5
6
Yes
Yes
Yes
Yes
190
190
190
190
25-35
25-35
30-40
30-40
Pizza
1
2
3
4
2 or 3
1 to 2
1
1
3 to 5
3
3
5
5
6
Yes
Yes
Yes
Yes
220
220
220
220
15-25
20-30
25-35
30-40
Biscuits
1
2
3
4
2 or 3
1 to 2
1
1
3 to 5
3
3
5
5
6
Yes
Yes
Yes
Yes
180
180
180
180
15-25
15-25
20-30
20-30
Pastries
1
2
3
2 or 3
2
1
5
4
6
Yes
Yes
Yes
200
200
200
30-40
35-45
40-50
Crème caramel
(bain-marie)
1
2
3
2 or 3
2
1
5
4
6
Yes
Yes
Yes
170
170
170
35-45
35-45
40-50
Panettone 1 1 or 2 Yes 160 45-60
Sponge cake made
with yoghurt
1
2
2 or 3
1
4 or 5
Yes
Yes
160
160
60-75
60-75
Sponge cake
1
2
3
2 or 3
2
1
5
4
6
Yes
Yes
Yes
190
190
190
30-35
35-40
40-45
Multilevel*
Large cut of meat 1 1 2 Yes 160 90-240
Rotisserie 1 2 3 No 200 35-75
Gratin 1 3 or 4 No 190 40-60
Large roast 1 1 2 No 200 90-120
Gratin*
Large roast game 1 1 2 No 200 90-120
Beef ribs 1 3 4 or 5 Yes 100% 20-30
Sausages 1 3 5 to 7 Yes 100% 10-20
Pork ribs 1 3 5 to 7 Yes 100% 15-25
Barbecue*
Bacon 1 3 5 to 7 Yes 100% 3-6
Proving / Defrosting 1 2 No 40
White meringues 4 1 3 5 6 No 65 8-12 hours**
Low
temperature
Meat / Fish 3 1 3 5 No 90 90-180**
Automatic
bread Bread (see recipe)
2
2
2
1
2
3
7***
7***
7***
2
1
1
4
3
5
No
No
No
Automatic
roast Roasts 1 2 3 No 60-90**
Automatic
baked
cakes
Desserts
1
2
2
2
5
No
No
35-60**
35-60**
Automatic
pizza Pizza (see recipe)
1
2
3
4
2
2
1
1
5
3
3
5
5
6
No
No
No
No
23-30**
25-35**
30-35**
35-40**
* The cooking times listed above are intended as guidelines only and may be modified according to personal tastes. Oven preheating times are set
as standard and may not be modified manually.
** The duration of the automatic cooking functions are set by default. The values in the table refer to the minimum and maximum duration, which
may be modified by the user, taking the default value as a starting point.
*** As stated in the recipe, pour 150
g
water into the drippin
g
pan.
FAST COOKING
Preheat the oven, making sure the dripping pan is on
shelf level 6.
When cooking frozen foods, always follow the
instructions on the packaging.

27
GB
Cooking advice table for the Small Space feature
Function Foods Weight
(in kg)
Cook on
no. of
shelves
Rack position Preheating Recommended
temperature
(°C)
Cooking
duration
(minutes)
No. Dripping
pan
Rack 1 Divider
Fast
cooking*
Fish fillets 1 6 D Yes 180-200 20-30
Meat fillets 1 6 D Yes 180-200 30-40
Frozen pizza 1 6 D Yes
Frozen prepared foods 1 6 D Yes
Grill Toast 1 - 6-7 D Yes 100% 3-5
Bacon 1 6 7 D Yes 100% 3-6
Pork steaks 1 6 7 D Yes 100% 15-25
* The cooking times listed above are intended as guidelines only and may be modified in accordance with personal tastes. Oven preheating times
are set as standard and may not be modified manually.
Cooking advice table for the Main Space feature
Function Foods Weight
(in kg)
Cook on
no. of
shelves
Rack position Preheating Recommended
temperature
(°C)
Cooking
duration
(minutes)
No. Dripping
pan
Rack 1 Divider
Universal* Pies / Tarts 1
2
2
1
3
D
D
Yes
Yes
200
200
30-40
35-45
Cream puffs 1
2
2
1
3
D
D
Yes
Yes
190
190
25-35
25-35
Pizza 1
2
2
1
3
D
D
Yes
Yes
220
220
15-25
20-30
Biscuits 1
2
2
1
3
D
D
Yes
Yes
180
180
15-25
15-25
Pastries 1
2
2
1
3
D
D
Yes
Yes
200
200
30-40
35-45
Crème caramel (bain-
marie)
1 2 D Yes 170 35-45
Sponge cake made
with yoghurt
1 2 D Yes 160 60-75
Sponge cake 1
2
2
1
3
D
D
Yes
Yes
190
190
30-35
35-40
Small roasting joints 1 2 3 D Yes 210 30-60
* The cooking times listed above are intended as guidelines only and may be modified in accordance with personal tastes. Oven preheating times
are set as standard and may not be modified manually.
Cooking advice table for using the Small Space and Main Space at the same time
Small Space
Function Foods Weight
(in kg)
Cook on
no. of
shelves
Rack position Preheating Recommended
temperature
(°C)
Cooking
duration
(minutes)
No. Dripping
pan
Rack 1 Divider
Fast
cooking*
Fish fillets 1 6 D Yes 200-220 20-30
Meat fillets 1 6 D Yes 200-220 30-40
Frozen pizza 1 6-7 D Yes
Frozen prepared foods 1 6-7 D Yes
“Pilaf” rice 1 6 D Yes 180-200 30-45
Grill Browning 1 6-7 D Yes 100% 3-6
Main Space
Function Foods Weight
(in kg)
Cook on
no. of
shelves
Rack position Preheating Recommended
temperature
(°C)
Cooking
duration
(minutes)
No. Dripping
pan
Rack 1 Divider
Universal* Cakes, pies / tarts 1
2
2
1 and 2
3 to 5
D
D
Yes
Yes
200
200
30-40
35-45
Biscuits 1
2
2
1 and 2
3 to 5
D
D
Yes
Yes
180
180
15-25
15-25
Crème caramel (bain-
marie)
1 2 D Yes 160 45
Pizza 1
2
2
1 and 2
3 to 5
D
D
Yes
Yes
220
220
15-25
20-30
Potato gratin 1 2 D Yes 200 60
Roasting joint 1 2 D Yes 200 60-90
Dishes with pastry
crust
1 2 D Yes 200 35-45
* The cooking times listed above are intended as guidelines only and may be modified in accordance with personal tastes. Oven preheating times
are set as standard and ma
y
not be modified manuall
y
.

28
GB
Precautions and tips
This appliance has been designed and
manufactured in compliance with international safety
standards. The following warnings are provided for
safety reasons and must be read carefully.
General safety
The appliance was designed for domestic use
inside the home and is not intended for
commercial or industrial use.
The appliance must not be installed outdoors, even
in covered areas. It is extremely dangerous to
leave the appliance exposed to rain and storms.
When moving or positioning the appliance, always
use the handles provided on the sides of the
oven.
Do not touch the appliance with bare feet or with
wet or damp hands and feet.
The appliance must be used by adults only for the
preparation of food, in accordance with the
instructions provided in this booklet.
Do not touch the heating elements or certain parts of
the oven door when the appliance is in use; these
parts become extremely hot. Keep children well
away from it and do not touch the hot parts yourself.
Make sure that the power supply cables of other
electrical appliances do not come into contact
with the hot parts of the oven.
The openings used for the ventilation and
dispersion of heat must never be covered.
Always grip the oven door handle in the centre:
the ends may be hot.
Always use oven gloves when placing cookware
in the oven or when removing it.
Do not use aluminium foil to line the bottom of the
oven.
Do not place flammable materials in the oven: If
the appliance is switched on accidentally, the
materials could catch fire.
Always make sure the knobs are in the l/¡
position when the appliance is not in use.
When unplugging the appliance, always pull the
plug from the mains socket; do not pull on the
cable.
Never perform any cleaning or maintenance work
without having disconnected the appliance from
the electricity mains.
If the appliance breaks down, under no
circumstances should you attempt to perform the
repairs yourself. Repairs carried out by
inexperienced individuals may cause injury or
further malfunctioning of the appliance. Contact a
Service Centre (see Assistance).
Do not rest heavy objects on the open oven door.
The appliance should not be operated by people
(including children) with reduced physical, sensory
or mental capacities, by inexperienced individuals
or by anyone who is not familiar with the product.
These individuals should, at the very least, be
supervised by someone who assumes responsibility
for their safety or receive preliminary instructions
relating to the operation of the appliance.
Do not let children play with the appliance.
Disposal
When disposing of packaging material: observe
local legislation so that the packaging may be
reused.
The European Directive 2002/96/EC relating to
Waste Electrical and Electronic Equipment
(WEEE) states that household appliances should
not be disposed of using the normal solid urban
waste cycle. Exhausted appliances should be
collected separately in order to optimise the cost
of re-using and recycling the materials inside the
machine, while preventing potential damage to
the atmosphere and to public health. The
crossed-out dustbin is marked on all products to
remind the owner of their obligations regarding
separated waste collection. For further information
relating to the correct disposal of exhausted
household appliances, owners may contact the
relevant public service or their local dealer.
Respecting and conserving the
environment
You can help to reduce the peak load of the
electricity supply network companies by using the
oven in the hours between late afternoon and the
early hours of the morning. The cooking mode
programming options, the delayed cooking
mode (see Cooking modes) and delayed
automatic cleaning mode (see Care and
Maintenance) in particular, enable the user to
organise their time efficiently.
Always keep the oven door closed when using the
BARBECUE and GRATIN modes: this will achieve
improved results while saving energy
(approximately 10%).
Check the door seals regularly and wipe them
clean to ensure they are free of debris so that
they adhere properly to the door, thus avoiding
heat dispersion.
! This product complies with the requirements of the
latest European Directive on the limitation of power
consumption of the standby mode.
If no operations are carried out for a period of 2
minutes, the appliance automatically switches to the
standby mode.
The standby mode is visualised by the high
luminosity "Watch Icon".
As soon as interaction with the machine resumes,
the system's operating mode is restored.

29
GB
Care and maintenance
Switching the appliance off
Disconnect your appliance from the electricity
supply before carrying out any work on it.
Cleaning the appliance
The stainless steel or enamel-coated external
parts and the rubber seals may be cleaned using
a sponge that has been soaked in lukewarm water
and neutral soap. Use specialised products for
the removal of stubborn stains. After cleaning,
rinse and dry thoroughly. Do not use abrasive
powders or corrosive substances.
The inside of the oven should ideally be cleaned
after each use, while it is still lukewarm. Use hot
water and detergent, then rinse well and dry with
a soft cloth. Do not use abrasive products.
All accessories - with the exception of the sliding
racks - can be washed like everyday crockery,
and are even dishwasher safe.
Never use steam cleaners or pressure cleaners on
the appliance.
Cleaning the oven door
Clean the glass part of the oven door using a
sponge and a non-abrasive cleaning product, then
dry thoroughly with a soft cloth. Do not use rough
abrasive material or sharp metal scrapers as these
could scratch the surface and cause the glass to
crack.
For more thorough cleaning purposes, the oven door
may be removed:
1. Open the oven door fully (see diagram).
2. Use a screwdriver to lift up and turn the small
levers F located on the two hinges (see diagram).
3. Grip the door on the two
outer sides and close it
approximately half way. Pull
the door towards you lifting it
out of its seat (see diagram).
To replace the door, reverse
this sequence.
Inspecting the seals
Check the door seals around the oven at regular
intervals. If the seals are damaged, please contact
your nearest After-sales Service Centre (see
Assistance). We recommend that the oven is not
used until the seals have been replaced.
Replacing the light bulb
To replace the oven light bulb:
1. Remove the
glass cover of the
lamp-holder.
2. Remove the
light bulb and
replace it with a
similar one:
halogen lamp
voltage 230 V,
wattage 25 W,
cap G 9.
3. Replace the glass cover (see diagram).
Do not touch the light bulb directly with your
hands.
Sliding rack kit assembly
To assemble the sliding racks:
1. Remove the two frames,
lifting them away from the
spacers A (see figure).
2. Choose which shelf to use
with the sliding rack. Paying
attention to the direction in
which the sliding rack is to be
extracted, position joint B and
then joint C on the frame.
3. Secure the two frames with
the guide rails using the holes
provided on the oven walls
(see diagram). The holes for
the left frame are situated at
the top, while the holes for the
right frame are at the bottom.
4. Finally, fit the frames on the spacers A.
F
A
B
C
Left
guide rail
Right guide
rail
Direction
of extraction
D
Glass cover
Lamp
Lamp Holder
compart ment

30
GB
Warning:
The appliance is fitted with an automatic diagnostic system which detects any malfunctions. Malfunctions are
displayed by messages of the following type: F, followed by numbers.
Call for technical assistance should a malfunction occur.
Never use the services of an unauthorised technician.
Please have the following information to hand:
The type of problem encountered.
The appliance model (Mod.).
The serial number (S/N).
The latter two pieces of information can be found on the data plate located on the appliance.
Assistance

OS 89D IX/HA
OS 99D C IX/HA
OS 997D C IX/HA
OS 992D C IX/HA
OS 99D C /HA
OSQ 99D C /HA
Sommaire
Installation, 32-33
Positionnement
Raccordement électrique
Caractéristiques techniques
Description de lappareil, 34
Vue densemble
Tableau de bord
Afficheur
Structure du four, 53
Mise en marche et utilisation, 36-42
Mise à lheure de lhorloge
Programmer la minuterie
ExtraLarge Space
Small Space
Main Space
Utilisation simultanée de Small Space et Main
Space
Comment programmer une cuisson
Conseils de cuisson
Tableau de cuisson ExtraLarge Space
Tableau de cuisson Small Space
Tableau de cuisson Main Space
Tableau de cuisson simultanée Small Space et Main
Space
Précautions et conseils, 43
Sécurité générale
Mise au rebut
Economies et respect de lenvironnement
Nettoyage et entretien, 44
Mise hors tension
Nettoyage de lfappareil
Nettoyage de la porte
Remplacement de lampoule déclairage
Montage du Kit glissières coulissantes
Assistance, 45
Mode demploi
FOUR
Italiano, 1 Français, 31
Espanol, 46 Portuges, 61
English,16
GB
FR
IT
ES PT
FR

32
FR
Aération
Pour garantir une bonne aération, la cavité
dencastrement doit être dépourvue de paroi arrière.
Il est conseillé dinstaller le four de manière à ce
quil repose sur deux cales en bois ou bien sur un
plan dappui continu qui ait une découpe dau moins
45 x 560 mm (voir figures).
Centrage et fixation
Positionner les 4 taquets situés sur les côtés du four
en face des 4 trous pratiqués sur le cadre et les
régler selon lépaisseur de la joue du meuble:
épaisseur 20 mm : enlever la
partie amovible du taquet (voir
figure) ;
épaisseur 18 mm : utiliser la
première rainure, comme
prévu par le fabricant (voir
figure) ;
épaisseur 16 mm : utiliser la
deuxième rainure (voir figure).
Pour fixer lappareil au meuble : ouvrir la porte du
four et visser 4 vis à bois dans les 4 trous du cadre.
Toutes les parties qui servent de protection doivent
être fixées de manière à ne pouvoir être enlevées
quavec laide dun outil.
Conserver ce mode demploi pour pouvoir le
consulter à tout moment. En cas de vente, de
cession ou de déménagement, veiller à ce qufil
suive lfappareil pour informer le nouveau
propriétaire sur son fonctionnement et lui fournir les
conseils correspondants.
Lire attentivement les instructions : elles
contiennent des conseils importants sur linstallation,
lutilisation et la sécurité de cet appareil.
Positionnement
Les emballages ne sont pas des jouets pour
enfants, il faut les mettre au rebut en respectant la
réglementation sur le tri sélectif des déchets (voir
Précautions et conseils).
Linstallation doit être effectuée par un
professionnel du secteur conformément aux
instructions du fabricant. Une mauvaise installation
peut causer des dommages à des personnes, des
animaux ou des biens.
Encastrement
Pour garantir le bon fonctionnement de lappareil, il
faut que le meuble possède des caractéristiques
bien précises :
les panneaux adjacents doivent être fabriqués
dans un matériau résistant à la chaleur;
dans le cas notamment de meubles plaqués bois,
il faut que les colles résistent à une température
de 100°C;
la cavité du meuble pour encastrement du four,
tant sous plan (voir figure) quen colonne, doit
avoir les dimensions suivantes :
Après encastrement de lappareil, il ne doit plus y
avoir possibilité de contact avec les parties
électrifiées.
Les déclarations de consommation indiquées sur
létiquette des caractéristiques ont été mesurées
pour ce type dinstallation
595 mm.
595 mm.
24 mm.
545 mm.
5 mm.
576 mm.
23 mm.
593 mm.
45 mm.
558 mm.
547 mm. min.
Installation
560 mm.
45 mm.

33
FR
Raccordement électrique
!Les fours munis dun câble dalimentation tripolaire
sont prévus pour un fonctionnement au courant
alternatif à la tension et à la fréquence indiquées sur
la plaque signalétique apposée sur lappareil (voir
ci-dessous).
Montage du câble dalimentation
1. Pour ouvrir le bornier, faire pression à laide dun
tournevis sur les
languettes latérales du
couvercle : tirer et ouvrir
le couvercle (voir
figure).
2. Montage du câble
dalimentation :
dévisser la vis du serre-
câble ainsi que les trois
vis des contacts L-N-
puis fixer les fils
sous les têtes de vis
en respectant les
couleurs Bleu (N)
Marron (L) Jaune-Vert
(voir figure).
3. Fixer le câble dans
le serre-câble prévu.
4. Fermer le couvercle
du bornier.
Branchement du câble dalimentation au réseau
électrique
Monter sur le câble une prise normalisée pour la
charge indiquée sur létiquette des caractéristiques
(voir ci-contre).
En cas de raccordement direct au réseau, il faut
intercaler entre lappareil et le réseau un interrupteur
à coupure omnipolaire ayant au moins 3 mm
décartement entre les contacts, dimensionné à la
charge et conforme aux normes en vigueur (le fil de
terre ne doit pas être interrompu par linterrupteur).
Le câble dalimentation ne doit atteindre, en aucun
point, une température dépassant de 50 °C la
température ambiante.
Linstallateur est responsable du bon raccordement
électrique de lappareil et du respect des normes de
sécurité.
Avant de procéder au branchement, sassurer que :
la prise est bien munie dune terre conforme à la loi ;
la prise est bien apte à supporter la puissance
maximale de lappareil, indiquée sur la plaque
signalétique (voir ci-dessous) ;
la tension dalimentation est bien comprise entre
les valeurs indiquées sur la plaque signalétique
(voir ci-dessous) ;
la prise est bien compatible avec la fiche de
lappareil. Si ce nest pas le cas, remplacer la
prise ou la fiche, ne pas utiliser de rallonges ni de
prises multiples.
Après installation de lappareil, le câble électrique
et la prise de courant doivent être facilement
accessibles
Le câble ne doit être ni plié ni excessivement
écrasé.
Il doit être contrôlé périodiquement et ne peut être
remplacé que par un technicien agréé (voir
Assistance).
Nous déclinons toute responsabilité en cas de
non respect des normes énumérées ci-dessus.
N
L
PLAQUE SIGNALÉTIQUE
Dimensions
extralarge space
largeur 43,4 cm
hauteur 39,5 cm
profondeur 40,8 cm
Volume
extralarge space l 70
ÉTIQUETTE
ÉNERGIE
extralarge space
Directive 2002/40/CE sur l'étiquette des
fours électriques
Norme EN 50304
Consommation énergie déclaration
Classe convection Forcée –
fonction four :
Gratin.
Raccordements
électriques
tension 220-240V~ 50 Hz ou puissance
maximum absorbée 2600W (voir plaque
signalétique)
Cet appareil est conforme aux
Directives Communautaires suivantes :
2006/95/CEE du 12.12.06 (Basse
Tension) et modifications successives -
2004/108/CEE du 15/12/04
(Compatibilité Électromagnétique) et
modifications successives - 93/68/CEE
du 22/07/93 et modifications
successives.
2002/96/CEE et modifications
successives.
1275/2008 stand-by/off mode.

34
FR
Tableau de bord
Support GRILLE
Support LÈCHEFRITE
GLISSI
È
RES
de coulissement
niveau 5
niveau 4
niveau 3
niveau 7
niveau 6
niveau Séparateur "D"
niveau 2
niveau 1
Support SÉPARATEUR
Description de
lappareil
Vue densemble
Tableau de bord
Afficheur
Bouton
FONCTIONS
EXTRALARGE SPACE
Bouton
SÉLECTION
TEMPÉRATURE/TEMPS
AFFICHEUR
Touche
SÉLECTION
TEMPS
Touche
SÉLECTION ENCEINTE
Bouton
FONCTIONS
MAIN SPACE
Bouton
FONCTIONS
SMALL SPACE
¡•OC
•• ••
:
¡•OC
•• ••
:
Chiffres
TEMPERATURE TEMPSet
Icône
FIN DE CUISSON
Icône
DURÉE
Icône
MINUTEUR
Icône
ENCEINTE
SÉLECTIONNÉE

35
FR
Le four Openspace a une capacité de 70lt et permet
de cuisiner simultanément les plats sur 4 niveaux ou
de cuire des pièces de grande taille, qui ne
rentreraient pas dans un four traditionnel.
Grâce à lExtraLarge Space, Openspace vous
permet de choisir entre 10 fonctions de cuisson,
dont 6 universelles, que vous pourrez utiliser pour
nimporte quelle préparation et 4 programmes
automatiques, qui vous permettront de réussir
toutes vos recettes.
En outre, Openspace assure un excellent confort
dutilisation pour toutes les exigences, grâce à 4
différentes possibilités de cuisson : le four est
unique mais il peut être divisé en espaces de
dimensions différentes, chacun permettant un
réglage indépendant de la température et du temps
Structure du four
de cuisson.
Ceci est possible grâce au DIVIDER calorifugé, qui
permet de diviser lExtraLarge Space en deux
espaces distincts de grandeur différente : Main
Space et Small Space.
Les deux Main et Small Space peuvent être utilisés
en même temps, pour cuisiner plus rapidement
différentes préparations, ou séparément, pour
utiliser seulement lespace nécessaire.
Quand les deux enceintes sont utilisées ensemble, il
est possible de régler les températures de cuisson
entre 50°C et 250 °C, et obtenir une différence de
température pouvant aller jusquà 100 °C entre les
deux zones, ce qui permet de réaliser des recettes
même très différentes sans mélanger les saveurs et
les odeurs.
GRILLE
LÈCHEFRITE
GRILLE
GRILLE
EXTRALARGE
SPACE
ExtraLarge Space : cuisson sur 4 niveaux
GRILLE OU LÈCHEFRITE
LÈCHEFRITE
(cuisson sur 3 niveaux)
Séparateur "D" (position fixe)
GRILLE (cuisson sur 3 niveaux)
GRILLE (cuisson sur 3 niveaux)
SMALL
SPACE
MAIN
SPACE
LÈCHEFRITE
(cuisson sur 3 niveaux)
Séparateur "D" (position fixe)
GRILLE (cuisson sur 3 niveaux)
GRILLE (cuisson sur 3 niveaux)
SMALL
SPACE
MAIN
SPACE
Main et Small Space : cuisson simultanée
GRILLE OU LÈCHEFRITE
Séparateur "D"
(position fixe)
SMALL
SPACE
MAIN
SPACE
ExtraLarge Space : cuisson sur 4 niveaux ExtraLarge Space : cuisson sur 4 niveaux
Le tableau ci-dessous décrit les valeurs de
température qu'il est possible de programmer.
L'afficheur intelligent vous aidera à trouver le juste
Pour annuler une sélection il vous suffira de tourner le bouton Fonctions Small Space ou Main Space sur 0.
réglage des températures à l'intérieur des deux
enceintes.
Température dans la première enceinte
(Main ou Small Space)
Température dans la deuxième enceinte
(Small ou Main Space)
Entre 40 °C et 150 °C La différence de température par rapport à la première
enceinte sélectionnée est de 50 C maximum
Exemple: vous sélectionnez 90°C dans une enceinte;
dans l'autre vous pouvez sélectionner une valeur comprise entre 40°C (90 C-50 C) et 140 C (90°C+50°C).
Entre 155°C et 200°C La différence de température par rapport à la première
enceinte sélectionnée est de 70 C maximum
Exemple: vous sélectionnez 180°C dans une enceinte;
dans l'autre vous pouvez sélectionner une valeur comprise entre 110°C (180°C-70°C) et 250 C (180°C+70°C).
Entre 205°C et 250 C La différence de température par rapport à la première
enceinte sélectionnée est de 100 C maximum
Exemple: vous sélectionnez 210 C dans une enceinte;
dans l'autre vous pouvez sélectionner une valeur comprise entre 110°C (210°C-100 C) et 250 C température maxi
programmable.

36
FR
Lors de son premier allumage, faire fonctionner le
four à vide, porte fermée, pendant au moins une
heure en réglant la température à son maximum.
Puis éteindre le four, ouvrir la porte et aérer la pièce.
Lodeur qui se dégage est due à lévaporation des
produits utilisés pour protéger le four.
Ne jamais poser dobjets à même la sole du four,
lémail risque de sabîmer.
Il faut toujours enfourner les plats sur les grilles
fournies avec lappareil.
Pendant lusage, veillez à retirer la vaisselle ou les
aliments délicats de lenceinte éteinte.
Pour les cuissons de pâte levée, nous conseillons
de ne pas ouvrir la porte pour éviter quelle ne
retombe.
Si la porte est soumise à plusieurs reprises à de
fortes sollicitations, il se pourrait que le divider sorte
de son logement. Dans ce cas, lheure saffiche sur
lécran. Assurez-vous que le divider soit
correctement inséré et relancez la cuisson.
Système de refroidissement
Pour obtenir un abaissement des températures
extérieures, un système de refroidissement souffle
de lair à lextérieur par une fente située entre le
bandeau et la porte du four.
Le ventilateur se met en marche et sarrête
automatiquement après larrêt du four jusquà ce que
ce dernier se soit suffisamment refroidi.
Régler lhorloge
Le réglage nest possible que lorsque le four est
éteint.
1. Appuyer sur la touche jusquà ce que le
premier chiffre se mette à clignoter sur lAFFICHEUR
et que les icônes , , séteignent ;
2. tourner le bouton SÉLECTION TEMPS pour
lamener sur + ou - et régler lheure ;
3. appuyer à nouveau sur la touche jusquà ce
que les deux autres chiffres numériques de
lAFFICHEUR se mettent à clignoter ;
4. tourner le bouton SÉLECTION TEMPS pour
lamener sur + ou - et régler les minutes ;
5. appuyer à nouveau sur la touche pour
confirmer.
Programmer le minuteur
Cette fonction ne stoppe pas la cuisson et est
indépendante du fonctionnement du four ; elle sert
uniquement à déclencher un signal sonore à
lexpiration des minutes sélectionnées.
1. Appuyer sur la touche jusquà ce que licône
et les trois chiffres de lAFFICHEUR se mettent à
clignoter ;
2. tourner le bouton SÉLECTION TEMPS pour
lamener sur + ou - et régler les minutes ;
3. appuyer à nouveau sur la touche pour
confirmer.
Laffichage du compte à rebours suivra. Un signal
sonore indiquera la fin du décompte.
ExtraLarge Space
Mise en marche du four
1. Sélectionner la fonction de cuisson souhaitée à
laide du bouton FONCTIONS EXTRALARGE SPACE.
Licône éclairée sur lafficheur indique que
lExtraLarge Space est sélectionnée et que seuls les
réglages de lExtraLarge Space peuvent être
modifiés.
2. Le four se place en préchauffage. Pour modifier la
température, tourner le bouton TEMPÉRATURE.
Pendant le préchauffage, licône clignote.
3. Une fois le préchauffage terminé, licône
devient fixe et un signal sonore retentit. Il est
maintenant possible denfourner les plats;
4. En cours de cuisson, il est possible à tout
moment de:
- modifier la fonction de cuisson à laide du bouton
FONCTIONS EXTRALARGE SPACE ;
- modifier la température à laide du bouton
TEMPÉRATURE (seulement pour les cuissons
universelles) ;
- programmer la durée (seulement pour les cuissons
universelles) et lheure de fin de cuisson ;
- interrompre la cuisson en ramenant le bouton
FONCTIONS EXTRALARGE SPACE sur 0.
5. En cas de coupure de courant, si la température
du four nest pas trop redescendue, un dispositif
spécial fait repartir la fonction à partir du moment où
elle a été interrompue. Les programmations en
attente de démarrage ne sont par contre pas
rétablies et doivent être reprogrammées dès
rétablissement du courant.
La configuration ExtraLarge ne permet pas
dutiliser les Main et Small Space : les boutons
FONCTIONS SMALL SPACE et MAIN SPACE sont
désactivés.
Fonctions de cuisson universelles
Toutes les fonctions ont une température de
cuisson présélectionnée. Il est possible de la régler
Mise en marche et
utilisation

37
FR
niveau 3 et encastrer le bout arrière de la broche
dans le trou situé au fond de lenceinte ;
3. pour actionner le tournebroche, sélectionner les
fonctions ou .
Fonctions de cuisson automatiques
La température et la durée de cuisson sont
présélectionnées et ne peuvent pas être modifiées
à laide du système C.O.P.® (Cuisson Optimale
Programmée) qui garantit automatiquement un
résultat parfait. La cuisson sarrête automatiquement
et le four signale que le plat est cuit. La durée de
cuisson peut être modifiée de quelques minutes,
comme indiqué ci-dessous dans la description des
différentes fonctions.
Fonction VIANDE
Choisir cette fonction pour cuisiner de la viande de
veau, de porc, dagneau et de buf. Enfourner à
froid. Il est aussi possible denfourner à chaud.
Seule la durée peut être modifiée, à raison de -10/
+10 minutes.
Fonction GÂTEAUX
Cette fonction est idéale pour la cuisson des
gâteaux. Enfourner à froid. Il est aussi possible
denfourner à chaud. Seule la durée peut être
modifiée, à raison de -10/+15 minutes.
Fonction PAIN
Cest la fonction idéale pour la cuisson du pain. Se
reporter au paragraphe suivant pour une recette
détaillée.
Pour obtenir de meilleurs résultats, nous
recommandons de suivre attentivement les conseils
suivants :
suivre la recette à la lettre ;
ne pas oublier de verser 150 gr (1.5 dl) deau froide
dans la lèchefrite au niveau 7;
Enfourner à froid. Au cas où vous souhaiteriez
enfourner à chaud, après une cuisson à haute
température, lafficheur visualisera le message Hot
jusquà ce que la température du four aura atteint 40
°C. Vous pouvez alors enfourner le pain.
Fonction PIZZA
Cest la fonction idéale pour la cuisson des pizzas.
Se reporter au paragraphe suivant pour une recette
détaillée. Seule la durée peut être modifiée, à raison
de -5/+12 minutes.
Pour obtenir de meilleurs résultats, nous
recommandons de suivre attentivement les conseils
suivants :
suivre la recette à la lettre ;
le poids de la pâte doit être compris entre 350g et
manuellement, entre 40 °C et 250 °C au choix.
Pour la fonction BARBECUE, la valeur
présélectionnée est un niveau de puissance exprimé
en %. Il peut lui aussi être réglé manuellement.
Fonction MULTICUISSON
Mise en marche de tous les éléments chauffants
ainsi que de la turbine. La chaleur est constante et
bien répartie à lintérieur du four, lair cuit et dore de
façon uniforme en tous points. Il est possible de
cuire au maximum sur quatre niveaux en même
temps. Si vous cuisez sur plusieurs niveaux en
même temps, nous recommandons de toujours
placer la lèchefrite sur le niveau du bas. En cas de
cuisson simultanée sur 4 niveaux, nous
recommandons de placer les grilles aux niveaux 3, 5
et 6 et la lèchefrite au niveau 1.
Fonction GRATIN
Mise en marche de la résistance de voûte, de la
résistance circulaire (pendant un certain temps) et
de la turbine et du tournebroche (si lappareil en est
équipé). Lirradiation thermique unidirectionnelle
sajoute au brassage de lair pour une répartition
uniforme de la chaleur dans lenceinte du four.
Plus de risque de brûler les aliments en surface et
plus grande pénétration de la chaleur. Cuisson porte
du four fermée.
Fonction BARBECUE
Mise en marche de la résistance de voûte et du
tournebroche (si lappareil en est équipé). Tourner le
bouton TEMPÉRATURE, lafficheur indique les
niveaux de puissance sélectionnables qui vont de 5
% à 100 %. La température élevée et directe du gril
est conseillée pour tous les aliments qui exigent une
haute température en surface. Cuisson porte du four
fermée.
Fonction BASSE TEMPÉRATURE
Ce type de cuisson permet de faire lever les pâtes,
de décongeler, de préparer du yaourt, de réchauffer
plus ou moins rapidement et de cuire lentement à
basse température. Températures sélectionnables :
40, 65, 90 °C.
Tournebroche
(nexiste que sur
certains modèles)
Pour actionner le
tournebroche (voir figure)
procéder comme suit :
1. placer la lèchefrite
au niveau 1 ;
2. placer le berceau au

38
FR
500g.
graisser légèrement la lèchefrite et les plats à rôti.
Enfourner à froid. Au cas où vous souhaiteriez
enfourner à chaud, après une cuisson à haute
température, lafficheur visualisera le message Hot
jusquà ce que la température du four aura atteint
120 °C. Vous pouvez alors enfourner la pizza.
Recette PIZZA :
Recette pour 3 ou 4 pizzas : 1.000g de farine, 500g
deau, 20g de sel, 20 g de sucre, 10 cl dhuile
dolive, 20g de levure de boulanger fraîche (ou bien
2 sachets en poudre)
Levage à température ambiante : 1 heure ou
fonction manuelle BASSE TEMPÉRATURE à 40°C
et laisser lever environ 30/45 minutes.
Enfourner à froid.
Démarrer la cuisson PIZZA.
Recette du PAIN (quantité de pâte maximum):
Ingrédients :
1,3 Kg de farine
700 gr deau
25 gr de sel
50 gr de levure fraîche de boulanger ou 4 sachets
de levure en poudre.
Préparation :
Mélanger la farine et le sel dans un grand
récipient.
Dissoudre la levure dans de leau légèrement
tiède (35 degrés environ).
Disposer la farine en fontaine.
Verser le mélange deau et de levure.
Mélanger et pétrir jusquà obtenir une pâte
homogène et peu collante, létirer avec la paume
de la main et la replier sur elle-même pendant 10
minutes.
Former une boule, la placer dans un bol et couvrir
dun film plastique pour éviter que la surface de la
pâte ne sèche. Mettre le bol dans le four,
sélectionner la fonction manuelle BASSE
TEMPÉRATURE à 40 °C et laisser lever environ 30
à 45 minutes ou à température ambiante pendant
environ 1 heure (la pâte doit doubler de volume).
Reprendre la pâte et la pétrir délicatement; la
diviser pour obtenir plusieurs pains.
Les disposer sur la grille (ou sur 2 ou 3 grilles si
vous souhaitez cuire les pains sur plusieurs
niveaux) recouverte de papier sulfurisé (découpé
en fonction de la taille du lèche-frite) et les
saupoudrer de farine.
Pratiquer des entailles à laide dune lame de
rasoir.
Enfourner la grille sur le niveau 2 pour la cuisson
sur un seul niveau ou les deux grilles sur les
niveaux 1 et 4 pour la cuisson sur deux niveaux et
1-3-5 pour la cuisson sur trois niveaux.
Positionner la lèchefrite au niveau 7 et y verser
150 gr deau froide.
Enfourner à froid.
Démarrer la fonction automatique PAIN.
En fin de cuisson, laisser reposer les pains sur la
grille jusquà ce quils aient complètement refroidi.
Small Space
Mise en marche du four
1. Insérer le DIVIDER (SÉPARATEUR) sur le support
DIVIDER "D", la cheville et les flèches étant tournées
vers la paroi arrière du four. Le message
OPENSPACE qui saffiche sur la partie avant du
cadre du DIVIDER confirme que linsertion a été
effectuée correctement. Le four émet un signal
sonore pour confirmer que linsertion du DIVIDER a
été correctement exécutée et quil est possible
dutiliser les deux Main et Small Space séparément
ou en même temps.
Le bouton FONCTIONS EXTRALARGE SPACE est
désactivé.
2. Sélectionner la fonction de cuisson souhaitée à
laide du bouton FONCTIONS SMALL SPACE.
3. Le four se place en préchauffage. Pour modifier la
température, tourner le bouton TEMPÉRATURE.
Pendant le préchauffage, licône clignote.
4. Une fois le préchauffage terminé, licône
devient fixe et un signal sonore retentit. Il est
maintenant possible denfourner les plats.
5. En cours de cuisson, il est possible à tout
moment de :
- modifier la fonction de cuisson à laide du bouton
FONCTIONS SMALL SPACE ;
- modifier la température à laide du bouton
TEMPÉRATURE ;
- programmer la durée et lheure de fin de cuisson ;
- interrompre la cuisson en ramenant le bouton
FONCTIONS SMALL SPACE sur 0.
6. En cas de coupure de courant, si la température
du four nest pas trop redescendue, un dispositif
spécial fait repartir la fonction à partir du moment où
elle a été interrompue. Les programmations en
attente de démarrage ne sont par contre pas
rétablies et doivent être reprogrammées dès
rétablissement du courant.
Fonctions de cuisson
Fonction GRIL
La résistance de voûte est branchée. Tourner le

39
FR
bouton TEMPÉRATURE, lafficheur indique les
niveaux de puissance sélectionnables qui vont de 5
% à 100 %. La température élevée et directe du gril
est conseillée pour tous les aliments qui exigent une
haute température en surface. Cette fonction est
indiquée pour : saisir la viande, gratiner, donner une
coloration aux meringues, préparer des croque-
monsieur, cuire les petites grillades de viandes
maigres et fines. Cuisson porte du four fermée.
Fonction FAST COOKING
La fonction nécessite un préchauffage. Cette
fonction est tout particulièrement recommandée pour
les cuissons rapides de plats préparés (surgelés ou
précuits).
Main Space
Mise en marche du four
1. Insérer le DIVIDER (SÉPARATEUR) sur le support
DIVIDER "D", la cheville et les flèches étant tournées
vers la paroi arrière du four. Le message
OPENSPACE qui saffiche sur la partie avant du
cadre du DIVIDER confirme que linsertion a été
effectuée correctement. Le four émet un signal
sonore pour confirmer que linsertion du DIVIDER a
été correctement exécutée et quil est possible
dutiliser les deux Main et Small Space séparément
ou en même temps.
Le bouton FONCTIONS EXTRALARGE SPACE est
désactivé.
2. Sélectionner la fonction de cuisson Universelle à
laide du bouton FONCTIONS MAIN SPACE.
3. Le four se place en préchauffage. Pour modifier la
température, tourner le bouton TEMPÉRATURE.
Pendant le préchauffage, licône clignote.
4. Une fois le préchauffage terminé, licône
devient fixe et un signal sonore retentit. Il est
maintenant possible denfourner les plats.
5. En cours de cuisson, il est possible à tout
moment de :
- modifier la température à laide du bouton
TEMPÉRATURE ;
- programmer la durée et lheure de fin de cuisson ;
- interrompre la cuisson en ramenant le bouton
FONCTIONS MAIN SPACE sur 0.
6. En cas de coupure de courant, si la température
du four nest pas trop redescendue, un dispositif
spécial fait repartir la fonction à partir du moment où
elle a été interrompue. Les programmations en
attente de démarrage ne sont par contre pas
rétablies et doivent être reprogrammées dès
rétablissement du courant.
Fonctions de cuisson
Fonction UNIVERSELLE
Mise en marche de tous les éléments chauffants
ainsi que de la turbine. La chaleur est constante et
bien répartie à lintérieur du four, lair cuit et dore de
façon uniforme en tous points. Il est possible de
cuire au maximum sur trois niveaux en même temps.
Si vous cuisez sur plusieurs niveaux en même
temps, nous recommandons de toujours placer la
lèchefrite sur le niveau 1. En cas de cuisson
simultanée sur 3 niveaux, nous recommandons de
placer les grilles aux niveaux 3 et 5 et la lèchefrite
au niveau 1.
Utilisation simultanée de Small Space et
Main Space
Mise en marche du four
1. Insérer le DIVIDER (SÉPARATEUR) sur le support
DIVIDER "D", la cheville et les flèches étant tournées
vers la paroi arrière du four. Le message
OPENSPACE qui saffiche sur la partie avant du
cadre du DIVIDER confirme que linsertion a été
effectuée correctement. Le four émet un signal
sonore pour confirmer que linsertion du DIVIDER a
été correctement exécutée et quil est possible
dutiliser les deux Main et Small Space séparément
ou en même temps.
Le bouton FONCTIONS EXTRALARGE SPACE est
désactivé.
Pour améliorer lefficience énergétique, le temps de
préchauffage de lenceinte SMALL SPACE est
denviron 15 minutes.
Si la MAIN SPACE est réglée sur une température
inférieure à 150°C, le gril ne se met pas en marche.
Ce, afin de préserver le résultat de la cuisson:
linscription OFF saffiche alors sur lécran.
2. Sélectionner la fonction de cuisson souhaitée pour
chaque enceinte à laide des boutons FONCTIONS
SMALL SPACE et/ou FONCTIONS MAIN SPACE.
Licône indique que la Small Space est
sélectionnée et quil est donc possible de procéder
aux réglages de la Small Space, licône éclairée
sur lafficheur indique que la Main Space est
sélectionnée et quil est donc possible de procéder
aux réglages de la Main Space.
3. Les deux fours se placent en phase de
préchauffage. Pour modifier la température, tourner
le bouton TEMPÉRATURE. Pendant le préchauffage,
licône clignote.

40
FR
1. Suivre la procédure de 1 à 3 décrite pour la durée ;
2. Appuyer sur la touche jusquà ce que licône
et les deux chiffres de lAFFICHEUR se mettent
à clignoter ;
3. tourner le bouton SÉLECTION TEMPS pour
lamener sur + ou - et régler lheure ;
4. appuyer à nouveau sur la touche jusquà ce
que les deux autres chiffres numériques de
lAFFICHEUR se mettent à clignoter ;
5. tourner le bouton SÉLECTION TEMPS pour
lamener sur + ou - et régler les minutes ;
6. appuyer à nouveau sur la touche pour confirmer ;
7. à expiration de la durée sélectionnée,
lAFFICHEUR affiche END, le four stoppe la cuisson
et un signal sonore retentit.
Les icônes et éclairées signalent quune
programmation a été lancée. LAFFICHEUR affiche à
tour de rôle lheure de fin de cuisson et la durée.
Pour annuler une programmation, amener le bouton
FONCTIONS sur 0.
Conseils de cuisson
MULTICUISSON
Utiliser les niveaux 1-3-5-6.
Placer la lèchefrite en bas et les grilles en haut.
BARBECUE
Préchauffer le four pendant 5 minutes.
Fermer la porte du four pendant la cuisson.
Placer la lèchefrite sur le niveau 3. Insérer la grille
sur les niveaux de 4 à 7 en fonction de lépaisseur
de la pièce à cuire ; placer les aliments au milieu
de la grille. Exemples : côte de buf sur le
niveau 4 et bacon sur le niveau 6 ou 7.
PIZZAS ou FOUGASSES
Utiliser un plat en aluminium léger de 30 cm de
diamètre maximum, le poser sur la grille du four.
Si les pizzas sont bien garnies, najouter la
mozzarelle quà mi-cuisson.
GRIL
Préchauffer le four pendant 5 minutes.
Insérer le DIVIDER sur le support DIVIDER D.
Fermer la porte du four pendant la cuisson.
Placer la grille au niveau 7, enfourner les plats au
milieu de la grille. Placer la lèchefrite au niveau 6.
Cette fonction est indiquée pour : saisir la viande,
gratiner, donner une coloration aux meringues,
4. Une fois le préchauffage terminé, licône
devient fixe et un signal sonore retentit. Il est
maintenant possible denfourner les plats.
5. Une plus intense luminosité des chiffres sur
lafficheur indique lenceinte sur laquelle on est en
train deffectuer les réglages. Pour modifier ceux de
lautre enceinte, appuyer sur la touche . Au cours
de la cuisson simultanée il est en effet possible de
modifier les réglages tant de la Small Space que de
la Main Space :
- modifier la fonction de cuisson à laide du bouton
FONCTIONS SMALL SPACE et/ou FONCTIONS
MAIN SPACE ;
- modifier la température à laide du bouton
TEMPÉRATURE ;
- programmer la durée et lheure de fin de cuisson ;
- interrompre la cuisson en ramenant le bouton
FONCTIONS SMALL SPACE et/ou FONCTIONS
MAIN SPACE sur 0.
6. En cas de coupure de courant, si la température
du four nest pas trop redescendue, un dispositif
spécial fait repartir la fonction à partir du moment où
elle a été interrompue. Les programmations en
attente de démarrage ne sont par contre pas
rétablies et doivent être reprogrammées dès
rétablissement du courant.
Comment programmer une cuisson
La programmation nest possible quaprès avoir
sélectionné une fonction de cuisson.
La programmation est activable depuis toutes les
configurations : EXTRALARGE, MAIN et SMALL
SPACE même en fonctionnement simultané.
Programmer la durée de cuisson
1. Appuyer plusieurs fois de suite sur la touche
jusquà ce que licône et les trois chiffres
numériques de lAFFICHEUR se mettent à clignoter ;
2. tourner le bouton SÉLECTION TEMPS pour
lamener sur + ou - et régler la durée désirée ;
3. appuyer à nouveau sur la touche pour confirmer ;
4. à expiration de la durée sélectionnée,
lAFFICHEUR affiche END, le four stoppe la cuisson
et un signal sonore retentit.
Exemple : il est 9h00 et la durée programmée est
de 1h15. La fonction sarrête automatiquement à
10h15.
Programmer la fin dune cuisson
La programmation dune fin de cuisson nest
possible quaprès avoir sélectionné une durée de
cuisson.

41
FR
Tableau de cuisson enceinte ExtraLarge Space
Cuisson
sur
niveaux
Niveau enfournement
Fonctions Aliments Poids
(Kg)
N. Lèchefrite Grille 1 Grille 2 Grille 3
Préchauffage Température
préconisée
(°C)
Durée
cuisson
(minutes)
Tartes
1
2
3
4
2 ou 3
1 à 2
1
1
3 à 5
3
3
5
5
6
Oui
Oui
Oui
Oui
180
180
180
180
30-40
35-45
40-50
45-55
Petits choux
1
2
3
4
2 ou 3
1 à 2
1
1
3 à 5
3
3
5
5
6
Oui
Oui
Oui
Oui
190
190
190
190
25-35
25-35
30-40
30-40
Pizza
1
2
3
4
2 ou 3
1 à 2
1
1
3 à 5
3
3
5
5
6
Oui
Oui
Oui
Oui
220
220
220
220
15-25
20-30
25-35
30-40
Biscuits
1
2
3
4
2 ou 3
1 à 2
1
1
3 à 5
3
3
5
5
6
Oui
Oui
Oui
Oui
180
180
180
180
15-25
15-25
20-30
20-30
Terrines
1
2
3
2 ou 3
2
1
5
4
6
Oui
OUI
Oui
200
200
200
30-40
35-45
40-50
Crème Caramel
(bain-marie)
1
2
3
2 ou 3
2
1
5
4
6
Oui
Oui
Oui
170
170
170
35-45
35-45
40-50
Panettone 1 1 ou 2 Oui 160 45-60
Cake 1
2 2 ou 3
1
4 ou 5 Oui
Oui 160
160 60-75
60-75
Génoise 1
2
3
2 ou 3
2
1
5
4
6
Oui
Oui
Oui
190
190
190
30-35
35-40
40-45
Multicuisson*
Grosse pièce de
viande
1 1 2 Oui 160 90-240
Rôtisserie 1 2 3 Non 200 35-75
Gratin 1 3 ou 4 Non 190 40-60
Gros rôti 1 1 2 Non 200 90-120
Gratin*
Grosse volaille rôtie 1 1 2 Non 200 90-120
Côte de bœuf 1 3 4 ou 5 Oui 100% 20-30
Saucisses 1 3 5 à 7 Oui 100% 10-20
Côte de porc 1 3 5 à 7 Oui 100% 15-25
Barbecue*
Bacon 1 3 5 à 7 Oui 100% 3-6
Étuve /
Décongélation
1 2 Non 40
Meringues
blanches
4 1 3 5 6 Non 65 8-12
heures**
Basse
température
Viande/Poisson 3 1 3 5 Non 90 90-180**
Pain
automatique
Pain (voir recette) 2
2
2
1
2
3
7***
7***
7***
2
1
1
4
3
5
Non
Non
Non
Viande
automatique
Rôtis 1 2 3 Non 60-90**
Gâteaux
automatique
Gâteaux 1
2
2
2
5
Non
Non
35-60**
35-60**
Pizza
automatique
Pizza (voir recette)
1
2
3
4
2
2
1
1
5
3
3
5
5
6
Non
Non
Non
Non
23-30**
25-35**
30-35**
35-40**
* Les temps de cuisson sont purement indicatifs et peuvent être modifiés selon les goûts de chacun. Les temps de préchauffage du four sont présélectionnés et ne
sont pas modifiables manuellement.
** Les durées des cuissons automatiques sont présélectionnées. Les valeurs figurant dans le tableau se réfèrent à la durée minimale et maximale, pouvant être
modifiée par l'utilisateur à partir de la durée présélectionnée.
*** Comme indiqué dans la recette, ajouter 150 gr d'eau dans la lèchefrite.
préparer des croque-monsieur, cuire les petites
grillades de viandes maigres et fines.
Nous conseillons de sélectionner le niveau
dénergie maximum. Ne pas sinquiéter si la
résistance de voûte nest pas allumée en
permanence : son fonctionnement est contrôlé par
un thermostat.
FAST COOKING
Préchauffer le four avec la lèchefrite au niveau 6.
Pour les cuissons de plats surgelés, se reporter
aux indications figurant sur lemballage.

42
FR
Tableau de cuisson Small Space
Fonctions Aliments Poids
(Kg)
Cuisson
sur
niveaux
Niveau enfournement Préchauffage Température
préconisée
(°C)
Durée
cuisson
(minutes)
N. Lèchefrite Grille 1 Séparateur
Fast cooking* Filets de poisson
1 6 D Oui 180-200 20-30
Filets de viande 1 6 D Oui 180-200 30-40
Pizza surgelée 1 6 D Oui
Préparation surgelés 1 6 D Oui
Gril Croque-monsieur 1 - 6-7 D Oui 100 % 3-5
Bacon 1 6 7 D Oui 100 % 3-6
Côte de porc 1 6 7 D Oui 100 % 15-25
* Les temps de cuisson sont purement indicatifs et peuvent être modifiés selon les goûts de chacun. Les temps de préchauffage du four sont présélectionnés et
ne sont pas modifiables manuellement.
Tableau de cuisson Main Space
Fonctions Aliments Poids
(Kg)
Cuisson
sur
niveaux
Niveau enfournement Préchauffage Température
préconisée
(°C)
Durée
cuisson
(minutes)
N. Lèchefrite Grille 1 Séparateur
Universelle* Tartes 1
2
2
1
3
D
D
Oui
Oui
200
200
30-40
35-45
Petits choux 1
2
2
1
3
D
D
Oui
Oui
190
190
25-35
25-35
Pizza 1
2
2
1
3
D
D
Oui
Oui
220
220
15-25
20-30
Biscuits 1
2
2
1
3
D
D
Oui
Oui
180
180
15-25
15-25
Terrines 1
2
2
1
3
D
D
Oui
Oui
200
200
30-40
35-45
Crème Caramel
(bain-marie)
1 2 D Oui 170 35-45
Cake 1 2 D Oui 160 60-75
Génoise 1
2
2
1
3
D
D
Oui
Oui
190
190
30-35
35-40
Petits rôtis 1 2 3 D Oui 210 30-60
* Les temps de cuisson sont purement indicatifs et peuvent être modifiés selon les goûts de chacun. Les temps de préchauffage du four sont présélectionnés et
ne sont pas modifiables manuellement.
Tableau de cuisson simultanée Small Space et Main Space
Small Space
Fonctions Aliments Poids
(Kg)
Cuisson
sur
niveaux
Niveau enfournement Préchauffage Température
préconisée
(°C)
Durée
cuisson
(minutes)
N. Lèchefrite Grille 1 Séparateur
Fast cooking* Filets de poisson
1 6 D Oui 200-220 20-30
Filets de viande 1 6 D Oui 200-220 30-40
Pizza surgelée 1 6-7 D Oui
Préparations
surgelés
1 6-7 D Oui
Riz pilaf
1 6 D Oui 180-200 30-45
Gril Saisir les aliments
1 6-7 D Oui 100 % 3-6
Main Space
Fonctions Aliments Poids
(Kg)
Cuisson
sur
niveaux
Niveau enfournement Préchauffage Température
préconisée
(°C)
Durée
cuisson
(minutes)
N. Lèchefrite Grille 1 Séparateur
Universelle* Gâteaux, tartes
1
2
2
1 et 2
3 à 5
D
D
Oui
Oui
200
200
30-40
35-45
Biscuits 1
2
2
1 et 2
3 à 5
D
D
Oui
Oui
180
180
15-25
15-25
Crème caramel
(bain-marie)
1 2 D Oui 160 45
Pizza 1
2
2
1 et 2
3 à 5
D
D
Oui
Oui
220
220
15-25
20-30
Gratin dauphinois
1 2 D Oui 200 60
Rôti 1 2 D Oui 200 60-90
Tourtes 1 2 D Oui 200 35-45
* Les temps de cuisson sont purement indicatifs et peuvent être modifiés selon les goûts de chacun. Les temps de préchauffage du four sont présélectionnés et
ne sont pas modifiables manuellement.

43
FR
Précautions et conseils
Cet appareil a été conçu et fabriqué conformément
aux normes internationales de sécurité. Ces
consignes de sécurité sont très importantes et
doivent être lues attentivement.
Sécurité générale
Cet appareil a été conçu pour un usage familial,
de type non professionnel.
Cet appareil ne doit pas être installé en extérieur,
même dans un endroit abrité, il est en effet très
dangereux de le laisser exposé à la pluie et aux
orages.
Pour déplacer lappareil, se servir des poignées
prévues à cet effet sur les côtés du four.
Ne pas toucher à lappareil pieds nus ou si les
mains ou les pieds sont mouillés ou humides
Cet appareil qui sert à cuire des aliments ne doit
être utilisé que par des adultes conformément aux
instructions du mode demploi.
En cours de fonctionnement, les éléments
chauffants et certaines parties de la porte
peuvent devenir très chauds. Attention à ne pas
les toucher et à garder les enfants à distance.
Éviter que le cordon dalimentation dautres
électroménagers touche à des parties chaudes du
four.
Les orifices ou les fentes daération ou
dévacuation de la chaleur ne doivent pas être
bouchés
Toujours saisir la poignée en son milieu : elle
risque dêtre très chaude à ses extrémités.
Utiliser toujours des gants de protection pour
enfourner ou sortir les plats du four.
Ne jamais tapisser la sole du four de papier
aluminium.
Ne pas ranger de matériel inflammable à lintérieur
du four : si lappareil était par inadvertance mis en
marche, il pourrait prendre feu.
Toujours sassurer que les boutons sont bien dans
la position l/¡ quand lappareil nest pas
utilisé.
Ne pas tirer sur le câble pour débrancher la fiche
de la prise de courant.
Neffectuer aucune opération de nettoyage ou
dentretien sans avoir auparavant débranché la
fiche de la prise de courant.
En cas de panne, nessayer en aucun cas
daccéder aux mécanismes internes pour tenter
de réparer lappareil. Contacter le service
dAssistance (voir Assistance).
Ne pas poser dobjets lourds sur la porte du four
ouverte.
Il nest pas prévu que cet appareil soit utilisé par
des personnes (enfants compris) présentant des
capacités physiques, sensorielles ou mentales
réduites ou qui nont pas lexpérience ou les
connaissances indispensables, à moins qulelles
ne le fassent sous la surveillance de quelqulun
responsable de leur sécurité ou qulelles aient été
dûment formées sur lutilisation de lappareil.
Éviter que les enfants ne jouent avec lappareil.
Mise au rebut
Mise au rebut du matériel demballage : se
conformer aux réglementations locales, les
emballages pourront ainsi être recyclés.
La directive européenne 2002/96/CE relative aux
déchets déquipements électriques et
électroniques (DEEE), prévoit que les
électroménagers ne peuvent pas être traités
comme des déchets solides urbains courants.
Les appareils usagés doivent faire lobjet dune
collecte séparée pour optimiser le taux de
récupération et de recyclage des matériaux qui
les composent et empêcher tout danger pour la
santé et pour lenvironnement. Le symbole de la
poubelle barrée est appliqué sur tous les produits
pour rappeler quils font lobjet dune collecte
sélective.
Pour de plus amples renseignements sur la mise
au rebut des électroménagers, les possesseurs
peuvent sadresser au service public prévu à cet
effet ou aux commerçants.
Économies et respect de
lenvironnement
Pour faire des économies délectricité, utiliser
autant que possible le four pendant les heures
creuses. Les options de programmation des
cuissons et plus particulièrement la cuisson
différée (voir Programmes) et le nettoyage
automatique différé (voir Nettoyage et entretien),
permettent de sorganiser en ce sens.
Pour les cuissons au BARBECUE et au GRATIN,
nous conseillons de garder la porte du four
fermée : les résultats obtenus sont meilleurs et la
consommation dénergie est moindre (environ
10% déconomie).
Garder les joints propres et en bon état pour quils
adhèrent bien à la porte et ne causent pas de
déperdition de chaleur.
! Ce produit est conforme à la nouvelle Directive
Européenne sur la réduction de la consommation
d'énergie en mode standby.
Sans opérations pendant 2 minutes, l'appareil se
place automatiquement en mode veille.
Le mode standby est signalé par l'intense luminosité
de l'"icône horloge".
A la moindre intervention sur l'appareil, le système
se remet en mode de fonctionnement normal.

44
FR
Nettoyage et entretien
Mise hors tension
Avant toute opération de nettoyage ou dentretien
couper lalimentation électrique de lappareil.
Nettoyage de lappareil
Nettoyer lextérieur émaillé ou inox et les joints en
caoutchouc à laide dune éponge imbibée deau
tiède additionnée de savon neutre Si les taches
sont difficiles à enlever, utiliser des produits
spéciaux. Il est conseillé de rincer abondamment
et dessuyer après le nettoyage. Ne pas utiliser
de poudres abrasives ni de produits corrosifs.
Nettoyer lenceinte après toute utilisation, quand
le four est encore tiède. Utiliser de leau chaude et
du détergent, rincer et essuyer avec un chiffon
doux. Eviter tout produit abrasif.
Tous les accessoires peuvent être lavés
normalement comme de la vaisselle courante et
passent au lave-vaisselle, sauf les glissières
coulissantes.
Ne jamais nettoyer lappareil avec des nettoyeurs
vapeur ou haute pression.
Nettoyage de la porte
Nettoyer la vitre de la porte à laide déponges et de
produits non abrasifs ; essuyer ensuite avec un
chiffon doux. Ne pas utiliser de matériaux abrasifs
ou de racloirs métalliques pointus qui risquent de
rayer la surface et de briser le verre.
Pour nettoyer plus à fond, il est possible de
démonter la porte du fou :
1. ouvrir la porte complètement (voir figure) ;
2. à laide dun tournevis, soulever et faire pivoter les
leviers F situés sur les deux charnières (voir figure)
;
3. saisir la porte par les côtés,
la refermer lentement mais
pas complètement. Tirer
ensuite la porte vers soi en la
dégageant des charnières
(voir figure). Remonter la porte
en refaisant en sens inverse
les mêmes opérations.
Contrôle des joints
Contrôler périodiquement létat du joint autour de la
porte du four. Sil est abîmé, sadresser au service
après-vente le plus proche de son domicile (voir
Assistance). Mieux vaut ne pas utiliser le four tant
quil nest pas réparé.
Remplacement de lampoule déclairage
Pour changer lampoule déclairage du four :
1. Enlever le
couvercle en verre
du boîtier de la
lampe.
2. Retirer
lampoule et la
remplacer par une
autre de même
type : ampoule
halogène tension
230V, puissance
25 W, culot G 9.
3. Remettre le couvercle à sa place (voir figure).
Ne touchez surtout pas lampoule les mains nues.
Montage du Kit glissières
Pour monter les glissières coulissantes :
1. Enlever les deux cadres en
les dégageant des entretoises
A (voir figure).
2. Choisir le niveau sur lequel
monter la glissière
coulissante. Positionner sur le
cadre dabord le dispositif de
fixation B puis le C en veillant
à bien respecter le sens
dextraction de la glissière.
3. Fixer les deux cadres avec
glissières assemblées dans
les trous prévus sur les parois
du four (voir figure). Les trous
pour le cadre de gauche sont
placés en haut tandis que les
trous pour celui de droite sont
placés en bas.
4. Emboîter enfin les cadres sur les entretoises A.
F
A
B
C
Glissière
gauche
Glissière
droite
Sens
d'extraction
D
hublot
lampe
cavité
Specyfikacje produktu
| Marka: | Hotpoint Ariston |
| Kategoria: | piekarnik |
| Model: | OS 89D IX /HA |
Potrzebujesz pomocy?
Jeśli potrzebujesz pomocy z Hotpoint Ariston OS 89D IX /HA, zadaj pytanie poniżej, a inni użytkownicy Ci odpowiedzą
Instrukcje piekarnik Hotpoint Ariston

12 Lutego 2025
11 Stycznia 2025
11 Stycznia 2025
14 Października 2024
12 Października 2024
4 Października 2024
30 Września 2024
29 Września 2024
27 Września 2024
23 Września 2024
Instrukcje piekarnik
- piekarnik Bauknecht
- piekarnik Ikea
- piekarnik Samsung
- piekarnik Bertazzoni
- piekarnik Electrolux
- piekarnik DeLonghi
- piekarnik AEG
- piekarnik Balay
- piekarnik Beko
- piekarnik Teka
- piekarnik LG
- piekarnik Küppersbusch
- piekarnik Smeg
- piekarnik Götze & Jensen
- piekarnik Gram
- piekarnik Caso
- piekarnik Amica
- piekarnik Gorenje
- piekarnik Etna
- piekarnik LERAN
- piekarnik Sharp
- piekarnik Cookology
- piekarnik Russell Hobbs
- piekarnik Sage
- piekarnik Tefal
- piekarnik Philips
- piekarnik Livoo
- piekarnik SilverCrest
- piekarnik Dometic
- piekarnik Bosch
- piekarnik Xblitz
- piekarnik Dash
- piekarnik Candy
- piekarnik Whirlpool
- piekarnik Ferroli
- piekarnik Cramer
- piekarnik Miele
- piekarnik Brentwood
- piekarnik Midea
- piekarnik Lamona
- piekarnik Severin
- piekarnik Hisense
- piekarnik Berg
- piekarnik Infiniton
- piekarnik Panasonic
- piekarnik Liebherr
- piekarnik Nedis
- piekarnik Medion
- piekarnik Baumatic
- piekarnik Black & Decker
- piekarnik OK
- piekarnik Adler
- piekarnik Hoover
- piekarnik Toshiba
- piekarnik Tesla
- piekarnik Ribimex
- piekarnik Westinghouse
- piekarnik Rinnai
- piekarnik Hendi
- piekarnik Quigg
- piekarnik Romo
- piekarnik Maytag
- piekarnik Domo
- piekarnik GE
- piekarnik Ardes
- piekarnik Taurus
- piekarnik Orbegozo
- piekarnik Blaupunkt
- piekarnik Brandt
- piekarnik Vivax
- piekarnik Siemens
- piekarnik Ambiano
- piekarnik Danby
- piekarnik Grundig
- piekarnik Haier
- piekarnik KKT Kolbe
- piekarnik Cylinda
- piekarnik Jocel
- piekarnik Hyundai
- piekarnik Silverline
- piekarnik Blomberg
- piekarnik Bimar
- piekarnik Rowenta
- piekarnik Brother
- piekarnik Mesko
- piekarnik Husqvarna
- piekarnik BLOW
- piekarnik Concept
- piekarnik Fisher & Paykel
- piekarnik Tripp Lite
- piekarnik ECG
- piekarnik Indesit
- piekarnik Ilve
- piekarnik Unold
- piekarnik Viking
- piekarnik Nodor
- piekarnik CATA
- piekarnik Cambridge
- piekarnik Fiap
- piekarnik Hotpoint
- piekarnik Kenwood
- piekarnik V-Zug
- piekarnik Trisa
- piekarnik Ariston Thermo
- piekarnik Zelmer
- piekarnik Mestic
- piekarnik PKM
- piekarnik Ninja
- piekarnik Cuisinart
- piekarnik Unox
- piekarnik Wilfa
- piekarnik Thor
- piekarnik Amana
- piekarnik Dacor
- piekarnik Krups
- piekarnik Furrion
- piekarnik Bomann
- piekarnik Moulinex
- piekarnik Ursus Trotter
- piekarnik PowerXL
- piekarnik Emerio
- piekarnik Create
- piekarnik Biltema
- piekarnik H.Koenig
- piekarnik InAlto
- piekarnik Meireles
- piekarnik Melissa
- piekarnik Schneider
- piekarnik Enders
- piekarnik Thetford
- piekarnik Stirling
- piekarnik MPM
- piekarnik OneConcept
- piekarnik CDA
- piekarnik Sam Cook
- piekarnik Philco
- piekarnik Neff
- piekarnik Qilive
- piekarnik Corbero
- piekarnik Morphy Richards
- piekarnik Zanussi
- piekarnik Bourgini
- piekarnik Instant
- piekarnik Ravanson
- piekarnik Thermex
- piekarnik Fagor
- piekarnik Redmond
- piekarnik Koenic
- piekarnik Everdure
- piekarnik Thomson
- piekarnik Bröhn
- piekarnik Izzy
- piekarnik Ardo
- piekarnik WMF
- piekarnik ProfiCook
- piekarnik Klarstein
- piekarnik BEEM
- piekarnik Coyote
- piekarnik Güde
- piekarnik Arendo
- piekarnik Witt
- piekarnik Manta
- piekarnik Wolkenstein
- piekarnik Cecotec
- piekarnik Artusi
- piekarnik KitchenAid
- piekarnik AFK
- piekarnik Eta
- piekarnik Camry
- piekarnik Steba
- piekarnik Germanica
- piekarnik Weber
- piekarnik Lenoxx
- piekarnik Qlima
- piekarnik Imperial
- piekarnik Scarlett
- piekarnik Sôlt
- piekarnik Nevir
- piekarnik Navitel
- piekarnik TriStar
- piekarnik Landmann
- piekarnik Exquisit
- piekarnik Bartscher
- piekarnik First Austria
- piekarnik Hestan
- piekarnik Gastroback
- piekarnik GYS
- piekarnik Mitsubishi
- piekarnik Privileg
- piekarnik Dimplex
- piekarnik Aurora
- piekarnik Falmec
- piekarnik Arçelik
- piekarnik Hanseatic
- piekarnik Continental Edison
- piekarnik Delta
- piekarnik Bifinett
- piekarnik Linarie
- piekarnik Maginon
- piekarnik Atag
- piekarnik Rosieres
- piekarnik Franke
- piekarnik DCG
- piekarnik Beautiful
- piekarnik G3 Ferrari
- piekarnik Axis
- piekarnik Sanyo
- piekarnik Westfalia
- piekarnik Hamilton Beach
- piekarnik Gourmetmaxx
- piekarnik Novy
- piekarnik Clatronic
- piekarnik Telefunken
- piekarnik Ferrari
- piekarnik Rommer
- piekarnik Inventum
- piekarnik SVAN
- piekarnik Ariete
- piekarnik IFB
- piekarnik Tepro
- piekarnik TurboTronic
- piekarnik Napoleon
- piekarnik Princess
- piekarnik Innoliving
- piekarnik Sunbeam
- piekarnik Solac
- piekarnik Heller
- piekarnik Euro Appliances
- piekarnik Waring Commercial
- piekarnik Mora
- piekarnik Caple
- piekarnik Duronic
- piekarnik Omega
- piekarnik Comfee
- piekarnik Classique
- piekarnik Bush
- piekarnik New Pol
- piekarnik Kenmore
- piekarnik Kaiser
- piekarnik Breville
- piekarnik BORA
- piekarnik VOX
- piekarnik Insignia
- piekarnik Hiberg
- piekarnik AYA
- piekarnik Pelgrim
- piekarnik Veripart
- piekarnik Esperanza
- piekarnik Chefman
- piekarnik Frilec
- piekarnik Benavent
- piekarnik Element
- piekarnik Tower
- piekarnik Orima
- piekarnik Rex
- piekarnik Kernau
- piekarnik Aspes
- piekarnik Hitachi
- piekarnik Zerowatt
- piekarnik Tracer
- piekarnik Salton
- piekarnik Respekta
- piekarnik Technika
- piekarnik Vedette
- piekarnik Seiki
- piekarnik JennAir
- piekarnik Frigidaire
- piekarnik Galanz
- piekarnik Matrix
- piekarnik Barazza
- piekarnik RCA
- piekarnik Summit
- piekarnik Gemini
- piekarnik Sirius
- piekarnik Foster
- piekarnik Chef
- piekarnik Rommelsbacher
- piekarnik Fulgor Milano
- piekarnik Electroline
- piekarnik Kelvinator
- piekarnik Gaggenau
- piekarnik Sencor
- piekarnik Hobart
- piekarnik Mistral
- piekarnik Elica
- piekarnik Nabo
- piekarnik Avanti
- piekarnik Asko
- piekarnik Kalorik
- piekarnik Binatone
- piekarnik Suntec
- piekarnik Nextbase
- piekarnik Zenith
- piekarnik Flavel
- piekarnik Altus
- piekarnik Esatto
- piekarnik Signature
- piekarnik Daewoo
- piekarnik Capital
- piekarnik Cosori
- piekarnik BlueStar
- piekarnik Consul
- piekarnik BioChef
- piekarnik Porter & Charles
- piekarnik Kunft
- piekarnik Robinhood
- piekarnik Grunkel
- piekarnik Becken
- piekarnik Haeger
- piekarnik Scandomestic
- piekarnik Bizerba
- piekarnik Traeger
- piekarnik Ignis
- piekarnik Guzzanti
- piekarnik Mach
- piekarnik Emilia
- piekarnik Aroma
- piekarnik Edilkamin
- piekarnik Dualit
- piekarnik Comelec
- piekarnik Campart
- piekarnik Belling
- piekarnik De Dietrich
- piekarnik ZLine
- piekarnik Campingaz
- piekarnik Magic Chef
- piekarnik Eurom
- piekarnik Clas Ohlson
- piekarnik Arctic Cooling
- piekarnik Sauber
- piekarnik Smith&Brown
- piekarnik Sogo
- piekarnik George Foreman
- piekarnik Crosley
- piekarnik Nutrichef
- piekarnik Constructa
- piekarnik Proline
- piekarnik Euromaid
- piekarnik Char-Broil
- piekarnik Flama
- piekarnik BLANCO
- piekarnik Emax
- piekarnik Ideal
- piekarnik Scancool
- piekarnik AENO
- piekarnik Thermador
- piekarnik Bass Polska
- piekarnik Finlux
- piekarnik Bestron
- piekarnik Optimum
- piekarnik Atosa
- piekarnik Swan
- piekarnik Zanker
- piekarnik Kluge
- piekarnik Acec
- piekarnik Alpina
- piekarnik Airlux
- piekarnik Aga
- piekarnik Ariston
- piekarnik Techwood
- piekarnik Arthur Martin
- piekarnik Korona
- piekarnik Saturn
- piekarnik Tiger
- piekarnik Progress
- piekarnik Zanussi-electrolux
- piekarnik Tomado
- piekarnik Bellini
- piekarnik Oster
- piekarnik Vestel
- piekarnik Sinbo
- piekarnik Jata
- piekarnik Fritel
- piekarnik Prima
- piekarnik Junker
- piekarnik Outwell
- piekarnik Mabe
- piekarnik Monogram
- piekarnik Iberna
- piekarnik Logik
- piekarnik Valberg
- piekarnik Scholtes
- piekarnik Profilo
- piekarnik Ernesto
- piekarnik Mellerware
- piekarnik Castor
- piekarnik Heinner
- piekarnik Lakeland
- piekarnik Termozeta
- piekarnik Bella
- piekarnik Palson
- piekarnik Eldom
- piekarnik Jocca
- piekarnik Maxxmee
- piekarnik Hoover-Helkama
- piekarnik Juno
- piekarnik Defy
- piekarnik Premium
- piekarnik Blokker
- piekarnik Trebs
- piekarnik Luxor
- piekarnik Nordmende
- piekarnik Rangemaster
- piekarnik Friac
- piekarnik Boretti
- piekarnik Eico
- piekarnik Hansa
- piekarnik Drew & Cole
- piekarnik Kubo
- piekarnik Elba
- piekarnik WLA
- piekarnik SEB
- piekarnik Champion
- piekarnik Everglades
- piekarnik Steel Cucine
- piekarnik Buffalo
- piekarnik Jenn-Air
- piekarnik Limit
- piekarnik Freggia
- piekarnik Listo
- piekarnik Edesa
- piekarnik Ufesa
- piekarnik Milectric
- piekarnik Leonard
- piekarnik Presto
- piekarnik Lofra
- piekarnik Zavor
- piekarnik Laica
- piekarnik New World
- piekarnik Leisure
- piekarnik Kayoba
- piekarnik Bompani
- piekarnik Glem Gas
- piekarnik FriFri
- piekarnik Viva
- piekarnik Nova
- piekarnik M-System
- piekarnik Koblenz
- piekarnik Proctor Silex
- piekarnik Primo
- piekarnik Barbecook
- piekarnik German Pool
- piekarnik Creda
- piekarnik Atlantic
- piekarnik Falcon
- piekarnik Saro
- piekarnik Airforce
- piekarnik Godrej
- piekarnik Konig
- piekarnik Ices
- piekarnik Conrad
- piekarnik Mx Onda
- piekarnik Igenix
- piekarnik Kleenmaid
- piekarnik Essentiel B
- piekarnik RGV
- piekarnik Montiss
- piekarnik Team
- piekarnik Schock
- piekarnik Stoves
- piekarnik Faber
- piekarnik Edy
- piekarnik CaterChef
- piekarnik Kambrook
- piekarnik Parmco
- piekarnik Roadstar
- piekarnik Zephir
- piekarnik Eurotech
- piekarnik Efbe-schott
- piekarnik Cadac
- piekarnik Wolf
- piekarnik Carrefour Home
- piekarnik Equator
- piekarnik Brixton
- piekarnik Vestfrost
- piekarnik Superior
- piekarnik Day
- piekarnik Koenig
- piekarnik Outdoorchef
- piekarnik Smev
- piekarnik Upo
- piekarnik Belion
- piekarnik Nesco
- piekarnik Waves
- piekarnik SIBIR
- piekarnik Coline
- piekarnik White And Brown
- piekarnik Eccotemp
- piekarnik Home Electric
- piekarnik Sauter
- piekarnik Café
- piekarnik ARC
- piekarnik Ellrona
- piekarnik Lynx
- piekarnik Bluesky
- piekarnik Burco
- piekarnik Khind
- piekarnik Tecnolux
- piekarnik Tisira
- piekarnik Micromaxx
- piekarnik Fratelli Onofri
- piekarnik Ronco
- piekarnik Eurochef
- piekarnik Premier
- piekarnik Weasy
- piekarnik Marynen
- piekarnik Opera
- piekarnik Therma
- piekarnik La Germania
- piekarnik Luxell
- piekarnik Krefft
- piekarnik Solitaire
- piekarnik Oranier
- piekarnik Leventi
- piekarnik Orava
- piekarnik Rösle
- piekarnik James
- piekarnik Roadeyes
- piekarnik Jamie Oliver
- piekarnik Globe
- piekarnik Esmaltec
- piekarnik Riviera And Bar
- piekarnik Apelson
- piekarnik Dominox
- piekarnik Thermomate
- piekarnik Melchioni
- piekarnik Fine Dine
- piekarnik Venga
- piekarnik OBU
- piekarnik Rival
- piekarnik Eudora
- piekarnik Thomas
- piekarnik Steelmatic
- piekarnik Supra
- piekarnik Wells
- piekarnik Kucht
- piekarnik Avantco
- piekarnik Kogan
- piekarnik Mibrasa
- piekarnik Vulcan
- piekarnik Lacanche
- piekarnik Emeril Lagasse
- piekarnik Verona
- piekarnik Riviera Bar
- piekarnik Thane
- piekarnik LotusGrill
- piekarnik APW Wyott
- piekarnik Cuckoo
- piekarnik General Electric
- piekarnik MSR
- piekarnik SPT
- piekarnik Pit Boss
- piekarnik Hatco
- piekarnik Elin
- piekarnik High One
- piekarnik Ciarra
- piekarnik WestBend
- piekarnik Companion
- piekarnik XO
- piekarnik NU-VU
- piekarnik Curtiss
- piekarnik Blodgett
- piekarnik Nemco
- piekarnik K&H
- piekarnik Winia
- piekarnik Bakers Pride
- piekarnik Alto-Shaam
- piekarnik TurboChef
- piekarnik Simfer
- piekarnik Firefriend
- piekarnik Merrychef
- piekarnik LAFE
- piekarnik Promis
- piekarnik Inno-Hit
- piekarnik Fisher Paykel
- piekarnik Brock
- piekarnik Arda
- piekarnik Casselin
- piekarnik Girmi
- piekarnik Americana
- piekarnik Petromax
- piekarnik YUNA
- piekarnik Spring USA
- piekarnik Cosmo
- piekarnik Elements
- piekarnik Forge Adour
- piekarnik Chef-Master
- piekarnik UGo
- piekarnik Eltac
- piekarnik Kitchenware
- piekarnik FAURE
- piekarnik Novamatic
- piekarnik VENINI
- piekarnik Buschbeck
- piekarnik Blackstone
- piekarnik BSK
- piekarnik New.Up!
- piekarnik Roller Grill
- piekarnik DPM
- piekarnik Studio
- piekarnik Adora
- piekarnik Sunpentown
- piekarnik Backyard Pro
- piekarnik Brastemp
- piekarnik Royal Catering
- piekarnik BAXTER
- piekarnik Vitrokitchen
- piekarnik Longvie
- piekarnik Gasmate
- piekarnik Arthur Martin-Electrolux
- piekarnik Triomph
- piekarnik PITT
- piekarnik Elektra Bregenz
- piekarnik KB Elements
- piekarnik TZS First Austria
- piekarnik Pyramis
- piekarnik Pando
- piekarnik Wiggo
- piekarnik Nestor Martin-Electrolux
- piekarnik Imarflex
- piekarnik Mayer
- piekarnik Acros
- piekarnik Thermarest
- piekarnik HomeCraft
- piekarnik La Cornue
- piekarnik Master Kitchen
- piekarnik Goldbrunn
- piekarnik Platypus
- piekarnik Yamazen
- piekarnik Masterpro
- piekarnik Fratelli
- piekarnik St George
- piekarnik Helkama
- piekarnik Pitsos
- piekarnik Sheffield
- piekarnik Lacunza
- piekarnik Globe Fire
- piekarnik Radiola
Najnowsze instrukcje dla piekarnik

9 Kwietnia 2025

9 Kwietnia 2025

9 Kwietnia 2025

9 Kwietnia 2025

9 Kwietnia 2025
9 Kwietnia 2025
9 Kwietnia 2025
9 Kwietnia 2025

9 Kwietnia 2025

9 Kwietnia 2025