Instrukcja obsługi Honeywell Performance HD251
Honeywell
Kamera monitorująca
Performance HD251
Przeczytaj poniżej 📖 instrukcję obsługi w języku polskim dla Honeywell Performance HD251 (2 stron) w kategorii Kamera monitorująca. Ta instrukcja była pomocna dla 4 osób i została oceniona przez 2 użytkowników na średnio 4.5 gwiazdek
Strona 1/2

800-11942V1 - - A 06/2012
HD251
Rugged Fixed Mini-Dome Camera
Quick Installation Guide
800-11942V1–Rev A–06/2012
FCC Compliance Statement
Information to the user: This equipment has been tested and found to comply with the
limits for a Class A digital device. Pursuant to part 15 of the FCC Rules, these limits are
designed to provide reasonable protection against harmful interference when the
equipment is operated in a commercial environment. This equipment generates, uses and
can radiate radio frequency energy and, if not installed and used in accordance with the
instructions, may cause harmful interference to radio communications. Operation of this
equipment in a residential area is likely to cause harmful interference in which case the user
will be required to correct the interference at his own expense.
CAUTION Changes or modifications not expressly approved by
the party responsible for compliance could void the user’s authority to
operate the equipment.
Canadian Compliance Statement
This Class A digital apparatus complies with Canadian ICES-003.
Cet appareil numérique de la Classe A est conforme à la norme NMB-003 du Canada.
Warranty and Service
Subject to the terms and conditions listed on the Product warranty, during the warranty
period Honeywell will repair or replace, at its sole option, free of charge, any defective
product returned prepaid.
In the event you have a problem with any Honeywell product, please call Customer Service
at 1.800.796.CCTV (North America only) for assistance or to request a Return Merchandise
Authorization (RMA) number.
Be sure to have the model number, serial number, and the nature of the problem available
for the technical service representative.
Prior authorization must be obtained for all returns, exchanges, or credits. Items shipped
to Honeywell without a clearly identified Return Merchandise Authorization (RMA)
number may be refused.
CAUTION THIS SYMBOL INDICATES THAT
DANGEROUS VOLTAGE
CONSTITUTING A RISK OF
ELECTRIC SHOCK IS PRESENT
WITHIN THE UNIT.
CAUTION:TO REDUCE THE RIS K OF ELECTRIC
SHOCK, DO NOT REMOVE THE COVER.
NO USER-SERVICEABLE PARTS INSIDE.
REFER SERVICING TO QUALIFIED S ERVICE
PERSONNEL.
THIS SYMBOL INDICATES THAT
IMPORTANT OPERAT ING AND•
MAINTENANCE INSTRUCTIONS
ACCOMPANY THIS UNIT.
RISK OF ELECTRIC
SHOCK
DO NOT OPEN
1. Safety Instructions
BEFORE OPERATING OR INSTALLING THE UNIT, READ AND FOLLOW ALL
INSTRUCTIONS.
AFTER INSTALLATION, retain the safety and operating instructions for future
reference.
1. HEED WARNINGS - Adhere to all warnings on the unit and in the operating
instructions.
2. INSTALLATION
• Install in accordance with the manufacturer’s instructions.
• Installation and servicing should be performed only by qualified and
experienced technicians to conform to all local codes and to maintain your
warranty.
• Any wall or ceiling mounting of the product should follow the manufacturer’s
instructions and use a mounting kit approved or recommended by the
manufacturer.
3. POWER SOURCES - This product should be operated only from the type of power
source indicated on the marking label. If you are not sure of the type of power
supplied to your facility, consult your product dealer or local power company.
WARNING
This device is configured for 12 V DC or 24 V
AC operation; do NOT connect to higher voltage. Use only
with NRTL-approved class 2 power supplies.
4. HEAT - Situate away from items that produce heat or are heat sources such as
radiators, heat registers, stoves, or other products (including amplifiers).
5. MOUNTING SYSTEM - Use only with a mounting system recommended by the
manufacturer, or sold with the product.
6. ATTACHMENTS - Do not use attachments not recommended by the product
manufacturer as they may result in the risk of fire, electric shock, or injury to persons.
7. ACCESSORIES - Only use accessories specified by the manufacturer.
8. CLEANING - Do not use liquid cleaners or aerosol cleaners. Use a damp cloth for
cleaning.
9. SERVICING - Do not attempt to service this unit yourself as opening or removing
covers may expose you to dangerous voltage or other hazards. Refer all servicing to
qualified service personnel.
10. REPLACEMENT PARTS - When replacement parts are required, be sure the service
technician has used replacement parts specified by the manufacturer or have the
same characteristics as the original part. Unauthorized substitutions may result in
fire, electric shock or other hazards.
2. Precautions
Precautions for use
• Read and keep these instructions.
• This camera should be installed by qualified personnel only.
• There are no user-serviceable parts inside. Do not dissemble this camera other than
to make the initial adjustments.
• Do not touch the camera lens, dome, or bezel (front glass plate).
• Do not drop the camera or subject it to physical shock.
• Do not use a strong or abrasive detergent when cleaning the camera.
• Use a UL-approved regulated 24 V AC or 12 V DC power supply.
• Use an appropriate low voltage power cable to prevent fire or electrical shock.
• Please ensure that your installation area can support the weight of the camera.
Operating Conditions
• Avoid aiming the camera towards an extreme light source (for example, light fixtures)
to prevent damaging the CCD. Do not view direct sunlight with the camera.
• Avoid operating or storing the unit in the following locations:
• Extremely humid, dusty, hot/cold environments; extreme temperature
conditions where the operating temperature is outside the recommended
range of 14°F to 122°F (-10°C to 50°C). Be especially careful to provide
ventilation when operating under high temperatures.
• Close to sources of powerful radio or TV transmitters.
• Near a cooling or heating device.
• Close to fluorescent lamps or objects reflecting light.
• Under unstable light sources (may cause flickering).
3. Package Includes
• a HD251 Vandal Dome Camera
• a User Guide
• a Quick Install Guide (this document)
• a Hardware Installation kit (including screws and an Allen key)
• Local Video Output and Power cables
4. Cable Connections
Key Features
• 1/3” Interline Transfer CCD image
sensor
• 620 TV lines
• Day/night
• Built-in 2.8 –12 mm DC Vari-focal
Auto Iris lens
• 8 Privacy Zones
• Mirror function
• User-friendly design for easy access
and adjustment of camera settings
• Vandal-proof and weather-resistant
housing: IP66 rating
• 3-D axis gimbal
• Local Video Out port for setup and
configuration
• Back Light Compensation
• 12 V DC, 24 V AC power supply
• Quick and easy setup with 6 presets
2 | HD251 Rugged Fixed Mini-Dome Quick Install Guide
www.honeywellvideo.com
www.honeywellvideo.com
+1.800.796.CCTV (North America only)
HVSsupport@honeywell.com
© 2012 Honeywell International Inc. All rights reserved. No part of this publication may be reproduced by any
means without written permission from Honeywell. The information in this publication is believed to be accurate
in all respects. However, Honeywell cannot assume responsibility for any consequences resulting from the use
thereof. The information contained herein is subject to change without notice. Revisions or new editions to this
publication may be issued to incorporate such changes.
Document 800-11942V1 – Rev A – 06/2012
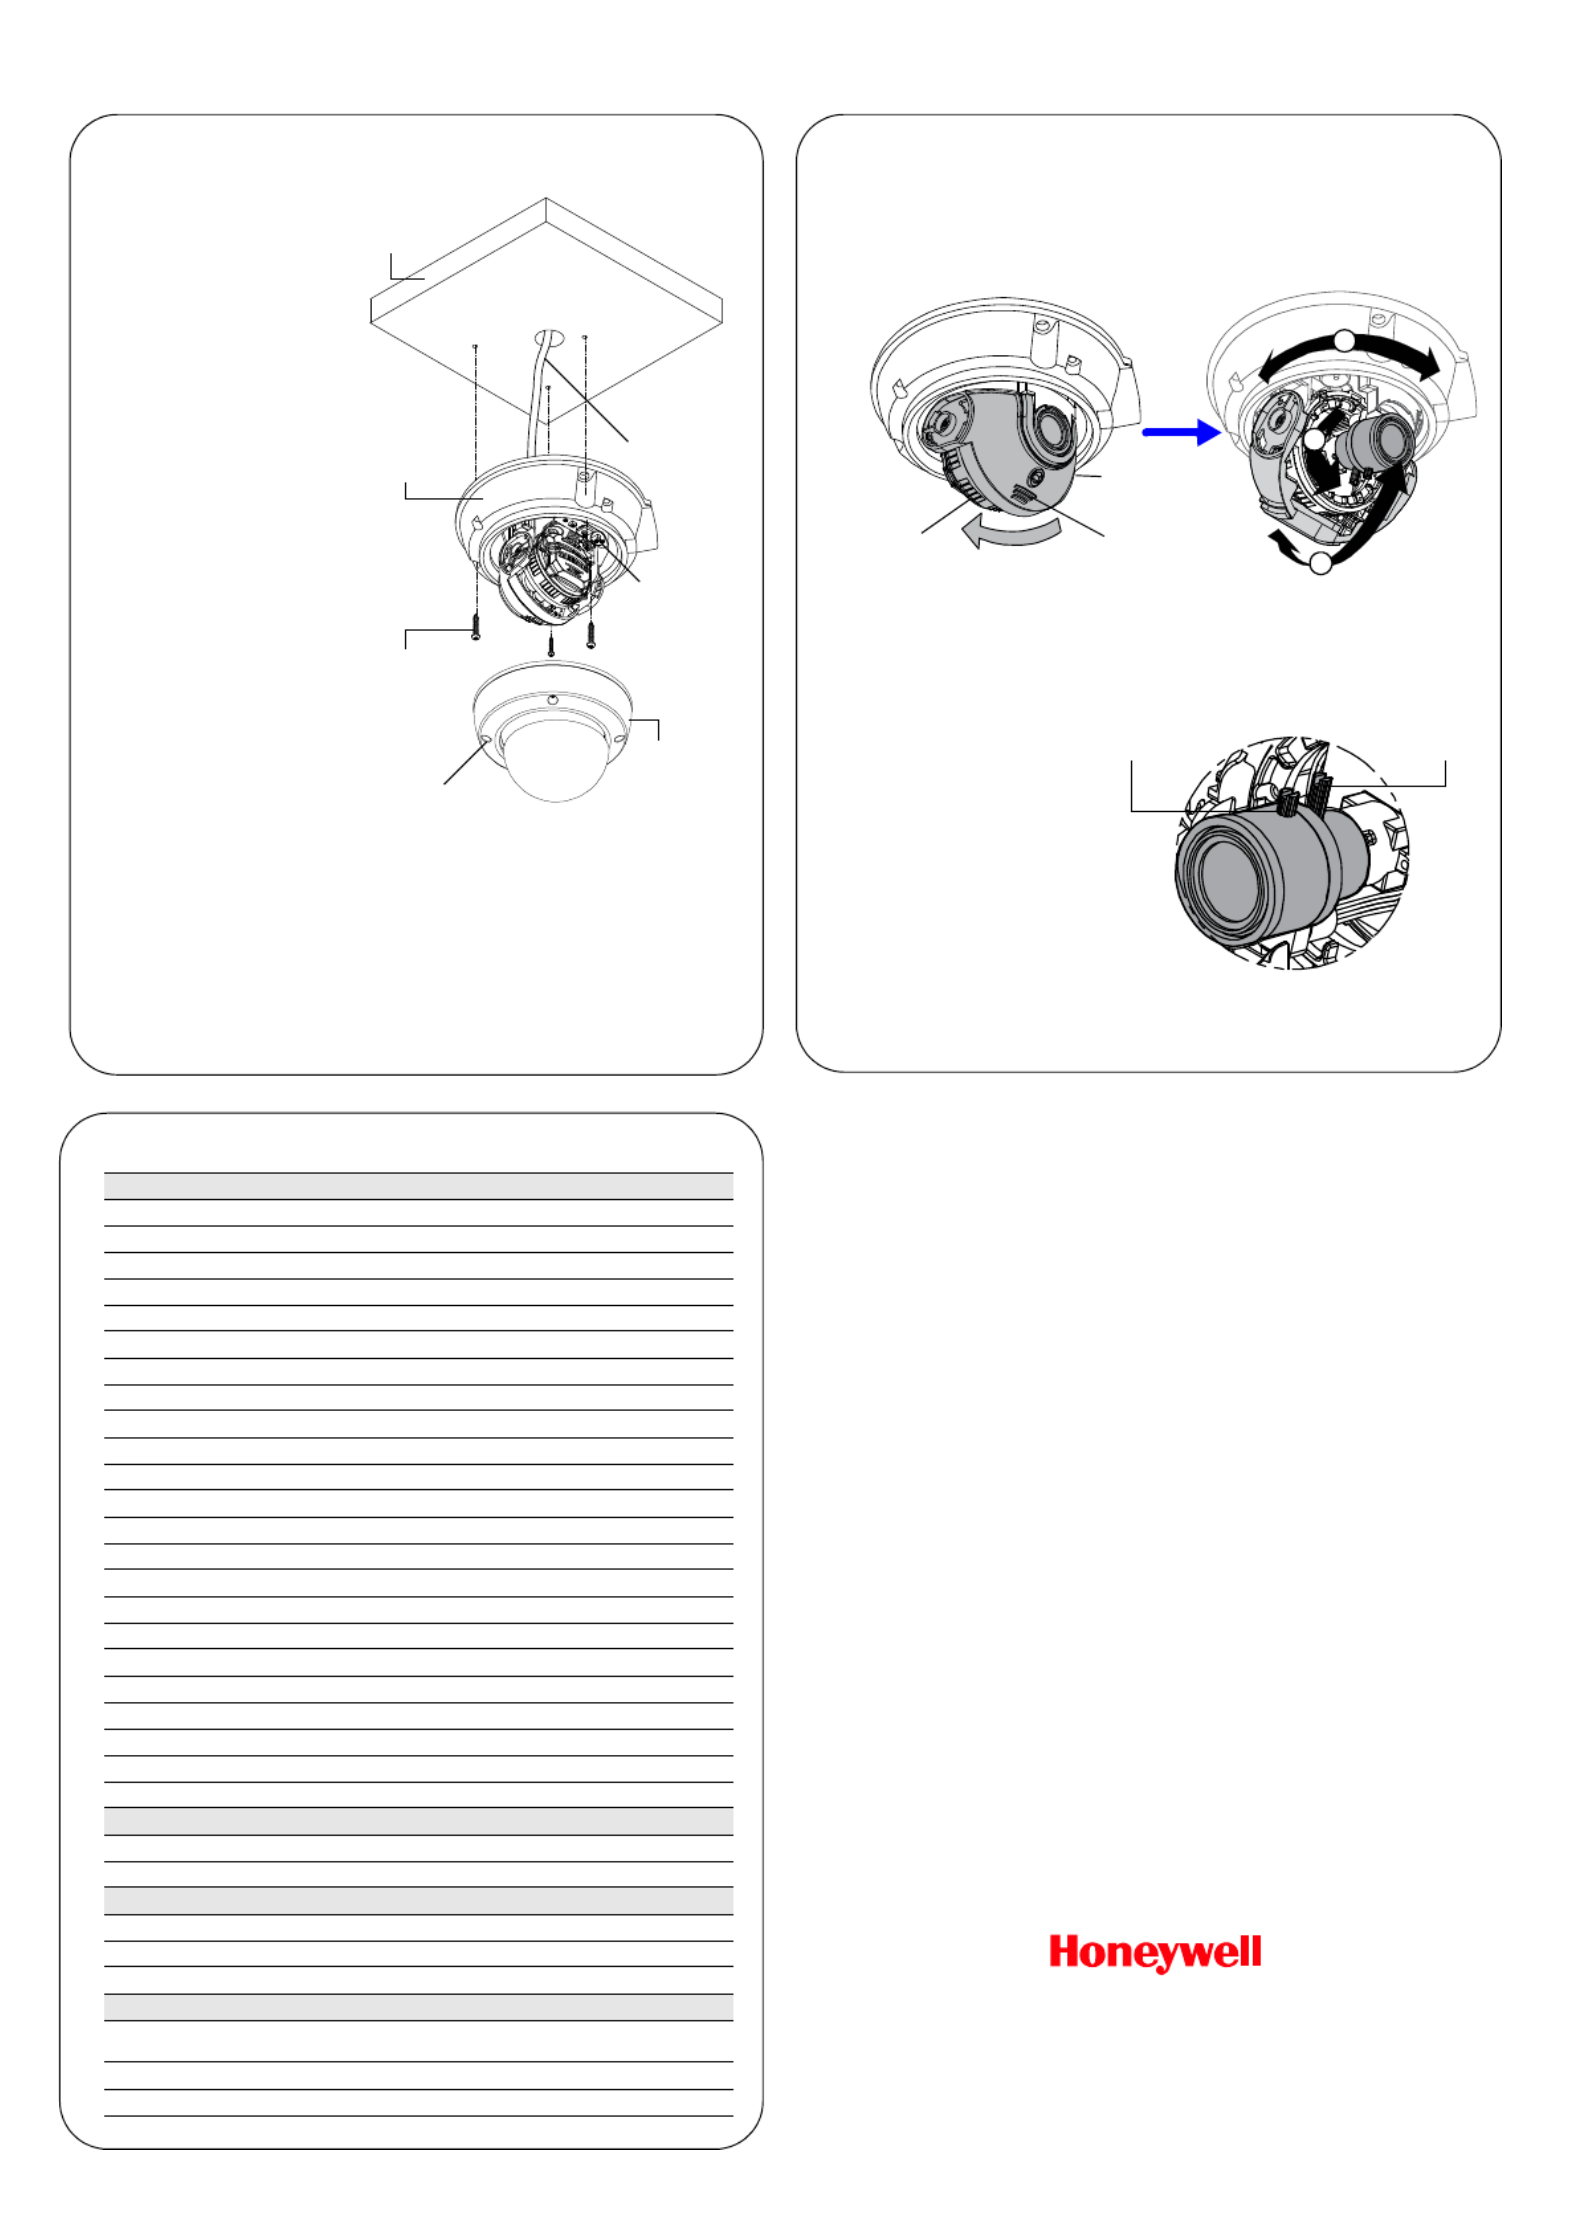
5. Camera Installation
1. Remove the dome from the
housing base by loosening
the captured screws on the
dome.
2. Connect the yellow video
output connector to the
video input port on your
monitor/DVR. Connect the
red power connector to
your 12 VDC power source.
Feed the cables into the
hole in the mounting
surface (such as a ceiling,
see graphic).
3. Install the housing base
onto the mounting surface
using the three mounting
screws provided.
4. Connect the local video
output cable to the video
output connector on the
camera board, located
behind the lens and gimbal.
Connect the other end of
the video connector to the
monitor you will use while
setting up the camera.
Note The video output
connector on the
camera board is
located next to the OSD
menu controls that you
can use to make
configuration changes.
5. While monitoring the
camera picture on the monitor, adjust the camera position (orientation), zoom and
focus settings (as described in the Camera Positioning, Zoom and Focus Adjustment
section).
6. Using the connected monitor, make camera configuration changes through the OSD
menus (see the Configuration Guide included with your camera for more
information).
7. Re-install the dome cover to the housing base by aligning the captured screws to the
screw holes, and then tightening the screws.
Video and
power cable
(see the Cable
Connections
diagram).
Dome
cover
2nd video
output
connector
Mounting
surface
Housing
base
Mounting
screws
Captured
screws
6. Camera Positioning, Zoom and Focus Adjustment
1. With the dome removed, you can see that the lens is surrounded by a protective
shroud (see the image below).
2. Use two hands to draw back the shroud from the lens by placing both thumbs on the
upper front section of the shroud with your fingers bracing the back side of the lens
and pushing your thumbs towards your fingers (see the image below).
3. Position the camera lens and gimbal so that the camera is viewing the required video
scene. Use the connected monitor to check that the field of view is oriented correctly
as you make the adjustments. You can pan the entire camera board and gimbal
(360°, labelled A in graphic above). Tilt the camera lens up and down (90°, labelled
B C), and/or rotate the lens (360°, ).
4. Use the three points of
adjustment (A, B, and C) to
position the camera
correctly.
5. Use the two levers located
on the lens to adjust zoom
and focus, as needed (see
the image for zoom and
focus lever locations).
6. When the camera is
correctly positioned,
zoomed and focused, push
the shroud back together
with the lens.
When you push the shroud back together with the lens, this will change the tilt angle that you
have set for the lens (adjustment labelled B). When the shroud and lens are snapped back
together, tilt both pieces back to the desired lens position.
Place thumbs
here to push
back shroud
Place fingers behind
the lens to brace it
when pushing back
the shroud
Camera
shroud
and lens
A
C
B
Focus
adjustment
Zoom
adjustment
8. Specifications
Video Signal Specifications
Video Standard NTSC
Scanning System 2:1 Interlace
Image Sensor 1/3 Interline Transfer CCD
Number of Pixels 768 (H) x 494 (V)
Minimum Illumination 0.3 lux (Color)
Horizontal Resolution 620 TVL
Video Output 1.0 Vp-p, composite @ 75Ohms
Sync System Internal / Line Lock
S/N Ratio 50dB (AGC Off)
Auto Gain Control Selectable: OFF, LOW, MID, HIGH
Automatic Electronic Shutter 1/60 - 1/100,000 second
White Balance ATW, ATC, MANUAL
BLC/HSBLC Selectable: OFF/ON
Day/Night (SDN or Electronic) Color, B/W, AUTO, EXT
Lens Type 2.8 –12 mm Vari-focal Auto Iris
Angle of View H: 96.7° - 24.1° V: 71.2° - 18.2°
SENS-UP Auto (x2 ~ x1024)
Mirror Function OFF/ON (horizontal mirror), selectable
Motion Detection ON/OFF (4 programmable zones)
Privacy Masking ON/OFF (8 programmable zones)
D-WDR ON/OFF (adjustable level)
Sharpness ON/OFF (adjustable level)
Blemish Compensation REAL auto
Electrical Specifications
Input Voltage Dual Voltage (24 V AC; 12 V DC)
Input Range 12 V DC ± 10%; 24 V DC ± 10%
Mechanical Specifications
Dimensions 5.9”(150 mm) (W) x 3.9” (100 mm) (H)
Weight 3.1 lbs (1.4 kg)
Construction Housing: Die-cast Aluminum; Dome: Polycarbonate
Environmental Specifications
Temperature Operating: 14°F to 122°F (-10°C to 50°C)
Storage: -4°F to 140°F (-20°C to 60°C)
Relative Humidity 0% to 85%, non-condensing
Rating IP66
Specyfikacje produktu
| Marka: | Honeywell |
| Kategoria: | Kamera monitorująca |
| Model: | Performance HD251 |
Potrzebujesz pomocy?
Jeśli potrzebujesz pomocy z Honeywell Performance HD251, zadaj pytanie poniżej, a inni użytkownicy Ci odpowiedzą
Instrukcje Kamera monitorująca Honeywell

21 Grudnia 2024
21 Grudnia 2024
23 Września 2024
19 Września 2024
14 Września 2024
13 Września 2024
11 Września 2024
10 Września 2024
10 Września 2024
10 Września 2024
Instrukcje Kamera monitorująca
- Kamera monitorująca Sony
- Kamera monitorująca Samsung
- Kamera monitorująca Tenda
- Kamera monitorująca Motorola
- Kamera monitorująca Stabo
- Kamera monitorująca Logitech
- Kamera monitorująca Xiaomi
- Kamera monitorująca Braun
- Kamera monitorująca Pioneer
- Kamera monitorująca TP-Link
- Kamera monitorująca Philips
- Kamera monitorująca Bosch
- Kamera monitorująca Gigaset
- Kamera monitorująca Hikvision
- Kamera monitorująca EZVIZ
- Kamera monitorująca Conceptronic
- Kamera monitorująca Panasonic
- Kamera monitorująca Canon
- Kamera monitorująca Crestron
- Kamera monitorująca Withings
- Kamera monitorująca Asus
- Kamera monitorująca Nedis
- Kamera monitorująca AG Neovo
- Kamera monitorująca Reolink
- Kamera monitorująca Boss
- Kamera monitorująca TRENDnet
- Kamera monitorująca Marquant
- Kamera monitorująca Toshiba
- Kamera monitorująca D-Link
- Kamera monitorująca August
- Kamera monitorująca Niceboy
- Kamera monitorująca Ring
- Kamera monitorująca Garmin
- Kamera monitorująca Imou
- Kamera monitorująca Blaupunkt
- Kamera monitorująca Grundig
- Kamera monitorująca APC
- Kamera monitorująca BLOW
- Kamera monitorująca Manhattan
- Kamera monitorująca Strong
- Kamera monitorująca Swann
- Kamera monitorująca Kwikset
- Kamera monitorująca Kodak
- Kamera monitorująca Cisco
- Kamera monitorująca ORNO
- Kamera monitorująca Broan
- Kamera monitorująca Moxa
- Kamera monitorująca Synology
- Kamera monitorująca Gembird
- Kamera monitorująca ZTE
- Kamera monitorująca Turing
- Kamera monitorująca Lindy
- Kamera monitorująca Minox
- Kamera monitorująca Zebra
- Kamera monitorująca DSC
- Kamera monitorująca JVC
- Kamera monitorująca ZyXEL
- Kamera monitorująca Trust
- Kamera monitorująca LogiLink
- Kamera monitorująca Furrion
- Kamera monitorująca Linksys
- Kamera monitorująca Google
- Kamera monitorująca Digitus
- Kamera monitorująca Vimar
- Kamera monitorująca V-TAC
- Kamera monitorująca Dahua Technology
- Kamera monitorująca Schneider
- Kamera monitorująca Eufy
- Kamera monitorująca Ricoh
- Kamera monitorująca Emos
- Kamera monitorująca AVMATRIX
- Kamera monitorująca Renkforce
- Kamera monitorująca Rollei
- Kamera monitorująca Marshall
- Kamera monitorująca Perel
- Kamera monitorująca Somfy
- Kamera monitorująca Uniden
- Kamera monitorująca Netgear
- Kamera monitorująca Thomson
- Kamera monitorująca DiO
- Kamera monitorująca Velleman
- Kamera monitorująca Ferguson
- Kamera monitorująca DataVideo
- Kamera monitorująca Delta Dore
- Kamera monitorująca Pyle
- Kamera monitorująca Intellinet
- Kamera monitorująca CRUX
- Kamera monitorująca Setti+
- Kamera monitorująca Waeco
- Kamera monitorująca Vivotek
- Kamera monitorująca Vtech
- Kamera monitorująca Speco Technologies
- Kamera monitorująca EtiamPro
- Kamera monitorująca Edimax
- Kamera monitorująca Petcube
- Kamera monitorująca ION
- Kamera monitorująca First Alert
- Kamera monitorująca AirLive
- Kamera monitorująca Maginon
- Kamera monitorująca EnGenius
- Kamera monitorująca SPC
- Kamera monitorująca Planet
- Kamera monitorująca Brilliant
- Kamera monitorująca Genie
- Kamera monitorująca LevelOne
- Kamera monitorująca Axis
- Kamera monitorująca Sanyo
- Kamera monitorująca Lorex
- Kamera monitorująca Control4
- Kamera monitorująca Milesight
- Kamera monitorująca Aluratek
- Kamera monitorująca Abus
- Kamera monitorująca Elro
- Kamera monitorująca Olympia
- Kamera monitorująca Hama
- Kamera monitorująca Marmitek
- Kamera monitorująca Ubiquiti Networks
- Kamera monitorująca Western Digital
- Kamera monitorująca Netatmo
- Kamera monitorująca Schwaiger
- Kamera monitorująca Promise Technology
- Kamera monitorująca GVI Security
- Kamera monitorująca AVer
- Kamera monitorująca ZKTeco
- Kamera monitorująca Netis
- Kamera monitorująca Extech
- Kamera monitorująca Denver
- Kamera monitorująca Anker
- Kamera monitorująca Allnet
- Kamera monitorująca Marshall Electronics
- Kamera monitorująca Orion
- Kamera monitorująca Yale
- Kamera monitorująca SereneLife
- Kamera monitorująca Ernitec
- Kamera monitorująca AVerMedia
- Kamera monitorująca MEE Audio
- Kamera monitorująca Genius
- Kamera monitorująca Trevi
- Kamera monitorująca Technaxx
- Kamera monitorująca Atlona
- Kamera monitorująca Hanwha
- Kamera monitorująca Overmax
- Kamera monitorująca Quantum
- Kamera monitorująca Y-cam
- Kamera monitorująca Grandstream
- Kamera monitorująca Raymarine
- Kamera monitorująca Powerfix
- Kamera monitorująca Avanti
- Kamera monitorująca Ikan
- Kamera monitorująca Alecto
- Kamera monitorująca Avidsen
- Kamera monitorująca JUNG
- Kamera monitorująca Burg Wächter
- Kamera monitorująca Foscam
- Kamera monitorująca Lumens
- Kamera monitorująca Monacor
- Kamera monitorująca Dörr
- Kamera monitorująca M-e
- Kamera monitorująca EVE
- Kamera monitorująca Smartwares
- Kamera monitorująca Adj
- Kamera monitorująca Qian
- Kamera monitorująca Arenti
- Kamera monitorująca Elmo
- Kamera monitorująca Vitek
- Kamera monitorująca Alfatron
- Kamera monitorująca UniView
- Kamera monitorująca Clas Ohlson
- Kamera monitorująca Laserliner
- Kamera monitorująca Megasat
- Kamera monitorująca REVO
- Kamera monitorująca BZBGear
- Kamera monitorująca BirdDog
- Kamera monitorująca KJB Security Products
- Kamera monitorująca HiLook
- Kamera monitorująca Profile
- Kamera monitorująca Aldi
- Kamera monitorująca Aritech
- Kamera monitorująca Acti
- Kamera monitorująca ACME
- Kamera monitorująca Flamingo
- Kamera monitorująca Caliber
- Kamera monitorująca Eminent
- Kamera monitorująca Sitecom
- Kamera monitorująca Exibel
- Kamera monitorująca Fortinet
- Kamera monitorująca KlikaanKlikuit
- Kamera monitorująca Trebs
- Kamera monitorująca Ednet
- Kamera monitorująca Steren
- Kamera monitorująca Flir
- Kamera monitorująca Buffalo
- Kamera monitorująca Arlo
- Kamera monitorująca Nest
- Kamera monitorująca Siedle
- Kamera monitorująca Hive
- Kamera monitorująca Switel
- Kamera monitorująca Chacon
- Kamera monitorująca InFocus
- Kamera monitorująca Hombli
- Kamera monitorująca Naxa
- Kamera monitorująca Konig
- Kamera monitorująca Valueline
- Kamera monitorująca BRK
- Kamera monitorująca QSC
- Kamera monitorująca Xavax
- Kamera monitorująca Vaddio
- Kamera monitorująca Gira
- Kamera monitorująca Interlogix
- Kamera monitorująca Boyo
- Kamera monitorująca IC Intracom
- Kamera monitorująca Iget
- Kamera monitorująca EverFocus
- Kamera monitorująca Adesso
- Kamera monitorująca Satel
- Kamera monitorująca POSline
- Kamera monitorująca Notifier
- Kamera monitorująca Hawking Technologies
- Kamera monitorująca Friedland
- Kamera monitorująca Nexxt
- Kamera monitorująca Monoprice
- Kamera monitorująca Watec
- Kamera monitorująca Beafon
- Kamera monitorująca Chuango
- Kamera monitorująca ETiger
- Kamera monitorująca Videcon
- Kamera monitorująca INSTAR
- Kamera monitorująca Provision ISR
- Kamera monitorująca Aqara
- Kamera monitorująca Advantech
- Kamera monitorująca Digital Watchdog
- Kamera monitorująca Ganz
- Kamera monitorująca AViPAS
- Kamera monitorująca ClearOne
- Kamera monitorująca Ebode
- Kamera monitorująca Oplink
- Kamera monitorująca Sonic Alert
- Kamera monitorująca Linear PRO Access
- Kamera monitorująca Summer Infant
- Kamera monitorująca SMC
- Kamera monitorująca Topica
- Kamera monitorująca Kogan
- Kamera monitorująca Iiquu
- Kamera monitorująca Verint
- Kamera monitorująca Brinno
- Kamera monitorująca Rostra
- Kamera monitorująca Caddx
- Kamera monitorująca Spyclops
- Kamera monitorująca EKO
- Kamera monitorująca Kguard
- Kamera monitorująca Woonveilig
- Kamera monitorująca Mobi
- Kamera monitorująca Surveon
- Kamera monitorująca Hollyland
- Kamera monitorująca Epcom
- Kamera monitorująca Indexa
- Kamera monitorująca Lutec
- Kamera monitorująca Whistler
- Kamera monitorująca ClearView
- Kamera monitorująca VideoComm
- Kamera monitorująca IMILAB
- Kamera monitorująca 3xLOGIC
- Kamera monitorująca Pelco
- Kamera monitorująca Leviton
- Kamera monitorująca Inkovideo
- Kamera monitorująca Pentatech
- Kamera monitorująca Weldex
- Kamera monitorująca SecurityMan
- Kamera monitorująca Canyon
- Kamera monitorująca CNB Technology
- Kamera monitorująca Tapo
- Kamera monitorująca Aigis
- Kamera monitorująca Exacq
- Kamera monitorująca Brickcom
- Kamera monitorująca Laxihub
- Kamera monitorująca Securetech
- Kamera monitorująca EFB Elektronik
- Kamera monitorująca NetMedia
- Kamera monitorująca Videotec
- Kamera monitorująca Illustra
- Kamera monitorująca Nivian
- Kamera monitorująca E-bench
- Kamera monitorująca Syscom
- Kamera monitorująca Tecno
- Kamera monitorująca Night Owl
- Kamera monitorująca Guardzilla
- Kamera monitorująca Astak
- Kamera monitorująca Blink
- Kamera monitorująca Milestone Systems
- Kamera monitorująca Zavio
- Kamera monitorująca Campark
- Kamera monitorująca IPX
- Kamera monitorująca Dedicated Micros
- Kamera monitorująca Hamlet
- Kamera monitorująca Annke
- Kamera monitorująca AVTech
- Kamera monitorująca Qoltec
- Kamera monitorująca Approx
- Kamera monitorująca Digimerge
- Kamera monitorująca Wisenet
- Kamera monitorująca Infortrend
- Kamera monitorująca Epiphan
- Kamera monitorująca Mach Power
- Kamera monitorująca Compro
- Kamera monitorująca Aida
- Kamera monitorująca Ikegami
- Kamera monitorująca Accsoon
- Kamera monitorująca Vimtag
- Kamera monitorująca Gewiss
- Kamera monitorująca Alula
- Kamera monitorująca Insteon
- Kamera monitorująca Costar
- Kamera monitorująca ALC
- Kamera monitorująca Security Labs
- Kamera monitorująca Comtrend
- Kamera monitorująca Seneca
- Kamera monitorująca Avigilon
- Kamera monitorująca American Dynamics
- Kamera monitorująca Vosker
- Kamera monitorująca Sentry360
- Kamera monitorująca Bea-fon
- Kamera monitorująca Owltron
- Kamera monitorująca Enabot
- Kamera monitorująca Luis Energy
- Kamera monitorująca Sir Gawain
- Kamera monitorująca VisorTech
- Kamera monitorująca Atlantis Land
- Kamera monitorująca B & S Technology
- Kamera monitorująca I3International
- Kamera monitorująca IDIS
- Kamera monitorująca Ecobee
- Kamera monitorująca Conbrov
- Kamera monitorująca HuddleCamHD
- Kamera monitorująca Mobotix
- Kamera monitorująca IOIO
- Kamera monitorująca BIRDFY
- Kamera monitorująca I-PRO
- Kamera monitorująca DVDO
- Kamera monitorująca TCP
- Kamera monitorująca Bolin Technology
- Kamera monitorująca Nextech
Najnowsze instrukcje dla Kamera monitorująca

28 Stycznia 2025
25 Stycznia 2025
17 Stycznia 2025
17 Stycznia 2025
15 Stycznia 2025

13 Stycznia 2025

13 Stycznia 2025
13 Stycznia 2025

12 Stycznia 2025
12 Stycznia 2025