Instrukcja obsługi Garmin GPSMAP 176
Garmin
Nawigacja osobista
GPSMAP 176
Przeczytaj poniżej 📖 instrukcję obsługi w języku polskim dla Garmin GPSMAP 176 (104 stron) w kategorii Nawigacja osobista. Ta instrukcja była pomocna dla 10 osób i została oceniona przez 2 użytkowników na średnio 4.5 gwiazdek
Strona 1/104

GPSMAP® 176/176C
chartplotting receiver
owner’s manual

© Copyright 2002-2005 Garmin Ltd. or its subsidiaries
Garmin International, Inc.
1200 East 151st Street,
Olathe, Kansas 66062, U.S.A.
Tel. 913/397.8200 or 800/800.1020
Fax 913/397.8282
Garmin (Europe) Ltd.
Unit 5, The Quadrangle,
Abbey Park Industrial Estate,
Romsey, SO51 9DL, U.K.
Tel. 44/0870.8501241
Fax 44/0870.8501251
Garmin Corporation
No. 68, Jangshu 2nd Road, Shijr,
Taipei County, Taiwan
Tel. 886/2.2642.9199
Fax 886/2.2642.9099
All rights reserved. Except as expressly provided herein, no part of this manual may be reproduced, copied, transmitted, disseminated, downloaded or stored in any
storage medium, for any purpose without the express prior written consent of Garmin. Garmin hereby grants permission to download a single copy of this manual onto
a hard drive or other electronic storage medium to be viewed and to print one copy of this manual or of any revision hereto, provided that such electronic or printed
copy of this manual must contain the complete text of this copyright notice and provided further that any unauthorized commercial distribution of this manual or any
revision hereto is strictly prohibited.
Information in this document is subject to change without notice. Garmin reserves the right to change or improve its products and to make changes in the content
without obligation to notify any person or organization of such changes or improvements. Visit the Garmin Web site (www.garmin.com) for current updates and
supplemental information concerning the use and operation of this and other Garmin products.
Garmin®, GPSMAP®, AutoLocate®, TracBack®, BlueChart®, and MapSource® are registered trademarks of Garmin Ltd. or its subsidiaries and may not be used without
the express permission of Garmin.
January 2005 Part Number 190-00185-10 Rev. C Printed in Taiwan

GPSMAP 176/176C Owner’s Manual i
INTRODUCTION
Thank you for choosing the Garmin® GPSMAP® 176/176C. The
GPSMAP 176/176C utilizes the proven performance of Garmin GPS
and full-featured mapping to create an unsurpassed portable GPS
receiver. Please take a moment now to compare the contents of this
package with the packing list on the outside of the box. If any pieces
are missing, contact your Garmin dealer immediately.
About This Manual
To get the most out of your new navigation system, take time to read
this manual and learn the operating procedures for your unit in detail.
This manual is organized into the following chapters.
The Introduction chapter contains the Table of Contents as well as
GPSMAP 176/176C care information.
The Getting Started chapter provides information such as an overview
of unit features to help you get acquainted with your new GPSMAP
176/176C.
The Basic Operation chapter provides you with information about
features such as using the Find Menu, navigating a route, and using
waypoints. There are also step-by-step directions to assist you in
these operations.
The Main Pages chapter provides detailed explanations about each
page in the GPSMAP 176/176C and step-by-step directions on using
the pages. The Main Menu chapter provides detailed explanations
about the Main Menu and how to use it to configure your unit.
The Appendix contains information such as specifications, optional
accessories, and maintenance information. You can also find warranty
and FCC information in the Appendix. Read the Safety Information
to learn how to install and use your Garmin GPSMAP 176/176C
safely and responsibly. An Index is provided at the end of the
manual for reference. Simply look up the topic you wish to learn
about and read the page or pages listed.
I > NTRODUCTION A T M BOUT HIS ANUAL

ii GPSMAP 176/176C Owner’s Manual
I > NTRODUCTION C IARE NFORMATION
Care Information
Cleaning the Unit
The GPSMAP 176/176C is constructed of high quality materials and
does not require user maintenance other than cleaning. Clean the unit
using a cloth dampened with a mild detergent solution and then wipe
dry. Avoid chemical cleaners and solvents that may damage plastic
components.
WARNING: The GPSMAP 176/176C lens is coated with a special
anti-reflective coating which is very sensitive to skin oils, waxes,
and abrasive cleaners. CLEANERS CONTAINING AMMONIA
HARM THE ANTI-REFLECTIVE COATING. It is very important
to clean the lens using an eyeglass lens cleaner that is specified as
safe for anti-reflective coatings and a clean, lint-free cloth.
Storing the GPSMAP 176/176C
Do not store the GPSMAP 176/176C where prolonged exposure to
temperature extremes may occur (such as in the trunk of a car) as
permanent damage may result. User information, such as waypoints
and routes are retained in the unit’s memory without the need for
external power. It is always a good practice to back up important user
data by manually recording it or downloading it to a PC (transferring
it to MapSource).
Immersing the Unit in Water
The GPSMAP 176/176C is waterproof to IEC Standard 60529
IPX7. It can withstand immersion in 1 meter of water for 30
minutes. Prolonged submersion can cause damage to the unit. After
submersion, be certain to wipe and air dry the unit before reuse.
To resolve problems that cannot be remedied using this guide, contact
Garmin Product Support in the U.S. at 800/800.1020 or Garmin
Europe at 44/0870.8501241.

GPSMAP 176/176C Owner’s Manual 1
I > NTRODUCTION T CABLE OF ONTENTS
Table of Contents
Introduction ...........................................................................i
About This Manual ................................................................... i
Care Information ...................................................................... ii
Getting Started .....................................................................3
Unit Basics ............................................................................... 3
Interface Keys .......................................................................... 6
Basic Operation ...................................................................7
Initializing the GPS Receiver .................................................. 7
Using the Map Pointer ............................................................ 9
Selecting Map Zoom Ranges ............................................... 11
Creating and Using Waypoints ............................................ 12
Marking Your Present Location .................................................... 12
Creating Waypoints Graphically ................................................... 13
Entering Coordinates .................................................................... 14
Projecting Waypoints .................................................................... 15
Waypoint Menu Options ............................................................... 16
Reviewing and Editing Waypoints ............................................... 17
Waypoint Lists .............................................................................. 19
User Waypoint List ................................................................. 20
User Waypoints List Options .................................................. 21
Proximity Waypoint List ......................................................... 22
Recent Waypoint List .............................................................. 23
Going to a Destination .......................................................... 24
Selecting a Go To Graphically ...................................................... 25
TracBack Navigation (Navigating a Track) .................................. 26
MOB ............................................................................................. 28
Creating a Route .................................................................... 29
Following a Route ........................................................................ 31
Route List Page ............................................................................. 32
Route Review Page ....................................................................... 33
Route Review Menu Options ....................................................... 35
Active Route Page ........................................................................ 39
Find ......................................................................................... 39
Main Pages .........................................................................41
Map Page ................................................................................ 41
Compass Page ....................................................................... 45
Highway Page ........................................................................ 46
Active Route Page ................................................................. 48
Numbers Page ....................................................................... 48
Main Menu Page ................................................................49
GPS Tab .................................................................................. 50
Trip Tab ................................................................................... 54
Route Tab ............................................................................... 54
Points Tab .............................................................................. 54
Track Tab ................................................................................ 55
Alarm Tab ............................................................................... 57

2 GPSMAP 176/176C Owner’s Manual
I > NTRODUCTION T CABLE OF ONTENTS
Celestial (Celes) Tab ............................................................. 58
Tide Tab ........................................................................................ 58
Sun & Moon Tab .......................................................................... 61
Hunt & Fish Tab ........................................................................... 62
Map Tab .................................................................................. 63
General Tab ................................................................................... 63
Map Tab ........................................................................................ 63
Waypoint Tab ................................................................................ 64
Point Tab ....................................................................................... 64
Marine Tab .................................................................................... 64
Navaids Tab .................................................................................. 65
Line Tab ........................................................................................ 65
Track Tab ...................................................................................... 66
Area Tab ........................................................................................ 66
Topo Tab ....................................................................................... 66
City Tab ........................................................................................ 67
Road Tab ....................................................................................... 67
Other Tab ...................................................................................... 68
Setup Map Menu Options ............................................................. 68
Setup Tab ............................................................................... 69
System Tab .................................................................................... 69
Time Tab ....................................................................................... 70
Units Tab ....................................................................................... 71
Location Tab ................................................................................. 71
Interface Tab ................................................................................. 74
Appendix ............................................................................78
Specifications ........................................................................ 78
Connecting the Power/Data .................................................. 79
Interfacing .............................................................................. 79
Satellite Information .............................................................. 80
What is WAAS? ...................................................................... 81
What is Differential GPS (DGPS)? ....................................... 81
Map Datums ........................................................................... 82
Navigation Terms .................................................................. 84
Messages ............................................................................... 86
LORAN TD System ................................................................ 88
Optional Accessories ............................................................ 90
Software License Agreement ............................................... 91
Product Registration ............................................................. 91
Limited Warranty ................................................................... 92
FCC Compliance .................................................................... 93
Safety Information ................................................................. 94
Index ...................................................................................95

GPSMAP 176/176C Owner’s Manual 3
G SETTING TARTED > U BNIT ASICS
Battery Compartment
Optional Data
Storage Card Port
Antenna
R
o
t
a
t
e
A
n
t
e
n
n
a
t
o
D
o
w
n
P
o
s
i
t
i
o
n
f
o
r
S
t
o
r
a
g
e
External Power and Computer Data Port
12-Level Gray scale LCD Display
with Backlight (GPSMAP 176)
16 color Transflective Display
with Backlight (GPSMAP 176C)
Backlit keypad for easy night operation
G SETTING TARTED
Unit Basics

4 GPSMAP 176/176C Owner’s Manual
G SETTING TARTED > U BNIT ASICS
The GPSMAP 176/176C uses 4 AA batteries, which can be Alkaline,
rechargeable, Lithium, or Ni-Cad. Immediately after installing new
batteries, turn the unit on to ensure that the unit’s power indicator
shows a full charge. Replace all batteries at the same time. Do NOT
mix new and used batteries. Do NOT mix Alkaline batteries with
Lithium or Ni-Cad rechargeable batteries. When installing new
batteries, observe the polarity markings in the case.
The GPSMAP 176/176C saves user data in non-volatile NOTE:
memory. Data is not lost when the batteries are removed.
To remove the battery lid, turn the D-ring
1/4 turn counterclockwise, and pull away.
To reinstall the battery lid, place the
locking pin into the unit and turn the
D-ring 1/4 turn clockwise.

GPSMAP 176/176C Owner’s Manual 5
G SETTING TARTED > U BNIT ASICS
To remove the antenna:
1. Remove the external power cable from the connector
on the back of the GPSMAP 176/176C.
2. Rotate the antenna to approximately a seven o’clock
position. The alignment notches in the casing must
line up with the notches on the antenna.
3. Pull the antenna away from the GPSMAP 176/176C.
Alignment Notches

6 GPSMAP 176/176C Owner’s Manual
G SETTING TARTED > INTERFACE EYS K
PAGE Key
• Press to cycle through the Main pages.
• Press when using the on-screen keyboard
to close.
• Press to end an operation in progress and
return to the main page.
QUIT Key
• Press and release to cancel data entry or
exit a page.
ENTER/MARK Key
• Press and release to enter highlighted options
and data or confirm on-screen messages.
• Press and release at any time to mark your
current location as a waypoint.
MENU Key
• Press and release to view options for a page.
• Press twice to view the Main Menu.
POWER Key
• Press and hold to turn unit On/Off.
• Press and release to adjust backlighting.
IN/OUT Zoom Keys
• From the Map page, press to zoom
in or out.
• From any other page, press to scroll
up or down a list.
ROCKER Key
• Move Up/Down or Right/Left to
move through lists, highlight fields,
on-screen buttons and icons, enter
data, or move the map panning arrow.
NAV/MOB Key
• Press and release at any time to
view the Find Menu page.
• Press and hold for MOB.
FIND Key
• Press to search for points such as user
waypoints, cities, and services.
Interface Keys
GPSMAP 176/176C Owner’s Manual 7
B OASIC PERATION > I GPS RNITIALIZING THE ECEIVER
B OASIC PERATION
Initializing the GPS Receiver
The GPSMAP 176/176C must be initialized before it can be used
for navigation. The GPS receiver only needs to be initialized the first
time the unit is used or if it has been stored for several months. This
process is automatic and should only take a few minutes.
The GPSMAP 176/176C stores orbital data for each satellite in an
Almanac. The orbital data is supplied in the satellite signals. Each
time the unit receives satellite signals, the Almanac is updated. If
the unit has not been used for several months or has moved over six
hundred miles between uses, the Almanac can become “cold.” If the
Almanac is “cold,” the orbital data is no longer valid and your unit
may take longer to lock on to satellites while updating the Almanac.
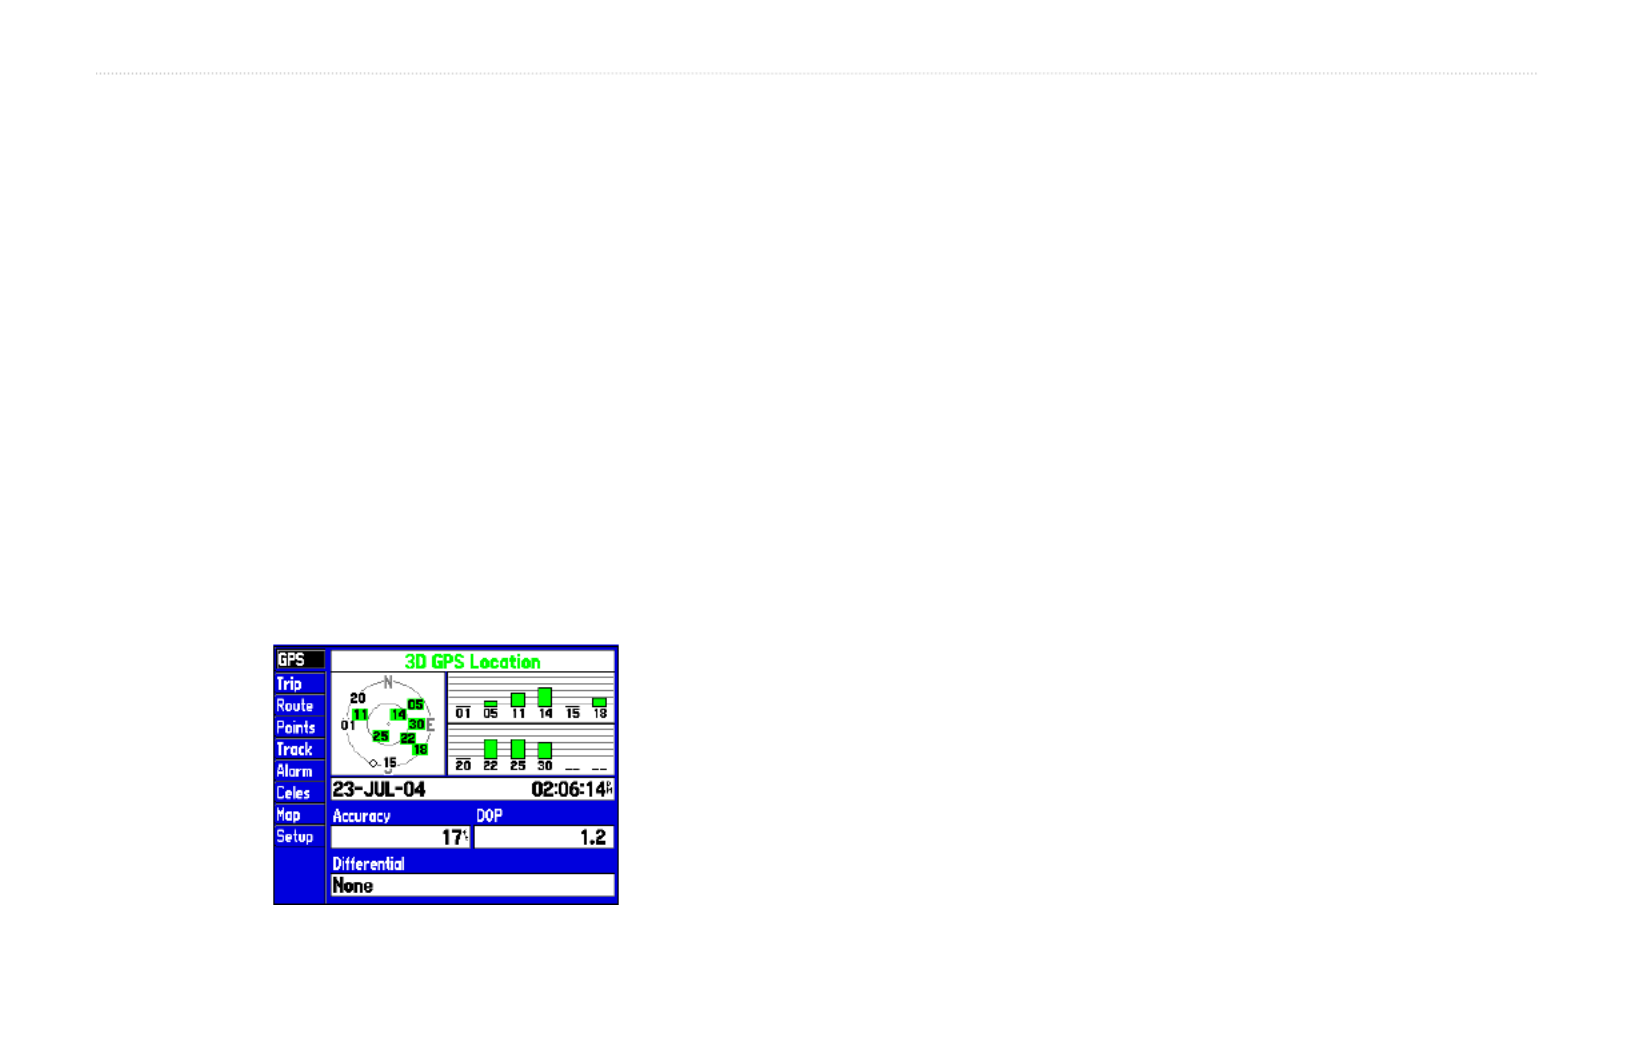
GPS Information Page
To initialize the GPS receiver:
1. Take the unit outside where it has an unobstructed view of
the sky and turn it on. Make sure the antenna is pointed up.
Following the screen prompts, press to display the ENTER
GPS Information page.
2. The unit searches for satellite signals and begin to gather and
save the information that it needs to become operational.
3. When the unit is able to navigate, the message 2D GPS
Location 3D GPS Location or is displayed at the top of the
GPS Information page, and the unit automatically switches to
the Map page.
If the unit is unable to gather the necessary satellite information, an
options menu appears. Select , then and New Location Automatic
allow the unit to continue initializing. This selection forces the unit
to search for all satellites. The unit may take a little longer to become
operational using this method.

8 GPSMAP 176/176C Owner’s Manual
B OASIC PERATION > I GPS RNITIALIZING THE ECEIVER
Initialization Options
If the GPSMAP 176/176C is unable to determine its location,
an options menu appears. Depending on the situation, select the
appropriate option to help the unit acquire satellites.
Start Simulator—turns the GPS receiver off for use indoors or
practice. This options saves battery power and allows the map to
redraw faster.
Do not attempt to navigate using simulator mode. When NOTE:
the unit is set to simulator mode, the GPS receiver is turned off.
Any satellite signal strength bars displayed are only simulations
and do not represent the strength of actual satellite signals.
New Location—if you have moved to another state, province, or
country, and are having trouble locking on to satellites, select New
Location. Another menu is displayed with the options or Automatic
Use Map Automatic. If is selected, the unit switches to AutoLocate
mode and begins searching for satellites. If is selected, use Use Map
the pointer on the Map page to select your approximate location and
the unit continues to acquire satellites normally. may take Automatic
longer to acquire satellites.
Stored w/o Batteries—if you have stored the unit without batteries,
the date stored in the GPS may be incorrect. To check the date,
highlight and verify the date displayed below Stored w/o Batteries
the options menu. If the date is incorrect, press and select ENTER
Stored w/o Batteries to search for satellites.
Continue Acquiring—if you are in an area where the satellites are
temporarily being blocked.
For more information on the GPS Information page, see page 50.

GPSMAP 176/176C Owner’s Manual 9
B OASIC PERATION > U M PSING THE AP OINTER
Using the Map Pointer
The map pointer allows you to pan away from your present location
and scroll to other map areas around the world, even outside of
your current detailed coverage area. As you pan past the edge of the
current map display, the screen actively scrolls forward to provide
continuous map coverage. Keep in mind that the boat icon moves
with the scrolling map, and may not be visible on the display screen.
Press the up, down, left, or right direction to move the ROCKER
map pointer.
When the pointer reaches the edge of the map, the unit NOTE:
may pause as it loads new map data.
Position the pointer over an item on the map to highlight it.
As you move the pointer, the distance and bearing from your present
location to the pointer are displayed in the data window, along with
the pointer’s location coordinates. When you zoom in pan mode, the
pointer stays centered on the screen. Press to exit pan mode QUIT
and re-center on your current location.
The pointer may also be used to highlight on-screen waypoints and
map items, allowing you to review a selected location directly from
the map display.
To highlight an on-screen map item with the pointer:
Use the to move the pointer to the desired waypoint ROCKER
or map item. If there are several waypoints grouped closely
together, zoom in closer for a better view. When a waypoint or
map item is highlighted, the name and location are displayed
at the top of the screen.

10 GPSMAP 176/176C Owner’s Manual
B OASIC PERATION > U M PSING THE AP OINTER
To view additional details about an on-screen waypoint
or map item:
1. With the waypoint or map item highlighted, press . ENTER
2. If the item is a waypoint, the Waypoint Review page appears.
The waypoint name, symbol, coordinates, elevation, depth,
and the options to , , or are displayed. Delete Show Map OK
Use the to highlight or press to exit the ROCKER OK QUIT
Waypoint Review page.
If the item is a map feature or a feature of BlueChart or
MapSource data, an Information page appears. In some
cases, additional information tabs and option buttons appear.
Use the to highlight the individual tabs to display ROCKER
the additional information and options. Press to exit the QUIT
Information page.
The pointer may also be used to create a new waypoint directly from
the map. Refer to “Creating and Using Waypoints” on page 12.
Information tabs for BlueChart data ( tab shown). Chart
Select to view additional notes about the chart Show Notes
or to view the list of maps on your data card Map List
through the Data Card Information screen.

GPSMAP 176/176C Owner’s Manual 11
B OASIC PERATION > S M Z RELECTING AP OOM ANGES
Selecting Map Zoom Ranges
The map display has 28 available zoom ranges from 20 ft. to 800 mi.
(5 m to 1,200 km). The zoom range is controlled by the and IN OUT
keys, with the current range displayed at the bottom right of the data
window. Press the key to zoom out and the key to zoom in.OUT IN
The range value represents the distance from one end of NOTE:
the range bar to the other.
Using BlueChart/MapSource Data
Using Built-In Basemap
Overzoom, no additional data
The GPSMAP 176/176C has a built-in worldwide database. More
detailed coverage is available through optional BlueChart or
MapSource data. The GPSMAP 176/176C displays cartography as
long as chart information is available for the range you select.
Map coverage conforms to the following conditions:
• When the selected zoom range is covered by either the internal
database, BlueChart, or MapSource data, mapping is displayed.
• When the selected zoom range is covered by both the internal
database and BlueChart/MapSource data, cartography is
displayed using the data with the best resolution.
• When the selected zoom range exceeds the resolution of the
data in use, an Overzoom warning appears below the range.

12 GPSMAP 176/176C Owner’s Manual
B OASIC PERATION > CREATING AND SING AYPOINTS U W
Creating and Using Waypoints
The Garmin GPSMAP 176/176C stores up to 3,000 alphanumeric
waypoints with a user-defined icon, comment, and depth available for
each waypoint. Waypoints can be created using three basic methods:
• —used primarily for marking your ENTER/MARK Key
present location, the key also provides ENTER/MARK
options that allow you to select a map location or map item
from the map display. You may also use the ENTER/MARK
key to create a waypoint projected from a user-defined location.
• —allows you to define a new waypoint location Graphically
from the map display using the key.ROCKER
• Text Entry—allows you to enter a new waypoint’s location
coordinates manually.
Marking Your Present Location
The key lets you quickly create a new waypoint ENTER/MARK
at your present location. You must have a valid location (2D or
3D) fix to mark your present location. This can be determined by
looking at the GPS tab on the Main Menu. Refer to page 50 for more
information on the Main Menu GPS tab.
To mark your present location:
1. Press and hold until the ENTER/MARK New Waypoint
window appears. A default three-digit name and symbol for the
new waypoint appears.
2. To accept the waypoint with the default name and symbol,
highlight and press .OK ENTER/MARK
3. To enter a different name, highlight the name field and press
ENTER/MARK ROCKER . Then use the to enter the new
letter/numbers and press when done. You may ENTER/MARK
use up to 10 alphanumeric characters for the name.
4. To enter a different symbol, highlight the symbol field to the
left of the name and press . Then use the ENTER/MARK
ROCKER ENTER/to highlight the new symbol and press
MARK.
5. To enter optional comments, elevation, or depth, highlight
the appropriate field and press . Then use theENTER/MARK
ROCKER ENTER/MARK to enter a value and press .
6. To manually enter a set of coordinates, highlight the
coordinates and press . Then use the ENTER/MARK
ROCKER ENTER/to enter the new coordinates and press
MARK when done.
7. When done, use the to highlight and press ROCKER OK
ENTER/MARK to save the waypoint.

GPSMAP 176/176C Owner’s Manual 13
B OASIC PERATION > CREATING AND SING AYPOINTS U W
Creating Waypoints Graphically
Waypoints may also be quickly created with the map pointer, which
allows you to create a waypoint at any map location or map feature.
When you move the pointer over a map item, you see a highlighted
description of that item. The GPSMAP 176/176C uses the map item
text shown on the cartography as the default name and symbol for the
new waypoint.
To create a new waypoint on an open map location
(not a map feature):
1. Use the to move the pointer to the location where ROCKER
you wish to create a waypoint.
2. Press and release . (Pressing and holding ENTER/MARK
ENTER/MARK marks your present location, not the map
pointer’s location.)
3. The New Map Waypoint page appears. To accept the
waypoint with the default name and symbol, highlight and OK
press . ENTER/MARK
4. To change the name, symbol, location, or enter comments,
elevation, or depth, highlight the appropriate field and press
ENTER/MARK ENTER/MARK. Make your changes and press
when done. After entering and confirming your changes,
highlight and press .OK ENTER/MARK
To create a new waypoint from a map feature or item:
1. Use the to move the pointer and highlight the ROCKER
desired map feature.
2. Press to capture the pointer location. An ENTER/MARK
Information page for that map feature appears. Highlight
Create Wpt ENTER/MARK and press .
3. The New Waypoint page appears. To accept the waypoint
with the default symbol and name based on the map feature,
highlight and press .OK ENTER/MARK
4. To change the name, symbol, location, or enter comments,
elevation, or depth, highlight the appropriate field and press
ENTER/MARK ENTER/MARK. Make your changes and press
when finished. After entering and confirming your changes,
highlight and press .OK ENTER/MARK
Choose on the Information page to Create Wpt
create a new waypoint at this map item’s location.

GPSMAP 176/176C Owner’s Manual 15
B OASIC PERATION > CREATING AND SING AYPOINTS U W
Projecting Waypoints
A waypoint may also be created by projecting the distance and
bearing from a specic location to a new location. Start by accessing
the New Waypoint page or the New Map Waypoint page.
Select a point from which to project a new waypoint.
To create a new waypoint by projecting its location:
1. Create a new waypoint using one of the methods previously
described. The New Waypoint page is now on your screen.
2. Verify the eld to the right of the word reads From Current
Location ENTER/. If it does not, highlight the eld and press
MARK Current Location ENTER/MARK, select , and press .
3. Highlight the distance and/or bearing elds below From
Current Location ENTER/MARK and press . Use the
ROCKER to enter the projected distance and bearing from
your current location for the new waypoint and press ENTER/
MARK.
4. Make any other desired changes to the new waypoint data,
such as the name and symbol, highlight , and press OK
ENTER/MARK.

16 GPSMAP 176/176C Owner’s Manual
B OASIC PERATION > CREATING AND SING AYPOINTS U W
Waypoint Menu Options
Two additional options are available by pressing on the New MENU
Waypoint and New Map Waypoint pages: Average Location and
Append To Route. These menu options also appear on the Waypoint
Edit and Waypoint Review pages.
Waypoint Menu Options
Average Location—takes several sample location measurements for
the waypoint and recalculates for a more accurate location reading.
Average Location Screen
To calculate the average location:
1. Select Average Location from the options menu.
2. The Average Location screen appears. Watch as the elds
change as the unit calculates the average location of the
waypoint. When you are satised with the average location,
press .ENTER/MARK
Append to Route—adds the new waypoint to the end of a route.
To append a new waypoint to a route:
1. Select Append To Route from the options menu.
2. The screen appears. Highlight the desired route Select Route
or select and press .New Route ENTER/MARK
3. Highlight press to save the waypoint.OK ENTER/MARK

18 GPSMAP 176/176C Owner’s Manual
B OASIC PERATION > CREATING AND SING AYPOINTS U W
To change the Comment, Location, Coordinates,
Elevation, or Depth:
1. Highlight the desired eld and press .ENTER/MARK
2. Use the to edit/enter the data. To drop to the next ROCKER
line, press to the Right on the . Press ROCKER ENTER/MARK
when done.
To change the distance/bearing from your current
location or another location:
1. To select a different location, highlight the eld next to , From
select a location and press .ENTER/MARK
2. Highlight the distance and/or bearing eld and use the
ROCKER ENTER/MARK to edit the data. Press when
nished. See “Projecting Waypoints” page 15.
You may also use the Waypoint Review and Waypoint Edit pages
to delete the selected waypoint, view the waypoint on the map, and
move the waypoint on the map. On the Waypoint Review/Waypoint
Edit page, use the to highlight and press ROCKER Delete ENTER/
MARK. With highlighted, press again to OK ENTER/MARK
conrm the deletion.
Waypoint Review page for a waypoint located on multiple map
features. The tabs only appear when BlueChart data is being used.
Moving a waypoint on the map.
(BlueChart map data shown.)

GPSMAP 176/176C Owner’s Manual 19
B OASIC PERATION > CREATING AND SING AYPOINTS U W
To view and move a waypoint on the map:
1. From the Waypoint Review/Waypoint Edit page, highlight
Show Map ENTERand press . The waypoint is highlighted
on a map screen with an information window at the top that
shows the waypoint name, location, distance, and bearing
from your current location.
2. To move the waypoint, press . A label now ENTER MOVE
appears under the map pointer. It may be necessary to use
the and keys to zoom in or out on the map. IN OUT
3. Use the to move the waypoint to a new location. As ROCKER
you move the pointer around the map display, the information
window at the top changes to show the distance, bearing,
and location of the map pointer (in relation to the waypoint’s
location) and a description of where the pointer is on the map.
If you wish to stop the move process, press .QUIT
4. With the pointer at the desired location, press . To ENTER
return to the Waypoint Edit/Waypoint Review page, press the
QUIT button.
On the display, two additional options are available by Show Map
pressing :MENU
Measure Distance —allows you to measure the distance and bearing
between two points on the map. See page 43 for more information.
Point to on Main Map—exits the Waypoint Review/Waypoint Edit
page and returns you to the highlighted waypoint on the Map page.
Waypoint Lists
The GPSMAP 176/176C’s Main Menu page features three submenus
of the Points tab, User, Proximity, and Recent, that let you manage a
large number of waypoints quickly and efciently. The submenu tabs
also provide a continuously updated proximity waypoint alarm that
can be used to dene an alarm circle around points such as submerged
hazards, shallow waters, and restricted waters. To access the waypoint
submenus, press twice and highlight the Points tab using the MENU
ROCKER, then highlight the desired submenu tab.
The Points tab of the Main Menu

20 GPSMAP 176/176C Owner’s Manual
B OASIC PERATION > CREATING AND SING AYPOINTS U W
User Waypoint List
The User submenu of the Points tab displays a master list of all
waypoints currently stored in memory. From the list, you may User
review, edit, rename or delete individual waypoints, or delete all user
waypoints. The total number of stored and available waypoints is
displayed at the bottom of the User page, with the stored waypoints
arranged in numerical/alphabetical order.
Name FieldWaypoint List
To scroll through and review the waypoint list:
1. With the highlight the tab on the Main ROCKER, Points
Menu, then highlight .User
2. Use the to scroll through the list.ROCKER
3. Press to review the highlighted waypoint on the ENTER
Waypoint Edit page. See page 17 for detailed information on
reviewing and editing waypoints.
4. Highlight and press to return to the list. The Next ENTER
cursor automatically highlights the next waypoint in the list.
To search for a waypoint by name:
1. Highlight the name eld and press .ENTER
2. Use the to select the rst letter of the name. ROCKER
3. Move to the Right and enter the second letter if you do not see
it on the list below.
4. Repeat this until the name appears. Press when you ENTER
see the name.
5. Highlight the name on the list and press to review the ENTER
waypoint. When done, highlight and press .OK ENTER

GPSMAP 176/176C Owner’s Manual 21
B OASIC PERATION > CREATING AND SING AYPOINTS U W
User Waypoints List Options
The following options are available by pressing while MENU
highlighting the Points tab, the User submenu, or one of the User
waypoint names:
Create Waypoint—creates a new waypoint. (See page 12.)
Delete Waypoint—deletes selected waypoint from list and any route
in which it was used.
Delete By Symbol—deletes all waypoints that use the same symbol.
Delete All—deletes all waypoints from the unit.
Once a waypoint is deleted from the list, it cannot be NOTE:
recovered from the unit. It is advisable to backup important
waypoints to a computer using the optional PC cable and
interface software or write them down by hand.
To delete an individual waypoint from the User list:
1. Use the to highlight the waypoint you want to delete.ROCKER
2. Press , then highlight MENU Delete Waypoint and press
ENTER.
OR
Press , then highlight and press .ENTER Delete ENTER
3. Press to confirm.ENTER
To delete waypoints by symbol:
1. Highlight the waypoint you want to delete and press . MENU
Select and press .Delete By Symbol ENTER
2. Use the to highlight the symbol of the waypoint(s) to ROCKER
be deleted and press .ENTER
3. Press to confirm. Choose or press to ENTER Cancel QUIT
stop the deletion.
To delete all user waypoints:
1. Press .MENU
2. Highlight Delete All ENTER and then press .
3. Highlight and press to confirm.OK ENTER

22 GPSMAP 176/176C Owner’s Manual
B OASIC PERATION > CREATING AND SING AYPOINTS U W
Proximity Waypoint List
The Proximity submenu of the Points tab lets you define an alarm
circle around a stored waypoint location, which can be used to help
you avoid reefs, rocks, or restricted waters. Up to ten waypoints
may be listed, with a maximum alarm radius of 99.99 nautical miles,
statute miles, or kilometers. If a proximity alarm circle overlaps with
an existing alarm circle, a “Proximity Overlaps Another Proximity
Waypoint” message appears. Since the unit only alerts for one of
the overlap points, use caution when navigating in these areas. If
you enter an alarm circle overlap, you are only alerted to the closest
proximity waypoint.
Proximity Waypoint List
Proximity
Circle
Proximity
Waypoint
To add a proximity waypoint:
1. Use the to highlight an empty space on the ROCKER
Proximity List and press . The screen appears. ENTER Find
Highlight Waypoints ENTER and press .
2. Highlight the desired waypoint from the or By Name Nearest
tab lists. The Waypoint Review page now appears for the
selected waypoint.
3. With highlighted, press to confirm. The distance OK ENTER
field is now highlighted.
4. Press to begin entry of the proximity radius.ENTER
5. Use the to enter a distance (up to 99.99 units) and ROCKER
press .ENTER

GPSMAP 176/176C Owner’s Manual 23
B OASIC PERATION > CREATING AND SING AYPOINTS U W
To turn proximity alarms on or off:
1. Use the to highlight the field below ROCKER Proximity Alarm
and press .ENTER
2. Select the desired or setting and press .ON OFF ENTER
The following options are available from the submenu of Proximity
the tab:Points
To clear one or all proximity waypoint(s) from the list:
1. Use the to highlight the proximity waypoint to clear ROCKER
and press .MENU
2. To clear a single alarm, highlight the option Remove Point
and press .ENTER
3. To clear all proximity waypoints, select the Remove All option
and press .ENTER
4. Use the to highlight the prompt and press ROCKER OK
ENTER to confirm.
Recent Waypoint List
The GPSMAP 176/176C also contains a recent waypoint list. This
list records your recent waypoint finds along with the bearing and
distance from your current location. Pressing activates a MENU
submenu allowing you to remove one or all of the entries in this list.

24 GPSMAP 176/176C Owner’s Manual
B OASIC PERATION > G OING TO A ESTINATION D
Going to a Destination
The GPSMAP 176/176C provides four ways to navigate to
a destination: Go To Point, Navigate Route, Navigate Track
(TracBack), and MOB (Man OverBoard) navigation. Once you are
actively navigating, a straight line that always runs from your current
location to the destination appears on the Map page. The easiest
method of navigation is a Go To, which lets you select a destination
point and quickly sets a direct course from your present location.
When you press NAV Go To <point name>, appears in addition to
Go To Point.
Choose a waypoint from either the or tab list.By Name Nearest
To activate a Go To from the points list:
The waypoint or map item name automatically
appears when you highlight the point and press NAV.
1. Press the NAV key.
2. Highlight Go To Point ENTER and press .
3. From the menu, highlight Find Waypoints ENTER and press .
You can also go to other points from this list, such as cities,
tide stations, and navaids.
4. Select a waypoint from the or and press By Name Nearest
ENTER. This displays the Waypoint Review page.
5. With Go To ENTER highlighted, press to begin navigation.

GPSMAP 176/176C Owner’s Manual 25
B OASIC PERATION > G OING TO A ESTINATION D
To stop navigation:
1. Press the NAV key.
2. Highlight and press .Stop Navigation ENTER
Selecting a Go To Graphically
A graphical Go To may be used to select one of three items from
the map display: an existing waypoint, an on-screen map feature,
such as roads, rivers, cities, and navaids, or a new map point. If you
are selecting a map item as a destination, the GPSMAP 176/176C
automatically uses the name of the map item, but the point is not
stored in the waypoint list. See page 13 for creating waypoints using
map features. If you are selecting a new map point as the Go To
destination, the GPSMAP 176/176C automatically creates or move a
waypoint named at the pointer position.MAP
To Go To a waypoint or map feature on the map:
1. Use the key to highlight the waypoint or map item ROCKER
on screen and press NAV.
2. Highlight Go To <waypoint name> ENTER and press .
Go To MAP Point allows you to navigate to a spot
on the map that is not a waypoint or map item.
To Go To a point on the map:
1. Move the map pointer to the desired position.
2. Press NAV Go To MAP Point, ENTER, highlight and press .

26 GPSMAP 176/176C Owner’s Manual
B OASIC PERATION > G OING TO A ESTINATION D
TracBack Navigation (Navigating a Track)
TracBack allows you to retrace your path using the track log
automatically stored in the receiver’s memory. This eliminates the
need to store waypoints along the way. TracBack routes are created
by reducing your track log to a route of up to 50 turns and activating
an inverted route along those points. Once activated, a TracBack route
leads you back to the oldest stored track log point, so it is a good idea
to clear the existing track log before you of your current trip. Refer to
the “Track Tab” on page 55 for more information.
Default
Track name
Total
Distance
Total number
of points
Check
this box to
display track
Changes the display
color of the track.
(GPSMAP 176C only)
To clear the track log and define a starting point for a
TracBack route:
1. Press twice to display the Main Menu.MENU
2. Using the , highlight the Track tab, then highlight the ROCKER
Active tab to the right.
3. Select the button and press .Clear ENTER
4. Highlight and press . Press to exit.OK ENTER QUIT
You must first save a track log before you can use the Navigate Track
option. The Save feature allows you to store up to 15 track logs from
certain times and dates.
Highlight and press to save an active track log.Save ENTER

GPSMAP 176/176C Owner’s Manual 27
B OASIC PERATION > G OING TO A ESTINATION D
To save a track log:
1. From the Main Menu, use the to highlight the ROCKER Track
tab and then highlight the tab.Active
2. Select and press .Save ENTER
3. From the window, highlight the desired Save Back Through
time, date, or Entire Log and press The track begins ENTER.
saving and then displays the Save Track window when done.
The default name, distance, and number of points (500 max)
is displayed.
To change the name of the saved track, highlight the name
field and press ENTER. Then make your changes and press
ENTER.
To display the track on the Map and Highway Pages, highlight
the check box to the left of and Show on Map and Highway
press . ENTER
To view the track on the map, highlight and Review on Map
press . Pressing on this page activates the ENTER MENU
options to (see page 43) and Measure Distance Point to on
Main Map, which exits the Save Track dialog. Press to QUIT
return to the Save Track dialog.
4. Highlight and press to save the track. Press OK ENTER QUIT
to exit.
To activate a TracBack using the NAV key:
1. Press NAV Navigate Track ENTER, highlight , and press .
2. Highlight the track you wish to navigate and press .ENTER
3. Choose either , which navigates from the start to the Original
end of your trip, or , which navigates from the end to Reverse
the start of your trip (TracBack) and press .ENTER
You must first save a track before using the Navigate Track option.
If there are no saved tracks, the Navigate Track option is disabled.
Once a TracBack has been activated, the GPSMAP 176/176C takes
the track currently stored in memory and divides it into segments
called “legs.” Up to 50 temporary “turns” are created to mark the
most significant features of the track in order to duplicate your path as
closely as possible.

28 GPSMAP 176/176C Owner’s Manual
B OASIC PERATION > G OING TO A ESTINATION D
To get the most out of the TracBack feature, remember these
navigating tips:
• Always clear the track log at the point that you want to return
to, such as the camp site or dock.
• Set the Record Mode Fill option on the track log setup page to
or .Wrap
• At least two track log points must be stored in memory to
create a TracBack route.
• If the track log interval is set to Time, the route may not
navigate your exact path. Keep the interval set to Resolution
for best performance.
• If the receiver is turned off or satellite coverage is lost during
your trip, TracBack draws a straight line between any point
where coverage was lost and where it resumed.
• If your track’s changes in distance and direction are too
complex, 50 waypoints may not mark your path accurately. The
receiver then assigns the 50 waypoints to the most significant
points of your track and simplifies segments with fewer
changes in direction.
To stop TracBack navigation, press NAV. Highlight Stop Navigation
and press . For more information on setting up the Track ENTER
options and saving tracks, see pages 55-56.
MOB
Man OverBoard (MOB) allows you to simultaneously mark your
current position and set a course to a location for quick response to
emergency situations.
Highlight Yes ENTER and press to start navigation.
To activate the MOB function:
1. Press and hold , or press twice.MOB MOB
2. Press to confirm and begin navigating to the MOB.ENTER
Once a MOB has been activated, a MOB waypoint with an
international MOB symbol is created and the unit is on an active
navigation to that point. Use any of the Navigation pages to guide
you back to the MOB point. The MOB waypoints are stored in
the waypoint list and may be deleted like any other waypoint. To
stop navigation to the MOB location, press NAV Stop , highlight
Navigation ENTER, and press .
GPSMAP 176/176C Owner’s Manual 29
B OASIC PERATION > CREATING A OUTE R
Creating a Route
The last way to navigate to a destination is to create a user-defined
route. The Garmin GPSMAP 176/176C lets you create and store up
to 50 reversible routes with up to 50 waypoints each. Routes can be
created in two ways. The first is by selecting waypoints or map items
from the Map page, allowing you to see each route point graphically
on-screen as you create the route. The second is to select waypoints
from the Find menu, allowing you to see a list of the route points as
you create the route. Access the Main Menu to start creating a route.
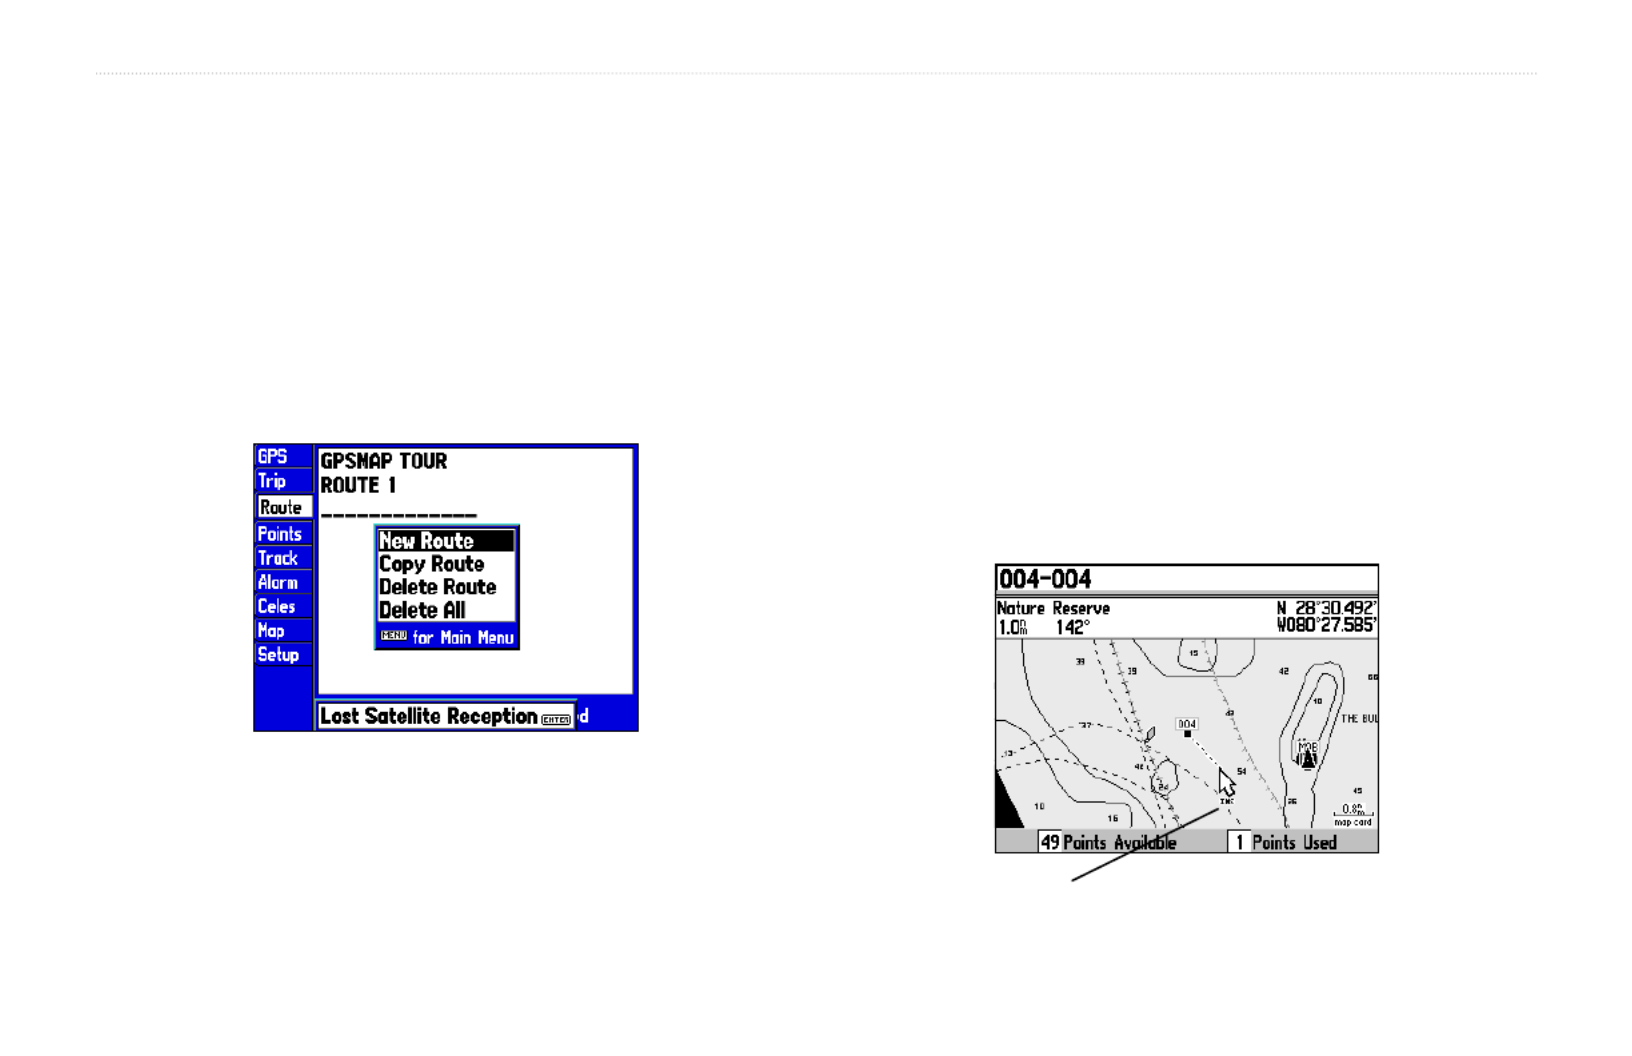
Route Tab and Route Options Menu
To create a route graphically:
1. Press twice to display the Main Menu page. Use the MENU
ROCKER Route to highlight the tab.
2. Press to display the Route Options page. Select MENU New
Route ENTER and press .
Or
Highlight the first blank slot in the Route List page and press
ENTER.
3. To add an existing waypoint or map item to the route, use the
ROCKER to highlight the desired item on the map and press
ENTER. Map items added to your route do not appear in the
waypoint list. See page 13 to create a waypoint from a map
feature.
INS appears below the pointer as you add points.

30 GPSMAP 176/176C Owner’s Manual
B OASIC PERATION > CREATING A OUTE R
4. To add a new waypoint to the route, use the to ROCKER
select the desired map location and press . The New ENTER
Waypoint page appears. With highlighted, press OK ENTER
again to confirm the new waypoint. You may also change the
name, symbol, and other properties of the new waypoint.
(See page 17.)
As you add each new waypoint to the route, the data window
at the top of the map display shows the waypoint/map item
name, bearing, and distance from your location, and the
coordinates of the pointer. The bottom of the display shows
you the number of available and used points. A route line
appears on the map to indicate each completed leg, and a
dotted line appears to indicate the distance and bearing from
the last route waypoint to the map pointer location.
5. Repeat steps 3 and 4 until you finish adding all route points.
6. When finished, press twice to return to the Route List; QUIT
or press , highlight MENU Edit as Text ENTER, and press to
view the Route Review page.
To edit a route on the map from the Route Review page, press
MENU Use Map ENTER, highlight and press .
To create a route using text:
1. Press twice to display the Main Menu. Use the MENU
ROCKER Route to highlight the tab.
2. Press to display the Route Options page. Select MENU New
Route ENTER and press .
Or
Highlight the first available blank route slot and press . ENTER
3. Press , select MENU Edit as Text ENTER, and press .
4. Use the to highlight the first blank field under the ROCKER
word Waypoint ENTERand press .
Choose the type of point to add to the route.

GPSMAP 176/176C Owner’s Manual 31
B OASIC PERATION > CREATING A OUTE R
5. From the menu, highlight Find Waypoints ENTERand press .
You may also choose from other points, such as Cities, Exits,
and Tide Stations. Select the desired waypoint and press
ENTER.
Choose a waypoint from either the By Name Nearest or tab list.
6. On the Point Review or Waypoint Review page, is OK
automatically highlighted. Choose and press Show Map
ENTER QUIT to view the point on the map, then press
to
return to the Waypoint Review page. With highlighted, OK
press to add the point to the route. ENTER
7. Repeat steps 4-6 until you nish adding route points. Press
QUIT to return to the Route List page.
Following a Route
The NAV key activates the route for navigation. You can navigate the
route in the same sequence as it was originally created, or inverted
and navigated from the end waypoint back to the beginning waypoint.
To activate and follow a route:
1. From any page, press NAV ROCKER, use the to highlight
Navigate Route ENTER, and press . (If you highlight a route
name on the Route List or Route Review page and press
NAV Navigate <the route , the window automatically displays,
name>.)
2. Highlight the route you wish to navigate and press . ENTER
3. Choose or Activate Reverse and Activate and press
ENTER Activate Reverse and Activate. uses the route as is;
inverts and activates it. The Active Route page appears.
See the “Active Route Page” section on page 39.
4. Press NAV Stop Navigation ENTER, highlight , and press to
deactivate (stop following) the route.

32 GPSMAP 176/176C Owner’s Manual
B OASIC PERATION > CREATING A OUTE R
Route List Page
The GPSMAP 176/176C Route List page, the Route tab of the Main
Menu, displays all the routes currently stored in memory, along with
a descriptive name for each route. By pressing the button on MENU
the Route List page, the following menu options appear: Navigate,
Go To Point, Navigate Route, Navigate Track, and Stop Navigation.
If you highlight a route name from the Route List and press
NAV, the name automatically appears as a navigation option.
To select and follow a route:
1. On the Route List page, use the to highlight the ROCKER
desired route from the list and press NAV.
2. With highlighted, press . The Navigate <route name> ENTER
Active Route page appears. See page 39.
3. To stop navigation, press NAV Stop Navigation,, highlight
and press .ENTER
Route List Options Menu

GPSMAP 176/176C Owner’s Manual 33
B OASIC PERATION > CREATING A OUTE R
To copy or delete a route:
1. From the Route List, use the to highlight the route ROCKER
you want to copy or delete and press .MENU
2. Choose either or and press Copy Route Delete Route
ENTER OK ENTER. With highlighted, press again to delete
(there is no confirmation window for copying a route). Copy
uses the same route name with an additional number at the
end of the route name or creates a new route name based on
names of the first and last route points.
To delete all routes:
1. From the Route List, press .MENU
2. Highlight Delete All ENTER OKand press . Highlight and
press again to confirm. ENTER
Route Review Page
Once you have created a route, you can edit a selected route from the
Route Review page.
Route
Points
Data
Fields
Route
Name
Data
Totals
To get to the Route Review Page:
1. Press twice and highlight the tab. MENU Route
2. Highlight the name of the route you wish to review and press
ENTER.

34 GPSMAP 176/176C Owner’s Manual
B OASIC PERATION > CREATING A OUTE R
The Route Review page allows you to enter a 15-character name for
any listed route. The GPSMAP 176/176C creates a default route name
using the first and last waypoint names.
To enter a custom route name:
1. From the Route Review page, highlight the name field and
press to begin editing.ENTER
2. Use the to enter the desired name and press ROCKER
ENTER when finished.
Once you are on the Route Review page, you may review the route
points (waypoints or map items) one at a time from the list.
To review individual route points:
1. Highlight the desired point and press . ENTER
2. On the Point Review window, you may choose to Next
highlight the next point on the route list, to show Show Map
the point on a map window, or to permanently delete Delete
the waypoint from the unit. Press to select an option. ENTER
If the route point is a user waypoint, you may edit any of the
waypoint properties on the Waypoint Review page.
See page 17 for information on the Waypoint Review page.
Once you are back on the Route Point list, the next point in the route
is automatically highlighted. This allows you to review each point on
the route by pressing repeatedly.ENTER

GPSMAP 176/176C Owner’s Manual 35
B OASIC PERATION > CREATING A OUTE R
Route Review Menu Options
By pressing on the Route Review page, the following menu MENU
options are available: Use Map, Add Waypoint, Remove Waypoint,
Reverse Route, Plan Route, and Delete Route.
Route Review Menu Options
Use Map—allows you to review and modify the route displayed for
each point (waypoint or map item) on a Map page. You may also
use the pointer to insert a new route point on a route leg, review the
waypoint, or map item.
Add Waypoint—allows you to insert a waypoint or point from the
Find Menu before a waypoint that is highlighted on the route list, or
add a point(s) onto the end of the route.
Remove Waypoint—allows you to remove a point (waypoint or
map item) from a route. This option is available from both the Route
Review and Active Route pages.
Reverse Route—reverses the order of the route making the last point
the first.
Plan Route—displays trip-planning information for each leg or the
entire route. Available information includes ETA, Fuel (to point), Leg
Distance, Leg Fuel, Leg Time, Sunrise and Sunset (at point location),
and Time To (point).
Delete Route—deletes a route from the Route List. Waypoints and
map items in the route are not be deleted from unit memory.

GPSMAP 176/176C Owner’s Manual 37
B OASIC PERATION > CREATING A OUTE R
To insert a new point between two existing route
waypoints:
1. Use the to highlight the leg in which you want to ROCKER
insert the new waypoint. The route line highlights and changes
to a dotted line when the leg is selected. Then press .ENTER
2. Move the pointer to the new map location, existing waypoint,
or map item. is now displayed below the pointer and the INS
route lines moves with the pointer. Press . ENTER
3. If you are not inserting an existing point, press to ENTER
confirm the new waypoint.
4. Press to return to the Route Review page.QUIT
Drag the route leg to an existing waypoint (shown), map
item, or a blank spot on the map to create a new route point.
To insert a point into the route or add a point to the end:
1. On the Route Review page, use the to highlight the ROCKER
point you wish to insert the new point before. To add a point to
the end, highlight the blank field at the bottom of the list. Then
press . MENU
2. Highlight Insert Waypoint Add Waypointor and press
ENTER.
3. From the menu, highlight Find Waypoints ENTER and press .
You may also choose from other points, such as Cities, Tide
Stations, and Marinas, from this list. From either the By Name
or tab lists, choose the waypoint you want and press Nearest
ENTER twice.
Press Left or Right on the ROCKER
to change the data field.

38 GPSMAP 176/176C Owner’s Manual
B OASIC PERATION > CREATING A OUTE R
To remove a point from a route:
1. On the Route Review or Active Route pages, use the
ROCKER MENU to highlight a point and press to remove.
2. Highlight Remove Waypoint ENTER and press .
To reverse the route:
1. From either the Route Review page, press .MENU
2. Highlight and press .Reverse Route ENTER
To delete a route:
1. From the Route Review page press .MENU
2. Highlight and press Delete Route ENTER, then press ENTER
again to confirm.
Trip Planning Data Fields
Fuel flow rates on your unit are measured in “units NOTE:
per hour.” System setting changes for units of measure (statute,
nautical, or metric) do not affect the fuel flow measure. You should
enter fuel flow rates based upon available information from your
vehicle’s operator’s manual performance specifications and make
note of the desired units of measure (gallons or liters).
To use the Trip Planning feature:
1. To select the desired planning figure, highlight the desired
route from the Route List and press to display the ENTER
Route Review page.
2. One of nine available planning figures appears to the right of
each route waypoint. Use the Left/Right keys on the ROCKER
to view the desired item.
3. To enter planning information, from the Route Review page
only, press and select . Enter the figures for MENU Plan Route
Speed, Fuel Flow, Departure Time, and Departure Date. Press
QUIT to return to the Route Review page.

GPSMAP 176/176C Owner’s Manual 39
B OASIC PERATION > FIND
Active Route Page
Whenever you have activated a route in the GPSMAP 176/176C,
the Active Route page shows each point (waypoint or map feature)
of the active route. It also shows the point name, Distance, Course,
ETA, Fuel to point, Leg Distance, Leg Fuel, Leg Time, Sunrise and
Sunset at point location, and Time To point for each point from your
present location. The current destination point, the “active” point, is
marked with an arrow icon. As you navigate a route, the waypoint
list automatically updates to indicate the next active point first. The
Active Route and Route Review pages share many of the same
features and options.
The following route options are available from the Active Route page:
• Use Map—see pages 35 for instructions.
• Insert/Add Waypoint—see page 36-37 for instructions.
• Remove Waypoint—see page 38 for instructions.
• Reverse Route—see page 38 for instructions.
• Plan Route—see page 38 for instructions.
Find
FIND allows you to search the unit for user waypoints, map items
and any optional BlueChart or MapSource information loaded on
a data card. The unit searches for items from your current location
or from another location on the map. When you press , a FIND
list of available items to search from appears. The default items
are Waypoints, Cities, Exits, Tide Stations, and Transportation.
Additional items are displayed depending on the optional BlueChart
or MapSource data card inserted into the unit. Your location or
the map pointer must be within the map outline area to search for
information from the BlueChart or MapSource data.
Find Menu
40 GPSMAP 176/176C Owner’s Manual
B OASIC PERATION > FIND
To find a waypoint or other item from your current
location:
1 From any page, press .FIND
2. Using the , highlight the desired category from the ROCKER
list and press until a search results list appears. ENTER
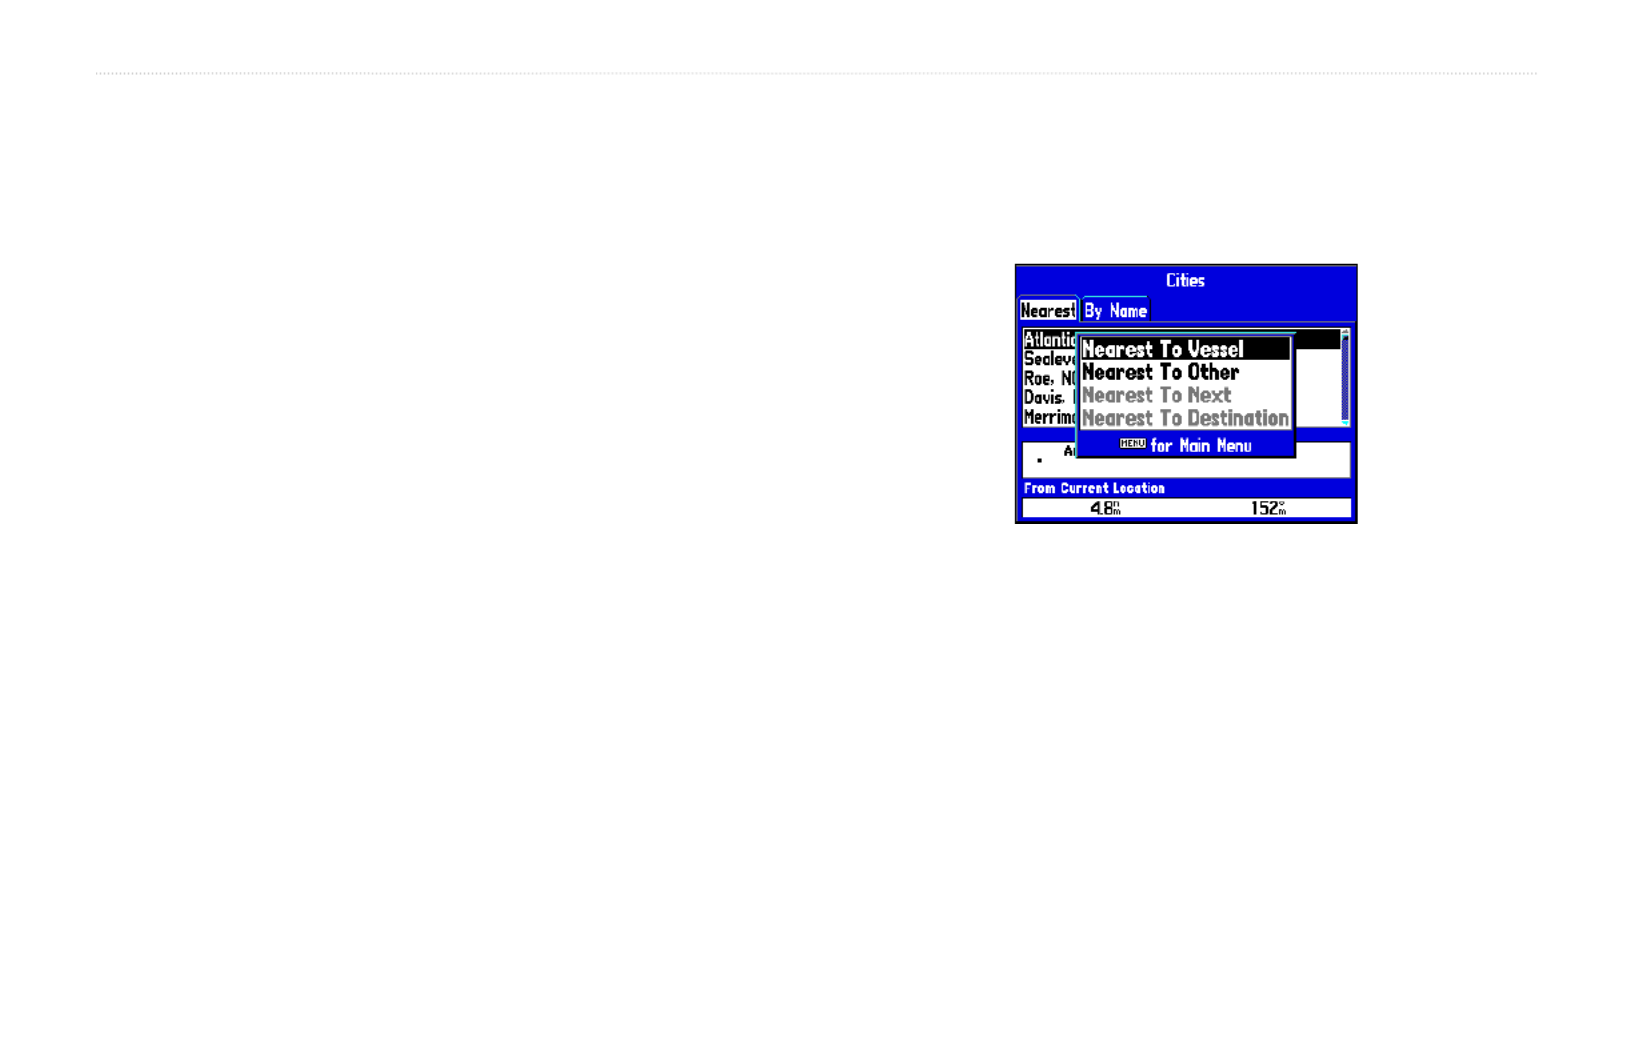
To find a waypoint or item from another location:
1. Once the search results list for a particular item is displayed,
press . Highlight and press . MENU Nearest to Other ENTER
If you are actively following a route, you may also choose
Nearest to Next Nearest to Destinationor .
2. Select a reference location on the map and press . ENTER
The search results list changes to list items nearest to the new
map location.
OR:
1 From the Map page, use the to pan to the desired ROCKER
location and press .FIND
2. Using the , highlight the desired category from the ROCKER
list and press .ENTER
The Find option also supports a “find from” feature which allows
you to center your search around an item which you have just found.
For example, you search for “Restricted Areas” and you find a point
named “Anchoring Prohibited.” If you press again, you see FIND
“From Anchoring Prohibited” as the new search from point.
You may also use the Find feature to center your search from any
waypoint, route list entry, map item or tide station. Highlight the item
you want to find from and press the FIND key.
Finding items from another reference point.
To view details about an item:
With the desired item highlighted in the search results list,
press . An Information page appears with details ENTER
about the item in a tabbed format. Depending on the type of
item, additional options are available for viewing the item on
the Map, viewing notes on a MapSource or BlueChart map,
viewing a tide chart, viewing the list of maps on your data
card, and viewing the next item in the search results list.

GPSMAP 176/176C Owner’s Manual 41
M P > AIN AGES M PAP AGE
M PAIN AGES
The GPSMAP 176/176C contains five main pages: Map, Compass,
Highway, Active Route/Go To, and Numbers. You can access these
pages by pressing PAGE to cycle forward through the pages or
QUIT to cycle backward until the page you wish is displayed.
Each of the main pages has an options menu, allowing you to
customize the page to your preferences and perform tasks that
specifically relate to that page. The data window, located at the right
side of the display, provides a user-selectable layout of various types
of useful data. Each data field may be configured to display any
one of several data options. The data window layout may also be
customized to change the actual size of the data displayed.
Map Page
The Map page provides a comprehensive display of electronic
cartography, plotting, and navigational data. When using the unit with
the optional BlueChart data or MapSource software, the map display
shows your location on a digital chart, complete with geographic
names, map items, navaids, and a host of other chart features. It also
plots your track and displays any routes and waypoints you create.
An on-screen pointer lets you pan and scroll to other map areas,
determine the distance and bearing to a position, and perform various
route and waypoint functions.
Data
Fields
Current
Location Map Range
Land
Water
Navaids
User
Waypoint
Map Page with optional BlueChart Marine data.
Geographic
Name
Two basic map operating modes, position mode and pan mode,
determine what cartography is shown on the map display. Position
mode pans the cartography to keep the present position marker within
the display area, while pan mode pans the cartography to keep the
pointer within the display area. The GPSMAP 176/176C always
powers up in the position mode, with the last known location centered
on the map display. When you press the , the GPSMAP ROCKER
176/176C enters pan mode. For more information on Map page setup
options, see pages 63-68.

42 GPSMAP 176/176C Owner’s Manual
M P > AIN AGES M PAP AGE
The Map page options menu provides access to functions and
features relating to the Map page and options for layout of the page.
Press to display the Map page options: Measure Distance, MENU
Show/Hide Next Street, Setup Page Layout, Change Data Fields,
Setup Map, and Declutter On/Off. Use the to highlight the ROCKER
option and press to select. ENTER
Map Page Options
Measure Distance—allows you to measure the bearing/distance
between two points on the map.
Show Next Street/Hide Next Street—displays the next cross street
in a window at the top of the display. This option is only available if
MapSource data is loaded. Highlight the option Show Next Street
and press to show the next street. Highlight the ENTER Hide Next
Street ENTER option and press to hide the next street window.
Setup Page Layout—allows you to choose the size of text and
number of data fields.
Change Data Fields—allows you to specify the type of data
displayed in each data field used on the map display. This option is
available from any of the main pages.
Set Up Map—jumps to the Map tab of the Main Menu, allowing
you to configure the map display to your preferences, including map
detail, map orientation, automatic zoom, and various map items and
points. The map setup option uses a file tab feature, organizing the
various settings for ease of use.
Declutter On/Declutter Off—toggles between showing spot
soundings and map outlines for easier viewing.

44 GPSMAP 176/176C Owner’s Manual
M P > AIN AGES M PAP AGE
Highlight the data field you wish to change.
To change a data field:
1. From the Map page, press . Highlight MENU Change Data
Fields ENTERand press .
2. Move the field highlight to the data field you want to change
and press . ENTER
3. Move up or down on the list using the . Select the ROCKER
data you want to display, and press . To exit, press ENTER
QUIT.
Choose the type of data you wish to display.
To change a map setup feature:
1. From the Map page menu, highlight and press Set Up Map
ENTER.
2. Use the to highlight the desired file tab, highlight the ROCKER
setting you want to change, and press .ENTER
3. Press Up or Down on the to highlight to the desired ROCKER
setting and press . ENTER
4. To exit, press .QUIT

GPSMAP 176/176C Owner’s Manual 45
M P > AIN AGES COMPASS AGE P
Compass Page
Whenever a Go To Navigate Track Navigate Route, (TracBack), or
is activated, the Compass page guides you to your destination with
digital readouts and a graphic compass display, which includes a
bearing pointer. Use this page when travelling at slower speeds,
making frequent directional changes, or where straight-line
navigation is not possible due to obstructions or terrain.
The middle of the page features a rotating compass ring that shows
your course over ground (track) while you are moving. Your present
course over ground is indicated at the top of the compass ring. A
bearing pointer, in the middle of the compass ring, indicates the
direction of the destination (bearing) relative to the course over
ground. The compass ring and pointer arrow work independently to
show, at a glance, the direction of your movement and the direction to
your destination. For instance, if the arrow points up, you are going
directly to the waypoint. If the arrow points any direction other than
up, turn toward the arrow until it points up.
The bearing pointer and compass ring may point in NOTE:
various directions when you are stationary or at very low speeds.
Once you start moving, the pointer is correct.
Compass Page Options
The Compass page features a menu page that provides access to
layout and data field options. The data window, located at the top
of the page, provides a user-selectable layout of various types of
useful data. Each data field can be configured to display several data
options. The data window layout can also be changed to display
more/less data fields and change the actual size of the data displayed.
Press to display the Compass page options. To select a menu MENU
option, use the to highlight the desired option and press ROCKER
ENTER. See pages 43-44 for detailed instructions on changing the
data fields and layout.
Compass Page
Options
Pointer—points
toward destination
while moving
Compass Ring—
indicates current
direction of travel

46 GPSMAP 176/176C Owner’s Manual
M P > AIN AGES HIGHWAY AGE P
Highway Page
Whenever a Go To TracBack, Route, or is activated, Highway page
provides digital and graphic steering guidance to the destination. The
right side of the Highway page features user-selectable data fields that
display useful navigation information. A compass ribbon is displayed
at the top of the page to show your current heading along with a dark,
vertical bar which indicates the bearing to your course. To stay on
course, steer towards the dark, vertical indicator (or arrows) until it
lines up with the lighter gray bar in the middle. The bottom section
of the screen provides visual guidance to the waypoint on a graphic
highway display. The line down the center of the highway represents
your heading.
As you head toward your destination, the highway perspective moves
to indicate your progress to the waypoint and which direction you
should steer to stay on course. If you are navigating a route, the
Highway page shows each route waypoint in sequence connected
by a black road with a white line down the middle, which is your
desired track line. Nearby waypoints not in the active route can also
be displayed. The highway perspective range may also be zoomed in
or out to display a larger or smaller view of the highway. Five settings
are available from 1X to 16X, with a default setting of 8X. Press the
IN OUT or key to change the highway perspective range.
Data Fields
Current Nav Point
Zoom
Range
Desired
Track Line Current
Location
Current Track
The Highway page options allow you to define the data fields and
select which waypoints and tracks are displayed on screen. The data
window, located along the right side of the page, provides a user-
selectable layout of various types of useful data. Each data field may
be configured to display several data options. The data window layout
may also be changed to display additional data fields and change
the actual size of the data displayed. Press to display the MENU
GPSMAP 176/176C Owner’s Manual 47
M P > AIN AGES HIGHWAY AGE P
Highway page options. To select a menu option, use the ROCKER
to highlight the desired option and press . ENTER
The following options are available from the Highway page menu:
Setup Page Layout—allows you to choose the size of text and
number of data elds on the page.
Change Data Fields—allows you to specify the type of data
displayed in each data eld used on the map display. This option is
available from any of the main pages. See the Appendix for a listing
of the data elds.
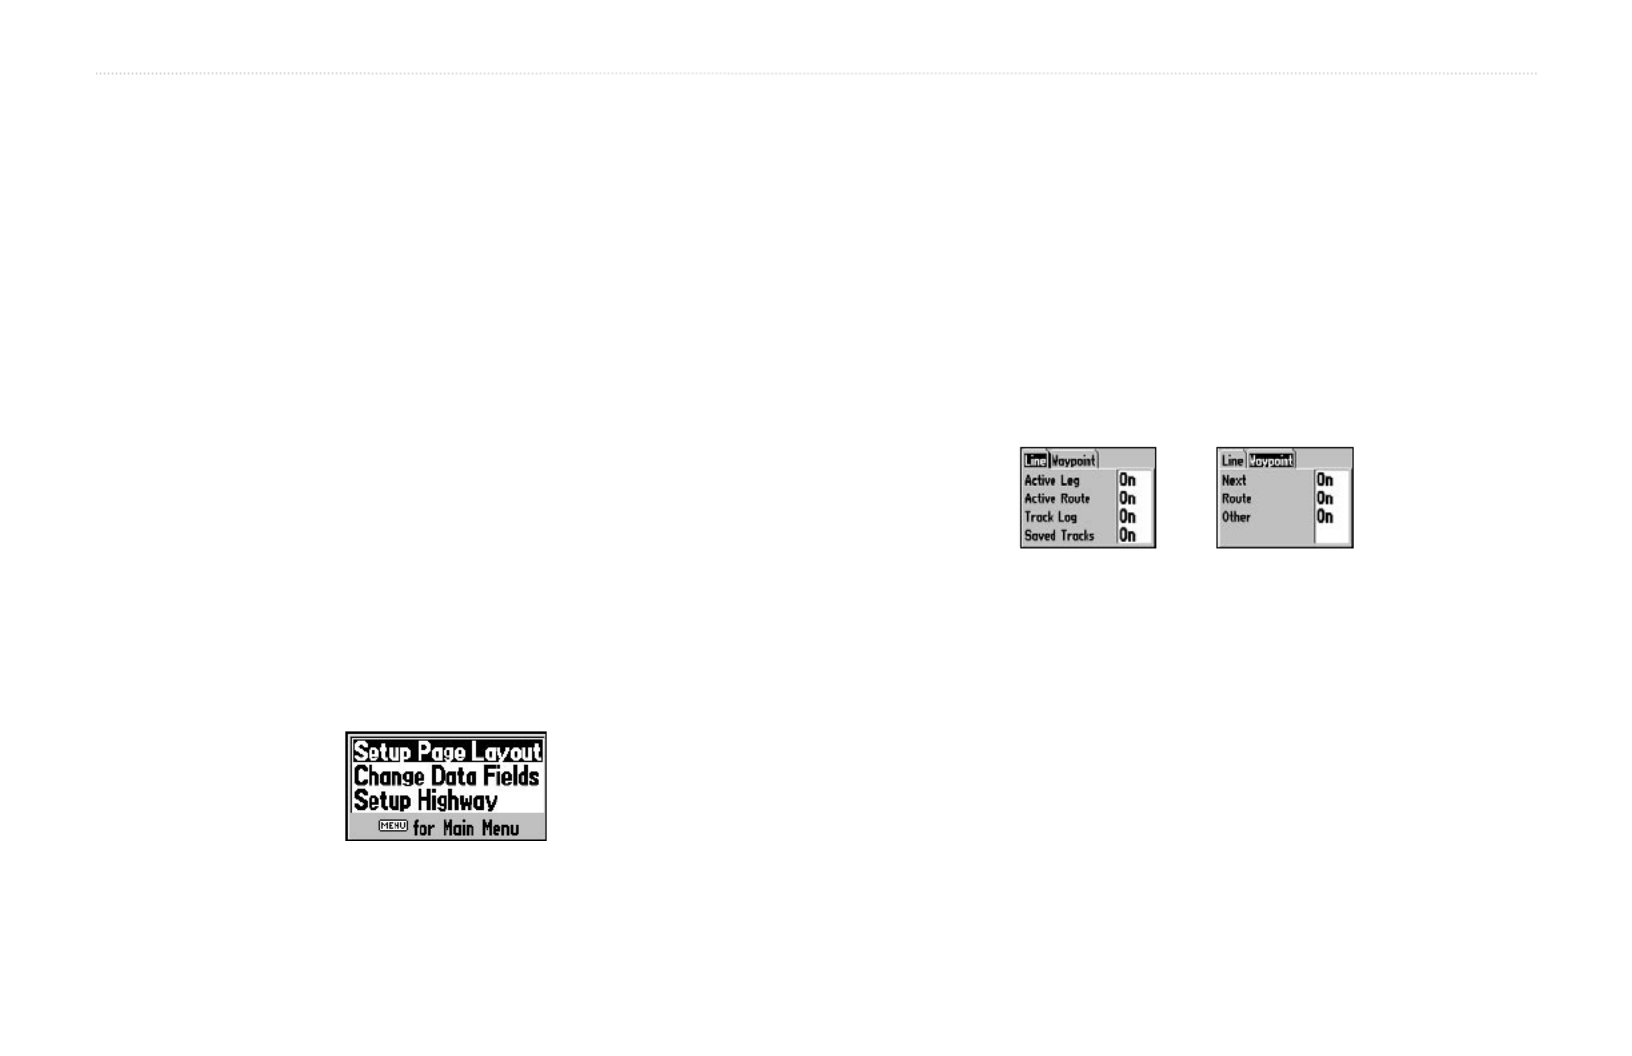
Set Up Highway—displays an option menu with two tabs: Line,
and Waypoint. Each tab has On/Off settings for several options. The
Line tab determines if the , , Active Leg Active Route Track Log, or
Saved Tracks are displayed on the Highway page. The Waypoint tab
determines if the , , or Next Route Other Waypoints are displayed on
the Highway page.
Highway Page Options Menu
To setup the page layout:
1. Highlight the option and press .Setup Page Layout ENTER
2. Select the desired option from the following and press .ENTER
To change a data eld:
1. From the menu, use the key to highlight ROCKER Change
Data Fields ENTERand press .
2. Highlight the data eld you want to change and press . ENTER
3. Use the to highlight the data you want to display ROCKER
and press . To exit, press .ENTER QUIT
Setup Highway
Line Tab
Setup Highway
Waypoint Tab

48 GPSMAP 176/176C Owner’s Manual
M P > AIN AGES A R N PCTIVE OUTE AND UMBERS AGE
Active Route Page
Whenever you have activated a route in the GPSMAP 176/176C, the
Active Route page shows each waypoint of the active route, along
with various, user-selectable types of data. For additional information
about the Active Route page, see page 39.
Numbers Page
The Numbers page provides a quick reference for important data you
want to display. The default page displays four large, user-selectable
data elds showing speed, track, the current location and GPS
accuracy. You may also choose to show the one data eld in large
lettering for better readability. For detailed instructions on changing
the data elds and layout of the Numbers page, see pages 43-44.
Numbers Page Options

GPSMAP 176/176C Owner’s Manual 49
M M > AIN ENU OVERVIEW
M M PAIN ENU AGE
The Main Menu page provides access to various waypoint, system,
navigation and interface management, and setup menus in an easy to
use “tab” format. The Main Menu page is available from any page in
the system. To access the Main Menu page, press twice. The MENU
Menu tabs are divided into categories by function.
Main Menu Page
Main Menu
Tabs
Submenu
Tabs
To select a menu tab from the Main Menu page:
1. Press the Up or Down to highlight the tab you want ROCKER
to view. The information for the highlighted tab automatically
appears to the right. If you want to highlight any of the tab
items, press the to select individual items.ROCKER
2. Press for additional submenu options or press MENU ENTER
to make changes to the highlighted item. Press the ROCKER
to get back to the menu tab list. Press to exit the Main QUIT
Menu page.

50 GPSMAP 176/176C Owner’s Manual
M M > AIN ENU GPS TAB
GPS Tab
The GPS tab provides a visual reference of satellite acquisition,
receiver status, and position accuracy. The status information shows
what the receiver is doing at any given moment. The sky view and
signal strength bars give an indication of what satellites are visible
to the receiver and whether or not they are being tracked. The signal
strength is shown on a bar graph for each satellite, with the satellite
number below. As the receiver locks onto satellites, a signal strength
bar appears for each satellite in view, with the appropriate satellite
number underneath each bar.
The progress of satellite acquisition is shown in three stages:
• No signal strength bars—the receiver is looking for the
satellites indicated.
• Light signal strength bars—the receiver has found the
satellite(s) and is collecting data.
• Dark signal strength bars—the receiver has collected the
necessary data and the satellite(s) are ready for use.
As soon as the GPSMAP 176/176C has collected the necessary data
from the best satellites in view to calculate a x, the status eld
indicates 2D or 3D status. The unit then updates the position, date,
and time.
You can use the sky view to help determine whether any satellites
are being blocked, and whether you have a current position x
(indicated by a , , , or 2D 2D Differential 3D 3D Differential in the
status eld). The sky view shows a bird’s-eye view of the position of
each satellite relative to the receiver’s last known position. The outer
circle represents the horizon (north up), the inner circle 45º above the
horizon, and the center point a position directly overhead. You can
also set the sky view to a Track Up conguration, causing the top of
the sky view to align along your current track heading.
WAAS Capability
The GPSMAP 176/176C is capable of receiving WAAS (Wide Area
Augmentation System) satellite signals. WAAS is an FAA (Federal
Aviation Administration) funded project to improve the overall
accuracy and integrity of the GPS signal for aviation use, but land/sea
based users may also benet from this system. At this time, the
system is still in the development stage and is not fully operational.
There are currently two WAAS satellites that can be received in the
U.S.A., one over the Atlantic Ocean and one over the Pacic Ocean,
in a geostationary orbit over the equator. Effective use of the WAAS
satellite signal may be limited by your geographic location in relation
to those satellites, now in developmental service.
Specyfikacje produktu
| Marka: | Garmin |
| Kategoria: | Nawigacja osobista |
| Model: | GPSMAP 176 |
Potrzebujesz pomocy?
Jeśli potrzebujesz pomocy z Garmin GPSMAP 176, zadaj pytanie poniżej, a inni użytkownicy Ci odpowiedzą
Instrukcje Nawigacja osobista Garmin

4 Lipca 2024
4 Lipca 2024
4 Lipca 2024
4 Lipca 2024
4 Lipca 2024
4 Lipca 2024
4 Lipca 2024
4 Lipca 2024
3 Lipca 2024
3 Lipca 2024
Instrukcje Nawigacja osobista
- Nawigacja osobista Pioneer
- Nawigacja osobista Panasonic
- Nawigacja osobista Medion
- Nawigacja osobista HP
- Nawigacja osobista Kenwood
- Nawigacja osobista Becker
- Nawigacja osobista Lowrance
- Nawigacja osobista VDO
- Nawigacja osobista Suunto
- Nawigacja osobista Navitel
- Nawigacja osobista Maginon
- Nawigacja osobista Navman
- Nawigacja osobista TomTom
- Nawigacja osobista Bushnell
- Nawigacja osobista Magellan
- Nawigacja osobista A-Rival
- Nawigacja osobista Ascot
- Nawigacja osobista Adapt
- Nawigacja osobista Audiovox
- Nawigacja osobista Navigon
- Nawigacja osobista Furuno
- Nawigacja osobista Snooper
- Nawigacja osobista Packard Bell
- Nawigacja osobista Route 66
- Nawigacja osobista Holux
- Nawigacja osobista Izzo
Najnowsze instrukcje dla Nawigacja osobista

11 Stycznia 2025
11 Stycznia 2025
11 Stycznia 2025
28 Września 2024
27 Września 2024
26 Września 2024
26 Września 2024
26 Września 2024
26 Września 2024
25 Września 2024