Instrukcja obsługi Epson Stylus NX100
Przeczytaj poniżej 📖 instrukcję obsługi w języku polskim dla Epson Stylus NX100 (40 stron) w kategorii drukarka. Ta instrukcja była pomocna dla 4 osób i została oceniona przez 2 użytkowników na średnio 4.5 gwiazdek
Strona 1/40

Epson Stylus NX100 Series
Quick Guide
Basic Copying, Printing, and Scanning
Maintaining Your NX100 Series
Solving Problems
®

2Contents
Contents
Introduction . . . . . . . . . . . . . . . . . . . . . . . . . . . . . . . . . . . . . . . . . . . 3
Loading Paper . . . . . . . . . . . . . . . . . . . . . . . . . . . . . . . . . . . . . . . . . 4
Using Special Papers . . . . . . . . . . . . . . . . . . . . . . . . . . . . . . . . . . . . . . . . 5
Copying a Document or Photo . . . . . . . . . . . . . . . . . . . . . . . . . . 7
Placing the Original on the Glass . . . . . . . . . . . . . . . . . . . . . . . . . . . . . . . 7
Copying a Document . . . . . . . . . . . . . . . . . . . . . . . . . . . . . . . . . . . . . . . 8
Copying a Photo . . . . . . . . . . . . . . . . . . . . . . . . . . . . . . . . . . . . . . . . . . 9
Copying Draft Documents . . . . . . . . . . . . . . . . . . . . . . . . . . . . . . . . . . 10
Printing From Your Computer . . . . . . . . . . . . . . . . . . . . . . . . . . 11
Printing in Windows . . . . . . . . . . . . . . . . . . . . . . . . . . . . . . . . . . . . . . 11
Printing With a Macintosh . . . . . . . . . . . . . . . . . . . . . . . . . . . . . . . . . . 13
Selecting the Correct Paper Type . . . . . . . . . . . . . . . . . . . . . . . . . . . . . . 17
Scanning a Photo or Document . . . . . . . . . . . . . . . . . . . . . . . . 18
Basic Scanning . . . . . . . . . . . . . . . . . . . . . . . . . . . . . . . . . . . . . . . . . . . 18
Restoring and Correcting Photos . . . . . . . . . . . . . . . . . . . . . . . . . . . . . . 19
Maintaining Your NX100 Series . . . . . . . . . . . . . . . . . . . . . . . . 20
Checking the Print Head Nozzles . . . . . . . . . . . . . . . . . . . . . . . . . . . . . . 20
Cleaning the Print Head . . . . . . . . . . . . . . . . . . . . . . . . . . . . . . . . . . . . 21
Checking the Ink Cartridge Status . . . . . . . . . . . . . . . . . . . . . . . . . . . . . 22
Replacing Ink Cartridges . . . . . . . . . . . . . . . . . . . . . . . . . . . . . . . . . . . . 23
Solving Problems . . . . . . . . . . . . . . . . . . . . . . . . . . . . . . . . . . . . . 28
Checking for Software Updates . . . . . . . . . . . . . . . . . . . . . . . . . . . . . . . 28
Error Indicators . . . . . . . . . . . . . . . . . . . . . . . . . . . . . . . . . . . . . . . . . . 28
Problems and Solutions . . . . . . . . . . . . . . . . . . . . . . . . . . . . . . . . . . . . . 29
Where To Get Help . . . . . . . . . . . . . . . . . . . . . . . . . . . . . . . . . . . . . . . 31
Notices. . . . . . . . . . . . . . . . . . . . . . . . . . . . . . . . . . . . . . . . . . . . . . . 33

Introduction 3
Introduction
After you have set up your Epson Stylus
® NX100 Series as described on the Start
Here sheet, turn here to:
■Load paper
■Make a copy of a document or photo
■Get the basic steps for printing from your computer
■Scan a document or photo and restore or correct the color, if necessary
■Perform routine maintenance
■Solve simple problems
This book tells you how to do most of these things without ever turning on your
computer! Of course, your NX100 Series can do a lot more when you connect it
to your Windows® or Macintosh® computer. For additional instructions, see the
on-screen Epson Information Center by double-clicking the icon for it on your
desktop.
Please follow these guidelines as you read your NX100 Series instructions:
Warning:
Warnings must be followed carefully to avoid bodily injury.
Caution:
Cautions must be observed to avoid damage to your equipment.
Note:
Notes contain important information about your NX100 Series.
Tip:
Tips contain hints for better copying, scanning, and printing.

4Loading Paper
Loading Paper
You can print on a variety of paper types and sizes. For details, see page 5.
1. Open the paper support, then open the output tray and pull out the
extension.
2. Flip the clear plastic feeder guard forward, then squeeze the edge guide and
slide it left.
3. Insert paper, glossy or printable side up, short edge first, against the right side
and beneath the tab. (Load letterhead or pre-printed paper top edge first.)
Always load paper short edge
first, even for landscape printing.

Using Special Papers 5
You can load up to 80 sheets of plain paper, Epson Bright White Paper, or
Presentation Paper Matte, or 20 sheets of photo paper. Load other special
papers one sheet at a time.
Note:
The type of paper you choose affects the way your printout looks. If you are just
making a copy or printing a rough draft, plain paper is fine. However, for the best
results, you’ll want to use one of Epson’s special ink jet papers designed for your
printer. See the next section for more information.
4. Slide the edge guide against the paper, but not too tightly.
5. Flip the clear plastic feeder guard back.
Note:
For instructions on loading envelopes, see your on-screen Epson Information Center.
Using Special Papers
Epson offers a wide array of high quality papers, making it easy to maximize the
impact of your photos, presentations, and creative projects.
You can purchase genuine Epson ink and paper at Epson Supplies Central
SM at
www.epson.com/ink3 (U.S. sales) or www.epson.ca (Canadian sales). You can
also purchase supplies from an Epson authorized reseller. To find the nearest one,
call 800-GO-EPSON (800-463-7766) or visit Epson’s website.
.
Paper type Size
Part
number
Sheet
count
Epson Bright White Paper Letter (8.5 × 11 in.) S041586 500
Epson Photo Paper Glossy 4 × 6 in. S041809
S042038
50
100
Letter (8.5 × 11 in.) S041141
S041649
S041271
20
50
100

6Using Special Papers
Epson Premium Photo Paper Glossy Borderless 4 × 6 in. S041808
S041727
40
100
Borderless 5 × 7 in. S041464 20
Borderless 8 × 10 in. S041465 20
Letter (8.5 × 11 in.) S042183
S041667
25
50
Epson Ultra Premium Photo Paper
Glossy
Borderless 4 × 6 in. S042181
S042174
60
100
Borderless 5 × 7 in. S041945 20
Borderless 8 × 10 in. S041946 20
Letter (8.5 × 11 in.) S042182
S042175
25
50
Epson Premium Photo Paper Semi-
gloss
Borderless 4 × 6 in. S041982 40
Letter (8.5 × 11 in.) S041331 20
Epson Presentation Paper Matte Letter (8.5 × 11 in.) S041062 100
Legal (8.5 × 14 in.) S041067 100
Epson Premium Presentation Paper
Matte
Borderless 8 × 10 in. S041467 50
Letter (8.5 × 11 in.) S041257
S042180
50
100
Epson Premium Presentation Paper
Matte Double-sided
Letter (8.5 × 11 in.) S041568 50
Epson Photo Quality Self-adhesive
sheets
A4 (8.3 × 11.7 in.) S041106 10
Epson Iron-on Cool Peel Transfer
Paper
Letter (8.5 × 11 in.) S041153 10
Paper type Size
Part
number
Sheet
count

Copying a Document or Photo 7
Copying a Document or Photo
Follow the instructions in this section to position your originals correctly on the
glass and make color or black-and-white copies.
Placing the Original on the Glass
1. Open the document cover and place your original face-down on the glass,
with the top facing into the front right corner.
2. Close the cover gently so you don’t move the original.

8Copying a Document
Copying a Document
You can copy documents onto letter- or A4-size plain paper or Epson special paper
just like a copy machine.
1. Load letter- or A4-size plain paper or Epson special paper.
2. Place your original document on the document table.
3. Press the xB&W Text button (for black-and-white documents) or x Color
Text button (for color documents) to start copying.
If you want to enlarge your document to fit on letter- or A4-size paper, press
and hold either the xB&W Text button (for black-and-white documents) or
xColor Text button (for color documents) for three seconds.
If you need to cancel copying, press the yStop button.
Note:
Copies may not be exactly the same size as your original document.
B&W text and
color text
buttons

Copying a Photo 9
Copying a Photo
You can copy photos onto 4 × 6-inch Epson photo paper (various types available)
for borderless photo reprints.
1. Load up to 20 sheets of 4 × 6-inch Epson photo paper.
2. Place your original photo on the document table.
3. Press the xColor Photo button to start copying. The NX100 Series
automatically sizes your photo to fit on the paper you loaded.
If you need to cancel copying, press the yStop button.
Note:
Copies may not be exactly the same size as your original photo, and cropping may
occur at the edges.
Color photo
button

10 Copying Draft Documents
Copying Draft Documents
You can make quick draft copies of documents on plain paper or Epson Bright
White paper. Draft copies have reduced print quality, but they print faster.
1. Load letter- or A4-size plain paper or Epson Bright White paper.
2. Place your original document on the document table.
3. Press and hold the yStop button as you press either the x B&W Text
button (for black-and-white documents) or x Color Text button (for color
documents).
If you need to cancel copying, press the yStop button.
Note:
Copies may not be exactly the same size as your originals.
B&W text and
color text
buttons
Stop button

Printing From Your Computer 11
Printing From Your Computer
This section describes the basic steps for printing a photo or document stored on
your Windows or Macintosh computer. For detailed instructions on printing, see
the on-screen Epson Information Center.
Before you start, make sure you’ve installed your printer software and connected
the NX100 Series to your computer as described on the Start Here sheet.
Tip:
It’s a good idea to check for updates to your NX100 Series software (see page 28 for
instructions).
Printing in Windows
1. Open a photo or document in an application.
2. Open the File menu and select Print. You see a window like this one:
3. Make sure EPSON NX100 Series is selected, then click the Preferences or
Properties button.
(If you see a Setup, Printer, or Options button, click it. Then click
Preferences or Properties on the next screen.)
Click here to open
your printer software
Select your printer
12 Printing in Windows
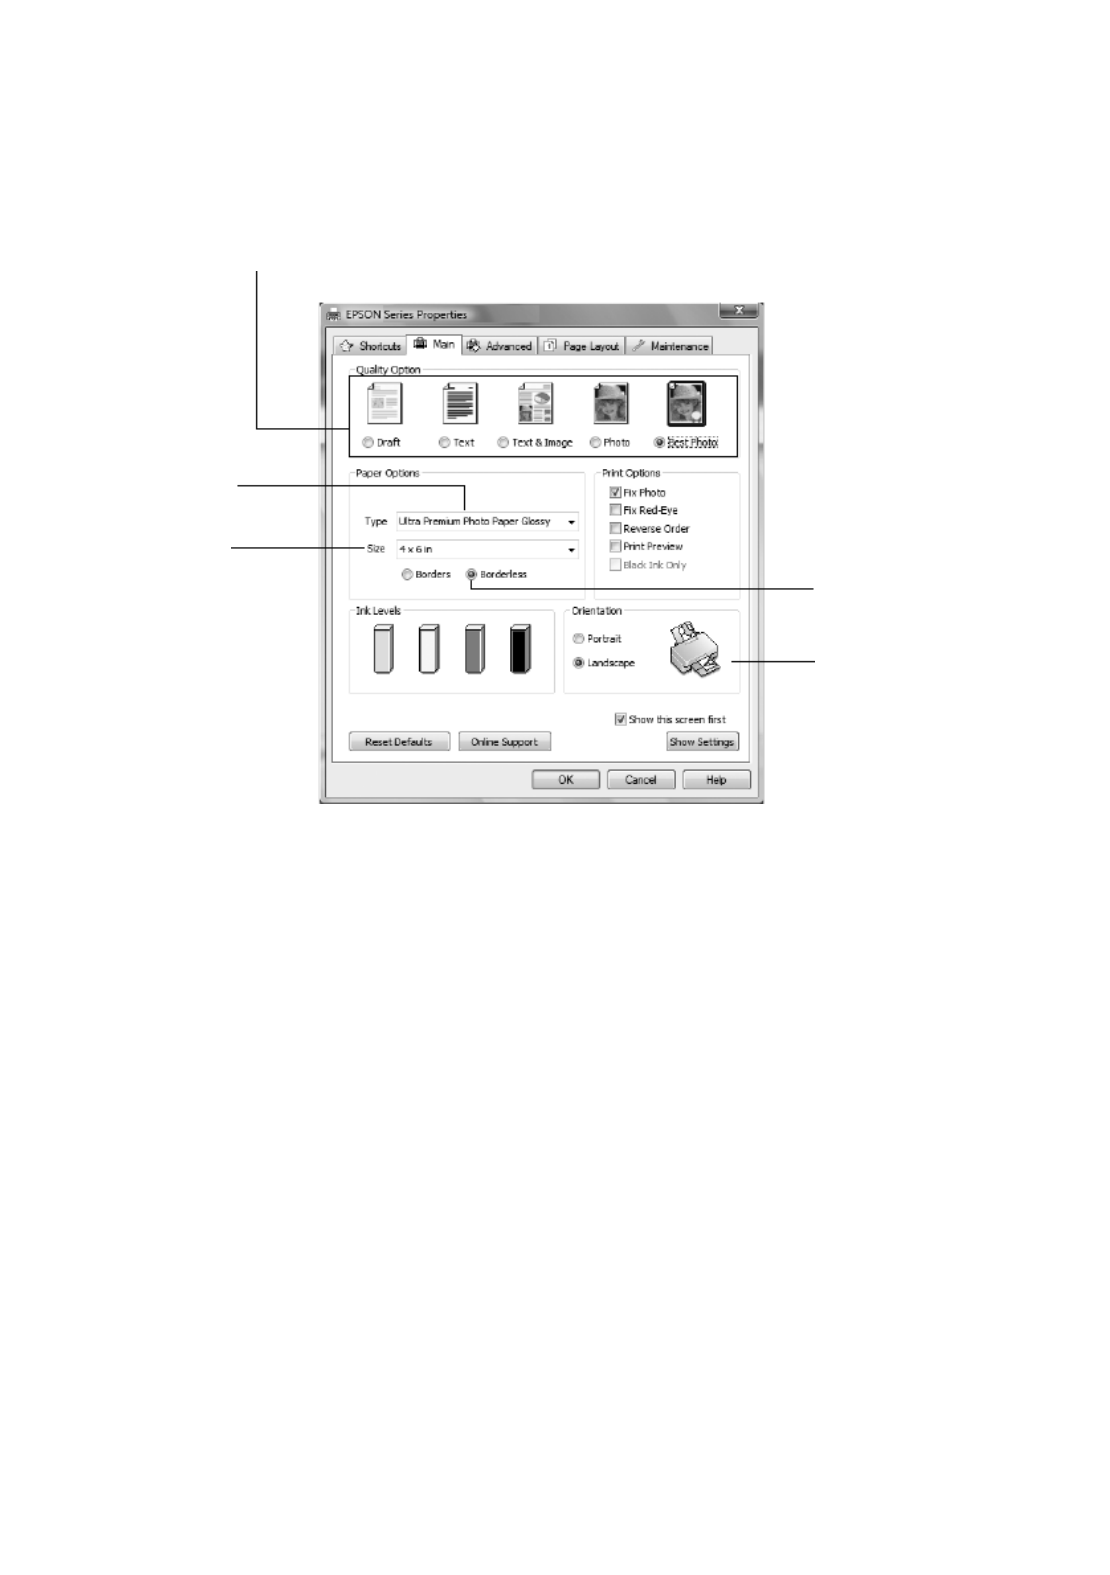
4. On the Main tab, select the basic print settings. Make sure you choose the
correct paper Type setting for the paper you are using (see page 17 for
details).
Tip:
For quick access to the most common settings, click the tab and select Shortcuts
one of the presets. You can create your own presets by clicking the Save Settings
button on the Advanced tab. For details, see your on-screen Epson Information
Center
5. To improve the color, contrast, and sharpness of photos, select Fix Photo.
6. To reduce or remove red-eye effects in photos, select Fix Red-Eye.
7. If you want to reduce or enlarge your printout, or print double-sided, click the
Page Layout tab and select settings as necessary.
8. For more printing options, click the Advanced tab.
Note:
For more information about print settings, click Help or see your on-screen Epson
Information Center
9. Click OK to save your settings.
Select your
document
Orientation
Select your
paper Size
Select your
paper Type
Click here for
borderless photos
Select the type of document you’re printing
(choose Photo or Best Photo for pictures)

Printing With a Macintosh 13
10. Click OK or Print to start printing. This window appears and shows the
progress of your print job.
Printing With a Macintosh
See one of the sections below for your Mac OS® operating system.
Mac OS X 10.5
1. Open a photo or document in an application.
2. Open the File menu and select Print.
3. Select EPSON Stylus NX100 as the Printer setting.
4. Click d to expand the Print window, if necessary.
Cancel
printing
Check ink
cartridge status
Click to expand

14 Printing With a Macintosh
5. Select the basic page setup options. For borderless photos, choose a Paper
Size setting with a Sheet Feeder - Borderless option.
Note:
If the setting you want isn’t shown (for example, Scale), check for it in your
application before printing.
6. Choose Print Settings from the pop-up menu, then select the following
settings that appear on the bottom of the screen:
7. Choose any other printing options you may need from the pop-up menu. See
the on-screen Epson Information Center for details.
Tip:
To reduce or remove red-eye effects in photos, choose Extension Settings from
the pop-up menu and select Fix Red-Eye.
8. Click Print.
Page setup
options
Pop-up menu
Select your paper type
(see page 17)
Select higher quality or
faster printing (if available)
Select Color or Black Ink
Only output
Choose Print Settings

Printing With a Macintosh 15
9. To monitor your print job, click the printer icon in the dock. Select your print
job, then select an option to cancel, pause, or resume printing, if necessary.
Mac OS X 10.3 to 10.4
1. Open a photo or document in an application.
2. Select Page Setup from the File menu. Select the following settings:
For borderless printing, choose a Sheet Feeder - Borderless option in the
Paper Size list for your paper size.
3. Click OK to close the Page Setup window.
Cancel
printing
Print job
Pause or resume printing
Select your printer
Select your Paper Size
Select your document
or image orientation

16 Printing With a Macintosh
4. Select Print from the File menu. You see a window like this one:
5. Choose Print Settings from the pop-up menu and select the following
settings as necessary:
Note:
In certain programs, you may need to select Advanced before you can select Print
Settings. For more information about printer settings, click the ? button.
6. Click the Advanced button to change additional settings.
Note:
For more information on advanced settings click ?.
7. Choose any other printing options you may need from the pop-up menu. See
your on-screen Epson Information Center for details.
8. Click Print.
Select Print Settings
Select your printer
Select your paper
type (see page 17)
Select Color or
Black Ink Only
Select higher quality
or faster printing
(if available)
Select
Automatic mode
Specyfikacje produktu
| Marka: | Epson |
| Kategoria: | drukarka |
| Model: | Stylus NX100 |
Potrzebujesz pomocy?
Jeśli potrzebujesz pomocy z Epson Stylus NX100, zadaj pytanie poniżej, a inni użytkownicy Ci odpowiedzą
Instrukcje drukarka Epson

1 Kwietnia 2025
18 Lutego 2025
12 Lutego 2025
3 Lutego 2025
3 Lutego 2025
3 Lutego 2025
3 Lutego 2025
3 Lutego 2025
3 Lutego 2025
2 Lutego 2025
Instrukcje drukarka
- drukarka Sony
- drukarka Samsung
- drukarka LG
- drukarka Xiaomi
- drukarka Sharp
- drukarka Huawei
- drukarka Lenovo
- drukarka Fujitsu
- drukarka Roland
- drukarka Panasonic
- drukarka StarTech.com
- drukarka Canon
- drukarka Fujifilm
- drukarka MSI
- drukarka Toshiba
- drukarka D-Link
- drukarka Citizen
- drukarka HP
- drukarka Brother
- drukarka Honeywell
- drukarka Kodak
- drukarka Testo
- drukarka Primera
- drukarka Xerox
- drukarka Godex
- drukarka Olivetti
- drukarka Zebra
- drukarka Dell
- drukarka Digitus
- drukarka AgfaPhoto
- drukarka Kyocera
- drukarka Ricoh
- drukarka Seiko
- drukarka Renkforce
- drukarka Thomson
- drukarka AVM
- drukarka Velleman
- drukarka Dymo
- drukarka Panduit
- drukarka Olympus
- drukarka OKI
- drukarka Mitsubishi
- drukarka Intermec
- drukarka NEC
- drukarka Polaroid
- drukarka Konica Minolta
- drukarka Bixolon
- drukarka Pantum
- drukarka Olympia
- drukarka Datamax O'Neil
- drukarka DNP
- drukarka Equip
- drukarka ZKTeco
- drukarka TSC
- drukarka HiTi
- drukarka Microboards
- drukarka Triumph-Adler
- drukarka Fargo
- drukarka Entrust
- drukarka Kern
- drukarka Brady
- drukarka Tomy
- drukarka Lexmark
- drukarka Sagem
- drukarka Nilox
- drukarka Argox
- drukarka Royal Sovereign
- drukarka Minolta
- drukarka Oce
- drukarka Paxar
- drukarka IDP
- drukarka Metapace
- drukarka Ultimaker
- drukarka Ibm
- drukarka CSL
- drukarka Toshiba TEC
- drukarka Frama
- drukarka Builder
- drukarka Kogan
- drukarka Star Micronics
- drukarka Posiflex
- drukarka Dascom
- drukarka GG Image
- drukarka Vupoint Solutions
- drukarka Elite Screens
- drukarka DTRONIC
- drukarka Phoenix Contact
- drukarka Videology
- drukarka Epson 7620
- drukarka Star
- drukarka EC Line
- drukarka Colop
- drukarka Approx
- drukarka Fichero
- drukarka Raspberry Pi
- drukarka Unitech
- drukarka Middle Atlantic
- drukarka Evolis
- drukarka Tally Dascom
- drukarka Custom
- drukarka Nisca
- drukarka Sawgrass
- drukarka Mutoh
Najnowsze instrukcje dla drukarka

9 Kwietnia 2025

9 Kwietnia 2025
9 Kwietnia 2025

9 Kwietnia 2025

9 Kwietnia 2025
4 Kwietnia 2025

3 Kwietnia 2025
3 Kwietnia 2025
3 Kwietnia 2025

2 Kwietnia 2025