Instrukcja obsługi Epson PictureMate PM-525
Przeczytaj poniżej 📖 instrukcję obsługi w języku polskim dla Epson PictureMate PM-525 (166 stron) w kategorii drukarka. Ta instrukcja była pomocna dla 3 osób i została oceniona przez 2 użytkowników na średnio 4.5 gwiazdek
Strona 1/166

PM-525 User's Guide


3
Contents
PM-525 User's Guide................................................................................................................................. 11
Product Basics .......................................................................................................................................... 12
Using the Control Panel ..................................................................................................................... 12
Control Panel Buttons.................................................................................................................... 13
The LCD Screen............................................................................................................................ 14
Viewing the Icon List ................................................................................................................. 14
Changing LCD Screen Language.................................................................................................. 15
Turning Off Control Panel Sounds................................................................................................. 15
Printer Parts ....................................................................................................................................... 16
Using the Optional Battery ................................................................................................................. 18
Purchase the Optional Battery....................................................................................................... 19
Battery Part Number ................................................................................................................. 19
Installing the Battery ...................................................................................................................... 19
Charging the Battery Using the AC Adapter .................................................................................. 20
Battery Safety Instructions............................................................................................................. 21
Removing the Handle......................................................................................................................... 22
The Power Off and Sleep Timers ....................................................................................................... 23
Changing the Power Off Timer Setting from the Control Panel...................................................... 23
Changing the Sleep Timer Setting from the Control Panel ............................................................ 23
Epson Connect Solutions for Smartphones, Tablets, and More ......................................................... 24
Setting Up Epson Connect Services.............................................................................................. 24
Using Epson Email Print ............................................................................................................... 24
Using the Epson Creative Print Mobile App................................................................................... 25
Using the Epson iPrint Mobile App ................................................................................................ 26
Using Epson Remote Print ........................................................................................................... 26
Using Google Cloud Print................................................................................................................... 27
Using AirPrint .................................................................................................................................... 28
Using the Mopria Print Service .......................................................................................................... 28
Android Printing Using the Epson Print Enabler ................................................................................ 29

4
Wi-Fi Networking ....................................................................................................................................... 30
Wi-Fi Infrastructure Mode Setup......................................................................................................... 30
Selecting Wireless Network Settings from the Control Panel ........................................................ 31
Wi-Fi Direct Mode Setup .................................................................................................................... 33
Enabling Wi-Fi Direct Mode........................................................................................................... 34
Wi-Fi Protected Setup (WPS)............................................................................................................. 34
Using WPS to Connect to a Network ............................................................................................. 34
Viewing the Network Status ............................................................................................................... 35
Printing a Network Connection Report ............................................................................................... 35
Changing or Updating Network Connections ..................................................................................... 36
Accessing the Web Config Utility................................................................................................... 36
Changing a USB Connection to a Wi-Fi Connection...................................................................... 36
Connecting to a New Wi-Fi Router ................................................................................................ 37
Disabling Wi-Fi Features ............................................................................................................... 37
Loading Paper ........................................................................................................................................... 39
Loading Paper in the Paper Feed Slot................................................................................................ 39
Paper Loading Capacity ..................................................................................................................... 44
Available Epson Papers ..................................................................................................................... 44
Borderless Paper Type Compatibility ................................................................................................. 45
Paper or Media Type Settings - Product Software.............................................................................. 45
Selecting the Paper Settings - Control Panel ..................................................................................... 46
Paper Type Settings - Control Panel ............................................................................................. 46
Printing from a Computer ......................................................................................................................... 48
Printing with Windows ........................................................................................................................ 48
Selecting Basic Print Settings - Windows ...................................................................................... 48
Print Quality Options - Windows ............................................................................................... 50
Multi-Page Printing Options - Windows..................................................................................... 51
Selecting Double-sided Printing Settings - Windows..................................................................... 51
Double-sided Printing Options - Windows................................................................................. 53
Selecting Additional Layout and Print Options - Windows ............................................................. 53
Custom Color Correction Options - Windows ............................................................................ 55
Image Options and Additional Settings - Windows.................................................................... 56
Selecting a Printing Preset - Windows........................................................................................... 57

5
Selecting Extended Settings - Windows ........................................................................................ 58
Extended Settings - Windows ................................................................................................... 60
Printing Your Document or Photo - Windows................................................................................. 61
Checking Print Status - Windows.............................................................................................. 63
Selecting Default Print Settings - Windows.................................................................................... 63
Changing the Language of the Printer Software Screens ......................................................... 64
Changing Automatic Update Options ............................................................................................ 65
Printing on a Mac ............................................................................................................................... 66
Selecting Basic Print Settings - Mac .............................................................................................. 67
Print Quality Settings - Mac....................................................................................................... 70
Print Options - Mac ................................................................................................................... 71
Selecting Page Setup Settings - Mac ............................................................................................ 71
Selecting Print Layout Options - Mac............................................................................................. 73
Sizing Printed Images - Mac.......................................................................................................... 74
Managing Color - Mac ................................................................................................................... 74
Color Matching and Color Options - Mac .................................................................................. 75
Selecting Printing Preferences - Mac ............................................................................................ 76
Printing Preferences - Mac........................................................................................................ 77
Printing Your Document or Photo - Mac ........................................................................................ 78
Checking Print Status - Mac...................................................................................................... 78
Printing From a Chromebook ............................................................................................................. 79
Cancelling Printing Using a Product Button........................................................................................ 80
Using Memory Cards with Your Product ................................................................................................. 81
Inserting a Memory Card.................................................................................................................... 81
Memory Card Types ...................................................................................................................... 82
Memory Card File Specifications................................................................................................... 82
Removing a Memory Card............................................................................................................. 82
Printing from a Memory Card ............................................................................................................. 83
Viewing and Printing Photos.......................................................................................................... 83
Printing Photo Layouts .................................................................................................................. 84
Photo Layout Options ............................................................................................................... 85
Print Setting Options...................................................................................................................... 85
Photo Adjustment Options............................................................................................................. 86

7
Cleaning Your Product ..................................................................................................................... 120
Solving Problems .................................................................................................................................... 122
Checking for Software Updates........................................................................................................ 122
Product Status Messages ................................................................................................................ 123
Running a Product Check ................................................................................................................ 124
Resetting Control Panel Defaults ..................................................................................................... 125
Solving Power and Battery Problems ............................................................................................... 126
Product Does Not Turn On .......................................................................................................... 126
Product Does Not Turn Off .......................................................................................................... 126
Product Turns Off Automatically .................................................................................................. 126
Solving Setup Problems................................................................................................................... 127
Noise After Ink Installation........................................................................................................... 127
Software Installation Problems .................................................................................................... 127
USB Connection Problems.......................................................................................................... 128
Solving Network Problems ............................................................................................................... 128
Product Cannot Connect to a Wireless Router or Access Point .................................................. 128
Network Software Cannot Find Product on a Network................................................................. 130
Product Does Not Appear in Mac Printer Window ....................................................................... 131
Cannot Print Over a Network....................................................................................................... 131
Solving Paper Problems................................................................................................................... 132
Paper Feeding Problems............................................................................................................. 132
Paper Jam Problems Inside the Product ..................................................................................... 133
Paper Ejection Problems ............................................................................................................. 137
Solving Problems Printing from a Computer..................................................................................... 137
Nothing Prints.............................................................................................................................. 137
Product Icon Does Not Appear in Windows Taskbar................................................................... 138
Printing is Slow............................................................................................................................ 139
Solving Page Layout and Content Problems.................................................................................... 140
Inverted Image............................................................................................................................. 141
Too Many Copies Print ................................................................................................................ 141
Blank Pages Print ........................................................................................................................ 141
Incorrect Margins on Printout....................................................................................................... 142
Border Appears on Borderless Prints .......................................................................................... 142

8
Incorrect Characters Print............................................................................................................ 143
Incorrect Image Size or Position.................................................................................................. 143
Slanted Printout........................................................................................................................... 143
Solving Print Quality Problems......................................................................................................... 144
White or Dark Lines in Printout .................................................................................................... 144
Blurry or Smeared Printout .......................................................................................................... 145
Faint Printout or Printout Has Gaps............................................................................................. 146
Grainy Printout............................................................................................................................. 146
Incorrect Colors ........................................................................................................................... 147
Solving Memory Card Problems....................................................................................................... 148
Memory Card Does Not Fit Into a Slot ......................................................................................... 148
Cannot View or Print Photos from a Memory Card or Device ...................................................... 149
Cannot Transfer Photos to or from a Memory Card or Device ..................................................... 149
Uninstall Your Product Software....................................................................................................... 149
Uninstalling Printing Software - Windows .................................................................................... 150
Uninstalling Product Software - Mac............................................................................................ 150
Where to Get Help............................................................................................................................ 151
Technical Specifications ........................................................................................................................ 154
Windows System Requirements ...................................................................................................... 154
Mac System Requirements .............................................................................................................. 155
Paper Specifications ........................................................................................................................ 155
Printable Area Specifications ........................................................................................................... 156
Ink Cartridge Specifications.............................................................................................................. 158
Memory Card Specifications ............................................................................................................ 158
External USB Device Specifications................................................................................................. 159
Dimension Specifications ................................................................................................................. 160
Electrical Specifications ................................................................................................................... 160
Environmental Specifications ........................................................................................................... 162
Interface Specifications .................................................................................................................... 162
Network Interface Specifications ...................................................................................................... 162
Safety and Approvals Specifications ................................................................................................ 163
Notices ..................................................................................................................................................... 164
FCC Compliance Statement............................................................................................................. 164

9
Trademarks...................................................................................................................................... 165
Copyright Notice............................................................................................................................... 165
A Note Concerning Responsible Use of Copyrighted Materials................................................... 166
Default Delay Times for Power Management for Epson Products............................................... 166
Copyright Attribution.................................................................................................................... 166


11
PM-525 User's Guide
Welcome to the PM-525 User's Guide.
For a printable click PDF copy of guide, this here.

12
Product Basics
See these sections to learn about the basic features of your product.
Using the Control Panel
Printer Parts
Using the Optional Battery
Removing the Handle
The Power Off and Sleep Timers
Epson Connect Solutions for Smartphones, Tablets, and More
Using Google Cloud Print
Using AirPrint
Using the Mopria Print Service
Android Printing Using the Epson Print Enabler
Using the Control Panel
See these sections to learn about the control panel and select control panel settings.
Control Panel Buttons
The LCD Screen
Changing LCD Screen Language
Turning Off Control Panel Sounds
Parent topic: Product Basics

13
Control Panel Buttons
1The power button
2 The and buttons; increase or decrease the number of copies+ –
3The stop button
4The home button
5The back button
6 The arrow buttons and the button; navigate menusOK
7 The start button
Parent topic: Using the Control Panel

15
4. Press the up or down arrow button to scroll through the icon list.
Parent topic: The LCD Screen
Changing LCD Screen Language
You can change the language used on the LCD screen.
1. Press the home button, if necessary.
2. Press the arrow buttons to select and press the button.Setup OK
3. Select and press the button.Printer Setup OK
4. Select and press the button.Language OK
5. Select a language and press the button.OK
Parent topic: Using the Control Panel
Turning Off Control Panel Sounds
You can turn off the sound heard when you press buttons on the control panel.
1. Press the home button, if necessary.
2. Press the arrow buttons to select and press the button.Setup OK
3. Select and press the button.Printer Setup OK
4. Select and press the button.Sound OK
5. Select and press the button.Button Press OK
6. Select and press the button.Off OK
Parent topic: Using the Control Panel

16
Printer Parts
1 Edge guide
2 Rear paper feed
3 Feeder guard
4 Rear paper feed cover
5 Control panel

17
6 Handle
7 The power light
8 The battery charging light
9 Memory card slot
1 Printer cover
2 Ink cartridge holder
3 Output tray

18
4 External USB port
1 USB port (for computer)
2 Battery cover
3 Maintenance box cover
4 Power inlet
Parent topic: Product Basics
Using the Optional Battery
See these sections for instructions on using your product with the optional battery.
Purchase the Optional Battery
Installing the Battery
Charging the Battery Using the AC Adapter
Battery Safety Instructions
Parent topic: Product Basics

19
Purchase the Optional Battery
You can purchase genuine accessories from an Epson authorized reseller. To find the nearest reseller,
visit or call your nearest Epson sales office.epson.com.jm
Epson recommends the use of a genuine Epson battery. Epson cannot guarantee the quality or reliability
of non-genuine batteries. The use of a non-genuine battery may cause damage that is not covered by
Epson’s warranties, and under certain circumstances, may cause erratic printer behavior.
Battery Part Number
Parent topic: Using the Optional Battery
Battery Part Number
Use this part number to order an optional battery.
Part number Description
C12C932941 PictureMate battery
Parent topic: Purchase the Optional Battery
Installing the Battery
Make sure you have an optional battery before you begin.
1. Make sure you installed the ink cartridge and charged the ink system.
2. Turn off the product using the power button.
3. Disconnect any connected cables.
4. Slide open the battery cover.

20
5. Insert the battery all the way into the product until it clicks into place.
6. Slide the battery cover closed.
Parent topic: Using the Optional Battery
Charging the Battery Using the AC Adapter
You can charge the battery using the AC adapter.
1. Connect the power cord to the AC adapter, and connect the AC adapter to the printer.

22
• Use only the battery model specified in this manual with the product.
• Use only the AC adapter model specified in this manual to charge the battery and operate the product.
Parent topic: Using the Optional Battery
Removing the Handle
If you prefer, you can use the product without the carrying handle.
1. Flip the handle forward, grasp the handle with both hands, and spread it apart to remove the handle.
2. Insert the included handle hole caps to protect the interior of your product.
Warning: Keep the handle hole caps out of the reach of children; they are a swallowing hazard.
To reattach the handle, remove the hole caps and insert the handle ends into the handle holes.

24
Epson Connect Solutions for Smartphones, Tablets, and More
Use your smartphone, tablet, or computer to print documents, photos, emails, and web pages from your
home, office, or even across the globe.
Setting Up Epson Connect Services
Using Epson Email Print
Using the Epson Creative Print Mobile App
Using the Epson iPrint Mobile App
Using Epson Remote Print
Parent topic: Product Basics
Related tasks
Using Google Cloud Print
Using AirPrint
Using the Mopria Print Service
Android Printing Using the Epson Print Enabler
Setting Up Epson Connect Services
If you did not activate your product's email address for use with Epson Connect when you set up your
product, you can activate it using the product control panel.
1. Press the home button, if necessary.
2. Select and press the button.Setup OK
3. Select and press the button.Epson Connect Services OK
4. Select and press the button.Register/Delete OK
5. Select and press the button.Yes OK
6. Follow the instructions on your screen to activate your product's email address.
Parent topic: Epson Connect Solutions for Smartphones, Tablets, and More
Using Epson Email Print
With Epson Email Print, you can print from any device that can send email, such as your smartphone,
tablet, or laptop. Just activate your product's unique email address. When you want to print, attach a
PDF, Microsoft Office document, or photo to an email and send it to your product. Both the email and the
attachments will print automatically.
1. Connect your product to your network. See the link below.

25
2. If you did not already set up Email Print when you installed your product software, see the link below
to use your product control panel to activate your unique email address. Or visit epsonconnect.com
to learn more about Email Print, create your Epson Connect account, and register your product to
the Epson Connect service.
3. Now you are ready to send and print emails to your product's Email Print address.
Note: Go to and log into your Epson Connect account to personalize your product'sepsonconnect.com
email, adjust print settings, and set up other Epson Connect services.
Parent topic: Epson Connect Solutions for Smartphones, Tablets, and More
Related tasks
Setting Up Epson Connect Services
Related topics
Wi-Fi Networking
Using the Epson Creative Print Mobile App
Use this free Apple and Android app to do the following:
• Access and print your mobile device photos, including Instagram and Facebook photos
• Create custom greeting cards and stationery
• Print onto CD/DVDs
• Turn photos into coloring book templates
Note: Not all features may be supported by your product.
1. Connect your product to your wireless network. See the link below.
2. Download Epson Creative Print from the Apple App Store or Google Play.
3. Connect your mobile device to the same wireless network that your product is using.
4. Open Epson Creative Print.
Now you are ready to get creative with your mobile device and your Epson product.
Parent topic: Epson Connect Solutions for Smartphones, Tablets, and More
Related topics
Wi-Fi Networking

26
Using the Epson iPrint Mobile App
Use this free Apple and Android app to print with networked Epson products. Epson iPrint lets you print
PDFs, Microsoft Office documents, photos, and web pages from your device or from popular cloud
services such as Box, Dropbox, Evernote, Google Drive, or Microsoft OneDrive.
1. Connect your product to your wireless network. See the link below.
2. Visit to learn more about Epson iPrint and check the compatibility of yourepson.com.jm/connect
mobile device.
3. Download Epson iPrint from the Apple App Store or Google Play.
4. Connect your mobile device to the same wireless network as your product.
5. Open Epson iPrint and select your Epson product.
Now you are ready to print with your mobile device and your Epson product.
Parent topic: Epson Connect Solutions for Smartphones, Tablets, and More
Related topics
Wi-Fi Networking
Using Epson Remote Print
With Epson Remote Print software, you can print from your laptop or desktop computer to an Epson
Email-enabled product anywhere in the world.
1. Connect your Epson product to your wireless network. See the link below.
2. If you did not already set up an Epson Connect account when you installed your product software,
visit to create your account and register your product to the Epson Connectepsonconnect.com
service.
Note: Make a note of your product's email address.
3. Visit to learn more about Remote Print and how to download the Remote Printepsonconnect.com
Driver software.
4. Download and install the Remote Print software.
5. Enter the email address and optional access key of your Epson product during Remote Print setup.
6. Now you are ready to print remotely. Select the print command in your laptop or desktop computer
application and choose the Remote Print option for your Epson product.
Parent topic: Epson Connect Solutions for Smartphones, Tablets, and More

27
Related topics
Wi-Fi Networking
Using Google Cloud Print
With a Google Account, you can print from your Apple or Android device to your Epson product. You can
also print from Chromebooks and the Google Chrome browser without drivers or cables.
1. Connect your Epson product to your wireless network. See the link below.
2. Note your product's IP address by checking your network status. See the link below.
3. Connect your computer or your Apple or Android device to the same wireless network as your Epson
product.
4. Enter your product's IP address into the address bar of a web browser.
5. Select the option.Google Cloud Print Services
Note: Google Cloud Print ServicesIf you don't see the option, turn your product off and back on. If
the option still doesn't appear, select the option and follow the on-screenFirmware Update
instructions to update your product.
6. Click .Register
7. Select the checkbox to agree to the Usage Advisory and click .Next
8. Click to launch the sign-in page.OK
A separate browser window opens.
9. Enter your Google Account username and password and click , or, if you don't have anSign in
account, click and follow the on-screen instructions.Sign up for a new Google Account
10. Click to complete setup and print a test page.Finish printer registration
Your product is now linked to your Google Account and can be accessed from any Chromebook,
computer, Apple or Android device with Internet access. For more information on using Google Cloud
Print and for a list of supported apps, visit the site.Google Cloud Print
Parent topic: Product Basics
Related tasks
Viewing the Network Status
Related topics
Epson Connect Solutions for Smartphones, Tablets, and More

28
Wi-Fi Networking
Using AirPrint
AirPrint enables instant wireless printing from iPhone, iPad, and iPod touch with the latest version of
iOS, and Mac with the latest version of OS X or macOS.
Note: If you disabled paper configuration messages on your product control panel, you cannot use
AirPrint. See the link below to enable the messages, if necessary.
1. Load paper in your product.
2. Set up your product for wireless printing. See the link below.
3. Connect your Apple device to the same wireless network that your product is using.
4. Print from your device to your product.
Note: For details, see the AirPrint page on the Apple website.
Parent topic: Product Basics
Related tasks
Selecting the Paper Settings - Control Panel
Related topics
Epson Connect Solutions for Smartphones, Tablets, and More
Wi-Fi Networking
Using the Mopria Print Service
You can use the Mopria Print Service to print from your Android phone or tablet (Android v4.4 or later) to
your Epson product or any Mopria-certified product from other manufacturers. You can download the
Mopria Print Service from Google Play.
1. Connect your Epson product to your wireless network. See the link below.

30
Wi-Fi Networking
See these sections to use your product on a Wi-Fi network.
Wi-Fi Infrastructure Mode Setup
Wi-Fi Direct Mode Setup
Wi-Fi Protected Setup (WPS)
Viewing the Network Status
Printing a Network Connection Report
Changing or Updating Network Connections
Wi-Fi Infrastructure Mode Setup
You can set up your product to communicate with your computer using a wireless router or access point.
The wireless router or access point can be connected to your computer over a wireless or wired network.
1 Epson product

31
2 Wireless router or access point
3 Computer with a wireless interface
4 Computer
5 Internet
6 Ethernet cable (used only for wired connection to the wireless router or access point)
Selecting Wireless Network Settings from the Control Panel
Parent topic: Wi-Fi Networking
Selecting Wireless Network Settings from the Control Panel
You can select or change wireless network settings using your product control panel.
To install your product on a wireless network, follow the instructions on the sheet and installStart Here
the necessary software. The installer program guides you through network setup.
1. Press the home button, if necessary.
2. Press the arrow buttons to select and press the button.Wi-Fi Setup OK
3. Press the button to select .OK Wi-Fi (Recommended)
4. Press the button again to proceed.OK
5. Select and press the button.Wi-Fi Setup Wizard OK
6. Press the arrow buttons to select the name of your wireless network and press the button. If youOK
do not see your wireless network's name, you can enter it manually.
Note: Other Networks OKTo enter the wireless network name manually, select and press the
button. Enter your network name as described in the next step.

32
7. If you see the following screen, enter your wireless password (or network name and then password).
• Press the arrow buttons to highlight a character or a function button displayed on the keypad.
Then press the button to select it.OK
• To change the case of letters or select symbols, select (uppercase), (lowercase), orAB12 ab12
Symbol OKand press the button.
• To enter a space, select and press the button.Space OK
• To delete characters, select the back arrow and press the button.OK
• When you finish entering characters, select and press the button.Done OK
8. Press the button to confirm Wi-Fi settings.OK
9. If you want to print a network status report, press the start button. (Otherwise, press the OK
button.)
Your product should now be connected to the network.
Note: The Wi-Fi icon is displayed in the upper left area on the LCD screen and indicates your
wireless connection status. If the product is not connected to the network, you may have selected
the wrong network name or entered the password incorrectly. Repeat these steps to try again.
Parent topic: Wi-Fi Infrastructure Mode Setup
Related tasks
Viewing the Icon List

33
Wi-Fi Direct Mode Setup
You can set up your product to communicate directly with your computer or another device without
requiring a wireless router or access point.
1 Epson product
2 Computer with a wireless interface
3 Other wireless device
You can select one of these modes to communicate with your computer or device:
Access point mode
The product itself acts as the network access point for up to 4 devices. When operating in this mode,
your product displays an connection symbol on the LCD screen.AP
Peer-to-peer mode
The product communicates one-to-one with another Wi-Fi Direct capable device. When operating in
this mode, your product displays a or connection symbol on the LCD screen.Direct D
To disconnect a peer-to-peer mode connection, release the connection to your product from your
computer or other device.
To enable peer-to-peer mode, you must select it from the Web Config Utility, under WiFi/Network
Settings Services Wi-Fi Direct> > .
Enabling Wi-Fi Direct Mode
Parent topic: Wi-Fi Networking

34
Enabling Wi-Fi Direct Mode
You can enable Wi-Fi Direct mode to allow direct communication between your product and computer or
other devices without a wireless router or access point.
1. Press the home button, if necessary.
2. Press the arrow buttons to select and press the button.Wi-Fi Setup OK
3. Press the up or down arrow button to select and press the button.Wi-Fi Direct OK
4. Press the button to confirm your selection.OK
5. Scroll down to view the Wi-Fi network name (SSID) and password.
6. Use your computer or wireless device to select the Wi-Fi network name (SSID) displayed on the
LCD screen, then enter the password shown.
7. Press the button to exit.OK
Parent topic: Wi-Fi Direct Mode Setup
Wi-Fi Protected Setup (WPS)
If your network uses a WPS-enabled wireless router or access point, you can quickly connect your
product to the network using Wi-Fi Protected Setup (WPS).
Note: WPSTo check if your router is WPS-enabled, look for a button labeled on your router or access
point. If there is no hardware button, there may be a virtual WPS button in the software for the device.
Check your network product documentation for details.
Using WPS to Connect to a Network
Parent topic: Wi-Fi Networking
Using WPS to Connect to a Network
If you have a WPS-enabled wireless router or access point, you can use Wi-Fi Protected Setup (WPS) to
connect your product to the network.
1. On the product, press the home button, if necessary.
2. Press the arrow buttons to select and press the button.Wi-Fi Setup OK
3. Press the button to select .OK Wi-Fi (Recommended)
4. Press the button again to proceed.OK
5. Select and press the button.Push Button Setup (WPS) OK

35
6. Follow the instructions on the LCD screen to complete WPS setup.
Your product should now be connected to the network.
Note: The Wi-Fi icon is displayed in the upper left area on the LCD screen and indicates your
wireless connection status. If the product is not connected to the network, repeat these steps to try
again.
Parent topic: Wi-Fi Protected Setup (WPS)
Related tasks
Viewing the Icon List
Viewing the Network Status
You can view the product's network status to help you determine the causes of any problems you may
have using your product on a network.
1. Press the home button, if necessary.
2. Press the arrow buttons to select and press the button.Setup OK
3. Select and press the button.Network Settings OK
4. Select and press the button.Network Status OK
5. Press the up or down arrow button to view the product's network status. To view additional network
details, press the left or right arrow button and select one of the options shown.
Parent topic: Wi-Fi Networking
Printing a Network Connection Report
You can print a network connection report to check the connection status between the product and your
network.
1. Load paper in the product.
2. Press the home button, if necessary.
3. Press the arrow buttons to select and press the button.Setup OK
4. Select and press the button.Network Settings OK
5. Select and press the button.Connection Check OK
6. Press the start button to print the report.

36
If an error code is shown on the report, you can check for solutions by visiting the website listed on the
report.
Parent topic: Wi-Fi Networking
Changing or Updating Network Connections
See these sections to change or update how your product connects to a network.
Accessing the Web Config Utility
Changing a USB Connection to a Wi-Fi Connection
Connecting to a New Wi-Fi Router
Disabling Wi-Fi Features
Parent topic: Wi-Fi Networking
Accessing the Web Config Utility
You can select your product's network settings and confirm its operating status using a web browser.
You do this by accessing your product's built-in Web Config utility from a computer or other device that is
connected to the same network as your product.
1. Check your network status.
2. Note your product's IP address.
3. On a computer or other device connected to the same network as your product, open a web
browser.
4. Enter your product's IP address into the address bar.
You see the available Web Config utility options.
Parent topic: Changing or Updating Network Connections
Related tasks
Viewing the Network Status
Changing a USB Connection to a Wi-Fi Connection
If you have already connected your product to your computer using a USB connection, you can change
to a Wi-Fi connection.
1. Disconnect the USB cable from your product.
2. Uninstall your product software.

37
3. Download and install your product software from the Epson website using the instructions on the
Start Here sheet.
Parent topic: Changing or Updating Network Connections
Related concepts
Uninstall Your Product Software
Connecting to a New Wi-Fi Router
If you change the wireless router you have been using on your network, you need to update your
product's Wi-Fi connection to the new router.
Note: If you switch to a 5 GHz wireless router, set the router to operate in dual band (2.4 GHz and
5 GHz) mode. See your router documentation for instructions.
1. Do one of the following:
• : Uninstall your product software.Windows
• : Go to the next step.Mac
2. Download and install your product software from the Epson website using the instructions on the
Start Here sheet.
Parent topic: Changing or Updating Network Connections
Related concepts
Uninstall Your Product Software
Disabling Wi-Fi Features
You may need to disable your product's Wi-Fi features if you change your network connection type or
need to solve a problem with your network connection.
Note: Before disabling Wi-Fi features, make a note of your product's SSID (network name) and
password, and any network settings selected for the Epson Connect services you may use.
1. Press the home button, if necessary.
2. Press the arrow buttons to select and press the button.Setup OK
3. Select and press the button.Network Settings OK
4. Select and press the button.Wi-Fi Setup OK

39
Loading Paper
Before you print, load paper for the type of printing you will do.
Loading Paper in the Paper Feed Slot
Paper Loading Capacity
Available Epson Papers
Borderless Paper Type Compatibility
Paper or Media Type Settings - Product Software
Selecting the Paper Settings - Control Panel
Loading Paper in the Paper Feed Slot
You can print photos on a variety of paper types and sizes up to: 5 × 7 inches (127 × 178 mm)
1. Move the handle behind the product, then open the rear paper feed cover.

40
2. Raise the control panel, then open the feeder guard.
3. Slide the edge guide to the right.

41
4. Load paper, glossy or printable side up and short edge first, against the left side of the paper feed
slot.
Note: To load envelopes, insert the envelopes printable side up and flap edge left.
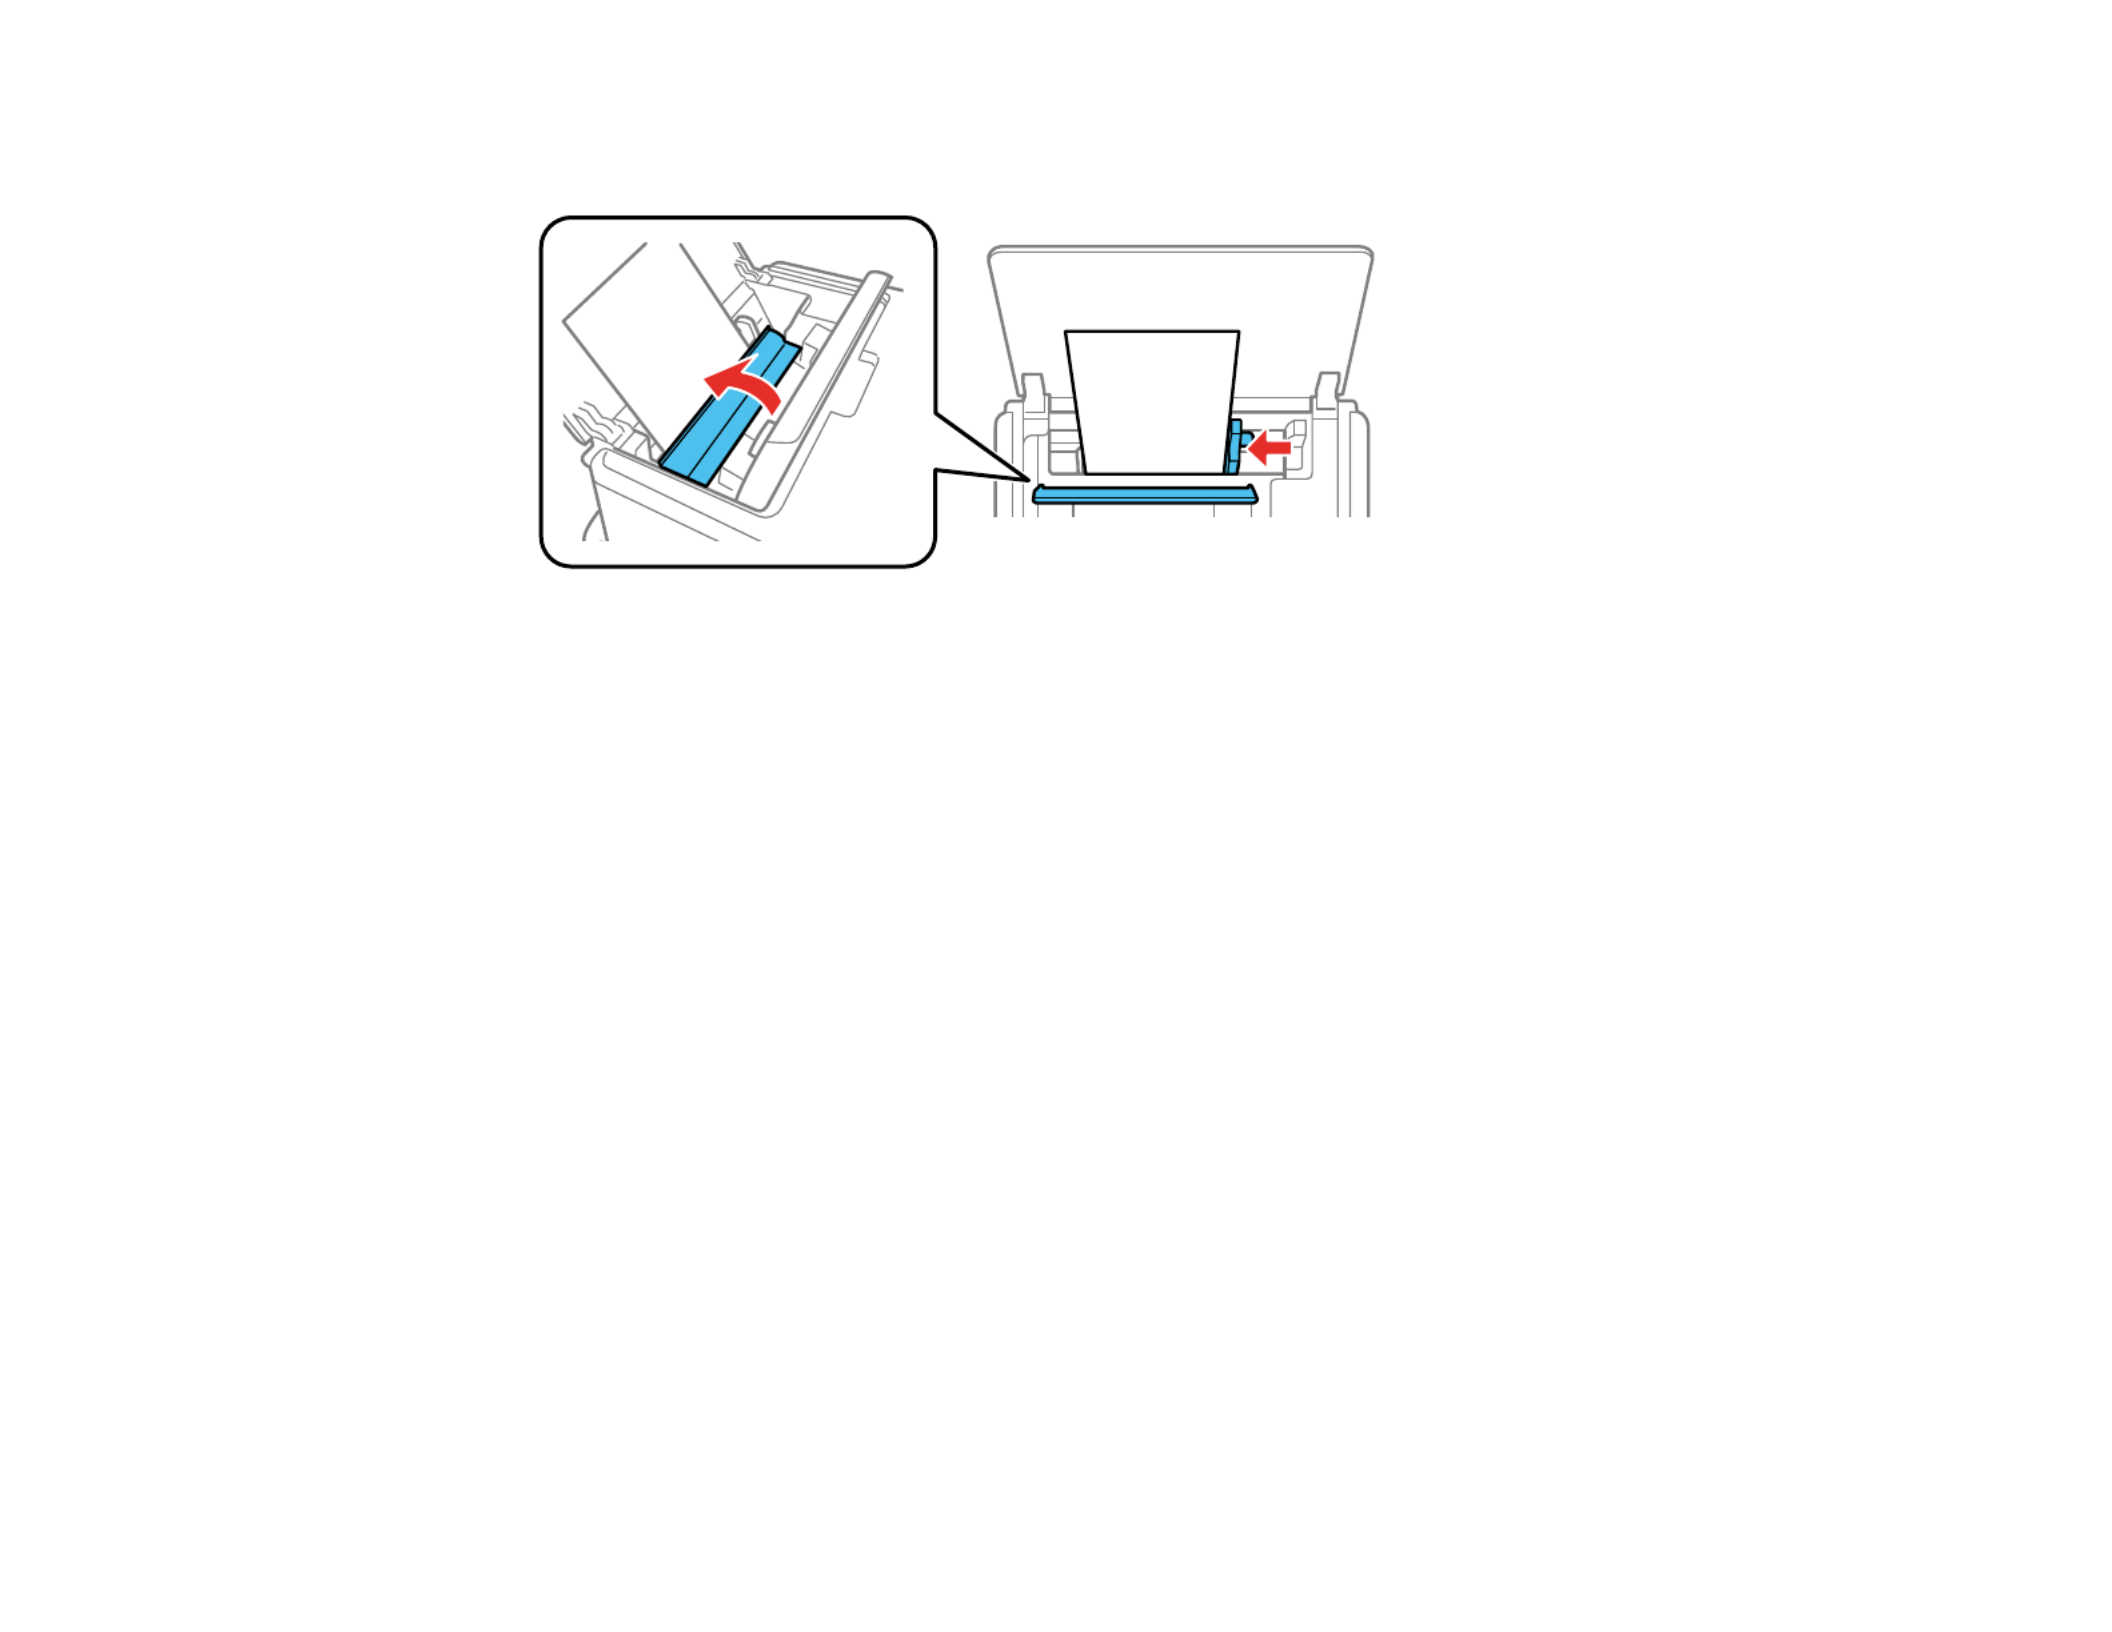
42
5. Slide the edge guide against the paper, then close the feeder guard.
6. Do one of the following to select the size and type of paper you just loaded on the product LCD
screen:
• To use the existing settings, press the button.OK
• To change the settings, press the up or down arrow button to select and press theChange OK
button. Select the paper size and press the button, select the paper type and press theOK OK
button, then press the button again to confirm the settings.OK
Note: To prevent the paper setup screen from appearing automatically when you load paper, turn off
the setting in the Setup menu. (This will also disable AirPrint.)Paper Configuration

43
7. Open the output tray.
Always follow these paper loading guidelines:
• Load only the recommended number of sheets.
• Load paper short edge first, no matter which way your document faces.
• Do not load paper above the arrow mark inside the edge guide.
• Do not load envelopes that are curled, folded, or too thin, or that have plastic windows.
• Check the paper package for any additional loading instructions.
Parent topic: Loading Paper
Related references
Paper Type Settings - Control Panel
Paper Loading Capacity
44
Paper Loading Capacity
Paper type Paper size Load up to this many sheets
Plain paper* A5 (5.8 × 8.2 inches
[148 × 210 mm])
Up to the arrow mark on the edge
guide or approximately 50 sheets
A6 (4.1 × 5.8 inches
[105 × 148 mm])
Epson Photo Paper Glossy 4 × 6 inches (102 × 152 mm) 20 sheets
Epson Premium Photo
Paper Glossy
4 × 6 inches (102 × 152 mm)
5 × 7 inches (127 × 178 mm)
Epson Premium Photo
Paper Semi-gloss
4 × 6 inches (102 × 152 mm)
Epson Ultra Premium
Photo Paper Glossy
4 × 6 inches (102 × 152 mm)
5 × 7 inches (127 × 178 mm)
Envelopes No. 10 (4.1 × 9.5 inches
[105 × 241 mm])
1 envelope
* You can load up to 20 sheets for manual 2-sided print jobs.
Parent topic: Loading Paper
Available Epson Papers
You can purchase genuine Epson ink and paper from an Epson authorized reseller. To find the nearest
reseller, visit or call your nearest Epson sales office.epson.com.jm
Paper type Size Part number Sheet count
Epson Photo Paper Glossy 4 × 6 inches (102 × 152 mm) S041809-20
S041809
S042038
20
50
100
Epson Premium Photo Paper
Glossy
4 × 6 inches (102 × 152 mm) S041808
S041727
40
100
5 × 7 inches (127 × 178 mm) S041464 20
45
Paper type Size Part number Sheet count
Epson Ultra Premium Photo
Paper Glossy
4 × 6 inches (102 × 152 mm) S042181
S042174
60
100
5 × 7 inches (127 × 178 mm) S041945 20
Epson Premium Photo Paper
Semi-gloss
4 × 6 inches (102 × 152 mm) S041982 40
Note: Paper/media availability varies by country.
Parent topic: Loading Paper
Borderless Paper Type Compatibility
You can print borderless photos on compatible paper types in compatible sizes:
Borderless Paper Types
• Epson Photo Paper Glossy
• Epson Premium Photo Paper Glossy
• Epson Ultra Premium Photo Paper Glossy
• Epson Premium Photo Paper Semi-gloss
Borderless Paper Sizes
• 4 × 6 inches (102 × 152 mm)
• 5 × 7 inches (127 × 178 mm)
Parent topic: Loading Paper
Paper or Media Type Settings - Product Software
For this paper Select this Paper Type or Media Type setting
Plain paper Plain Paper
Epson Ultra Premium Photo Paper Glossy Ultra Premium Photo Paper Glossy
Epson Premium Photo Paper Glossy Premium Photo Paper Glossy

46
For this paper Select this Paper Type or Media Type setting
Epson Photo Paper Glossy Photo Paper Glossy
Epson Premium Photo Paper Semi-gloss Premium Photo Paper Semi-Gloss
Envelope Envelope
Parent topic: Loading Paper
Selecting the Paper Settings - Control Panel
You can change the default paper settings using the control panel on the product.
1. Press the home button, if necessary.
2. Select > > .Setup Printer Setup Paper Source Settings
3. Select the following options as necessary:
• : Changes the default paper size and paper type settings.Paper Setup
• : Controls whether or not an alert appears when a print job's paper settingsPaper Setting Alert
are different from the product's default paper settings.
• : Controls whether or not the paper settings selection screen appears afterPaper Configuration
you load paper.
4. Press the home button to exit.
Paper Type Settings - Control Panel
Parent topic: Loading Paper
Paper Type Settings - Control Panel
For this paper Select this Paper Type setting
Plain paper Plain Paper
Epson Ultra Premium Photo Paper Glossy Ultra Glossy
Epson Premium Photo Paper Glossy Prem. Glossy
Epson Photo Paper Glossy Glossy
Epson Premium Photo Paper Semi-gloss Prem. Semi-Gloss
Envelope Envelope

47
Parent topic: Selecting the Paper Settings - Control Panel

48
Printing from a Computer
Before printing from your computer, make sure you have set up your product and installed its software
as described on the sheet.Start Here
Note: If you have an Internet connection, it is a good idea to check for updates to your product software
on Epson's support website. If you see a Software Update screen, select Enable automatic checking
and click . The update scans your system to see if you have the latest product software. Follow theOK
on-screen instructions.
Printing with Windows
Printing on a Mac
Printing From a Chromebook
Cancelling Printing Using a Product Button
Printing with Windows
You can print with your product using any Windows application, as described in these sections.
Note: If you are using your Epson product with the Windows 10 S operating system, you cannot use the
software described in this section. You also cannot download and install any Epson product software
from the Epson website for use with Windows 10 S; you must obtain software only from the Windows
Store.
Selecting Basic Print Settings - Windows
Selecting Double-sided Printing Settings - Windows
Selecting Additional Layout and Print Options - Windows
Selecting a Printing Preset - Windows
Selecting Extended Settings - Windows
Printing Your Document or Photo - Windows
Selecting Default Print Settings - Windows
Changing Automatic Update Options
Parent topic: Printing from a Computer
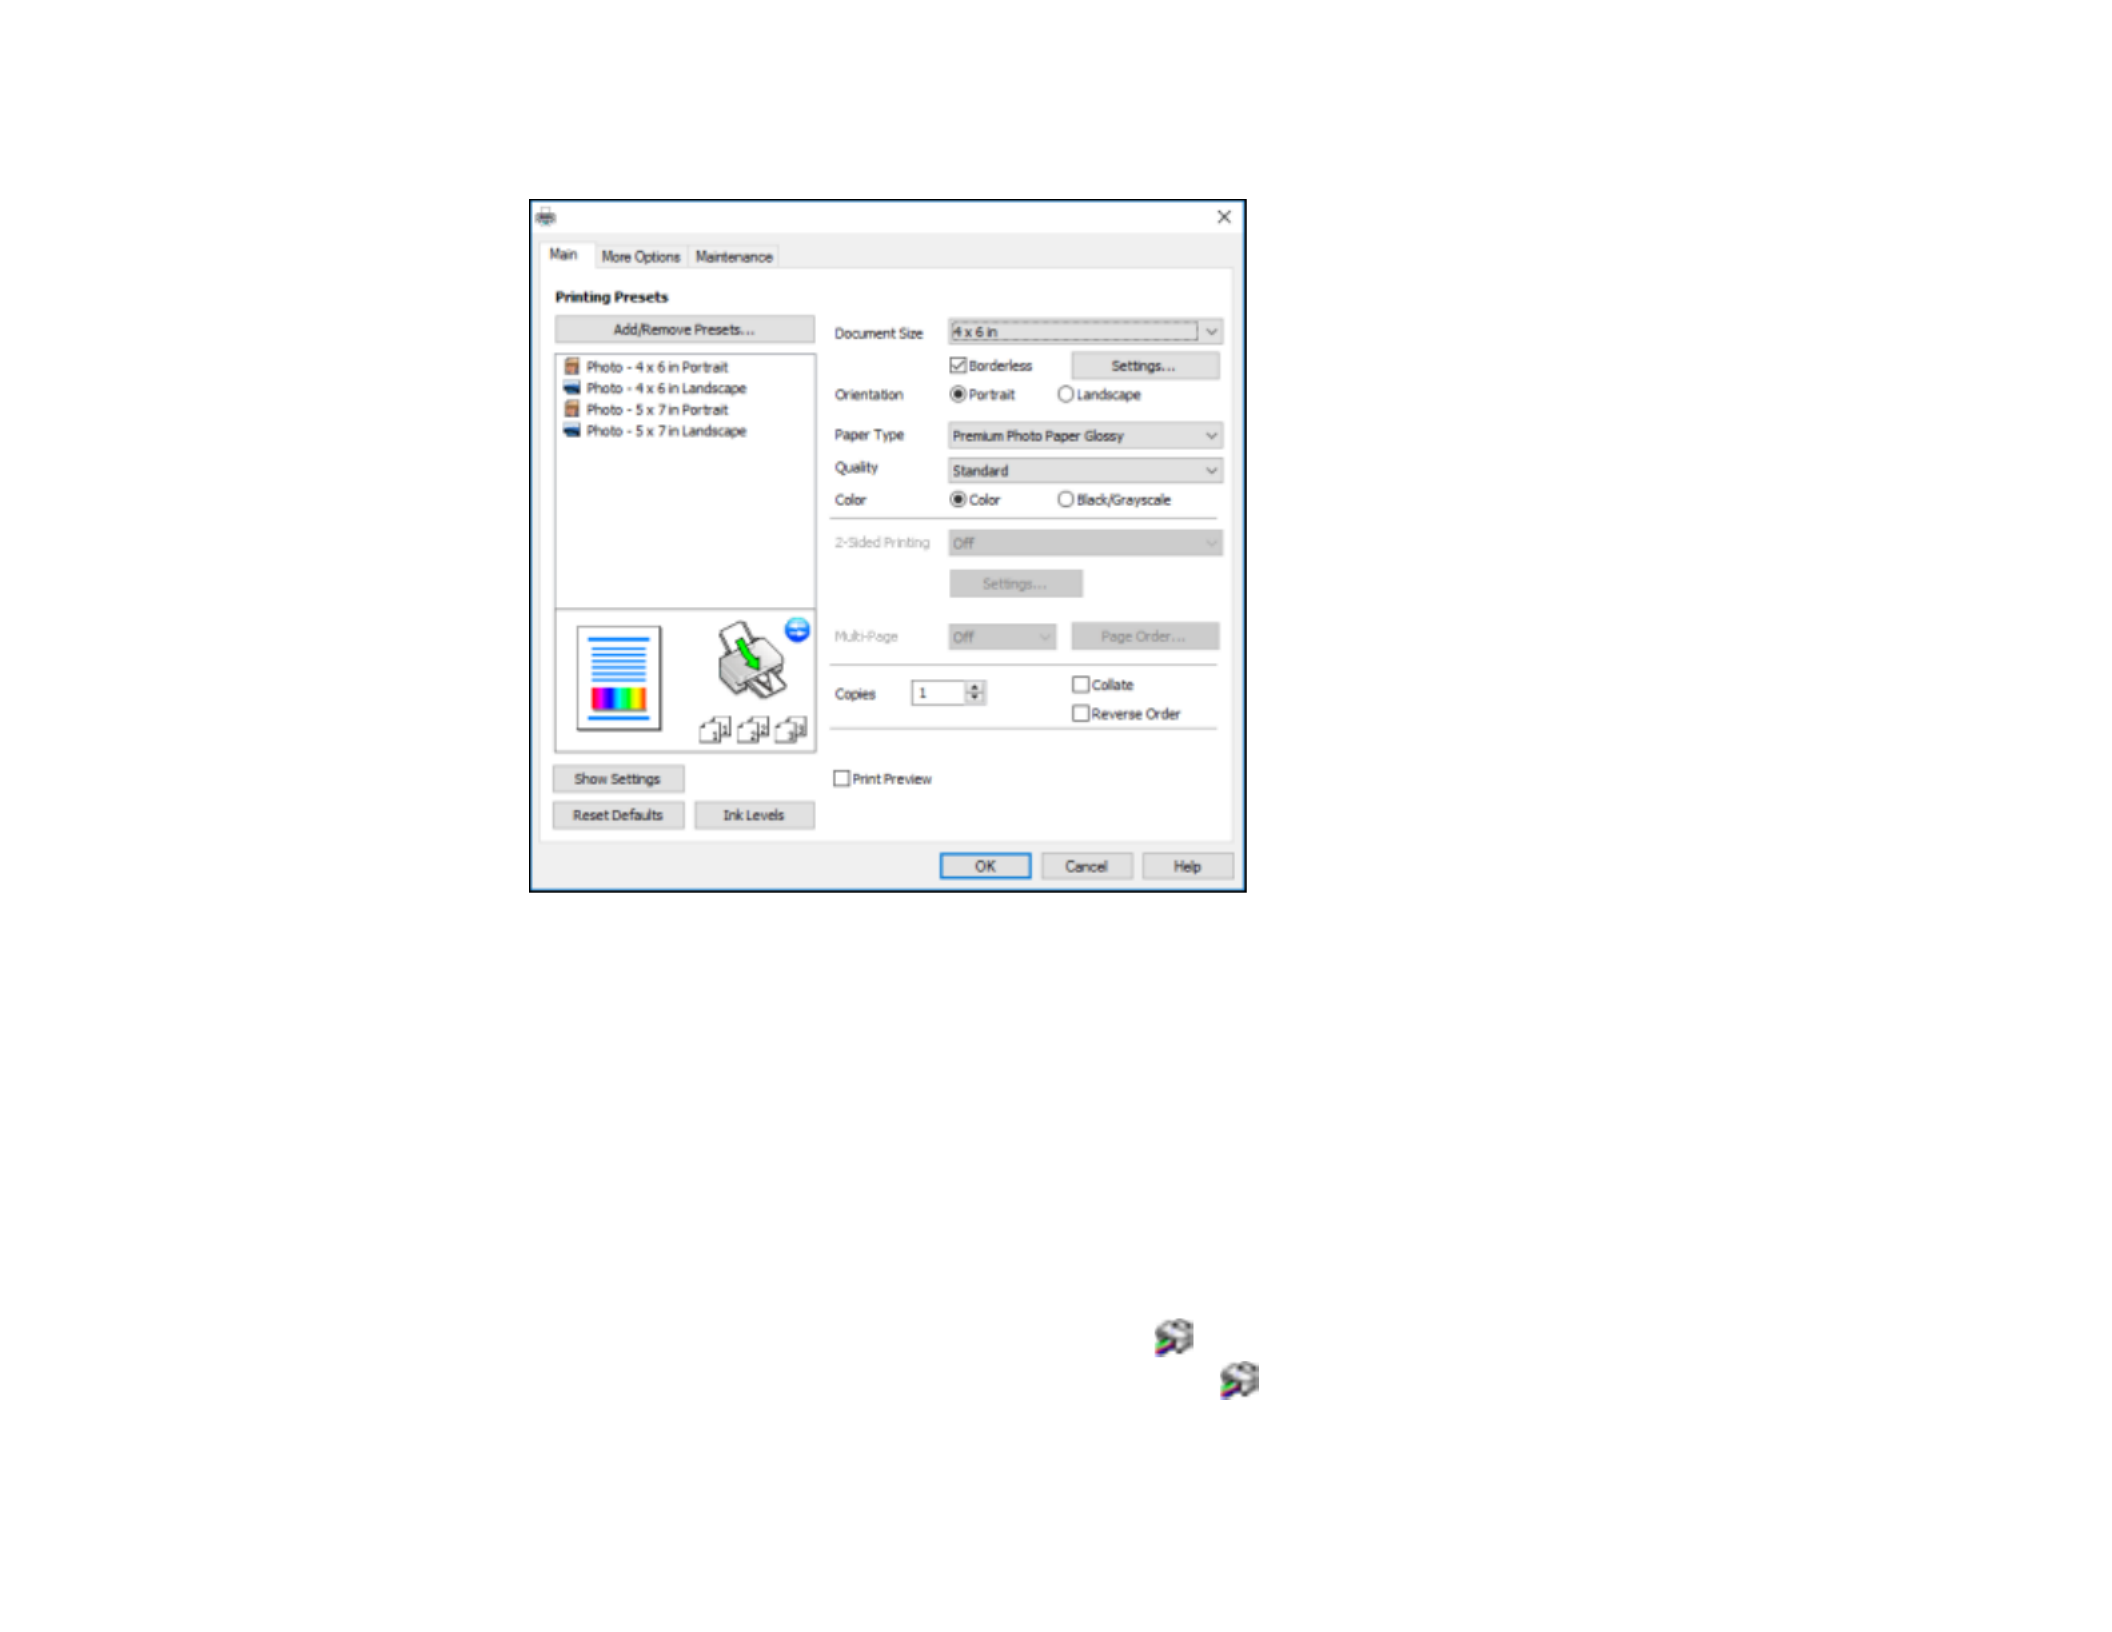
Selecting Basic Print Settings - Windows
Select the basic settings for the document or photo you want to print.

49
1. Open a photo or document for printing.
2. Select the print command in your application.
Note: Print FileYou may need to select a print icon on your screen, the option in the menu, or
another command. See your application's help utility for details.
3. If necessary, select your product name as the printer you want to use.
Note: Properties PreferencesYou may also need to select or to view your print settings.
You see the Main tab of your printer settings window:
4. Select the size of the paper you loaded as the setting.Document Size
Note: User-DefinedYou can also select the setting to create a custom paper size, but you cannot
use the setting.Borderless

50
5. If you are printing a borderless photo, select . You can click to accessBorderless Settings
additional options for borderless printing.
Note: You must select a compatible borderless paper type and size to print without borders. Check
the borderless paper compatibility list for details.
6. Select the orientation of your document.
Note: LandscapeIf you are printing an envelope, select .
7. Select the type of paper you loaded as the setting.Paper Type
Note: The setting may not exactly match the name of your paper. Check the paper type settings list
for details.
8. Select the setting that matches the print quality you want to use.Quality
9. Select a Color option:
• To print a color document or photo, select the setting.Color
• To print text and graphics in black or shades of gray, select the setting.Black/Grayscale
10. To print on both sides of the paper, select a option.2-Sided Printing
11. To print multiple pages on one sheet of paper, or print one image on multiple sheets of paper, select
one of the settings in the menu and select the printing options you want.Multi-Page
12. To print multiple copies and arrange their print order, select the options.Copies
13. To preview your job before printing, select .Print Preview
Print Quality Options - Windows
Multi-Page Printing Options - Windows
Parent topic: Printing with Windows
Related references
Borderless Paper Type Compatibility
Paper or Media Type Settings - Product Software
Print Quality Options - Windows
You can select any of the available Quality options to fine-tune the quality of your print. Some settings
may be unavailable, depending on the paper type setting you have chosen.

51
Standard
For everyday text and image printing.
High
For text and graphics with high print quality.
Parent topic: Selecting Basic Print Settings - Windows
Multi-Page Printing Options - Windows
You can select any of the available options in the Multi-Page menu to set up your multi-page print job.
2-Up and 4-Up
Prints 2 or 4 pages on one sheet of paper. Click the button to select page layout andPage Order
border options.
2×1 Poster, 2×2 Poster, 3×3 Poster, 4×4 Poster
Prints one image on multiple sheets of paper to create a larger poster. Click the button toSettings
select image layout and guideline options.
Parent topic: Selecting Basic Print Settings - Windows
Selecting Double-sided Printing Settings - Windows
You can print on both sides of the paper by selecting one of the options on the Main2-Sided Printing
tab.
Note: You will need to print one side and flip the paper over manually to print the other side.
Note: Some options may be pre-selected or unavailable, depending on other settings you have chosen
or if you are accessing the product over a network.
1. Select one of the following options for :2-Sided Printing
• to print your double-sided print job by printing one side andManual (Long-edge binding)
prompting you to flip the paper over on the long edge to print the other side.
• to print your double-sided print job by printing one side andManual (Short-edge binding)
prompting you to flip the paper over on the short edge to print the other side.

52
2. Click the button.Settings
You see a window like this:
3. Select the double-sided printing options you want to use.
4. Click to return to the Main tab.OK
5. Print a test copy of your double-sided document to test the selected settings.
6. Follow any instructions displayed on the screen during printing.
Note: The surface of the paper may smear during double-sided printing. Make sure the ink has dried
before reloading the paper.
Double-sided Printing Options - Windows
Parent topic: Printing with Windows
53
Double-sided Printing Options - Windows
You can select any of the available options on the 2-Sided Printing Settings window to set up your
double-sided print job.
Binding Edge Options
Select a setting that orients double-sided print binding in the desired direction.
Binding Margin Options
Select options that define a wider margin to allow for binding.
Booklet
Select the checkbox to print double-sided pages as a booklet.Booklet
Parent topic: Selecting Double-sided Printing Settings - Windows
Selecting Additional Layout and Print Options - Windows
You can select a variety of additional layout and printing options for your document or photo on the More
Options tab.

54
1. To change the size of your printed document or photo, select the Reduce/Enlarge Document
checkbox and select one of these sizing options:
• Select the option to size your image to fit the paper you loaded. Select the size of yourFit to Page
document or photo as the setting, and the size of your paper as theDocument Size Output
Paper Centersetting. If you want to center your image on the paper, select the option.
• Select the option to reduce or enlarge your document or photo by a specific percentage.Zoom to
Select the percentage in the menu.%
2. Select one of the following Color Correction options:
• Select to automatically adjust the sharpness, brightness, contrast, and color saturationAutomatic
for your image.
• Select and click the button to manually adjust the color correction settings orCustom Advanced
turn off color management in your printer software.
• Select to access additional settings for improving printed images.Image Options
Note: Color Universal PrintYou can also select settings.
3. To add a visible watermark to your printout, click the button.Watermark Features
Note: Add/Delete SettingsClick the button to create your own watermark, and click the button to
customize the watermark.
4. Select any of the Additional Settings options to customize your print.
Custom Color Correction Options - Windows
Image Options and Additional Settings - Windows
Parent topic: Printing with Windows

55
Custom Color Correction Options - Windows
You can select any of the available options in the Color Correction window to customize the image colors
for your print job.

56
Color Controls
Lets you select a setting, individual settings for , , , andColor Mode Brightness Contrast Saturation
Density, and individual color tones. Depending on the selected color mode, you can also adjust the
midtone density using the setting.Gamma
Fix Photo
Improves the color, contrast, and sharpness of flawed photos.
Note: Fix Photo uses a sophisticated face recognition technology to optimize photos that include
faces. For this to work, both eyes and the nose must be visible in the subject's face. If your photo
includes a face with an intentional color cast, such as a statue, you may want to turn off toFix Photo
retain the special color effects.
Parent topic: Selecting Additional Layout and Print Options - Windows
Image Options and Additional Settings - Windows
You can select any of the Image Options and Additional Settings to customize your print. Some options
may be pre-selected or unavailable, depending on other settings you have chosen.
Image Options
Emphasize Text
Adjusts the weight of printed text to increase readability.
Emphasize Thin Lines
Adjusts the weight of printed lines to increase visibility.
Edge Smoothing
Smooths jagged edges in low-resolution images such as screen captures or images from the Web.
Fix Red-Eye
Reduces or removes red-eye in photos.
Enhancement Options
Specifies Color Universal Print enhancement settings for text, graphics, and images.
Additional Settings Options
Rotate 180º
Prints the image rotated 180º from its original orientation.
Mirror Image
Flips the printed image left to right.
Parent topic: Selecting Additional Layout and Print Options - Windows
57
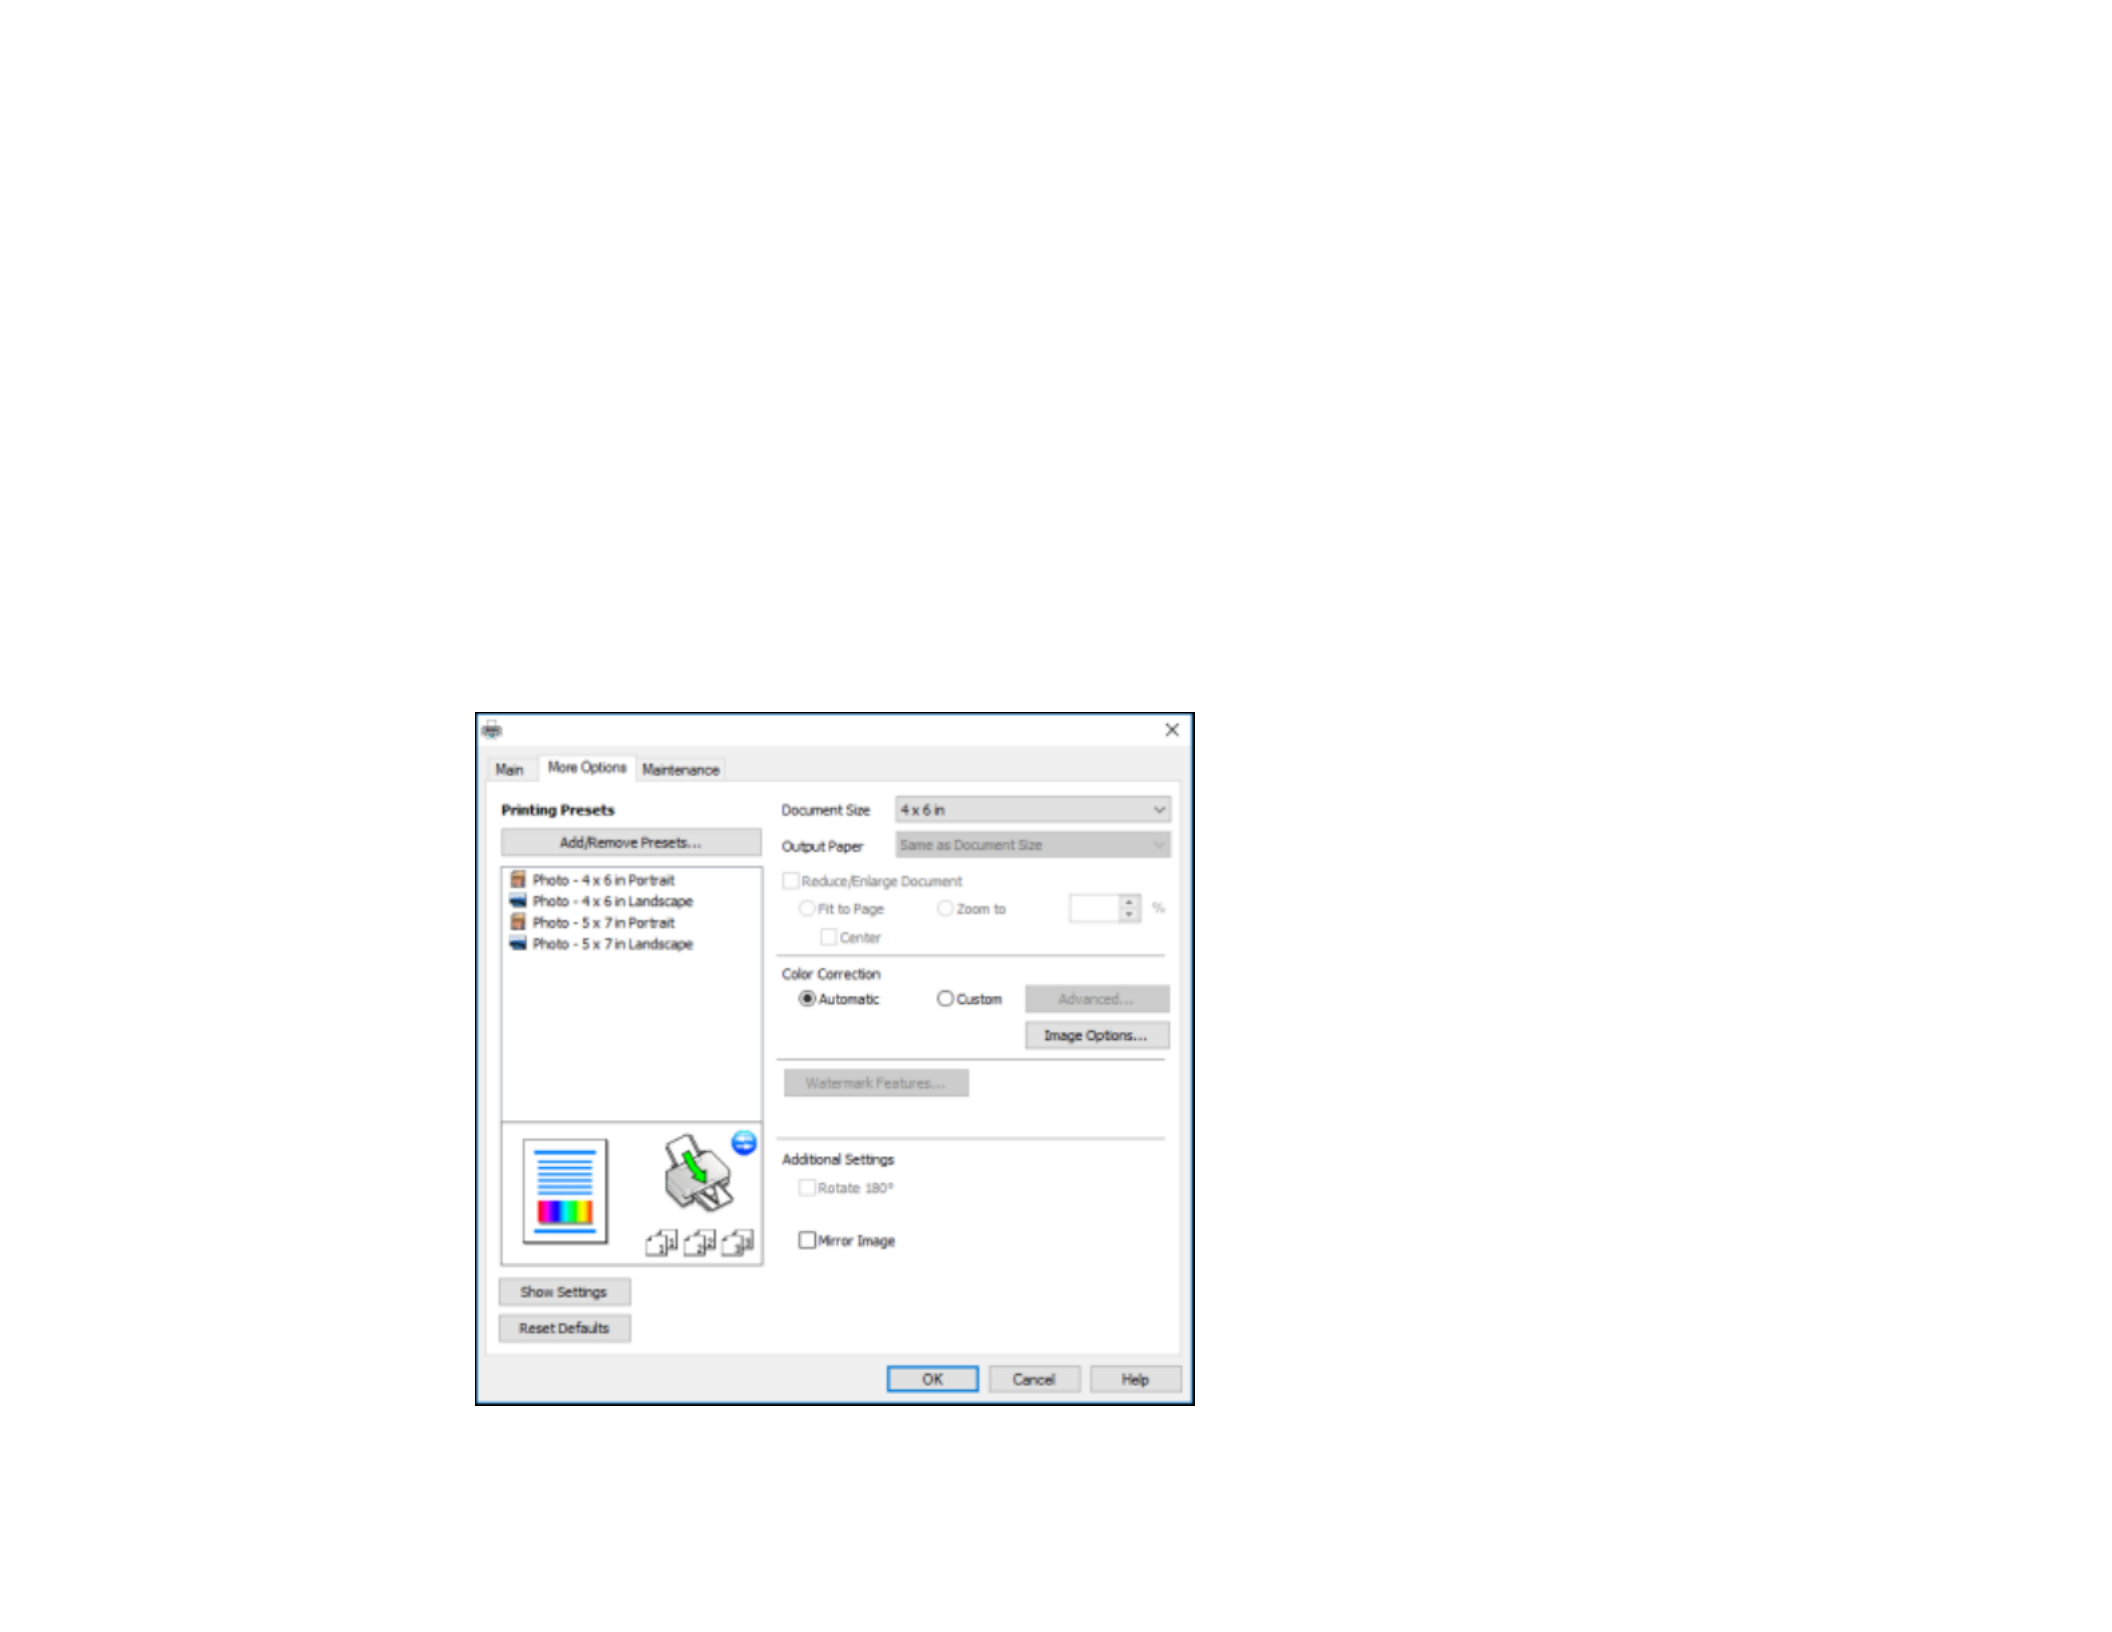
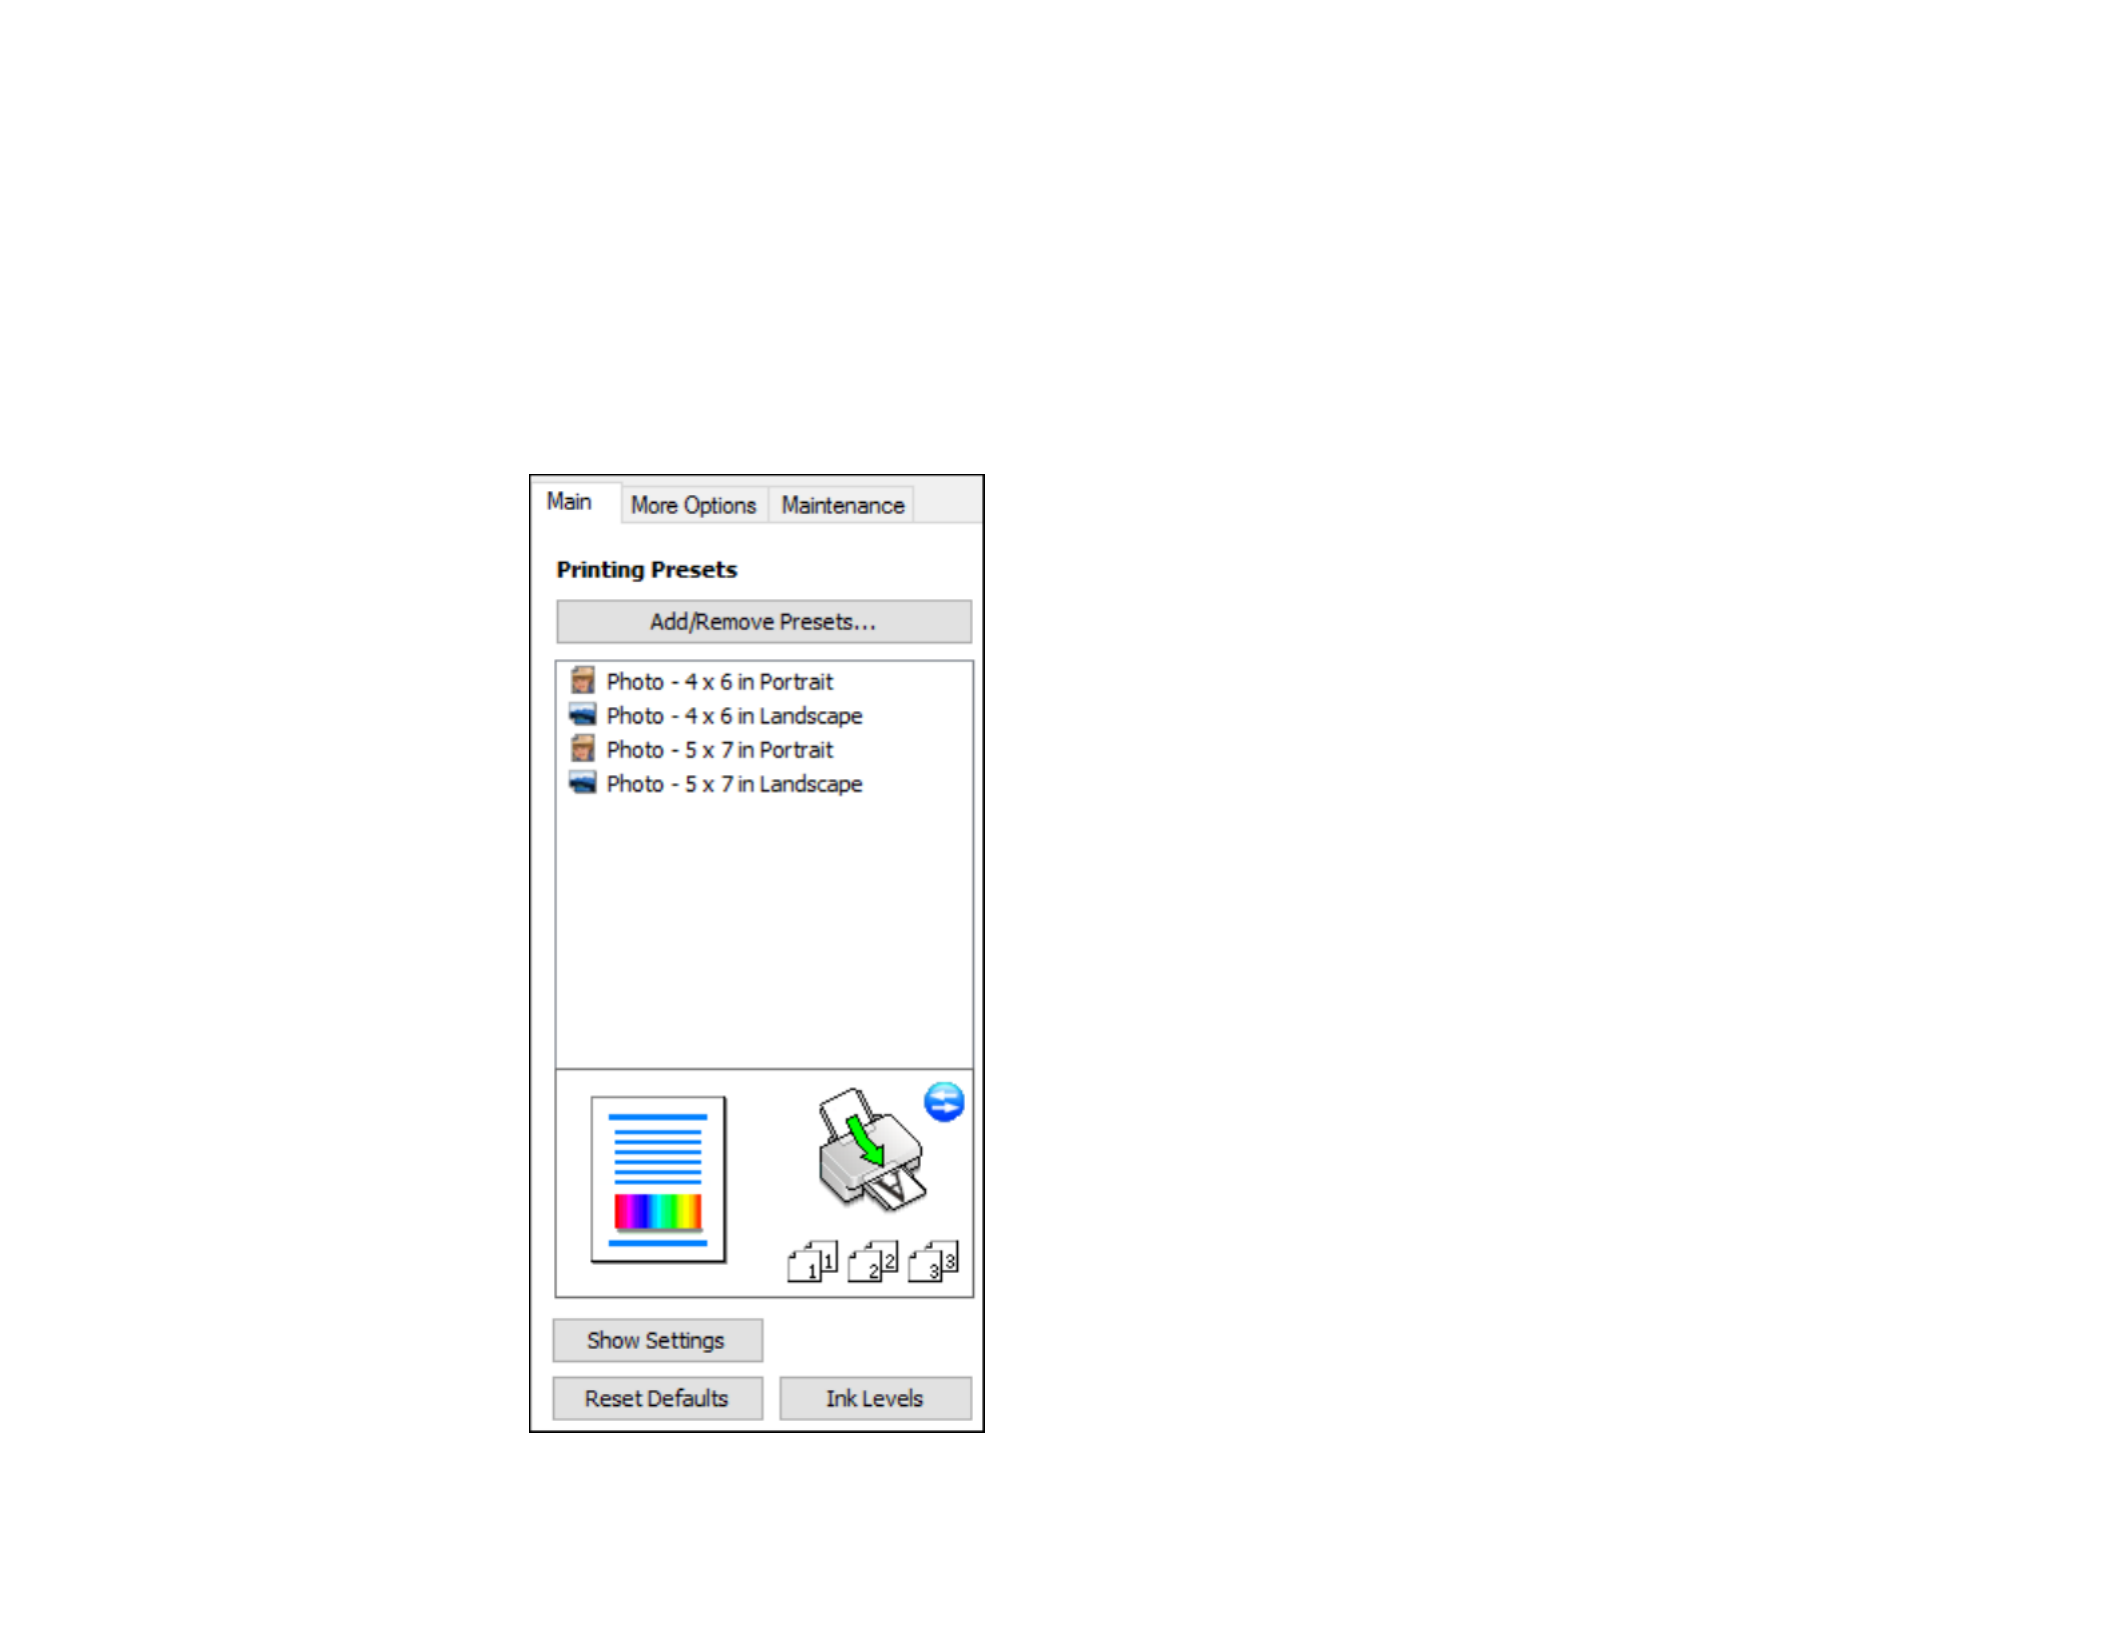
Selecting a Printing Preset - Windows
For quick access to common groups of print settings, you can select a printing preset on the Main or
More Options tab.
Note: Add/Remove PresetsYou can create your own preset by clicking the button.
1. Click the or tab.Main More Options
You see the available on the left:Printing Presets

58
2. Place your cursor over one of the to view its list of settings.Printing Presets
3. Click on a preset to change its settings, or use any of the available options on the screen to control
your printing presets.
4. To choose a preset for printing, select it.
5. Click .OK
Parent topic: Printing with Windows
Selecting Extended Settings - Windows
You can select additional settings that apply to all the print jobs you send to your product.
1. Access the Windows Desktop and right-click the icon for your product in the right side of the
Windows taskbar, or click the up arrow and right-click .
2. Select .Printer Settings
3. Click the tab.Maintenance

59
You see the maintenance options:
4. Click the button.Extended Settings
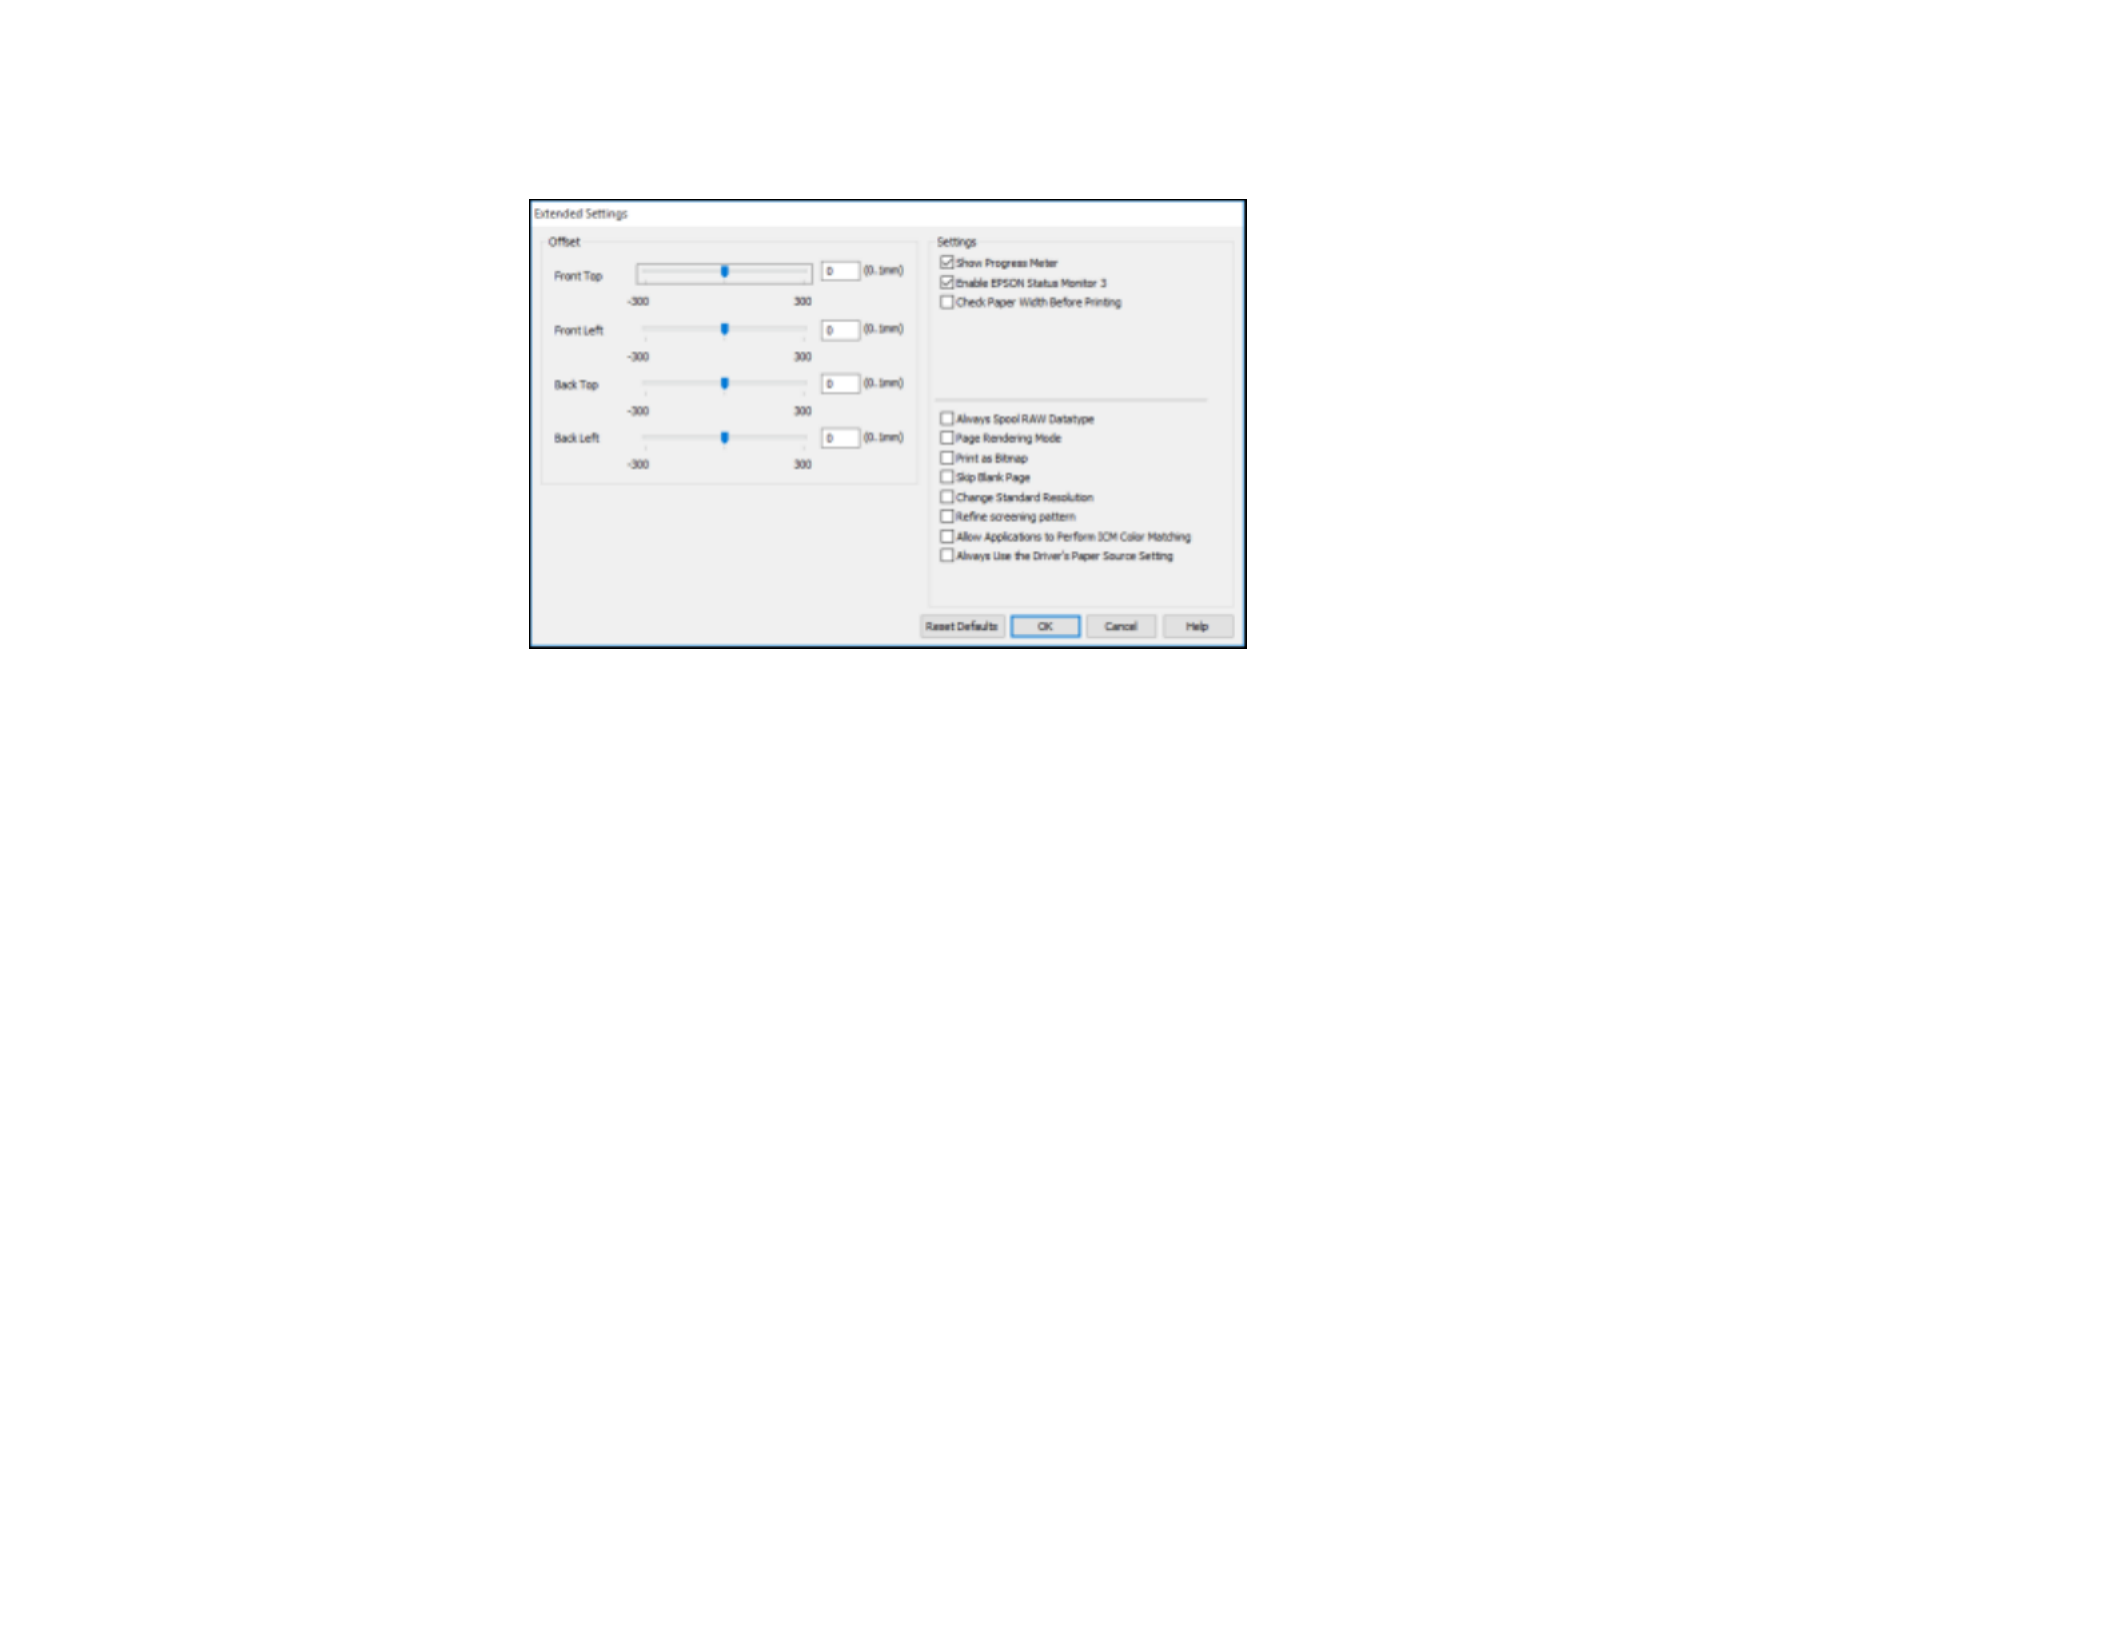
60
You see this window:
5. Select any of the extended settings to customize your print.
6. Click to close the Extended Settings window.OK
7. Click to close the printer software window.OK
Extended Settings - Windows
Parent topic: Printing with Windows
Extended Settings - Windows
You can select from these settings on the Extended Settings window.
Show Progress Meter
Displays the progress of print jobs as they are being printed.
Enable EPSON Status Monitor 3
Enables product monitoring for ink and paper supplies and other issues.
Check Paper Width Before Printing
Prevents printing beyond the edges of the paper if the paper size setting is incorrect; may reduce print
speed.
Always Spool RAW Datatype
Increases print speed and may solve other printing problems.
Page Rendering Mode
Increases print speed when printing is extremely slow or the print head stops during printing.

62
You see your application's Print window, such as this one:
2. Click or to start printing.OK Print
Checking Print Status - Windows
Parent topic: Printing with Windows

63
Checking Print Status - Windows
During printing, you see this window showing the progress of your print job. It allows you to control
printing and check ink cartridge status.
• To cancel printing, click .Cancel
• To see print jobs waiting to print, click .Print Queue
• To check ink status, click .Consumables/Battery Status
Parent topic: Printing Your Document or Photo - Windows
Selecting Default Print Settings - Windows
When you change your print settings in a program, the changes apply only while you are printing in that
program session. If you want to change the print settings you use in all your Windows programs, you can
select new default print settings.
1. Access the Windows Desktop and right-click the icon for your product in the right side of the
Windows taskbar, or click the up arrow and right-click .
2. Select .Printer Settings
64
You see the printer settings window:
3. Select the print settings you want to use as defaults in all your Windows programs.
4. Click .OK
These settings are now the defaults selected for printing. You can still change them as needed for
printing in any program session.
Changing the Language of the Printer Software Screens
Parent topic: Printing with Windows
Changing the Language of the Printer Software Screens
You can change the language used on the Windows printer software screens.
1. Access the Windows Desktop and right-click the icon for your product in the right side of the
Windows taskbar, or click the up arrow and right-click .
2. Select .Printer Settings

65
You see the printer settings window.
3. Click the tab.Maintenance
You see the maintenance options:
4. Select the language you want to use as the setting.Language
5. Click to close the printer software window.OK
The printer software screens appear in the language you selected the next time you access them.
Parent topic: Selecting Default Print Settings - Windows
Changing Automatic Update Options
Your printer software for Windows automatically checks for updates to the product software. You can
change how often the software checks for updates or disable this feature.

66
1. Access the Windows Desktop and right-click the icon for your product in the right side of the
Windows taskbar, or click the up arrow and right-click .
2. Select .Software Update Settings
You see this window:
3. Do one of the following:
• To change how often the software checks for updates, select a setting in the menu.Check every
• To disable the automatic update feature, select the option.Never
4. Click to exit.OK
Note: If you choose to disable the automatic update feature, you can check for updates manually.
Parent topic: Printing with Windows
Printing on a Mac
You can print with your product using any Mac printing program, as described in these sections.
Note: If you have an Internet connection, it is a good idea to check for updates to your product software
on Epson's support website.
Selecting Basic Print Settings - Mac

68
You see the expanded printer settings window for your product:
Note: The print window may look different, depending on your version of the Mac operating system
and the application you are using.
5. Select the and settings as necessary.Copies Pages
Note: If you do not see these settings in the print window, check for them in your application before
printing.
69
6. Select the page setup options: and .Paper Size Orientation
Note: If you do not see these settings in the print window, check for them in your application before
printing. They may be accessible by selecting from the File menu.Page Setup
7. Select any application-specific settings that appear on the screen, such as those shown in the image
above for the Preview application.
8. Select from the pop-up menu.Print Settings

70
You see these settings:
9. Select the type of paper you loaded as the setting.Media Type
Note: The setting may not exactly match the name of your paper. Check the paper type settings list
for details.
10. Select the setting you want to use.Print Quality
11. Select any of the available print options.
Print Quality Settings - Mac
Print Options - Mac
Parent topic: Printing on a Mac
Related references
Paper or Media Type Settings - Product Software
Print Quality Settings - Mac
You can select any of the settings to fine-tune the quality of your print. Some settings mayPrint Quality
be unavailable, depending on the paper type and border setting you have chosen.

71
Normal
For everyday text and image printing.
Fine
For text and graphics with good quality and print speed.
Quality
For photos and graphics with good quality and print speed.
Best Quality
For the best print quality, but the slowest print speed.
Parent topic: Selecting Basic Print Settings - Mac
Print Options - Mac
You can select any of the print options to customize your print. Some options may be unavailable,
depending on other settings you have chosen.
Expansion
If you selected a borderless paper size setting, this option adjusts the image expansion settings to
control printing at the edges of borderless prints.
Grayscale
Prints text and graphics in black or shades of gray.
Mirror Image
Lets you flip the printed image horizontally.
Note: MinIf you select the option for the Expansion setting, you may see white borders on your printed
photo.
Parent topic: Selecting Basic Print Settings - Mac
Selecting Page Setup Settings - Mac
Depending on your application, you may be able to select the paper size and orientation settings from
the print window.

72
Note: If you do not see these settings in the print window, check for them in your application before
printing. They may be accessible by selecting from the File menu.Page Setup
1. Select the size of the paper you loaded as the setting. If you are printing a borderlessPaper Size
photo, select the checkbox or a paper size with a option. You can alsoBorderless Borderless
select a custom setting to create a custom paper size, but the Quality setting will be limited to
Normal.
Note: You must select a compatible borderless paper type and size to print without borders. Check
the borderless paper compatibility list for details.
2. Select the orientation of your document or photo as shown in the print window.
Note: If you are printing an envelope, select the icon.
Note: Paper HandlingYou can reduce or enlarge the size of the printed image by selecting from the
pop-up menu and selecting a scaling option.
Parent topic: Printing on a Mac
Related references
Borderless Paper Type Compatibility

73
Selecting Print Layout Options - Mac
You can select a variety of layout options for your document or photo by selecting from the pop-Layout
up menu on the print window.
• To print multiple pages on one sheet of paper, select the number of pages in the Pages per Sheet
pop-up menu. To arrange the print order of the pages, select a setting.Layout Direction
• To print borders around each page on the sheet, select a line setting from the pop-up menu.Border
• To invert or flip the printed image, select the or settings.Reverse page orientation Flip horizontally
Parent topic: Printing on a Mac

75
2. Select one of the available options.
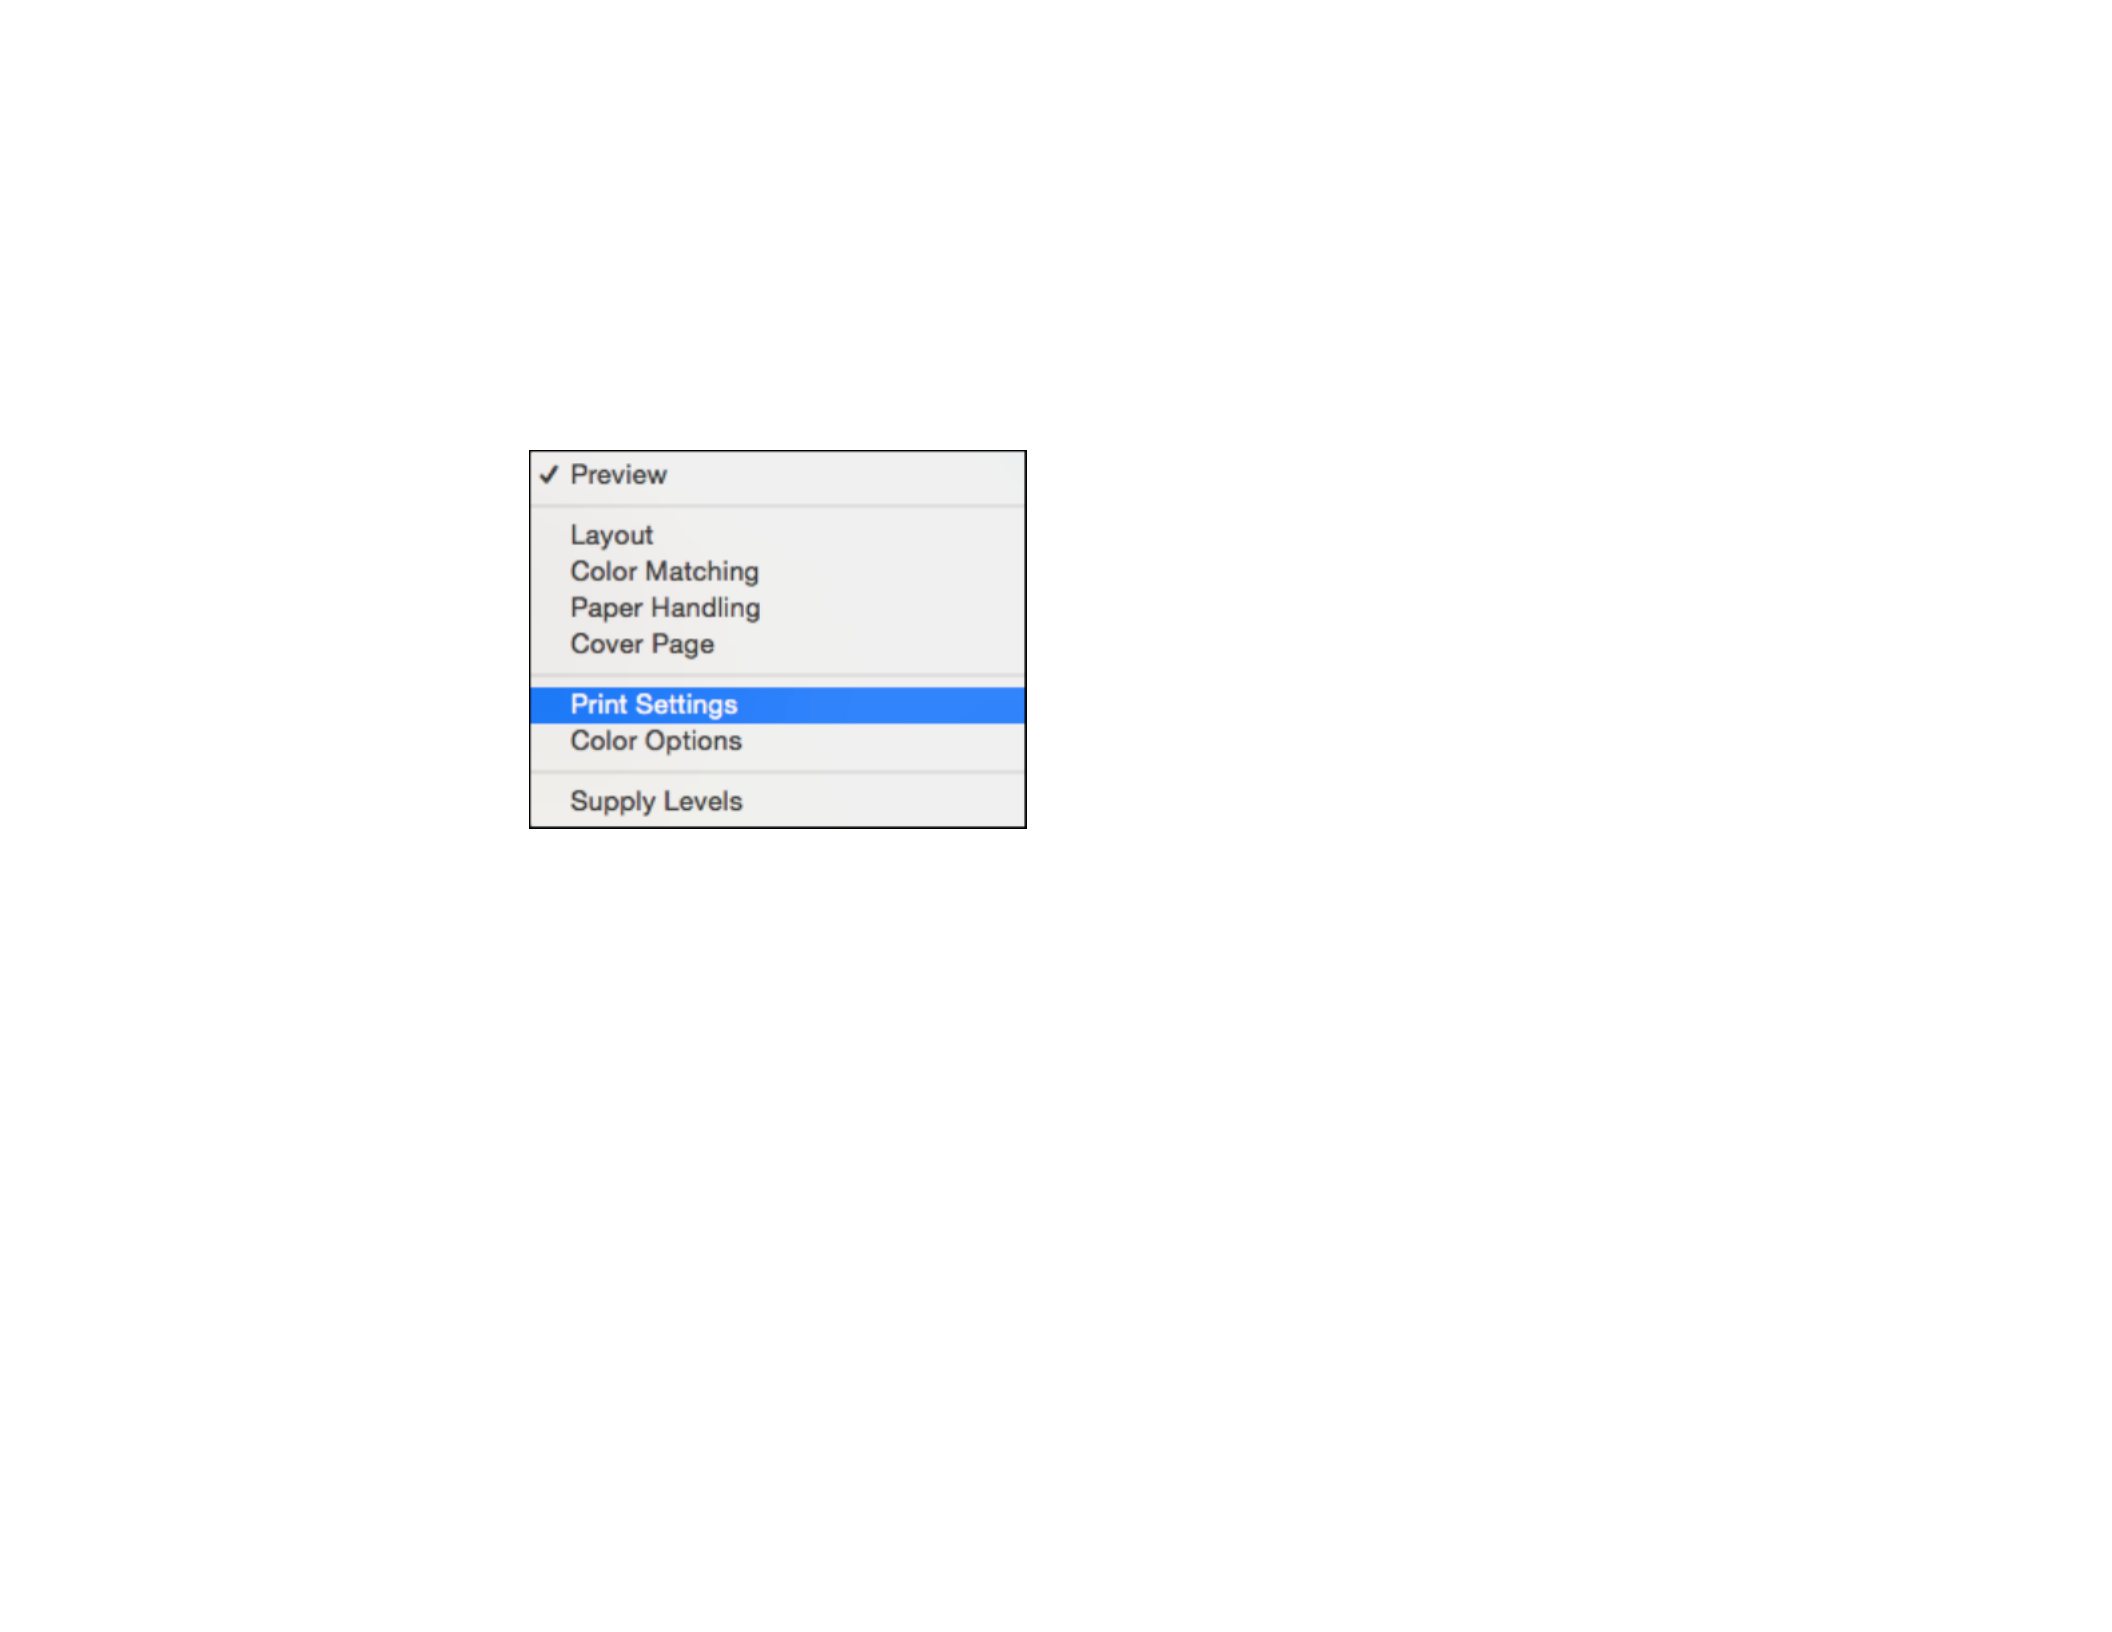
3. Select from the pop-up menu in the print window.Color Options
Note: The available settings on the Color Options menu depend on the option you selected on the
Color Matching menu.
4. Select one of the available options.
Color Matching and Color Options - Mac
Parent topic: Printing on a Mac
Color Matching and Color Options - Mac
You can select from these settings on the and menus.Color Matching Color Options
Color Matching Settings
EPSON Color Controls
Lets you manage color using controls in your printer software or turn off color management.
ColorSync
Prints using standard color profiles for your product and paper to help match image colors. You can
customize the conversion method and filter settings on the ColorSync pop-up menu in the print
window.

76
Color Options Settings
Manual Settings
Lets you select manual color adjustments. Click the arrow next to and selectAdvanced Settings
settings for , , , and individual color tones. You can also select a colorBrightness Contrast Saturation
Mode Fix Red-Eyesetting for printing photos and graphics and the setting to reduce or remove red-
eye in photos. Depending on the selected color mode, you can also adjust the midtone density using
the setting.Gamma
Fix Photo
Improves the color, contrast, and sharpness of flawed photos. Click the arrow next to Advanced
Settings Fix Red-Eyeand select the setting to reduce or remove red-eye in photos.
Note: Fix Photo uses a sophisticated face recognition technology to optimize photos that include
faces. For this to work, both eyes and the nose must be visible in the subject's face. If your photo
includes a face with an intentional color cast, such as a statue, you may want to turn off toFix Photo
retain the special color effects.
Parent topic: Managing Color - Mac
Selecting Printing Preferences - Mac
You can select printing preferences that apply to all the print jobs you send to your product.
1. In the Apple menu or the Dock, select .System Preferences
2. Select , , or , select your product, and selectPrint & Fax Print & Scan Printers & Scanners Options
& Supplies.
3. Select or .Driver Options
77
You see a screen like this:
4. Select any of the available printing preferences.
5. Click .OK
Printing Preferences - Mac
Parent topic: Printing on a Mac
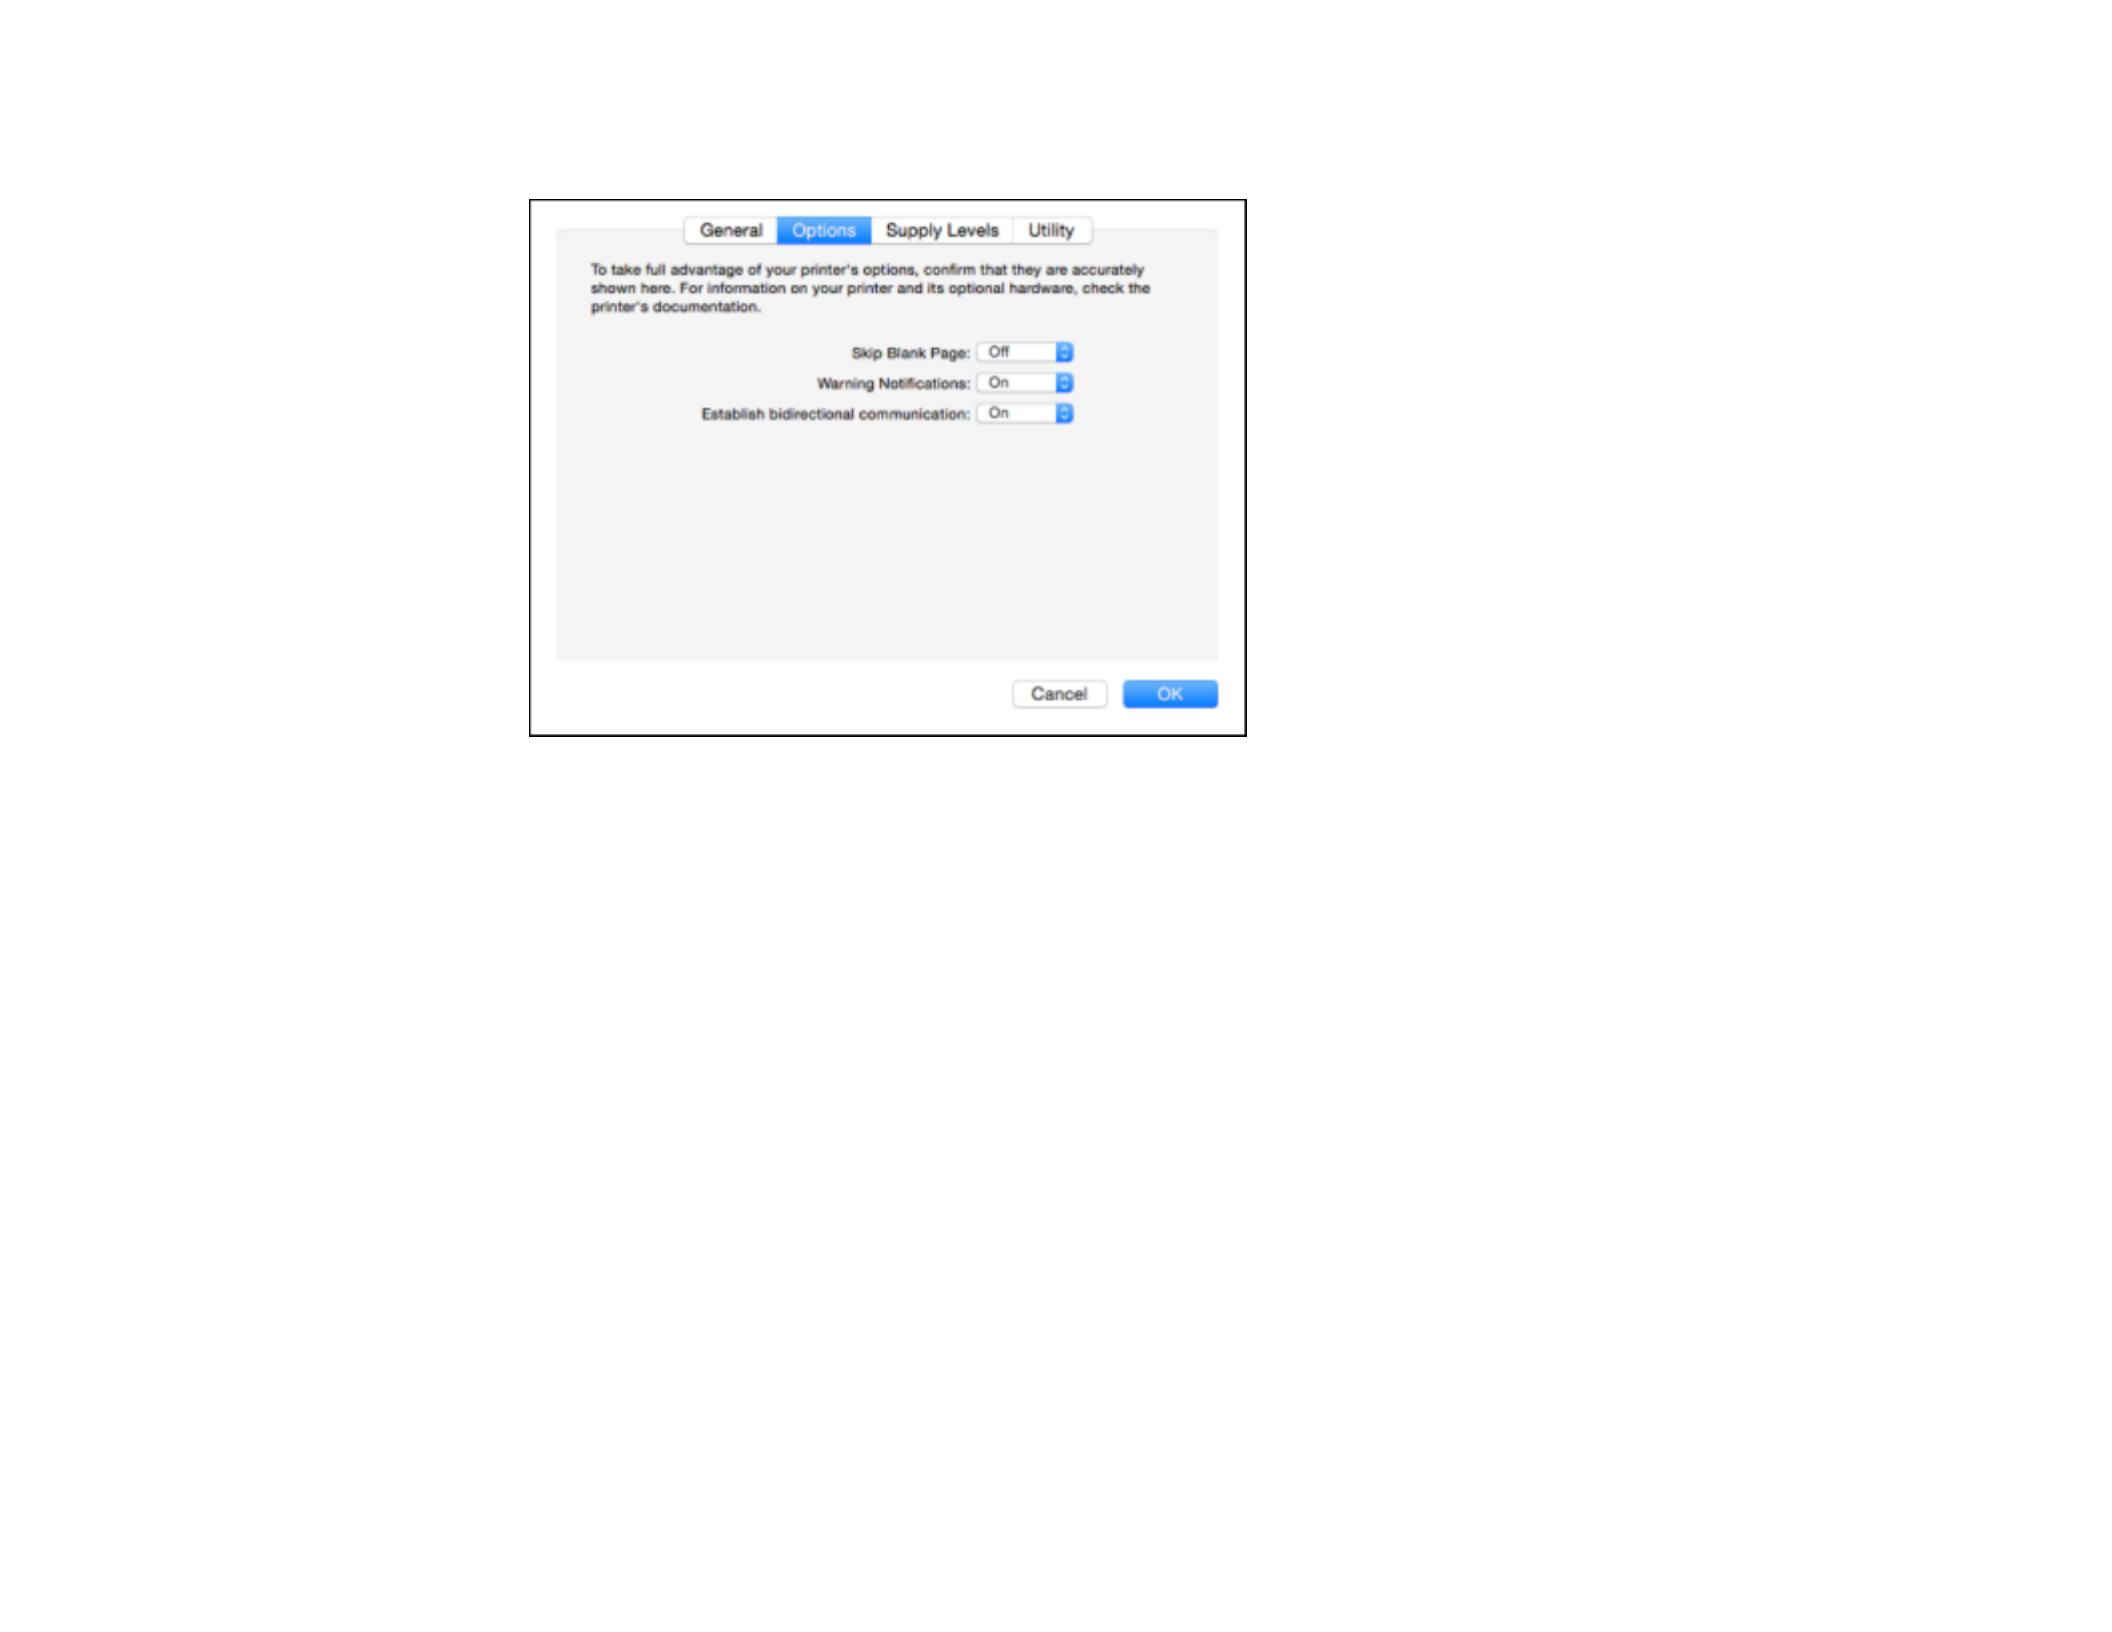
Printing Preferences - Mac
You can select from these settings on the or tab.Options Driver
Skip Blank Page
Ensures that your product does not print pages that contain no text or images.
Warning Notifications
Lets you choose whether or not to receive warning notifications from the printer software for various
operating conditions.
Establish bidirectional communication
Allows the product to communicate with the computer. Do not change the default setting unless you
experience issues when using a shared printing pool.
Parent topic: Selecting Printing Preferences - Mac

78
Printing Your Document or Photo - Mac
Once you have selected your print settings, you are ready to print.
Click at the bottom of the print window.Print
Checking Print Status - Mac
Parent topic: Printing on a Mac
Checking Print Status - Mac
During printing, you can view the progress of your print job, control printing, and check ink status.
1. Click the printer icon when it appears in the Dock.
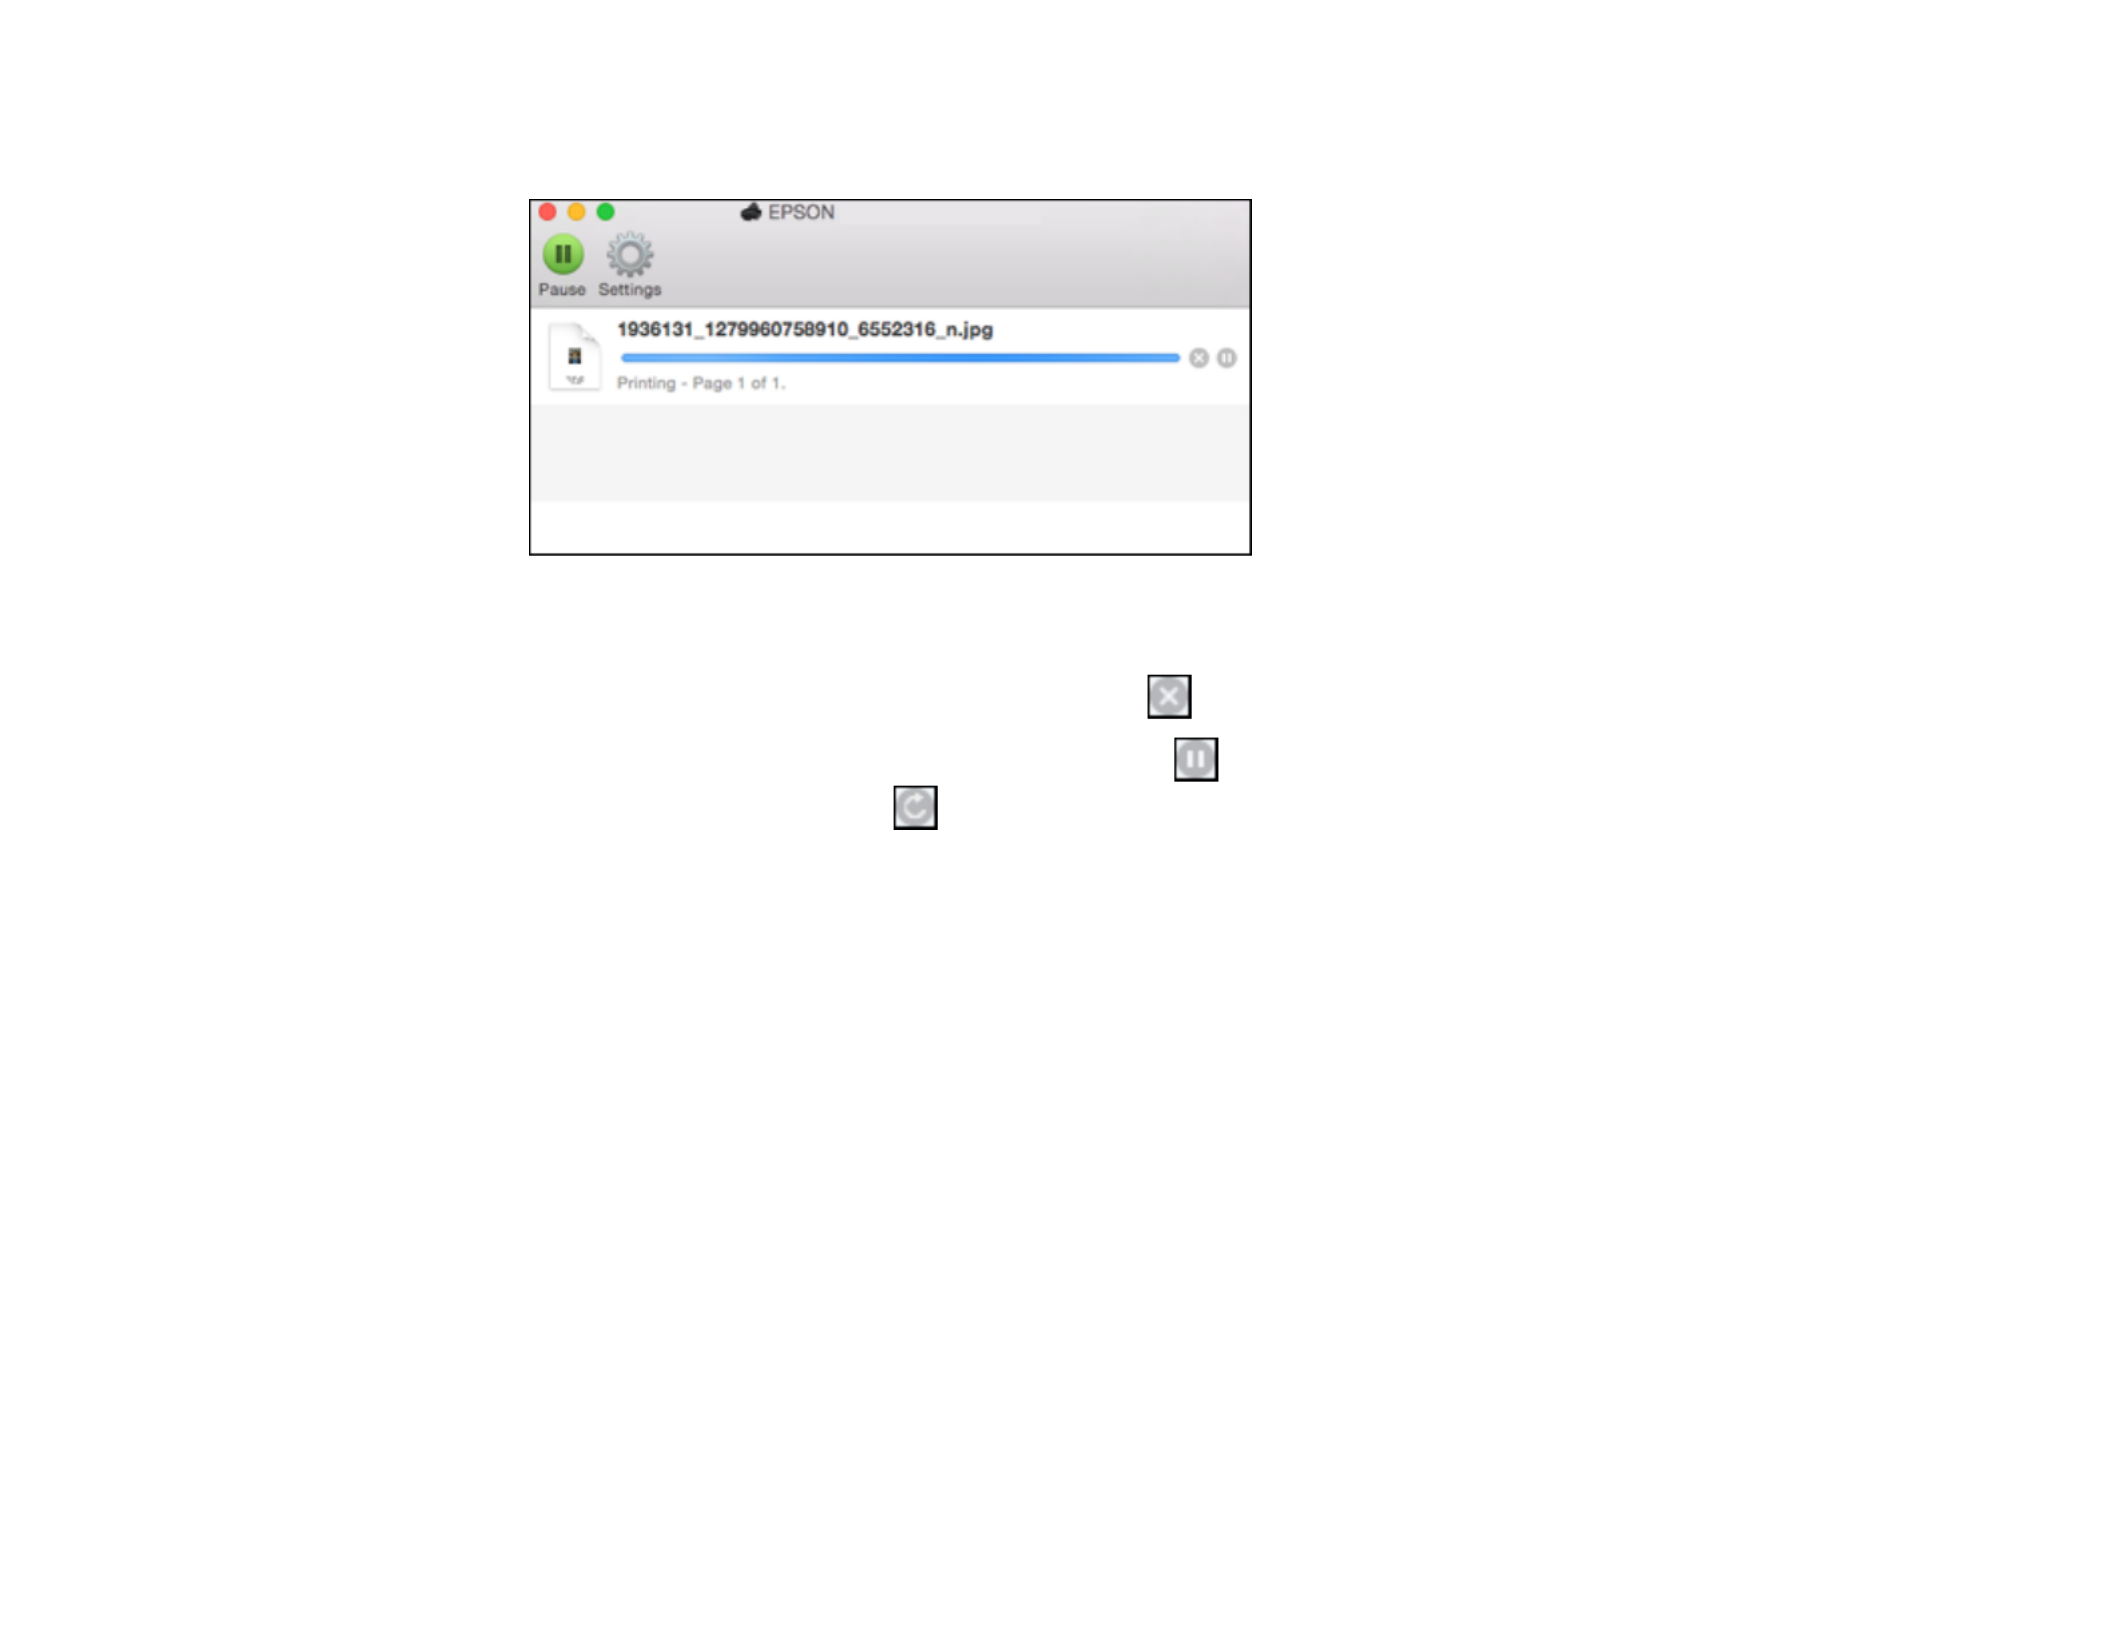
79
You see the print status window:
2. Select the following options as necessary for your Mac OS version:
• To cancel printing, click the print job and click or .Delete
• To pause a print job, click the print job and click or . To resume a print job, click theHold
paused print job and click or .Resume
• To pause printing for all queued print jobs, click or .Pause Pause Printer
• To display other printer information, click or .Settings Supply Levels
Parent topic: Printing Your Document or Photo - Mac
Printing From a Chromebook
With a Google Account, you can print from a Chromebook without drivers or cables.
1. Connect your Epson product to your wireless network. See the link below.
2. Turn on your Chromebook and connect it to the same wireless network as your product.
Note: See your Chromebook's documentation for details on connecting to a network.
3. Do one of the following:
• Click in the notification that appears in the corner of your ChromebookAdd to Cloud Print
screen.

80
Note: If you do not see a notification, check to see if a number appears in the status area at the
lower-right corner of the screen. Click this number to open the notifications menu, then click Add
to Cloud Print.
• Open a web browser and enter in the address bar. Skip to step 4.chrome://devices
• If you see a registration confirmation screen instead, click .Register
4. Click .Add Device
5. Click the button that appears next to your product.Register
6. Click on the confirmation screen. Your product's LCD screen displays a confirmationRegister
message.
7. Select or press the button on your product to confirm the Google Cloud Print connection andOK OK
print a test page.
8. To print to the connected product, select the print command in your Chrome app.
Your product is now linked to your Google Account and can be accessed from any Chromebook where
you are logged in, as long as you have Internet access. For more information on using Google Cloud
Print and for a list of supported apps, visit the site.Google Cloud Print
Parent topic: Printing from a Computer
Related tasks
Using Google Cloud Print
Related topics
Wi-Fi Networking
Cancelling Printing Using a Product Button
If you need to cancel printing, press the stop button on your product.
Parent topic: Printing from a Computer

81
Using Memory Cards with Your Product
Follow the instructions here to work with a memory card inserted into your product.
Inserting a Memory Card
Printing from a Memory Card
Transferring Photos on a Memory Card
Inserting a Memory Card
Insert only one memory card at a time into a memory card slot on your product.
1. Make sure the memory card and the files on it are compatible with your product before inserting the
card.
2. Insert your memory card into the correct slot, making sure the card is oriented correctly.
Note: Do not force the card all the way into the slot. Insert it only until it meets resistance.
The memory card access light flashes and then stays lit.
Caution: Do not remove a memory card or turn off your product while the memory card access light is
flashing or you may lose data from the memory card.
Memory Card Types
Memory Card File Specifications
Removing a Memory Card

83
Caution: Do not remove a memory card or turn off your product while the memory card access light is
flashing or you may lose data from the memory card.
1. Make sure the memory card access light is not flashing.
2. If your product is connected to your computer using a USB cable, do one of the following:
• : Open the , , , or utility.Windows My Computer Computer Windows Explorer File Explorer
Then right-click the name of your memory card (listed as a removable disk) and select .Eject
• : Drag the removable disk icon for your memory card from the desktop or computer windowMac
into the trash.
3. Push in the memory card, then pull it straight out of its slot.
Parent topic: Inserting a Memory Card
Printing from a Memory Card
See these sections to print photos from a memory card inserted into your product:
Viewing and Printing Photos
Printing Photo Layouts
Print Setting Options
Photo Adjustment Options
Parent topic: Using Memory Cards with Your Product
Viewing and Printing Photos
You can select photos for printing as you view them on the LCD screen.
1. Press the home button, if necessary.

84
2. Press the arrow buttons to select and press the button.Print Photos OK
3. Select and press the button.View and Print Photos OK
A photo on your memory card is displayed.
4. Press the right or left arrow button to scroll through your photos and display one that you want to
print.
5. Press the or button to select one or more copies of the photo (up to 99).+ –
6. To select additional photos for printing, repeat the steps above.
7. To view additional settings, press the down arrow button.
8. Follow the on-screen instructions to select from the following options:
• to select photos by dateBrowse
• to select all photosSelect Photos
• to select how photos are displayed on the LCD screenDisplay Options
• to change the print settingsPrint Settings
• to change the appearance of your printed photosPhoto Adjustments
• to apply a sepia tone or black-and-white filter to the viewed or printed photoFilter
• to crop or zoom into your photoCrop/Zoom
Note: When you are finished changing your settings, press the back button.
9. When you are ready to print, press the start button.
Note: To cancel printing, press the stop button.
Parent topic: Printing from a Memory Card
Printing Photo Layouts
You can print one or more photos from a memory card in special layouts.
1. Press the home button, if necessary.
2. Press the arrow buttons to select and press the button.Print Photos OK
3. Select and press the button.Photo Layout Sheet OK
4. Select one of the photo layout options and press the button.OK

85
5. Select the paper size setting that matches the paper you loaded and press the button.OK
6. Select the paper type setting that matches the paper you loaded and press the button.OK
7. If you see a screen prompting you to select a layout method, do one of the following:
• To allow your product to place photos in the layout automatically, select andAutomatic Layout
press the button. Press the left or right arrow button to scroll through your photos, and pressOK
the or button to select a photo for your layout. Press the down arrow button to view additional+ –
settings. Press the button when you're finished.OK
• To place photos in the layout manually, select and press the button.Place Photos Manually OK
Follow the instructions on the LCD screen to select and place photos on your layout sheet.
8. When you see the screen to select the number of copies, press the or button to select the+ –
number of copies (up to 99) and press the button.OK
9. When you are ready to print, press the start button.
Note: To cancel printing, press the stop button.
Photo Layout Options
Parent topic: Printing from a Memory Card
Photo Layout Options
Select the layout you want to use when printing your photos in a layout.
2-up, 4-up, 8-up, or 20-up
Print 2, 4, 8, or 20 photos on one sheet.
Upper ½ or Lower ½
Print one photo in the upper or lower half of the sheet.
Photo ID
Print 4 ID-sized photos on one sheet.
Parent topic: Printing Photo Layouts
Print Setting Options
Select the options you want to use when printing photos from a memory card or externalPrint Settings
device.
Specyfikacje produktu
| Marka: | Epson |
| Kategoria: | drukarka |
| Model: | PictureMate PM-525 |
Potrzebujesz pomocy?
Jeśli potrzebujesz pomocy z Epson PictureMate PM-525, zadaj pytanie poniżej, a inni użytkownicy Ci odpowiedzą
Instrukcje drukarka Epson

1 Kwietnia 2025
18 Lutego 2025
12 Lutego 2025
3 Lutego 2025
3 Lutego 2025
3 Lutego 2025
3 Lutego 2025
3 Lutego 2025
3 Lutego 2025
2 Lutego 2025
Instrukcje drukarka
- drukarka Sony
- drukarka Samsung
- drukarka LG
- drukarka Xiaomi
- drukarka Sharp
- drukarka Huawei
- drukarka Lenovo
- drukarka Fujitsu
- drukarka Roland
- drukarka Panasonic
- drukarka StarTech.com
- drukarka Canon
- drukarka Fujifilm
- drukarka MSI
- drukarka Toshiba
- drukarka D-Link
- drukarka Citizen
- drukarka HP
- drukarka Brother
- drukarka Honeywell
- drukarka Kodak
- drukarka Testo
- drukarka Primera
- drukarka Xerox
- drukarka Godex
- drukarka Olivetti
- drukarka Zebra
- drukarka Dell
- drukarka Digitus
- drukarka AgfaPhoto
- drukarka Kyocera
- drukarka Ricoh
- drukarka Seiko
- drukarka Renkforce
- drukarka Thomson
- drukarka AVM
- drukarka Velleman
- drukarka Dymo
- drukarka Panduit
- drukarka Olympus
- drukarka OKI
- drukarka Mitsubishi
- drukarka Intermec
- drukarka NEC
- drukarka Polaroid
- drukarka Konica Minolta
- drukarka Bixolon
- drukarka Pantum
- drukarka Olympia
- drukarka Datamax O'Neil
- drukarka DNP
- drukarka Equip
- drukarka ZKTeco
- drukarka TSC
- drukarka HiTi
- drukarka Microboards
- drukarka Triumph-Adler
- drukarka Fargo
- drukarka Entrust
- drukarka Kern
- drukarka Brady
- drukarka Tomy
- drukarka Lexmark
- drukarka Sagem
- drukarka Nilox
- drukarka Argox
- drukarka Royal Sovereign
- drukarka Minolta
- drukarka Oce
- drukarka Paxar
- drukarka IDP
- drukarka Metapace
- drukarka Ultimaker
- drukarka Ibm
- drukarka CSL
- drukarka Toshiba TEC
- drukarka Frama
- drukarka Builder
- drukarka Kogan
- drukarka Star Micronics
- drukarka Posiflex
- drukarka Dascom
- drukarka GG Image
- drukarka Vupoint Solutions
- drukarka Elite Screens
- drukarka DTRONIC
- drukarka Phoenix Contact
- drukarka Videology
- drukarka Epson 7620
- drukarka Star
- drukarka EC Line
- drukarka Colop
- drukarka Approx
- drukarka Fichero
- drukarka Raspberry Pi
- drukarka Unitech
- drukarka Middle Atlantic
- drukarka Evolis
- drukarka Tally Dascom
- drukarka Custom
- drukarka Nisca
- drukarka Sawgrass
- drukarka Mutoh
Najnowsze instrukcje dla drukarka

9 Kwietnia 2025

9 Kwietnia 2025
9 Kwietnia 2025

9 Kwietnia 2025

9 Kwietnia 2025
4 Kwietnia 2025

3 Kwietnia 2025
3 Kwietnia 2025
3 Kwietnia 2025

2 Kwietnia 2025