Instrukcja obsługi Epson EB-S12
Epson
Projektor Beamer
EB-S12
Przeczytaj poniżej 📖 instrukcję obsługi w języku polskim dla Epson EB-S12 (113 stron) w kategorii Projektor Beamer. Ta instrukcja była pomocna dla 5 osób i została oceniona przez 2 użytkowników na średnio 4.5 gwiazdek
Strona 1/113
User’s Guide

Notations Used in This Guide
•Safety indications
The documentation and the projector use graphical symbols to show how to use the projector safely.
Please understand and respect these caution symbols in order to avoid injury to persons or property.
Warning
This symbol indicates information that, if ignored, could possibly result in personal injury or even death due to incorrect handling.
Caution
This symbol indicates information that, if ignored, could possibly result in personal injury or physical damage due to incorrect handling.
•General information indications
Attention
Indicates procedures which may result in damage or injury if sufficient care is not taken.
a
Indicates additional information and points which may be useful to know regarding a topic.
sIndicates a page where detailed information regarding a topic can be found.
g
Indicates that an explanation of the underlined word or words in front of this symbol appears in "Glossary"the glossary of terms. See the
section of the "Appendix".
s "Glossary" p.109
[Name] Indicates the name of the buttons on the remote control or the control panel.
Example: [Esc] button
Menu Name Indicates Configuration menu items.
Example:
Select Brightness from Image.
Image - Brightness

Notations Used in This Guide . . . . . . . . . . . . . . . . . . . . . . . . 2
Introduction
Projector Features .......................................... 7
List of Functions by Model . . . . . . . . . . . . . . . . . . . . . . . . . . . . . . . . . . . . . . . . 7
Quick and Easy Set up, Projection, and Storage . . . . . . . . . . . . . . . . . . . . . . . . . . 8
Connecting with a USB cable and projecting (USB Display) . . . . . . . . . . . . . . . . 8
Detecting projector movements and automatically correcting image distortion
(EB-X14/EB-W12/EB-X12/EB-S12/EB-X11 only) . . . . . . . . . . . . . . . . . . . . . . . . . 8
Horizontal keystone adjuster (EB-X14/EB-W12/EB-X12/EB-S12/EB-X11 only) . . . . . 8
Useful Functions for Projecting Images . . . . . . . . . . . . . . . . . . . . . . . . . . . . . . . . 8
Increasing projection content in wide (WXGA) screen (EB-W12 only) . . . . . . . . . . 8
Making the most of the remote control . . . . . . . . . . . . . . . . . . . . . . . . . . . . . 9
Enlarge and project your files with the Document Camera . . . . . . . . . . . . . . . . . 9
Enhanced security functions . . . . . . . . . . . . . . . . . . . . . . . . . . . . . . . . . . . . . 9
Part Names and Functions . . . . . . . . . . . . . . . . . . . . . . . . . . . . . . . . . . 10
Front/Top . . . . . . . . . . . . . . . . . . . . . . . . . . . . . . . . . . . . . . . . . . . . . . . . . . . 10
Rear . . . . . . . . . . . . . . . . . . . . . . . . . . . . . . . . . . . . . . . . . . . . . . . . . . . . . . . 11
Base . . . . . . . . . . . . . . . . . . . . . . . . . . . . . . . . . . . . . . . . . . . . . . . . . . . . . . 13
Control Panel................................................14
Remote Control . . . . . . . . . . . . . . . . . . . . . . . . . . . . . . . . . . . . . . . . . . . . . . . 15
Replacing the remote control batteries . . . . . . . . . . . . . . . . . . . . . . . . . . . . . 17
Remote control operating range . . . . . . . . . . . . . . . . . . . . . . . . . . . . . . . . . 18
Preparing the Projector
Installing the Projector . . . . . . . . . . . . . . . . . . . . . . . . . . . . . . . . . . . . . 20
Installation Methods . . . . . . . . . . . . . . . . . . . . . . . . . . . . . . . . . . . . . . . . . . . 20
Installation methods . . . . . . . . . . . . . . . . . . . . . . . . . . . . . . . . . . . . . . . . . 20
Screen Size and Approximate Projection Distance . . . . . . . . . . . . . . . . . . . . . . . 21
Connecting Equipment . . . . . . . . . . . . . . . . . . . . . . . . . . . . . . . . . . . . . 23
Connecting a Computer . . . . . . . . . . . . . . . . . . . . . . . . . . . . . . . . . . . . . . . . . 23
Connecting Image Sources . . . . . . . . . . . . . . . . . . . . . . . . . . . . . . . . . . . . . . . 24
Connecting USB Devices . . . . . . . . . . . . . . . . . . . . . . . . . . . . . . . . . . . . . . . . . 26
Connecting External Equipment (EB-S12/EB-X11/EB-S11 only) . . . . . . . . . . . . . . . 27
Basic Usage
Projecting Images . . . . . . . . . . . . . . . . . . . . . . . . . . . . . . . . . . . . . . . . . 30
From Installation to Projection . . . . . . . . . . . . . . . . . . . . . . . . . . . . . . . . . . . . . 30
Automatically Detect Input Signals and Change the Projected Image (Source Search)
..........................................................31
Switching to the Target Image by Remote Control . . . . . . . . . . . . . . . . . . . . . . . 32
Projecting with USB Display . . . . . . . . . . . . . . . . . . . . . . . . . . . . . . . . . . . . . . 32
System requirements . . . . . . . . . . . . . . . . . . . . . . . . . . . . . . . . . . . . . . . . . 32
Connecting for the first time . . . . . . . . . . . . . . . . . . . . . . . . . . . . . . . . . . . . 33
Uninstalling............................................... 34
Adjusting Projected Images . . . . . . . . . . . . . . . . . . . . . . . . . . . . . . . . 36
Correcting Keystone Distortion . . . . . . . . . . . . . . . . . . . . . . . . . . . . . . . . . . . . 36
Correcting automatically . . . . . . . . . . . . . . . . . . . . . . . . . . . . . . . . . . . . . . 36
Correcting manually . . . . . . . . . . . . . . . . . . . . . . . . . . . . . . . . . . . . . . . . . 37
Adjusting the Image Size . . . . . . . . . . . . . . . . . . . . . . . . . . . . . . . . . . . . . . . . 40
Adjusting the Image Position . . . . . . . . . . . . . . . . . . . . . . . . . . . . . . . . . . . . . 40
Adjusting the Horizontal Tilt . . . . . . . . . . . . . . . . . . . . . . . . . . . . . . . . . . . . . . 41
Correcting the Focus . . . . . . . . . . . . . . . . . . . . . . . . . . . . . . . . . . . . . . . . . . . 41
Adjusting the Volume . . . . . . . . . . . . . . . . . . . . . . . . . . . . . . . . . . . . . . . . . . 41
Selecting the Projection Quality (Selecting Color Mode) . . . . . . . . . . . . . . . . . . . 41
Setting Auto Iris . . . . . . . . . . . . . . . . . . . . . . . . . . . . . . . . . . . . . . . . . . . . . . 42
Changing the Aspect Ratio of the Projected Image . . . . . . . . . . . . . . . . . . . . . . 43
Changing methods . . . . . . . . . . . . . . . . . . . . . . . . . . . . . . . . . . . . . . . . . . 43
Changing the aspect mode . . . . . . . . . . . . . . . . . . . . . . . . . . . . . . . . . . . . . 43
Useful Functions
Projection Functions . . . . . . . . . . . . . . . . . . . . . . . . . . . . . . . . . . . . . . . 47
Projecting Without a Computer (Slideshow) . . . . . . . . . . . . . . . . . . . . . . . . . . . 47
Specifications for files that can be projected using Slideshow . . . . . . . . . . . . . . 47
Contents
3

Slideshow examples . . . . . . . . . . . . . . . . . . . . . . . . . . . . . . . . . . . . . . . . . 47
Slideshow operating methods . . . . . . . . . . . . . . . . . . . . . . . . . . . . . . . . . . . 47
Projecting the selected image . . . . . . . . . . . . . . . . . . . . . . . . . . . . . . . . . . . 49
Projecting image files in a folder in sequence (Slideshow) . . . . . . . . . . . . . . . . 50
Image file display settings and Slideshow operation settings . . . . . . . . . . . . . . 51
Hiding the Image and Sound Temporarily (A/V Mute) . . . . . . . . . . . . . . . . . . . . . 52
Freezing the Image (Freeze) . . . . . . . . . . . . . . . . . . . . . . . . . . . . . . . . . . . . . . 52
Pointer Function (Pointer) . . . . . . . . . . . . . . . . . . . . . . . . . . . . . . . . . . . . . . . . 53
Enlarging Part of the Image (E-Zoom) . . . . . . . . . . . . . . . . . . . . . . . . . . . . . . . . 54
Using the Remote Control to Operate the Mouse Pointer (Wireless Mouse) . . . . . . 55
Saving a User's Logo . . . . . . . . . . . . . . . . . . . . . . . . . . . . . . . . . . . . . . . . . . . 56
Security Functions . . . . . . . . . . . . . . . . . . . . . . . . . . . . . . . . . . . . . . . . . 58
Managing Users (Password Protect) . . . . . . . . . . . . . . . . . . . . . . . . . . . . . . . . . 58
Kinds of Password Protect . . . . . . . . . . . . . . . . . . . . . . . . . . . . . . . . . . . . . . 58
Setting Password Protect . . . . . . . . . . . . . . . . . . . . . . . . . . . . . . . . . . . . . . 58
Entering the Password . . . . . . . . . . . . . . . . . . . . . . . . . . . . . . . . . . . . . . . . 59
Restricting Operation (Control Panel Lock) . . . . . . . . . . . . . . . . . . . . . . . . . . . . 60
Anti-Theft Lock . . . . . . . . . . . . . . . . . . . . . . . . . . . . . . . . . . . . . . . . . . . . . . . 61
Installing the wire lock . . . . . . . . . . . . . . . . . . . . . . . . . . . . . . . . . . . . . . . . 61
Monitoring and Controlling . . . . . . . . . . . . . . . . . . . . . . . . . . . . . . . . 62
ESC/VP21 Commands . . . . . . . . . . . . . . . . . . . . . . . . . . . . . . . . . . . . . . . . . . . 62
Before starting . . . . . . . . . . . . . . . . . . . . . . . . . . . . . . . . . . . . . . . . . . . . . 62
Command list . . . . . . . . . . . . . . . . . . . . . . . . . . . . . . . . . . . . . . . . . . . . . . 62
Communications protocol . . . . . . . . . . . . . . . . . . . . . . . . . . . . . . . . . . . . . 63
Configuration Menu
Using the Configuration Menu . . . . . . . . . . . . . . . . . . . . . . . . . . . . . . 65
List of Functions . . . . . . . . . . . . . . . . . . . . . . . . . . . . . . . . . . . . . . . . . . . 66
Configuration Menu Table . . . . . . . . . . . . . . . . . . . . . . . . . . . . . . . . . . . . . . . 66
Image Menu . . . . . . . . . . . . . . . . . . . . . . . . . . . . . . . . . . . . . . . . . . . . . . . . . 67
Signal Menu . . . . . . . . . . . . . . . . . . . . . . . . . . . . . . . . . . . . . . . . . . . . . . . . . 68
Settings Menu . . . . . . . . . . . . . . . . . . . . . . . . . . . . . . . . . . . . . . . . . . . . . . . . 70
Extended Menu . . . . . . . . . . . . . . . . . . . . . . . . . . . . . . . . . . . . . . . . . . . . . . . 71
Info Menu (Display Only) . . . . . . . . . . . . . . . . . . . . . . . . . . . . . . . . . . . . . . . . 72
Reset Menu . . . . . . . . . . . . . . . . . . . . . . . . . . . . . . . . . . . . . . . . . . . . . . . . . 73
Troubleshooting
Using the Help . . . . . . . . . . . . . . . . . . . . . . . . . . . . . . . . . . . . . . . . . . . . . 75
Problem Solving . . . . . . . . . . . . . . . . . . . . . . . . . . . . . . . . . . . . . . . . . . . 76
Reading the Indicators . . . . . . . . . . . . . . . . . . . . . . . . . . . . . . . . . . . . . . . . . . 76
When the Indicators Provide No Help . . . . . . . . . . . . . . . . . . . . . . . . . . . . . . . . 79
Problems Relating to Images . . . . . . . . . . . . . . . . . . . . . . . . . . . . . . . . . . . . . . 80
No images appear . . . . . . . . . . . . . . . . . . . . . . . . . . . . . . . . . . . . . . . . . . . 80
Moving images are not displayed (only the moving image portion turns black)
. . . . . . . . . . . . . . . . . . . . . . . . . . . . . . . . . . . . . . . . . . . . . . . . . . . . . . . . 81
Projection stops automatically . . . . . . . . . . . . . . . . . . . . . . . . . . . . . . . . . . . 81
The message Not supported is displayed. . . . . . . . . . . . . . . . . . . . . . . . . . . . 81
The message No Signal is displayed. . . . . . . . . . . . . . . . . . . . . . . . . . . . . . . . 81
Images are fuzzy, out of focus, or distorted . . . . . . . . . . . . . . . . . . . . . . . . . . 82
Interference or distortion appear in images . . . . . . . . . . . . . . . . . . . . . . . . . . 83
The image is truncated (large) or small, or the aspect is not suitable . . . . . . . . . 83
Image colors are not right . . . . . . . . . . . . . . . . . . . . . . . . . . . . . . . . . . . . . . 84
Images appear dark . . . . . . . . . . . . . . . . . . . . . . . . . . . . . . . . . . . . . . . . . . 85
Problems when Projection Starts . . . . . . . . . . . . . . . . . . . . . . . . . . . . . . . . . . . 85
The projector does not turn on . . . . . . . . . . . . . . . . . . . . . . . . . . . . . . . . . . 85
Other Problems . . . . . . . . . . . . . . . . . . . . . . . . . . . . . . . . . . . . . . . . . . . . . . . 86
No sound can be heard or the sound is faint . . . . . . . . . . . . . . . . . . . . . . . . . 86
The remote control does not work . . . . . . . . . . . . . . . . . . . . . . . . . . . . . . . . 86
I want to change the language for messages and menus . . . . . . . . . . . . . . . . . 87
Image file names are not displayed correctly in Slideshow . . . . . . . . . . . . . . . . 87
Maintenance
Cleaning .................................................. 89
Cleaning the Projector's Surface . . . . . . . . . . . . . . . . . . . . . . . . . . . . . . . . . . . 89
Cleaning the Lens . . . . . . . . . . . . . . . . . . . . . . . . . . . . . . . . . . . . . . . . . . . . . 89
Cleaning the Air Filter . . . . . . . . . . . . . . . . . . . . . . . . . . . . . . . . . . . . . . . . . . . 89
Contents
4

Replacing Consumables . . . . . . . . . . . . . . . . . . . . . . . . . . . . . . . . . . . . 91
Replacing the Lamp ............................................ 91
Lamp replacement period . . . . . . . . . . . . . . . . . . . . . . . . . . . . . . . . . . . . . . 91
How to replace the lamp . . . . . . . . . . . . . . . . . . . . . . . . . . . . . . . . . . . . . . 91
Resetting the lamp hours . . . . . . . . . . . . . . . . . . . . . . . . . . . . . . . . . . . . . . 94
Replacing the Air Filter . . . . . . . . . . . . . . . . . . . . . . . . . . . . . . . . . . . . . . . . . . 94
Air filter replacement period . . . . . . . . . . . . . . . . . . . . . . . . . . . . . . . . . . . . 94
How to replace the air filter . . . . . . . . . . . . . . . . . . . . . . . . . . . . . . . . . . . . . 94
Appendix
Optional Accessories and Consumables . . . . . . . . . . . . . . . . . . . . . . 97
Optional Accessories . . . . . . . . . . . . . . . . . . . . . . . . . . . . . . . . . . . . . . . . . . . 97
Consumables . . . . . . . . . . . . . . . . . . . . . . . . . . . . . . . . . . . . . . . . . . . . . . . . 97
Screen Size and Projection Distance . . . . . . . . . . . . . . . . . . . . . . . . . 98
Projection Distance (For EB-W12) . . . . . . . . . . . . . . . . . . . . . . . . . . . . . . . . . . . 98
Projection Distance (For EB-X14/EB-X12/EB-X11) . . . . . . . . . . . . . . . . . . . . . . . . 99
Projection Distance (For EB-S12/EB-S11) . . . . . . . . . . . . . . . . . . . . . . . . . . . . . 100
Supported Monitor Displays . . . . . . . . . . . . . . . . . . . . . . . . . . . . . . . 102
Supported Resolutions . . . . . . . . . . . . . . . . . . . . . . . . . . . . . . . . . . . . . . . . . 102
Computer signals (analog RGB) . . . . . . . . . . . . . . . . . . . . . . . . . . . . . . . . . 102
Component Video . . . . . . . . . . . . . . . . . . . . . . . . . . . . . . . . . . . . . . . . . . 103
Composite video . . . . . . . . . . . . . . . . . . . . . . . . . . . . . . . . . . . . . . . . . . . 103
Input signal from the HDMI port (EB-X14/EB-W12/EB-X12 only) . . . . . . . . . . . 103
Specifications . . . . . . . . . . . . . . . . . . . . . . . . . . . . . . . 104. . . . . . . . . . . . .
Projector General Specifications . . . . . . . . . . . . . . . . . . . . . . . . . . . . . . . . . . . 104
Appearance .............................................. 108
Glossary . . . . . . . . . . . . . . . . . . . . . . . . . . . . . . . . . . . . . . . . . . . . . . . . . 109
General Notes . . . . . . . . . . . . . . . . . . . . . . . . . . . . . . . . . . . . . . . . . . . . 111
About Notations . . . . . . . . . . . . . . . . . . . . . . . . . . . . . . . . . . . . . . . . . . . . . 111
General Notice: .............................................. 111
Index . . . . . . . . . . . . . . . . . . . . . . . . . . . . . . . . . . . . . . . . . . . . . . . . . . . . 112
Contents
5

Introduction
This chapter explains the projector's features and the part names.

List of Functions by Model
Available functions differ depending on the model being used. See the table below for a list of the functions available for each model.
Func
Func
Func
FuncFunction
tion
tion
tiontion EB-X14
EB-X14
EB-X14
EB-X14EB-X14 EB-W12
EB-W12
EB-W12
EB-W12EB-W12 EB-X12
EB-X12
EB-X12
EB-X12EB-X12 EB-S12
EB-S12
EB-S12
EB-S12EB-S12 EB
EB
EB
EBEB-X11
-X11
-X11
-X11-X11 EB
EB
EB
EBEB-S11
-S11
-S11
-S11-S11
USB Display
HDMI Connection - - -
External Equipment
Connection
--- *1
Auto V-Keystone -
H-Keystone Adjuster -*2
Quick Corner
Slideshow
*1Depending on the area of purchase, this may not be available.
*2 Although the horizontal keystone adjuster is not installed for this model, you can perform H-Keystone from the control panel or the Configuration menu.
Projector Features
7

Quick and Easy Set up, Projection, and Storage
•Turn the projector on and off by simply plugging in or unplugging.
•Project onto large screens from a short distance.
•Make easy height adjustments with one lever.
•No cool down delay makes it easy to put away.
Connecting with a USB cable and projecting (USB Display)
By simply connecting a USB cable, you can
project images from a computer's screen
without a computer cable.
s "Projecting with USB Display" p.32
Detecting projector movements and automatically correcting
image distortion (EB-X14/EB-W12/EB-X12/EB-S12/EB-X11 only)
This projector automatically corrects vertical keystone distortion which
occurs when positioning or moving the projector.
s "Correcting automatically" p.36
Horizontal keystone adjuster (EB-X14/EB-W12/EB-X12/EB-S12/EB-
X11 only)
This allows you to quickly correct horizontal distortion in the projected
image. This is useful if you cannot install the projector parallel to the
screen.
s "Correcting manually" p.37
Useful Functions for Projecting Images
Increasing projection content in wide (WXGA) screen (EB-W12
only)
With a computer that has a 16:10 WXGA wide
LCD display, the image can be projected in the
same aspect. You can use whiteboards and other
landscape format screens.
s "Changing the Aspect Ratio of the Projected
Image " p.43
Projector Features
8

Making the most of the remote control
You can use the remote control to perform operations such as enlarging
part of the image. You can also use the remote control as a pointer during
presentations or as a mouse for the computer.
s "Pointer Function (Pointer)" p.53
s "Enlarging Part of the Image (E-Zoom)" p.54
s "Using the Remote Control to Operate the Mouse Pointer (Wireless
Mouse)" p.55
Enlarge and project your files with the Document Camera
You can project paper documents and objects using the optional Document
Camera. Image focus is automatically adjusted using the auto focus
function. You can also enlarge images using digital zoom.
s "Optional Accessories" p.97
Enhanced security functions
•Password Protect to restrict and manage users
By setting a Password you can restrict who can use the projector.
s "Managing Users (Password Protect)" p.58
•Control Panel Lock restricts button operation on the control panel
You can use this to prevent people changing projector settings without
permission at events, in schools, and so on.
s "Restricting Operation (Control Panel Lock)" p.60
•Equipped with various anti-theft devices
The projector is equipped with the following types of anti-theft security
devices.
•Security slot
•Security cable installation point
s "Anti-Theft Lock" p.61
Projector Features
9

All of the features in this guide are explained using illustrations of EB-W12
unless otherwise mentioned.
Front/Top
Name
Name
Name
NameName Func
Func
Func
FuncFunction
tion
tion
tiontion
AAir exhaust ven
Air exhaust ven
Air exhaust ven
Air exhaust venAir exhaust vent
t
t
tt Exhaust vent for air used to cool the projector internally.
Caution
While projecting, do not put your face or hands
near the air exhaust vent, and do not place objects
that may become warped or damaged by heat near
the vent.
BA/
A/
A/
A/A/V
V
V
VV mute slide k
mute slide k
mute slide k
mute slide k mute slide knob
nob
nob
nobnob Slide the knob to open and close the A/V mute slide.
Name
Name
Name
NameName Function
Function
Function
FunctionFunction
CFoot a
Foot a
Foot a
Foot aFoot adj
dj
dj
djdjus
us
us
usust lev
t lev
t lev
t levt lever
er
er
erer Press the foot adjust lever to extend and retract the front
adjustable foot.
s "Adjusting the Image Position" p.40
DFront adjust
Front adjust
Front adjust
Front adjustFront adjustable
able
able
ableable foot
foot
foot
foot foot When setup on a surface such as a desk, extend the foot to
adjust the position of the image.
s "Adjusting the Image Position" p.40
EA/
A/
A/
A/A/V mute
V mute
V mute
V muteV mute slid
slid
slid
slid slide
e
e
ee Close when not using the projector to protect the lens. By
closing during projection you can hide the image and the
sound.
s "Hiding the Image and Sound Temporarily (A/V
Mute)" p.52
FRem
Rem
Rem
RemRemo
o
o
oot
t
t
tte
e
e
ee re
re
re
re rec
c
c
cce
e
e
eei
i
i
iive
ve
ve
vever
r
r
rr Receives signals from the remote control.
GFoc
Foc
Foc
FocFocu
u
u
uus ring
s ring
s ring
s rings ring Adjusts the image focus.
s "Correcting the Focus" p.41
HZoom
Zoom
Zoom
ZoomZoom ring
ring
ring
ring ring
(EB-
(EB-
(EB-
(EB-(EB-X14/
X14/
X14/
X14/X14/EB-W12/
EB-W12/
EB-W12/
EB-W12/EB-W12/EB
EB
EB
EBEB-
-
-
--
X12/
X12/
X12/
X12/X12/EB
EB
EB
EBEB-X11 on
-X11 on
-X11 on
-X11 on-X11 only)
ly)
ly)
ly)ly)
Adjusts the image size.
s "Adjusting the Image Size" p.40
IAir intak
Air intak
Air intak
Air intakAir intake ven
e ven
e ven
e vene vent
t
t
tt
(ai
(ai
(ai
(ai(air
r
r
rr fi
fi
fi
fi filt
lt
lt
ltlter
er
er
erer)
)
)
))
Takes in air to cool the projector internally.
s "Cleaning the Air Filter" p.89
JAir filter co
Air filter co
Air filter co
Air filter coAir filter cov
v
v
vver
er
er
erer Opens and closes the air filter cover.
s "Replacing the Air Filter" p.94
KSpeaker
Speaker
Speaker
SpeakerSpeaker Outputs audio.
LIndic
Indic
Indic
IndicIndicators
ators
ators
atorsators Indicates the projector's status.
s "Reading the Indicators" p.76
MCon
Con
Con
ConCont
t
t
ttr
r
r
rro
o
o
ool p
l p
l p
l pl pa
a
a
aan
n
n
nnel
el
el
elel Operates the projector.
s "Base" p.13
NHori
Hori
Hori
HoriHorizontal k
zontal k
zontal k
zontal kzontal keystone
eystone
eystone
eystoneeystone
adjus
adjus
adjus
adjusadjuste
te
te
teter
r
r
rr
(EB-
(EB-
(EB-
(EB-(EB-X14/
X14/
X14/
X14/X14/EB-W12/
EB-W12/
EB-W12/
EB-W12/EB-W12/EB
EB
EB
EBEB-
-
-
--
X12/
X12/
X12/
X12/X12/EB-S12/
EB-S12/
EB-S12/
EB-S12/EB-S12/EB-X11
EB-X11
EB-X11
EB-X11EB-X11
only
only
only
onlyonly)
)
)
))
Corrects horizontal distortion in the projected image.
s "Correcting manually" p.37
Part Names and Functions
10

Name
Name
Name
NameName Func
Func
Func
FuncFunction
tion
tion
tiontion
OLamp c
Lamp c
Lamp c
Lamp cLamp co
o
o
oover
ver
ver
verver Open when replacing the projector's lamp.
s "Replacing the Lamp" p.91
Rear
EB-X14/EB-W12/EB-X12
EB-S12/EB-X11/EB-S11
Name
Name
Name
NameName Function
Function
Function
FunctionFunction
ARem
Rem
Rem
RemRemo
o
o
oot
t
t
tte
e
e
ee rec
rec
rec
rec recei
ei
ei
eieive
ve
ve
vever
r
r
rr Receives signals from the remote control.
B
Pow
Pow
Pow
PowPower
er
er
erer inl
inl
inl
inl inlet
et
et
etet Connects the power cable to the projector.
s "From Installation to Projection" p.30
CVi
Vi
Vi
ViVid
d
d
dde
e
e
eeo
o
o
oo p
p
p
p po
o
o
oort
rt
rt
rtrt Inputs composite video signals from video sources.
Part Names and Functions
11
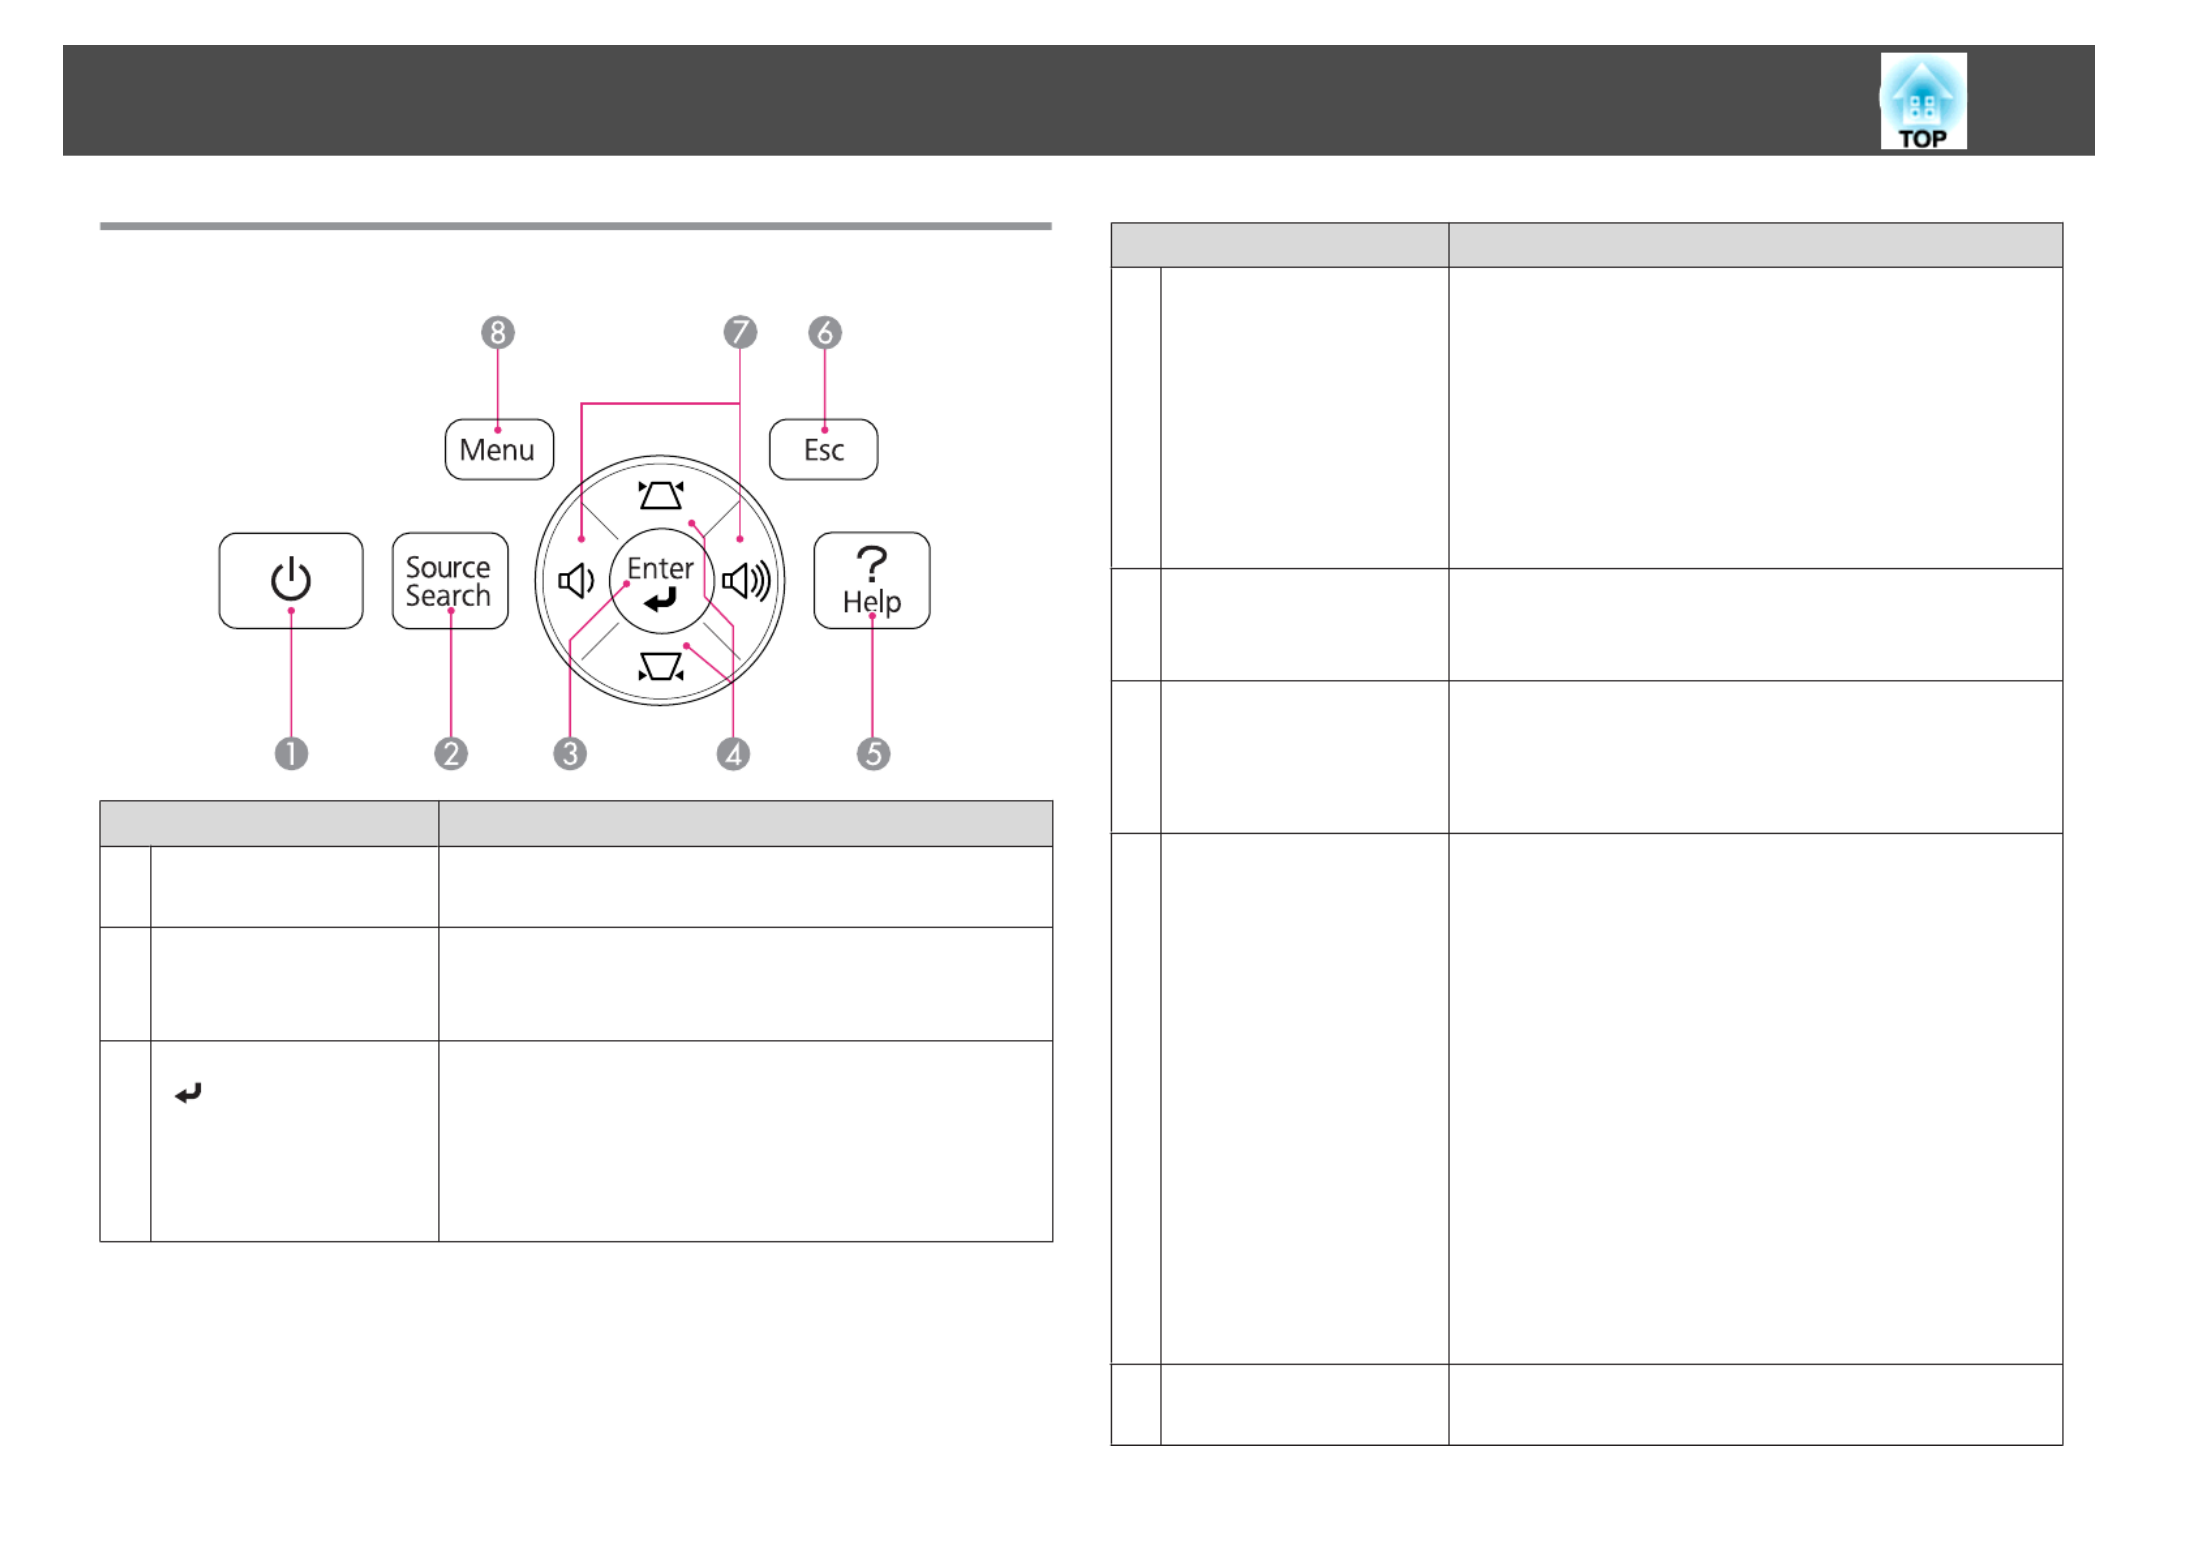
Control Panel
Name
Name
Name
NameName Func
Func
Func
FuncFunction
tion
tion
tiontion
A[
[
[
[[t] button
] button
] button
] button] button Turns the projector power on or off.
s "From Installation to Projection" p.30
B[Sour
[Sour
[Sour
[Sour[Source Sear
ce Sear
ce Sear
ce Searce Search]
ch]
ch]
ch]ch]
button
button
button
buttonbutton
Changes to the next input source that is sending an image.
s "Automatically Detect Input Signals and Change the
Projected Image (Source Search)" p.31
C[Enter
[Enter
[Enter
[Enter[Enter] bu
] bu
] bu
] bu] button
tton
tton
ttontton
[ ]
•When the Configuration menu or the Help screen is
displayed, it accepts and enters the current selection and
moves to the next level.
•If pressed while projecting analog RGB signals from the
Computer port, you can automatically optimize
Tracking, Sync., and Position.
Name
Name
Name
NameName Function
Function
Function
FunctionFunction
D[
[
[
[[w][
][
][
][][v] buttons
] buttons
] buttons
] buttons] buttons •Displays the Keystone screen allowing you to correct
keystone distortion in vertical and horizontal
directions.
s "Correcting manually" p.37
•If pressed when the Configuration menu or the Help
screen is displayed, these buttons select menu items and
setting values.
s "Using the Configuration Menu" p.65
s "Using the Help" p.75
E[Help] button
[Help] button
[Help] button
[Help] button[Help] button Displays and closes the Help screen which shows you how
to deal with problems if they occur.
s "Using the Help" p.75
F[Esc
[Esc
[Esc
[Esc[Esc] button
] button
] button
] button] button •Stops the current function.
•If pressed when the Configuration menu is displayed, it
moves to the previous menu level.
s "Using the Configuration Menu" p.65
G[
[
[
[[a][
][
][
][][b] buttons
] buttons
] buttons
] buttons] buttons
or [W
or [W
or [W
or [Wor [Wi
i
i
iide][T
de][T
de][T
de][Tde][Tele]
ele]
ele]
ele]ele]
buttons
buttons
buttons
buttonsbuttons
•For EB-X14/EB-W12/EB-X12/EB-X11
[a] Decreases the volume.
[b] Increases the volume.
s "Adjusting the Volume" p.41
•For EB-S12/EB-S11
[Wide]: Enlarges the size of the projected image.
[Tele]: Reduces the size of the projected image.
s "Adjusting the Image Size" p.40
•Corrects keystone distortion in the horizontal direction
when the Keystone screen is displayed.
s "H/V-Keystone" p.37
•If pressed when the Configuration menu or the Help
screen is displayed, these buttons select menu items and
setting values.
s "Using the Configuration Menu" p.65
s "Using the Help" p.75
H[Menu] button
[Menu] button
[Menu] button
[Menu] button[Menu] button Displays and closes the Configuration menu.
s "Using the Configuration Menu" p.65
Part Names and Functions
14

Name
Name
Name
NameName Func
Func
Func
FuncFunction
tion
tion
tiontion
I
[
[
[
[[ ]
]
]
]]
][
][
][
][][ ][
][
][
][][ ][
][
][
][][
buttons
buttons
buttons
buttonsbuttons
•When the Configuration menu or the Help screen is
displayed, pressing these buttons selects menu items
and setting values.
s "Using the Configuration Menu" p.65
•When projecting a Slideshow, pressing these buttons
displays the previous/next image, rotates the image, and
so on.
s "Slideshow operating methods" p.47
•During Wireless Mouse function, the mouse pointer
moves in the direction of the button that was pushed.
s "Using the Remote Control to Operate the
Mouse Pointer (Wireless Mouse)" p.55
J
[
[
[
[[ ] button
] button
] button
] button] button •When the Configuration menu or the Help screen is
displayed, it accepts and enters the current selection and
moves to the next level.
s "Using the Configuration Menu" p.65
•Acts as a mouse's left button when using the Wireless
Mouse function.
s "Using the Remote Control to Operate the
Mouse Pointer (Wireless Mouse)" p.55
K[User] button
[User] button
[User] button
[User] button[User] button Select any frequently used item from the five available
Configuration menu items, and assign it to this button. By
pressing the [User] button, the assigned menu item
selection/adjustment screen is displayed, allowing you to
make one-touch settings/adjustments.
s "Settings Menu" p.70
Power Consumption is assigned as the default setting.
Name
Name
Name
NameName Function
Function
Function
FunctionFunction
L[Page] buttons
[Page] buttons
[Page] buttons
[Page] buttons[Page] buttons
[
[
[
[[[][
][
][
][][]]
]
]
]]
Changes pages in files such as PowerPoint files when using
the following projection methods.
•When using the Wireless Mouse function
s "Using the Remote Control to Operate the
Mouse Pointer (Wireless Mouse)" p.55
•When using USB Display
s "Projecting with USB Display" p.32
When projecting images using Slideshow, pressing these
buttons displays the previous/next screen.
M[E-Zoom
[E-Zoom
[E-Zoom
[E-Zoom[E-Zoom] buttons
] buttons
] buttons
] buttons] buttons
[
[
[
[[ ]
]
]
]]z][
][
][
][][x
Enlarges or reduces the image without changing the
projection size.
s "Enlarging Part of the Image (E-Zoom)" p.54
N[A/V
[A/V
[A/V
[A/V[A/V Mute] bu
Mute] bu
Mute] bu
Mute] bu Mute] button
tton
tton
ttontton •Turns the video and audio on or off.
s "Hiding the Image and Sound Temporarily (A/V
Mute)" p.52
•You can change the Projection mode as follows by
pressing the button for about five seconds.
FrontWFront/Ceiling
RearWRear/Ceiling
O[Help] bu
[Help] bu
[Help] bu
[Help] bu[Help] button
tton
tton
ttontton Displays and closes the Help screen which shows you how
to deal with problems if they occur.
s "Using the Help" p.75
P[Freeze] button
[Freeze] button
[Freeze] button
[Freeze] button[Freeze] button Images are paused or unpaused.
s "Freezing the Image (Freeze)" p.52
Q[V
[V
[V
[V[Volume] buttons
olume] buttons
olume] buttons
olume] buttonsolume] buttons
[ ]a][b
[a] Decreases the volume.
[b] Increases the volume.
s "Adjusting the Volume" p.41
R[Pointer
[Pointer
[Pointer
[Pointer[Pointer] button
] button
] button
] button] button Displays the on-screen pointer.
s "Pointer Function (Pointer)" p.53
Part Names and Functions
16

Name
Name
Name
NameName Func
Func
Func
FuncFunction
tion
tion
tiontion
S[Esc]
[Esc]
[Esc]
[Esc][Esc] button
button
button
button button •Stops the current function.
•If pressed when the Configuration menu is displayed, it
moves to the previous level.
s "Using the Configuration Menu" p.65
•Acts as a mouse's right button when using the Wireless
Mouse function.
s "Using the Remote Control to Operate the
Mouse Pointer (Wireless Mouse)" p.55
T[Co
[Co
[Co
[Co[Color M
lor M
lor M
lor Mlor Mode] b
ode] b
ode] b
ode] bode] button
utton
utton
uttonutton Each time the button is pressed, the Color Mode changes.
s "Selecting the Projection Quality (Selecting Color
Mode)" p.41
U[LAN] button
[LAN] button
[LAN] button
[LAN] button[LAN] button Not available for this projector.
V[USB
[USB
[USB
[USB[USB] button
] button
] button
] button] button Each time the button is pressed, it cycles through the
following images:
•USB Display
•Images from the device connected to the USB(TypeA)
port
W[Sour
[Sour
[Sour
[Sour[Sourc
c
c
cce Search]
e Search]
e Search]
e Search]e Search]
button
button
button
buttonbutton
Changes to the next input source that is sending an image.
s "Automatically Detect Input Signals and Change the
Projected Image (Source Search)" p.31
XRemote c
Remote c
Remote c
Remote cRemote control light-
ontrol light-
ontrol light-
ontrol light-ontrol light-
emitting area
emitting area
emitting area
emitting areaemitting area
Outputs remote control signals.
Replacing the remote control batteries
If delays in the responsiveness of the remote control occur or if it does not
operate after it has been used for some time, it probably means that the
batteries are becoming flat. When this happens, replace them with new
batteries. Have two AA size manganese or alkaline batteries ready. You
cannot use other batteries except for the AA size manganese or alkaline.
Attention
Make sure you read the following manual before handling the batteries.
s Safety Instructions
a
Remove the battery cover.
While pushing the battery compartment cover catch, lift the cover
up.
b
Replace the old batteries with new batteries.
Part Names and Functions
17

Caution
Check the positions of the (+) and (-) marks inside the battery holder to
ensure the batteries are inserted the correct way.
c
Replace the battery cover.
Press the battery compartment cover until it clicks into place.
Remote control operating range
Part Names and Functions
18

Installation Methods
The projector supports the following four different projection methods.
Install the projector according to the conditions of the installation location.
•Project images from in front of
the screen. (Front projection)
•Project images from behind a
translucent screen. (Rear projec-
tion)
•Suspend the projector from the
ceiling and project images from
in front of a screen. (Front/Ceil-
ing projection)
•Suspend the projector from the
ceiling and project images from
behind a translucent screen.
(Rear/Ceiling projection)
Warning
•A special method of installation is required when suspending the projector
from a ceiling (ceiling mount). If it is not installed correctly, it could fall
causing an accident and injury.
•If you use adhesives on the Ceiling mount fixing points to prevent the screws
from loosening, or if you use things such as lubricants or oils on the
projector, the projector case may crack causing it to fall from its ceiling
mount. This could cause serious injury to anyone under the ceiling mount
and could damage the projector.
When installing or adjusting the ceiling mount, do not use adhesives to
prevent the screws from loosening and do not use oils or lubricants and so
on.
Attention
•Do not use the projector on its side. This may cause malfunctions to occur.
•Do not cover the projector's air intake vent or air exhaust vent. If either of
the vents are covered, the internal temperature could rise and cause a fire.
a
•An optional Ceiling mount is required when suspending the
projector from a ceiling.
s "Optional Accessories" p.97
•The default Projection setting is Front. You can change from Front
to Rear from the Configuration menu.
s Extended - Projection p.71
•You can change the Projection mode as follows by pressing down
the [A/V Mute] button on the remote control for about five seconds.
FrontWFront/Ceiling
RearWRear/Ceiling
Installation methods
Install the projector as follows.
Installing the Projector
20

•Install the projector so that it is parallel to the screen.
If the projector is installed at an angle to the screen, keystone distortion
occurs in the projected image.
•Place the projector on a level surface.
If the projector is tilted the projected image is also tilted.
a
•See the following if you cannot install the projector parallel to the
screen.
s "Correcting Keystone Distortion" p.36
•See the following if you cannot install the projector on a level
surface.
s "Adjusting the Horizontal Tilt" p.41
s "Correcting Keystone Distortion" p.36
Screen Size and Approximate Projection Distance
Projection size is determined by the distance from the projector to the
screen. See the illustrations on the right to select the best position according
to the screen size. The illustrations show the approximate shortest distance
at maximum zoom. See the following for more information on the
projection distance.
s "Screen Size and Projection Distance" p.98
a
When you correct keystone distortion, the projected image may be
reduced.
16:10 Screen Size
EB-W12
(110×67cm)
(170×110cm)
(220×130cm)
(320×200cm)
50”
80”
100”
150”
4:3 Screen Size
EB-X14/EB-X12/EB-X11
Installing the Projector
21

Removing USB devices
After finishing projecting, remove USB devices from the projector. For devices such as digital cameras or hard disks, turn off the device and then remove it from
the projector.
Connecting External Equipment (EB-S12/EB-X11/EB-S11 only)
You can output images and audio by connecting an external monitor or speaker.
AWhen outputting images to an external monitor
Connect the external monitor to the projector's Monitor Out port using the cable supplied with the external monitor.
BWhen outputting audio to an external speaker
Connect the external speaker to the projector's Audio Out port using a commercially available audio cable.
Connecting Equipment
27

Basic Usage
This chapter explains how to project and adjust images.

From Installation to Projection
This section explains the procedure for connecting the projector to a
computer with the computer cable and projecting images.
a
Connect the projector to an electrical outlet with the power cable.
b
Connect the projector to the computer with the computer cable.
c
Turn on the projector.
d
Slide open the A/V mute slide.
e
Turn on your computer.
f
Change the computer's screen output.
When using a laptop computer, you need to change the screen
output from the computer.
Hold down the Fn key (function key), and press the b key.
a
The method for changing differs depending on the computer
being used. See the documentation supplied with the computer.
If the image is not projected, you can change the projected image using one
of the following methods.
•Press the [Source Search] button on the control panel or the remote
control.
s "Automatically Detect Input Signals and Change the Projected Image
(Source Search)" p.31
•Press the button for the target port on the remote control.
s "Switching to the Target Image by Remote Control" p.32
a
After projecting the image, adjust the image if necessary.
s "Correcting Keystone Distortion" p.36
s "Correcting the Focus" p.41
Projecting Images
30

Switching to the Target Image by Remote Control
You can change directly to the target image by pressing the following
buttons on the remote control.
Rem
Rem
Rem
RemRemot
ot
ot
otote c
e c
e c
e ce co
o
o
oontro
ntro
ntro
ntrontrol
l
l
ll
AChanges to images from the Computer port.
BEach time the button is pressed, it cycles through the images being input
from the following sources.
•S-Video port
•Video port
•HDMI port (EB-X14/EB-W12/EB-X12 only)
CEach time the button is pressed, it cycles through the images being input
from the following sources.
•USB Display
•Images from the device connected to the USB(TypeA) port
Projecting with USB Display
You can use a USB cable to connect the projector to a computer to project
images from the computer.
You can send the computer's audio with the projected image.
For EB-X14/EB-W12/EB-X12/EB-S12, set USB Type B to USB Display
from the Configuration menu.
s Extended - USB Type B p.71
System requirements
For Windows
OS
OS
OS
OSOS Windows 2000*1
Windows XP*2Professional 32 bit
Home Edition 32 bit
Tablet PC Edition 32 bit
Windows Vista Ultimate 32 bit
Enterprise 32 bit
Business 32 bit
Home Premium 32 bit
Home Basic 32 bit
Windows 7 Ultimate 32/64 bit
Enterprise 32/64 bit
Professional 32/64 bit
Home Premium 32/64 bit
Home Basic 32 bit
Starter 32 bit
CP
CP
CP
CPCPU
U
U
UU Mobile Pentium III 1.2 GHz or faster
Recommended: Pentium M 1.6 GHz or faster
Projecting Images
32

Amo
Amo
Amo
AmoAmoun
un
un
ununt
t
t
tt of
of
of
of of Mem
Mem
Mem
Mem Mem-
-
-
--
ory
ory
ory
oryory
256 MB or more
Recommended: 512 MB or more
Har
Har
Har
HarHard
d
d
dd Disk
Disk
Disk
Disk Disk
Spac
Spac
Spac
SpacSpace
e
e
ee
20 MB or more
Dis
Dis
Dis
DisDispla
pla
pla
plaplay
y
y
yy Resolution of no less than 640x480 and no higher than
1600x1200.
Display color in 16-bit color or greater
*1 Service Pack 4 only
*2 Except for Service Pack 1
For Mac OS
OS
OS
OS
OSOS Mac OS X 10.5.x
Mac OS X 10.6.x
CP
CP
CP
CPCPU
U
U
UU Power PC G4 1GHz or faster
Recommended: Core Duo 1.83GHz or faster
Amount of
Amount of
Amount of
Amount ofAmount of
Mem
Mem
Mem
MemMemory
ory
ory
oryory
512 MB or more
Hard Disk
Hard Disk
Hard Disk
Hard DiskHard Disk
Spac
Spac
Spac
SpacSpace
e
e
ee
20 MB or more
Dis
Dis
Dis
DisDispla
pla
pla
plaplay
y
y
yy Resolution of no less than 640x480 and no higher than
1600x1200.
Display color in 16-bit color or greater
Connecting for the first time
The first time you connect the projector and the computer using the USB
cable, the driver needs to be installed. The procedure is different for
Windows and Mac OS.
a
•You do not need to install the driver the next time you connect.
•When inputting images from multiple sources, change the input
source to USB Display.
•If you use a USB hub, the connection may not operate correctly.
Connect the USB cable directly to the projector.
•Depending on the model used and the area of purchase, the USB
cable may not be supplied with the projector.
For Windows
a
Connect the computer's USB port to the projector's USB(TypeB)
port using a USB cable.
a
For Windows 2000 or Windows XP, a message asking you if
you want to restart your computer may be displayed. Select
No.
For Windows 2000
Double-click Computer, EPSON PJ_UD, and then
EMP_UDSE.EXE.
For Windows XP
Driver installation starts automatically.
For Windows Vista/Windows 7
When the dialog box is displayed, click Run EMP_UDSE.exe.
b
When the License Agreement screen is displayed, click Agree.
Projecting Images
33

Adjusting the Horizontal Tilt
Extend and retract the rear feet to adjust the projector's horizontal tilt.
AExtend the rear foot.
BRetract the rear foot.
Correcting the Focus
You can correct the focus using the focus ring.
EB-X14/EB-W12/EB-X12/EB-X11
EB-S12/EB-S11
Adjusting the Volume
You can adjust the volume using one of the following methods.
•Press the [Volume] button on the control panel or the remote control
to adjust the volume.
[a] Decreases the volume.
[b] Increases the volume.
Using the remote c
Using the remote c
Using the remote c
Using the remote cUsing the remote control
ontrol
ontrol
ontrolontrol Using
Using
Using
Using Using the
the
the
the the c
c
c
ccontrol
ontrol
ontrol
ontrol ontrol panel
panel
panel
panelpanel
(EB-X14/EB-W12/EB-X12/EB-X11 only)
•Adjust the volume from the Configuration menu.
s Settings - Volume p.70
Caution
Do not start at high volume.
A sudden excessive volume may cause loss of hearing. Always lower the volume
before powering off, so that you can power on and then gradually increase the
volume.
Selecting the Projection Quality (Selecting Color
Mode)
You can easily obtain the optimum image quality simply by selecting the
setting that best corresponds to your surroundings when projecting. The
brightness of the image varies depending on the mode selected.
Adjusting Projected Images
41
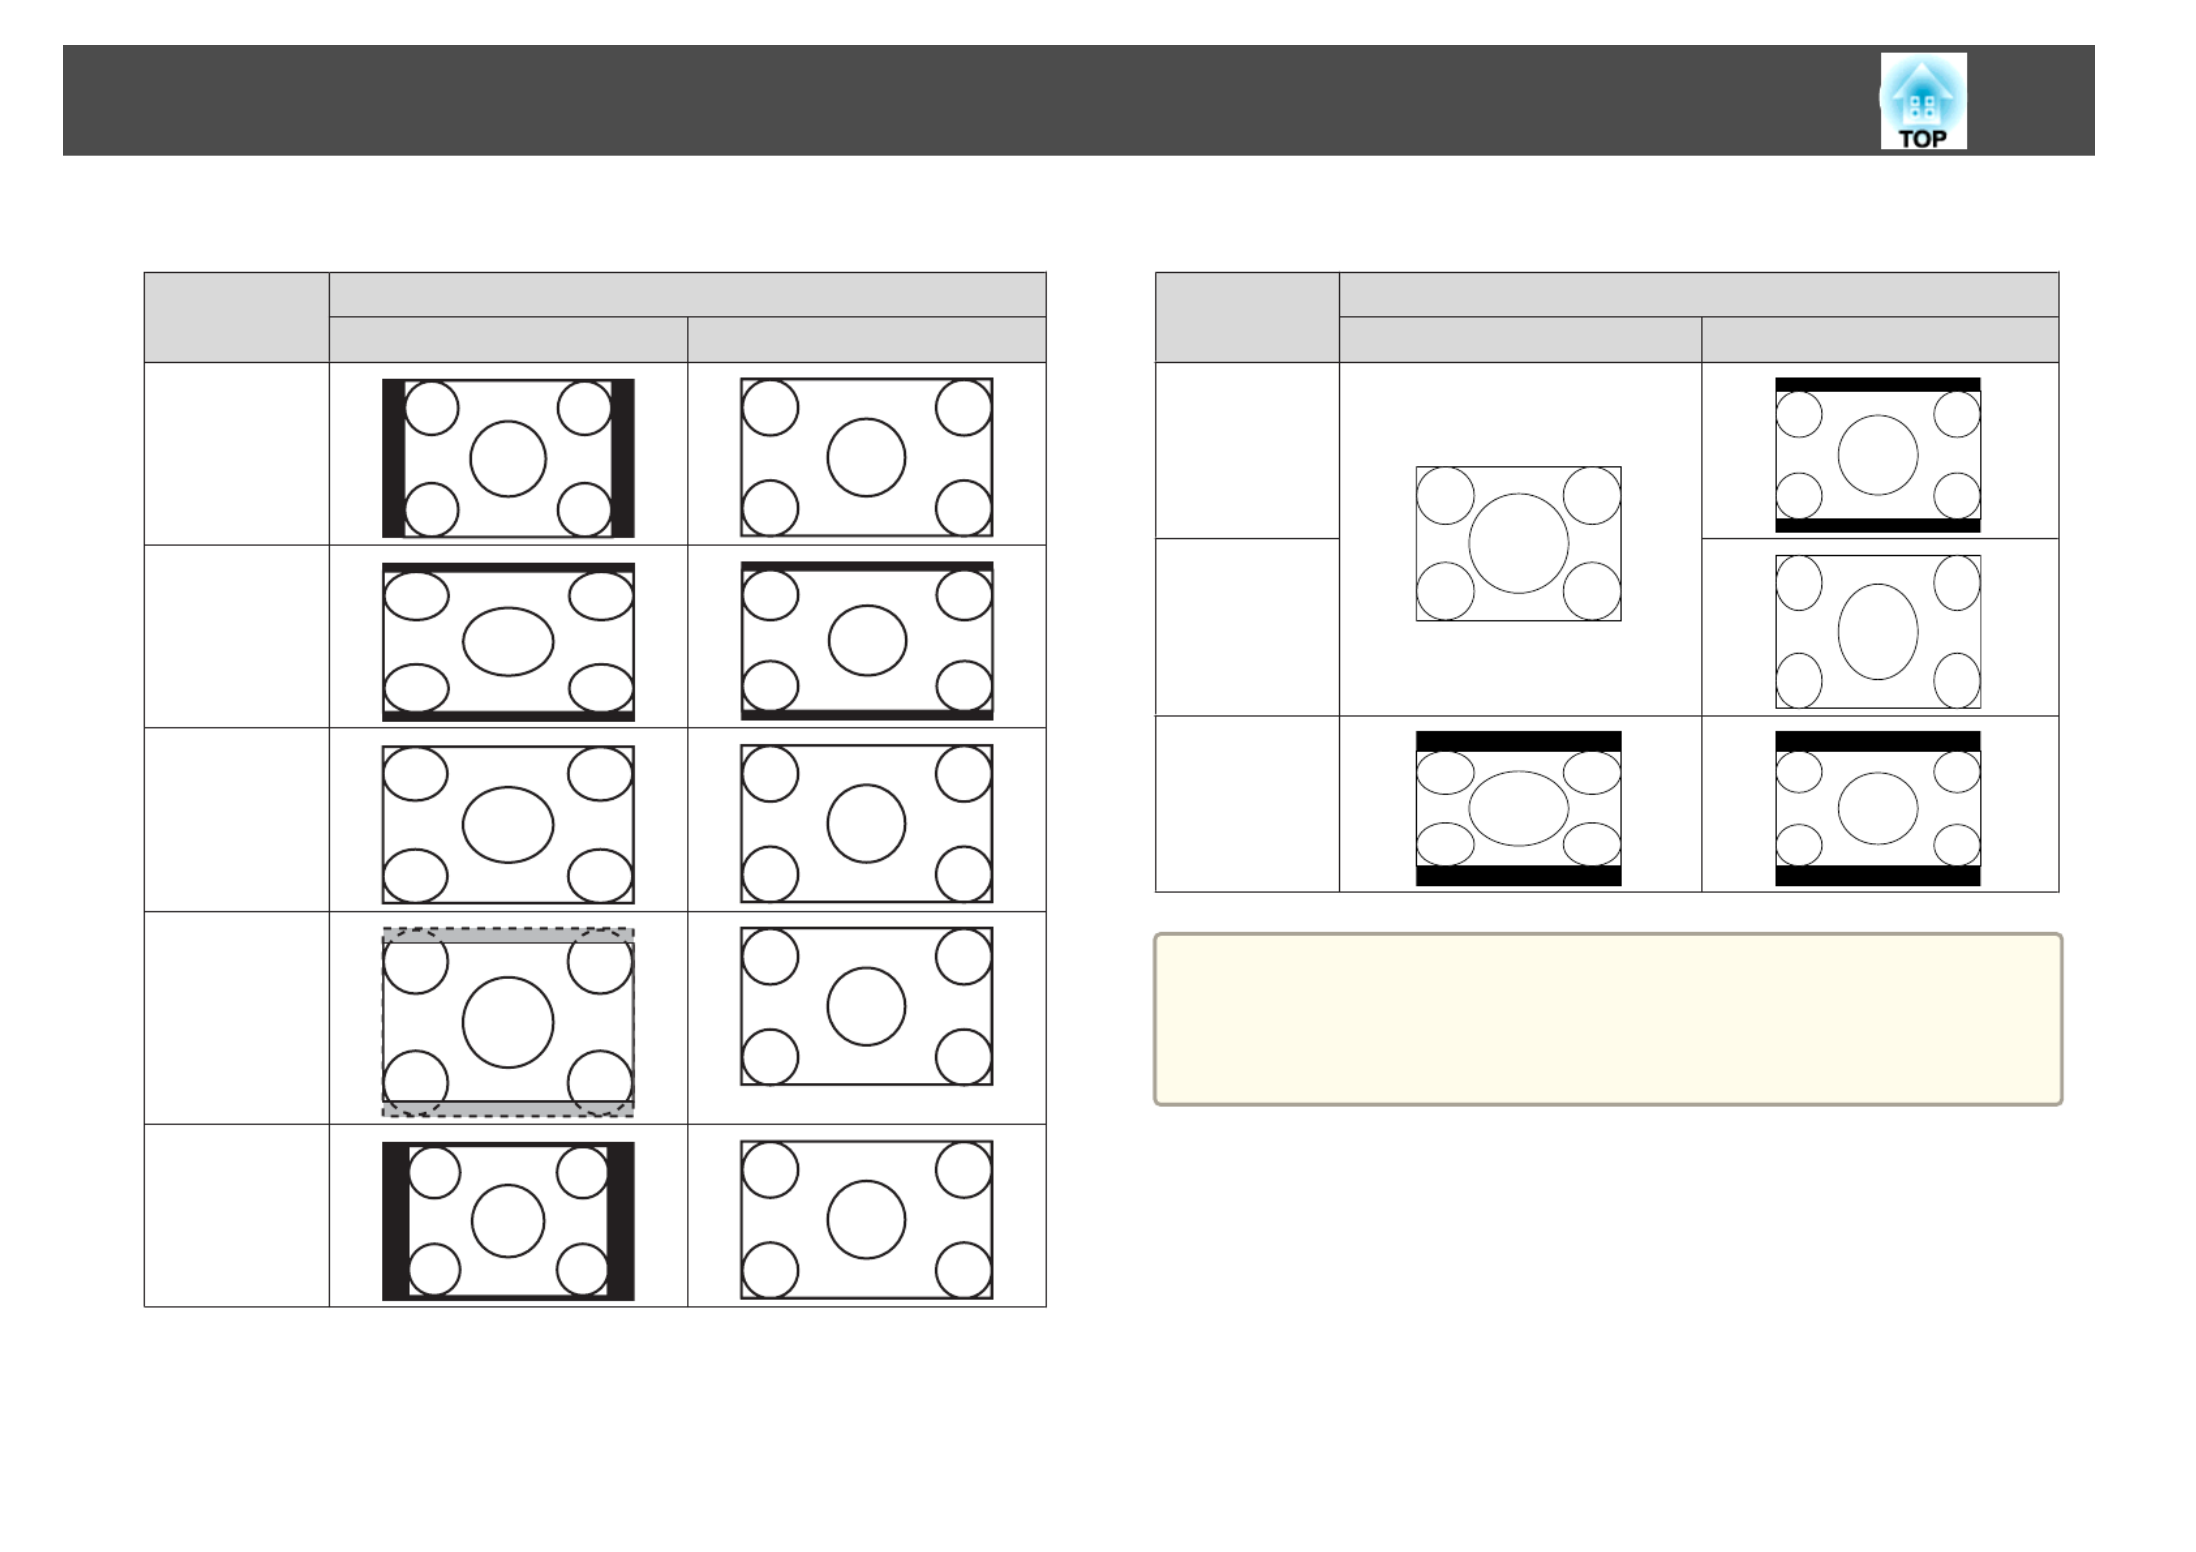
EB-W12
Aspect Mode
Aspect Mode
Aspect Mode
Aspect ModeAspect Mode Input Si
Input Si
Input Si
Input SiInput Signal
gnal
gnal
gnalgnal
XGA 1024X7
XGA 1024X7
XGA 1024X7
XGA 1024X7XGA 1024X768(4:3)
68(4:3)
68(4:3)
68(4:3)68(4:3) WXGA 1280X80
WXGA 1280X80
WXGA 1280X80
WXGA 1280X80WXGA 1280X800(16:10)
0(16:10)
0(16:10)
0(16:10)0(16:10)
Normal
16:9
Full
Zoom
Native
EB-X14/EB-X12/EB-S12/EB-X11/EB-S11
Asp
Asp
Asp
AspAspe
e
e
eec
c
c
cct M
t M
t M
t Mt Mod
od
od
odode
e
e
ee Inp
Inp
Inp
InpInput
ut
ut
ut ut Sig
Sig
Sig
SigSignal
nal
nal
nalnal
XGA 1024X768(
XGA 1024X768(
XGA 1024X768(
XGA 1024X768(XGA 1024X768(4:3)
4:3)
4:3)
4:3)4:3) WXG
WXG
WXG
WXGWXGA 1280X800(16:
A 1280X800(16:
A 1280X800(16:
A 1280X800(16:A 1280X800(16:10)
10)
10)
10)10)
Normal
4:3
16:9
a
If parts of the image are missing, set the Resolution setting to Wide
or Normal from the Configuration menu, according to the size of the
computer panel.
s Signal - Resolution p.68
Adjusting Projected Images
45

Useful Functions
This chapter explains useful tips for giving presentations, and the Security functions.
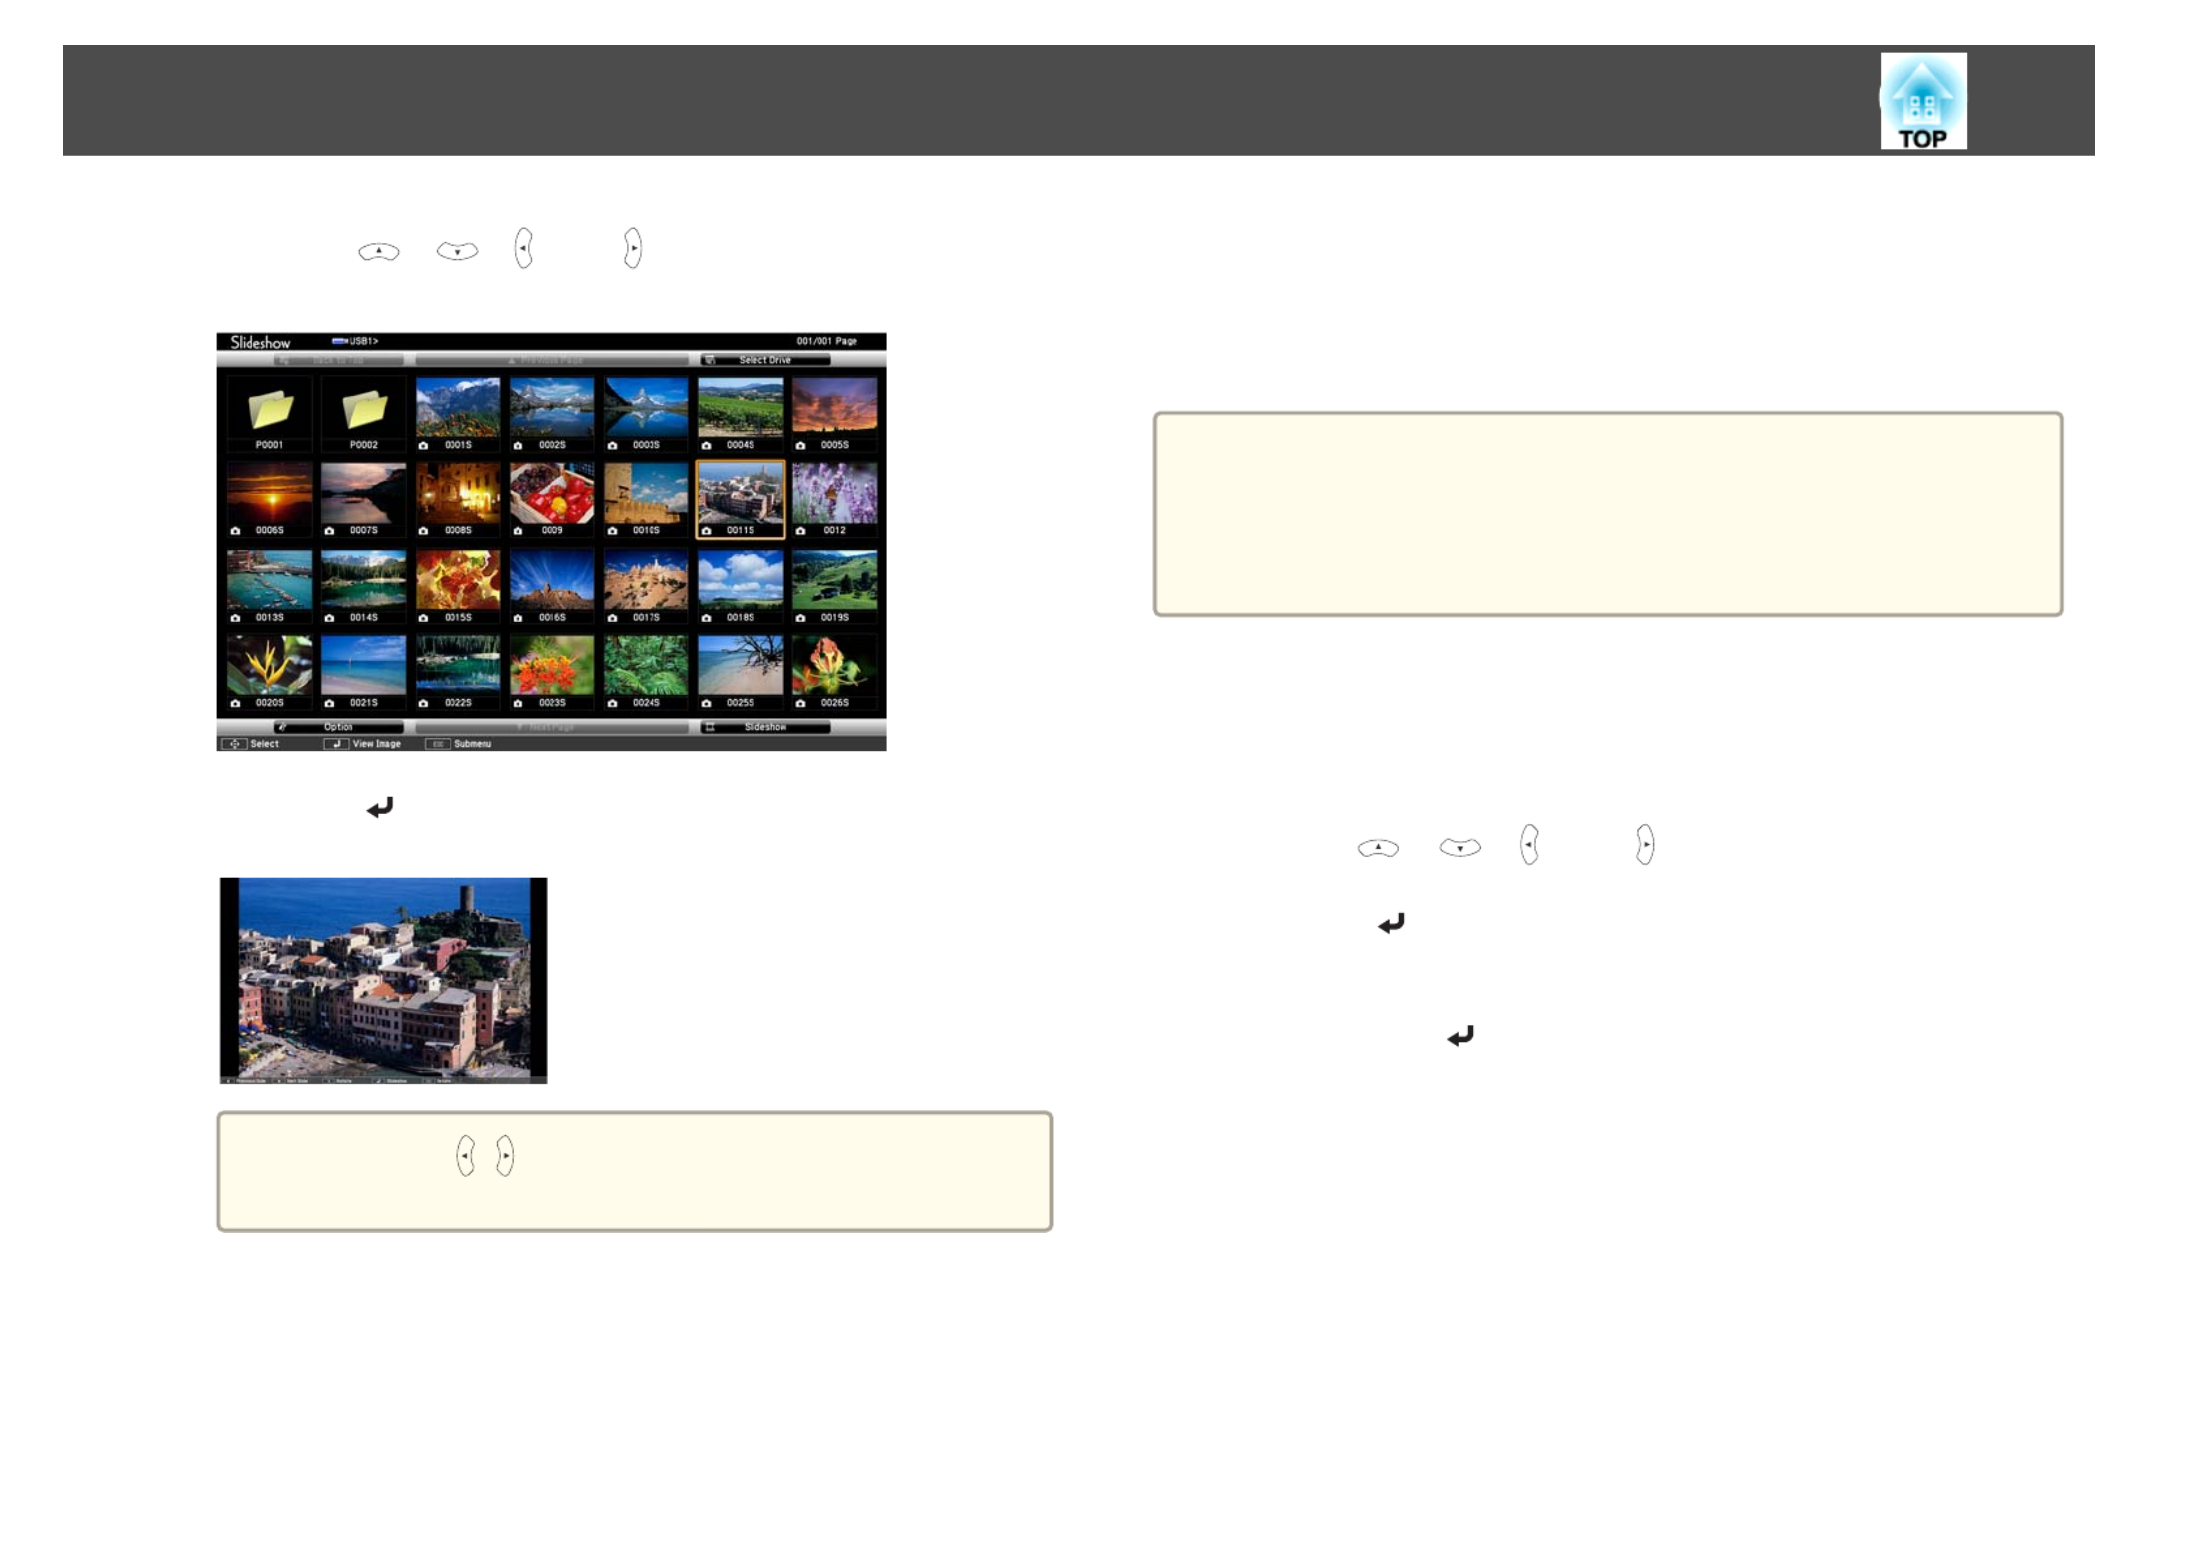
b
Press the [ ], [ ], [ ], and [ ] buttons to select the image file
you want to project.
c
Press the [ ] button.
The image is displayed.
a
Press the [ ][ ] buttons to move to the next or previous
image file.
d
Press the [Esc] button to return to the file list screen.
Projecting image files in a folder in sequence (Slideshow)
You can project the image files in a folder in sequence, one at a time. This
function is called Slideshow. Use the following procedure to run
Slideshow.
a
To change files automatically when you run Slideshow, set Screen
Switching Time from Option in Slideshow to anything other than No.
The default setting is 3 seconds.
s "Image file display settings and Slideshow operation settings"
p.51
a
Start Slideshow.
The file list screen is displayed.
s "Starting Slideshow" p.47
b
Use the [ ], [ ], [ ], and [ ] buttons to position the cursor
over the folder for the Slideshow that you want to run, and then
press the [ ] button.
c
Select Slideshow at the bottom right of the file list screen, and
then press the [ ] button.
Slideshow starts, and the image files in the folder are automatically
projected in sequence, one at a time.
When the last file is projected, the file list is displayed again
automatically. If you set in the OptionContinuous Play to On
window, projection starts again from the beginning when it reaches
the end.
s "Image file display settings and Slideshow operation settings"
p.51
You can proceed to the next screen, return to the previous screen, or
stop playback while projecting a Slideshow.
Projection Functions
50
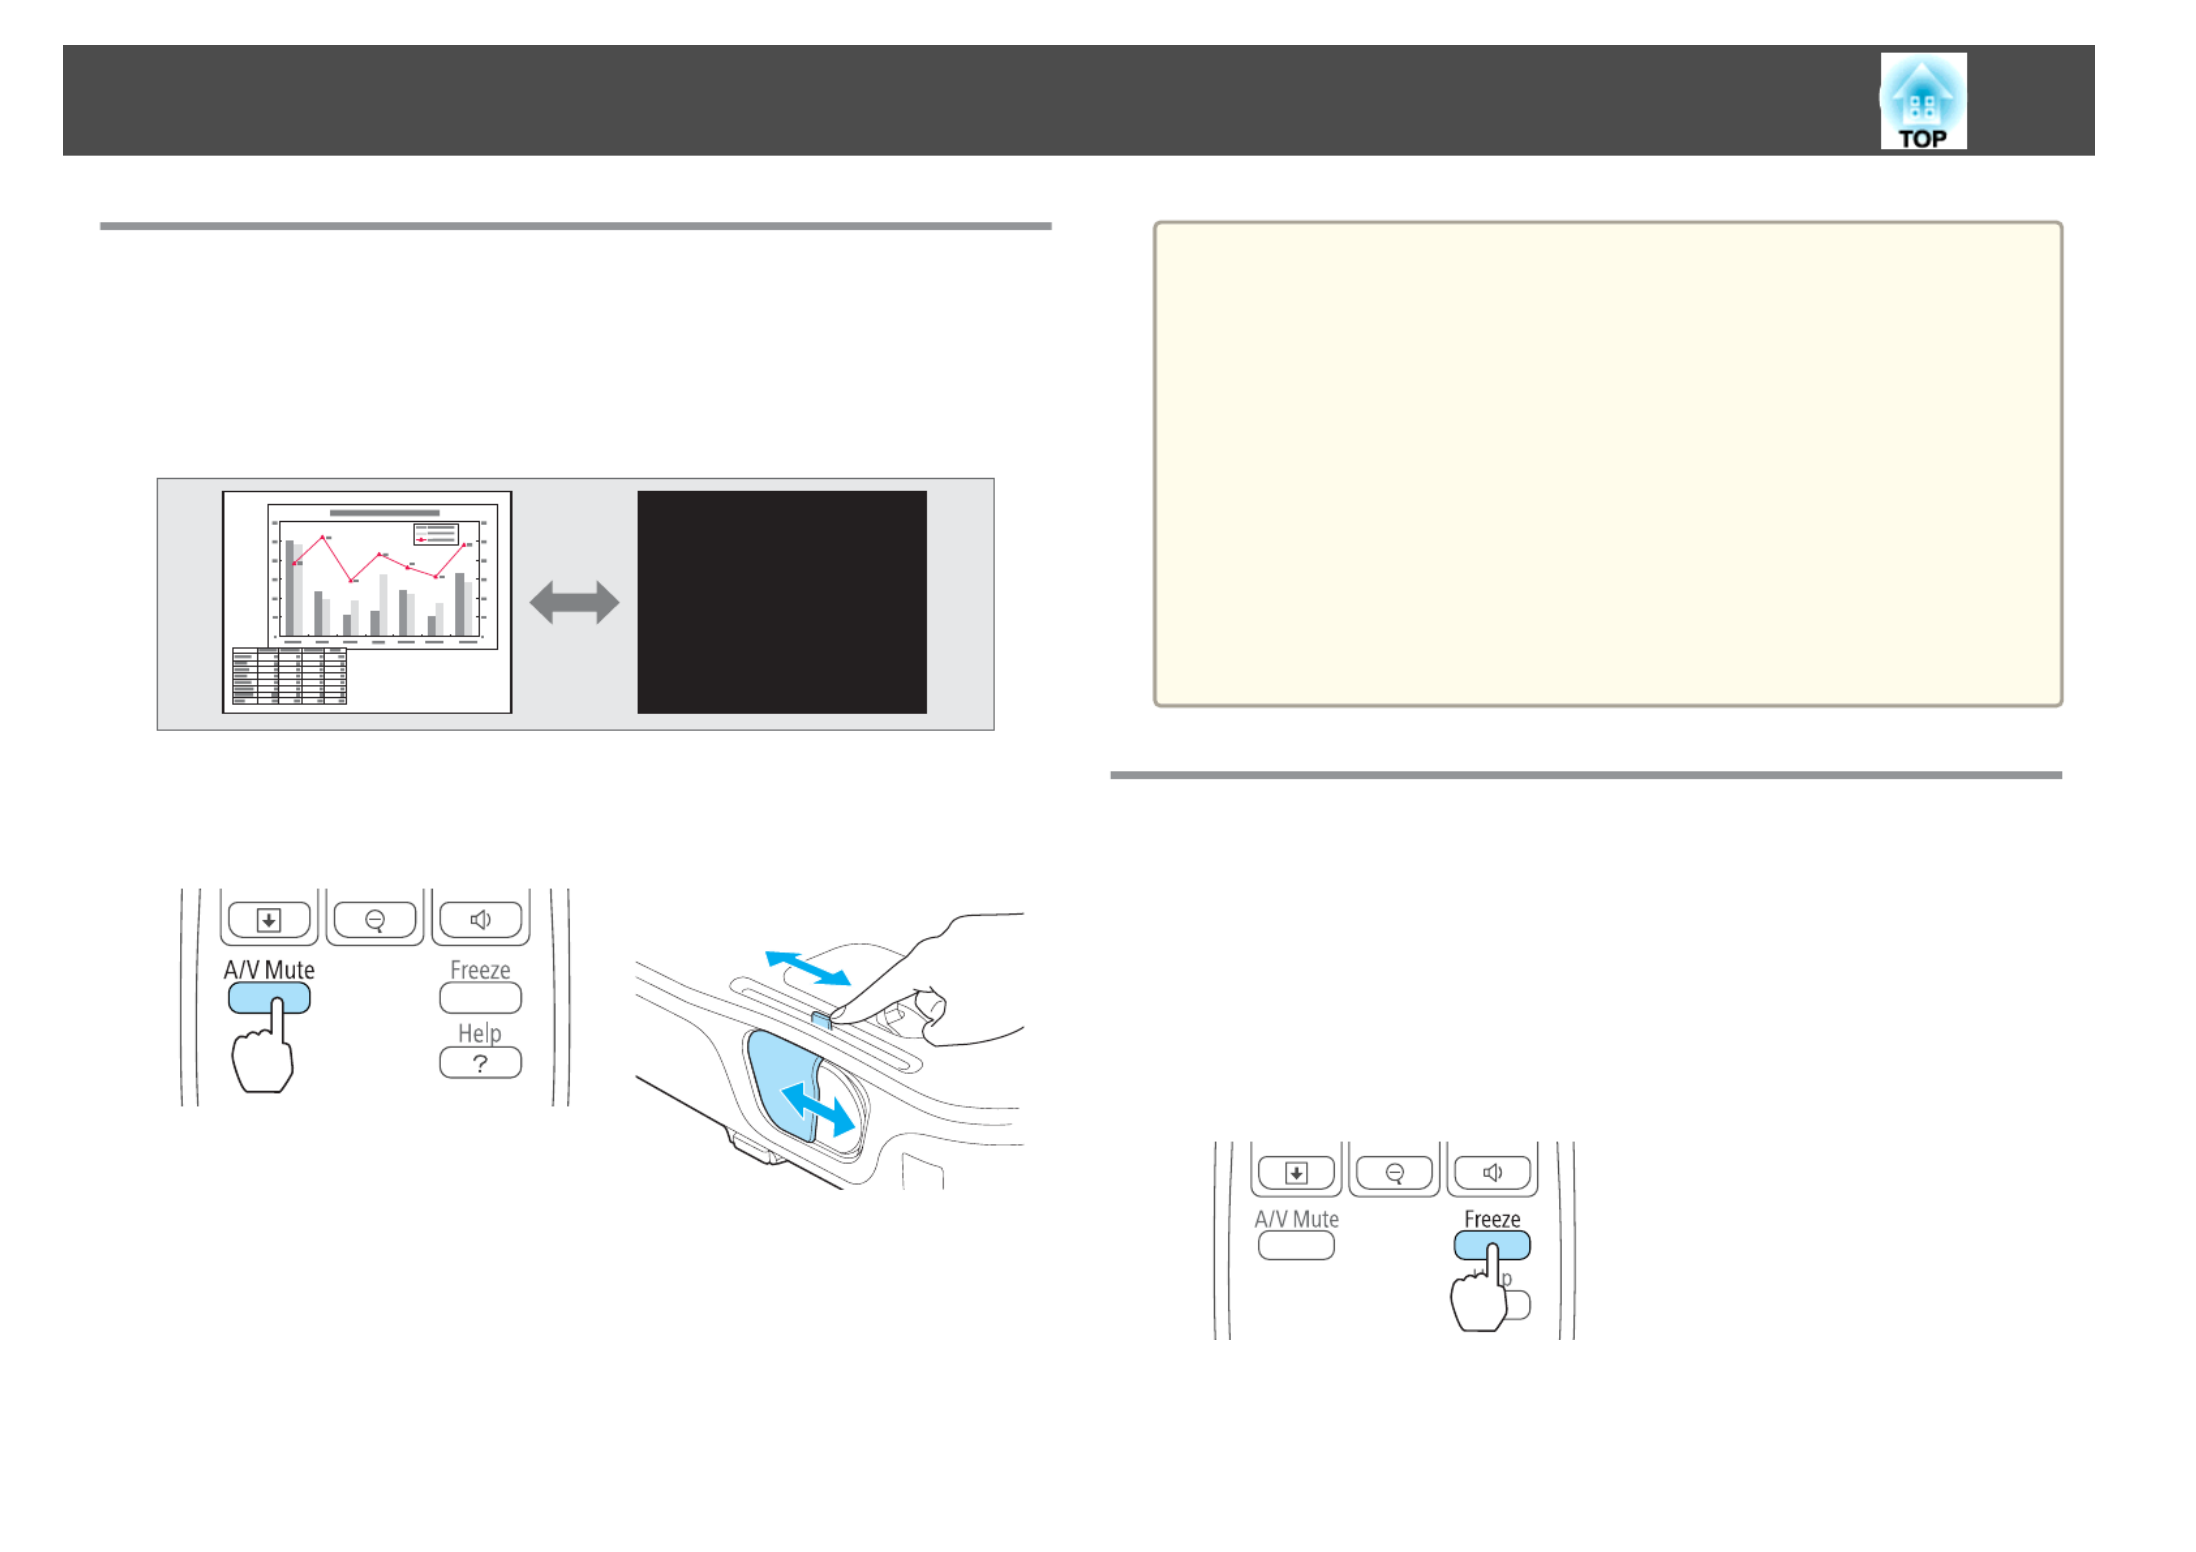
Hiding the Image and Sound Temporarily (A/V
Mute)
You can use this when you want to focus the audience's attention on what
you are saying, or if you do not want to show details such as when you are
changing between files during presentations from a computer.
Each time you press the [A/V Mute] button, or open/close the lens cover
A/V Mute turns on or off.
Re
Re
Re
ReRem
m
m
mmo
o
o
oote
te
te
tete c
c
c
c co
o
o
oont
nt
nt
ntntro
ro
ro
rorol
l
l
ll Pro
Pro
Pro
ProProje
je
je
jejec
c
c
ccto
to
to
totor
r
r
rr
a
•When projecting moving images, the images and sound continue to
be played back while A/V Mute is on. It is not possible to resume
projection from the point where A/V Mute was activated.
•You can select the screen displayed when the [A/V Mute] button is
pressed from the Configuration menu.
s Extended - Display - A/V Mute p.71
•When the A/V mute slide is closed for approximately 30 minutes,
Lens Cover Timer activates and the power is automatically turned
off. If you do not want Lens Cover Timer to activate, set Lens Cover
Timer to Off.
s Extended - Operation - Lens Cover Timer p.71
•The lamp is still lit during A/V Mute, so the lamp hours continue to
accumulate.
Freezing the Image (Freeze)
When Freeze is activated on moving images, the frozen image continues to
project on the screen, so you can project a moving image one frame at a
time like a still photo. Also, you can perform operations such as changing
between files during presentations from a computer without projecting any
images if the Freeze function is activated beforehand.
Each time you press the [Freeze] button, Freeze turns on or off.
Rem
Rem
Rem
RemRemote
ote
ote
oteote c
c
c
c con
on
on
onontro
tro
tro
trotrol
l
l
ll
Projection Functions
52

a
•Audio does not stop.
•When projecting moving images, the images continue to be played
back while the screen is frozen. It is not possible to resume
projection from the point where the screen was frozen.
•If the [Freeze] button is pressed while the Configuration menu or
the Help screen is displayed, the menu or the Help screen that is
displayed is closed.
•Freeze still works while E-Zoom is being used.
Pointer Function (Pointer)
This allows you to move a Pointer icon on the projected image, and helps
you draw attention to the area you are talking about.
a
Display the Pointer.
Each time you press the [Pointer] button, the pointer appears or
disappears.
Re
Re
Re
ReRem
m
m
mmo
o
o
oote
te
te
tete c
c
c
c con
on
on
onontro
tro
tro
trotrol
l
l
ll
b
Move the Pointer icon ( ).
Re
Re
Re
ReRem
m
m
mmot
ot
ot
otote
e
e
ee c
c
c
c con
on
on
onontro
tro
tro
trotrol
l
l
ll
When any pair of adjacent [ ], [ ], [ ], or [ ] buttons are
pressed at the same time, the pointer can be moved diagonally.
a
You can select the shape of the pointer icon from the
Configuration menu.
s Settings - Pointer Shape p.70
Projection Functions
53

Using the Remote Control to Operate the Mouse
Pointer (Wireless Mouse)
You can control the computer's mouse pointer from the projector's remote
control. This function is called Wireless Mouse.
The following operating systems are compatible with Wireless Mouse.
Wi
Wi
Wi
WiWindows
ndows
ndows
ndowsndows Ma
Ma
Ma
MaMac
c
c
cc OS
OS
OS
OS OS
OS
OS
OS
OSOS Windows 98
Windows 98SE
Windows Me
Windows 2000
Windows XP
Windows Vista
Windows 7
Mac OS X 10.3.x
Mac OS X 10.4.x
Mac OS X 10.5.x
Mac OS X 10.6.x
*It may not be possible to use the Wireless Mouse function under some
versions of the operating systems.
Use the following procedure to enable the Wireless Mouse function.
a
Connect the projector to the computer with the USB cable.
s "Connecting a Computer" p.23
b
Change the source to one of the following.
•USB Display
•Computer
•HDMI
s "Switching to the Target Image by Remote Control" p.32
Once set, the mouse pointer can be controlled as follows.
Moving the mouse pointer
[ ][ ][ ][ ] buttons:
Moves the mouse pointer.
Mouse clicks
[Esc] button: Right click.
[ ] button: Left click. Press quickly
twice to double-click.
Drag and drop
While holding down the [ ] button,
press the [ ], [ ], [ ], and [ ]
buttons.
Release the [ ] button to drop at the
desired location.
Page Up/Down
[[] button: Moves to the previous page.
[]] button: Moves to the next page.
Projection Functions
55

The projector has the following enhanced security functions.
•Password Protect
You can limit who can use the projector.
•Control Panel Lock
You can prevent people changing the settings on the projector without
permission.
s "Restricting Operation (Control Panel Lock)" p.60
•Anti-Theft Lock
The projector is equipped with the following anti-theft security device.
s "Anti-Theft Lock" p.61
Managing Users (Password Protect)
When Password Protect is activated, people who do not know the password
cannot use the projector to project images even if the projector power is on.
Furthermore, the user's logo that is displayed when you turn on the
projector cannot be changed. This acts as an anti-theft function as the
projector cannot be used even if it is stolen. At the time of purchase,
Password Protect is not activated.
Kinds of Password Protect
The following two kinds of Password Protect settings can be made
according to how the projector is being used.
•Power On Protect
When Power On Protect is On, you need to enter a preset password after
the projector is plugged in and turned on (this also applies to Direct
Power On). If the correct password is not entered, projection does not
start.
•User's Logo Protect
Even if someone tries to change the User's Logo set by the owner of the
projector, it cannot be changed. When User's Logo Protect is set to On,
the following setting changes for the User's Logo are prohibited.
•Capturing a User's Logo
•Setting Display Background, Startup Screen, or A/V Mute from
Display
s Extended - Display p.71
Setting Password Protect
Use the following procedure to set Password Protect.
a
During projection, hold down the [Freeze] button for about five
seconds.
The Password Protect setting menu is displayed.
Re
Re
Re
ReRem
m
m
mmo
o
o
oote
te
te
tete c
c
c
c co
o
o
oont
nt
nt
ntntro
ro
ro
rorol
l
l
ll
a
•If Password Protect is already activated, you must enter the
password.
If the password is entered correctly, the Password Protect
setting menu is displayed.
s "Entering the Password" p.59
•When the password is set, stick the password protect sticker
in a visible position on the projector as a further theft
deterrent.
s Password Protect Sticker
Security Functions
58

Attention
•If an incorrect password is entered three times in succession, the message
"The projector's operation will be locked." is displayed for approximately five
minutes, and then the projector switches to standby mode. If this happens,
disconnect the power plug from the electrical outlet and then reinsert it and
turn the projector's power back on. The projector displays the password entry
screen again so that you can enter the correct password.
•If you have forgotten the password, make a note of the "Request Code:
xxxxx" number that appears on the screen and contact the nearest address
provided in the Epson Projector Contact List.
s Epson Projector Contact List
•If you continue to repeat the above operation and enter the wrong password
thirty times in succession, the following message is displayed and the
projector does not accept any more password entries. "The projector's
operation will be locked. Contact Epson as described in your documentation."
s Epson Projector Contact List
Restricting Operation (Control Panel Lock)
Perform one of the following to lock the operation buttons on the control
panel.
•Full Lock
All of the buttons on the control panel are locked. You cannot perform
any operations from the control panel, including turning the power on or
off.
•Partial Lock
All of the buttons on the control panel, except for the [t] button, are
locked.
This is useful at events or shows when you want to deactivate all buttons
during projection or at schools when you want to limit button operation.
The projector can still be operated using the remote control.
a
Press the [Menu] button while projecting.
s "Using the Configuration Menu" p.65
Using the remo
Using the remo
Using the remo
Using the remoUsing the remote c
te c
te c
te cte control
ontrol
ontrol
ontrolontrol Using the c
Using the c
Using the c
Using the cUsing the control panel
ontrol panel
ontrol panel
ontrol panelontrol panel
b
Select Control Panel Lock from Settings.
c
Select either Full Lock or Partial Lock according to your purpose.
Security Functions
60

d
Select Yes when the confirmation message is displayed.
The control panel buttons are locked according to the setting you
chose.
a
You can release the control panel lock by one of the following
two methods.
•Select Off from Control Panel Lock.
s Settings - Control Panel Lock p.70
•Press and hold down the [ ] button on the control panel
for about seven seconds, a message is displayed and the lock
is released.
Anti-Theft Lock
The projector is equipped with the following types of anti-theft security
devices.
•Security slot
The security slot is compatible with the Microsaver Security System
manufactured by Kensington.
See the following for more details on the Microsaver Security System.
s http://www.kensington.com/
•Security cable installation point
A commercially available theft-prevention wire lock can be passed
through the installation point to secure the projector to a desk or pillar.
Installing the wire lock
Pass an anti-theft wire lock through the installation point.
See the documentation supplied with the wire lock for locking instructions.
Security Functions
61

To
To
To
ToTop
p
p
pp Menu
Menu
Menu
Menu Menu Na
Na
Na
Na Name
me
me
meme Su
Su
Su
SuSubmenu
bmenu
bmenu
bmenubmenu Na
Na
Na
Na Name
me
me
meme It
It
It
ItItems
ems
ems
emsems or
or
or
or or S
S
S
S Setti
etti
etti
ettietting
ng
ng
ngng V
V
V
V Va
a
a
aalues
lues
lues
lueslues
Info menu
s p.72
Lamp Hours -
Source -
Input Signal -
Resolution -
Video Signal -
Refresh Rate -
Sync Info -
Status -
Serial Number -
Reset menu
s p.73
Reset All -
Reset Lamp Hours -
*1 The number of supported languages differs depending on the region where the
projector is used.
Image Menu
Settable items vary depending on the image signal and source currently
being projected. Setting details are saved for each image signal.
s "Automatically Detect Input Signals and Change the Projected Image
(Source Search)" p.31
Subm
Subm
Subm
SubmSubmen
en
en
enenu
u
u
uu Func
Func
Func
FuncFunction
tion
tion
tiontion
Col
Col
Col
ColColor
or
or
oror Mo
Mo
Mo
Mo Mode
de
de
dede You can select the quality of the image to suit your surroundings.
s "Selecting the Projection Quality (Selecting Color Mode)"
p.41
B
B
B
BBrightness
rightness
rightness
rightnessrightness You can adjust the image brightness.
Cont
Cont
Cont
ContContr
r
r
rra
a
a
aast
st
st
stst You can adjust the difference between light and dark in the
images.
C
C
C
CColo
olo
olo
oloolor Satu
r Satu
r Satu
r Satur Saturati
rati
rati
ratiration
on
on
onon You can adjust the color saturation for the images.
Tin
Tin
Tin
TinTint
t
t
tt (Adjustment is possible when a component video signal is being
input. If a composite video or S-video signal is input, adjustment
is only possible when NTSC signals are being input.)
You can adjust the image tint.
Sharp
Sharp
Sharp
SharpSharpness
ness
ness
nessness You can adjust the image sharpness.
Colo
Colo
Colo
ColoColor
r
r
rr Te
Te
Te
Te Temp.
mp.
mp.
mp.mp. (This item cannot be selected if Color Mode is set to sRGB
g
.)
You can adjust the overall tint of the image. You can adjust tints
in three stages from High, Medium, and Low. The image is tinted
blue when High is selected and tinted red when Low is selected.
List of Functions
67
Submenu
Submenu
Submenu
SubmenuSubmenu Function
Function
Function
FunctionFunction
Pr
Pr
Pr
PrProgressive
ogressive
ogressive
ogressiveogressive (This setting can only be adjusted when a component video or
RGB video with an interlaced signal (480i/576i/1080i) is input.
This cannot be set when a digital RGB signal is input.)
Interlace
g
(i) signal is converted to Progressive
g
(p). (IP
conversion)
•For EB-X14/EB-W12/EB-X12
Off: Ideal for images with a large amount of movement.
Video: Ideal for general video images.
Film/Auto: This is ideal for movie films, computer
graphics, and animation.
•For EB-S12/EB-X11/EB-S11
On: Ideal for still images.
Off: Ideal for images with a large amount of movement.
Noise R
Noise R
Noise R
Noise RNoise Reduction
eduction
eduction
eductioneduction
(EB
(EB
(EB
(EB(EB-X1
-X1
-X1
-X1-X14/EB-
4/EB-
4/EB-
4/EB-4/EB-
W12/
W12/
W12/
W12/W12/EB
EB
EB
EBEB-X
-X
-X
-X-X12 on
12 on
12 on
12 on12 on-
-
-
--
ly)
ly)
ly)
ly)ly)
(This cannot be set when a digital RGB signal is input, or when an
interlace signal is being displayed when Progressive is set to
Off.)
Smoothes out rough images. There are two modes. Select your
favorite setting. It is recommended that this is set to Off when
viewing image sources in which noise is very low, such as for
DVDs.
HDMI V
HDMI V
HDMI V
HDMI VHDMI Video
ideo
ideo
ideoideo
Rang
Rang
Rang
RangRange
e
e
ee
(EB
(EB
(EB
(EB(EB-X1
-X1
-X1
-X1-X14/EB-
4/EB-
4/EB-
4/EB-4/EB-
W12/
W12/
W12/
W12/W12/EB
EB
EB
EBEB-X
-X
-X
-X-X12 on
12 on
12 on
12 on12 on-
-
-
--
ly)
ly)
ly)
ly)ly)
When the projector's HDMI port is connected to a DVD player,
the projector's video range is set according to the DVD player's
video range setting.
Input S
Input S
Input S
Input SInput Signal
ignal
ignal
ignalignal You can select input signal from Computer port.
If set to Auto, the input signal is set automatically according to
the connected equipment.
If colors do not appear correctly when set to Auto, select the
appropriate signal according to the connected equipment.
Vi
Vi
Vi
ViVid
d
d
dde
e
e
eeo
o
o
oo Si
Si
Si
Si Sig
g
g
ggn
n
n
nna
a
a
aal
l
l
ll You can select the input signal from the Video port. If this is set to
Auto, video signals are recognized automatically. If interference
appears in the image or a problem occurs such as no image is
being projected when set to Auto, select the appropriate signal
depending on the connected equipment.
Subm
Subm
Subm
SubmSubmen
en
en
enenu
u
u
uu Fu
Fu
Fu
FuFunc
nc
nc
ncnction
tion
tion
tiontion
Asp
Asp
Asp
AspAspe
e
e
eect
ct
ct
ctct You can set the aspect ratio
g
for projected images.
s "Changing the Aspect Ratio of the Projected Image " p.43
Over
Over
Over
OverOverscan
scan
scan
scanscan Changes the output image ratio (the range of the projected
image). You can set the cropping range to Off, 4% 8%, or . When
the source is HDMI, Auto is available (EB-X14/EB-W12/EB-
X12 only). When Auto is selected, it automatically changes to Off
or 8% according to the input signal.
Re
Re
Re
ReRese
se
se
seset
t
t
tt You can reset all adjustment values on the Signal menu to their
default settings, except for Input Signal.
See the following to return all menu items to their default
settings.
s "Reset Menu" p.73
List of Functions
69

Settings Menu
Submenu
Submenu
Submenu
SubmenuSubmenu Function
Function
Function
FunctionFunction
Ke
Ke
Ke
KeKeys
ys
ys
ysyst
t
t
tto
o
o
oon
n
n
nne
e
e
ee You can correct keystone distortion.
•When H/V-Keystone is selected:
Adjust V-Keystone and H-Keystone to correct horizontal
and vertical keystone distortion.
You can also set Auto V-Keystone and H-Keystone
Adjuster to On or Off. (EB-X14/EB-W12/EB-X12/EB-S12/
EB-X11 only)
•When Quick Corner is selected:
Select and correct the four corners of the projected image.
s "Quick Corner" p.38
Zoom
Zoom
Zoom
ZoomZoom
(EB-S12/
(EB-S12/
(EB-S12/
(EB-S12/(EB-S12/EB-S11
EB-S11
EB-S11
EB-S11EB-S11
only
only
only
onlyonly)
)
)
))
Adjusts the size of the projected image.
Co
Co
Co
CoContr
ntr
ntr
ntrntrol Pa
ol Pa
ol Pa
ol Paol Panel
nel
nel
nelnel
Loc
Loc
Loc
LocLock
k
k
kk
You can use this to restrict operation of the projector's control
panel.
s "Restricting Operation (Control Panel Lock)" p.60
Subm
Subm
Subm
SubmSubmenu
enu
enu
enuenu Func
Func
Func
FuncFunctio
tio
tio
tiotion
n
n
nn
Poi
Poi
Poi
PoiPointe
nte
nte
ntenter Shap
r Shap
r Shap
r Shapr Shape
e
e
ee You can select the shape of the pointer.
Pointer 1:
Pointer 2:
Pointer 3:
s "Pointer Function (Pointer)" p.53
Power Consump-
Power Consump-
Power Consump-
Power Consump-Power Consump-
tion
tion
tion
tiontion
You can set the lamp brightness to one of two settings.
Select ECO if the images being projected are too bright, such as
when projecting images in a dark room or onto a small screen.
When ECO is selected, the power consumption and the lamp's
operating life are changed as follows, and fan rotation noise
during projection is reduced.
Electrical consumption: about 17.5% decrease, lamp life: about
1.25 times longer
When the projector is used at a high altitude or in a location
subject to high temperatures, the ECO setting may be used
automatically. If this happens, Power Consumption is grayed
out and cannot be adjusted.
Vo
Vo
Vo
VoVol
l
l
llu
u
u
uum
m
m
mme
e
e
ee You can adjust the volume. Setting values are saved for each
source.
Re
Re
Re
ReRemo
mo
mo
momot
t
t
tte Re
e Re
e Re
e Ree Rec
c
c
cce
e
e
eeive
ive
ive
iveiver
r
r
rr You can limit the reception of the operation signal from the
remote control.
When set to Off, you cannot perform any operations from the
remote control. If you want to make operations from the remote
control, hold down the [Menu] button on the remote control for
at least 15 seconds to reset the setting to its default value.
User B
User B
User B
User BUser Button
utton
utton
uttonutton You can select and assign an item from the Configuration menu
with the remote control's [User] button. Pressing the [User]
button directly displays the assigned menu item selection/
adjustment screen, allowing you to make one-touch changes to
settings/adjustments. You can assign one of the following items
to the [User] button.
Brightness Control, Info, Progressive, Test Pattern,
Resolution
List of Functions
70
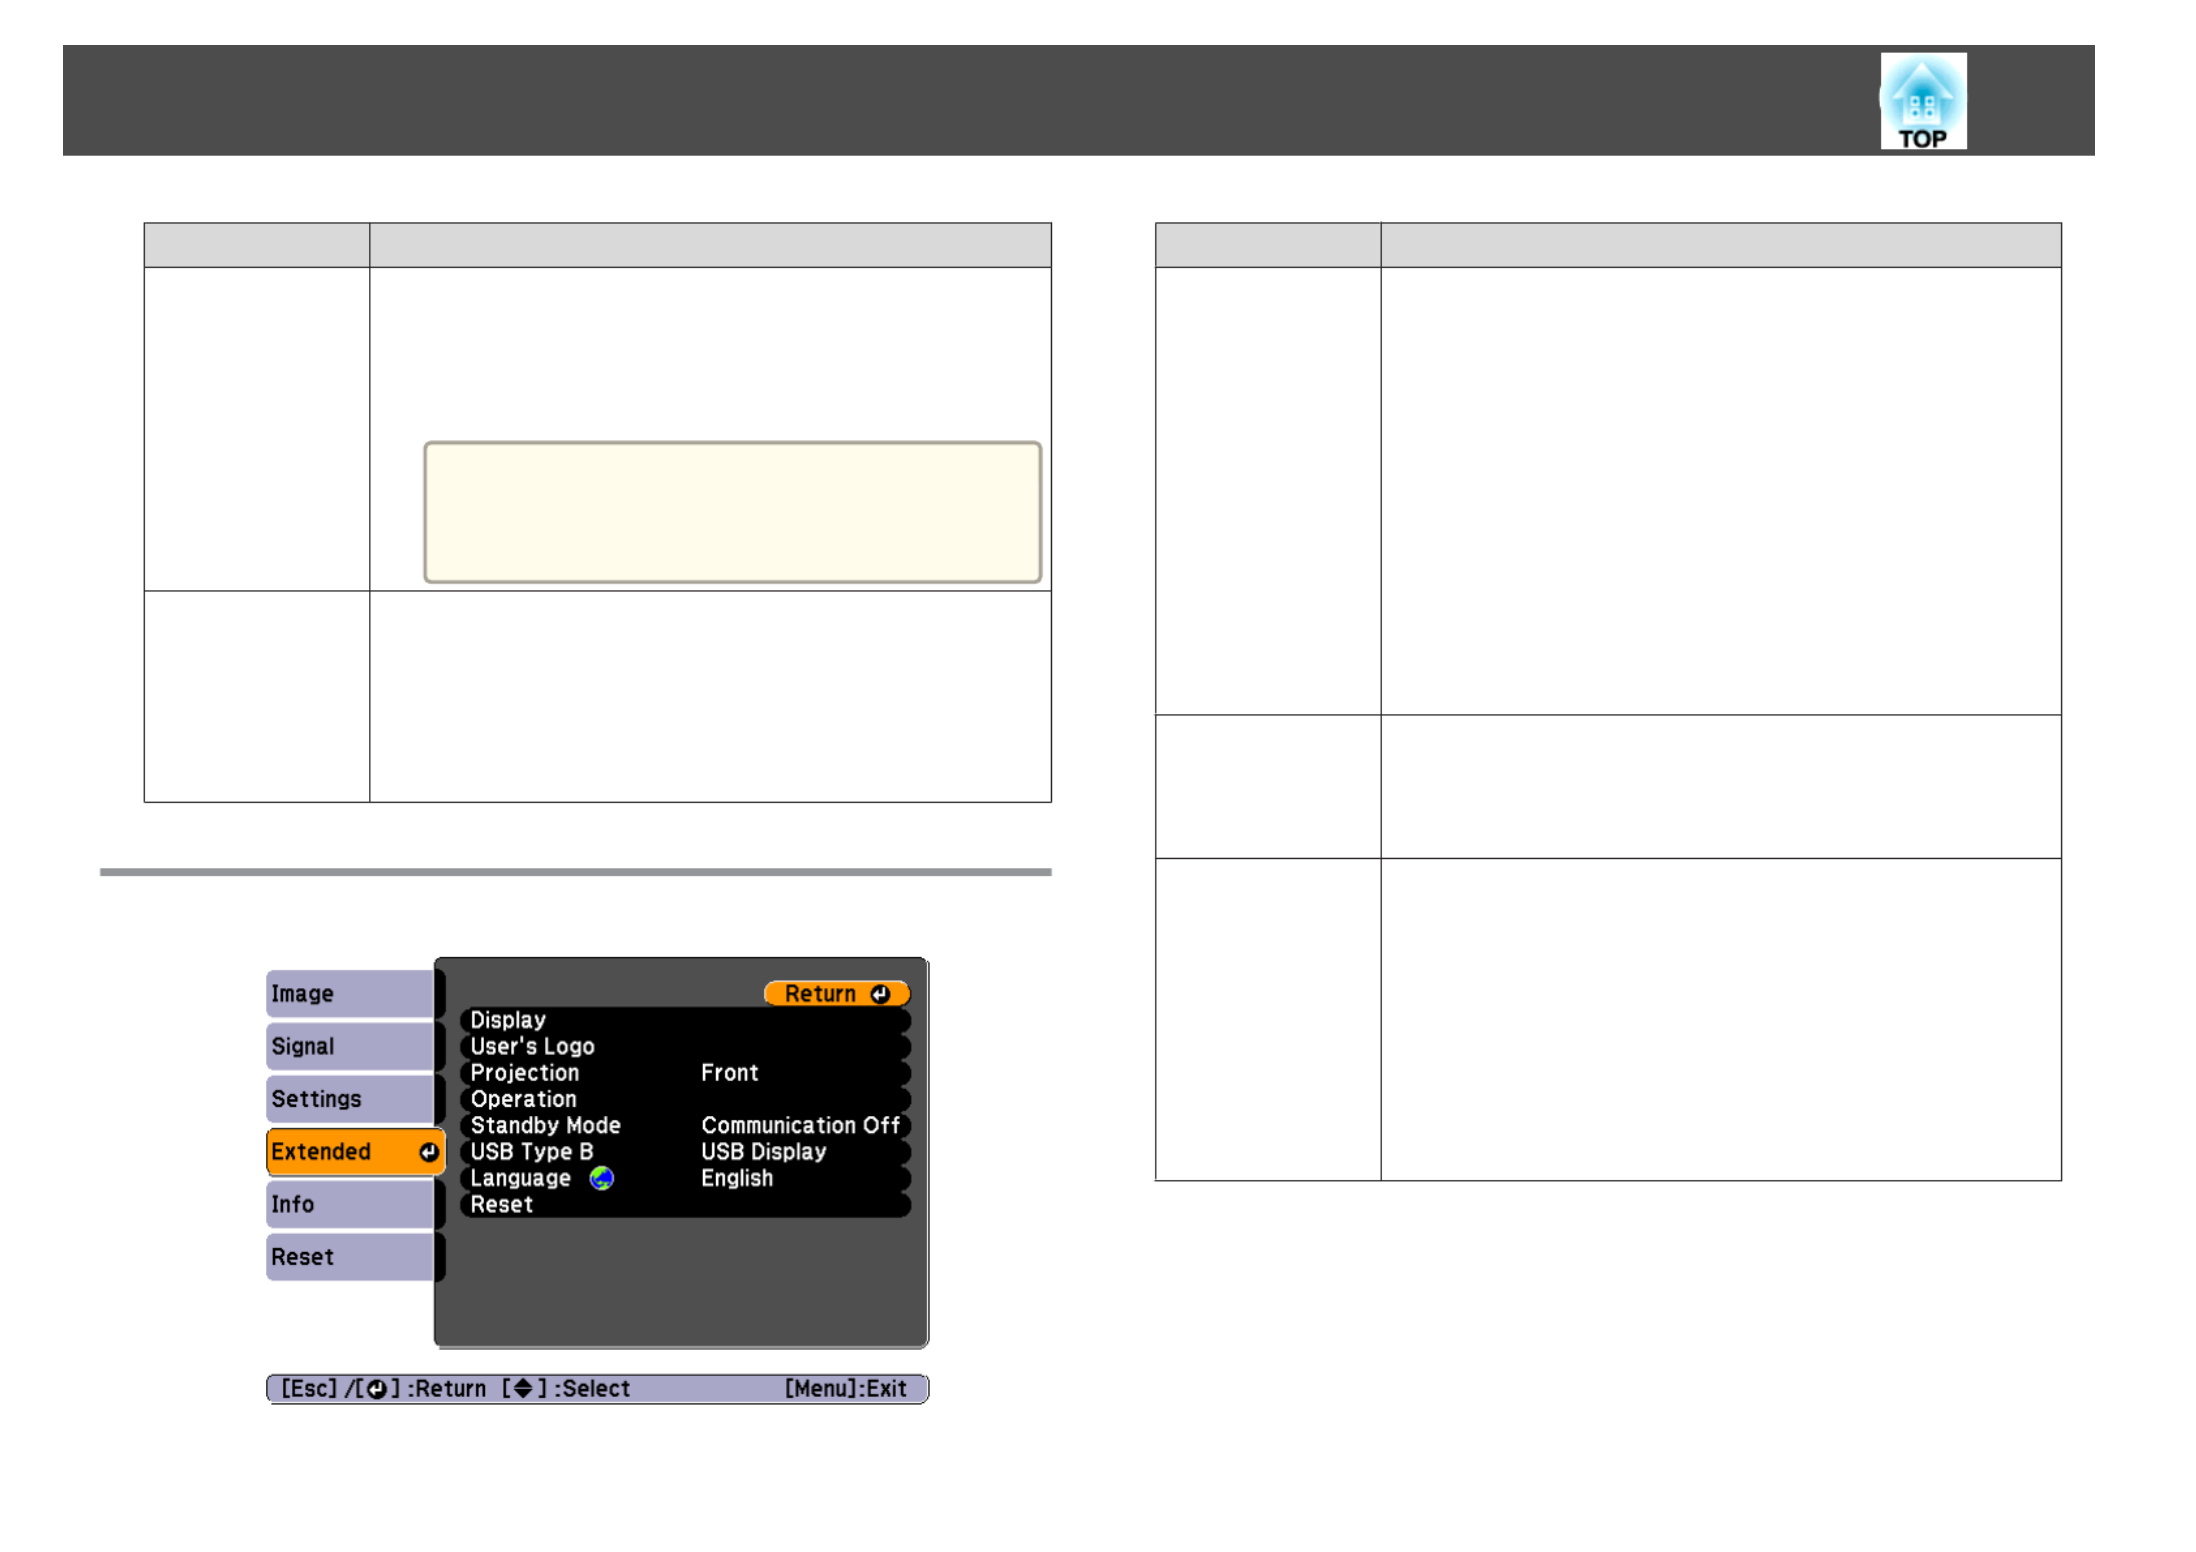
Submenu
Submenu
Submenu
SubmenuSubmenu Function
Function
Function
FunctionFunction
Test Pa
Test Pa
Test Pa
Test PaTest Pattern
ttern
ttern
tternttern When the projector is set up, a test pattern is displayed so that you
can adjust the projection status without connecting equipment.
While the test pattern is displayed, zoom, focus adjustments, and
keystone correction can be performed. To cancel the test pattern,
press the [Esc] button on the remote control or the control panel.
Attention
If a pattern is displayed for a long time, a residual
image may be visible in projected images.
Res
Res
Res
ResRese
e
e
eet
t
t
tt You can reset all adjustment values on the Settings menu to their
default settings, except for Zoom (EB-S12/EB-S11 only) and
User Button.
See the following to return all menu items to their default
settings.
s "Reset Menu" p.73
Extended Menu
Subm
Subm
Subm
SubmSubmenu
enu
enu
enuenu Func
Func
Func
FuncFunct
t
t
ttion
ion
ion
ionion
Display
Display
Display
DisplayDisplay You can make settings related to the projector's display.
Messages: When set to Off, the following items will not be
displayed.
Item names when the Source, Color Mode, or Aspect Ratio
is changed, messages when no signal is being input, and
warnings such as High Temp Warning.
Display Background*1: You can set the screen background
to Black, Blue, or Logo when no image signal is available.
Startup Screen*1: Set to On to display the User's Logo
when projection starts.
A/V Mute*1: You can set the screen displayed when the
remote control's [A/V Mute] button is pressed to Black,
Blue, or Logo.
User's
User's
User's
User'sUser's Logo
Logo
Logo
Logo Logo*1
*1
*1
*1*1 You can change the user's logo that is displayed as a
background during Display Background, A/V Mute, and so
on.
s "Saving a User's Logo" p.56
Proje
Proje
Proje
ProjeProject
ct
ct
ctction
ion
ion
ionion Select from one of the following projection methods
depending on how the projector is installed.
Front, Front/Ceiling, Rear, and Rear/Ceiling
You can change the setting as follows by pressing down
the [A/V Mute] button on the remote control for about five
seconds.
FrontWFront/Ceiling
RearWRear/Ceiling
s "Installation Methods" p.20
List of Functions
71

Submenu
Submenu
Submenu
SubmenuSubmenu Function
Function
Function
FunctionFunction
Oper
Oper
Oper
OperOperat
at
at
atation
ion
ion
ionion Direct Power On: Set to On to turn on the projector
simply by plugging it in.
When the power cable is plugged in, note that the projector
turns on automatically in cases such as a power outage
being restored.
Sleep Mode: When set to On, this automatically stops
projection when no image signal is being input and no
operations are carried out.
Sleep Mode Timer: When , youSleep Mode is set to On
can set the time before the projector automatically turns off
within a range of 1 to 30 minutes.
Lens Cover Timer: When set to On, this turns off the
power automatically 30 minutes after the A/V mute slide is
closed.
This is set to On by default.
High Altitude Mode: Set to On when using the projector
above an altitude of 1500 m.
Stand
Stand
Stand
StandStandby
by
by
byby Mode
Mode
Mode
Mode Mode If you set Communication On, you can perform the
following operations even if the projector is in standby
mode.
•Monitoring and controlling the projector from the
computer
s "Monitoring and Controlling" p.62
•Outputting analog RGB signals from the Computer port
to an external monitor (EB-S12/EB-X11/EB-S11 only)
USB
USB
USB
USBUSB Ty
Ty
Ty
Ty Type
pe
pe
pepe B
B
B
B B
(EB
(EB
(EB
(EB(EB-X1
-X1
-X1
-X1-X14/EB-
4/EB-
4/EB-
4/EB-4/EB-
W12/
W12/
W12/
W12/W12/EB-X12/
EB-X12/
EB-X12/
EB-X12/EB-X12/EB-
EB-
EB-
EB-EB-
S12
S12
S12
S12S12 only)
only)
only)
only) only)
USB Display: Enables USB Display.
s "Projecting with USB Display" p.32
Link 21L: Enables ESC/VP21 commands.
s "ESC/VP21 Commands" p.62
Languag
Languag
Languag
LanguagLanguage
e
e
ee You can set the language for messages and menus.
Subm
Subm
Subm
SubmSubmenu
enu
enu
enuenu Func
Func
Func
FuncFunction
tion
tion
tiontion
Re
Re
Re
ReRese
se
se
seset
t
t
tt You can reset the adjustment values for Display*1 and
Operation*2 from the Extended menu to their default
settings.
See the following to return all menu items to their default
settings.
s "Reset Menu" p.73
*1 When User's Logo Protect is set to On in Password Protect, settings related
to user's logo cannot be changed. You can make changes after setting User's
Logo Protect to Off.
s "Managing Users (Password Protect)" p.58
*2 Except for High Altitude Mode.
Info Menu (Display Only)
Lets you check the status of the image signals being projected and the status
of the projector. Items that can be displayed vary depending on the source
currently being projected. Depending on the model used, some input
sources are not supported.
List of Functions
72
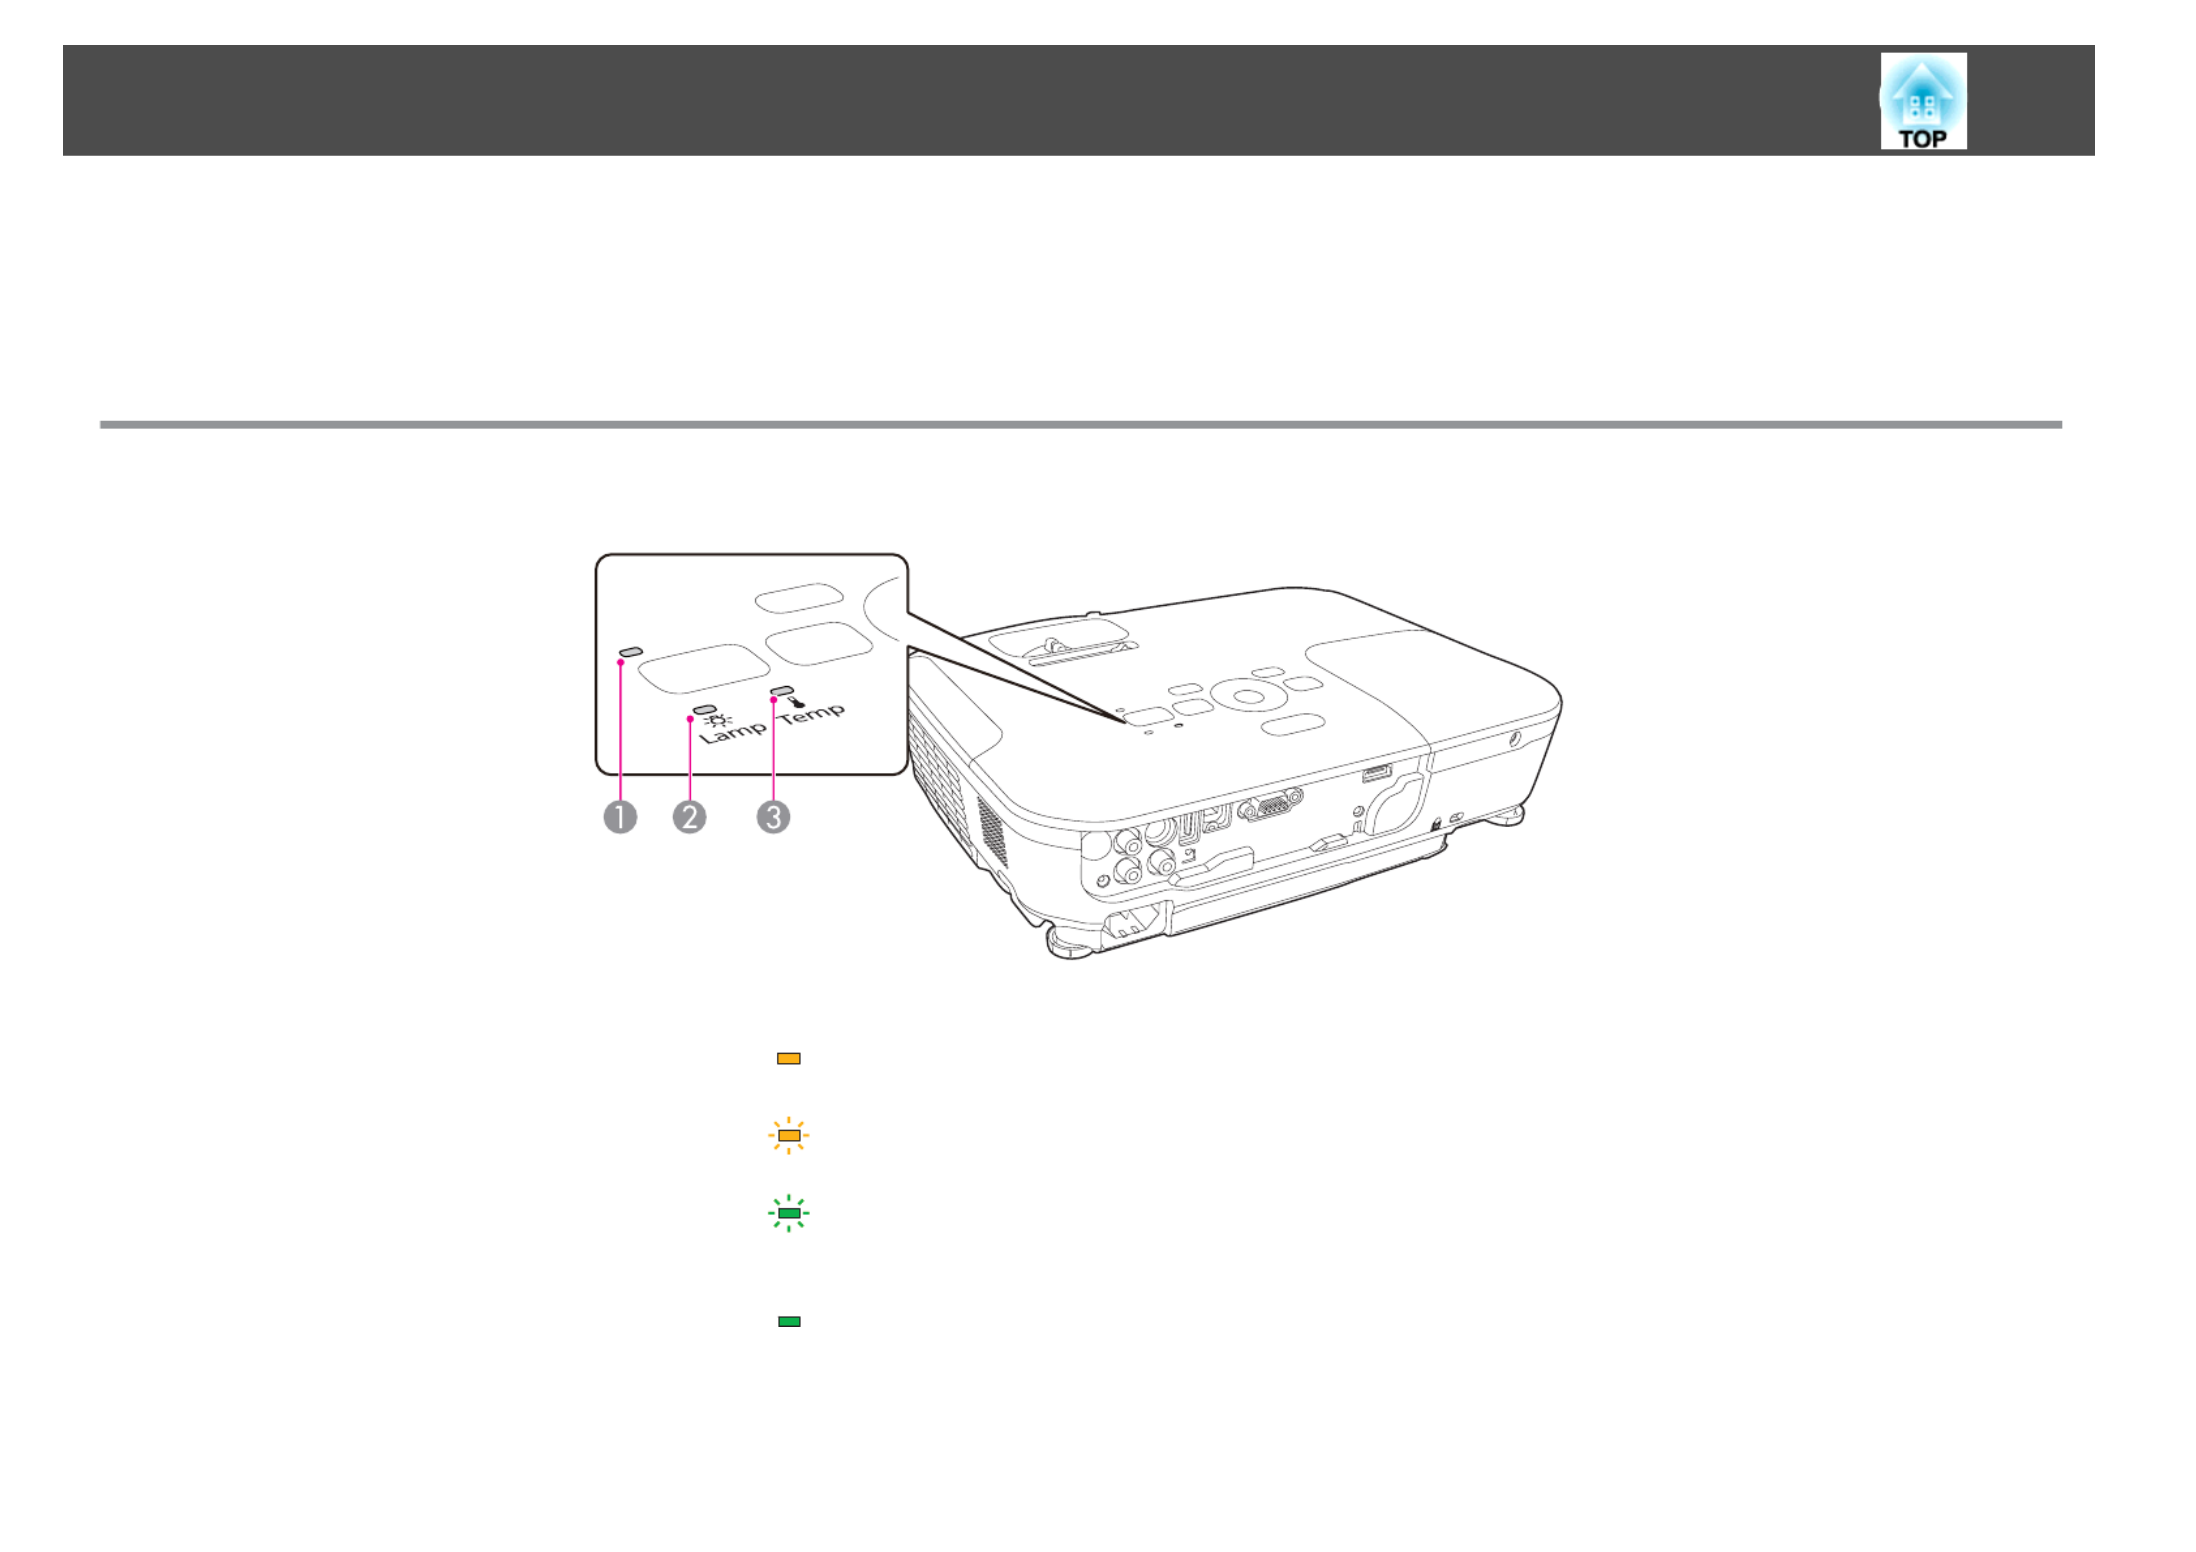
If you are having a problem with the projector, first check the projector's indicators and refer to "Reading the Indicators" below.
See the following if the indicators do not show clearly what the problem might be.
s "When the Indicators Provide No Help" p.79
Reading the Indicators
The projector is provided with the following three indicators that indicate the operating status of the projector.
APower indicator Indicates the operating status.
Standby condition
When the [ ] button is pressed in this condition, projection starts.t
Preparing for monitoring via USB communication/serial connection or cool down in progress
All buttons are disabled while the indicator is flashing.
Warming up
Warm-up time is about 30 seconds. After warm-up is complete, the indicator stops flashing.
The [t] button is disabled during warm-up.
Projecting
BLamp indicator Indicates the projection lamp status.
CTemp indicator Indicates the internal temperature status.
Problem Solving
76
Specyfikacje produktu
| Marka: | Epson |
| Kategoria: | Projektor Beamer |
| Model: | EB-S12 |
Potrzebujesz pomocy?
Jeśli potrzebujesz pomocy z Epson EB-S12, zadaj pytanie poniżej, a inni użytkownicy Ci odpowiedzą
Instrukcje Projektor Beamer Epson

2 Września 2024
31 Sierpnia 2024
4 Lipca 2024
4 Lipca 2024
4 Lipca 2024
4 Lipca 2024
4 Lipca 2024
4 Lipca 2024
4 Lipca 2024
4 Lipca 2024
Instrukcje Projektor Beamer
- Projektor Beamer Sony
- Projektor Beamer Yamaha
- Projektor Beamer Philips
- Projektor Beamer Acer
- Projektor Beamer Nobo
- Projektor Beamer Panasonic
- Projektor Beamer Canon
- Projektor Beamer Viewsonic
- Projektor Beamer Medion
- Projektor Beamer Toshiba
- Projektor Beamer Casio
- Projektor Beamer HP
- Projektor Beamer Kodak
- Projektor Beamer JVC
- Projektor Beamer Dell
- Projektor Beamer Auna
- Projektor Beamer Mitsubishi
- Projektor Beamer XGIMI
- Projektor Beamer NEC
- Projektor Beamer Sanyo
- Projektor Beamer Optoma
- Projektor Beamer Nebula
- Projektor Beamer BenQ
- Projektor Beamer Overmax
- Projektor Beamer Fenton
- Projektor Beamer Aiptek
- Projektor Beamer Apeman
- Projektor Beamer Sagem
- Projektor Beamer Eiki
- Projektor Beamer InFocus
- Projektor Beamer Bauer
- Projektor Beamer Aaxa
- Projektor Beamer Vivitek
- Projektor Beamer Brookstone
- Projektor Beamer Stereoboomm
- Projektor Beamer Ibm
- Projektor Beamer Legamaster
- Projektor Beamer La Vague
- Projektor Beamer FengMi Wemax
- Projektor Beamer Nor-tec
- Projektor Beamer Skytronic
- Projektor Beamer Eumig
- Projektor Beamer DreamVision
Najnowsze instrukcje dla Projektor Beamer

18 Stycznia 2025

15 Stycznia 2025

13 Stycznia 2025
13 Stycznia 2025
13 Stycznia 2025
13 Stycznia 2025

12 Stycznia 2025

17 Grudnia 2024
5 Października 2024
5 Października 2024