Instrukcja obsługi Dell OptiPlex 3050 Micro
Przeczytaj poniżej 📖 instrukcję obsługi w języku polskim dla Dell OptiPlex 3050 Micro (2 stron) w kategorii Pulpit. Ta instrukcja była pomocna dla 5 osób i została oceniona przez 2 użytkowników na średnio 4.5 gwiazdek
Strona 1/2
Quick Start Guide
Snelstartgids
Guide d'information rapide
Schnellstart-Handbuch
Guida introduttiva rapida
OptiPlex 3050 Micro
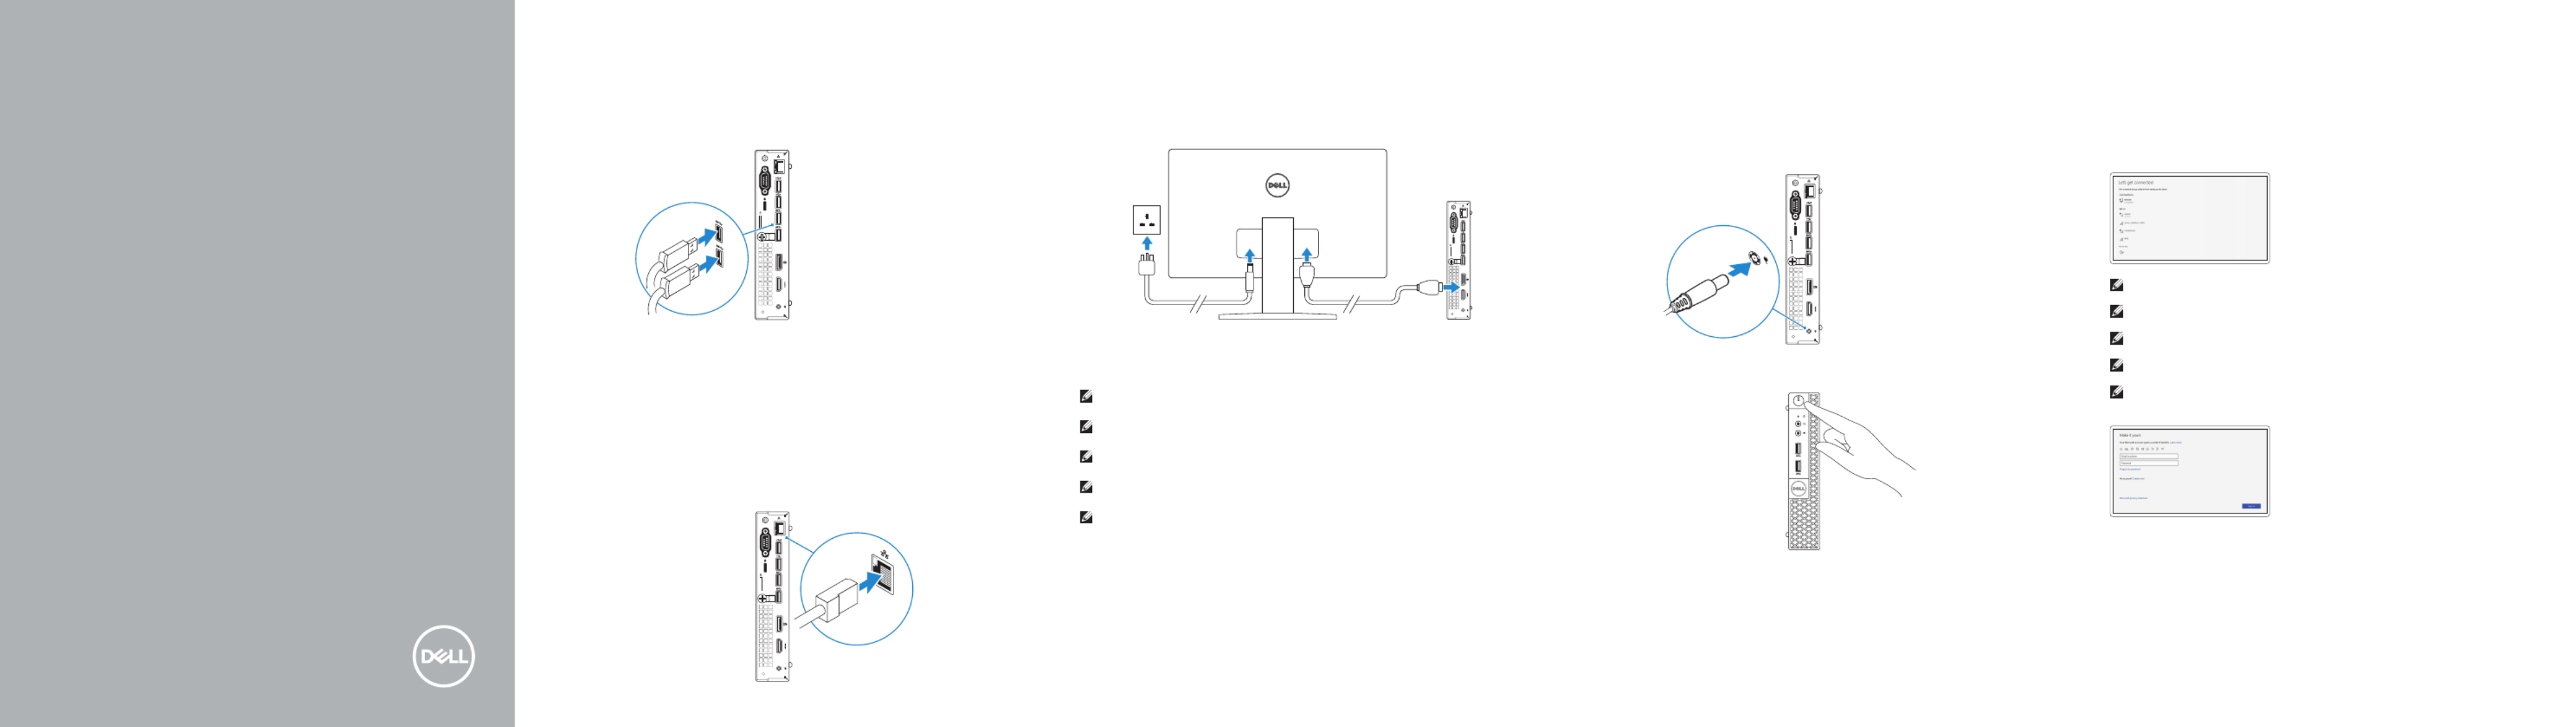
1 Connect the keyboard and mouse
Sluit het toetsenbord en de muis aan
Connecter le clavier et la souris
Tastatur und Maus anschließen
Collegare la tastiera e il mouse
2 Connect the network cable — optional
Sluit de netwerkkabel aan — optioneel
Connecter le câble réseau — facultatif
Netzwerkkabel anschließen — optional
Collegare il cavo di rete — opzionale
3 Connect the display
Sluit het beeldscherm aan
Connecter l'écran
Bildschirm anschließen
Collegare lo schermo
NOTE: If you ordered your computer with a discrete graphics card, connectthe display to the
discrete graphics card.
N.B.: Als u uw computer inclusief een discrete grafische kaart heeft gekocht, sluit u het
beeldscherm aan op de discrete grafische kaart.
REMARQUE : si l'ordinateur a été livré avec une carte graphique dédiée en option, connecter
l'écran à la carte graphique.
ANMERKUNG: Wenn Sie einen Computer mit separater Grafikkarte bestellt haben, schließen Sie
die Anzeige über die separate Grafikkarte an.
N.B.: se il computer è stato ordinato con una scheda grafica discreta, collegare lo schermo alla
scheda grafica discreta.
4 Connect the power adapter and
press the power button
Sluit de netadapter aan en druk op de aan-uitknop
Brancher l’adaptateur d’alimentation et appuyer sur le bouton d’alimentation
Netzadapter anschließen und Betriebsschalter drücken
Connettere l’adattatore di alimentazione e premere il pulsante di alimentazione
5 Finish operating system setup
Voltooi de installatie van het besturingssysteem
Terminer la configuration du système d’exploitation
Betriebssystem-Setup abschließen
Terminare la configurazione del sistema operativo
Windows
Connect to your network
Maak verbinding met uw netwerk
Se connecter à un réseau
Mit dem Netzwerk verbinden
Connettere alla rete
If you are connecting to a secured wireless network, enter the password for the wireless NOTE:
network access when prompted.
Als u verbinding maakt met een beveiligd draadloos netwerk, vul dan het wachtwoord N.B.:
voor het netwerk in wanneer daar om gevraagd wordt.
dans le cas d’une connexion à un réseau sans fil sécurisé, saisir le mot de passe REMARQUE :
d’accès au réseau sans fil lorsque l’invite apparaît.
Wenn Sie sich mit einem geschützten Wireless-Netzwerk verbinden, geben Sie ANMERKUNG:
das Kennwort für das Wireless-Netzwerk ein, wenn Sie dazu aufgefordert werden.
per collegarsi a una rete senza fili protetta, inserire la password di accesso alla rete senza N.B.:
fili quando richiesto.
Sign in to your Microsoft account orcreate
alocal account
Meld u aan bij uw Microsoft-account of maak
een lokale account aan
Se connecter à un compte Microsoft ou créer
un compte local
Bei Ihrem Microsoft-Konto anmelden
oderlokales Kontoerstellen
Effettuare l’accesso al proprio account
Microsoft oppure creare un account locale
Ubuntu
Follow the instructions on the screen to finish setup.
Volg de instructies op het scherm om de setup te voltooien.
Suivre les instructions qui s’affichent à l’écran pour terminer la configuration.
Folgen Sie den Anweisungen auf dem Bildschirm, um das Setup abzuschließen.
Seguire le istruzioni visualizzate sullo schermo per terminare la configurazione.

Locate Dell apps
Vind Dell apps | Localiser les applications Dell
Dell Apps ausfindig machen | Individuare le app Dell
SupportAssist Check and update your computer
Controleer en update uw computer
Rechercher des mises à jour et les installer sur
votre ordinateur
Computer überprüfen und aktualisieren
Verificare e aggiornare il computer
Features
Kenmerken | Caractéristiques | Funktionen | Funzioni
1. Power button and power light
2. Hard drive activity light
3. Headset port
4. Line-out port
5. USB 3.0 ports
6. VGA port or Serial port or PS/2 port
or DisplayPort — optional
7. Kensington security cable slot
8. Padlock ring
9. Cable holder
10. DisplayPort
11. HDMI port
12. Power connector port
13. Network port
14. USB 2.0 port (supports Smart
Power On)
15. USB 2.0 port
16. USB 3.0 ports
1. Aan-uitknop en voedingslampje
2. Activiteitenlampje vaste schijf
3. Headsetpoort
4. Lijnuitgang
5. USB 3.0-poorten
6. VGA- of seriële- of PS/2-poort of
DisplayPort — optioneel
7. Kensington-veiligheidskabelslot
8. Padlock-ring
9. Kabelhouder
10. DisplayPort
11. HDMI-poort
12. Poort voor stroomkabel
13. Netwerkpoort
14. USB 2.0-connector
(ondersteunt Smart Power On)
15. USB 2.0-poort
16. USB 3.0-poorten
1. Bouton d’alimentation et voyant
d’alimentation
2. Voyant d’activité du disque dur
3. Port pour casque
4. Port de ligne de sortie
5. Ports USB 3.0
6. Port VGA, port série, port PS/2 ou
port DisplayPort (en option)
7. Passage pour câble de sécurité
Kensington
8. Anneau pour cadenas
9. Serre-câbles
10. Port DisplayPort
11. Port HDMI
12. Port du connecteur d’alimentation
13. Port réseau
14. Port USB 2.0
(compatible Smart Power On)
15. Port USB 2.0
16. Ports USB 3.0
1. Betriebsschalter und Betriebsanzeige
2. Festplatten-Aktivitätsanzeige
3. Kopfhöreranschluss
4. Ausgangsanschluss
5. USB 3.0-Anschlüsse
6. VGA-Anschluss oder serielle
Schnittstelle oder PS/2-Anschluss
oder DisplayPort — optional
7. Kensington-Sicherheitskabeleinschub
8. Ring für das Vorhängeschloss
9. Kabelhalter
10. DisplayPort-Anschluss
11. HDMI-Anschluss
12. Netzanschluss-Port
13. Netzwerkanschluss
14. USB 2.0-Anschluss
(unterstützt Smart Power On)
15. USB 2.0-Anschluss
16. USB 3.0-Anschlüsse
1. Indicatore di alimentazione e
pulsante di alimentazione
2. Indicatore di attività del disco rigido
3. Porta auricolare
4. Porta della linea di uscita
5. Porte USB 3.0
6. Porta VGA o porta seriale o porta
PS/2 o DisplayPort (opzionale)
7. Slot per cavo di sicurezza
Kensington
8. Anello del lucchetto
9. Supporto per cavo
10. DisplayPort
11. Porta HDMI
12. Porta connettore di alimentazione
13. Porta di rete
14. Porta USB 2.0
(supporta l’accensione intelligente)
15. Porta USB 2.0
16. Porte USB 3.0
Product support and manuals
Productondersteuning en handleidingen
Support produits et manuels
Produktsupport und Handbücher
Supporto prodotto e m anuali
Dell.com/support
Dell.com/support/manuals
Dell.com/support/windows
Contact Dell
Contact opnemen met Dell | Contacter Dell
Kontaktaufnahme mit Del l | Contattare Dell
Dell.com/contactdell
Regulatory and safety
Regelgeving en veiligheid
Réglementations et sécurité
Sicherheitshinweise und Zulassungsinformationen
Normative e sicurezza
Dell.com/regulatory_compliance
Regulatory model
Beschreven model | Modèle réglementaire
Muster-Modellnummer | Modello normativo
D10U
Regulatory type
Beschreven type | Type réglementaire
Muster-Typnummer | Tipo di conformità
D10U002
Computer model
Computermodel | Modèle de l'ordinateur
Computermodell | Modello computer
OptiPlex 3050 Micro
Printed in China.
2016-12
© 2016 Dell Inc.
© 2016 Microsoft Corporation.
© 2016 Canonical Ltd.
Specyfikacje produktu
| Marka: | Dell |
| Kategoria: | Pulpit |
| Model: | OptiPlex 3050 Micro |
Potrzebujesz pomocy?
Jeśli potrzebujesz pomocy z Dell OptiPlex 3050 Micro, zadaj pytanie poniżej, a inni użytkownicy Ci odpowiedzą
Instrukcje Pulpit Dell

7 Października 2024
2 Października 2024
29 Września 2024
29 Września 2024
29 Września 2024
29 Września 2024
29 Września 2024
29 Września 2024
29 Września 2024
29 Września 2024
Instrukcje Pulpit
- Pulpit Sony
- Pulpit Samsung
- Pulpit LG
- Pulpit Sharp
- Pulpit Supermicro
- Pulpit Lenovo
- Pulpit Gigabyte
- Pulpit Acer
- Pulpit Fujitsu
- Pulpit LC-Power
- Pulpit Promethean
- Pulpit Mio
- Pulpit Viewsonic
- Pulpit Asus
- Pulpit Medion
- Pulpit MSI
- Pulpit Toshiba
- Pulpit Haier
- Pulpit HP
- Pulpit Tripp Lite
- Pulpit Moxa
- Pulpit ZTE
- Pulpit JYSK
- Pulpit Apple
- Pulpit AOC
- Pulpit Vtech
- Pulpit Razer
- Pulpit Kobo
- Pulpit NEC
- Pulpit Axis
- Pulpit Optoma
- Pulpit Asrock
- Pulpit Microsoft
- Pulpit Sharkoon
- Pulpit ECS
- Pulpit BenQ
- Pulpit BDI
- Pulpit Zotac
- Pulpit Alienware
- Pulpit Emachines
- Pulpit Parisot
- Pulpit Maxdata
- Pulpit Woood
- Pulpit Wehkamp
- Pulpit InFocus
- Pulpit Intel
- Pulpit Targa
- Pulpit Peaq
- Pulpit Seagate
- Pulpit Shuttle
- Pulpit Vorago
- Pulpit VXL
- Pulpit Foxconn
- Pulpit Ibm
- Pulpit Packard Bell
- Pulpit Advantech
- Pulpit Kogan
- Pulpit MP
- Pulpit Elitegroup
- Pulpit Smart Things
- Pulpit ONYX
- Pulpit System76
- Pulpit Zoostorm
- Pulpit Bestar
- Pulpit Pelco
- Pulpit Altra
- Pulpit Dell Wyse
- Pulpit AOpen
- Pulpit NComputing
- Pulpit MvixUSA
- Pulpit Faytech
- Pulpit AIS
- Pulpit Wyse
Najnowsze instrukcje dla Pulpit

15 Października 2024
15 Października 2024

14 Października 2024

12 Października 2024

10 Października 2024
9 Października 2024
9 Października 2024

9 Października 2024
8 Października 2024
8 Października 2024