Instrukcja obsługi Dell OptiPlex 3010
Przeczytaj poniżej 📖 instrukcję obsługi w języku polskim dla Dell OptiPlex 3010 (61 stron) w kategorii ambona. Ta instrukcja była pomocna dla 14 osób i została oceniona przez 2 użytkowników na średnio 4.5 gwiazdek
Strona 1/61

Dell OptiPlex 3010 Mini-Tower
Dell OptiPlex 3010 Mini-Tower
Dell OptiPlex 3010 Mini-Tower
Dell OptiPlex 3010 Mini-TowerDell OptiPlex 3010 Mini-Tower
Owner's Manual
Owner's Manual
Owner's Manual
Owner's ManualOwner's Manual
Regulatory Model: D12M
Regulatory Model: D12M
Regulatory Model: D12M
Regulatory Model: D12MRegulatory Model: D12M
Regulatory Type: D12M001
Regulatory Type: D12M001
Regulatory Type: D12M001
Regulatory Type: D12M001Regulatory Type: D12M001

Notes, Cautions, and Warnings
Notes, Cautions, and Warnings
Notes, Cautions, and Warnings
Notes, Cautions, and WarningsNotes, Cautions, and Warnings
NOTE:
NOTE:
NOTE:
NOTE: NOTE: A NOTE indicates important information that helps you make better use of your computer.
CAUTION: A CAUTION indicates either potential damage to hardware or loss of data and tells you how to avoid the
CAUTION: A CAUTION indicates either potential damage to hardware or loss of data and tells you how to avoid the
CAUTION: A CAUTION indicates either potential damage to hardware or loss of data and tells you how to avoid the
CAUTION: A CAUTION indicates either potential damage to hardware or loss of data and tells you how to avoid the CAUTION: A CAUTION indicates either potential damage to hardware or loss of data and tells you how to avoid the
problem.
problem.
problem.
problem.problem.
WARNING: A WARNING indicates a potential for property damage, personal injury, or death.
WARNING: A WARNING indicates a potential for property damage, personal injury, or death.
WARNING: A WARNING indicates a potential for property damage, personal injury, or death.
WARNING: A WARNING indicates a potential for property damage, personal injury, or death.WARNING: A WARNING indicates a potential for property damage, personal injury, or death.
© 2013 Dell Inc.
2013 Dell Inc.
2013 Dell Inc.
2013 Dell Inc. 2013 Dell Inc.
Trademarks used in this text: Dell™, the DELL logo, Dell Precision™, Precision ON™,ExpressCharge™, Latitude™, Latitude ON™,
OptiPlex™, Vostro™, and Wi-Fi Catcher™ are trademarks of Dell Inc. Intel®, Pentium®, Xeon®, Core™, Atom™, Centrino®, and Celeron®
are registered trademarks or trademarks of Intel Corporation in the U.S. and other countries. AMD® is a registered trademark and
AMD Opteron™, AMD Phenom™, AMD Sempron™, AMD Athlon™, ATI Radeon™, and ATI FirePro™ are trademarks of Advanced Micro
Devices, Inc. Microsoft
®, Windows®, MS-DOS®, Windows Vista®
, the Windows Vista start button, and Office Outlook® are either
trademarks or registered trademarks of Microsoft Corporation in the United States and/or other countries. Blu-ray Disc™ is a trademark
owned by the Blu-ray Disc Association (BDA) and licensed for use on discs and players. The Bluetooth® word mark is a registered
trademark and owned by the Bluetooth® SIG, Inc. and any use of such mark by Dell Inc. is under license. Wi-Fi® is a registered
trademark of Wireless Ethernet Compatibility Alliance, Inc.
2013 — 08
Rev. A01

Contents
Contents
Contents
ContentsContents
1 Working on Your Computer.......................................................................................................
1 Working on Your Computer.......................................................................................................
1 Working on Your Computer.......................................................................................................
1 Working on Your Computer.......................................................................................................1 Working on Your Computer....................................................................................................... 7
7
7
77
Before Working Inside Your Computer.....................................................................................................................7
Turning Off Your Computer....................................................................................................................................... 8
After Working Inside Your Computer........................................................................................................................8
2 Removing and Installing Components.....................................................................................
2 Removing and Installing Components.....................................................................................
2 Removing and Installing Components.....................................................................................
2 Removing and Installing Components.....................................................................................2 Removing and Installing Components..................................................................................... 9
9
9
99
Removing the Cover..................................................................................................................................................9
Installing the Cover...................................................................................................................................................9
Removing the Front Bezel.......................................................................................................................................10
Installing The Front Bezel....................................................................................................................................... 10
Removing the Expansion Card................................................................................................................................ 10
Installing The Expansion Card................................................................................................................................ 12
Removing the Optical Drive.................................................................................................................................... 12
Installing The Optical Drive.....................................................................................................................................13
Removing the Hard Drive........................................................................................................................................13
Installing The Hard Drive ....................................................................................................................................... 14
Removing the Memory............................................................................................................................................14
Installing the Memory.............................................................................................................................................15
Removing The Chassis Intrusion Switch................................................................................................................ 15
Installing the Intrusion Switch................................................................................................................................16
Removing The Speaker...........................................................................................................................................16
Installing the Speaker.............................................................................................................................................17
Removing the Heat Sink and Processor................................................................................................................. 18
Installing the Heat Sink and Processor.................................................................................................................. 19
Removing The Coin-Cell Battery.............................................................................................................................20
Installing The Coin-Cell Battery..............................................................................................................................20
Removing the Power-Switch Cable........................................................................................................................20
Installing the Power-Switch Cable......................................................................................................................... 22
Removing the Front Thermal Sensor...................................................................................................................... 22
Installing the Front Thermal Sensor........................................................................................................................23
Removing The System Fan......................................................................................................................................23
Installing the System Fan........................................................................................................................................24
Removing the Input/Output Panel...........................................................................................................................24
Installing the Input/Output Panel............................................................................................................................26
Removing The Power Supply..................................................................................................................................26
Installing the Power Supply....................................................................................................................................28
Removing The System Board..................................................................................................................................28
Installing The System Board...................................................................................................................................29

3 System Setup.............................................................................................................................
3 System Setup.............................................................................................................................
3 System Setup.............................................................................................................................
3 System Setup.............................................................................................................................3 System Setup.............................................................................................................................31
31
31
3131
System Setup..........................................................................................................................................................31
Boot Menu.............................................................................................................................................................. 31
Boot Menu Enhancements..................................................................................................................................... 31
Timing Key Sequences........................................................................................................................................... 32
Beep Codes and Text Error Messages...................................................................................................................32
Navigation...............................................................................................................................................................32
System Setup Options.............................................................................................................................................33
4 Troubleshooting.........................................................................................................................
4 Troubleshooting.........................................................................................................................
4 Troubleshooting.........................................................................................................................
4 Troubleshooting.........................................................................................................................4 Troubleshooting.........................................................................................................................41
41
41
4141
Diagnostic LEDs......................................................................................................................................................41
Diagnostic Light Patterns.................................................................................................................................41
Beep Codes.............................................................................................................................................................47
Error Messages...................................................................................................................................................... 49
Address mark not found................................................................................................................................... 49
Alert! Previous attempts at booting this system have failed at checkpoint [nnnn]. For help in resolving
this problem, please note this checkpoint and contact Dell Technical Support............................................. 49
Alert! Security override Jumper is installed.................................................................................................... 49
Attachment failed to respond...........................................................................................................................49
Bad command or file name ............................................................................................................................. 49
Bad error-correction code (ECC) on disk read.................................................................................................49
Controller has failed......................................................................................................................................... 50
Data error ........................................................................................................................................................ 50
Decreasing available memory .........................................................................................................................50
Diskette drive 0 seek failure.............................................................................................................................50
Diskette read failure.........................................................................................................................................50
Diskette subsystem reset failed....................................................................................................................... 50
Gate A20 failure................................................................................................................................................50
General failure .................................................................................................................................................50
Hard-disk drive configuration error .................................................................................................................50
Hard-disk drive controller failure..................................................................................................................... 51
Hard-disk drive failure .....................................................................................................................................51
Hard-disk drive read failure............................................................................................................................. 51
Invalid configuration information-please run SETUP program........................................................................51
Invalid Memory configuration, please populate DIMM1................................................................................. 51
Keyboard failure...............................................................................................................................................51
Memory address line failure at address, read value expecting value ............................................................51
Memory allocation error.................................................................................................................................. 51
Memory data line failure at address, read value expecting value...................................................................51
Memory double word logic failure at address, read value expecting value....................................................52
Memory odd/even logic failure at address, read value expecting value.........................................................52

Memory write/read failure at address, read value expecting value................................................................52
Memory size in CMOS invalid.......................................................................................................................... 52
Memory tests terminated by keystroke............................................................................................................52
No boot device available..................................................................................................................................52
No boot sector on hard-disk drive....................................................................................................................52
No timer tick interrupt ..................................................................................................................................... 52
Non-system disk or disk error.......................................................................................................................... 52
Not a boot diskette........................................................................................................................................... 53
Plug and play configuration error.................................................................................................................... 53
Read fault......................................................................................................................................................... 53
Requested sector not found............................................................................................................................. 53
Reset failed.......................................................................................................................................................53
Sector not found ..............................................................................................................................................53
Seek error ........................................................................................................................................................53
Shutdown failure ............................................................................................................................................. 53
Time-of-day clock stopped ..............................................................................................................................53
Time-of-day not set-please run the System Setup program ........................................................................... 53
Timer chip counter 2 failed ..............................................................................................................................54
Unexpected interrupt in protected mode.........................................................................................................54
WARNING: Dell's Disk Monitoring System has detected that drive [0/1] on the [primary/secondary]
EIDE controller is operating outside of normal specifications. It is advisable to immediately back up
your data and replace your hard drive by calling your support desk or Dell................................................... 54
Write fault.........................................................................................................................................................54
Write fault on selected drive............................................................................................................................54
X:\ is not accessible. The device is not ready ................................................................................................. 54
5 Specifications............................................................................................................................
5 Specifications............................................................................................................................
5 Specifications............................................................................................................................
5 Specifications............................................................................................................................5 Specifications............................................................................................................................55
55
55
5555
Specification...........................................................................................................................................................55
6 Contacting Dell..........................................................................................................................
6 Contacting Dell..........................................................................................................................
6 Contacting Dell..........................................................................................................................
6 Contacting Dell..........................................................................................................................6 Contacting Dell.......................................................................................................................... 61
61
61
6161
Contacting Dell....................................................................................................................................................... 61

6

1
1
1
11
Working on Your Computer
Working on Your Computer
Working on Your Computer
Working on Your ComputerWorking on Your Computer
Before Working Inside Your Computer
Before Working Inside Your Computer
Before Working Inside Your Computer
Before Working Inside Your ComputerBefore Working Inside Your Computer
Use the following safety guidelines to help protect your computer from potential damage and to help to ensure your
personal safety. Unless otherwise noted, each procedure included in this document assumes that the following
conditions exist:
• You have read the safety information that shipped with your computer.
• A component can be replaced or--if purchased separately--installed by performing the removal procedure in
reverse order.
WARNING: Before working inside your computer, read the safety information that shipped with your computer. For
WARNING: Before working inside your computer, read the safety information that shipped with your computer. For
WARNING: Before working inside your computer, read the safety information that shipped with your computer. For
WARNING: Before working inside your computer, read the safety information that shipped with your computer. For WARNING: Before working inside your computer, read the safety information that shipped with your computer. For
additional safety best practices information, see the Regulatory Compliance Homepage at www.dell.com/
additional safety best practices information, see the Regulatory Compliance Homepage at www.dell.com/
additional safety best practices information, see the Regulatory Compliance Homepage at www.dell.com/
additional safety best practices information, see the Regulatory Compliance Homepage at www.dell.com/additional safety best practices information, see the Regulatory Compliance Homepage at www.dell.com/
regulatory_compliance
regulatory_compliance
regulatory_compliance
regulatory_compliance regulatory_compliance
CAUTION: Many repairs may only be done by a certified service technician. You should only perform
CAUTION: Many repairs may only be done by a certified service technician. You should only perform
CAUTION: Many repairs may only be done by a certified service technician. You should only perform
CAUTION: Many repairs may only be done by a certified service technician. You should only perform CAUTION: Many repairs may only be done by a certified service technician. You should only perform
troubleshooting and simple repairs as authorized in your product documentation, or as directed by the online or
troubleshooting and simple repairs as authorized in your product documentation, or as directed by the online or
troubleshooting and simple repairs as authorized in your product documentation, or as directed by the online or
troubleshooting and simple repairs as authorized in your product documentation, or as directed by the online or troubleshooting and simple repairs as authorized in your product documentation, or as directed by the online or
telephone service and support team. Damage due to servicing that is not authorized by Dell is not covered by your
telephone service and support team. Damage due to servicing that is not authorized by Dell is not covered by your
telephone service and support team. Damage due to servicing that is not authorized by Dell is not covered by your
telephone service and support team. Damage due to servicing that is not authorized by Dell is not covered by your telephone service and support team. Damage due to servicing that is not authorized by Dell is not covered by your
warranty. Read and follow the safety instructions that came with the product.
warranty. Read and follow the safety instructions that came with the product.
warranty. Read and follow the safety instructions that came with the product.
warranty. Read and follow the safety instructions that came with the product.warranty. Read and follow the safety instructions that came with the product.
CAUTION: To avoid electrostatic discharge, ground yourself by using a wrist grounding strap or by periodically
CAUTION: To avoid electrostatic discharge, ground yourself by using a wrist grounding strap or by periodically
CAUTION: To avoid electrostatic discharge, ground yourself by using a wrist grounding strap or by periodically
CAUTION: To avoid electrostatic discharge, ground yourself by using a wrist grounding strap or by periodically CAUTION: To avoid electrostatic discharge, ground yourself by using a wrist grounding strap or by periodically
touching an unpainted metal surface, such as a connector on the back of the computer.
touching an unpainted metal surface, such as a connector on the back of the computer.
touching an unpainted metal surface, such as a connector on the back of the computer.
touching an unpainted metal surface, such as a connector on the back of the computer.touching an unpainted metal surface, such as a connector on the back of the computer.
CAUTION: Handle components and cards with care. Do not touch the components or contacts on a card. Hold a
CAUTION: Handle components and cards with care. Do not touch the components or contacts on a card. Hold a
CAUTION: Handle components and cards with care. Do not touch the components or contacts on a card. Hold a
CAUTION: Handle components and cards with care. Do not touch the components or contacts on a card. Hold a CAUTION: Handle components and cards with care. Do not touch the components or contacts on a card. Hold a
card by its edges or by its metal mounting bracket. Hold a component such as a processor by its edges, not by its
card by its edges or by its metal mounting bracket. Hold a component such as a processor by its edges, not by its
card by its edges or by its metal mounting bracket. Hold a component such as a processor by its edges, not by its
card by its edges or by its metal mounting bracket. Hold a component such as a processor by its edges, not by its card by its edges or by its metal mounting bracket. Hold a component such as a processor by its edges, not by its
pins.
pins.
pins.
pins.pins.
CAUTION: When you disconnect a cable, pull on its connector or on its pull-tab, not on the cable itself. Some
CAUTION: When you disconnect a cable, pull on its connector or on its pull-tab, not on the cable itself. Some
CAUTION: When you disconnect a cable, pull on its connector or on its pull-tab, not on the cable itself. Some
CAUTION: When you disconnect a cable, pull on its connector or on its pull-tab, not on the cable itself. Some CAUTION: When you disconnect a cable, pull on its connector or on its pull-tab, not on the cable itself. Some
cables have connectors with locking tabs; if you are disconnecting this type of cable, press in on the locking tabs
cables have connectors with locking tabs; if you are disconnecting this type of cable, press in on the locking tabs
cables have connectors with locking tabs; if you are disconnecting this type of cable, press in on the locking tabs
cables have connectors with locking tabs; if you are disconnecting this type of cable, press in on the locking tabs cables have connectors with locking tabs; if you are disconnecting this type of cable, press in on the locking tabs
before you disconnect the cable. As you pull connectors apart, keep them evenly aligned to avoid bending any
before you disconnect the cable. As you pull connectors apart, keep them evenly aligned to avoid bending any
before you disconnect the cable. As you pull connectors apart, keep them evenly aligned to avoid bending any
before you disconnect the cable. As you pull connectors apart, keep them evenly aligned to avoid bending any before you disconnect the cable. As you pull connectors apart, keep them evenly aligned to avoid bending any
connector pins. Also, before you connect a cable, ensure that both connectors are correctly oriented and aligned.
connector pins. Also, before you connect a cable, ensure that both connectors are correctly oriented and aligned.
connector pins. Also, before you connect a cable, ensure that both connectors are correctly oriented and aligned.
connector pins. Also, before you connect a cable, ensure that both connectors are correctly oriented and aligned.connector pins. Also, before you connect a cable, ensure that both connectors are correctly oriented and aligned.
NOTE:
NOTE:
NOTE:
NOTE: NOTE: The color of your computer and certain components may appear differently than shown in this document.
To avoid damaging your computer, perform the following steps before you begin working inside the computer.
1.
1.
1.
1.1. Ensure that your work surface is flat and clean to prevent the computer cover from being scratched.
2.
2.
2.
2.2. Turn off your computer (see Turning Off Your Computer).
CAUTION: To disconnect a network cable, first unplug the cable from your computer and then unplug the
CAUTION: To disconnect a network cable, first unplug the cable from your computer and then unplug the
CAUTION: To disconnect a network cable, first unplug the cable from your computer and then unplug the
CAUTION: To disconnect a network cable, first unplug the cable from your computer and then unplug the CAUTION: To disconnect a network cable, first unplug the cable from your computer and then unplug the
cable from the network device.
cable from the network device.
cable from the network device.
cable from the network device.cable from the network device.
3.
3.
3.
3.3. Disconnect all network cables from the computer.
4.
4.
4.
4.4. Disconnect your computer and all attached devices from their electrical outlets.
5.
5.
5.
5.5. Press and hold the power button while the computer is unplugged to ground the system board.
6.
6.
6.
6.6. Remove the cover.
7

CAUTION: Before touching anything inside your computer, ground yourself by touching an unpainted metal
CAUTION: Before touching anything inside your computer, ground yourself by touching an unpainted metal
CAUTION: Before touching anything inside your computer, ground yourself by touching an unpainted metal
CAUTION: Before touching anything inside your computer, ground yourself by touching an unpainted metal CAUTION: Before touching anything inside your computer, ground yourself by touching an unpainted metal
surface, such as the metal at the back of the computer. While you work, periodically touch an unpainted metal
surface, such as the metal at the back of the computer. While you work, periodically touch an unpainted metal
surface, such as the metal at the back of the computer. While you work, periodically touch an unpainted metal
surface, such as the metal at the back of the computer. While you work, periodically touch an unpainted metal surface, such as the metal at the back of the computer. While you work, periodically touch an unpainted metal
surface to dissipate static electricity, which could harm internal components.
surface to dissipate static electricity, which could harm internal components.
surface to dissipate static electricity, which could harm internal components.
surface to dissipate static electricity, which could harm internal components.surface to dissipate static electricity, which could harm internal components.
Turning Off Your Computer
Turning Off Your Computer
Turning Off Your Computer
Turning Off Your ComputerTurning Off Your Computer
CAUTION: To avoid losing data, save and close all open files and exit all open programs before you turn off your
CAUTION: To avoid losing data, save and close all open files and exit all open programs before you turn off your
CAUTION: To avoid losing data, save and close all open files and exit all open programs before you turn off your
CAUTION: To avoid losing data, save and close all open files and exit all open programs before you turn off your CAUTION: To avoid losing data, save and close all open files and exit all open programs before you turn off your
computer.
computer.
computer.
computer.computer.
1.
1.
1.
1.1. Shut down the operating system:
– In Windows 8:
* Using a touch-enabled device:
a. Swipe in from the right edge of the screen, opening the Charms menu and select .
Settings
Settings
Settings
SettingsSettings
b. Select the and then select Shut down
Shut down
Shut down
Shut downShut down
* Using a mouse:
a. Point to upper-right corner of the screen and click .
Settings
Settings
Settings
SettingsSettings
b. Click the and select .
Shut down
Shut down
Shut down
Shut downShut down
– In Windows 7:
1. Click .
Start
Start
Start
StartStart
2. Click Shut Down.
Shut Down.
Shut Down.
Shut Down.Shut Down.
or
1. Click .
Start
Start
Start
StartStart
2. Click the arrow in the lower-right corner of the menu as shown below, and then click
Start
Start
Start
StartStart Shut
Shut
Shut
Shut Shut
Down.
Down.
Down.
Down.Down..
2.
2.
2.
2.2. Ensure that the computer and all attached devices are turned off. If your computer and attached devices did not
automatically turn off when you shut down your operating system, press and hold the power button for about 6
seconds to turn them off.
After Working Inside Your Computer
After Working Inside Your Computer
After Working Inside Your Computer
After Working Inside Your ComputerAfter Working Inside Your Computer
After you complete any replacement procedure, ensure you connect any external devices, cards, and cables before
turning on your computer.
1.
1.
1.
1.1. Replace the cover.
CAUTION: To connect a network cable, first plug the cable into the network device and then plug it into the
CAUTION: To connect a network cable, first plug the cable into the network device and then plug it into the
CAUTION: To connect a network cable, first plug the cable into the network device and then plug it into the
CAUTION: To connect a network cable, first plug the cable into the network device and then plug it into the CAUTION: To connect a network cable, first plug the cable into the network device and then plug it into the
computer.
computer.
computer.
computer.computer.
2.
2.
2.
2.2. Connect any telephone or network cables to your computer.
3.
3.
3.
3.3. Connect your computer and all attached devices to their electrical outlets.
4.
4.
4.
4.4. Turn on your computer.
5.
5.
5.
5.5. If required, verify that the computer works correctly by running the Dell Diagnostics.
8
2
2
2
22
Removing and Installing Components
Removing and Installing Components
Removing and Installing Components
Removing and Installing ComponentsRemoving and Installing Components
This section provides detailed information on how to remove or install the components from your computer.
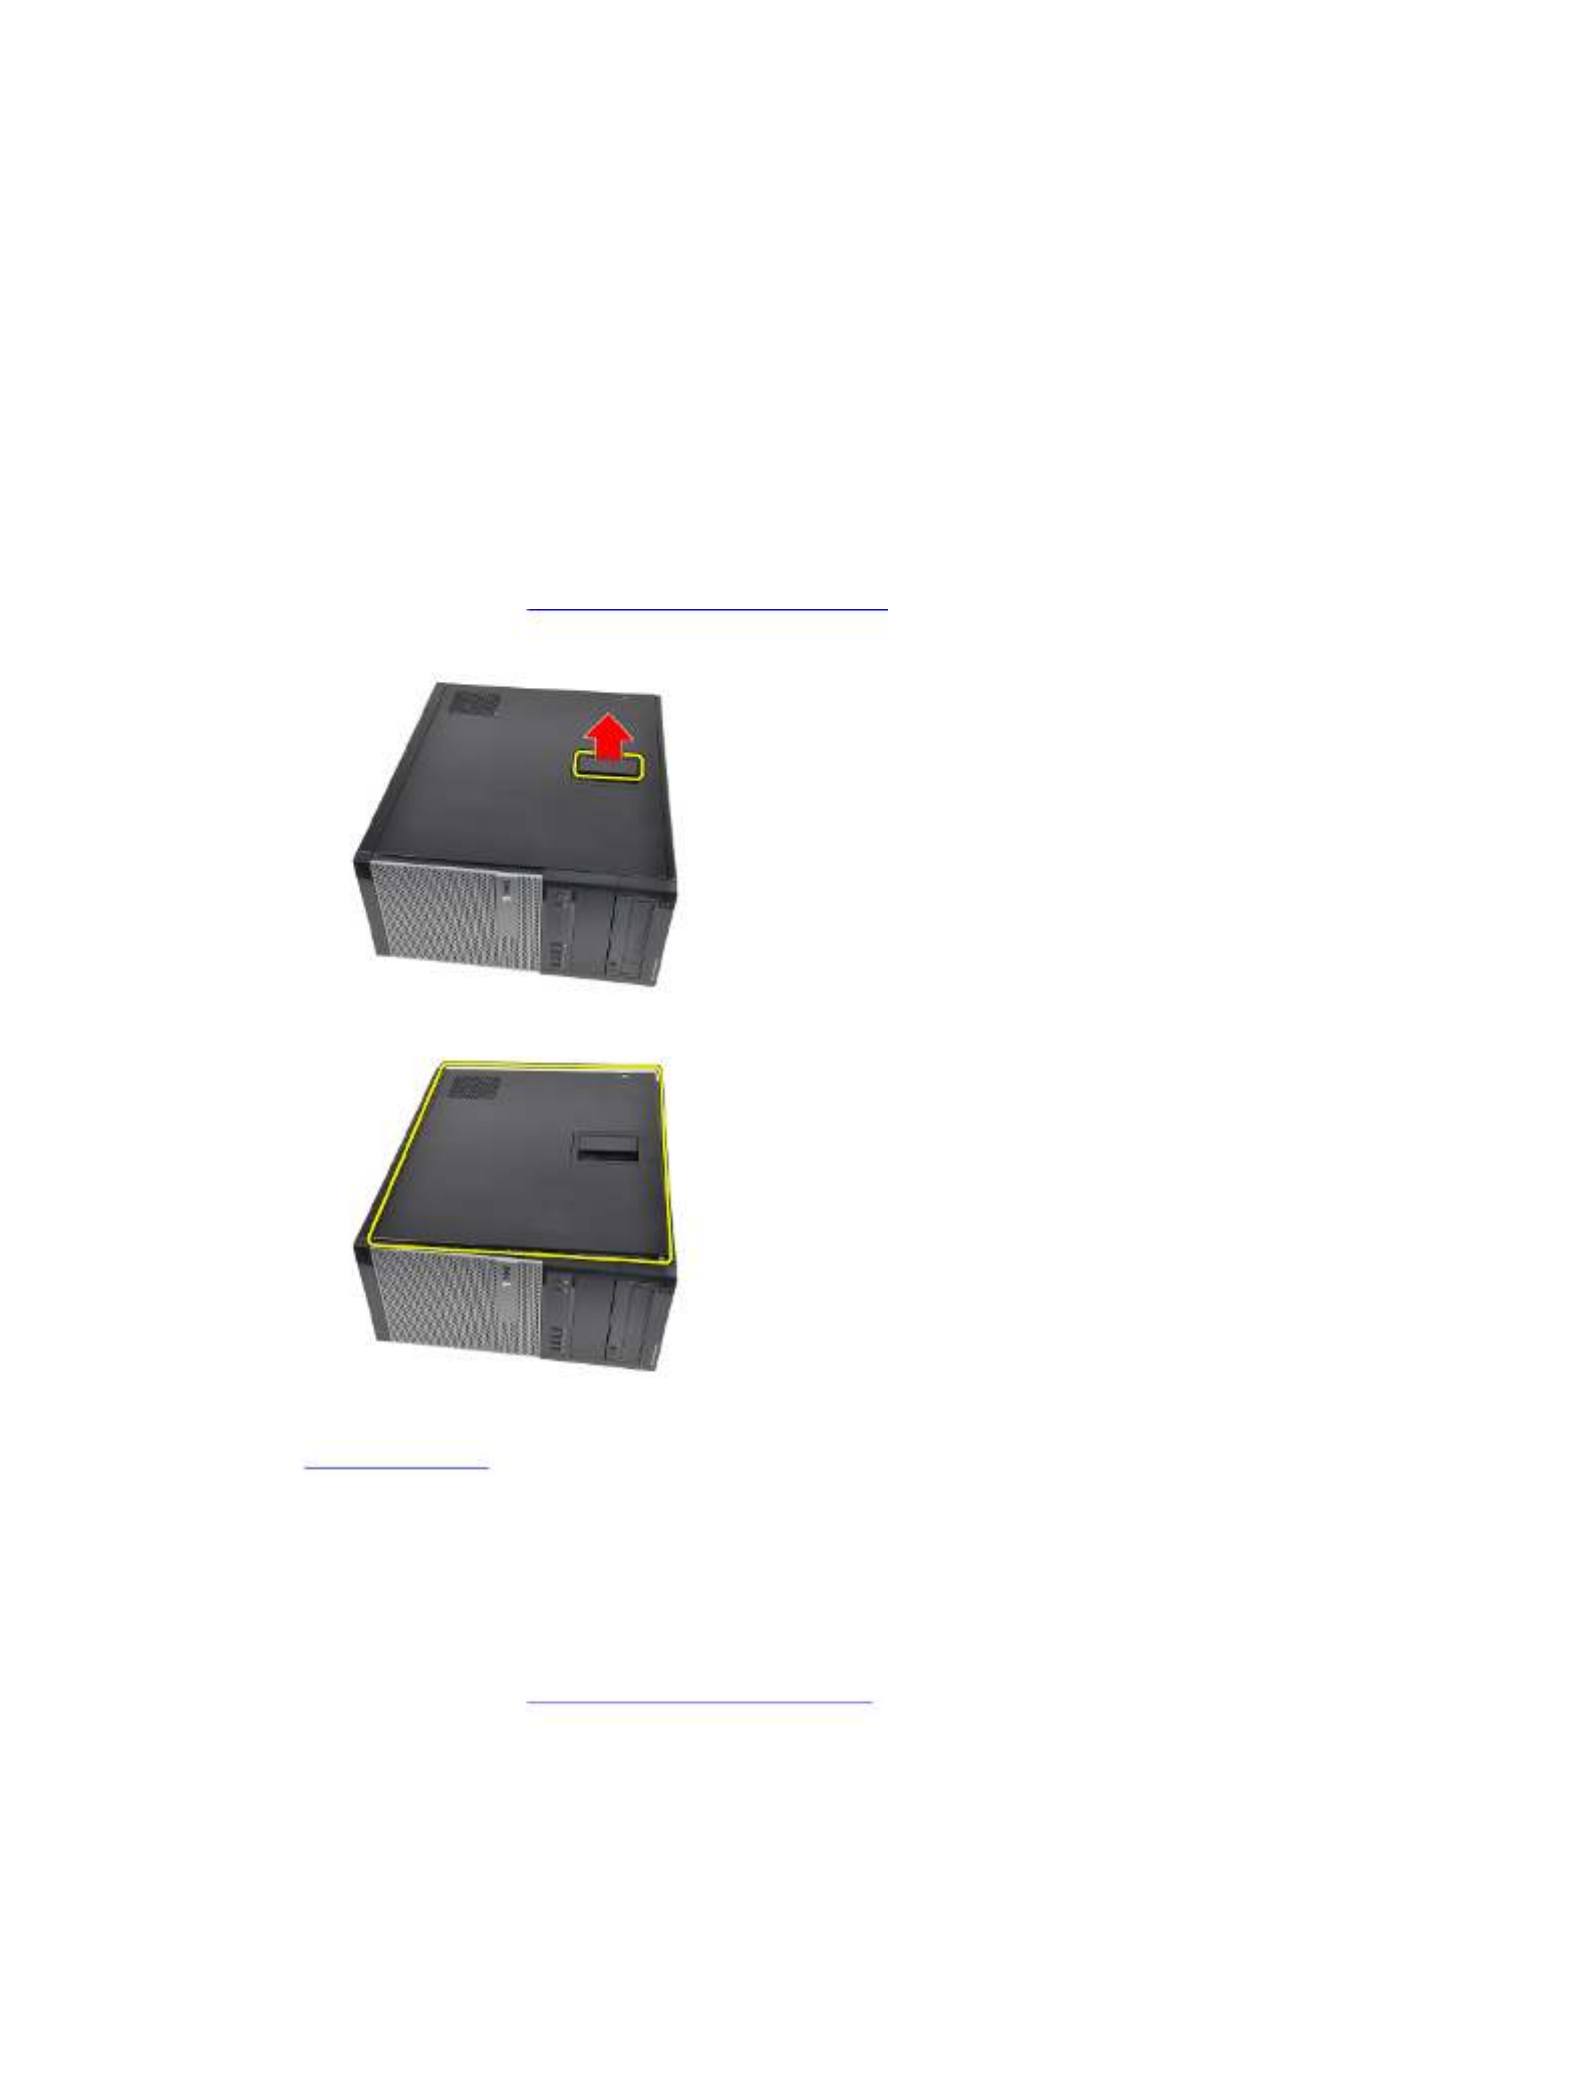
Removing the Cover
Removing the Cover
Removing the Cover
Removing the CoverRemoving the Cover
1.
1.
1.
1.1. Follow the procedures in .
Before Working Inside Your Computer
2.
2.
2.
2.2. Pull up the cover-release-latch at the side of the computer.
3.
3.
3.
3.3. Lift the cover upward to a 45–degree angle and remove it from the computer.
Related Links
Related Links
Related Links
Related LinksRelated Links
Installing the Cover
Installing the Cover
Installing the Cover
Installing the Cover
Installing the CoverInstalling the Cover
1.
1.
1.
1.1. Place the cover on the computer.
2.
2.
2.
2.2. Press down on the cover till it clicks into place.
3.
3.
3.
3.3. Follow the procedures in .
After Working Inside Your Computer
Related Links
Related Links
Related Links
Related LinksRelated Links
Removing the Cover
9
Removing the Front Bezel
Removing the Front Bezel
Removing the Front Bezel
Removing the Front BezelRemoving the Front Bezel
1.
1.
1.
1.1. Follow the procedures in .
Before Working Inside Your Computer
2.
2.
2.
2.2. Remove the .
cover
3.
3.
3.
3.3. Pry the front bezel retention clips away from the chassis located at the side edge of front bezel.
4.
4.
4.
4.4. Rotate the bezel away from the computer to release the hooks on the opposite edge of the bezel from the chassis.
Related Links
Related Links
Related Links
Related LinksRelated Links
Installing the Front Bezel
Installing The Front Bezel
Installing The Front Bezel
Installing The Front Bezel
Installing The Front BezelInstalling The Front Bezel
1.
1.
1.
1.1. Insert the hooks along the bottom edge of the front bezel into the slots on the chassis front.
2.
2.
2.
2.2. Rotate the bezel toward the computer to engage the four front-bezel retention clips until they click into place.
3.
3.
3.
3.3. Install the .
cover
4.
4.
4.
4.4. Follow the procedures in .
After Working Inside Your Computer
Related Links
Related Links
Related Links
Related LinksRelated Links
Removing the Front Bezel
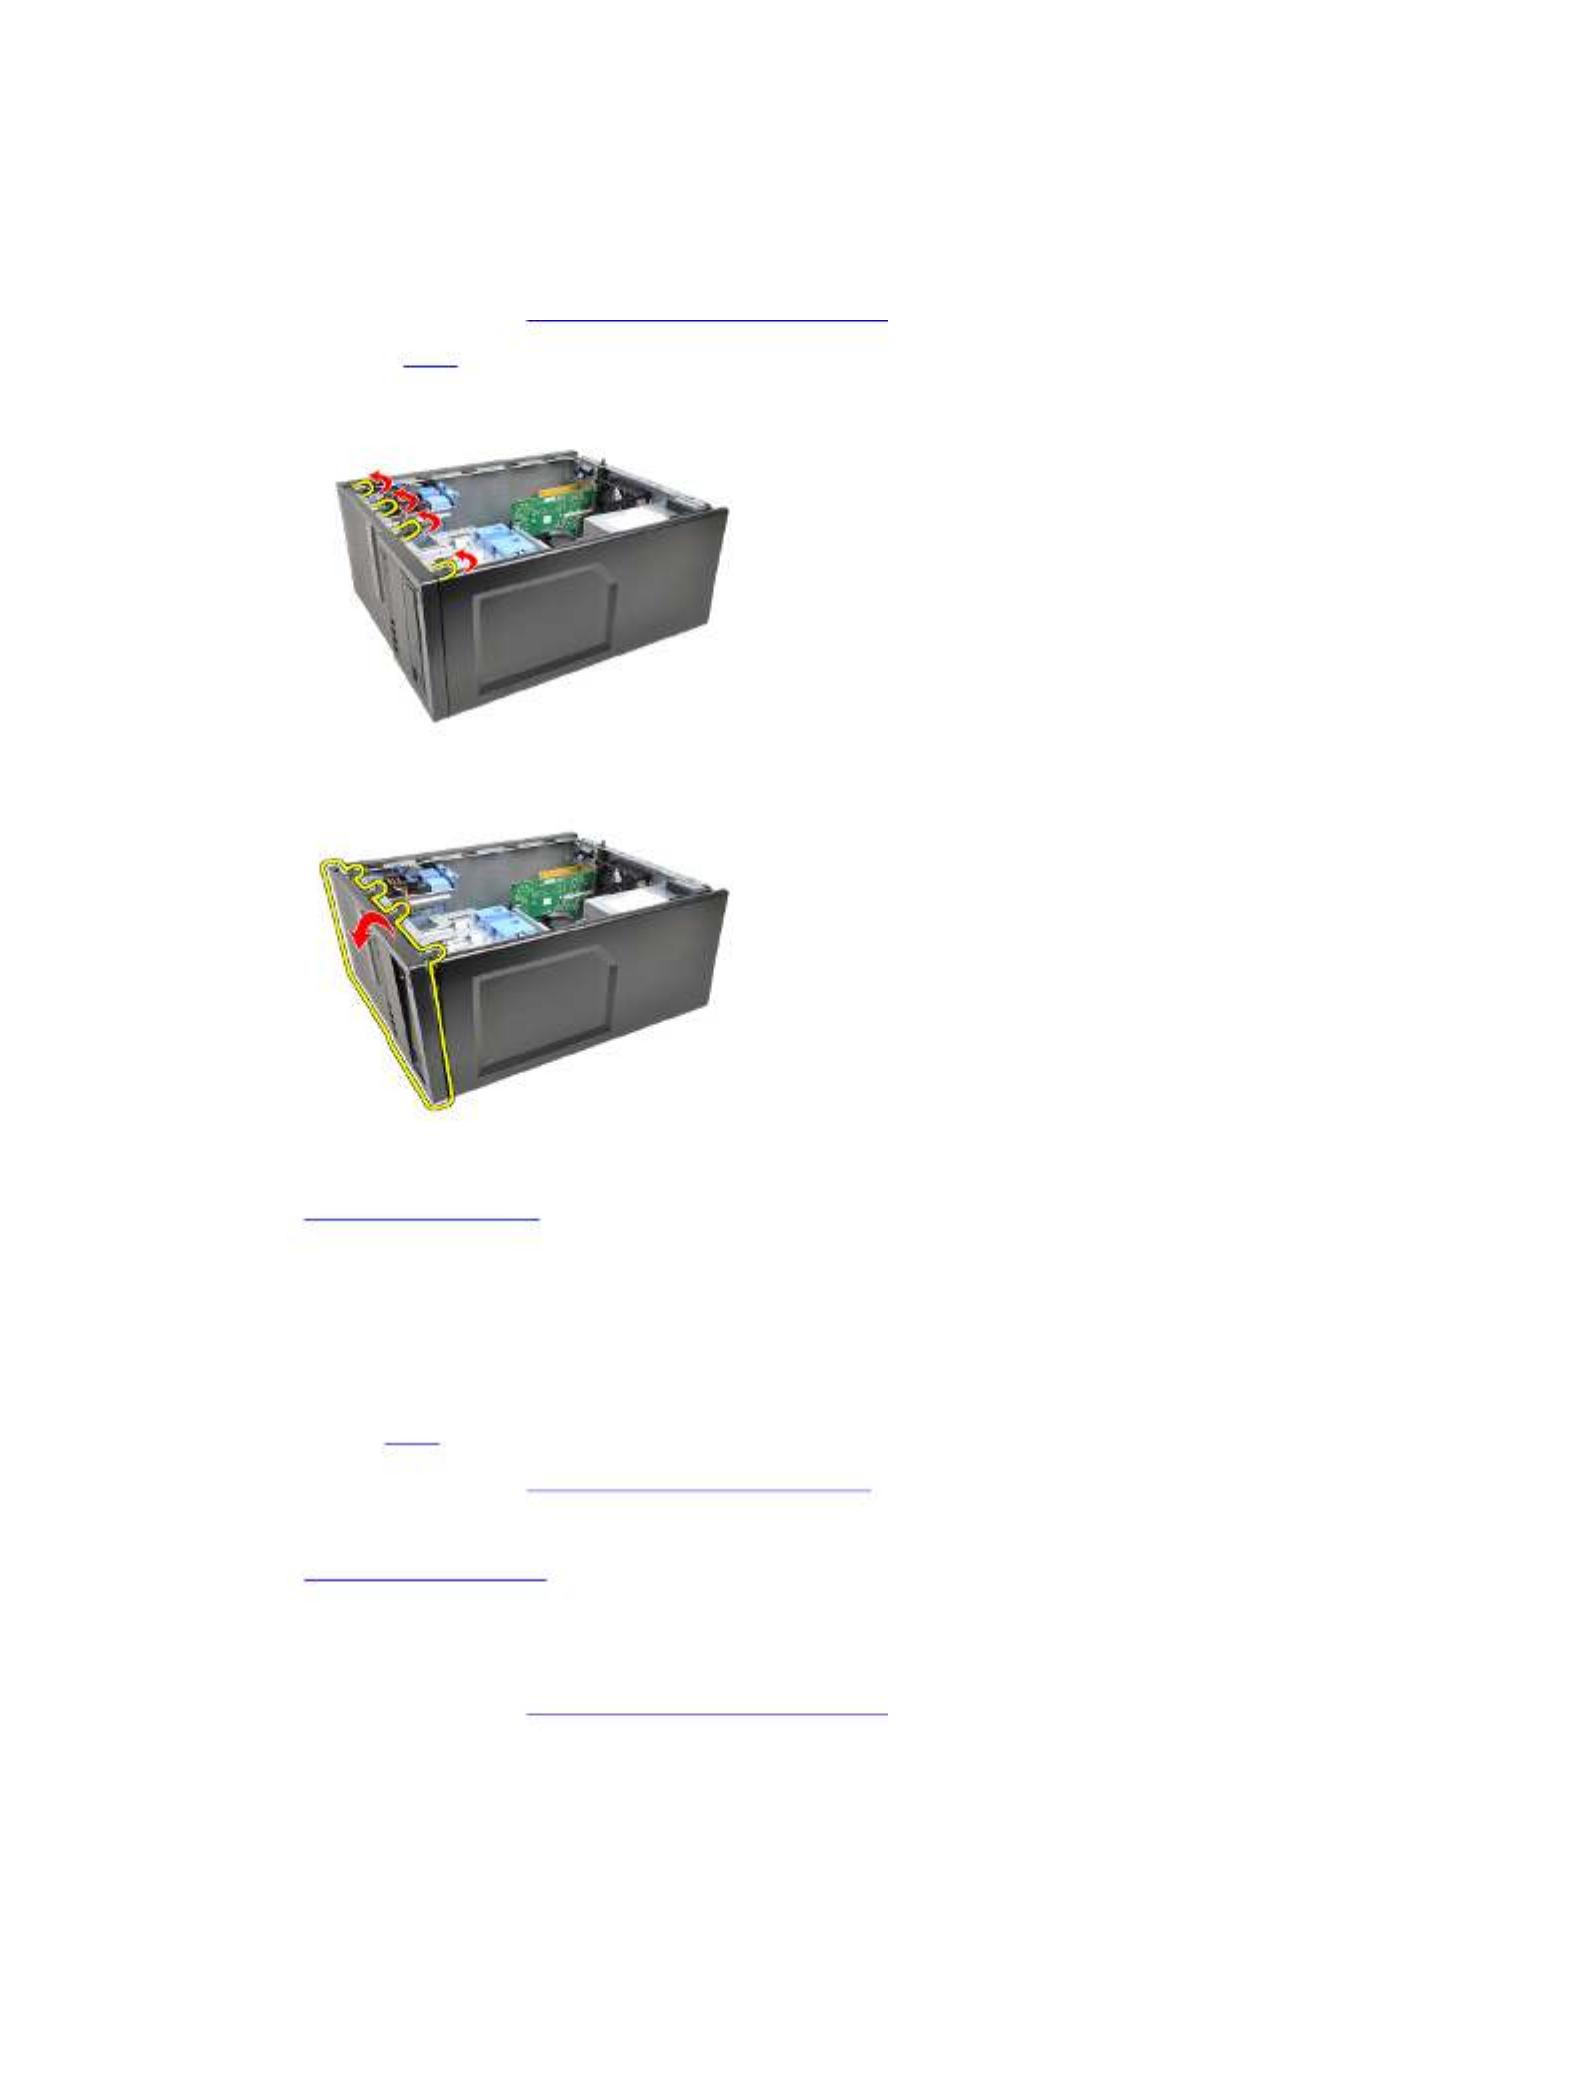
Removing the Expansion Card
Removing the Expansion Card
Removing the Expansion Card
Removing the Expansion CardRemoving the Expansion Card
1.
1.
1.
1.1. Follow the procedures in .
Before Working Inside Your Computer
2.
2.
2.
2.2. Remove the .
cover
3.
3.
3.
3.3. Push the release tab on the card-retention latch outward.
10
Specyfikacje produktu
| Marka: | Dell |
| Kategoria: | ambona |
| Model: | OptiPlex 3010 |
| Kolor produktu: | Aluminium, Black |
| Typ produktu: | PC |
| Wysokość produktu: | 290 mm |
| Szerokość produktu: | 93 mm |
| Głębokość produktu: | 312 mm |
| Waga produktu: | 5700 g |
| Certyfikat środowiskowy (zrównoważonego rozwoju): | EPEAT Gold, ENERGY STAR |
| Certyfikaty: | CECP, AEEA, BvGS |
| Wyjścia słuchawkowe: | 1 |
| Prędkość transferu danych przez Ethernet LAN: | 10,100,1000 Mbit/s |
| Ilość portów Ethernet LAN (RJ-45): | 1 |
| Taktowanie procesora: | 3.3 GHz |
| Typ procesora: | Intel® Core™ i3 |
| Model procesora: | i3-2120 |
| Platforma: | PC |
| Liczba portów USB 2.0: | 8 |
| Przewodowa sieć LAN: | Tak |
| Zintegrowany czytnik kart: | Nie |
| Producent procesora: | Intel |
| Liczba rdzeni procesora: | 2 |
| Typ pamięci wewnętrznej: | DDR3-SDRAM |
| Pamięć wewnętrzna: | 4 GB |
| Obudowa: | SFF |
| Zainstalowany system operacyjny: | Windows 7 Professional |
| Maksymalna pojemność pamięci: | 8 GB |
| Obsługa kanałów pamięci: | Dwukanałowy |
| Gniazdo procesora: | LGA 1155 (Socket H2) |
| Układ płyty głównej: | Intel® H61 |
| PCI Express x1 slots: | 1 |
| PCI Express x16 gniazda: | 1 |
| Ilość portów HDMI: | 1 |
| Mikrofon: | Tak |
| Technologia okablowania: | 10/100/1000Base-T(X) |
| Zasilanie: | 240 W |
| Rodzaj interfejsu sieci Ethernet: | Gigabit Ethernet |
| Dołączona myszka: | Nie |
| Liczba portów VGA (D-Sub): | 1 |
| HDMI: | Tak |
| Cechy sieci: | Gigabit Ethernet |
| Zgodny ze standradami przemysłowymi: | IEEE 802.3, IEEE 802.3u, IEEE 802.3ab |
| Rodzina adaptera graficznego: | Intel |
| Wejście liniowe: | Tak |
| Port DVI: | Nie |
| Gniazda pamięci: | 1x DIMM |
| Pojemność HDD: | 250 GB |
| Szybkość HDD: | 7200 RPM |
| Rozmiar HDD: | 3.5 " |
| Całkowita pojemność przechowywania: | 250 GB |
| Ilość zatok 3.5": | 2 |
| Procesor ARK ID: | 53426 |
| Technologia Intel® Hyper Threading (Intel® HT Technology): | Tak |
| Technologia Intel® Turbo Boost: | Nie |
| Technologia Intel® Quick Sync Video: | Tak |
| Technologia Intel® InTru™ 3D: | Tak |
| Technologia Intel® Clear Video HD (Intel® CVT HD): | Tak |
| Nowe instrukcje AES (Intel® AES-NI): | Nie |
| Technologia Udoskonalona Intel SpeedStep: | Tak |
| Technologia Intel® Trusted Execution: | Nie |
| Maksymalna konfiguracja CPU: | 1 |
| Intel® Enhanced Halt State: | Tak |
| Intel® Clear Video Technology dla MID (Intel® CVT for MID): | Nie |
| Intel® VT-x with Extended Page Tables (EPT): | Tak |
| Intel® 64: | Tak |
| Technologia Wirtualizacji Intel® (Directed I/O) (VT-d): | Nie |
| Technologia Intel® Clear Video: | Nie |
| Technologia virtualizacji Intel® (VT-x): | Tak |
| Interfejs HDD: | SATA |
| Liczba procesorów: | 1 |
| Typ pamięci procesora: | Smart Cache |
| Cache procesora: | 3 MB |
| Wskaźnik magistrali systemowej: | 5 GT/s |
| Litografia procesora: | 32 nm |
| Liczba wątków: | 4 |
| Tryb pracy procesora: | 64-bit |
| Nazwa kodowa procesora: | Sandy Bridge |
| Maksymalna pamięć wewnętrzna wspierana przez procesor: | 32 GB |
| Typy pamięci wspierane przez procesor: | DDR3 1066/1333 |
| Przepustowość pamięci obsługiwana przez procesor ( max ): | 21 GB/s |
| Pamięć ECC wspierana przez procesor: | Nie |
| Maksymalna liczba linii PCI Express: | 16 |
| Termiczny układ zasilania (TDP): | 65 W |
| Bezkonfliktowy procesor: | Nie |
| Instrukcje obsługiwania: | AVX |
| Technologia Execute Disable Bit (EDB): | Tak |
| Stan spoczynku: | Tak |
| Technologie Thermal Monitoring: | Tak |
| Wbudowane opcje dostępne: | Tak |
| Typ magistrali: | DMI |
| Wielkość opakowania procesora: | 37.5 x 37.5 mm |
| Układ pamięci: | 1 x 4 GB |
| Prędkość zegara pamięci: | 1333 MHz |
| Karta graficzna on-board: | Tak |
| Model karty graficznej on-board: | Intel® HD Graphics 2000 |
| Wersja gniazd typu Slot (PCI Express): | 2.0 |
| Parytet FSB: | Nie |
| Tcase: | 69.1 °C |
| Magistrala systemowa: | - MHz |
| Seria procesora: | Intel Core i3-2100 Desktop Series |
| Generowanie procesora: | Intel® Core™ i3 drugiej generacji |
| Wbudowana bazowa częstotliwość procesora: | 850 MHz |
| Dynamiczne taktowanie wbudowanej karty graficznej (max): | 1100 MHz |
| Liczba monitorów wspieranych (wbudowana karta graficzna): | 2 |
| Model dedykowanej karty graficznej: | Niedostępny |
| ID wbudowanego urządzenia graficznego: | 0x102 |
| Typ zintegrowanej karty graficznej: | Intel® HD Graphics |
| Intel® Wireless Display (Intel® WiDi): | Nie |
| Technologia Intel® My WiFi (Intel® MWT): | Nie |
| Technologia Intel® Identity Protection (Intel® IPT): | Tak |
| Technologia Intel® Anti-Theft (Intel® AT): | Nie |
| Intel® Insider™: | Tak |
| Technologia Intel® FDI: | Tak |
| Intel® Flex Memory Access: | Tak |
| Intel® Fast Memory Access: | Tak |
| Intel® Demand Based Switching: | Nie |
| Technologia Intel® Dual Display Capable: | Tak |
| Intel® Rapid Storage Technology: | Nie |
| Wersja technologii Intel® Identity Protection: | 1.00 |
| Ilość zatok 5.25": | 2 |
| Napędy optyczne: | DVD±RW |
| Ilość dysków optycznych: | 1 |
| Architektura systemu operacyjnego: | 64-bit |
| W zestawie klawiatura: | Nie |
| Dołączony wyświetlacz: | Nie |
| Współczynnik Magistrala/Rdzeń: | 33 |
| Liczba zainstalowanych HDD: | 1 |
| Mapa typów obrazów: | <div><img src="https://ark.intel.com/inc/images/diagrams/diagram-18.gif" title="Block Diagram" /></div> |
Potrzebujesz pomocy?
Jeśli potrzebujesz pomocy z Dell OptiPlex 3010, zadaj pytanie poniżej, a inni użytkownicy Ci odpowiedzą
Instrukcje ambona Dell

17 Września 2024
17 Września 2024
21 Sierpnia 2024
9 Lipca 2024
29 Maja 2024
29 Maja 2024
28 Maja 2024
25 Maja 2024
23 Maja 2024
22 Maja 2024
Instrukcje ambona
- ambona Lenovo
- ambona Gigabyte
- ambona Acer
- ambona Fujitsu
- ambona LC-Power
- ambona Viewsonic
- ambona Asus
- ambona Medion
- ambona MSI
- ambona Haier
- ambona HP
- ambona Tripp Lite
- ambona Apple
- ambona Razer
- ambona Asrock
- ambona ECS
- ambona Elo
- ambona Cybernet
- ambona Planar
- ambona Zotac
- ambona Kramer
- ambona TrekStor
- ambona Alienware
- ambona Intel
- ambona Advantech
- ambona AOpen
- ambona Kendall Howard
Najnowsze instrukcje dla ambona

9 Kwietnia 2025
2 Kwietnia 2025

1 Kwietnia 2025
1 Kwietnia 2025

1 Kwietnia 2025

29 Marca 2025
27 Marca 2025
6 Marca 2025
26 Lutego 2025
26 Lutego 2025