Instrukcja obsługi Dell Inspiron 11z 1120
Przeczytaj poniżej 📖 instrukcję obsługi w języku polskim dla Dell Inspiron 11z 1120 (36 stron) w kategorii laptop. Ta instrukcja była pomocna dla 32 osób i została oceniona przez 2 użytkowników na średnio 4.5 gwiazdek
Strona 1/36

Dell™Inspiron™1121ServiceManual
Notes, Cautions, and Warnings
Information in this document is subject to change without notice.
©2010DellInc.Allrightsreserved.
Reproduction of these materials in any manner whatsoever without the written permission of Dell Inc. is strictly forbidden.
Trademarks used in this text: Dell, the DELL logo, and Inspiron are trademarks of Dell Inc.; Windows and the Windows start button logo are either trademarks or registered
trademarks of Microsoft Corporation in the United States and/or other countries; Bluetooth is a registered trademark owned by Bluetooth SIG, Inc. and is used by Dell under
license.
Other trademarks and trade names may be used in this document to refer to either the entities claiming the marks and names or their products. Dell Inc. disclaims any
proprietary interest in trademarks and trade names other than its own.
December 2010 Rev. A00
Regulatory model: P07T series
Regulatory type: P07T001
Before You Begin
Battery
Memory Module(s)
Keyboard
Hard Drive
Palm Rest
Power Button Board
Wireless Mini-Card(s)
Audio Board
Coin-Cell Battery
Display
Camera
Middle Cover
AC Adapter Connector
System Board
Processor Heat Sink
Speakers
Flashing the BIOS
NOTE: A NOTE indicates important information that helps you make better use of your computer.
CAUTION: A CAUTION indicates either potential damage to hardware or loss of data and tells you how to avoid the problem.
WARNING: A WARNING indicates a potential for property damage, personal injury, or death.
Back to Contents Page
AC Adapter Connector
Dell™Inspiron™1121ServiceManual
Removing the AC Adapter Connector
Replacing the AC Adapter Connector
Removing the AC Adapter Connector
1. Follow the instructions in Before You Begin.
2. Remove the battery (see Removing the Battery).
3. Remove the keyboard (see Removing the Keyboard).
4. Follow the instructions from step 4 to step 6 in Removing the Hard Drive.
5. Remove the palm rest (see Removing the Palm Rest).
6. Remove the display assembly (see Removing the Display Assembly).
7. Remove the middle cover (see Removing the Middle Cover).
8. Remove the audio board (see Removing the Audio Board).
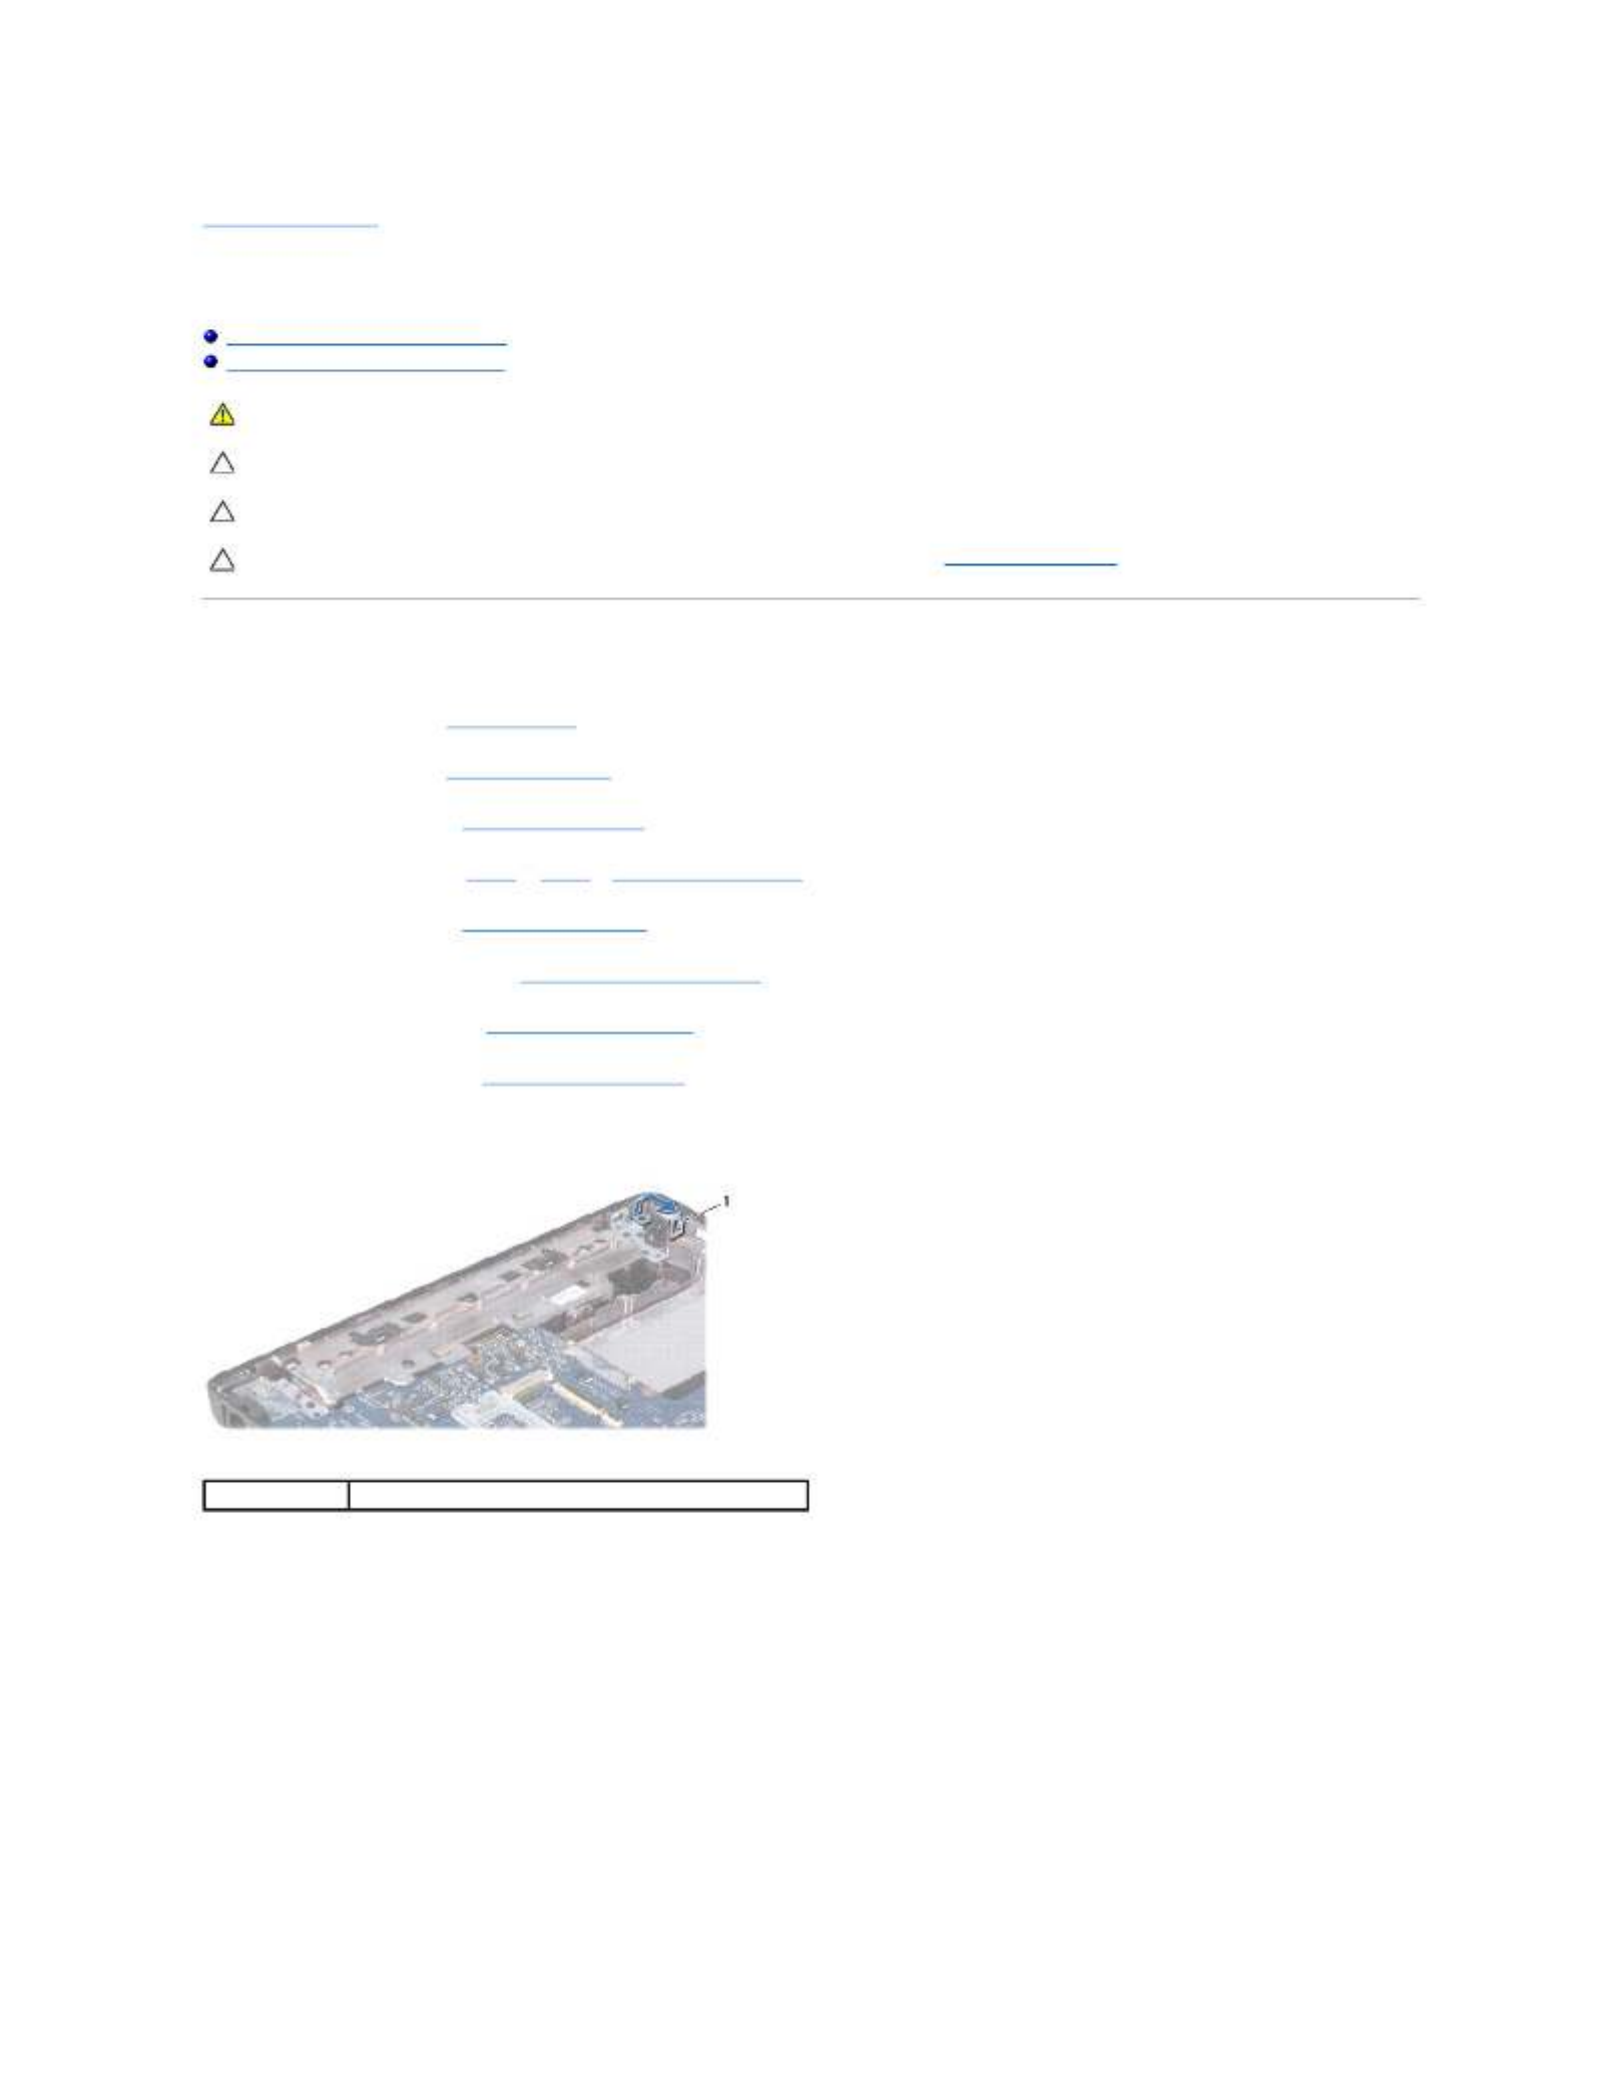
9. Lift and remove the bracket off the computer base as shown in the illustration.
10. Disconnect the AC adapter connector cable from the connector on the system board.
11. Make note of the cable routing and carefully dislodge the AC adapter connector cable from the routing guides.
12. Lift the AC adapter connector off the computer base.
WARNING: Before working inside your computer, read the safety information that shipped with your computer. For additional safety best
practices information, see the Regulatory Compliance Homepage at www.dell.com/regulatory_compliance.
CAUTION: Onlyacertifiedservicetechnicianshouldperformrepairsonyourcomputer.DamageduetoservicingthatisnotauthorizedbyDell™
is not covered by your warranty.
CAUTION: To avoid electrostatic discharge, ground yourself by using a wrist grounding strap or by periodically touching an unpainted metal
surface (such as a connector on your computer).
CAUTION: To help prevent damage to the system board, remove the main battery (see Removing the Battery) before working inside the
computer.
1
bracket

Replacing the AC Adapter Connector
1. Follow the instructions in Before You Begin.
2. Route the AC adapter connector cable and place the AC adapter connector on the computer base.
3. Connect the AC adapter connector cable to the connector on the system board.
4. Replace the bracket that secures the AC adapter connector on the computer base.
5. Replace the audio board (see Replacing the Audio Board).
6. Replace the middle cover (see Replacing the Middle Cover).
7. Replace the display assembly (see Replacing the Display Assembly).
8. Replace the palm rest (see Replacing the Palm Rest).
9. Follow the instructions from step 5 to step 7 in Replacing the Hard Drive.
10. Replace the keyboard (see Replacing the Keyboard).
11. Replace the battery (see Replacing the Battery).
Back to Contents Page
1
AC adapter connector cable
2
AC adapter connector
CAUTION: Before turning on the computer, replace all screws and ensure that no stray screws remain inside the computer. Failure to do so may
result in damage to the computer.
Specyfikacje produktu
| Marka: | Dell |
| Kategoria: | laptop |
| Model: | Inspiron 11z 1120 |
Potrzebujesz pomocy?
Jeśli potrzebujesz pomocy z Dell Inspiron 11z 1120, zadaj pytanie poniżej, a inni użytkownicy Ci odpowiedzą
Instrukcje laptop Dell

3 Kwietnia 2025
13 Marca 2025
26 Lutego 2025
22 Lutego 2025
6 Lutego 2025
6 Lutego 2025
28 Stycznia 2025
15 Stycznia 2025
10 Stycznia 2025
30 Grudnia 2025
Instrukcje laptop
- laptop Sony
- laptop Samsung
- laptop Fellowes
- laptop LG
- laptop Xiaomi
- laptop Huawei
- laptop Lenovo
- laptop Gigabyte
- laptop Acer
- laptop Fujitsu
- laptop Panasonic
- laptop Viewsonic
- laptop Asus
- laptop Medion
- laptop MSI
- laptop Toshiba
- laptop Haier
- laptop HP
- laptop Prixton
- laptop Hyundai
- laptop Honor
- laptop Tripp Lite
- laptop Zebra
- laptop Schneider
- laptop Thomson
- laptop Pyle
- laptop Apple
- laptop Razer
- laptop ADATA
- laptop GoClever
- laptop SPC
- laptop NEC
- laptop Oregon Scientific
- laptop Jay-Tech
- laptop Microsoft
- laptop ECS
- laptop XPG
- laptop Denver
- laptop Lexibook
- laptop Micromax
- laptop Odys
- laptop TechBite
- laptop TrekStor
- laptop Alienware
- laptop Airis
- laptop Emachines
- laptop Hähnel
- laptop Sylvania
- laptop Coby
- laptop Evga
- laptop Naxa
- laptop Ricatech
- laptop Mpman
- laptop Vizio
- laptop Targa
- laptop Peaq
- laptop Ematic
- laptop Hannspree
- laptop Inovia
- laptop Ergotron
- laptop Ibm
- laptop Atdec
- laptop Packard Bell
- laptop Compaq
- laptop SIIG
- laptop Hercules
- laptop Kogan
- laptop Getac
- laptop Vulcan
- laptop System76
- laptop General Dynamics Itronix
- laptop CTL
- laptop Everex
- laptop Olidata
- laptop Dynabook
- laptop Hamilton Buhl
- laptop AORUS
- laptop Humanscale
- laptop Aplic
- laptop Schenker
Najnowsze instrukcje dla laptop

2 Kwietnia 2025

28 Marca 2025

28 Marca 2025
26 Marca 2025
7 Marca 2025

4 Marca 2025
1 Marca 2025
23 Lutego 2025
23 Lutego 2025
22 Lutego 2025