Instrukcja obsługi Casio Exilim EX-Z1000
Casio
aparat fotograficzny
Exilim EX-Z1000
Przeczytaj poniżej 📖 instrukcję obsługi w języku polskim dla Casio Exilim EX-Z1000 (266 stron) w kategorii aparat fotograficzny. Ta instrukcja była pomocna dla 5 osób i została oceniona przez 2 użytkowników na średnio 4.5 gwiazdek
Strona 1/266
E
Digital Camera
EX-Z1000
User’s Guide
K800PCM1DMX
Thank you for purchasing this CASIO product.
• Before using it, be sure to read the precautions
contained in this User’s Guide.
• Keep the User’s Guide in a safe place for future
reference.
• For the most up-to-date information about this
product, visit the official EXILIM
Website at http://www.exilim.com/.

2UNPACKING
UNPACKING
As you unpack your camera, check to make sure that all items shown below are included. If anything is missing, contact your original
retailer.
Digital Camera Rechargeable Lithium Ion
Battery (NP-40) USB Cradle (CA-33) Strap
CD-ROM USB Cable AV Cable Basic Reference
•Note that the shape of the AC adaptor depends on the area where you purchased the camera.
To attach the strap to the camera
Attach strap here.
Special AC Adaptor (Inlet Type)
(AD-C52G)
AC Power Cord
*Special AC Adaptor (Plug-in Type)
(AD-C52J)
*The shape of the AC power
cord plug varies according to
country or geographic area.

3CONTENTS
CONTENTS
UNPACKING 2
QUICK START BASICS 10
First, charge the battery . . . . . . . . . . . . . . . . . . . . . 10
Configuring Display Language, Date,
and Time Settings . . . . . . . . . . . . . . . . . . . . . . . . . . 12
Using a Memory Card . . . . . . . . . . . . . . . . . . . . . . . 14
Shooting a Snapshot . . . . . . . . . . . . . . . . . . . . . . . . 16
Viewing Snapshots . . . . . . . . . . . . . . . . . . . . . . . . . 18
Shooting a Movie . . . . . . . . . . . . . . . . . . . . . . . . . . . 19
Viewing a Movie . . . . . . . . . . . . . . . . . . . . . . . . . . . . 20
Deleting a File . . . . . . . . . . . . . . . . . . . . . . . . . . . . . 21
INTRODUCTION 22
Features . . . . . . . . . . . . . . . . . . . . . . . . . . . . . . . . . . 22
Read this first! . . . . . . . . . . . . . . . . . . . . . . . . . . . . . 24
Precautions during Use . . . . . . . . . . . . . . . . . . . . . 26
GETTING READY 36
Charging the Battery . . . . . . . . . . . . . . . . . . . . . . . . 36
■To load the battery 36
■To charge the battery 37
■Replacing the Battery 41
■Battery Precautions 41
Turning Power On and Off . . . . . . . . . . . . . . . . . . . 42
Using a Memory Card . . . . . . . . . . . . . . . . . . . . . . .45
■Loading a Memory Card into the Camera 47
■Replacing the Memory Card 48
■Formatting a Memory Card 49
Using On-screen Menus . . . . . . . . . . . . . . . . . . . . . 51
■Configuring Monitor Screen Settings 52
■Selecting a Screen Layout (Layout) 53
■Turning Display Information On and Off (Info.) 56
■Adjusting Monitor Screen Brightness (Brightness) 58
■Adjusting Monitor Screen Image Quality (Type) 59
If you lose your way... . . . . . . . . . . . . . . . . . . . . . . . 60
Using the Camera on a Trip . . . . . . . . . . . . . . . . . . 61
■Extra Batteries 61
■Using the Camera in another Country 61
C

4CONTENTS
SHOOTING A SNAPSHOT 62
Holding the Camera Correctly . . . . . . . . . . . . . . . . 62
Shooting a Snapshot . . . . . . . . . . . . . . . . . . . . . . . . 63
■Changing the Image Size 67
■Specifying Image Quality 68
■Turning Off the AF Assist Lamp 69
■Snapshot Shooting Precautions 70
■Auto Focus Restrictions 71
Shooting with Zoom . . . . . . . . . . . . . . . . . . . . . . . . 72
Using Instant Zoom . . . . . . . . . . . . . . . . . . . . . . . . . 75
Using Flash . . . . . . . . . . . . . . . . . . . . . . . . . . . . . . . 76
Using the Self-Timer . . . . . . . . . . . . . . . . . . . . . . . . 81
Using Continuous Shutter . . . . . . . . . . . . . . . . . . . 83
■Selecting the Continuous Shutter Mode 84
■Recording with Normal-speed Continuous
Shutter, High-speed Continuous Shutter,
and Flash Continuous Shutter 84
■Recording with Zoom Continuous Shutter 85
■Continuous Shutter Precautions 86
Adding Audio to a Snapshot . . . . . . . . . . . . . . . . . 87
SHOOTING A MOVIE 89
Movie Image Quality . . . . . . . . . . . . . . . . . . . . . . . . 89
Shooting a Movie . . . . . . . . . . . . . . . . . . . . . . . . . . . 90
■Movie Recording Precautions 91
USING BEST SHOT 93
Reducing the Eects of Hand and Subject
Movement . . . . . . . . . . . . . . . . . . . . . . . . . . . . . . . . . 98
Taking Bright Images without Flash . . . . . . . . . . 100
Shooting Images of Business Cards
and Documents (Business Shot) . . . . . . . . . . . . . 101
Shooting ID Photographs . . . . . . . . . . . . . . . . . . . 103
Restoring an Old Photograph . . . . . . . . . . . . . . . . 106

10 QUICK START BASICS
QUICK START BASICS
(page 36)
■Loading the Battery into the Camera
1. Open the battery cover.
2. Load the battery into the camera.
3. Close the battery cover.
First, charge the battery
While pressing lightly on the
cover, slide it in the direction
indicated by the arrow to
open.

11 QUICK START BASICS
■Using the USB Cradle to Charge
•Note that the shape of the AC adaptor depends on the area
where you purchased the camera.
1. Plug the USB cradle into a household power
outlet.
2. Place the camera onto the USB cradle.
Inlet Type
Plug-in Type
AC adaptor
AC adaptor
[CHARGE] lamp
Red: Charging
Green: Charged (Full)
• It takes about three hours to achieve
a full charge.

13 QUICK START BASICS
6. Use [ ] and [ ] to select the date format and then press [SET].
Example: December 19, 2006
7. Set the date and the time.
Use [ ] and [ ] to select the setting you want (year, month, day, hour, minute) and then use [ ] and [ ] to change the setting.
To switch between 12-hour and 24-hour format, press [BS].
8. When all the settings are the way you want, press [SET].
9. Press [ON/OFF] to turn off the camera.
•After finishing this procedure, advance to the procedure on the next page.
To display the date like this: Select this option:
06/12/19 YY/MM/DD
19/12/06 DD/MM/YY
12/19/06 MM/DD/YY

14 QUICK START BASICS
(page 45)
■Loading a Memory Card into the Camera
When a memory card is loaded, the camera stores images you
shoot on the card.
NOT
E
•Though the camera has built-in memory, using a memory
card provides additional capacity you can use to store more
images, high-quality and large-size images, and longer
movies.
•The camera will store images in its built-in memory if there
is no memory card loaded. If you prefer to use built-in
memory, skip this procedure and go to “Shooting a
Snapshot” on page 16.
1. Open the battery cover.
2. Load a memory card into the camera.
With the front of the memory card facing upwards (towards
the monitor screen side of the camera), slide it into the card
slot and press until it clicks securely into place.
3. Close the battery cover.
Using a Memory Card
While pressing lightly on the
cover, slide it in the
direction indicated by the
arrow to open.
Front Back

15 QUICK START BASICS
■Formatting a Memory Card
Before you can use a memory card with your camera, you must
format it.
IMPORTANT!
•Formatting a memory card that already has snapshots or
other files on it, will delete its contents. Normally you do not
need to format a memory card again. However, if storing to
a card has slowed down or if you notice any other
abnormality, re-format the card.
•Be sure to perform the following procedure on the camera
to format the memory card.
1. Press [ON/OFF] to turn on the camera.
2. Press [MENU].
3. Use [ ] and [ ] to select the “Set Up” tab.
4. Use [ ] to select “Format” and then press [ ].
5. Press [ ] to select “Format” and then press
[SET].
•To cancel formatting, select “Cancel” and then press
[SET].
Wait until the “Busy... Please wait...” message disappears
from the monitor screen before doing anything else.
“Set Up” Tab
[ON/OFF] (Power)
[MENU]
16 QUICK START BASICS
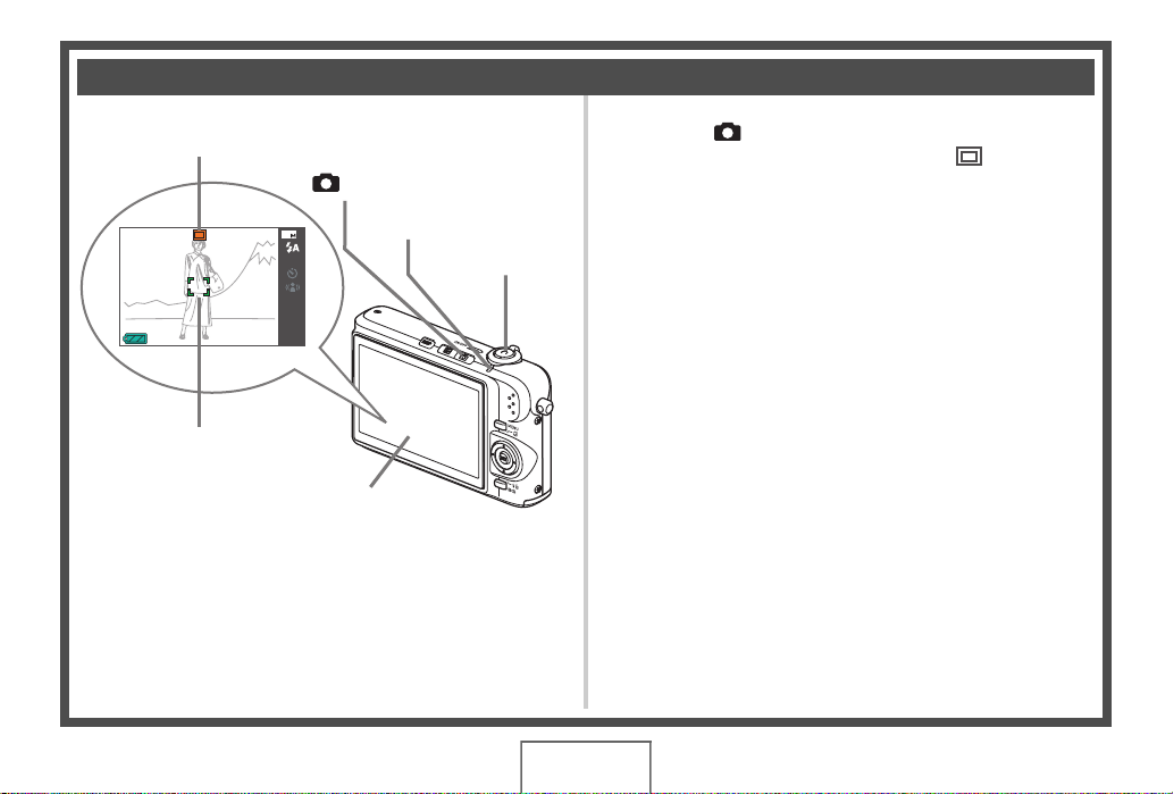
(page 62)
1. Press [ ] to turn on the camera.
This enters the REC mode and displays “ ” (Auto icon)
on the monitor screen.
2. Point the camera at the subject.
3. While taking care to keep the camera still, half-
press the shutter button.
When the image is in focus, the camera will beep, the operation
lamp will light green, and the focus frame will turn green.
4. Continuing to keep the camera still, press the
shutter button all the way down.
The recorded image will remain on the display for about one
second, and then it will be stored in memory. After that, the
camera will be ready to shoot the next image.
Shooting a Snapshot
AWB
AF
ISO
-0.3EV
15:37
N
10
62
62
62
62
62
Auto icon
Focus Frame
Shutter Button
[ ] (REC)
Monitor Screen
Operation Lamp

17 QUICK START BASICS
Snapshot Image Size and Image Quality
Your camera lets you select from among various image size
and quality settings. Note that image size and quality
settings affect how many images can be stored in memory.
• You can change the image size and quality settings as
required to shoot a smaller or lower-resolution image for
attachment to an e-mail message, for publishing on a
website, etc. You can also select an image size that suits
the size of paper you plan to use for printing your images.
For details, see pages 67, 68, and 259.
How do I half-press the shutter button?
The shutter button is designed to stop about half way down
when you press it lightly. Stopping at this point is called a
“half-press”. When you half-press the shutter button, the
camera automatically adjusts exposure and focuses on the
subject it is currently pointed at.
Mastering how much pressure is required for a half-press
and a full-press of the shutter button is an important
technique for good-looking images.
Half-press
Press lightly
until the
button stops.
Beep-beep! Click!
Full-press
All the way

18 QUICK START BASICS
(page 139)
1. Press [ ] to enter the PLAY mode.
If there are multiple images in memory, use [W] and [X] to
scroll through them.
■To return to the REC mode
Press [ ].
Viewing Snapshots
[ ] (PLAY)
[ ]W][X
19 QUICK START BASICS
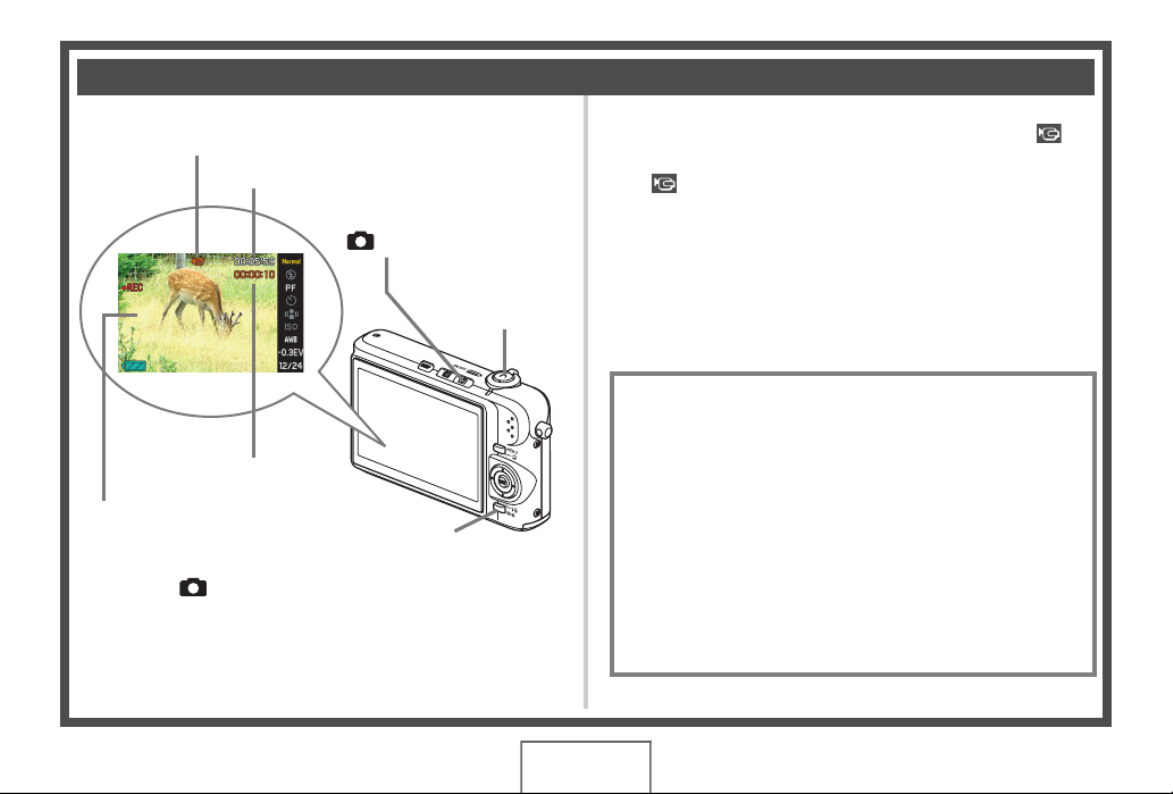
(page 89)
1. Press [ ] to enter the REC mode.
2. Press [BS] (BEST SHOT).
3. Use [S
S
S
SS], [T
T
T
TT], [W
W
W
WW], and [X
X
X
XX] to select the “ ”
(Movie) scene and then press [SET].
“ ” (movie icon) remains on the monitor screen.
4. Press the shutter button to start shooting the
movie.
• Audio is also recorded during movie recording.
5. Press the shutter button again to stop
recording.
Shooting a Movie
Movie Icon
Remaining Recording Time
Recording Time
[ ] (REC)
Shutter Button
Movie Recording Screen
[BS]
Movie Image Quality
Your camera lets you select from among three image quality
settings (HQ, Normal, LP) for movies. For best camera
performance, use the “HQ” (High Quality) setting for movie
recording.
Movie quality is a standard that determines the detail,
smoothness, and clarity of the image during playback.
Reducing image quality let’s you shoot longer, so you can
switch to “Normal” or “LP” conserve remaining memory
capacity if you start to run low.
For details, see pages 89 and 259.

20 QUICK START BASICS
(page 141)
The film-like frame that appears on the monitor screen indicates
that this is an image from a movie.
1. Press [ ] to enter the PLAY mode.
2. Use [W
W
W
WW] and [X
X
X
XX] to select the movie you want
to play.
When scrolling through images, a movie is displayed on the
monitor screen by showing its first frame.
3. Press [SET] to start playback.
The monitor screen will return to the image selection screen
in step 2 after the end of the movie is reached.
• During movie playback, you can adjust volume, skip
forward and back, and perform other operations (page
142).
■To return to the REC mode
Press [ ].
Viewing a Movie
[ ] (PLAY)
[ ]W][X
[SET]
“ ” Movie icon
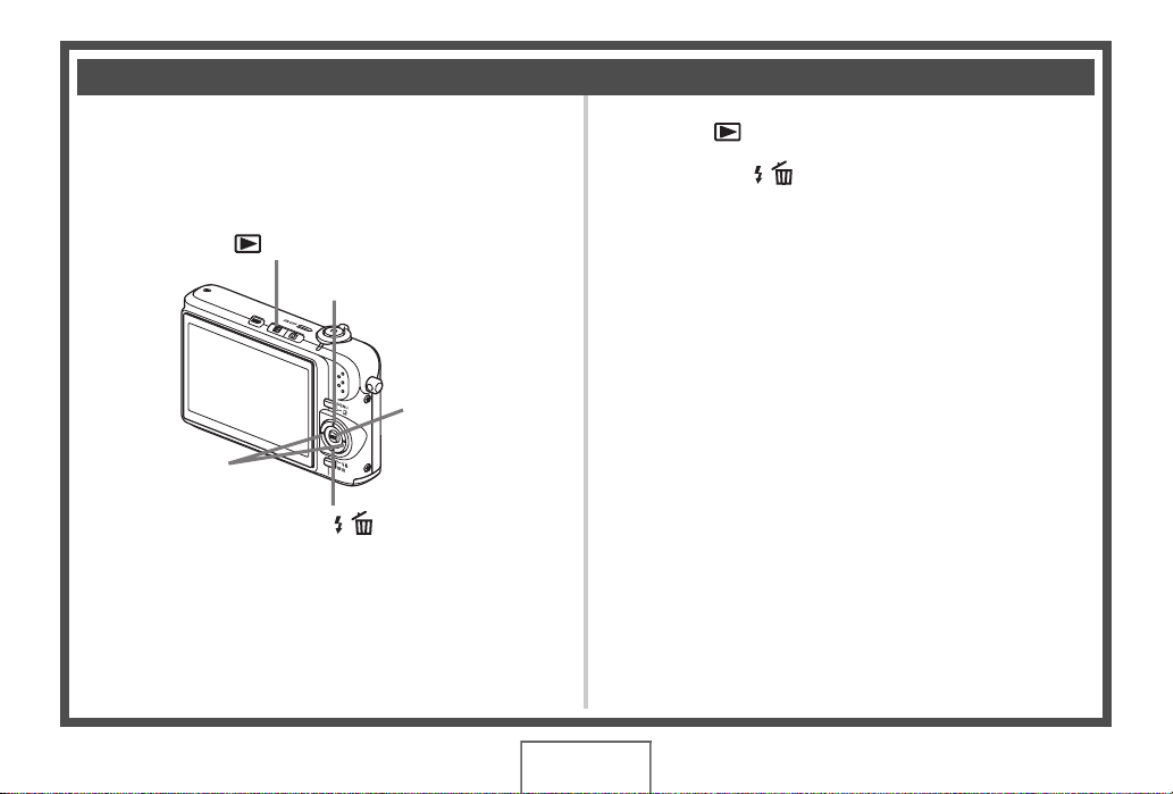
21 QUICK START BASICS
(page 181)
You can use the following procedure to delete files you have
transferred to your computer’s hard disk, images you have
printed, or files you simply no longer need. This frees up
memory for recording more images.
1. Press [ ].
2. Press [T
T
T
TT] ( ).
3. Use [W
W
W
WW] and [X
X
X
XX] to select the snapshot or
movie you want to delete.
4. Press [S
S
S
SS] to select “Delete”.
• To cancel the delete operation, select “Cancel”.
5. Press [SET].
This deletes the selected snapshot or movie.
• If you want to delete more, repeat the above procedure
from step 3.
• To quit the delete operation, press [MENU].
Deleting a File
[ ] (PLAY)
[ ]W][X
[T] ( )
[ ]S
[SET]

22 INTRODUCTION
INTRODUCTION
■BEST SHOT for beautiful shots simply by
selecting a sample image built into the
camera
Simply select the scene that is similar to what you want to shoot
(Night Scene Portrait, Flower, etc.), for instant camera setups. A
dedicated [BS] button gives you direct access to the BEST
SHOT library of sample scenes.
■Direct Mode Power On
■A powerful collection of useful recording
features
• Hand movement and subject movement reduction using high
shutter speed (page 98)
• High-sensitivity recording avoids dark images, even when the
flash is not being used (page 100)
• Quick Shutter for very high-speed focus (page 115)
Features
Example: Select for skillful shots of a fast-moving pet.
BEST SHOT Screen
Example: Select for beautiful portraits.
To record, press [ ] to
power up in the REC mode.
To view images, press
[ ] to power up in the
PLAY mode.

23 INTRODUCTION
■High-quality (Motion JPEG) movie recording
(page 89)
• MOTION PRINT for printing of a
movie scene as a single image
(page 166)
■Powerful Print Features
• DPOF feature for easy specification of date stamping and the
number of copies (page 200)
• Timestamp feature that stamps the date into the image data
(page 128)
• Support for PictBridge and USB DIRECT-PRINT for easy at-
home printing on a printer that supports one of these
standards, without a computer (page 197)
■Multi-function USB Cradle
You can place the camera on the USB cradle to perform the
following operations.
– Battery charging (page 36)
– Photo Stand slideshow of images (page 145)
– Connection to a TV for viewing on the TV screen (page
147)
– Connection to a printer for image printing (page 197)
– Connection to a computer for transfer of images to the
computer (pages 211, 226)

25 INTRODUCTION
• All other company or product names mentioned herein are
registered trademarks or trademarks of their respective
companies.
• Photo Loader and Photohands rights are owned by CASIO
COMPUTER CO., LTD. Except for the rights of other
companies as defined above, all rights related to these
programs and other rights shall revert to CASIO COMPUTER
CO., LTD.
• The contents of this manual are subject to change without
notice.
• The content of this manual has been checked at each step
of the production process. Please contact us if you notice
anything that is questionable, erroneous, etc.
• Any copying of the contents of this manual, either in part or
its entirety, is forbidden. Except for your own personal use,
and other use of the contents of this manual without the
permission of CASIO COMPUTER CO., LTD. is forbidden
under copyright laws.
• CASIO COMPUTER CO., LTD. shall not be held liable for
any damages or loss suffered by you or any third party due
to the use or malfunction of this product.
• CASIO COMPUTER CO., LTD. shall not be held liable for
any damages or loss suffered by you or any third party due
to the use of Photo Loader and/or Photohands.
• CASIO COMPUTER CO., LTD. shall not be held liable for
any damages or loss caused by deletion of memory
contents due to malfunction, repair, or any other reason.
• Note that the example screens and product illustrations
shown in this manual may differ somewhat by the screens
and configuration of the actual camera.

28 INTRODUCTION
■Water and Foreign Matter
•Water, other liquids, or foreign matter (especially metal)
getting inside the camera creates the risk of fire and electric
shock. Immediately perform the following steps whenever any
of the above symptoms are present. Particular care is
required when using the camera where it is raining or
snowing, near the ocean or other body of water, or in a
bathroom.
1. Turn off the camera.
2. If you are using the AC adaptor to power the camera,
unplug it from the wall outlet. If you are using battery
power, remove the battery from the camera.
3. Contact your dealer or nearest CASIO authorized service
center.
■Dropping and Rough Treatment
•Continued use of the camera after it is damaged by dropping
or other rough treatment creates the risk of fire and electric
shock. Immediately perform the following steps whenever any
of the above symptoms are present.
1. Turn off the camera.
2. If you are using the AC adaptor to power the camera,
unplug it from the wall outlet. If you are using battery
power, remove the battery from the camera.
3. Contact your dealer or nearest CASIO authorized service
center.
■Keep Away From Fire
•Never expose the camera to fire, which can cause it to
explode and creates the risk of fire and electric shock.

31 INTRODUCTION
•Be sure to read the user documentation that comes with the
camera and special charger unit before using or charging the
battery.
•If a battery is to be used by young children, make sure that a
responsible adult makes them aware of the precautions and
proper handling instructions, and make sure that they handle
battery correctly.
•Should fluid from a battery accidentally get onto clothing or
your skin, immediately rinse it off with clean tap water.
Prolonged contact with battery fluid can cause skin irritation.
■AC Adaptor
•Misuse of the AC adaptor creates the risk of fire and electric
shock. Make sure you observe the following precautions
when using the AC adaptor.
– Use only the AC adaptor specified for this camera.
– Use the AC adaptor to supply power only to devices that
are specified for use with it.
– Use a 100 to 240V AC (50/60Hz) wall outlet as a power
source.
– Never plug the power cord into a wall outlet that is shared
by other devices, or into a shared extension cord.
•Misuse of the AC adaptor can cause it to become damaged,
creating the risk of fire and electric shock. Make sure you
observe the following precautions when using the AC adaptor.
– Never place heavy objects on the AC adaptor or subject it
to direct heat.
– Never try to modify the AC adaptor or subject it to bending.
– Do not twist or pull on the power cord.
– Should the power cord or plug ever become damaged,
contact your dealer or nearest CASIO authorized service
center.

32 INTRODUCTION
•Never touch the AC adaptor while your hands are wet. Doing
so creates the risk of electric shock.
•Misuse of the AC adaptor creates the risk of fire and electric
shock. Make sure you observe the following precautions
when using the AC adaptor.
– Never locate the power cord near a stove or other heating
device.
– When unplugging from the wall outlet, grasp the plug on
the AC adaptor power cord. Never pull on the power cord.
– Insert the plug into the wall outlet as far as it will go.
– Unplug the AC adaptor from the wall outlet before leaving
the camera unattended for long periods, such as when
leaving on a trip, etc.
– At least once a year, unplug the AC adaptor from the wall
outlet and clean off any dust built up around the prongs.
■USB Cradle and AC Adaptor Precautions
•Make sure you always remove the camera from the USB
cradle before connecting or disconnecting the AC adaptor.
•Charging, USB data communication, the Photo Stand
operation can cause the AC adaptor to become warm. This is
normal and does not indicate malfunction.

34 INTRODUCTION
■Operating Environment
•The operating temperature range of the camera is 0°C to
40°C (32°F to 104°F).
•Do not place the camera in any of the following locations.
– In an area exposed to direct sunlight, or large amounts of
moisture or dust
– Near an air conditioner or in other areas subjected to
extreme temperature or humidity
– Inside of a motor vehicle on a hot day, or in an area
subjected to strong vibration
■Condensation
•Sudden and extreme temperature changes, such as when the
camera is moved from the outdoors on a cold winter day into
a warm room, can cause water droplets called “condensation”
to form on the interior and the exterior of the camera. Note
that condensation can cause malfunction of the camera. To
avoid condensation, place the camera into a plastic bag
before subjecting it to sudden temperature change. Wait until
the air in the bag has had enough time to become acclimated
to the new temperature before removing the camera. After
that, open the battery cover and leave it open for a few hours.
■Power Supply
•Use only the special rechargeable lithium ion battery (NP-40)
to power this camera. Use of any other type of battery is not
supported.
•The camera does not have a separate battery for the clock.
The date and time settings of the camera are cleared about
one day after power is totally cut off (from both the battery and
USB cradle). If this happens, be sure to reconfigure these
settings after power is restored (page 187).
■Lens
•Never apply too much force when cleaning the surface of the
lens. Doing so can scratch the lens surface and cause
malfunction.
•You may sometimes notice some distortion in certain types of
images, such as a slight bend in lines that should be straight.
This is due to the characteristics of lens, and does not
indicate malfunction of the camera.

35 INTRODUCTION
■Caring for your camera
•Fingerprints, dirt, and other foreign matter on the lens surface
can interfere with proper operation of the camera. Avoid
touching the lens surface. To clean the lens surface, use a
blower to blow off dust or foreign matter and then wipe with a
soft, dry cloth.
•Fingerprints, dirt, and other foreign matter on the flash can
interfere with proper operation of the camera. Avoid touching
the flash. If the flash becomes dirty, wipe it clean with a soft,
dry cloth.
•To clean the camera, wipe it with a soft, dry cloth.
■Monitor Screen Images
•The images that normally appear on the monitor screen
during image playback are smaller than normal, and so you
cannot see all of the detail of the actual image. Your camera
has an image zoom feature (page 150) which you can use to
enlarge the monitor screen image. You can use this feature
for on-the-spot checks of important images.
■Other Precautions
•The camera becomes slightly warm during use. This is normal
and does not indicate malfunction.

37 GETTING READY
3. Close the battery cover.
Swing the battery cover closed, and then slide it securely
into place as you press it against the camera.
The battery is not fully charged when you use the camera
for the first time after purchasing it. Use the following
procedure to charge it.
To charge the battery
1. Plug the USB cradle into a household power
outlet.
• Note the shape of the AC adaptor depends on the area
where you purchased the camera.
AC Adaptor
USB Cradle
[DC IN 5.3V]
AC Adaptor
USB Cradle
AC power cord
Plug-in Type
Inlet Type
[DC IN 5.3V]

38 GETTING READY
2. Make sure the camera is turned off.
If the camera is on, be sure to press [ON/OFF] to turn it off
before placing it onto the USB cradle.
3. With the camera positioned so the monitor
screen is facing towards you as shown in the
illustration, place it onto the USB cradle.
The [CHARGE] lamp lights red and charging starts.
• It takes about three hours to achieve a full charge. Actual
charging time depends on current battery capacity,
remaining power, and charging conditions.
When charging is complete
The [CHARGE] lamp, which was lit red during charging,
changes to green.
Remove the camera from the USB cradle and unplug the AC
adaptor from the power outlet.
If the [CHARGE] lamp lights amber
This indicates that charging cannot be performed because you
have just finished using the camera, or because the temperature
in your location is too hot or too cold. If this happens, wait until
the camera returns to normal temperature. When the camera
returns to a temperature where charging can be performed, the
[CHARGE] lamp will light red.
Carefully insert the camera
as far as it will go.
Cradle contact
[CHARGE] lamp
Camera contact

39 GETTING READY
If the [CHARGE] lamp flashes red
This indicates that the camera or battery is faulty, or that the
battery is loaded in the camera incorrectly.
Remove the battery from the camera and check if its contacts
are dirty. If they are, wipe them off with a dry cloth and then
reload the battery into the camera. After confirming that the AC
adaptor is plugged into the power outlet and the USB cradle, set
the camera on the cradle again.
IMPORTANT!
• Use only the bundled USB cradle or the separately
available special charger unit (BC-30L) to charge the
special rechargeable lithium ion battery (NP-40). The
battery cannot be charged using any other type of charger
device. Attempting to use a different charger can result in
unexpected accident.
• Use only the AC adaptor that comes bundled with the
camera. Never use any other type of AC adaptor. Use of
the separately available AD-C30, AD-C40, AD-C620, or
AD-C630 is not supported.
■Battery Power Conservation Tips
• When you do not need to use the flash, select “ ” (flash off)
for the flash setting (page 76).
• Enable the Auto Power Off and the Sleep features to protect
against wasting battery power when you forget to turn off the
camera (page 44).
If an error still continues to occur after you perform the above
steps, it could mean that the battery is faulty. Contact your
nearest CASIO authorized service center.

41 GETTING READY
Replacing the Battery
1. Open the battery cover.
2. With the camera oriented with its monitor
screen facing upwards as shown in the
illustration, slide the stopper in the direction
indicated by the arrow and hold it there.
• This will cause the battery to come out part way.
3. While still holding the stopper, pull the battery
out the rest of the way.
4. Load a new battery.
Battery Precautions
■Precautions during Use
• Operation provided by a battery under cold conditions is
always less than operation under normal temperatures. This
is due to the characteristics of the battery, not the camera.
• Charge the battery in an area where the temperature is within
the range of 10°C to 35°C (50°F to 95°F). Charging outside
this temperature range can cause charging to take longer
than normal or even cause charging to fail.
• If a battery provides only very limited operation following a full
charge, it probably means that the battery has reached the
end of its service life. Replace the battery with a new one.
Stopper

42 GETTING READY
■Storage Precautions
• Though a rechargeable lithium ion battery provides high
capacity in a compact configuration, long-term storage while
charged can cause it to deteriorate.
– If you do not plan to use a battery for some time, fully use
up its charge before storing it.
– Always remove the battery from the camera when you are
not using it. Leaving a battery in the camera can cause it to
discharge and go dead, which will require longer charging
when you need to use the camera.
– Store batteries in a cool, dry place (20°C (68°F) or lower).
■Turning Power On
To turn power on and enter the REC mode
Press [ON/OFF] (Power) or [ ] (REC).
To turn power on and enter the PLAY mode
Press [ ] (PLAY).
Pressing a button causes the operation lamp to light green
momentarily and turns on power.
Turning Power On and Off
[ON/OFF] (Power)
Operation Lamp
[ ] (PLAY) [ ] (REC)

43 GETTING READY
IMPORTANT!
•Pressing [ON/OFF] or [ ] (REC) to turn on power also
causes the lens to extend. Take care there is nothing
pressing against or hitting the lens. Holding the lens with
your hand so it cannot extend creates the risk of
malfunction.
NOT
E
•Pressing [ ] (PLAY) while in the REC mode switches to
the PLAY mode. The lens retracts about 10 seconds after
switching modes.
•Auto Power Off (page 44) will turn off power automatically if
you do not perform any operation for a preset amount of
time. If this happens, turn power back on.
■Turning Power Off
Press [ON/OFF] (Power).
NOT
E
•You can configure the camera so power does not turn on
when you press [ ] (REC) or [ ] (PLAY). You can
also configure the camera to turn off when you press [ ]
(REC) or [ ] (PLAY) (page 192).

44 GETTING READY
■Battery Power Conservation Features
The camera is equipped with two features for conserving battery
power, as described below.
1. Press [MENU].
2. Use [ ] and [ ] to select the “Set Up” tab.
3. Use [ ] and [ ] to select the item you want to
configure (“Sleep” or “Auto Power Off”) and
then press [ ].
Turning On Power for the First Time
The first time you load a battery into the camera, a screen
appears for configuring screen text language, date, and time
settings. Use the procedure under “Configuring Display
Language, Date, and Time Settings” (page 12) to configure
the settings correctly.
IMPORTANT!
•Failure to set the date and time will cause the wrong
date and time data to be recorded with images.
•Leaving the camera for about one day with no power
supplied will cause the date and time settings to be
cleared. You will have to re-configure the settings after
power is restored. The following conditions will result in
no power being supplied to the camera.
– Battery not loaded or dead battery
– Battery not loaded or dead battery with the camera
on the cradle, but without the cradle plugged into a
power outlet
•If you make a mistake when configuring the language,
date, and time settings, you can change the settings
(pages 187, 191).
Feature
Name Description Settings
Sleep
In the REC mode, the monitor screen
turns off (goes into a sleep state) if no
operation is preformed for a preset
amount of time. Press any button to
turn the monitor screen back on.
Note that the Sleep feature does not
operate in the PLAY mode.
30 sec,
1 min,
2 min,
Off
Auto Power
Off
Power it turned off if no operation is
performed for a preset amount of
time.
2 min,
5 min

45 GETTING READY
4. Use [S
S
S
SS] and [T
T
T
TT] to select the sleep or Auto
Power Off trigger time and then press [SET].
Selecting “Off” for the sleep setting disables the sleep
feature.
NOT
E
• Auto Power Off and sleep are disabled under the following
conditions.
– When there is a connection between the camera and
computer or other device via the USB cradle
– During a slide show
– During Voice Recording file playback
– During movie recording and playback
You can store images you shoot with the camera on a memory
card. It is up to you to purchase a commercially available
memory card. In addition to memory card storage, the camera
also has built-in memory, which is enough to hold a few
snapshots or a short movie. Use built-in memory for test
purposes, emergency use, etc.
NOT
E
• Images can be copied between the camera’s built-in
memory and a memory card (page 179).
• The following data is stored in built-in memory. It cannot be
copied to a memory card.
– BEST SHOT mode user image information
– FAVORITE folder
– Mode memory settings
– Start-up screen image
Using a Memory Card
C

46 GETTING READY
Supported Memory Cards
Your camera supports use of SD
memory cards or MMCs
(MultiMediaCard).
Memory Used for Storage
Images recorded while a memory card is loaded are saved to
the memory card. When no memory card is loaded, images are
saved in built-in memory.
•Note that you cannot save images in built-in memory while a
memory card is loaded in the camera.
IMPORTANT!
•See the instructions that come with the memory card for
information about how to use it.
•Certain types of cards can slow down processing speeds. If
you are using a slow memory card, you may not be able to
record a movie using the “HQ” image quality setting.
Because of this, use of an SD memory card with a
maximum transfer speed of at least 10MB per second is
recommended.
•Certain types of memory cards take longer to record data,
which can cause movie frames to be dropped. “ ” and
“ ” flash on the monitor screen during recording to let
you know when a frame has been dropped. Use of an SD
memory card with a maximum transfer speed of at least
10MB per second is recommended.
•SD memory cards have a write protect switch. Use it when
you need to guard against accidentally deleting data. Note,
however, if you write protect an SD memory card you must
then turn write protection off whenever you want to record
to the card, format it, or delete any of its images.

47 GETTING READY
•Electrostatic charge, electrical noise, and other
phenomena can cause data to become corrupted or even
lost. Make sure that you always back up important data on
other media (CD-R, CD-RW, MO disk, hard disk, etc.).
Loading a Memory Card into the Camera
IMPORTANT!
•Make sure you always turn off the camera before loading or
removing a memory card.
•Be sure to orient the card correctly when loading it. Never
try to force a memory card into the slot when you feel
resistance.
1. Open the battery cover.
While pressing the battery cover, slide it in the direction
indicated by the arrow.

48 GETTING READY
2. Load a memory card into the camera.
Positioning the memory card so its front is facing upwards
(towards the monitor screen side of the camera), slide it into
the card slot all the way in until you hear it click securely into
place.
3. Close the battery cover.
Swing the battery cover closed, and then slide it securely
into place as you press it against the camera.
Replacing the Memory Card
1. Remove the memory card from the camera.
Press the memory card and then release it, so it comes part
way out. Pull the card out the rest of the way by hand.
2. Load the other memory card.
Front Back

49 GETTING READY
IMPORTANT!
•Never insert anything besides an SD memory card or MMC
(MultiMediaCard) into the memory card slot. Doing so can
lead to malfunction.
•Should water or any foreign object ever get into the card
slot, immediately turn off the camera, remove the battery,
and contact your retailer or nearest CASIO authorized
service center.
•Never remove a card from the camera while the operation
lamp is flashing green. Doing so can cause the image save
operation to fail and even damage the memory card.
Formatting a Memory Card
Before using a new memory card for the first time, you need to
format it. Once you format a memory card, you will not need to
format it each time you use it.
Formatting a memory card that already has files on it will delete
its contents.
IMPORTANT!
•Note that data deleted by a memory card format operation
cannot be recovered. Double-check to make sure that you
really want to delete all the contents of the memory card
before proceeding with the format operation.
•Even if the file data on a memory card is protected (page
175), formatting the card will delete all its data.
•Be sure to use the camera to format a memory card.
Formatting a memory card on a computer and then using it
in the camera can slow down data processing by the
camera. In the case of an SD memory card, formatting on a
computer can result in non-conformity with the SD format,
causing problems with compatibility, operation, etc.
102 USING BEST SHOT
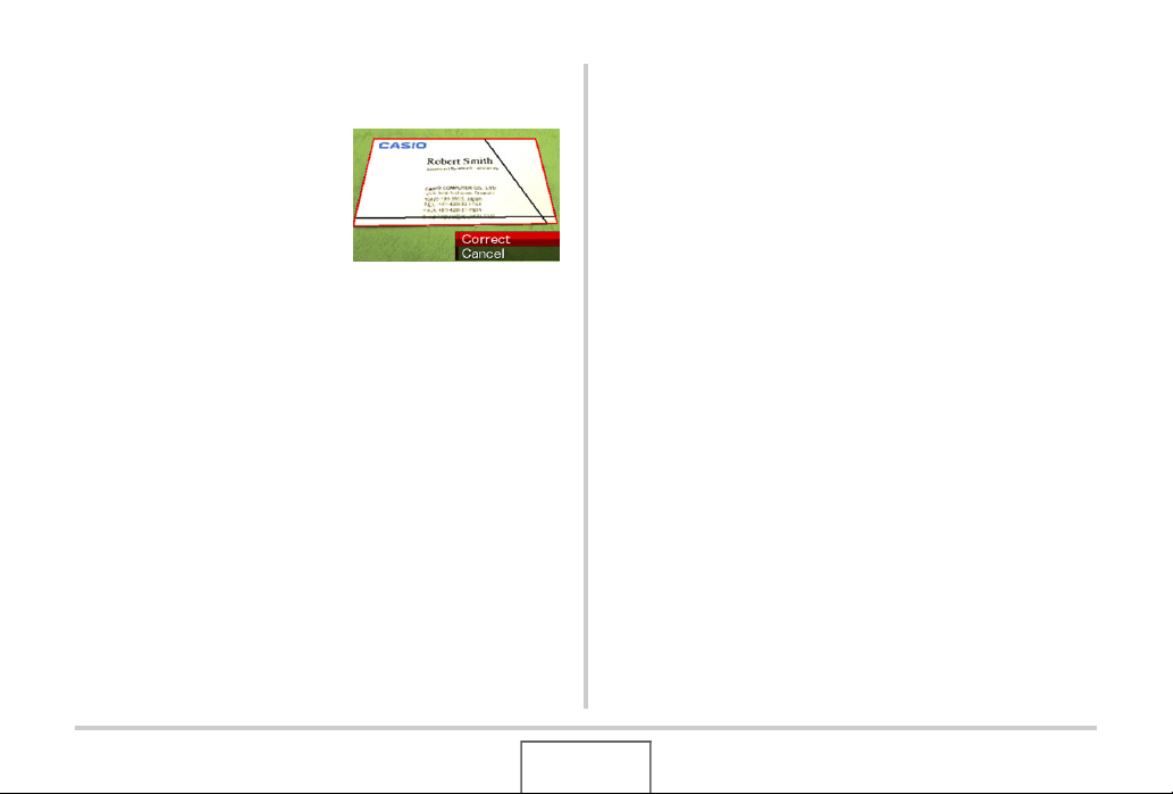
■Shooting an Image Using a Business Shot
Scene
1. After selecting either
of the BEST SHOT
Business Shot
scenes, compose the
image and press the
shutter button to
shoot.
This displays a screen that shows all of the rectangular
shapes in the image that qualify as candidates for keystone
correction.
A red boundary will surround the currently selected
correction candidate. If there is a black boundary, it means
that the black boundary is indicating a second possible
candidate. If there is no second candidate (black boundary),
jump directly to step 3.
• If the camera is unable to detect any keystone correction
candidate at all, the message “Cannot correct image!” will
appear on the monitor screen momentarily and then the
camera will save the image as-is (uncorrected).
2. Use [W
W
W
WW] and [ ] to select the candidate you
X
X
X
XX
want to use for correction.
3. Use [S
S
S
SS] and [T
T
T
TT] to select “Correct” and then
press [SET].
This will correct the image and store the resulting
(corrected) image.
• To cancel the correction operation, select “Cancel”.
Specyfikacje produktu
| Marka: | Casio |
| Kategoria: | aparat fotograficzny |
| Model: | Exilim EX-Z1000 |
Potrzebujesz pomocy?
Jeśli potrzebujesz pomocy z Casio Exilim EX-Z1000, zadaj pytanie poniżej, a inni użytkownicy Ci odpowiedzą
Instrukcje aparat fotograficzny Casio

25 Sierpnia 2024
25 Sierpnia 2024
25 Sierpnia 2024
25 Sierpnia 2024
25 Sierpnia 2024
25 Sierpnia 2024
25 Sierpnia 2024
25 Sierpnia 2024
25 Sierpnia 2024
25 Sierpnia 2024
Instrukcje aparat fotograficzny
- aparat fotograficzny Leica
- aparat fotograficzny Logitech
- aparat fotograficzny Xiaomi
- aparat fotograficzny Joy-It
- aparat fotograficzny Braun
- aparat fotograficzny Philips
- aparat fotograficzny Epson
- aparat fotograficzny Hikvision
- aparat fotograficzny Panasonic
- aparat fotograficzny Canon
- aparat fotograficzny Medion
- aparat fotograficzny Lenco
- aparat fotograficzny Fujifilm
- aparat fotograficzny GE
- aparat fotograficzny Ring
- aparat fotograficzny Imou
- aparat fotograficzny Blaupunkt
- aparat fotograficzny IOptron
- aparat fotograficzny Metra
- aparat fotograficzny Grundig
- aparat fotograficzny HP
- aparat fotograficzny SJCAM
- aparat fotograficzny Swann
- aparat fotograficzny Nikon
- aparat fotograficzny Kodak
- aparat fotograficzny Alpine
- aparat fotograficzny Zenit
- aparat fotograficzny Minox
- aparat fotograficzny AgfaPhoto
- aparat fotograficzny Vimar
- aparat fotograficzny Eufy
- aparat fotograficzny Ricoh
- aparat fotograficzny Rollei
- aparat fotograficzny Netgear
- aparat fotograficzny Pyle
- aparat fotograficzny Vtech
- aparat fotograficzny Olympus
- aparat fotograficzny Avaya
- aparat fotograficzny Polaroid
- aparat fotograficzny Konica Minolta
- aparat fotograficzny Sanyo
- aparat fotograficzny Lorex
- aparat fotograficzny Netatmo
- aparat fotograficzny Denver
- aparat fotograficzny Pentax
- aparat fotograficzny Marshall Electronics
- aparat fotograficzny SereneLife
- aparat fotograficzny BenQ
- aparat fotograficzny Lexibook
- aparat fotograficzny Sygonix
- aparat fotograficzny Elmo
- aparat fotograficzny Alfatron
- aparat fotograficzny AquaTech
- aparat fotograficzny Extralink
- aparat fotograficzny Laserliner
- aparat fotograficzny Vivitar
- aparat fotograficzny BZBGear
- aparat fotograficzny BirdDog
- aparat fotograficzny Agfa
- aparat fotograficzny Argus
- aparat fotograficzny Yashica
- aparat fotograficzny Flir
- aparat fotograficzny King
- aparat fotograficzny Arlo
- aparat fotograficzny Ansco
- aparat fotograficzny Zeiss Ikon
- aparat fotograficzny Busch
- aparat fotograficzny Mamiya
- aparat fotograficzny Fuji
- aparat fotograficzny Minolta
- aparat fotograficzny Petri
Najnowsze instrukcje dla aparat fotograficzny

3 Kwietnia 2025

15 Stycznia 2025
13 Października 2024
11 Października 2024

10 Października 2024

10 Października 2024
24 Września 2024
24 Września 2024
17 Września 2024
16 Września 2024