Instrukcja obsługi Canon Pixma Pro 9000 series
Przeczytaj poniżej 📖 instrukcję obsługi w języku polskim dla Canon Pixma Pro 9000 series (100 stron) w kategorii drukarka. Ta instrukcja była pomocna dla 9 osób i została oceniona przez 2 użytkowników na średnio 4.5 gwiazdek
Strona 1/100
QT5-0115-V02 XXXXXXXX ©CANON INC.2006 PRINTED IN JAPAN
Quick Start Guide
Series
Photo Printer
Quick Start Guide
The following ink tanks are compatible with this printer.
For details on ink tank replacement, refer to “Replacing an Ink Tank” in this guide.

Getting Help from Canon
Help Us Help You Better
Before you contact Canon, please record the following information.
Serial Number (located on the inside of the product):
Model Number (located on the top of the product):
Setup CD-ROM number (located on the CD-ROM):
Purchase Date:
Customer Technical Support Sequence*
1. Internet — www.canontechsupport.com
For quick and comprehensive self-help in an intuitively guided interactive troubleshooting
environment, the place to start is our helpful tech support web site. In addition, the latest
driver downloads, answers to frequently asked questions, product information, and
“where to buy” instructions are found here.
2. Email Tech Support — www.canontechsupport.com
For individual attention to a special issue, try emailing our friendly technical support repre-
sentatives, specially trained to communicate quick, easy, and logical solutions to your
inquiries within 24 hours.
3. Toll-Free Live Tech Support — (1-800-828-4040)
This option provides live telephone technical support, free of service charges, Monday-
Saturday (excluding holidays), during your product’s 1 year limited warranty period.
Telephone Device for the Deaf (TDD) support is available at (1-866-251-3752).
4. Extended Service and Support — www.canonesp.com
Canon CarePAK Extended Service Plan is a cost-attractive and easy-to-use extended service
program that provides up to three full years of service and support coverage at a very
attractive price. CarePAK offers toll-free Canon technical support and includes Canon’s
superb InstantExchange product replacement program. For further information about
extending your Canon service and support, call (1-800-385-2155), or visit our Web site at
www.canonesp.com. CarePAK must be purchased during your product’s warranty period.
For more information and updated program specifics, please visit our web site at
www.canontechsupport.com.
* Support program specifics are subject to change without notice.
Ordering Information
For additional supplies, use the following descriptions and order numbers.
Description Order #
Ink Tanks
CLI-8PM Photo Magenta 0625B002
CLI-8BK Black 0620B002
CLI-8PC Photo Cyan 0624B002
CLI-8C Cyan 0621B002
CLI-8M Magenta 0622B002
CLI-8Y Yellow 0623B002
CLI-8R Red 0626B002
CLI-8G Green 0627B002
Canon Specialty Papers
Photo Paper Pro for Borderless Printing (4" x 6" / 20 sheets) 1029A014
Photo Paper Pro for Borderless Printing (4" x 6" / 75 sheets) 1029A027
Photo Paper Pro (8.5" x 11" / 15 sheets) 1029A004
Photo Paper Pro (8.5" x 11" / 30 sheets) 1029A028
Photo Paper Pro (8" x 10" / 20 sheets) 1029A059
Photo Paper Pro (13" x 19" / 10 sheets) 1029A009
Photo Paper Plus Glossy (4" x 6" / 20 sheets) 7980A007
Photo Paper Plus Glossy (4" x 6" / 50 sheets) 7980A012
Photo Paper Plus Glossy (4" x 6" / 120 sheets) 7980A022
Photo Paper Plus Glossy (5" x 7" / 20 sheets) 7980A019
Photo Paper Plus Glossy (8.5" x 11" / 20 sheets) 7980A006
Photo Paper Plus Glossy (13" x 19" / 20 sheets) 7980A014
Photo Paper Plus Semi-gloss (4" x 6" / 50 sheets) 1686B014
Photo Paper Plus Semi-gloss (8.5" x 11" / 20 sheets) 1686B020
Photo Paper Plus Semi-gloss (8" x 10" / 20 sheets) 1686B017
Photo Paper Plus Semi-gloss (13" x 19" / 20 sheets) 1686B031
Matte Photo Paper (4" x 6" / 120 sheets) 7981A014
Matte Photo Paper (8.5" x 11" / 50 sheets) 7981A004
Matte Photo Paper (13" x 19" / 20 sheets) 7981A011
Fine Art Photo Rag (8.5" x 11" / 20 sheets) 0587B005
Fine Art Photo Rag (13" x 19" / 20 sheets) 0587B008
Fine Art Premium Matte (8.5" x 11" / 20 sheets) 1263B004
Fine Art Premium Matte (13" x 19" / 20 sheets) 1263B007
High Resolution Paper (8.5" x 11" / 100 sheets) 1033A011
Photo Stickers (4" x 6" / 5 sheets) 0001C001
Call 1-800-OK-CANON to locate a dealer near you, or visit the Canon eStore at
www.estore.usa.canon.com.
© 2006 Canon U.S.A., Inc. Canon is a registered trademark of Canon Inc. in the United States and may be a
registered trademark or trademarks in other countries. All other product and brand names are trademarks of
their respective owners. As an ENERGY STAR® partner, Canon U.S.A., Inc. has determined that this product
meets the ENERGY STAR® guidelines for energy efficiency.
Photo Printer
Quick Start Guide

Contents
1
Contents
Basic Printing
Turning on the Printer . . . . . . . . . . . . . . . . . . . . . . . . . . . . . . . . . . . . . . . . . . . . . . . . . . . . . . . . . . . . . 2
Turning off the Printer . . . . . . . . . . . . . . . . . . . . . . . . . . . . . . . . . . . . . . . . . . . . . . . . . . . . . . . . . . . . . 3
Loading Paper . . . . . . . . . . . . . . . . . . . . . . . . . . . . . . . . . . . . . . . . . . . . . . . . . . . . . . . . . . . . . . . . . . . 4
Using Specialty Media . . . . . . . . . . . . . . . . . . . . . . . . . . . . . . . . . . . . . . . . . . . . . . . . . . . . . . . . . . . 15
Printing with Windows . . . . . . . . . . . . . . . . . . . . . . . . . . . . . . . . . . . . . . . . . . . . . . . . . . . . . . . . . . . 18
Printing with Macintosh . . . . . . . . . . . . . . . . . . . . . . . . . . . . . . . . . . . . . . . . . . . . . . . . . . . . . . . . . . 21
Canceling Printing . . . . . . . . . . . . . . . . . . . . . . . . . . . . . . . . . . . . . . . . . . . . . . . . . . . . . . . . . . . . . . . 25
Advanced Printing
Printing Photographs Directly from a PictBridge Compliant Device . . . . . . . . . . . . . . . . . . . . . . . 26
Accessing the Printer Driver (Windows) . . . . . . . . . . . . . . . . . . . . . . . . . . . . . . . . . . . . . . . . . . . . . 33
Using the Bundled Software. . . . . . . . . . . . . . . . . . . . . . . . . . . . . . . . . . . . . . . . . . . . . . . . . . . . . . . 35
Printing Maintenance
Replacing an Ink Tank . . . . . . . . . . . . . . . . . . . . . . . . . . . . . . . . . . . . . . . . . . . . . . . . . . . . . . . . . . . . 36
When Printing Becomes Faint or Colors are Incorrect . . . . . . . . . . . . . . . . . . . . . . . . . . . . . . . . . . 45
Printing the Nozzle Check Pattern . . . . . . . . . . . . . . . . . . . . . . . . . . . . . . . . . . . . . . . . . . . . . . . . . . 46
Print Head Cleaning. . . . . . . . . . . . . . . . . . . . . . . . . . . . . . . . . . . . . . . . . . . . . . . . . . . . . . . . . . . . . . 51
Print Head Deep Cleaning. . . . . . . . . . . . . . . . . . . . . . . . . . . . . . . . . . . . . . . . . . . . . . . . . . . . . . . . . 55
Aligning the Print Head . . . . . . . . . . . . . . . . . . . . . . . . . . . . . . . . . . . . . . . . . . . . . . . . . . . . . . . . . . . 58
Troubleshooting
Cannot Install the Printer Driver or an Application Program . . . . . . . . . . . . . . . . . . . . . . . . . . . . . 63
Cannot Connect to PC Properly . . . . . . . . . . . . . . . . . . . . . . . . . . . . . . . . . . . . . . . . . . . . . . . . . . . . 64
Print Results Not Satisfactory or Contains Errors . . . . . . . . . . . . . . . . . . . . . . . . . . . . . . . . . . . . . . 65
Troubleshooting Printer Hardware. . . . . . . . . . . . . . . . . . . . . . . . . . . . . . . . . . . . . . . . . . . . . . . . . .68
Paper Does Not Feed Properly . . . . . . . . . . . . . . . . . . . . . . . . . . . . . . . . . . . . . . . . . . . . . . . . . . . . . 71
Paper Jams . . . . . . . . . . . . . . . . . . . . . . . . . . . . . . . . . . . . . . . . . . . . . . . . . . . . . . . . . . . . . . . . . . . . . 72
Handling Error Messages . . . . . . . . . . . . . . . . . . . . . . . . . . . . . . . . . . . . . . . . . . . . . . . . . . . . . . . . . 73
An Error Message Appears on the Screen . . . . . . . . . . . . . . . . . . . . . . . . . . . . . . . . . . . . . . . . . . . . 76
Cannot Print Properly from the Digital Camera. . . . . . . . . . . . . . . . . . . . . . . . . . . . . . . . . . . . . . . . 80
Appendix
Specifications . . . . . . . . . . . . . . . . . . . . . . . . . . . . . . . . . . . . . . . . . . . . . . . . . . . . . . . . . . . . . . . . . . 84
Safety Precautions . . . . . . . . . . . . . . . . . . . . . . . . . . . . . . . . . . . . . . . . . . . . . . . . . . . . . . . . . . . . . . 87
Regulatory Information. . . . . . . . . . . . . . . . . . . . . . . . . . . . . . . . . . . . . . . . . . . . . . . . . . . . . . . . . . . 89
Canon U.S.A., INC. LIMITED WARRANTY --- (USA Only) . . . . . . . . . . . . . . . . . . . . . . . . . . . . . . . . . 90
Index. . . . . . . . . . . . . . . . . . . . . . . . . . . . . . . . . . . . . . . . . . . . . . . . . . . . . . . . . . . . . . . . . . . . . . . . . . . . . . . . . . . . 92

Basic Printing
2
Basic Printing
This
Quick Start Guide
describes some of the features of your printer and how
to use them. For more information, view the Pro9000
User’s Guide
,
Printer
Driver Guide
,
Photo Application Guide
, and
Digital Photo Printing Guide
installed on your computer, or use the online help within your printer driver
interface:
While in the printer’s properties window, press the F1 key, or click in the
upper right corner. Then click the feature you want to know more about, or click
the Help button when displayed.
While in the Page Setup dialog box or Print dialog box, click in the lower left
corner.
Clicking provides detailed information about each setting.
When the Help window appears, select your desired topic.
Turning on the Printer
1Press the POWER button.
The POWER lamp flashes green while the printer warms up and changes to steady
(non-flashing) when the printer is ready.
If the ALARM lamp begins flashing orange, refer to “Handling Error
Messages” on page 73.

Basic Printing
3
Turning off the Printer
1To turn off the printer, press the POWER button.
When the POWER lamp stops blinking, the printer is turned off.
About the Power Plug
When removing the power plug after turing off the printer, be sure to
check that the POWER lamp is not lit. If the power plug is removed from
the wall outlet with the POWER lamp lit or blinking green, the printer
cannot protect its print heads and may be unable to print.

Basic Printing
4
Loading Paper
This section describes how to load paper in the Auto Sheet Feeder and the Front Tray.
Using the Auto Sheet Feeder and the Front Tray
You can load paper in both the Auto Sheet Feeder and the Front Tray.
Loading paper in the Auto Sheet Feeder is easy, and is convenient if you frequently
switch to and print on various sizes or types of paper.
Use the Front Tray to print on large size paper or to print on thick paper such as art
paper.
* There are some kinds of paper, depending on their size or type, that can only be used in either the Auto Sheet Feeder
or the Front Tray.
See “Using Specialty Media” on page 15.
Print Media to Avoid
Do not use the following types of paper. Using such paper will not only produce
unsatisfactory results, but can also cause the printer to jam or malfunction.
• Folded, curled or wrinkled paper
• Damp paper
• Excessively thin paper
Auto Sheet Feeder: Less than 64 gsm / 17 lb
Front Tray: Less than 0.1 mm / 4 mil
• Excessively thick paper
Auto Sheet Feeder: More than 105 gsm / 28 lb (plain paper except for supported
Canon genuine media)
* However, you can use art paper that is not produced by Canon that is up to 200 gsm / 53 lb.
See “Non-Canon Genuine Specialty Paper” in the
User’s Guide
.
Front Tray: More than 1.2 mm / 47 mil
•Picture postcards
• Postcards affixed with photos or stickers
• Envelopes with double flaps
• Envelopes with sticker flaps
• Envelopes with an embossed or treated surface
• Any type of paper with holes
• Paper that is not rectangular
• Paper bound with staples or glue etc.
• Paper coated with adhesive
• Paper decorated with glitter etc.

Basic Printing
5
Loading Paper in the Auto Sheet Feeder
For detailed information on the Canon genuine media for use with its
various printers, refer to “Using Specialty Media” on page 15, or
“Printing Media” in the
User’s Guide
.
1Flatten the four corners of the paper before loading it.
zWhen paper is curled, gently bend it in the opposite direction of the curl
(without curling the reverse side) and then load the paper. For details on
how to flatten paper curl, refer to “Media is curled” on page 68.
zTo prevent paper from being curled, we recommend handling it in the
following ways:
- Put unused paper back into the package, and store them
horizontally.
- Remove only as many sheets from the package as you need right
before printing.
2Prepare to load paper.
(1) 1 Open the Paper Support.
2 Open the Paper Support
Extension to support the paper.
(2) 1 Gently press the mark on
the Front Tray.
2 Pull out the Front Tray Extension
completely.
(3) Ensure that the FRONT FEED button is
not lit.
If the FRONT FEED button is lit or
flashing, set the Front Tray to its
normal printing position.
See “Returning the Front Tray to Its
Normal Printing Position” on page 14.
1
1
2
2
Basic Printing
6
3Load the paper.
zThe following paper can be used in the Auto Sheet Feeder.
Paper Size
Standard paper: From 4" x 6" / 101.6 x 152.4 mm to A3+ (13" x 19")
size (329.0 x 483.0 mm / 13 x 19 inches)
Non-standard paper: From 89.0 x 120.0 mm / 3.50 x 4.72 inches to
329.0 x 584.2 mm / 12.95 x 23 inches
Weight
From 64 gsm / 17 lb to 105 gsm / 28 lb (plain paper except for
supported Canon genuine media)
*You can use art paper that is not produced by Canon that is up to 200
gsm / 53 lb.
Do not use paper heavier than this (except for supported Canon
genuine media), as it could jam in the printer.
See “Non-Canon Genuine Specialty Paper” of the
User’s Guide
.
zWhen printing on plain paper (64 gsm / 17 lb), load up to 150 sheets in
the Auto Sheet Feeder.
However, the paper may not feed correctly depending on the type of
paper and the environment (high temperature / high humidity / low
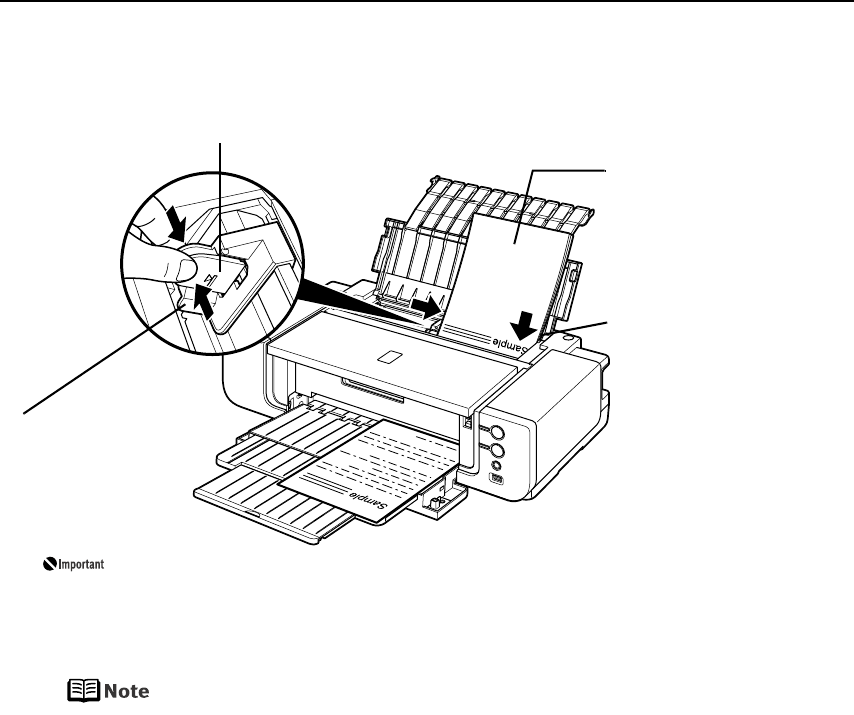
(2) Align the paper stack
with the right edge of
the Auto Sheet
Feeder.
(3) Pinch the Paper
Guide and slide
it against the
left side of the
paper stack.
Load Limit Mark
Do not load beyond this Load Limit Mark.
(1) Load the paper
into the Auto
Sheet Feeder with
the print side
facing UP.
Set the Paper Guide correctly
when printing from the Auto
Sheet Feeder. The paper may
not feed correctly if the Paper
Guide is not set correctly.

Basic Printing
7
temperature / low humidity). If this happens, reduce the number of
sheets of paper by about half (approximately 5 mm / 0.2 inches).
zWhen printing on art paper that is not produced by Canon that is up to
200 gsm / 53 lb, load one sheet at a time.
zWhen printing on plain paper, do not stack more than 50 sheets in the
Front Tray.
zDo not touch the printed surfaces until the ink dries. For specific drying
times, refer to the instructions packaged with your media.

Basic Printing
8
Loading Envelopes in the Auto Sheet Feeder
Use either European DL or US Comm. Env. #10 size envelopes.
The address is rotated automatically to match the direction of the envelope when
printing.
zDo not use envelopes with embossed or treated surfaces, a double
flap, pressure seals or sticker flaps.
zSelect either DL Env. (Windows) / DL Envelope (Macintosh) or Comm.
Env. #10 (Windows) / #10 Envelope (Macintosh) in the printer driver
according to the envelope size you are using. If you do not, the address
will be printed in the wrong direction.
(4) Select Envelope in Media Type, and then select DL Env. (Windows) / DL Envelope
(Macintosh) or Comm. Env. #10 (Windows) / #10 Envelope (Macintosh) in Page
Size.
For a detailed description of the printer driver settings, refer to “Printing with
Windows” on page 18, or “Printing with Macintosh” on page 21.
When printing starts, the printer may not detect the envelope
correctly depending on the type of envelope. If the ALARM lamp
flashes orange eleven times, refer to “Error Regarding the Width of
Paper” on page 78 to set the printer driver not to detect the width
of the paper.
Fold the envelope flap shut.
(2) Pinch the
Paper Guide
and slide it
against the
left side of
the envelope.
(1) Load the envelope
and align it with the
right edge of the Auto
Sheet Feeder with the
front face UP, and the
rear flaps DOWN on
the left.
A maximum of
10 envelopes
can be loaded at
once.
(3) Ensure that the FRONT FEED button is not lit.
If the FRONT FEED button is lit or flashing, set
the Front Tray to its normal printing position.
See “Returning the Front Tray to Its Normal
Printing Position” on page 14.
Printing direction

Basic Printing
9
Loading 4" x 6" or 5" x 7"-Sized Paper in the Auto Sheet Feeder
Cutting plain paper to 4" x 6" / 101.6 mm x 152.4 mm or 5" x 7" / 127.0 x
177.8 mm size for a trial printing can cause paper jams.
(4) Select 4 x 6 in 101.6 x 152.4 mm or 5 x 7 in 127.0 x 177.8 mm from Page Size in
the printer driver.
For a detailed description of the printer driver settings, refer to “Printing with
Windows” on page 18, or “Printing with Macintosh” on page 21.
Always load paper in portrait orientation. Loading paper in
landscape orientation can cause the paper to be jammed.
We recommend using Canon genuine photo media when printing
photographs.
See “Using Specialty Media” on page 15.
(1) Load the paper and align
it with the right edge of
the Auto Sheet Feeder
with the print side facing
UP.
• Load the paper lengthways
regardless of the direction of
the document.
• You can load up to 20 sheets
of 4" x 6"-sized paper; 10
sheets of 5" x 7"-sized
paper.
(2) Pinch the Paper Guide and
slide it against the left side
of the paper stack.
(3) Ensure that the FRONT FEED button is not lit.
If the FRONT FEED button is lit or flashing, set the
Front Tray to its normal printing position.
See “Returning the Front Tray to Its Normal Printing
Position” on page 14.
Portrait Landscape
Specyfikacje produktu
| Marka: | Canon |
| Kategoria: | drukarka |
| Model: | Pixma Pro 9000 series |
| Kolor produktu: | Czarny |
| Opcja regulacji wysokości: | Tak |
| Wbudowany wyłącznik: | Tak |
| Częstotliwość wejściowa AC: | 50 - 60 Hz |
| Napięcie wejściowe AC: | 100 - 240 V |
| Szerokość opakowania: | 660 mm |
| Wysokość opakowania: | 392 mm |
| Głębokość opakowania: | 182 mm |
| Certyfikat środowiskowy (zrównoważonego rozwoju): | RoHS,ENERGY STAR |
| Ilość na paczkę: | 1 szt. |
| Tryb wyłączenia: | 0.18 W |
| Skala efektywności energetycznej: | Od A do G |
| Wbudowane głośniki: | Tak |
| Ilość głośników: | 2 |
| Moc wyjściowa (RMS): | 2 W |
| Wyjścia słuchawkowe: | 1 |
| Typ HD: | Full HD |
| Typ ekranu: | IPS-ADS |
| Długość przekątnej ekranu: | 23.6 " |
| Rozdzielczość: | 1920 x 1080 px |
| Współczynnik kontrastu (typowy): | 1000:1 |
| Natywne proporcje obrazu: | 16:9 |
| Ekran dotykowy: | Nie |
| Skrócona instrukcja obsługi: | Tak |
| Przewody: | AC,HDMI |
| Pobór mocy w trybie czuwania: | 0.21 W |
| Wyjście na słuchawki: | Tak |
| Pobór mocy: | 18 W |
| Waga wraz z opakowaniem: | 6500 g |
| Rodzaj opakowania: | Pudełko |
| Ilość portów HDMI: | 1 |
| Jasność wyświetlacza (typowa): | 250 cd/m² |
| Technologia wyświetlacza: | LED |
| Kształt ekranu: | Płaski |
| Współczynik kontrastu (dynamiczny): | 80000000:1 |
| Maksymalna częstotliwość odświeżania: | 60 Hz |
| Kąt widzenia (poziomy): | 178 ° |
| Kąt widzenia (pionowy): | 178 ° |
| Kolory wyświetlacza: | 16.78 millionów kolorów |
| Czas odpowiedzi (typowy): | 8 ms |
| Rozmiar plamki: | 0.2715 x 0.2715 mm |
| Technologia eliminująca migotanie obrazu: | Tak |
| Wbudowana kamera/aparat: | Nie |
| Pozycjonowanie na rynku: | Biznes |
| Standard VESA: | Tak |
| Interfejs do montażu panelu: | 100 x 100 mm |
| Kensington Lock: | Tak |
| Typ gniazda zamka kabla: | Kensington |
| Regulacja wysokości: | 130 mm |
| Oś obrotu: | Tak |
| Kąt obrotu wokół osi: | 0 - 90 ° |
| Obrotowe: | Tak |
| Obracany: | -170 - 170 ° |
| Możliwośc pochylenia: | Tak |
| Zakres kąta nachylenia: | -2 - 21.5 ° |
| Wbudowany USB hub: | Nie |
| Liczba portów VGA (D-Sub): | 1 |
| HDMI: | Tak |
| Wejście audio: | Nie |
| HDCP: | Tak |
| Klasa efektywności energetycznej (SDR): | E |
| Zużycie energii (SDR) na 1000 godzin: | 16 kWh |
| Szerokość urządzenia (z podstawą): | 547.6 mm |
| Głębokość urządzenia (z podstawą): | 224.8 mm |
| Wysokość urządzenia (z podstawą): | 509.2 mm |
| Waga (z podstawą): | 4900 g |
| Szerokość (bez podstawy): | - mm |
| Głębokość (bez podstawy): | - mm |
| Wysokość (bez podstawy): | - mm |
| Waga (bez podstawy): | - g |
| Zasięg skanowania w poziomie: | 24 - 83 kHz |
| Zasięg skanowania (długość): | 55 - 76 Hz |
| Obsługiwane rozdzielczości grafiki: | 1920 x 1080 (HD 1080) |
| Wbudowany tuner tv: | Nie |
| Obsługiwane tryby wideo: | 1080p |
| OSD: | Tak |
| Obsługa funkcji Plug & Play: | Tak |
| Port DVI: | Tak |
| Liczba języków OSD: | 9 |
| Tryb gry: | Tak |
| Tryb ECO: | Tak |
Potrzebujesz pomocy?
Jeśli potrzebujesz pomocy z Canon Pixma Pro 9000 series, zadaj pytanie poniżej, a inni użytkownicy Ci odpowiedzą
Instrukcje drukarka Canon

9 Kwietnia 2025
4 Kwietnia 2025
4 Marca 2025
3 Marca 2025
1 Marca 2025
13 Lutego 2025
8 Lutego 2025
2 Lutego 2025
18 Stycznia 2025
18 Stycznia 2025
Instrukcje drukarka
- drukarka Sony
- drukarka Samsung
- drukarka LG
- drukarka Xiaomi
- drukarka Sharp
- drukarka Huawei
- drukarka Lenovo
- drukarka Epson
- drukarka Fujitsu
- drukarka Roland
- drukarka Panasonic
- drukarka StarTech.com
- drukarka Fujifilm
- drukarka MSI
- drukarka Toshiba
- drukarka D-Link
- drukarka Citizen
- drukarka HP
- drukarka Brother
- drukarka Honeywell
- drukarka Kodak
- drukarka Testo
- drukarka Primera
- drukarka Xerox
- drukarka Godex
- drukarka Olivetti
- drukarka Zebra
- drukarka Dell
- drukarka Digitus
- drukarka AgfaPhoto
- drukarka Kyocera
- drukarka Ricoh
- drukarka Seiko
- drukarka Renkforce
- drukarka Thomson
- drukarka AVM
- drukarka Velleman
- drukarka Dymo
- drukarka Panduit
- drukarka Olympus
- drukarka OKI
- drukarka Mitsubishi
- drukarka Intermec
- drukarka NEC
- drukarka Polaroid
- drukarka Konica Minolta
- drukarka Bixolon
- drukarka Pantum
- drukarka Olympia
- drukarka Datamax O'Neil
- drukarka DNP
- drukarka Equip
- drukarka ZKTeco
- drukarka TSC
- drukarka HiTi
- drukarka Microboards
- drukarka Triumph-Adler
- drukarka Fargo
- drukarka Entrust
- drukarka Kern
- drukarka Brady
- drukarka Tomy
- drukarka Lexmark
- drukarka Sagem
- drukarka Nilox
- drukarka Argox
- drukarka Royal Sovereign
- drukarka Minolta
- drukarka Oce
- drukarka Paxar
- drukarka IDP
- drukarka Metapace
- drukarka Ultimaker
- drukarka Ibm
- drukarka CSL
- drukarka Toshiba TEC
- drukarka Frama
- drukarka Builder
- drukarka Kogan
- drukarka Star Micronics
- drukarka Posiflex
- drukarka Dascom
- drukarka GG Image
- drukarka Vupoint Solutions
- drukarka Elite Screens
- drukarka DTRONIC
- drukarka Phoenix Contact
- drukarka Videology
- drukarka Epson 7620
- drukarka Star
- drukarka EC Line
- drukarka Colop
- drukarka Approx
- drukarka Fichero
- drukarka Raspberry Pi
- drukarka Unitech
- drukarka Middle Atlantic
- drukarka Evolis
- drukarka Tally Dascom
- drukarka Custom
- drukarka Nisca
- drukarka Sawgrass
- drukarka Mutoh
Najnowsze instrukcje dla drukarka

9 Kwietnia 2025

9 Kwietnia 2025
9 Kwietnia 2025

9 Kwietnia 2025

3 Kwietnia 2025
3 Kwietnia 2025
3 Kwietnia 2025

2 Kwietnia 2025
2 Kwietnia 2025

2 Kwietnia 2025