Instrukcja obsługi Canon Pixma MX722
Przeczytaj poniżej 📖 instrukcję obsługi w języku polskim dla Canon Pixma MX722 (4 stron) w kategorii drukarka. Ta instrukcja była pomocna dla 7 osób i została oceniona przez 2 użytkowników na średnio 4.5 gwiazdek
Strona 1/4
1
XXXXXXXX © CANON INC. 2013
5
1
3
4
2
6
1
2
3
series
2
1
Retire las hojas protectoras y la cinta.
Compruebe que se le han suministrado los siguientes elementos.
La bandeja de salida del papel se abre automáticamente al comenzar la impresión. Mantenga la parte frontal del equipo libre de
obstáculos.
No conecte aún el cable USB o
Ethernet.
Conecte el cable de alimentación.
4
Pulse el botón ACTIVADO (ON).
5
Seleccione su idioma y, a
continuación, pulse el botón .OK
6
Para cambiar el ajuste de idioma, pulse
el botón .Atrás (Back)
Abra la bandeja de salida del
papel.
La extensión de la bandeja de salida se
abre automáticamente.
1
Cierre la cubierta de documentos.
3
Preparativos
Elementos
suministrados
Abra la cubierta de documentos.
Retire la cinta naranja y el material
de protección.
2
Botón Atrás (Back)
ESPAÑOL
¡Léame en primer lugar!
Consérvelo a mano para utilizarlo
como referencia en el futuro.
Para llevar a cabo la instalación, coloque el equipo cerca del punto de acceso* y del
ordenador.
(* necesario para LAN inalámbrica)
Guía de inicio
Canon Inkjet Equipo multifunción para ocina
Ayuda de Canon
Asistencia técnica por correo electrónico:
www.usa.canon.com/support
Asistencia técnica gratuita: 1-800-OK-CANON
Esta opción proporciona asistencia telefónica técnica personal,
sin cargo por servicio, de lunes a viernes (excepto festivos),
durante el periodo de garantía.
Se dispone de un dispositivo telefónico auxiliar para sordos (TDD)
en 1-866-251-3752.
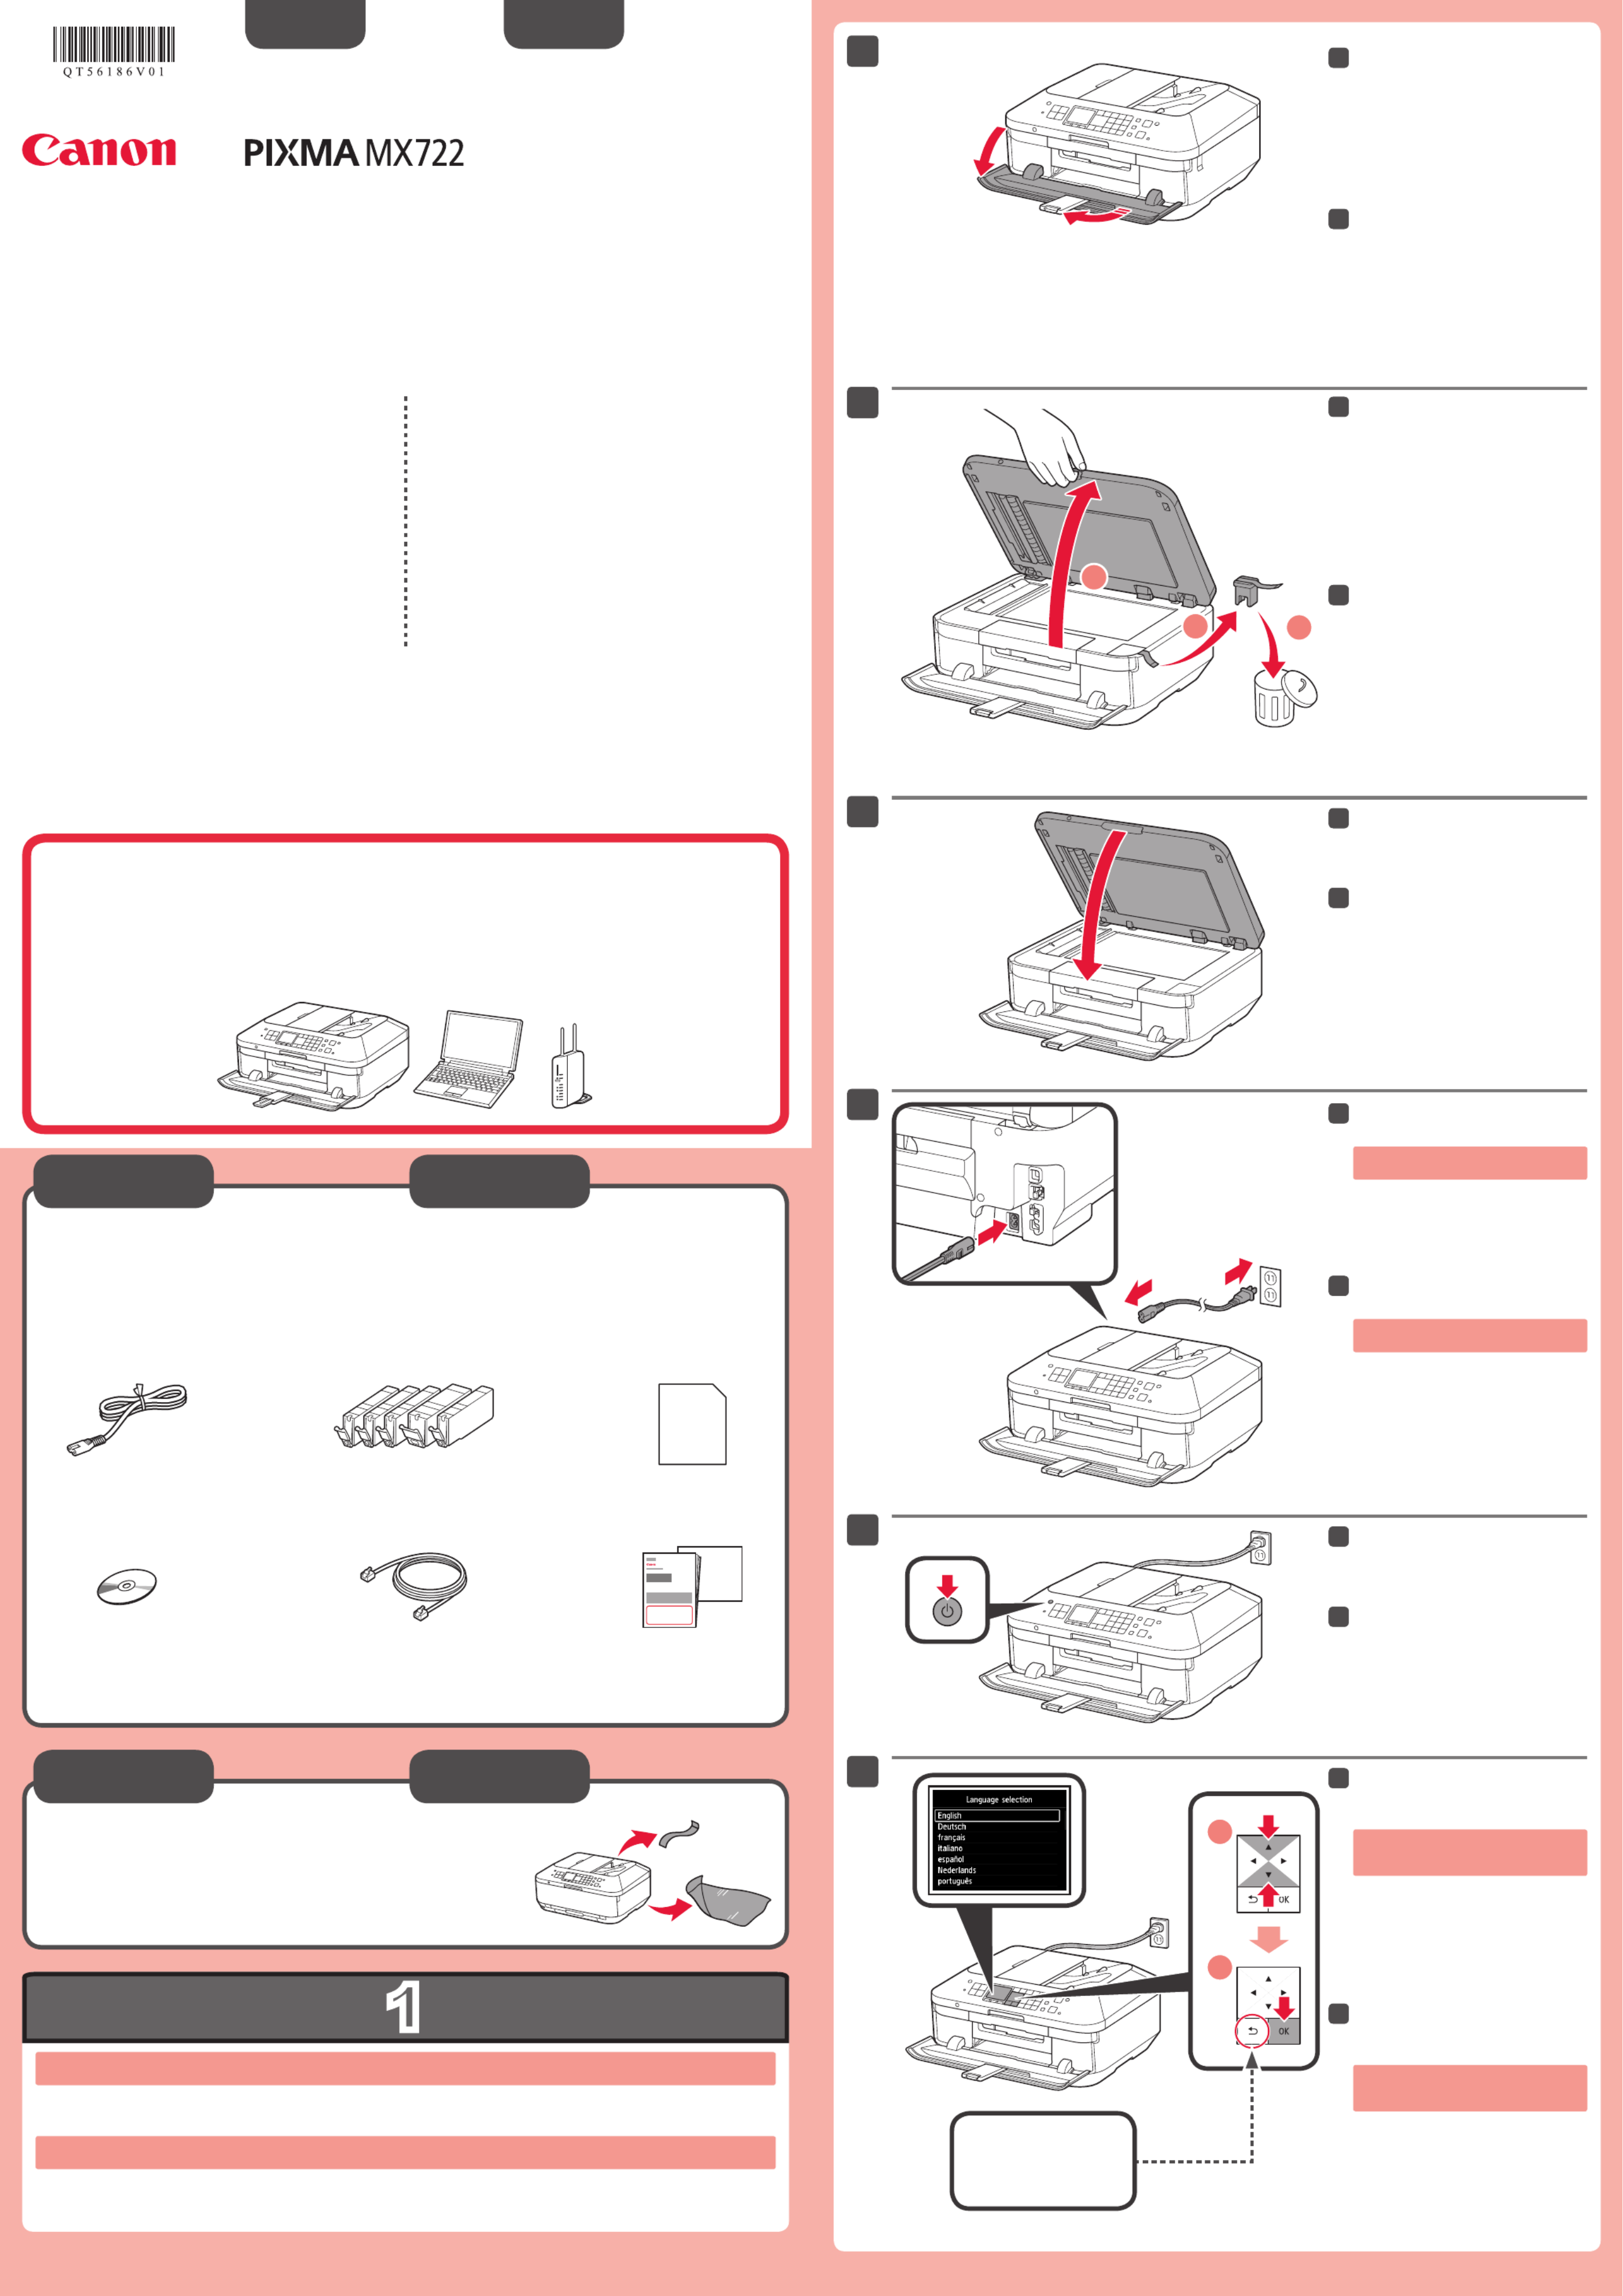
Remove the protective sheets and tape.
Check the included items.
The Paper Output Tray opens automatically as printing starts. Keep the front of the machine clear of any obstacles.
Do not connect the USB or Ethernet
cable yet.
Connect the power cord.
4
Press the button.ON
5
Select your language, then press
the button.OK
6
To change the language setting, press
the button.Back
Open the Paper Output Tray.
The Output Tray Extension opens
automatically.
1
Close the Document Cover.
3
Preparation
Included Items
Open the Document Cover.
Remove the orange tape and
protective material.
2
Back button
ENGLISH
Getting Started Read me rst!
Keep me handy for future reference.
To perform setup, place the machine near the access point* and computer.
(* Required for wireless LAN)
Canon Inkjet Ofce All-In-One
Getting Help from Canon
Email Tech Support — www.usa.canon.com/support
Toll-Free Tech Support— 1-800-OK-CANON
This option provides live telephone technical support, free of
service charges, Monday-Friday (excluding holidays), during the
warranty period.
Telephone Device for the Deaf (TDD) support is available at
1-866-251-3752.
QT5-6186-V01 PRINTED IN XXXXXXXX

2
1
2
1
2
5
6
1
2
2
4
1
3
8
(B)(A)
1
2
7
7
1
2
1
2
2
Cuando aparezca esta pantalla,
pulse el botón .OK
7
Abra la cubierta de documentos y
la cubierta de la tinta.
1
Sujete la tapa naranja con los
dedos y tire de ella suavemente.
(A) No presione los laterales si la
ranura en forma de Y está bloqueada.
(B) ¡No tocar!
3
Introduzca y empuje hacia abajo el depósito de tinta en la ranura del color correspondiente.
Compruebe que la lámpara de tinta está encendida y coloque el siguiente depósito de tinta.
4
Compruebe que todas las
lámparas están encendidas.
5
Si aparece un mensaje de error,
compruebe que los depósitos de tinta
están instalados correctamente.
Cierre la cubierta de la tinta y la cubierta de documentos.
¡No cierre aún la bandeja de salida del papel!
6
Los depósitos de tinta deberán instalarse en este soporte.
No toque el interior hasta que cese el movimiento.
Retire totalmente la cinta naranja.
Retire el envoltorio protector.
2
Cierre la bandeja de salida del
papel.
La extensión de la bandeja de salida se
cierra automáticamente.
8
Al cabo de aproximadamente
3 minutos, compruebe que la
pantalla p2-ha cambiado tal como se
muestra en la gura.
7
Open the Document Cover and the
Ink Cover.
1
Hook your ngers under the
orange cap and slowly pull it out.
(A) Do not press the sides when the
Y-shaped groove is blocked.
(B) Do not touch!
3
Insert and push down the ink tank into the matching color slot.
Check that the ink lamp is lit, then install the next ink tank.
4
Check that all lamps are lit.
5
If an error message appears, check
that the ink tanks are installed correctly.
Close the Ink Cover and the Document Cover.
Don't close the Paper Output Tray yet!
6
When this screen is displayed,
press the button.OK
7
Remove the orange tape completely.
Remove the protective wrap.
2
The ink tanks will be installed into this holder.
Do not touch inside until the movement stops.
Close the Paper Output Tray.
The Output Tray Extension closes
automatically.
8
After about 3 minutes, check that
the screen changes as shown in
the gure.
7

3
4
2
1
4
3
1
2
1
2
1
2
1
2
5
6
1
2
7
8
1
3
2
Realice la Alineación de los cabezales de impresión (Print Head Alignment).
Cuando aparezca esta pantalla,
pulse el botón .OK
7
Cuando aparezca esta pantalla,
cierre el soporte de la salida del
papel.
1
Cargue papel en el cassette como se describe en -
hasta - .
Ajuste las guías del papel al tamaño del papel.
2
Cargue el papel MP-101
suministrado en el cassette.
3
Pulse el botón .OK
3
Extraiga el cassette (inferior).
1
Si aparece un mensaje
de error, pulse el botón
OK y continúe con .
Cuando nalice la
instalación, consulte el
Manual en pantalla o
el para Manual en línea
repetir la Alineación de los
cabezales de impresión
(Print Head Alignment).
Al cabo de 5 a 6 minutos, se
imprime un patrón en negro y azul.
La Alineación de los cabezales de
impresión (Print Head Alignment)
naliza.
8
Ajuste la guía del papel derecha al
tamaño del papel.
Deslice el papel contra la guía
frontal.
4
Para obtener más
información sobre
el papel, consulte el
Manual en pantalla o
el .Manual en línea
Cuando el equipo
no se utiliza durante
unos 5 minutos, la
pantalla se desconecta.
Para reactivarla,
pulse cualquier botón
(excepto el botón
ACTIVADO (ON)) en el
panel de control.
•
•
Ajuste la guía del papel frontal al
tamaño A4.
Deslice la guía del papel derecha
hacia el lado.
Las guías del papel izquierda y derecha
se mueven al mismo tiempo.
2
Deslice el cassette (inferior) hacia
atrás.
5
Abra la bandeja de salida del
papel. Extraiga el soporte de la
salida del papel.
6
Perform the Print Head Alignment.
Pull out the Cassette (Lower).
1
When this screen is displayed,
press the button.OK
7
In about 5 to 6 minutes, a blue-
black pattern is printed. Print Head
Alignment is complete.
8
When this screen is displayed,
close the Paper Output Support.
1
Load paper into the Cassette as described in
- through - .
Adjust the Paper Guides to t the paper size.
2
Load the supplied MP-101 paper
into the Cassette.
3
Adjust the right guide to t the
paper size.
Slide the paper against the front
guide.
4
For information about
paper, refer to the
On-screen Manual or
Online Manual.
The screen turns off
if the machine is not
operated for about 5
minutes. To restore
the display, press any
button (except the
ON button) on the
Operation Panel.
•
•
Press the button.OK
3
If an error message
appears, press the OK
button, then proceed to
. After installation is
complete, refer to the On-
screen Manual Online or
Manual to redo Print Head
Alignment.
Adjust the front Paper Guide to A4
size.
Slide the right Paper Guide to the
side.
The left and right Paper Guide move
together.
2
Slide the Cassette (Lower) back.
5
Open the Paper Output Tray. Pull
out the Paper Output Support.
6
Specyfikacje produktu
| Marka: | Canon |
| Kategoria: | drukarka |
| Model: | Pixma MX722 |
Potrzebujesz pomocy?
Jeśli potrzebujesz pomocy z Canon Pixma MX722, zadaj pytanie poniżej, a inni użytkownicy Ci odpowiedzą
Instrukcje drukarka Canon

9 Kwietnia 2025
4 Kwietnia 2025
4 Marca 2025
3 Marca 2025
1 Marca 2025
13 Lutego 2025
8 Lutego 2025
2 Lutego 2025
18 Stycznia 2025
18 Stycznia 2025
Instrukcje drukarka
- drukarka Sony
- drukarka Samsung
- drukarka LG
- drukarka Xiaomi
- drukarka Sharp
- drukarka Huawei
- drukarka Lenovo
- drukarka Epson
- drukarka Fujitsu
- drukarka Roland
- drukarka Panasonic
- drukarka StarTech.com
- drukarka Fujifilm
- drukarka MSI
- drukarka Toshiba
- drukarka D-Link
- drukarka Citizen
- drukarka HP
- drukarka Brother
- drukarka Honeywell
- drukarka Kodak
- drukarka Testo
- drukarka Primera
- drukarka Xerox
- drukarka Godex
- drukarka Olivetti
- drukarka Zebra
- drukarka Dell
- drukarka Digitus
- drukarka AgfaPhoto
- drukarka Kyocera
- drukarka Ricoh
- drukarka Seiko
- drukarka Renkforce
- drukarka Thomson
- drukarka AVM
- drukarka Velleman
- drukarka Dymo
- drukarka Panduit
- drukarka Olympus
- drukarka OKI
- drukarka Mitsubishi
- drukarka Intermec
- drukarka NEC
- drukarka Polaroid
- drukarka Konica Minolta
- drukarka Bixolon
- drukarka Pantum
- drukarka Olympia
- drukarka Datamax O'Neil
- drukarka DNP
- drukarka Equip
- drukarka ZKTeco
- drukarka TSC
- drukarka HiTi
- drukarka Microboards
- drukarka Triumph-Adler
- drukarka Fargo
- drukarka Entrust
- drukarka Kern
- drukarka Brady
- drukarka Tomy
- drukarka Lexmark
- drukarka Sagem
- drukarka Nilox
- drukarka Argox
- drukarka Royal Sovereign
- drukarka Minolta
- drukarka Oce
- drukarka Paxar
- drukarka IDP
- drukarka Metapace
- drukarka Ultimaker
- drukarka Ibm
- drukarka CSL
- drukarka Toshiba TEC
- drukarka Frama
- drukarka Builder
- drukarka Kogan
- drukarka Star Micronics
- drukarka Posiflex
- drukarka Dascom
- drukarka GG Image
- drukarka Vupoint Solutions
- drukarka Elite Screens
- drukarka DTRONIC
- drukarka Phoenix Contact
- drukarka Videology
- drukarka Epson 7620
- drukarka Star
- drukarka EC Line
- drukarka Colop
- drukarka Approx
- drukarka Fichero
- drukarka Raspberry Pi
- drukarka Unitech
- drukarka Middle Atlantic
- drukarka Evolis
- drukarka Tally Dascom
- drukarka Custom
- drukarka Nisca
- drukarka Sawgrass
- drukarka Mutoh
Najnowsze instrukcje dla drukarka

9 Kwietnia 2025

9 Kwietnia 2025
9 Kwietnia 2025

9 Kwietnia 2025

3 Kwietnia 2025
3 Kwietnia 2025
3 Kwietnia 2025

2 Kwietnia 2025
2 Kwietnia 2025

2 Kwietnia 2025