Instrukcja obsługi Canon imageCLASS 2300N
Przeczytaj poniżej 📖 instrukcję obsługi w języku polskim dla Canon imageCLASS 2300N (197 stron) w kategorii drukarka. Ta instrukcja była pomocna dla 4 osób i została oceniona przez 2 użytkowników na średnio 4.5 gwiazdek
Strona 1/197


imageCLASS 2300
Reference Guide
0
Ot ¯

The manuals for this machine are divided as follows. Please refer to them for detailed information.
Some of the manuals listed below are only supplied with the Network Model of this machine.
Manuals for the Machine
Guides with this symbol are printed manuals. Guides with this symbol are PDF manuals included on the
accompanying CD-ROM.
CD-ROM
Installing and Setting Up the Machine Set-Up Sheet
for the Machine
Network and Printer Settings Set-Up Sheet
for Networking and Printing
Basic Operations Basic Guide
Machine Settings
Troubleshooting Reference Guide
(This Document)
Copying Instructions Copying Guide
Fax Instructions Facsimile Guide
Sending Instructions Sending Guide
Remote User Interface Instructions Remote UI Guide
CD-ROM
Network Connectivity and Setup Instructions Network Guide
CD-ROM
PCL Printer Instructions PCL Printer Guide
CD-ROM
PCL Printer Driver Installation and
Instructions PCL Driver Guide
CD-ROM
Fax Driver and Cover Sheet Editor
Installation and Instructions Fax Driver Guide
with Cover Sheet Editor
CD-ROM
The machine illustration on the cover may differ slightly from your machine.

Chapter 1 Before You Start Using This Machine
Chapter 2 Basic Operations
Chapter 3 Selecting and Storing Settings
Chapter 4 Checking Job Status
Chapter 5 System Manager Settings
Chapter 6 Routine Maintenance
Chapter 7 Troubleshooting
Chapter 8 Appendix
Includes the report samples, speci cations, and index.fi
How This Manual Is Organized
Considerable effort has been made to ensure that this manual is free of inaccuracies and omissions. However, as we are constantly improving our
products, if you need an exact speci cation, please contact Canon.fi

iv
Contents
Preface . . . . . . . . . . . . . . . . . . . . . . . . . . . . . . . . . . . . . . . . . . . . . . . . . . . . . . . . .viii
How to Use This Manual . . . . . . . . . . . . . . . . . . . . . . . . . . . . . . . . . . . . . . . . . . .viii
Symbols Used in This Manual . . . . . . . . . . . . . . . . . . . . . . . . . . . . . . . . . . . . . viii
Keys Used in This Manual . . . . . . . . . . . . . . . . . . . . . . . . . . . . . . . . . . . . . . . . viii
Operations and Terms Used in This Manual . . . . . . . . . . . . . . . . . . . . . . . . . . . . x
Legal Notices . . . . . . . . . . . . . . . . . . . . . . . . . . . . . . . . . . . . . . . . . . . . . . . . . . . . xii
Laser Safety . . . . . . . . . . . . . . . . . . . . . . . . . . . . . . . . . . . . . . . . . . . . . . . . . . . xii
CDRH Regulations. . . . . . . . . . . . . . . . . . . . . . . . . . . . . . . . . . . . . . . . . . . . . . xiii
International Energy Star Program. . . . . . . . . . . . . . . . . . . . . . . . . . . . . . . . . . xiv
Trademarks. . . . . . . . . . . . . . . . . . . . . . . . . . . . . . . . . . . . . . . . . . . . . . . . . . . . xiv
Copyright . . . . . . . . . . . . . . . . . . . . . . . . . . . . . . . . . . . . . . . . . . . . . . . . . . . . . xiv
Disclaimers. . . . . . . . . . . . . . . . . . . . . . . . . . . . . . . . . . . . . . . . . . . . . . . . . . . . xiv
Legal Limitations on the Usage of Your Product and the Use of Images . . . . . xv
Important Safety Instructions . . . . . . . . . . . . . . . . . . . . . . . . . . . . . . . . . . . . . . .xvi
Installation . . . . . . . . . . . . . . . . . . . . . . . . . . . . . . . . . . . . . . . . . . . . . . . . . . . . xvi
Power Supply . . . . . . . . . . . . . . . . . . . . . . . . . . . . . . . . . . . . . . . . . . . . . . . . . xvii
Handling . . . . . . . . . . . . . . . . . . . . . . . . . . . . . . . . . . . . . . . . . . . . . . . . . . . . . xviii
Maintenance and Inspections . . . . . . . . . . . . . . . . . . . . . . . . . . . . . . . . . . . . . xix
Consumables . . . . . . . . . . . . . . . . . . . . . . . . . . . . . . . . . . . . . . . . . . . . . . . . . . xx
Other Warnings . . . . . . . . . . . . . . . . . . . . . . . . . . . . . . . . . . . . . . . . . . . . . . . . xxi
Chapter 1 Before You Start Using This Machine
Installation, Location, and Handling . . . . . . . . . . . . . . . . . . . . . . . . . . . . . . . . 1-2
Installation Precautions . . . . . . . . . . . . . . . . . . . . . . . . . . . . . . . . . . . . . . . . . 1-2
Avoid Installing the Machine in the Following Locations . . . . . . . . . . . . . 1-2
Select a Safe Power Supply . . . . . . . . . . . . . . . . . . . . . . . . . . . . . . . . . . . 1-5
Provide Adequate Installation Space. . . . . . . . . . . . . . . . . . . . . . . . . . . . 1-6
Moving the Machine . . . . . . . . . . . . . . . . . . . . . . . . . . . . . . . . . . . . . . . . . 1-7
Handling Precautions . . . . . . . . . . . . . . . . . . . . . . . . . . . . . . . . . . . . . . . . . . . 1-7
Parts and Their Functions . . . . . . . . . . . . . . . . . . . . . . . . . . . . . . . . . . . . . . . . 1-10
External View . . . . . . . . . . . . . . . . . . . . . . . . . . . . . . . . . . . . . . . . . . . . . . . . 1-10
Internal View. . . . . . . . . . . . . . . . . . . . . . . . . . . . . . . . . . . . . . . . . . . . . . . . . 1-11
Control Panel Parts and Functions. . . . . . . . . . . . . . . . . . . . . . . . . . . . . . . . 1-12
One-Touch Speed Dialing Panels Closed . . . . . . . . . . . . . . . . . . . . . . . 1-12
One-Touch Speed Dialing Panels Opened . . . . . . . . . . . . . . . . . . . . . . 1-14

ix
Function Keys: <Key icon> + (Key Function)
Example: Press [F3] (DENSITY)
Press [F4] (
▲
)
F3
F4

x
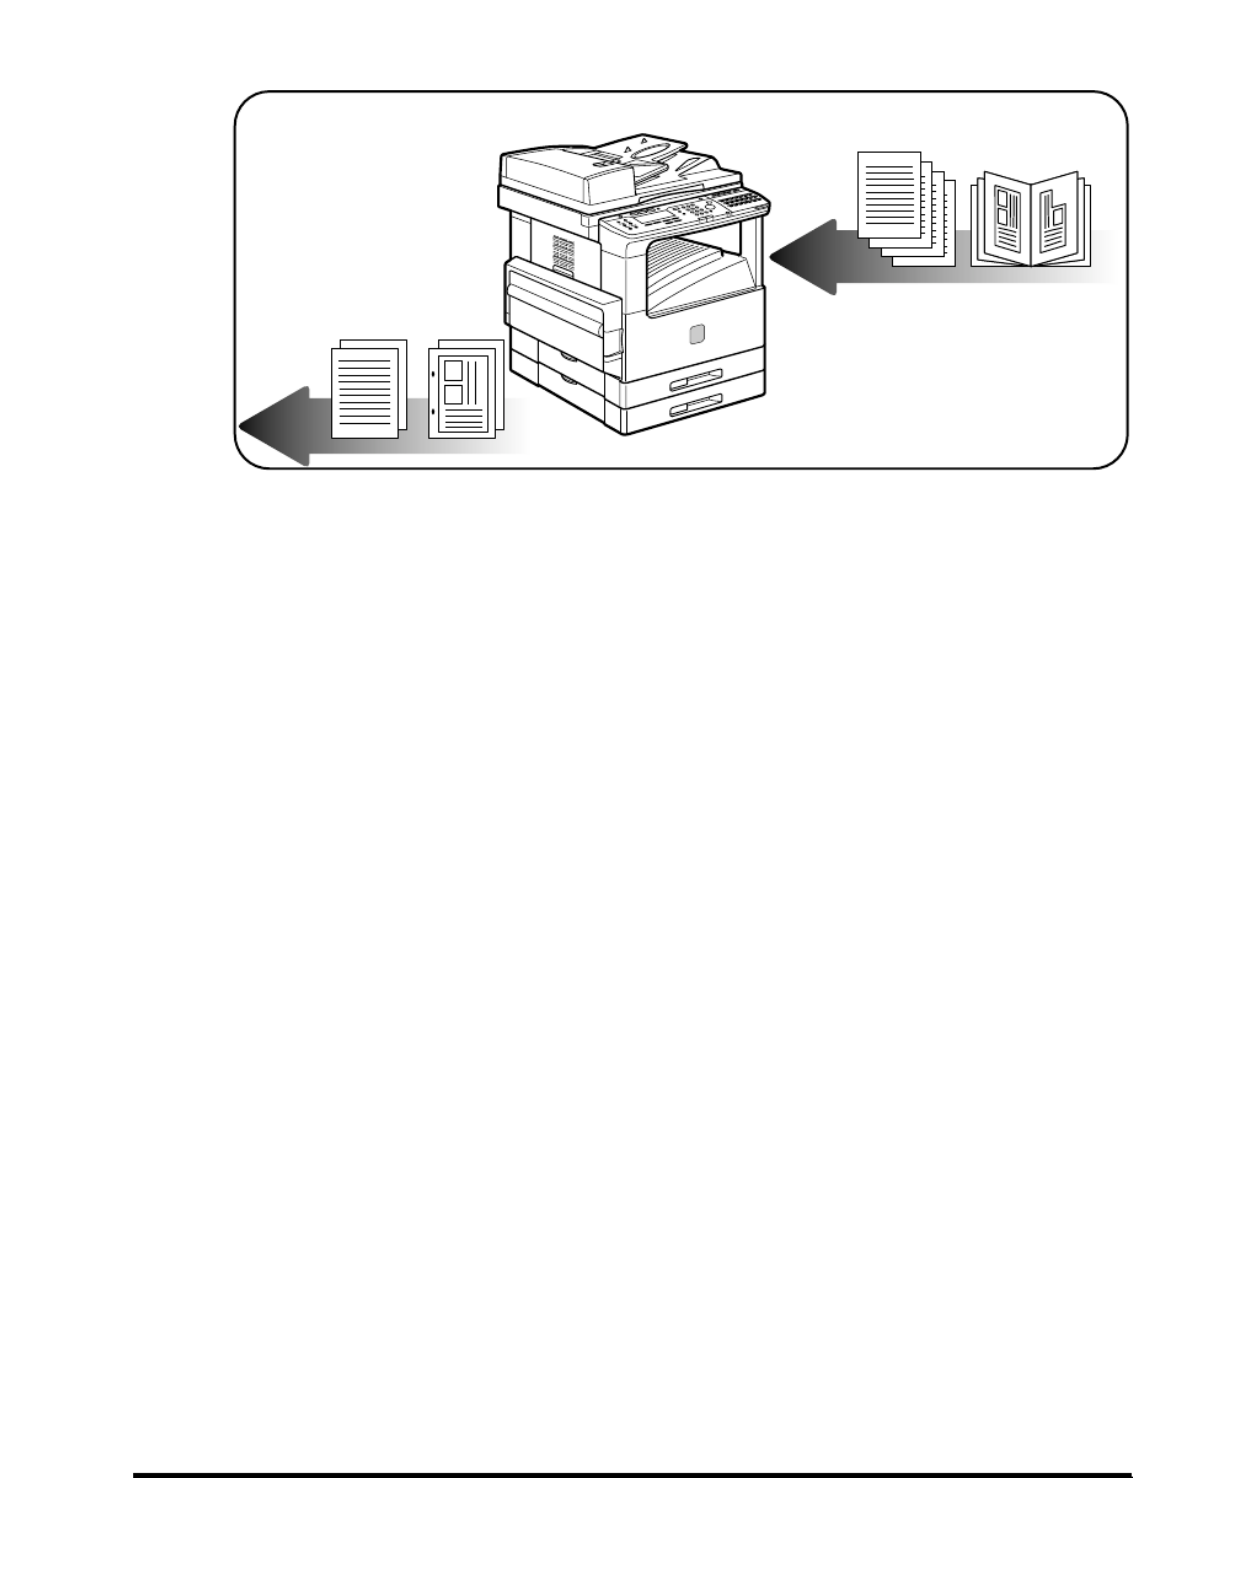
This machine makes effective use of memory in order to perform print operations
efficiently. For example, as soon as the machine has scanned the original that you
want to copy, it can immediately scan the next person's original. You can also print
from this machine, using a function other than the Copy function. In this machine,
these operations take place in a complex way, so that not only copies, but also
various kinds of prints may sometimes have to wait their turn before they can be
output.
To avoid confusion when reading this manual, the terms "scanning", "printing", and
"copying" used throughout this manual are de ned as set out below. There are fi
some cases in which the scanning of an original when making a copy, and the
process of making a print, are described separately.
Operations and Terms Used in This Manual
Scanning an original to be copied,
or scanning an original to be
stored as data in a mailbox.
Scanning
Printing
Outputting a copy, or outputting data sent
from a personal computer to the machine.
xi
Copying
Scanning of an original,
printing through finishing.

xii
Laser Safety
This product complies with 21 CFR Chapter 1 Subchapter J as a Class 1 laser
product under the U.S. Department of Health and Human Services (DHHS)
Radiation Performance Standard according to the Radiation Control for Health and
Safety Act of 1968. Class 1 levels of laser radiation are not considered to be
hazardous.
Since radiation emitted inside the product is completely con ned within protective fi
housings and external covers, the laser beam cannot escape from the machine
during any phase of user operation. Do not remove protective housings or external
covers, except as directed by the equipment's Reference Guide.
Legal Notices

xiii
CDRH Regulations
The Center for Devices and Radiological Health (CDRH) of the U.S. Food and Drug
Administration implemented regulations for laser products on August 2, 1976.
These regulations apply to laser products manufactured since August 1, 1976.
Compliance is mandatory for products marketed in the United States. The label
shown below indicates compliance with the CDRH regulations and must be
attached to laser products marketed in the United States.
The label shown below is attached to the laser scanner unit inside the machine.
CAUTION
Use of controls, adjustments, or performance of procedures other than those
specified in this manual may result in hazardous radiation exposure.
CANON INC.
3-30-2 SHIMOMARUKO, OHTA-KU, TOKYO, JAPAN
CANON U.S.A., INC.
ONE CANON PLAZA, LAKE SUCCESS, N.Y. 11042, U.S.A.
CANON CANADA INC.
3128 ORLANDO DRIVE, UNIT#1, BUILDING F, MISSISSAUGA, ONTARIO,
L4V1R5, CANADA
MANUFACTURED:
THIS PRODUCT CONFORMS WITH DHHS RADIATION PERFORMANCE
STANDARD, 21 CFR CHAPTER 1 SUBCHAPTER J.
DANGER- Invisible laser radiation when open.
AVOID DIRECT EXPOSURE TO BEAM.
CAUTION-INVISIBLE LASER RADIATION WHEN OPEN.
AVOID EXPOSURE TO BEAM.
ATTENTION
-
RAYONNEMENT LASER INVISIBLE EN CAS D OUVERTURE. EXPOSITION ’
DANGEREUSE AU FAISCEAU.
VORSICHT -
UNSICHTBARE LASERSTRAHLUNG, WENN ABDECKUNG GE FFNET. NICHT Ö
DEM STRAHL AUSSETZEN.
ATTENZIONE
-
RADIAZIONE LASER INVISIBLE IN CASO DI APERTURA. EVITARE
L ESPOSIZIONE AL FASCIO.’
PRECAUCION
-
RADIACION LASER INVISIBLE CUANDO SE ABRE. EVITAR EXPONERSE AL
RAYO.
VARO! -
AVATTAESSA OLET ALTTIINA N KYM TT M LLE LASERS TEILYLLE. Ä Ä Ö Ä Ä
Ä Ä ÄL KATSO S TEESEEN.
VARNING! -
OSYNLIG LASERSTR LNING NAR DENNA DEL R PPNAD.Ä Ä Ö
BETRAKTA EJ STR LEN.Ä
ADVARSEL! -
USYNLIG LASER STR LING, N R DENNE ER BEN. Å Å Å
UNDG BESTR LING.Å Å
ADVARSEL -
USYNLIG LASERSTR LING N R DEKSEL PNES.Å Å Å
UNNG EKSPONERING FOR STR LEN.Å Å
DANGER- Invisible laser radiation when opening the cover,
removing developing assembly, or cartridges.
AVOID DIRECT EXPOSURE TO BEAM.
CAUTION-INVISIBLE LASER RADIATION WHEN OPENING
THE COVER, REMOVING DEVELOPING ASSEMBLY.
AVOID EXPOSURE TO BEAM.
ATTENTION
-
RAYONNEMENT LASER INVISIBLE EN CAS D’OUVERTURE DU COUVERCLE.
DU D MONTAGE DE L VELOPPEMENT.É ’ENSEMBLE DE DÉ
EVITER TOUTE EXPOSITION DIRECTE AVEC LE FAISCEAU.
VORSICHT -
UNSICHTBARE LASERSTRAHLUNG, WENN ABDECKUNG GEÖFFNET.
NICHT DEM STRAHL AUSSETZEN.
ATTENZIONE
-
EMISSIONE DI UN RAGGIO LASER INVISIBILE A SEGUITO DELL’ APERTURA
DELLA COPERTURA O DELLA RIMOZIONE DEL GRUPPO DI SVILUPPO.
EVITARE L’ESPOSIZIONE DIRETTA AL RAGGIO LASER.
PRECAUCIÓN
-
RADIACIÓN LÁSER INVISIBLE EN CASO DE ABRIR LA CUBIERTA Y RETIRAR
LA UNIDAD REVELADORA. EVITE LA EXPOSICI SER.ÓN AL HAZ LÁ
VARO! -
AVATTAESSA KEHITYSYKSIKÖN POISSAOLLESSA OLET ALTTINA
N M LÄKYMÄTTÖ ÄLLE LASERSÄTEILYLLE. Ä Ä KATSO SÄTEESEEN.
VARNING! -
OSYNLIG LASERSTR LNING N R DENNA DEL R Ä Ä Ä ÖPPNAD OCH.
FRAMKALLAREN RURTAGEN. BETRAKTA EJ STR LEN.Ä Ä
ADVARSEL! -
USYNLIG LASER STR LING, NÅ ÅR D KSLET BNES FOR AT FJERNEÆ Å
FRAMKALLALDEREN. UNDG LEN.ÅAT BLIVE RAMT AFSTRÅ
ADVARSEL -
USYNLIG LASERSTR R DEKSELEÅLING NÅ Í Å PNES OG.
LASERENHETEN TASUT. IKKE SE DIREKTE PÅ STR LEN.Å

xiv
International Energy Star Program
Trademarks
Canon, the Canon logo, and imageCLASS are trademarks of Canon Inc.
Other product and company names herein may be the trademarks of their
respective owners.
Copyright
Copyright 2003 by Canon Inc. All rights reserved.
No part of this publication may be reproduced or transmitted in any form or by any
means, electronic or mechanical, including photocopying and recording, or by any
information storage or retrieval system without the prior written permission of
Canon Inc.
Disclaimers
The information in this document is subject to change without notice.
CANON INC. MAKES NO WARRANTY OF ANY KIND WITH REGARD TO THIS
MATERIAL, EITHER EXPRESS OR IMPLIED, EXCEPT AS PROVIDED HEREIN,
INCLUDING WITHOUT LIMITATION, THEREOF, WARRANTIES AS TO
MARKETABILITY, MERCHANTABILITY, FITNESS FOR A PARTICULAR
PURPOSE OF USE OR AGAINST INFRINGEMENT OF ANY PATENT. CANON
INC. SHALL NOT BE LIABLE FOR ANY DIRECT, INCIDENTAL, OR
CONSEQUENTIAL DAMAGES OF ANY NATURE, OR LOSSES OR EXPENSES
RESULTING FROM THE USE OF THIS MATERIAL.
As an ENERGY STAR® Partner, Canon USA, Inc. has determined that
this copier model meets the ENERGY STAR® Program for energy
ef ciency.fi
The International ENERGY STAR® Of ce Equipment Program is an fi
international program that promotes energy saving through the use of
computers and other of ce equipment. The program backs the fi
development and dissemination of products with functions that effectively
reduce energy consumption. It is an open system in which business
proprietors can participate voluntarily. The targeted products are office
equipment, such as computers, displays, printers, facsimiles, and copiers.
The standards and logos are uniform among participating nations.

xv
Legal Limitations on the Usage of Your Product and the
Use of Images
Using your product to scan, print or otherwise reproduce certain documents, and
the use of such images as scanned, printed or otherwise reproduced by your
product, may be prohibited by law and may result in criminal and/or civil liability. A
non-exhaustive list of these documents is set forth below. This list is intended to be
a guide only. If you are uncertain about the legality of using your product to scan,
print or otherwise reproduce any particular document, and/or of the use of the
images scanned, printed or otherwise reproduced, you should consult in advance
with your legal advisor for guidance.
Paper Money Traveles Checks
Money Orders Food Stamps
Certi Passportsficates of Deposit
Postage Stamps
(canceled or uncanceled)
Immigration Papers
Identifying Badges or Insignias Internal Revenue Stamps
(canceled or uncanceled)
Selective Service or Draft
Papers
Bonds or Other Certi cates of Indebtednessfi
Checks or Drafts Issued by
Governmental Agencies
Stock Certificates
Motor Vehicle Licenses and
Certificates of Title
Copyrighted Works/Works of Art without
Permission of Copyright Owner

xvi
Please read these "Important Safety Instructions" thoroughly before operating the
machine. As these instructions are intended to prevent injury to the user or other
persons or destruction of property, always pay attention to these instructions. Also,
since it may result in unexpected accidents or injuries, do not perform any operation
unless otherwise speci ed in the manual. Improper operation or use of this fi
machine could result in personal injury and/or damage requiring extensive repair
that may not be covered under your Limited Warranty.
Installation
WARNING
Do not install the machine near alcohol, paint thinner or other ammable substances. fl
If flammable substances come into contact with electrical parts inside the machine, it
may result in a re or electrical shock.fi
Do not place the following items on the machine. If these items come into contact
with a high-voltage area inside the machine, it may result in a fire or electrical shock.
If these items are dropped or spilled inside the machine, immediately turn OFF the
main power switch, and disconnect the power cord from the power outlet. Then,
contact your service representative.
- Necklaces and other metal objects
- Cups, vases, owerpots, and other containers lled with water or liquidsfl fi
CAUTION
Do not install the machine in unstable locations, such as unsteady platforms or
inclined floors, or in locations subject to excessive vibrations, as this may cause the
machine to fall or tip over, resulting in personal injury.
Never block the ventilation slots and louvers on the machine. These openings are
provided for proper ventilation of working parts inside the machine. Blocking these
openings can cause the machine to overheat. Never place the machine on a soft
surface, such as a sofa or rug.
Important Safety Instructions

xvii
Do not install the machine in the following locations:
- A damp or dusty location
- A location near water faucets or water
- A location exposed to direct sunlight
- A location subject to high temperatures
- A location near open flames
Power Supply
WARNING
Do not damage or modify the power cord. Also, do not place heavy objects on the
power cord, or pull on or excessively bend it, as this could cause electrical damage
and result in a re or electrical shock.fi
Keep the power cord away from a heat source; failure to do this may cause the power
cord coating to melt, resulting in a re or electrical shock.fi
Do not connect or disconnect the power cord with wet hands, as this may result in
electrical shock.
Do not connect the power cord to a multiplug power strip, as this may cause a fire or
electrical shock.
Do not bundle up or tie the power cord in a knot, as this may result in a re or fi
electrical shock.
Insert the power plug completely into the power outlet, as failure to do so may result
in a re or electrical shock.fi
Do not use power cords other than the power cord provided, as this may result in a
fire or electrical shock.
As a general rule, do not use extension cords. Using an extension cord may result in
a fire or electrical shock. If an extension cord must be used, however, use one rated
for voltages of 120 V AC and over, untie the cord binding, and insert the power plug
completely into the extension cord outlet to ensure a rm connection between the fi
power cord and the extension cord.
CAUTION
Do not use power supplies with voltages other than those speci ed herein, as this fi
may result in a re or electrical shock.fi
Always grasp the power plug when disconnecting the power cord. Pulling on the
power cord may expose or snap the core wire, or otherwise damage the power cord.
If the power cord is damaged, this could cause current to leak, resulting in a re or fi
electrical shock.
Leave suf cient space around the power plug so that it can be unplugged easily. If fi
objects are placed around the power plug, you will be unable to unplug it in an
emergency.
xviii
Handling
WARNING
Do not attempt to disassemble or modify the machine. There are high-temperature
and high-voltage components inside the machine which may result in a re or fi
electrical shock.
If the machine makes strange noises, or gives off smoke, heat, or strange smells,
immediately turn OFF the main power switch, and disconnect the power cord from
the power outlet. Then, contact your service representative. Continued use of the
machine in this condition may result in a re or electrical shock.fi
Do not use highly ammable sprays near the machine. If gas from these sprays fl
comes into contact with the electrical components inside the machine, it may result
in a re or electrical shock.fi
To avoid damage to the power cord and creating a re hazard, always turn OFF the fi
main power switch, and unplug the interface cable when moving the machine.
Otherwise, the power cord or interface cable may be damaged, resulting in a re or fi
electrical shock.
Do not drop paper clips, staples, or other metal objects inside the machine. Also, do
not spill water, liquids, or ammable substances (alcohol, benzene, paint thinner, fl
etc.) inside the machine. If these items come into contact with a high-voltage area
inside the machine, it may result in a re or electrical shock. If these items are fi
dropped or spilled inside the machine, immediately turn OFF the main power switch,
and disconnect the power cord from the power outlet. Then, contact your service
representative.
CAUTION
Do not place heavy objects on the machine, as they may tip over or fall resulting in
personal injury.
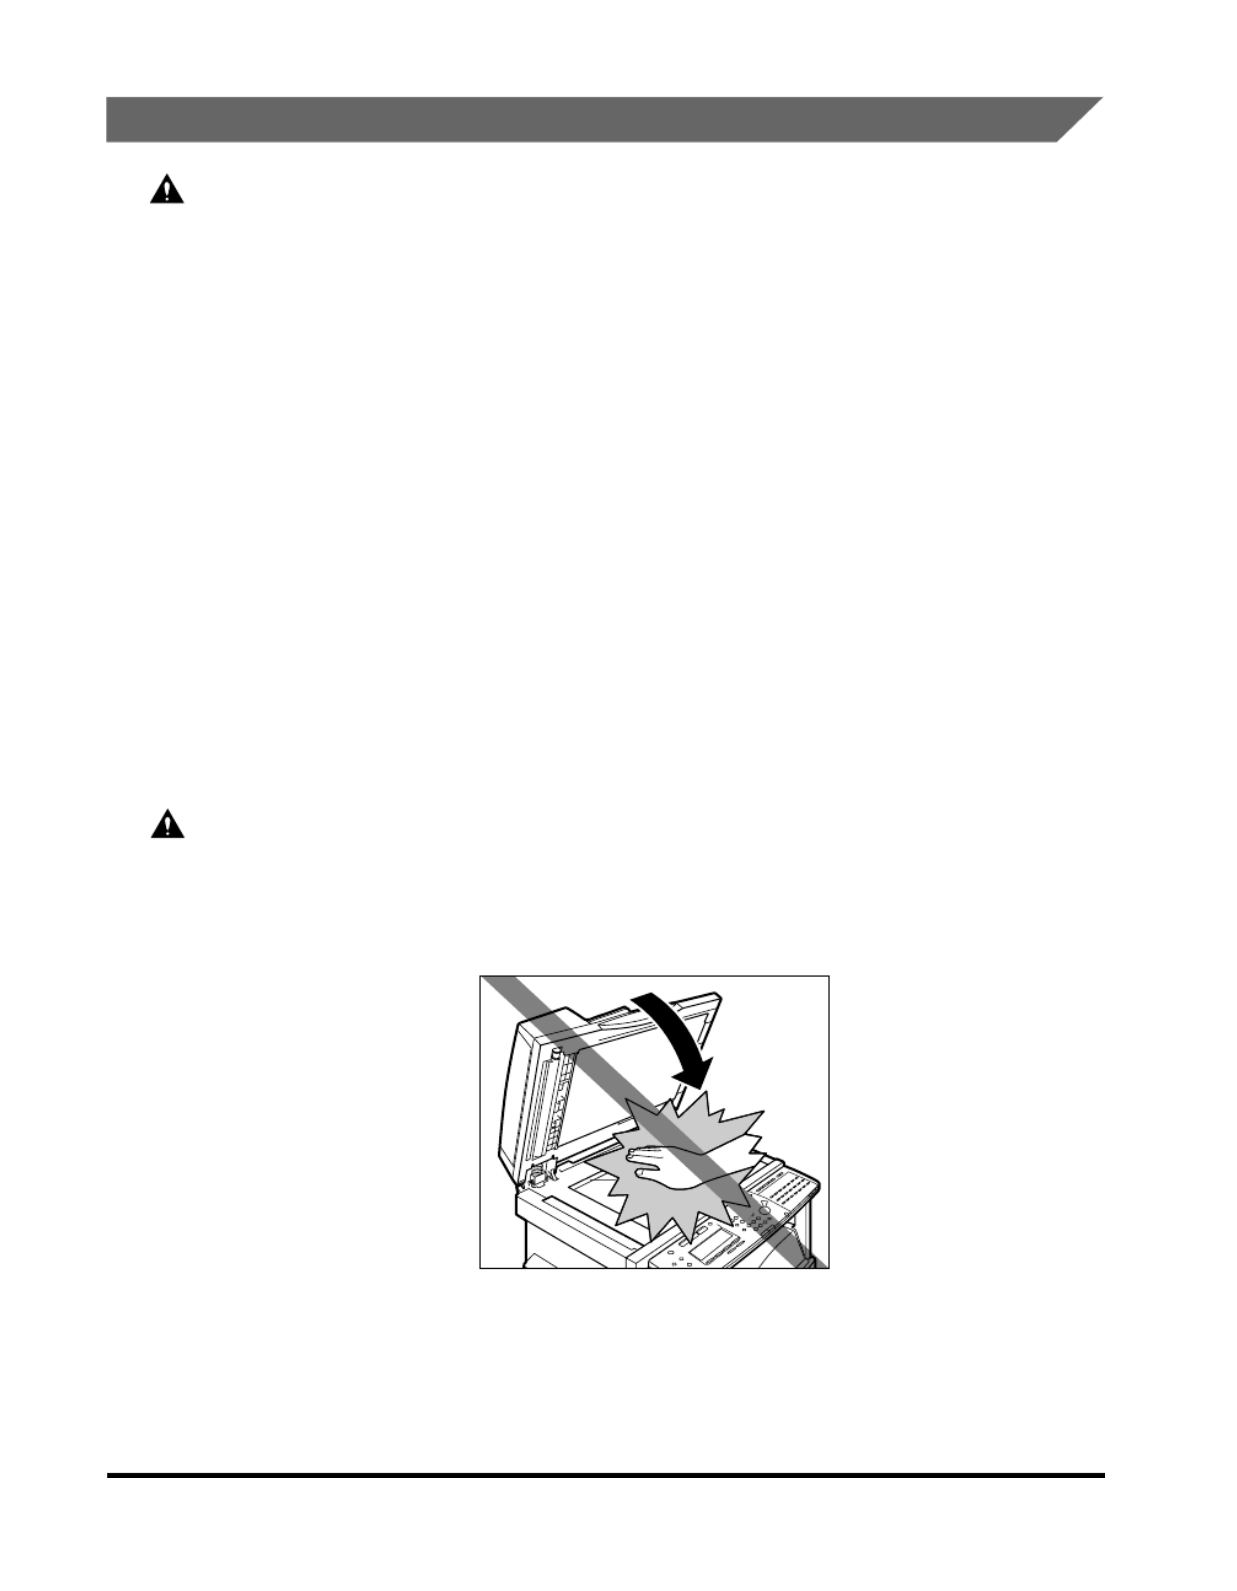
Close the feeder/platen glass cover gently to avoid catching your hands, as this may
result in personal injury.
Do not press down hard on the feeder/platen glass cover when using the platen glass
to make copies of thick books, etc. Doing so may damage the platen glass and result
in personal injury.
Do not touch the paper output area while the machine is copying or printing, as this
may result in personal injury.

xix
Turn OFF the main power switch for safety when the machine will not be used for a
long period of time, such as overnight. Also, disconnect the power cord for safety
when the machine will not be used for an extended period of time, such as during
consecutive holidays.
The laser beam can be harmful to human bodies. Since radiation emitted inside the
product is completely con ned within protective housings and external covers, the fi
laser beam cannot escape from the machine during any phase of user operation.
Read the following remarks and instructions for safety.
Never open covers other than those instructed in this manual.
Do not remove the caution label attached to the cover of the laser scanner unit.
If the laser beam escapes from the machine, exposure may cause serious damage to
your eyes.
Maintenance and Inspections
WARNING
When cleaning the machine, rst turn OFF the main power switch, then disconnect fi
the power cord. Failure to observe these steps may result in a re or electrical shock.fi
Disconnect the power cord from the power outlet regularly, and clean the area around
the base of the power plug's metal pins and the power outlet with a dry cloth to
ensure that all dust and grime is removed. If the power cord is connected for a long
period of time in a damp, dusty, or smoky location, dust can build up around the
power plug and become damp. This may cause a short circuit and result in a fire.
Clean the machine using a slightly dampened cloth with a mild detergent mixed with
water. Do not use alcohol, benzene, paint thinner, or other ammable substances. fl
Check detergent for ammability prior to use. If ammable substances come into fl fl
contact with a high-voltage area inside the machine, it may result in a re or electrical fi
shock.
There are some areas inside the machine which are subject to high-voltages. When
removing jammed paper or when inspecting the inside of the machine, do not allow
necklaces, bracelets, or other metal objects to touch the inside of the machine, as
this may result in burns or electrical shock.
Do not burn or throw used toner cartridges into open ames, as this may cause the fl
toner remaining inside the cartridge to ignite, resulting in burns or a fire.

xx
CAUTION
The fixing unit and its surroundings inside the machine may become hot during use.
When removing jammed paper or when inspecting the inside of the machine, do not
touch the xing unit and its surroundings, as doing so may result in burns or fi
electrical shock.
When removing jammed paper or replacing the toner cartridge, take care not to allow
the toner to come into contact with your hands or clothing, as this will dirty your
hands or clothing. If they become dirty, wash them immediately with cold water.
Washing them with warm water will set the toner, and make it impossible to remove
the toner stains.
When removing paper which has become jammed inside the machine, remove the
jammed paper gently to prevent the toner on the paper from scattering and getting
into your eyes or mouth. If the toner gets into your eyes or mouth, wash them
immediately with cold water and immediately consult a physician.
When loading paper or removing jammed originals or paper, take care not to cut your
hands on the edges of the originals or paper.
When removing a used toner cartridge, remove the cartridge carefully to prevent the
toner from scattering and getting into your eyes or mouth. If the toner gets into your
eyes or mouth, wash them immediately with cold water and immediately consult a
physician.
Consumables
WARNING
Do not burn or throw used toner cartridges into open ames, as this may cause the fl
toner remaining inside the cartridges to ignite, resulting in burns or a fire.
Do not store toner cartridges or copy paper in places exposed to open ames, as this fl
may cause the toner or paper to ignite, resulting in burns or a fire.
When discarding used toner cartridges, put the cartridges in a bag to prevent the
toner remaining inside the cartridges from scattering, and dispose of them in a
location away from open flames.
CAUTION
Keep toner and other consumables out of the reach of small children. If these items
are ingested, consult a physician immediately.

xxi
Other Warnings
WARNING
For cardiac pacemaker users:
This product generates a low level magnetic eld. If you use a cardiac pacemaker and fi
feel abnormalities, please move away from the product and consult your doctor.

xxii

1-1
CHAPTER
1
Before You Start Using This
Machine
This chapter describes what you should know before using this machine, such as main
features, parts and their functions, how to turn ON the main power, and so on.
Installation, Location, and Handling . . . . . . . . . . . . . . . . . . . . . . . . . . . . . . . . . . . . . . . . . 1-2
Installation Precautions . . . . . . . . . . . . . . . . . . . . . . . . . . . . . . . . . . . . . . . . . . . . . . . . . . . . . . . .1-2
Handling Precautions . . . . . . . . . . . . . . . . . . . . . . . . . . . . . . . . . . . . . . . . . . . . . . . . . . . . . . . . . .1-7
Parts and Their Functions. . . . . . . . . . . . . . . . . . . . . . . . . . . . . . . . . . . . . . . . . . . . . . . . 1-10
External View . . . . . . . . . . . . . . . . . . . . . . . . . . . . . . . . . . . . . . . . . . . . . . . . . . . . . . . . . . . . . . .1-10
Internal View . . . . . . . . . . . . . . . . . . . . . . . . . . . . . . . . . . . . . . . . . . . . . . . . . . . . . . . . . . . . . . . .1-11
Control Panel Parts and Functions . . . . . . . . . . . . . . . . . . . . . . . . . . . . . . . . . . . . . . . . . . . . . . .1-12
Main Power and Energy Saver Key . . . . . . . . . . . . . . . . . . . . . . . . . . . . . . . . . . . . . . . . 1-15
How to Turn ON the Main Power . . . . . . . . . . . . . . . . . . . . . . . . . . . . . . . . . . . . . . . . . . . . . . . .1-15
Adjusting the Brightness of the LCD Display . . . . . . . . . . . . . . . . . . . . . . . . . . . . . . . . . . . . . . .1-17
Energy Saver Mode . . . . . . . . . . . . . . . . . . . . . . . . . . . . . . . . . . . . . . . . . . . . . . . . . . . . . . . . . .1-18
System Settings . . . . . . . . . . . . . . . . . . . . . . . . . . . . . . . . . . . . . . . . . . . . . . . . . . . . . . . 1-19
Installation, Location, and Handling
1-2
Before You Start Using This Machine
1
Installation, Location, and Handling
This section describes precautions for installation location and handling. We
recommend that you read this section prior to use.
Installation Precautions
Avoid Installing the Machine in the Following Locations
■
Avoid locations which are subject to extreme temperature and humidity,
whether low or high.
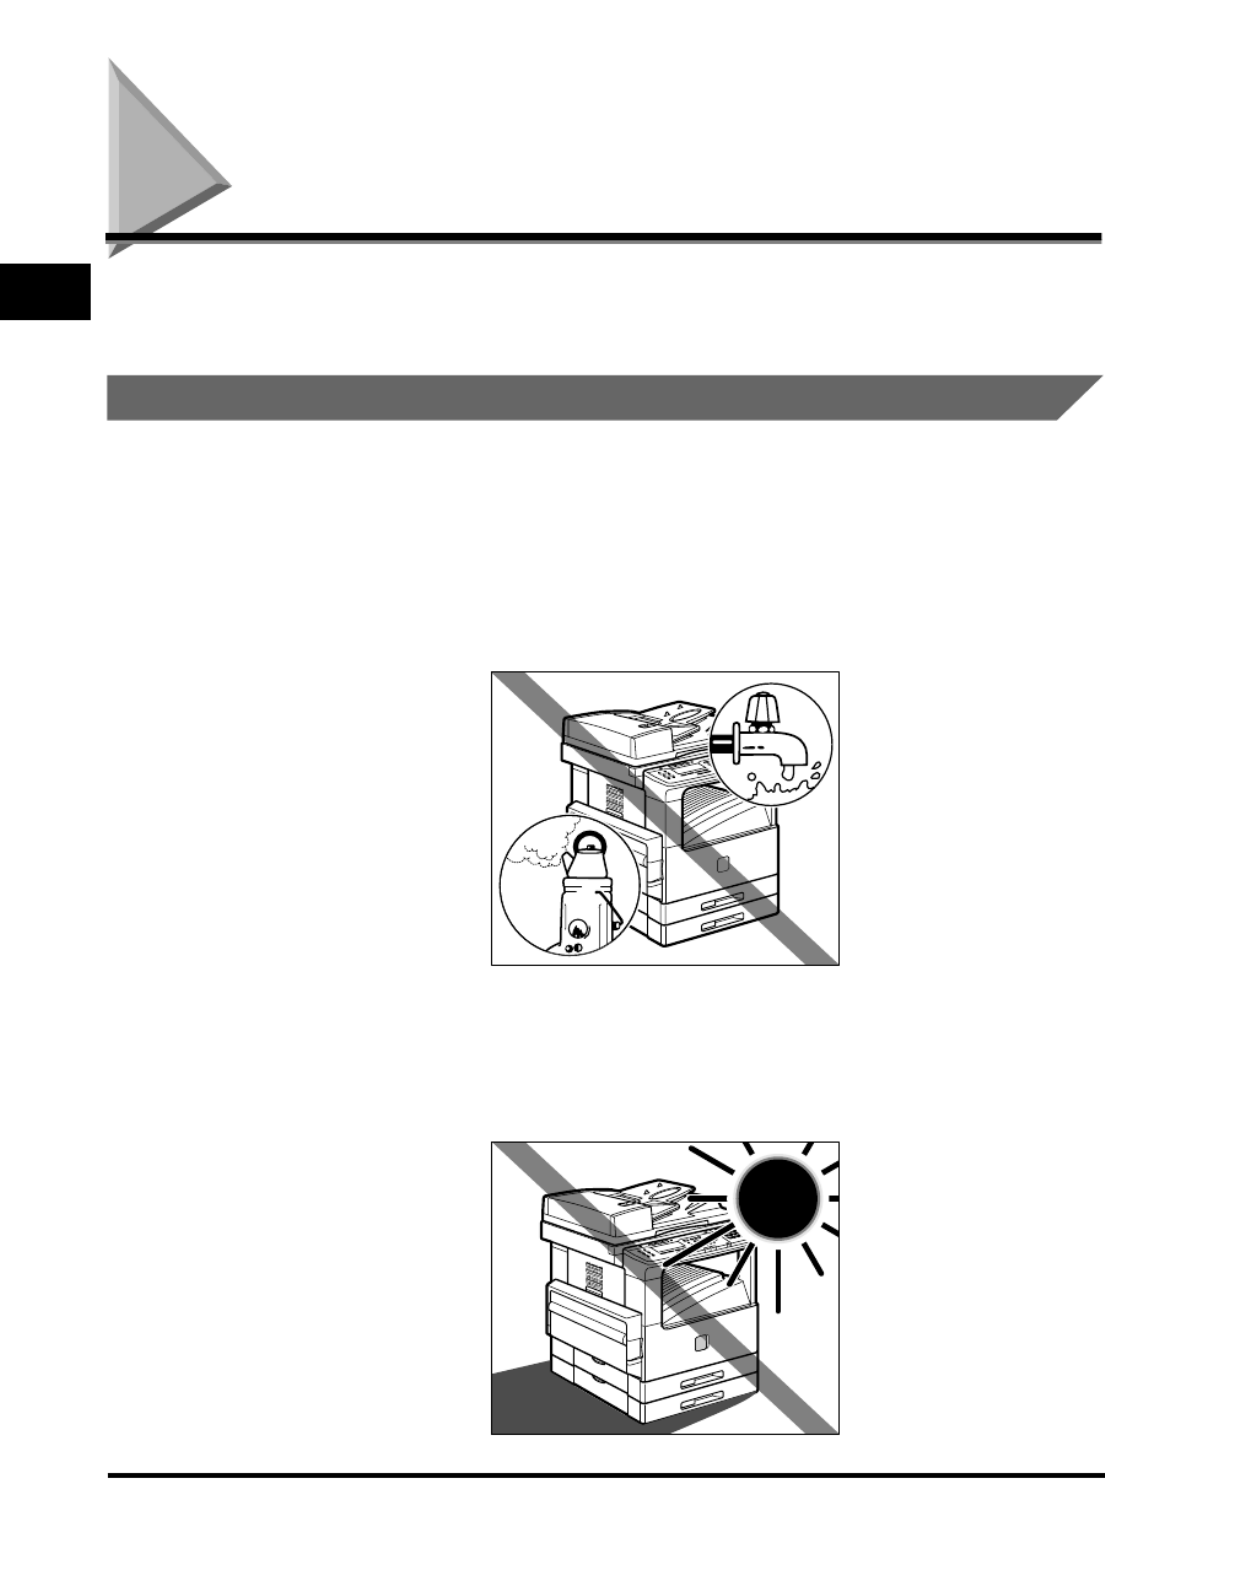
For example, avoid installing the machine near water faucets, hot water heaters,
humidifiers, air conditioners, heaters or stoves.
■
Avoid installing the machine in direct sunlight.
If this is unavoidable, use curtains to shade the machine. Be sure that the curtains do
not block the machine's ventilation slots or louvers, or interfere with the electrical cord
or power supply.

Installation, Location, and Handling
1-3
Before You Start Using This Machine
1
■
Avoid poorly ventilated locations.
This machine generates a slight amount of ozone during normal use. Although
sensitivity to ozone may vary, this amount is not harmful. Ozone may be more
noticeable during extended use or long production runs, especially in poorly ventilated
rooms. It is recommended that the room be appropriately ventilated, suf cient to fi
maintain a comfortable working environment, in areas of machine operation.
■
Avoid locations where a considerable amount of dust accumulates.
■
Avoid locations where ammonia gas is emitted.
■
Avoid locations near volatile, flammable materials, such as alcohol or paint
thinner.
■
Avoid locations that are subject to vibration.
For example, avoid installing the machine on unstable oors or stands.fl

Installation, Location, and Handling
1-4
Before You Start Using This Machine
1
■
Avoid exposing the machine to rapid changes in temperature.
If the room in which the machine is installed is cold but rapidly heated, water droplets
(condensation) may form inside the machine. This may result in a noticeable
degradation in the quality of the copied image, the inability to properly scan an original,
or the copies having no printed image at all.
■
Avoid installing the machine near computers or other precision electronic
equipment.
Electrical interference and vibrations generated by the machine during printing can
adversely affect the operation of such equipment.
■
Avoid installing the machine near televisions, radios, or similar electronic
equipment.
The machine might interfere with sound and picture signal reception. Insert the power
plug into a dedicated power outlet and maintain as much space as possible between
the machine and other electronic equipment.
■
About the machine's leveling feet.
Do not remove the machine's leveling feet after the machine has been installed. If you
put weight on the front of the machine while the drawers or units within the machine are
pulled out, the machine may fall forward. To prevent this from happening, make sure
that the machine's leveling feet are in place.

Installation, Location, and Handling
1-6
Before You Start Using This Machine
1
Provide Adequate Installation Space
■
Provide enough space on each side of the machine for unrestricted
operation.
NOTE
Be sure to provide enough space also at the top of the machine in order to open the
feeder.
4" or more (100 mm)
39 3/4" (1010 mm)
33 1/2" (852 mm)
4" or more (100 mm)

Installation, Location, and Handling
1-7
Before You Start Using This Machine
1
Moving the Machine
■
Be sure to unplug the power cord and disconnect all the other connection
cables before moving the machine. Failure to do so may damage the power
cord and may result in a re or electric shock.fi
■
When carrying the machine, be sure to hold the parts indicated below.
Failure to do so may cause the machine to be dropped and result in injury.
CAUTION
When holding the bottom of the machine, be careful not to get your fingers
caught on the oor or the cabinet stand as this may result in personal injury.fl
Handling Precautions
■
Do not attempt to disassemble or modify the machine.

Installation, Location, and Handling
1-8
Before You Start Using This Machine
1
■
Some parts inside the machine are subject to high-voltages and
temperatures. Take adequate precautions when inspecting the inside of the
machine. Do not carry out any inspections not described in this manual.
■
Be careful not to drop any foreign objects, such as paper clips or staples,
inside the machine. If a foreign object comes into contact with electrical
parts inside the machine, it may cause a short circuit and result in a re or fi
electrical shock.
■
If there is smoke, or unusual noise, immediately turn the main power
switch OFF, disconnect the power cord from the outlet, and contact your
service representative. Using the machine in this state may cause a fire or
electrical shock. Also, avoid placing objects around the power plug so that
the machine can be unplugged whenever necessary.
■
Do not turn the main power switch OFF or open the front covers while the
machine is in operation. This may result in paper jams.
■
Do not use flammable sprays, such as spray glue, near the machine. There
is a danger of ignition.

Parts and Their Functions
1-10
Before You Start Using This Machine
1
Parts and Their Functions
This section provides you with the names and functions of all the parts on the
outside and inside of the main unit, and the control panel.
External View
aa
aa
Control Panel
Includes the keys, LCD display, and indicators
required for operating the machine. (See
"Control Panel Parts and Functions," on p. 1-12.)
bb
bb
Feeder
You can place a stack of originals in the original
supply tray, and they are automatically fed to the
platen glass for copying.
cccc
Original Supply Tray
Originals can be automatically sent to the platen
glass by placing them in the original supply tray.
dddd
Original Output Area
Originals scanned from the original supply tray
are output to the original output area.
ee
ee
Paper Drawers
Each paper drawer holds up 250 sheets of paper
(20 lb bond (80 g/m
2)).
ff
ff
Ventilation Slot
Heat produced in the machine escapes from
here.
gg
gg
Telephone Line Jack
Connect the telephone line to this jack for fax
operations.
hh
hh
10Base-T/100Base-TX Port
Connect the LAN cable to this port for network
printing and I-Fax operations. Available in the
Network Model only.
Front View Rear View
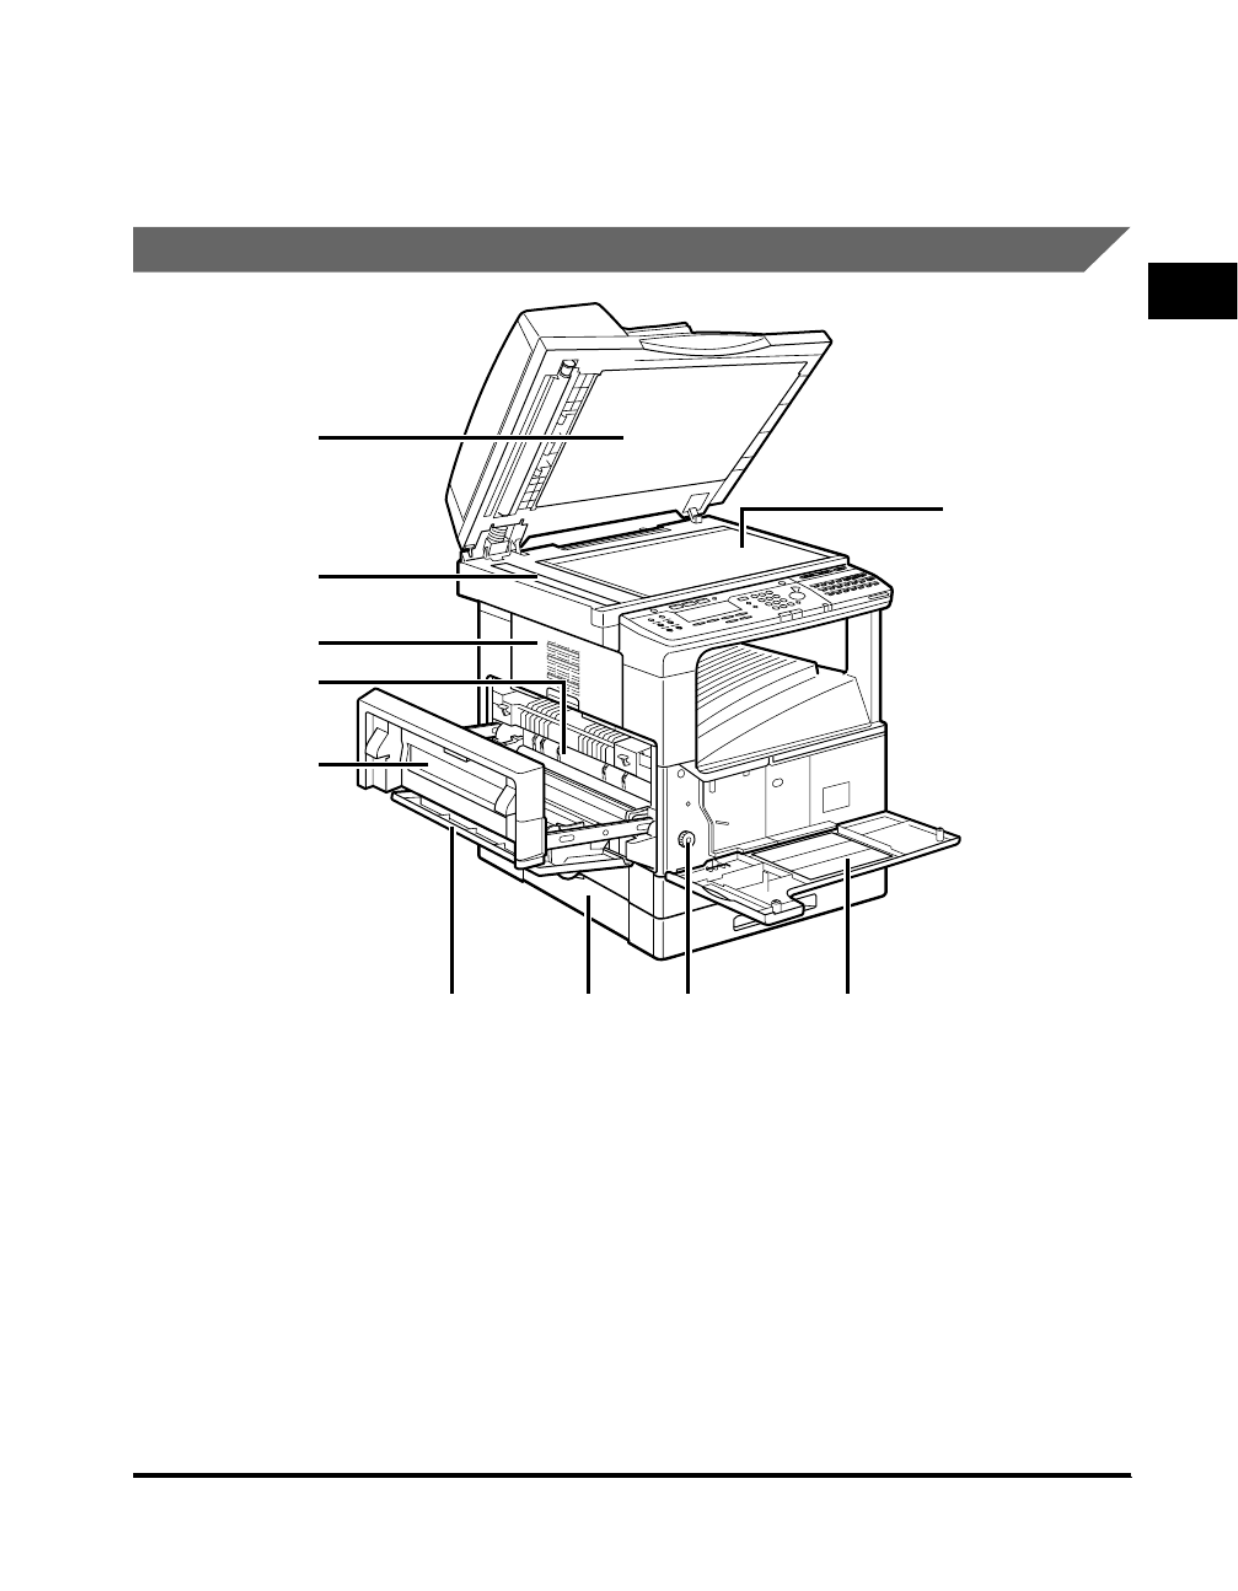
Parts and Their Functions
1-11
Before You Start Using This Machine
1
ii
ii
Printer Ports
Connect the printer cable (USB or parallel) to the
matching port. Available in the Network Model
only.
jj
jj
Main Power Switch
Internal View
aaaa
Underside of the Feeder
This holds originals in place on the platen glass.
bb
bb
Platen Glass
Place originals here when scanning books, thick
originals, thin originals, etc.
cc
cc
Front Cover
You can open this cover to clear paper jams and
replace the toner cartridge.
dd
dd
Paper Feeding Dial
Turn this dial counterclockwise to remove
jammed paper.
ee
ee
Lower Left Cover
ffff Stack Bypass
Feeds transparencies and nonstandard or
alternate paper stock.
gggg Left Cover
Open this cover to remove jammed paper and to
replace the toner cartridge.
hhhh Toner Cartridge
Pull out the handle of this cartridge when
replacing the toner.
iiii Upper Left Cover
Open this cover to remove jammed paper.
jj
jj Scanning Area
Originals placed in the feeder are scanned here.
0
1
2
3456
8
7
9

Parts and Their Functions 1-13
Before You Start Using This Machine
1
qq
qq One-touch speed dialing panels
The rst panel displays keys 01 to 21. Open the fi
first panel to access keys 22 to 42. Open the
second panel to access keys 43 to 63. Open the
third panel to access the Fax function keys.
rrrr One-touch speed dialing keys
Press to dial numbers registered under
one-touch speed dialing keys or access the Fax
functions when registered as program-one-touch
keys.
ssss Main Power indicator
Lights when the main power is turned ON.
tttt Stop key
Press to return to the Basic Features screen, or
to stop scanning, printing copies or sending a
fax.
uuuu Start key
Press to start an operation.
vvvv ID key
Press in order to use the Department ID
Management function.
wwww Alarm lamp
Lights or blinks red when an error occurs. If the
alarm lamp blinks, solve the problem by following
the instructions on the LCD display. If the alarm
lamp maintains a steady red light, contact your
service representative.
xx
xx In Use Memory lamp
A light that blinks red or maintains a steady
green light when the machine is copying or there
are documents stored in memory.
yy
yy Interrupt key
Press to interrupt a continuous copy job when
you need to make priority copies.
zz
zz Additional Functions key
Press to enter the Additional Functions menu.
AAAA OK key
Press to set a mode or function.
BBBB BACK key
Press to go back to the previous screen when
adjusting settings in a menu.
CCCC Function keys (F1 to F4)
Select options that appear on the LCD display.
DD
DD Special Features key
Press to set special copying features, such as
Two-Page Separation, Image Combination,
Margin, and Frame Erase.
EEEE Copy shortcut keys (1 to 4)
Press to use registered special copying features.
The default settings are as follows:
1: Reduce
2: Enlarge
3: Two-Page Separation
4: Frame Erase
You can change the Copy Shortcut keys settings
in the Copy Settings menu from the Additional
Functions menu.
FF
FF Collate key
Press to turn ON/OFF the nisher functions, fi
such as Collate or Rotate.

Parts and Their Functions
1-14
Before You Start Using This Machine
1
One-Touch Speed Dialing Panels Opened
aa
aa Delayed Transmission key
Press to set a time for delayed sending.
bbbb Advanced Communication key
Press to set a document for advanced
communications such as polling sending/
receiving, con dential mailbox, relay broadcast, fi
and subaddress/password transmission.
cc
cc Transfer key
Press to use the transfer mode, or to cancel it.
dd
dd Memory Reception key
Press to turn ON/OFF the memory reception
function.
ee
ee Space key
Enters a space between letters and numbers
when registering information.
ff
ff Speaker volume switch
Adjusts the speaker Volume in four levels.
gggg Delete key
During a step when you are registering a name,
press this key to delete the character you
entered last.
hh
hh OK key
Press to set a mode or function.
iiii , , ▲ ▼, Cursor keys
Press to scroll through options and selections in
the menus on the display during data
registration, or to move the cursor left or right
during data registration.
jj
jj Clear key
Clears an entire entry during information
registration.
kk
kk + key
Press this key to enter a plus sign in a fax
number.
ll
ll Pin Code key
Displays the PIN code message so you can
enter a PIN code when dialing through a PBX
(Public Branch Exchange).
mm
mm TTI Selector key
Enters a registered sender's name which is
printed at the top of the document you are
sending.
nnnn Stamp key
Switches the machine in and out of the Stamp
mode.
oooo Report key
Prints reports about information registered in the
machine.
pppp Stack Bypass Settings key
Press to set the paper size for the stack bypass.
qq
qq Memory Reference key
Performs operations with documents currently
stored in memory, including printing a list of
documents, printing documents, sending
documents to another destination, or deleting
documents.
Delayed
Transmission
Memory
Reference
Stack Bypass
Settings
Advanced
Communication
Memory
Reception
Transfer
Report
Stamp Pin Code
TTI Selector
Delete
Space
OKClear
+
89B A0CDEG F
32 567
1 4
Main Power and Energy Saver Key 1-15
Before You Start Using This Machine
1
Main Power and Energy Saver Key
The machine is provided with a main power switch and an Energy Saver key to
enter the Energy Saver mode.
How to Turn ON the Main Power
This section explains about how to turn ON the main power.
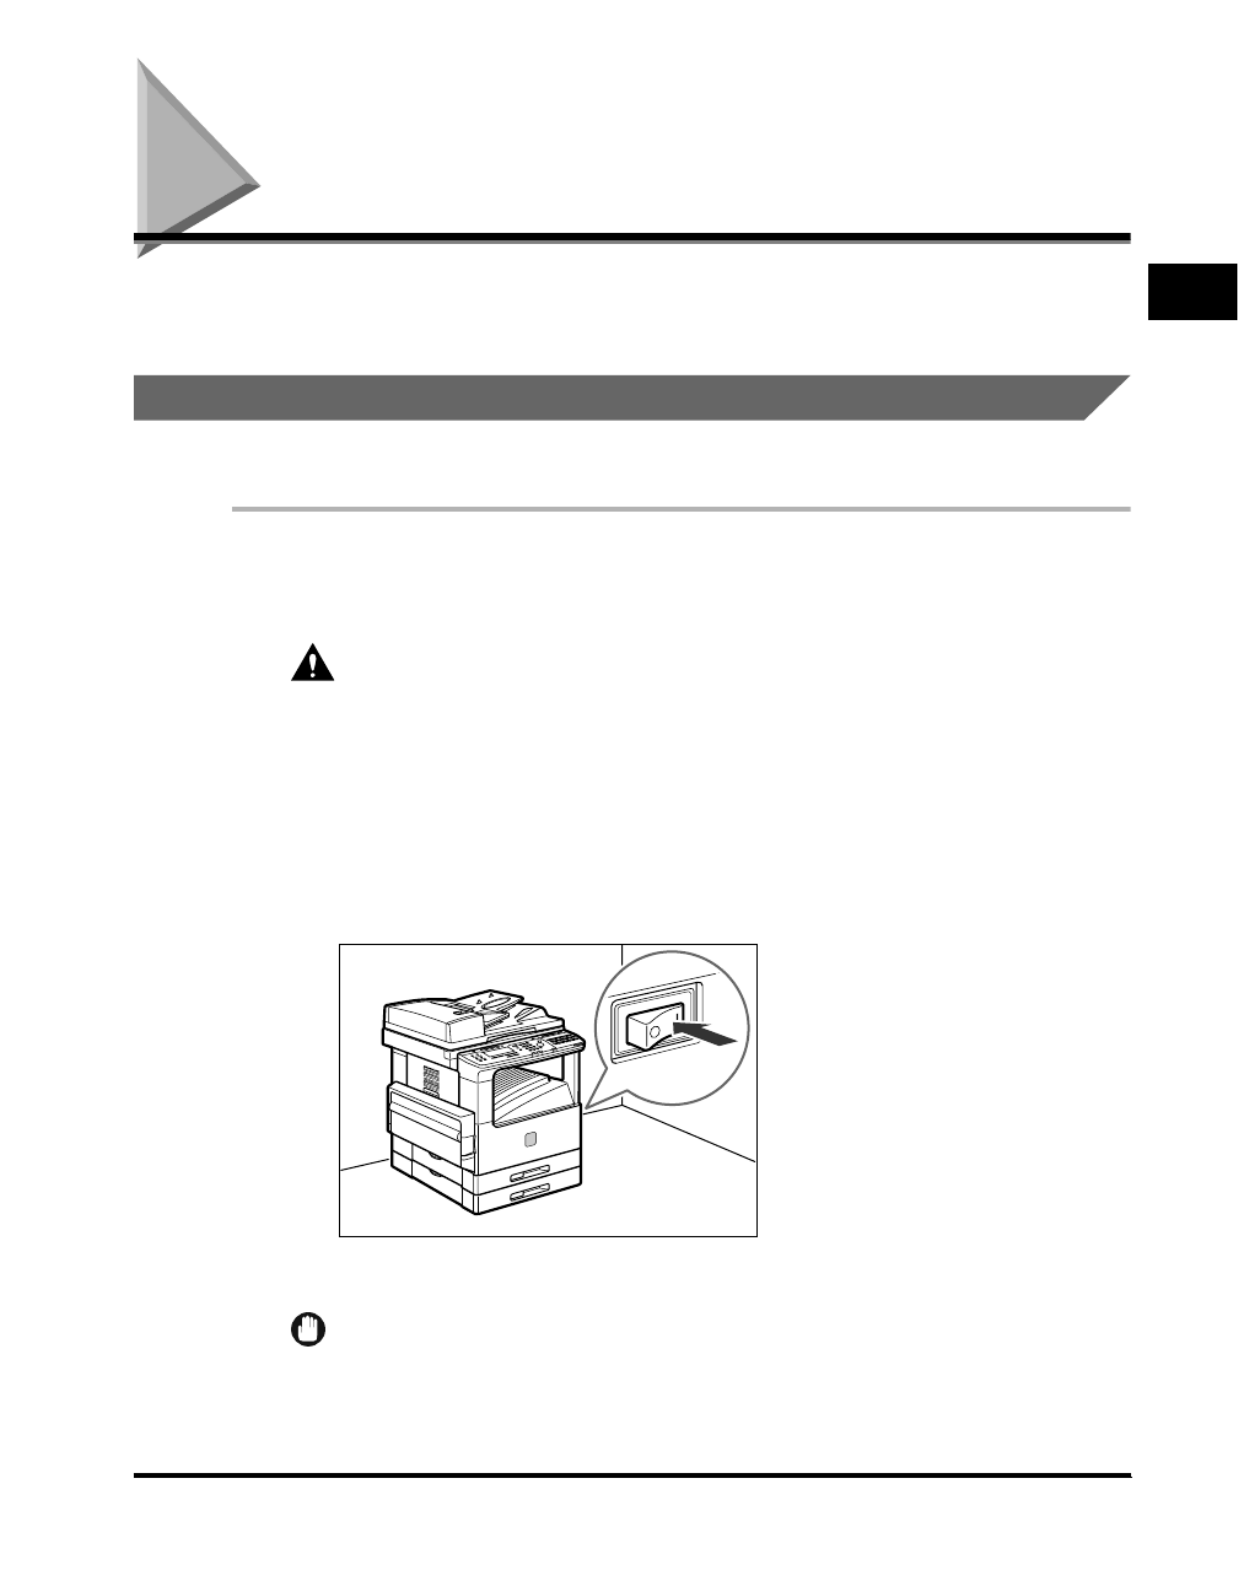
1
Make sure that the power plug is rmly inserted into the
power outlet.
WARNING
Do not connect or disconnect the power cord with wet hands, as this may
result in electrical shock.
2
Press the power switch to ON ("I" side). The main power
switch is located on the right side of the machine.
If you are turning OFF the main power, press the main power switch to the "O"
side.
The main power indicator on the control panel lights.
IMPORTANT
If the main power indicator does not light, check if the power plug is rmly inserted
into the power outlet.
Main Power and Energy Saver Key
1-16
Before You Start Using This Machine
1
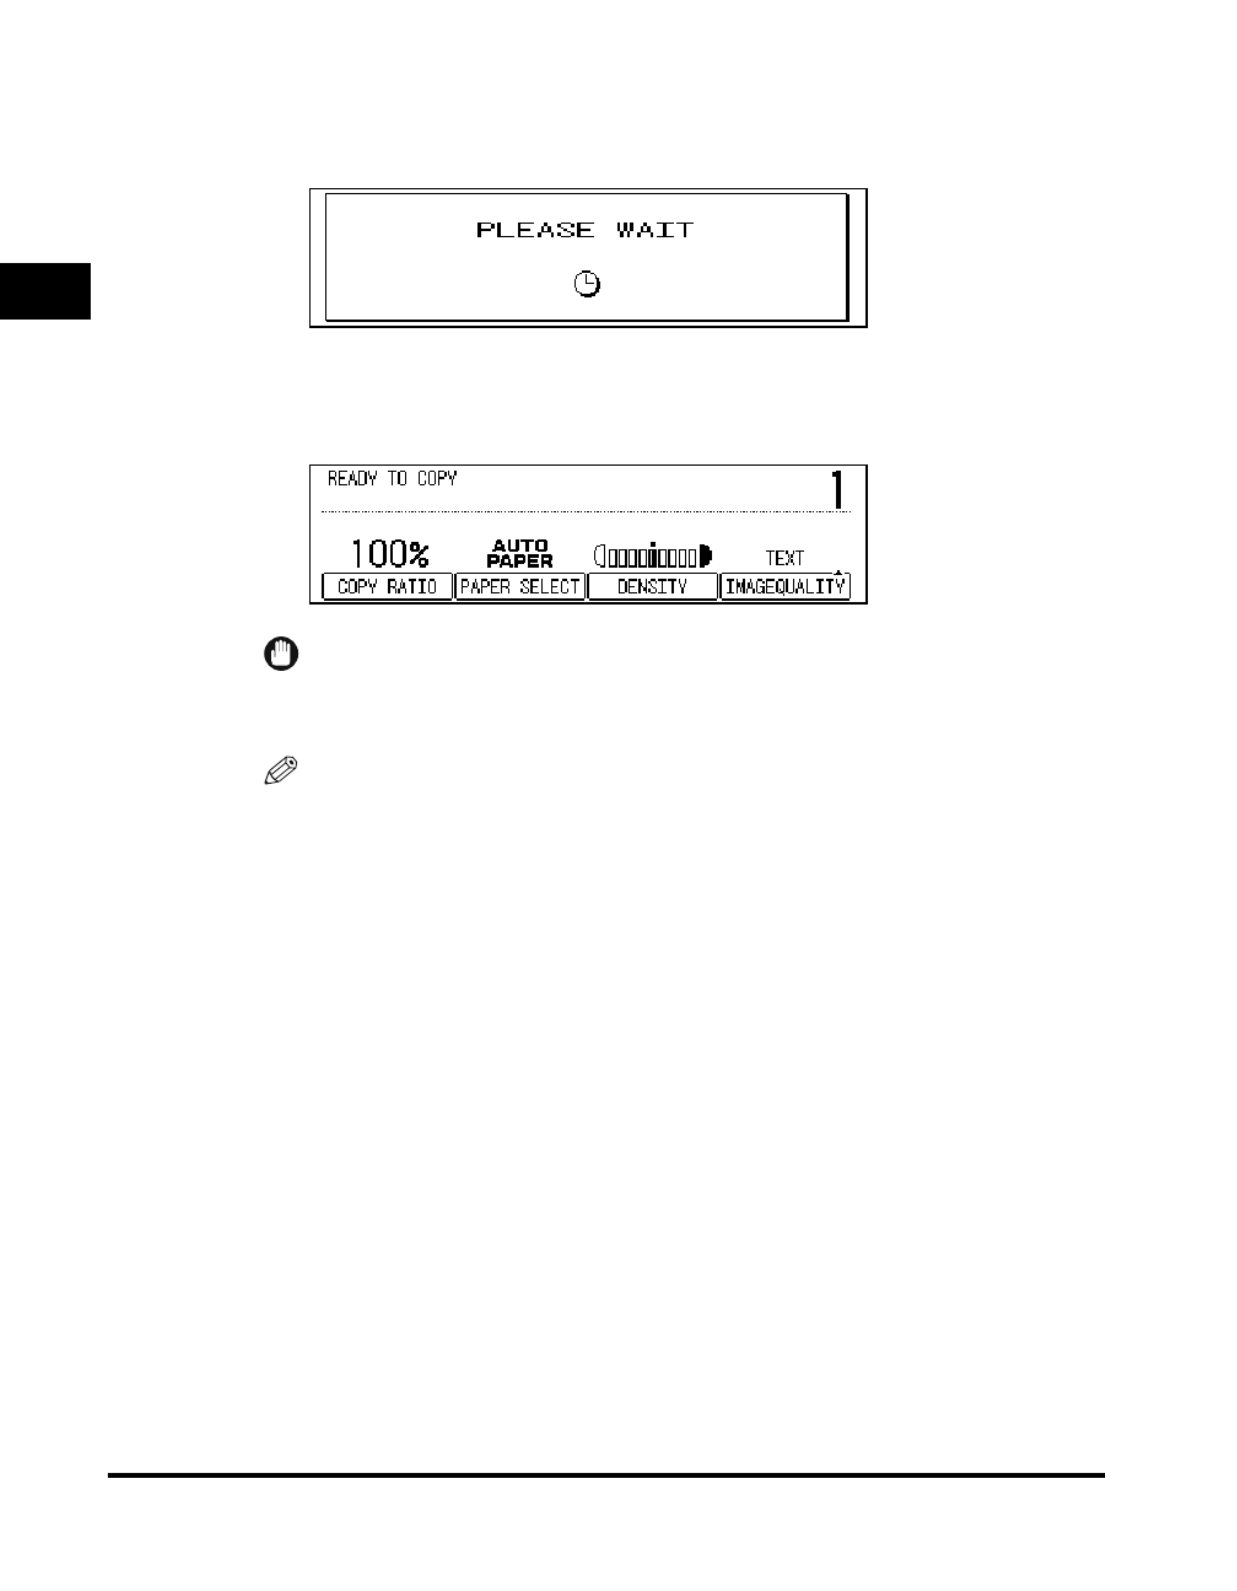
3
The screen below is displayed while the system software is
loading.
The machine is ready to print about 30 seconds (at a room temperature of 68˚F
(20˚C).) after the screen above appears.
The screen below is displayed when the machine is ready to scan.
IMPORTANT
If you turn OFF the main power, wait for at least 10 seconds before turning the
main power back ON.
NOTE
The standard settings are selected at power ON.
The standard copy settings are:
You can change the standard copy settings. (See Chapter 4, "Customizing
Settings," in the Copying Guide.)
You can select which function to display on the Basic Features screen, according to
the Additional Function settings. (See "Initial Function at Power ON," on p. 3-8.)
You can reserve a job when the display above appears. (See Chapter 1,
"Introduction to Copying," in the Copying Guide.)
Copy Ratio: Direct (100%)
Paper Selection:Auto Paper Selection
Copy Exposure: 5
Copy Quantity: 1

Main Power and Energy Saver Key 1-17
Before You Start Using This Machine
1
4
If a message appears on the LCD display, follow the
instructions.
●If the message <ENTER DEPARTMENT ID AND PASSWORD>
appears:
❑Enter the Department ID and password press [ID].➞
The Basic Features screen appears.
NOTE
For instructions on how to enter the Department ID and password, see "Entering
the Department ID and Password," on p. 2-11.
For details about the Department ID Management, see "Department ID
Management," on p. 5-7.
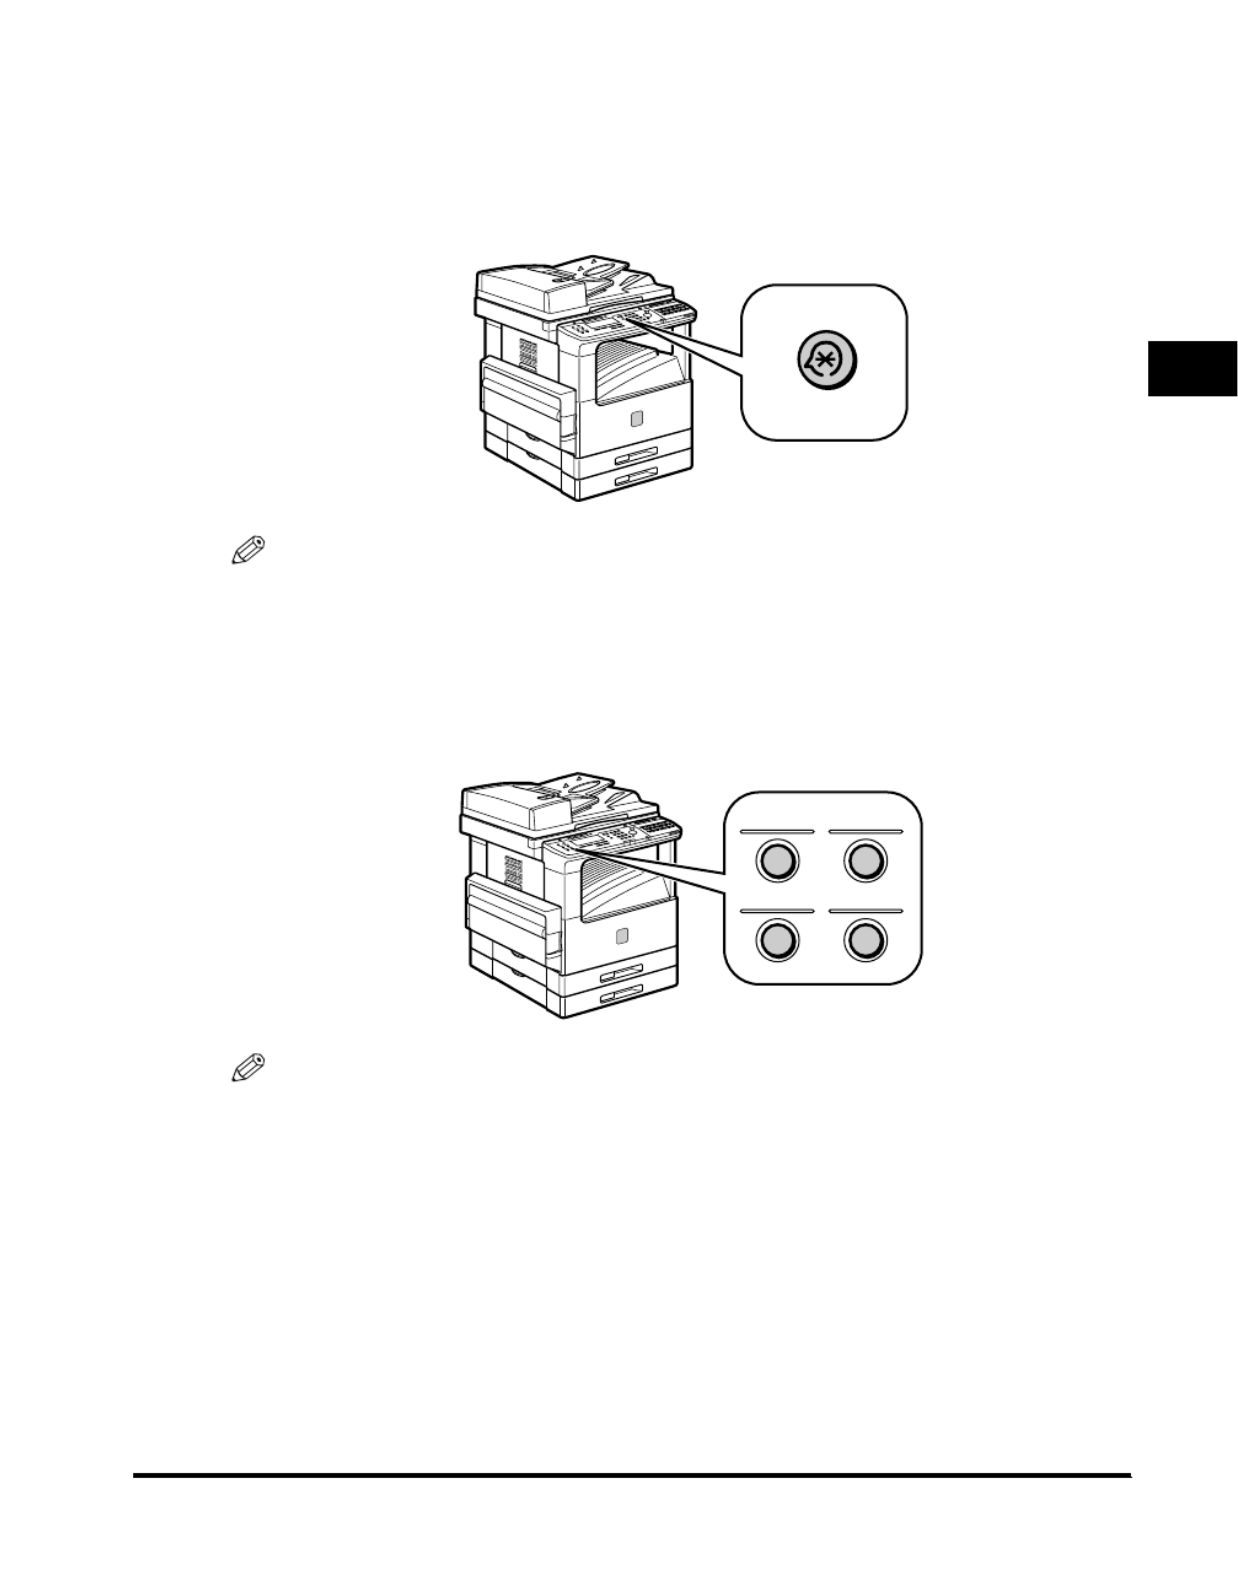
Adjusting the Brightness of the LCD Display
If the LCD display is dif cult to view, use the display contrast dial on the control fi
panel to adjust the brightness.
To make the LCD display brighter, turn the dial counterclockwise. To make it darker,
turn the dial clockwise.
F4F3
OKBACK
F2F1
Monitor
21
43
Special Fe at ure sCollate
Display Contrast
COPY
FAX
SYSTEM
Reduce
Two Page Se paration Frame Erase
Enlarge
Reset
Interrupt
Addit ional Funct ions
Display Contrast
ID

System Settings 1-19
Before You Start Using This Machine
1
System Settings
It is necessary to set up the machine before using it on a network, as a printer, and
with the Fax and I-Fax function.
To set up the machine, refer to the following instructions:
■Setting Up and Connecting to the Network
See the Network Guide.
■Installing the Printer Driver
See the PCL Driver Guide.
■Installing the Fax Driver
See the Fax Driver Guide with Cover Sheet Editor.
■Date and Time Settings
See "Current Date and Time," on p. 3-22.
■System Manager Settings
See "System Manager Settings," on p. 5-1.
NOTE
The network, printer, and I-Fax functions are only available in the Network Model of this
machine.

System Settings
1-20
Before You Start Using This Machine
1

Overview of the imageCLASS 2300
2-2
Basic Operations
2
Overview of the imageCLASS 2300
Convenient Functions
■
Reserving Jobs
You can perform several jobs without waiting for the current job to be finished. For
example, you can copy a document while the machine is sending a job scanned into the
memory.
NOTE
For details of multifunctional operations, see "Multifunctional Operations," on p. 2-20.
The I-Fax function is only available in the Network Model of this machine.
For details on I-Fax, see Chapter 1, "Overview," in the
Sending Guide.
Fax, I-Fax
Copy

Overview of the imageCLASS 2300
2-4
Basic Operations
2
■
Using the Access Code
You can use an access code with your speci ed number in place of a telephone fi
number. For example, the codes of branch of ces or divisions of the recipient can be fi
used.
NOTE
For details on the access code, see Chapter 2, "Speed Dialing," in the
Facsimile Guide.
Easy Operations
■
Using the Directory
By using the directory, you can nd the destination easily from among many telephone fi
numbers and e-mail addresses registered for one-touch speed dialing, coded speed
dialing, and group dialing.
NOTE
For details on the directory, see Chapter 2, "Speed Dialing," in the
Facsimile Guide.
For details on one-touch speed dialing, see "Parts and Their Functions," on p. 1-10, and
Chapter 2, "Speed Dialing," in the
Facsimile Guide.
For details on coded speed dialing, see Chapter 2, "Speed Dialing," in the
Facsimile
Guide.
For details on group dialing, see Chapter 2, "Speed Dialing," in the
Facsimile Guide.
100
Branch Office A (100)
Branch Office C (102)
Branch Office B (101)
07060504030201
14131211100908
21
22
~
42
43
~
63
201918171615
Directory
Hook Line/Mail Direct TX
Tone
Coded
Dial
Pause/
Redial
Overview of the imageCLASS 2300
2-5
Basic Operations
2
■
Omitting Procedures Using the Additional Functions Menu
The Additional Functions menu enables you to specify the default settings you usually
use, and therefore omit having you change the settings every time. You can specify the
mode automatically set when you turn ON the power, the drawer in use, etc. in the
Additional Functions menu.
NOTE
For details about the Additional Functions menu, see "Additional Functions Settings
Table," on p. 3-2.
■
Shortcuts to Your Favorite Copy Function
By registering the copy functions you frequently use to the shortcut keys, you can
select your favorite function simply by pressing one key.
NOTE
For details on setting the shortcut keys, see Chapter 4, "Customizing Settings," in the
Copying Guide.
Additional Functions
21
43
Enlarge
Frame Erase
Reduce
Two Page Separation

Overview of the imageCLASS 2300
2-7
Basic Operations
2
■
Scheduling the Energy Saver Mode
You can specify the time the machine enters the Energy Saver mode automatically for
each day of the week.
NOTE
For details on the daily timer, see "Daily Timer Settings," on p. 3-27.
■
Department ID Management
By setting a Department ID for each department, you can restrict the number of prints
and transmission pages to control running costs. You can manage the Department ID
using the control card if the card reader is attached to the machine.
NOTE
For Department ID management, see "Department ID Management," on p. 5-7.
31 1 2 3 4 5 6
m t w t f s s
7 8 9 10 11 12 13
14 15 16 17 18 19
20
21 22 23 24 25 26 27
28 29 30
1 2 3 4
Department A: Up to 1,000 pages
Department B: Up to 1,500 pages
Department C: Up to 1,200 pages
Entering Characters
2-8
Basic Operations
2
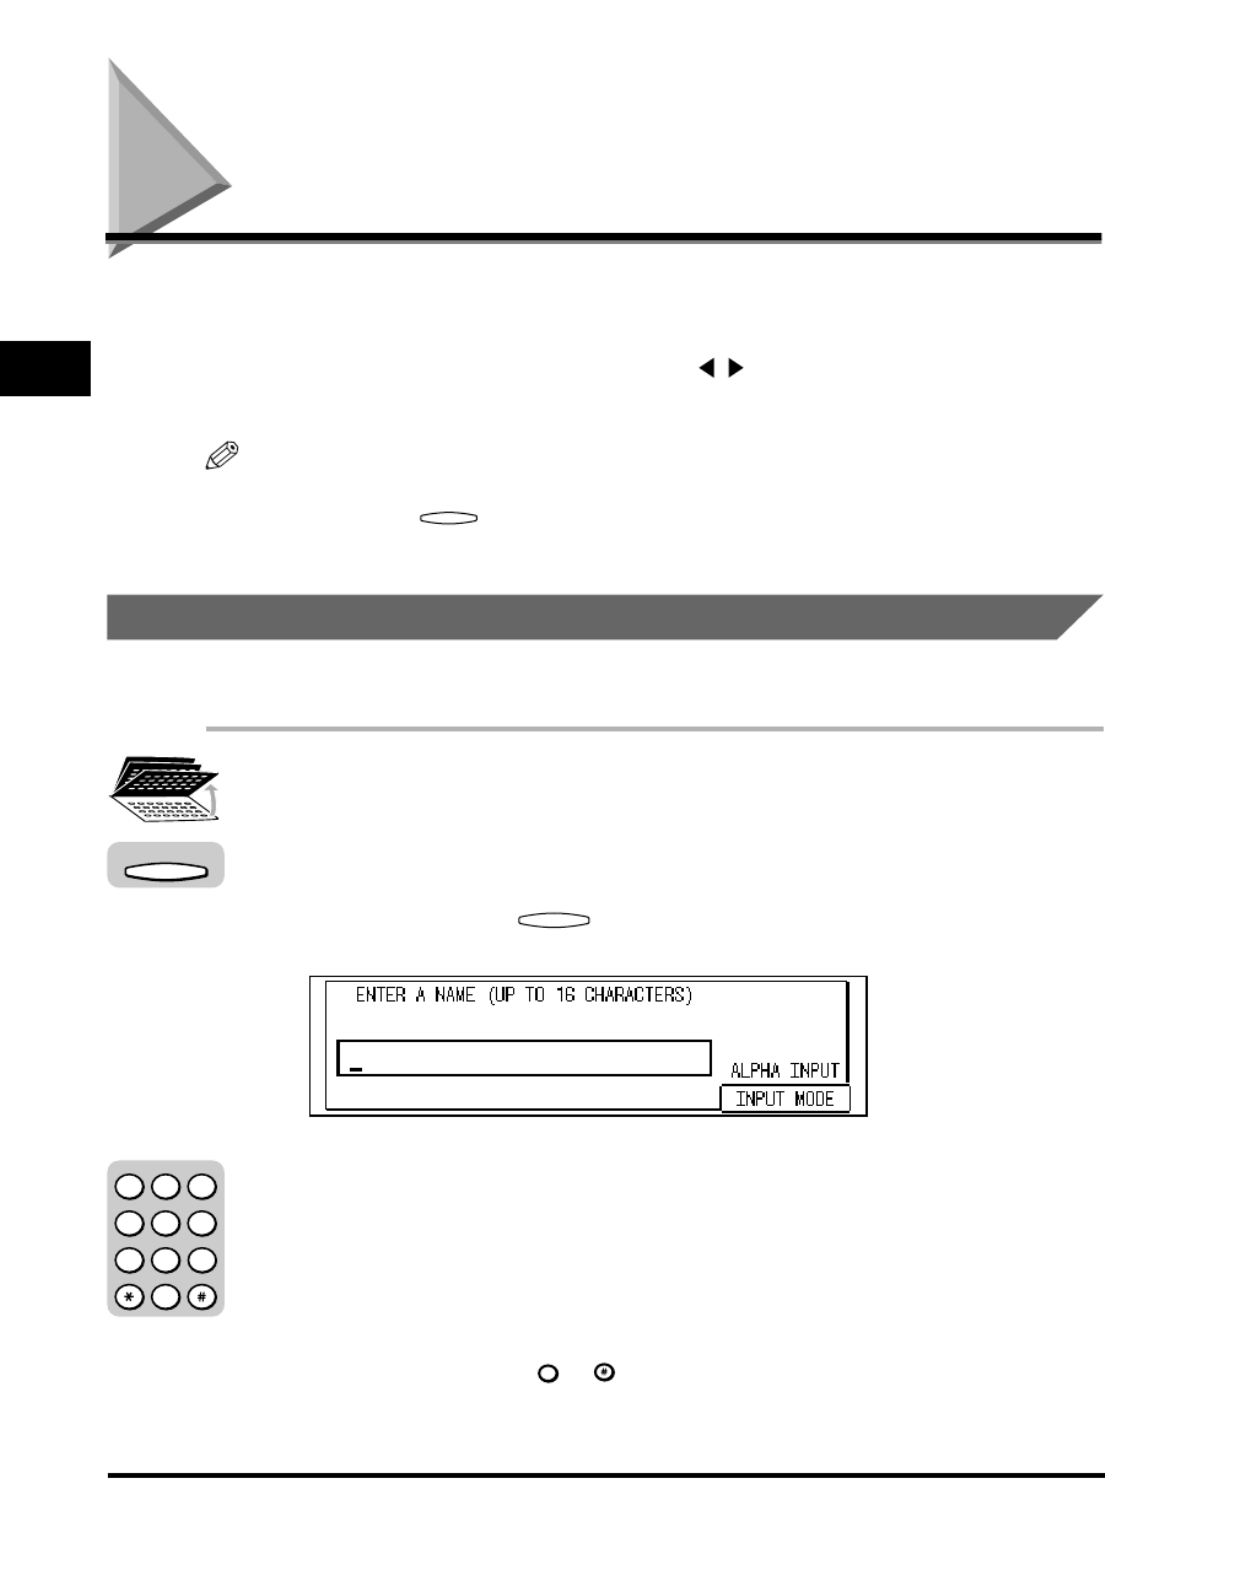
Entering Characters
If a message <ENTER xxxx> is displayed, enter characters as follows.
To enter characters, use the function keys and numeric keys on the control panel,
and the fourth one-touch speed dialing panel ( , ,
▲,
▼, Space, Delete, and Clear
keys).
NOTE
This section explains how to enter alphabetic and special characters. If you want to enter
numbers, press (INPUT MODE) to select <NUMBER INPUT>
➞ enter the number
using the numeric keys.
Alphanumeric and Special Characters
Example: Enter 'EUROPE'.
1
Open all three one-touch speed dialing panels.
2
Press [F4] (INPUT MODE) to select <ALPHA INPUT>.
Each time you press (INPUT MODE), <ALPHA INPUT> or <NUMBER
INPUT> are selected in sequence.
3
Press the appropriate key on the numeric keypad to enter a
letter or number.
If ALPHA INPUT is the chosen entry mode, keep pressing the key until the upper
or lower case letter you want appears, as in the following table.
If you go past the letter you want, keep pressing the key until it appears again.
To enter a symbol, use or .
F4
F4
1
@
.
SYMBOLS
F4
123
456
789
0
@.
GHI
PRS
ABC
JKL
TUV
DEF
MNO
WXY
OPER
SYMBOLS

Entering Characters 2-9
Basic Operations
2
Each key contains the upper and lower case letters for its group of letters. (for
example: ABCabc).
To enter 'EUROPE', press the keys as follows:
<EUROPE> is displayed.
Key Characters
@
ABCabc
DEFdef
GHIghi
JKLjkl
MNOmno
PQRSpqrs
TUVtuv
WXYZwxyz
-.*#!",;:^'_=/l ?$@%&+\~()[ ]{ }< >
1
@
.
2
ABC
3
DEF
4
GHI
5
JKL
6
MNO
7
PRS
8
TUV
9
WXY
SYMBOLS
6
MNO
7
PRS
7
PRS
3
DEF
3
DEF DEF
8
TUV
6
MNO
7
PRS
3 E
DEF
3
8
TUV
6
MNO
7
PRS
U
E
O
R
P

Entering Characters
2-10
Basic Operations
2
NOTE
To enter a space, press [Space].
To move a cursor, press [ ] or [ ].
To enter the same character continuously, press [ ] to move the cursor to the right.
If you entered an incorrect character, delete it using , , and [Delete], and enter
the correct character.
To delete all the entered characters, press [Clear].
The types and maximum number of characters you can register depend on the
setting item.
4
When the entry of all the characters is complete, press [OK].
OK
Entering the Department ID and Password 2-11
Basic Operations
2
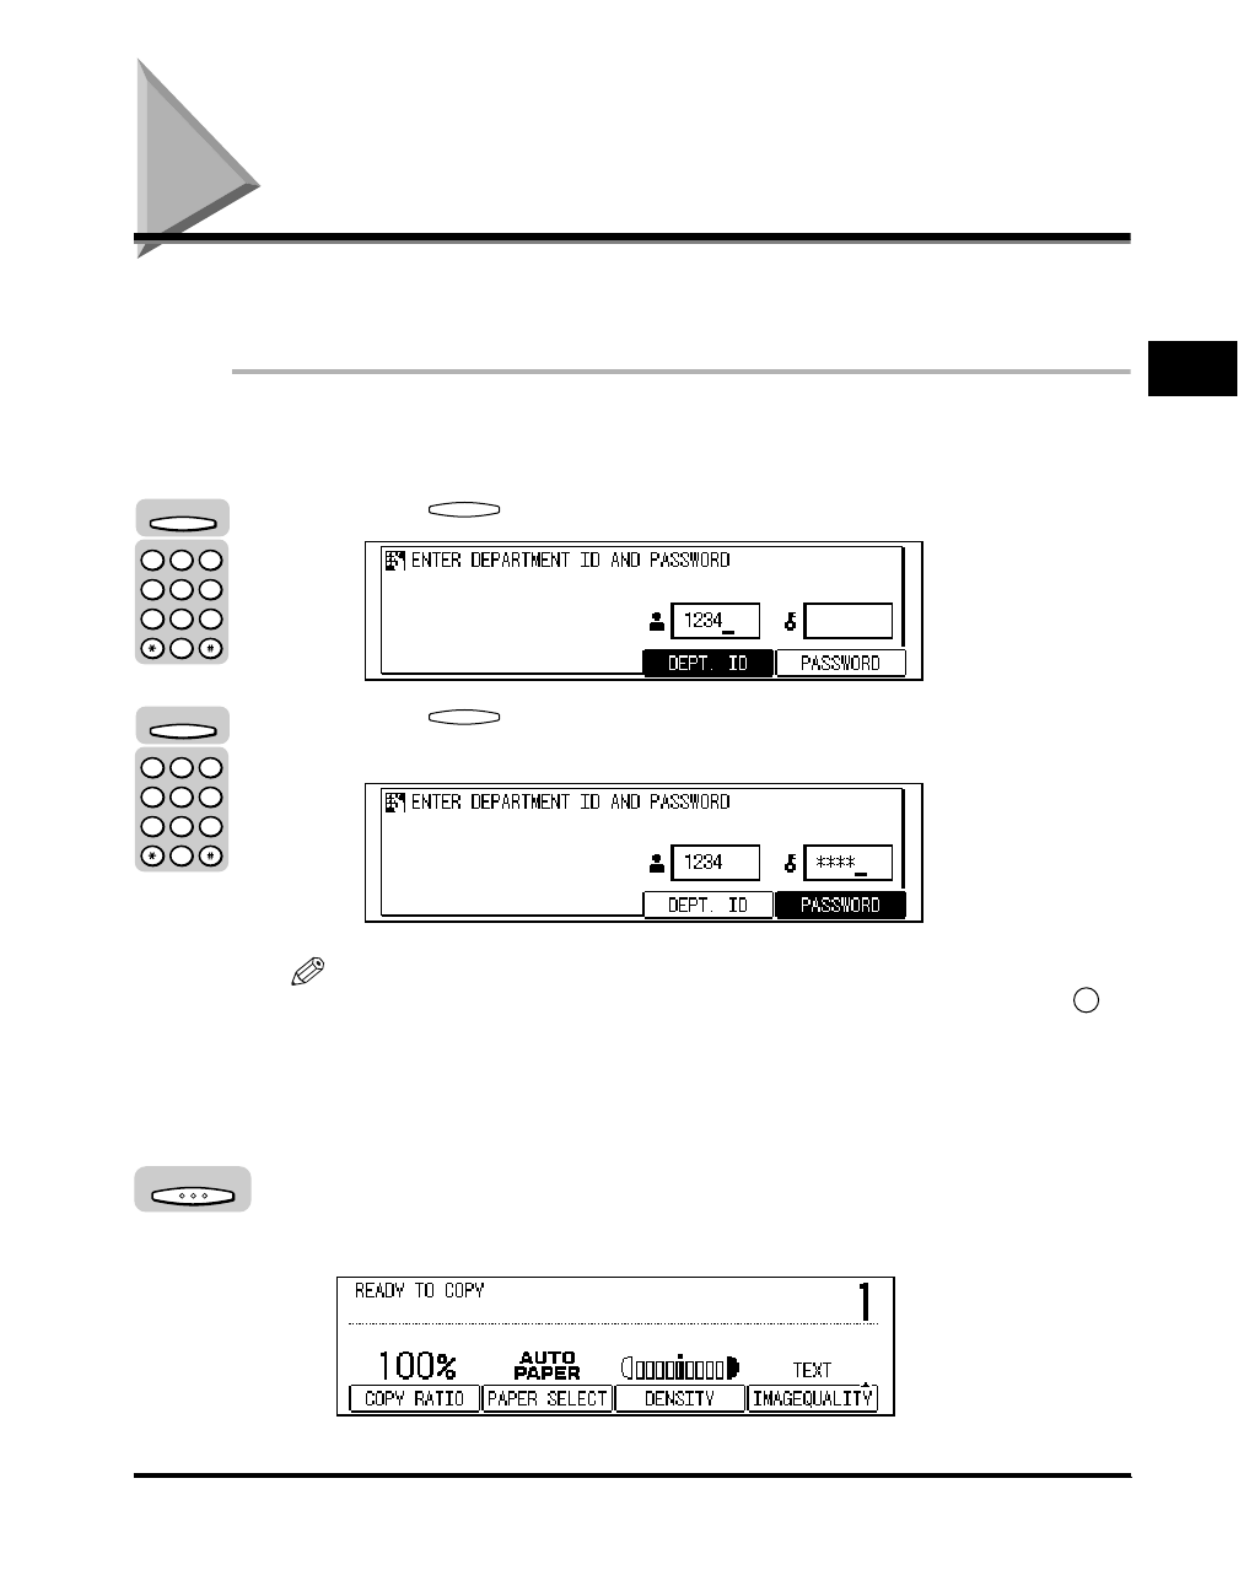
Entering the Department ID and Password
If Department ID Management has been set, the Department ID and password
must be entered before using this machine.
1
Use the numeric keys to enter values for the Department ID
and password.
❑Press (DEPT. ID) ➞ enter the Department ID using the numeric keys.
❑Press (PASSWORD) ➞ enter the password.
If the password is not set, proceed to step 2.
NOTE
If you make a mistake when entering the Department ID or password, press
(Clear) enter the correct values.➞
The Department ID and password can be up to seven digits long.
For details about Department ID Management, see "Department ID Management,"
on p. 5-7.
2
Press [OK].
The Basic Features screen of the selected function appears.
F3
F4
C
F3
123
456
789
0
@.
GHI
PRS
ABC
JKL
T UV
DEF
MNO
WXY
OPER
SYMBOLS
F4
123
456
789
0
@.
GHI
PRS
ABC
JKL
T UV
DEF
MNO
WXY
OPER
SYMBOLS
OK

Entering the Department ID and Password
2-12
Basic Operations
2
NOTE
If the Department ID or Password that you entered is wrong, the beep sounds.
Repeat the procedure from step 1.
3
When your operations are complete, press [ID] on the control
panel.
The display for entering the Department ID and password appears.
NOTE
To perform operations again, enter the Department ID and password.
If you do not press (ID) after nishing your operations, any subsequent copies
are totaled under the Department ID you previously entered.
When operations are complete, the screen for entering the Department ID and
password automatically appears after the set time has elapsed, even if you forget
to press (ID). (See "Auto Clear Time," on p. 3-24.)
ID
ID
ID

Making Prints Using the Stack Bypass 2-13
Basic Operations
2
Making Prints Using the Stack Bypass
If you are making prints on transparencies or non-standard size paper stock, load
the paper stock into the stack bypass.
■ Standard Size
You can select standard inch paper, or A or B series paper.
■ Free Size
You can load non-standard size paper (4" x 5 3/4" to 11 5/8" x 17" (100 mm x 148 mm to
297 mm x 432 mm)).
■ Envelope
The following envelopes can be loaded into the stack bypass: COM10, Monarch, and
DL.
IMPORTANT
Note the following points when using the stack bypass:
- Paper quantity: 1 to approximately 100 sheets (stack approximately 3/8" (10 mm) high)
- Paper size: 4" x 5 3/4" to 11 5/8" x 17" (100 mm x 148 mm to 297 mm x 432 mm)
- Paper weight: 16 to 32 lb bond (60 to 128g/m
2
)
- Paper which has been rolled or curled must be straightened out prior to use, to allow
the paper to feed smoothly through the stack bypass (allowable curl amount: less than
10 mm for normal paper, less than 5 mm for heavy paper.) There are some types of
paper stock that may meet the above speci cations, but cannot be fed into the stack
bypass.
Do not load different size/type paper at the same time.
It is recommended not to use the back side of preprinted paper.
If you are using label sheets, load them one by one on the stack bypass.
LTR transparencies must be placed vertically into the stack bypass. Placing this paper
horizontally may cause blurred images.
If you are printing on envelopes, empty the output tray when at most 10 printed
envelopes accumulate in the tray.
For details about paper sizes when using the stack bypass, see "Standard Paper for the
Stack Bypass," on p. 3-16.
NOTE
For high quality printouts, use paper recommended by Canon.
Specyfikacje produktu
| Marka: | Canon |
| Kategoria: | drukarka |
| Model: | imageCLASS 2300N |
Potrzebujesz pomocy?
Jeśli potrzebujesz pomocy z Canon imageCLASS 2300N, zadaj pytanie poniżej, a inni użytkownicy Ci odpowiedzą
Instrukcje drukarka Canon

9 Kwietnia 2025
4 Kwietnia 2025
4 Marca 2025
3 Marca 2025
1 Marca 2025
13 Lutego 2025
8 Lutego 2025
2 Lutego 2025
18 Stycznia 2025
18 Stycznia 2025
Instrukcje drukarka
- drukarka Sony
- drukarka Samsung
- drukarka LG
- drukarka Xiaomi
- drukarka Sharp
- drukarka Huawei
- drukarka Lenovo
- drukarka Epson
- drukarka Fujitsu
- drukarka Roland
- drukarka Panasonic
- drukarka StarTech.com
- drukarka Fujifilm
- drukarka MSI
- drukarka Toshiba
- drukarka D-Link
- drukarka Citizen
- drukarka HP
- drukarka Brother
- drukarka Honeywell
- drukarka Kodak
- drukarka Testo
- drukarka Primera
- drukarka Xerox
- drukarka Godex
- drukarka Olivetti
- drukarka Zebra
- drukarka Dell
- drukarka Digitus
- drukarka AgfaPhoto
- drukarka Kyocera
- drukarka Ricoh
- drukarka Seiko
- drukarka Renkforce
- drukarka Thomson
- drukarka AVM
- drukarka Velleman
- drukarka Dymo
- drukarka Panduit
- drukarka Olympus
- drukarka OKI
- drukarka Mitsubishi
- drukarka Intermec
- drukarka NEC
- drukarka Polaroid
- drukarka Konica Minolta
- drukarka Bixolon
- drukarka Pantum
- drukarka Olympia
- drukarka Datamax O'Neil
- drukarka DNP
- drukarka Equip
- drukarka ZKTeco
- drukarka TSC
- drukarka HiTi
- drukarka Microboards
- drukarka Triumph-Adler
- drukarka Fargo
- drukarka Entrust
- drukarka Kern
- drukarka Brady
- drukarka Tomy
- drukarka Lexmark
- drukarka Sagem
- drukarka Nilox
- drukarka Argox
- drukarka Royal Sovereign
- drukarka Minolta
- drukarka Oce
- drukarka Paxar
- drukarka IDP
- drukarka Metapace
- drukarka Ultimaker
- drukarka Ibm
- drukarka CSL
- drukarka Toshiba TEC
- drukarka Frama
- drukarka Builder
- drukarka Kogan
- drukarka Star Micronics
- drukarka Posiflex
- drukarka Dascom
- drukarka GG Image
- drukarka Vupoint Solutions
- drukarka Elite Screens
- drukarka DTRONIC
- drukarka Phoenix Contact
- drukarka Videology
- drukarka Epson 7620
- drukarka Star
- drukarka EC Line
- drukarka Colop
- drukarka Approx
- drukarka Fichero
- drukarka Raspberry Pi
- drukarka Unitech
- drukarka Middle Atlantic
- drukarka Evolis
- drukarka Tally Dascom
- drukarka Custom
- drukarka Nisca
- drukarka Sawgrass
- drukarka Mutoh
Najnowsze instrukcje dla drukarka

9 Kwietnia 2025

9 Kwietnia 2025
9 Kwietnia 2025

9 Kwietnia 2025

3 Kwietnia 2025
3 Kwietnia 2025
3 Kwietnia 2025

2 Kwietnia 2025
2 Kwietnia 2025

2 Kwietnia 2025