Instrukcja obsługi Blaupunkt BPDW8913WR
Blaupunkt
aparat fotograficzny
BPDW8913WR
Przeczytaj poniżej 📖 instrukcję obsługi w języku polskim dla Blaupunkt BPDW8913WR (1 stron) w kategorii aparat fotograficzny. Ta instrukcja była pomocna dla 6 osób i została oceniona przez 2 użytkowników na średnio 4.5 gwiazdek
Strona 1/1
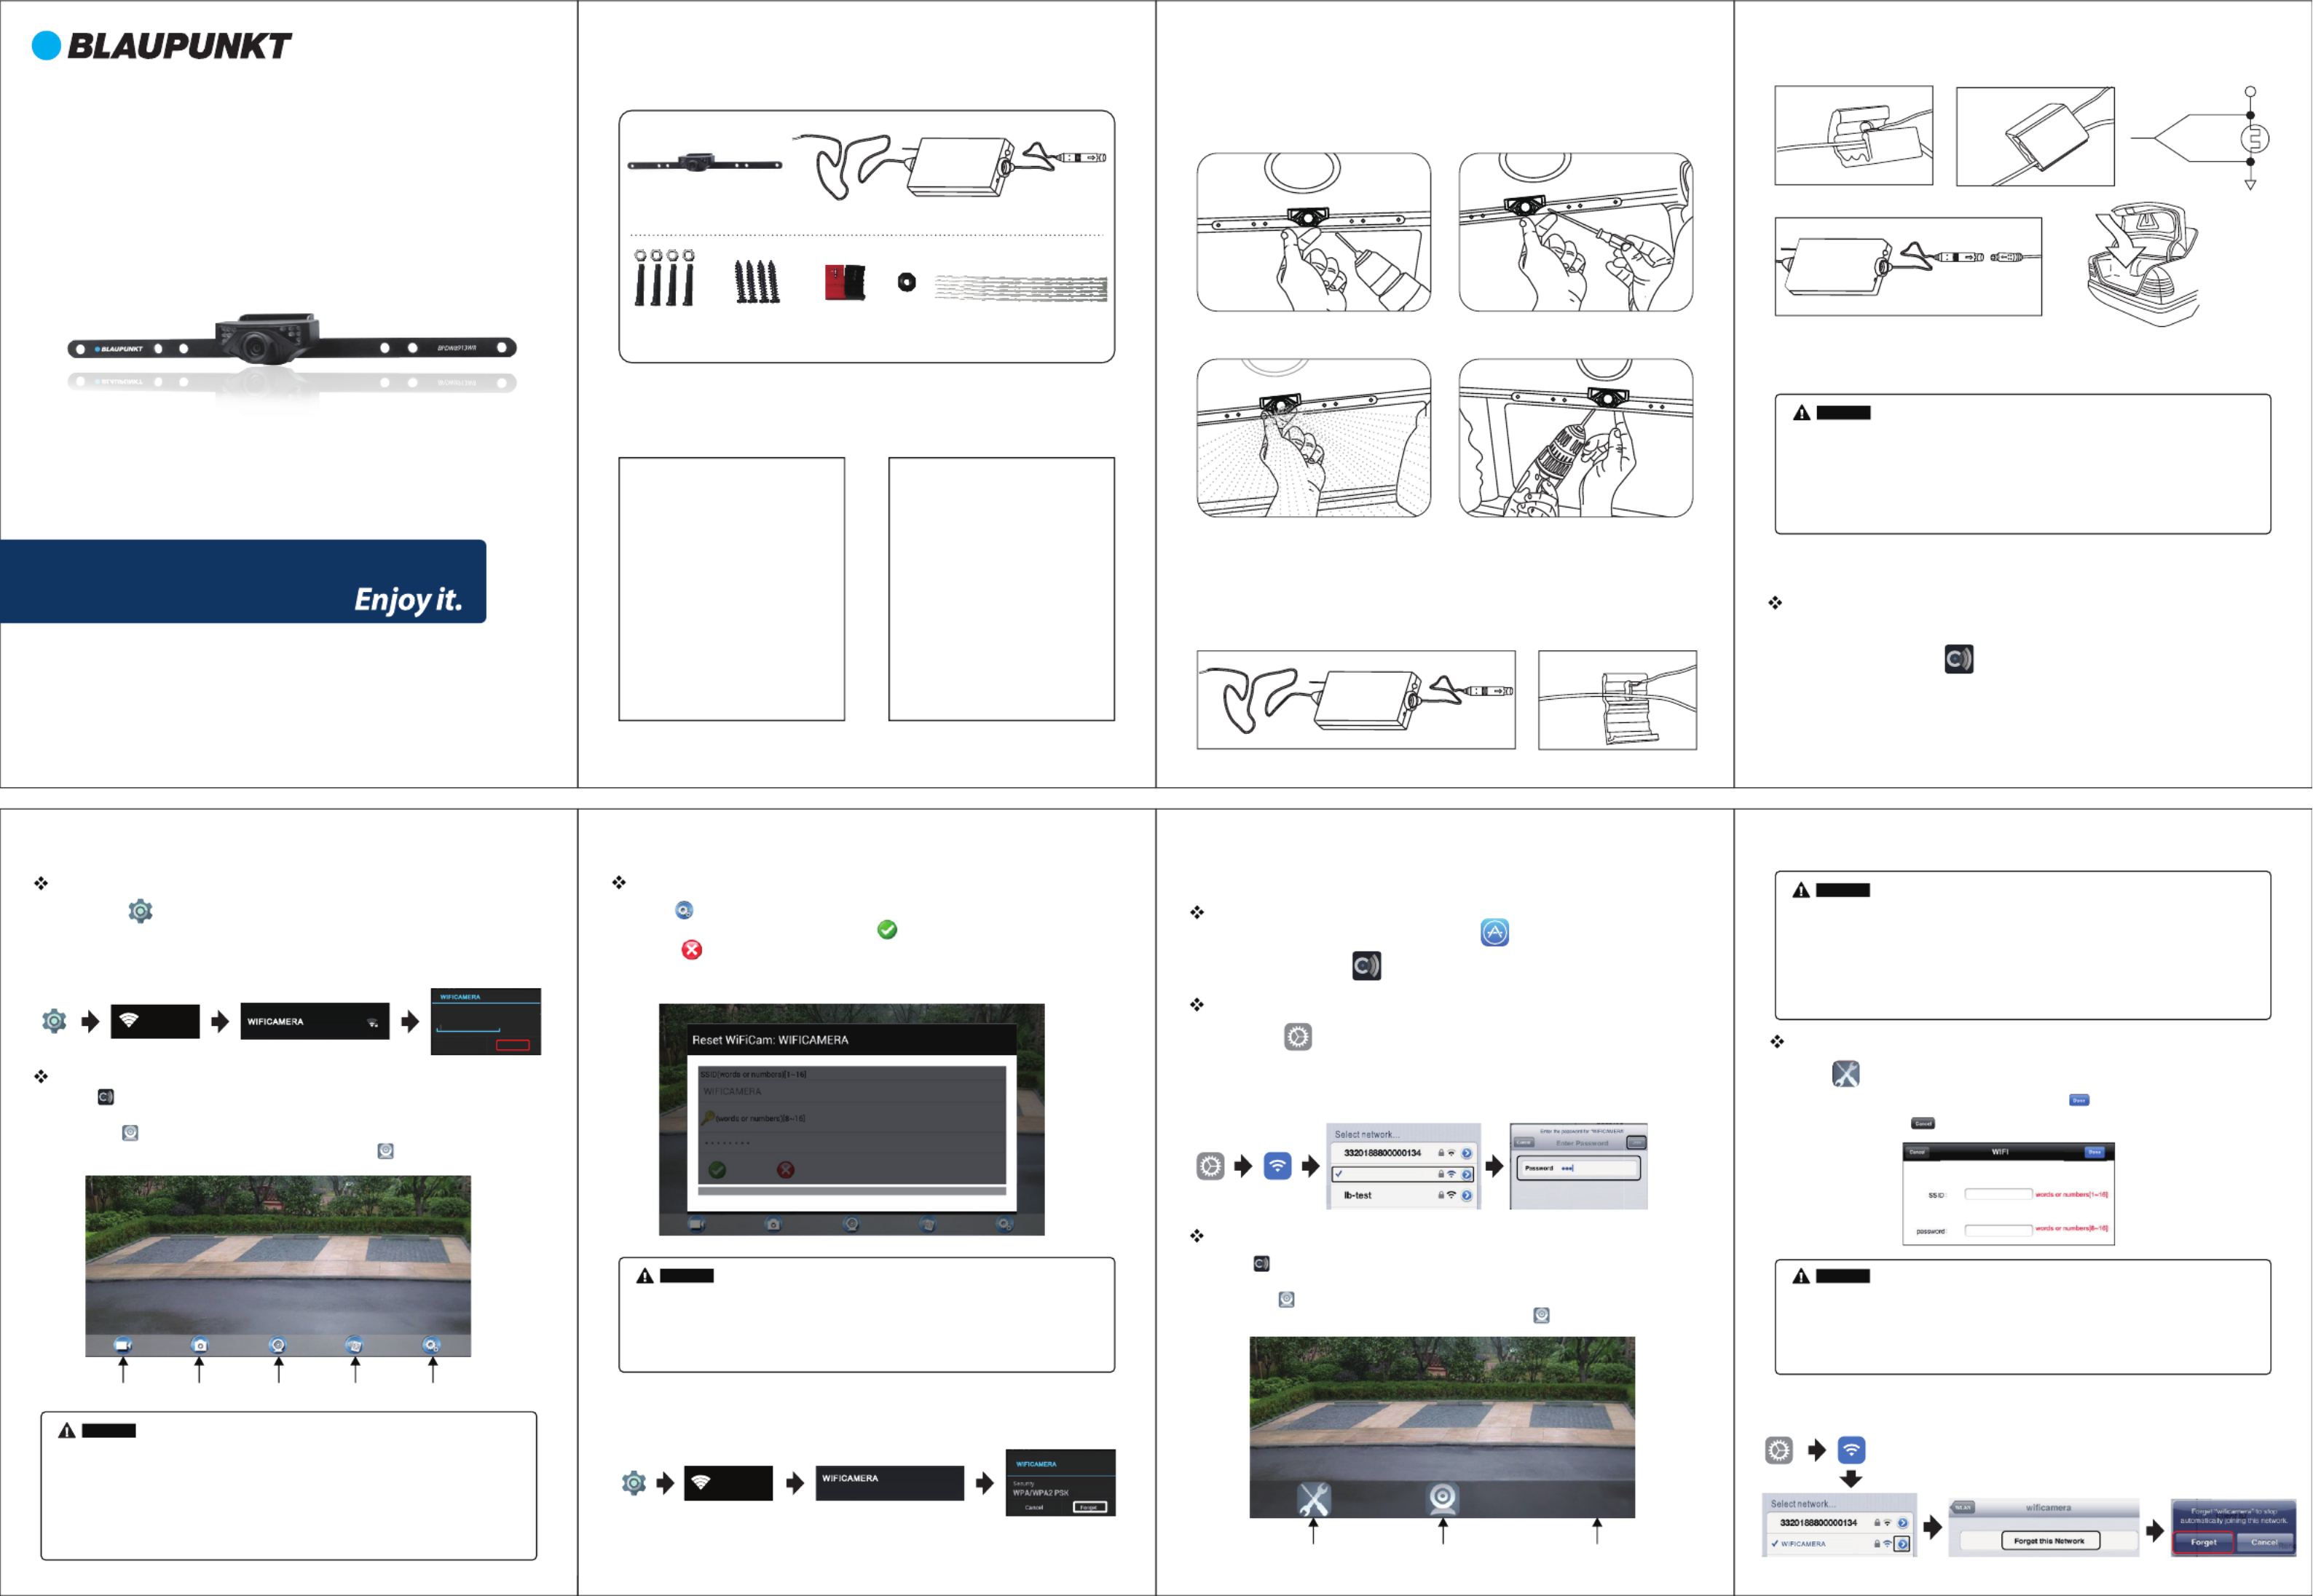
When the camera is xed, put the lead-wire of the camera through the car trunk.
Notice
Camera Emitter
Installation ins tr uctions for the camera:
Installation ins tr uctions for the emitter:
rear lamp
Notice
Speci cations
Packing List Installation
Operations for Android system client
Operations for iOS Apple system client
Installation app Software
Settings:
WIFICAMERA
Not in ra nge
.
* When set WIFI signal to connect the mobile phone, please close the WIFI signal
previously opened.
image display time is relate to the CPU memory, software version, working
software number of mobile phone.
* when the background is black or the image is still, please exit the APP, and check
whether the wifi connection is normal then click again the APP icon to enter into
the software interface.
* ,
Notice
Connection WiFi:
WIFICAMERA
Secured wit h WP2
WI FI CA ME RA
1. Turn on the iOS device and enter the App Store
2. Search “Sight Wi ” app.
3. Install the Sight Wi app
Installation app Software
Connection WiFi:
WIFICAM ER A
View the video:
G
Notice
The speci c steps to clear network memory are as follows. and then follow the above WIFI connection
method to reconnect the new network.
Press this icon to enter into the settings menu . You can change the default factory
SSID and password of the wifi camera tool, and clicking will show whether the change
is successful, and clicking to cancel the new SSID set.
Settings:
* When set WIFI signal to connect the mobile phone, please close the WIFI signal
previously opened.
image display time is relate to the CPU memory, software version, working
software number of mobile phone.
* when the background is black
click again the APP icon to enter into
the software interface.
* ,
or the image is still, please exit the APP, and check
whether the wifi connection is normal then .
Notice
WI FI CA ME RA
WP2 PSK
Pa ssw ord
Se cur ity
Conne ct Cance l
4. After adjustment, drill a second hole, then
mount and tighten to nish camera installation
3. Move the camera orientation to adjust the
display e ect
2. Use a Screwdriver to ensure that the rst
screw is properly screwed into the drill hole.
1. In the proper position of rear license plate
drill a hole for mounting screws
View the video:
WIFI car rear view
Night Vision Range >3m
Power Supply 12V DC
Video output 0.9 Vp-p. 75Ω ~1 2
Consumption Current 150mA MAX
Image Sensor 1/4inch CMOS
Minimum illumination <5 Lux
Electronic Exposure Time 1/60s-12ns(NTSC) sec
1/50s-12.5ns(PAL) sec
Horizontal View Angle
Storage Temperature
Operation Humidity 15%~85%RH
Operation Temperature
Dimensions 370 X 55 X 35MM
Weight 140g
Items GL8912
640×480 pixels
Effective Pixels
Video Format NTSC/PAL
80O
O
- 10~ C+50
O
- 20~ C+60
WIFI transmitter box
Wireless Protocol
Modulation Mode
Transmission Distance
With No Obstacle
Weight
Operation Voltage 12V DC
Operation Frequency 2400 2483.5MHz-
IEEE 802.11b, IEEE 802.11g,
IEEE 802.n (1T1R Modes)
Operation Current 150mA(MAX)
Encryption Mode WPA2
802.11b:DSSS (CCK, DQPSK,
DBPSK)•802.11g/n:OFDM
(BPSK, QPSK, 16QAM, 64QAM)
≥10m
60±5g
Operation Temperature
Dimensions 71 35.5 12.3MM X X
Storage Temperature
Operation Humidity 20%~90%RH
Items GT4068
O
- 10~ C+50
O
- 20~ C+60
Settings Connecting Camera Logo
Settings
BPDW8913WR
2.4GHz Digtal Wireless
Car Rearview System
Open the APP, if the connection between the wi tool and the mobile device is
successful the app will be highlighted. Then the image would be transmitted from the
camera to the app. As shown in the gure below, the camera is showning real-time
monitoring in the app. The user would also be able to press icon to refresh the image
2. Click on “Wi-Fi”, then select the camera to connect too. The initial SSID of the device
is “WIFICAMERA”. Then type in the password of the devices
(Default password: 88888888).
1. Click on the “ ” icon.
Wi-Fi
2. Click on “Wi-Fi”, then select the camera to connect too. The initial SSID of the device
is “WIFICAMERA”. Then type in the password of the devices
(Default password: 88888888).
1. Click on the “ ” icon in the main interface of the iOS device.
* Never reverse the positive and negative pole. Reversing the poles
can damage the emitter box and camera, rendering them unusable.
* The positive and negative pole of the emitter box’s power cable are connected
to the positive and negative pole of the rear lamp of the car.
* The antenna of the emitter box should not be placed near any metal part of the car.
This can negatively e ect the emitting distance and image transmission.
1. Turn on the Andriod Phone and enter the Google Play Store
2. Search “Sight Wi ” app.
3. Install the “Sight Wi ” app
Wi-Fi
* User could press the RESET button of the emitter to renew the default factory
SSID and password.
* When the user changes the SSID and password, the user shall forget the network in the
"Settings" , and then reconnect the new network. Otherwise login error will remain displayed.
Press this icon to enter into the settings menu you can change the default factory SSID
and password of the wifi camera tool, and clicking will show whether the change is successful,
and clicking to cancel the new SSID set.
* User could press the RESET button of the emitter to renew the default factory
SSID and password.
* When the user changes the SSID and password, the user shall forget the network in the
"Settings" , and then reconnect the new network. Otherwise login error will remain displayed.
Connecting
Camera
Take a
Photo
Record
a Video
Video
Playback
* All the speci cations are subject to minor change without prior notice
License Plate
Nuts & Bolts
License Plate
Screws (Optional)
In-line Wire
Connectors
Grommet Cable Ties
Black-
Red+
The speci c steps to clear network memory are as follows. and then follow the above WIFI connection
method to reconnect the new network.
Specyfikacje produktu
| Marka: | Blaupunkt |
| Kategoria: | aparat fotograficzny |
| Model: | BPDW8913WR |
Potrzebujesz pomocy?
Jeśli potrzebujesz pomocy z Blaupunkt BPDW8913WR, zadaj pytanie poniżej, a inni użytkownicy Ci odpowiedzą
Instrukcje aparat fotograficzny Blaupunkt

29 Lipca 2024
29 Lipca 2024
29 Lipca 2024
23 Czerwca 2024
22 Czerwca 2024
22 Czerwca 2024
22 Czerwca 2024
22 Czerwca 2024
22 Czerwca 2024
22 Czerwca 2024
Instrukcje aparat fotograficzny
- aparat fotograficzny Leica
- aparat fotograficzny Logitech
- aparat fotograficzny Xiaomi
- aparat fotograficzny Joy-It
- aparat fotograficzny Braun
- aparat fotograficzny Philips
- aparat fotograficzny Epson
- aparat fotograficzny Hikvision
- aparat fotograficzny Panasonic
- aparat fotograficzny Canon
- aparat fotograficzny Medion
- aparat fotograficzny Lenco
- aparat fotograficzny Fujifilm
- aparat fotograficzny GE
- aparat fotograficzny Ring
- aparat fotograficzny Imou
- aparat fotograficzny IOptron
- aparat fotograficzny Casio
- aparat fotograficzny Metra
- aparat fotograficzny Grundig
- aparat fotograficzny HP
- aparat fotograficzny SJCAM
- aparat fotograficzny Swann
- aparat fotograficzny Nikon
- aparat fotograficzny Kodak
- aparat fotograficzny Alpine
- aparat fotograficzny Zenit
- aparat fotograficzny Minox
- aparat fotograficzny AgfaPhoto
- aparat fotograficzny Vimar
- aparat fotograficzny Eufy
- aparat fotograficzny Ricoh
- aparat fotograficzny Rollei
- aparat fotograficzny Netgear
- aparat fotograficzny Pyle
- aparat fotograficzny Vtech
- aparat fotograficzny Olympus
- aparat fotograficzny Avaya
- aparat fotograficzny Polaroid
- aparat fotograficzny Konica Minolta
- aparat fotograficzny Sanyo
- aparat fotograficzny Lorex
- aparat fotograficzny Netatmo
- aparat fotograficzny Denver
- aparat fotograficzny Pentax
- aparat fotograficzny Marshall Electronics
- aparat fotograficzny SereneLife
- aparat fotograficzny BenQ
- aparat fotograficzny Lexibook
- aparat fotograficzny Sygonix
- aparat fotograficzny Elmo
- aparat fotograficzny Alfatron
- aparat fotograficzny AquaTech
- aparat fotograficzny Extralink
- aparat fotograficzny Laserliner
- aparat fotograficzny Vivitar
- aparat fotograficzny BZBGear
- aparat fotograficzny BirdDog
- aparat fotograficzny Agfa
- aparat fotograficzny Argus
- aparat fotograficzny Yashica
- aparat fotograficzny Flir
- aparat fotograficzny King
- aparat fotograficzny Arlo
- aparat fotograficzny Ansco
- aparat fotograficzny Zeiss Ikon
- aparat fotograficzny Busch
- aparat fotograficzny Mamiya
- aparat fotograficzny Fuji
- aparat fotograficzny Minolta
- aparat fotograficzny Petri
Najnowsze instrukcje dla aparat fotograficzny

3 Kwietnia 2025

15 Stycznia 2025
13 Października 2024
11 Października 2024

10 Października 2024

10 Października 2024
24 Września 2024
24 Września 2024
17 Września 2024
16 Września 2024