Instrukcja obsługi Archos TV connect
Archos
tablet do rysowania
TV connect
Przeczytaj poniżej 📖 instrukcję obsługi w języku polskim dla Archos TV connect (226 stron) w kategorii tablet do rysowania. Ta instrukcja była pomocna dla 5 osób i została oceniona przez 2 użytkowników na średnio 4.5 gwiazdek
Strona 1/226

1
EN
Table of contents
For more information, please consult the FAQs on www.archos.com. Make sure to read them before considering any
product return. Your deal may be no big deal. As we are often updating and improving our products, your device’s
software may have a slightly dierent appearance or modied functionality than presented in this Quick Start Guide.
Package contents...................................................................................................................................
Description of the ARCHOS TV CONNECT...................................................................................
Getting started.......................................................................................................................................
Description of the ARCHOS TV TOUCH remote........................................................................
ARCHOS TV TOUCH remote gesture mode.................................................................................
Navigating through the ARCHOS TV CONNECT........................................................................
Connecting to Internet.......................................................................................................................
Archos Game mapping tool..............................................................................................................
The AndroidTM interface......................................................................................................................
Archos video & music.........................................................................................................................
Getting familiar with Android TM.....................................................................................................
Troubleshooting...................................................................................................................................
2
.4
8
10
12
14
15
16
22
24
26
28

2
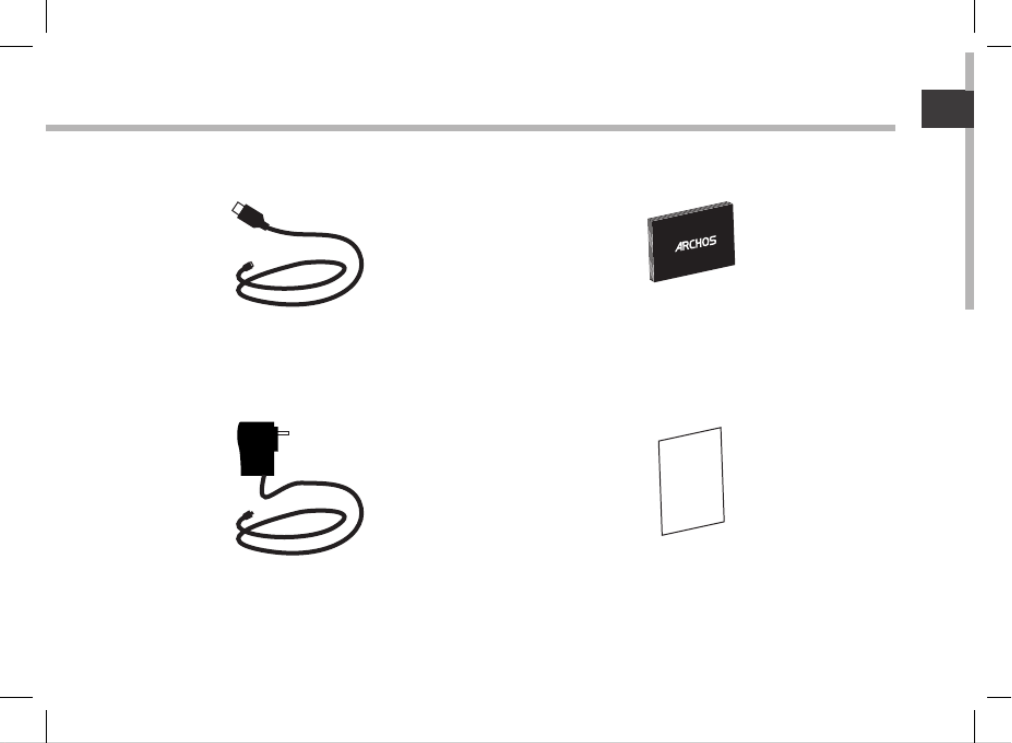
Package Contents
ARCHOS TV CONNECT
ARCHOS TV TOUCH remote*
*The ARCHOS TV TOUCH remote functions with 2 AA LR6 batteries.

3
HDMI
Warranty
EN
HDMI cable
Power supply
QSG booklet
Warranty,
legal & safety booklet
4
43
5 6
7
8
9
2
10
1
11
12
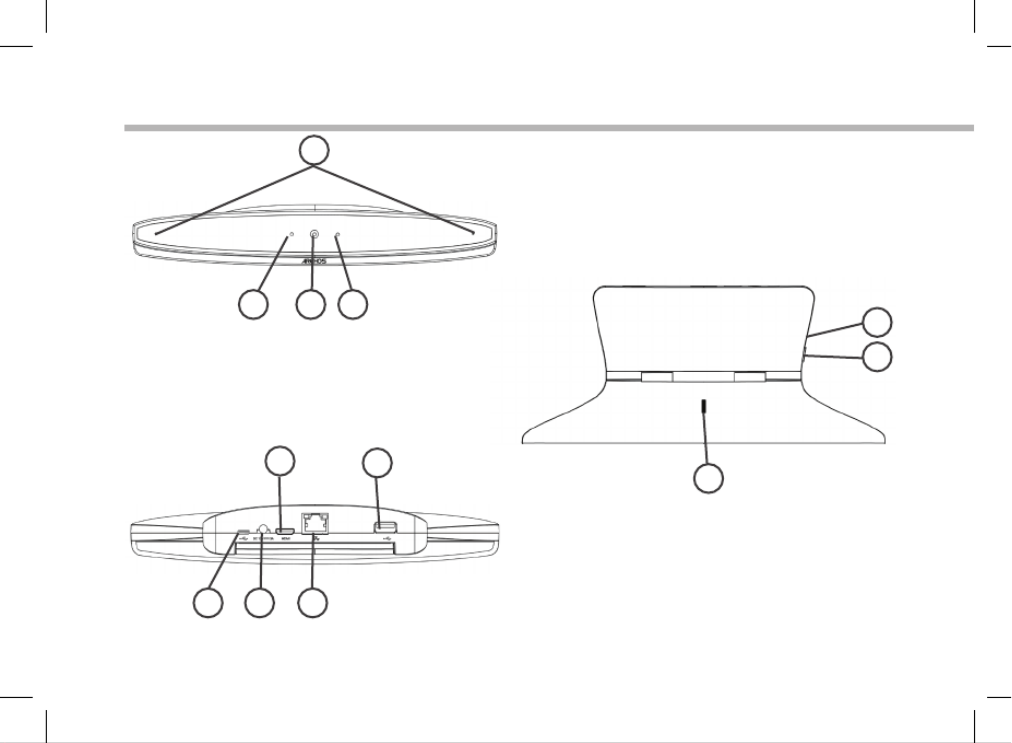
Description of the ARCHOS TV CONNECT
Front view
Rear view
View from top to bottom

5
EN
Microphones
On light
Webcam
Notication light
Micro-USB port
Power connector
Mini-HDMI video output
Ethernet port
USB port
Camera adjustment wheel
ON/OFF button
Micro-SD card slot
19
210
311
4
5
6
7
8
12
6
Getting Started
Connecting
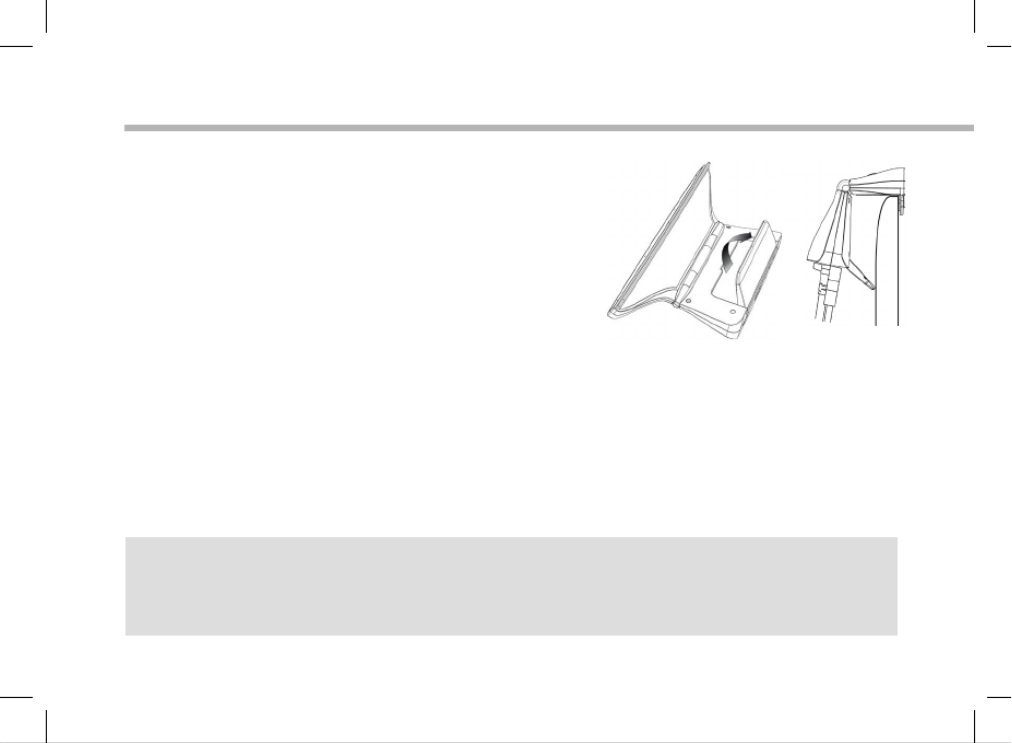
1. Place the ARCHOS TV CONNECT on the TV.
2. Connect the supplied power cable to the ARCHOS TV
CONNECT and to a wall outlet.
3. Connect the HDMI cable to the ARCHOS TV CONNECT
and to the TV.
4. Turn on the TV.
5. On the ARCHOS TV CONNECT, press the ON/OFF button
to turn on the ARCHOS TV CONNECT. The ON/OFF button of the ARCHOS TV TOUCH remote
can’t turn on the ARCHOS TV CONNECT.
The ARCHOS TV CONNECT turns on.
On your TV, if you are not on the correct HDMI channel, you will need to switch to the correct
HDMI channel.
TIPS:
To receive more complete service, please register your product. From the device, select the "Apps" button,
then select "Online registration" and follow the on-screen instructions.
From a computer, go to www.archos.com/register.

7
EN
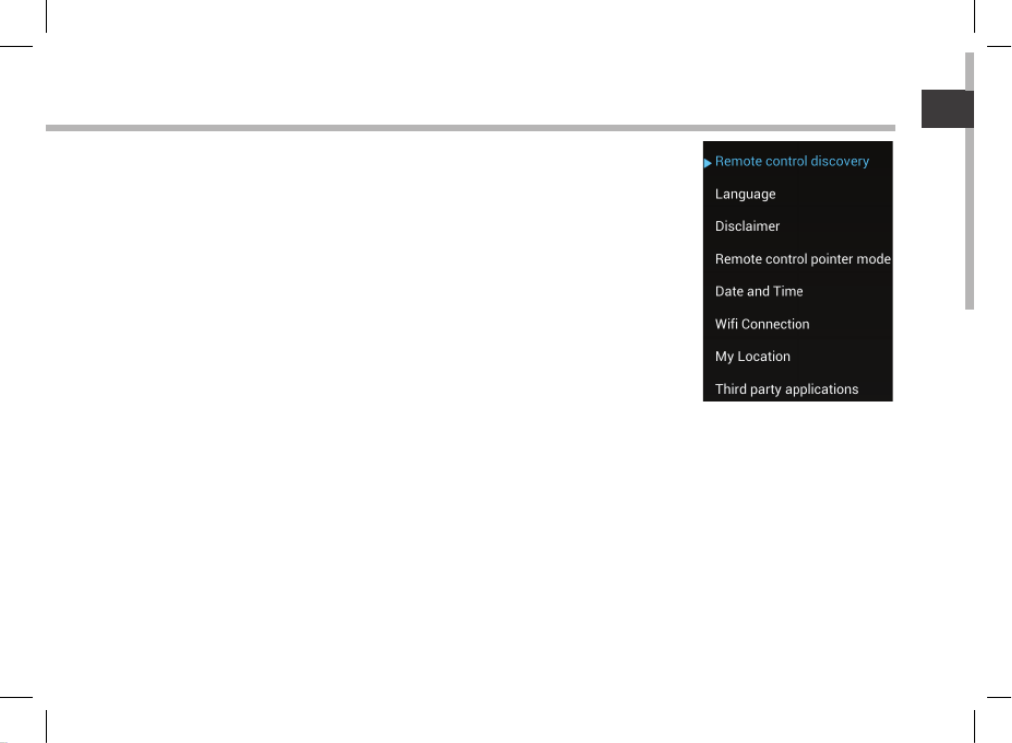
Through the wizard
The rst time you start up your ARCHOS, the installation wizard will
help you associate it with its ARCHOS TV TOUCH remote and do the
setup:
-Remote control discovery
-Language
-Remote control pointer mode
-Date & time
- WiFi connection
-Location service options
-3rd party apps
ARCHOS TV CONNECT Interface display on TV
To adjust the display of the ARCHOS TV CONNECT interface on TV, go
to : Settings > Display and select Overscan. Drag the cursor to increase
the overscan.

8
1
7
3
2
4
3
10
5
8
6
9
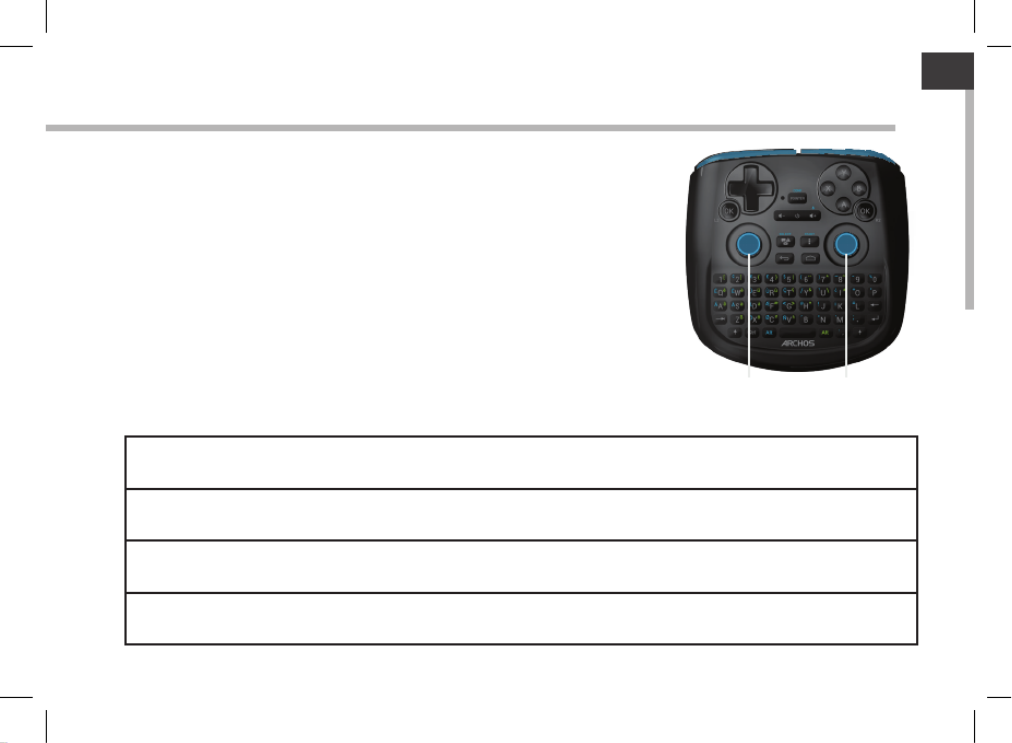
Description of the remote

9
EN
Directional Pad
A, X, Y, B buttons
Analog sticks
Keyboard(1)
Triggers
Functioning indicator
Pointer display switch
ON/OFF button
Volume buttons
Android interface buttons
19
210
3
4
5
6
7
8
(1) Qwerty keyboard

10
ARCHOS TV TOUCH remote gesture mode
In many applications, you can use the analog sticks of the ARCHOS TV TOUCH remote to
perform standard Android gestures. You can choose between two modes: Gesture emulation
mode and Finger mode. These two modes allow you to zoom out or zoom in when surng the
web and to change maps display.
Switching between the modes
1. To manage the gesture mode, select the "All Apps" button.
2. In the "All Apps" interface, select the Archos tool application.
3. Select "Gesture mode" to choose between Gesture emulation mode and Finger mode.
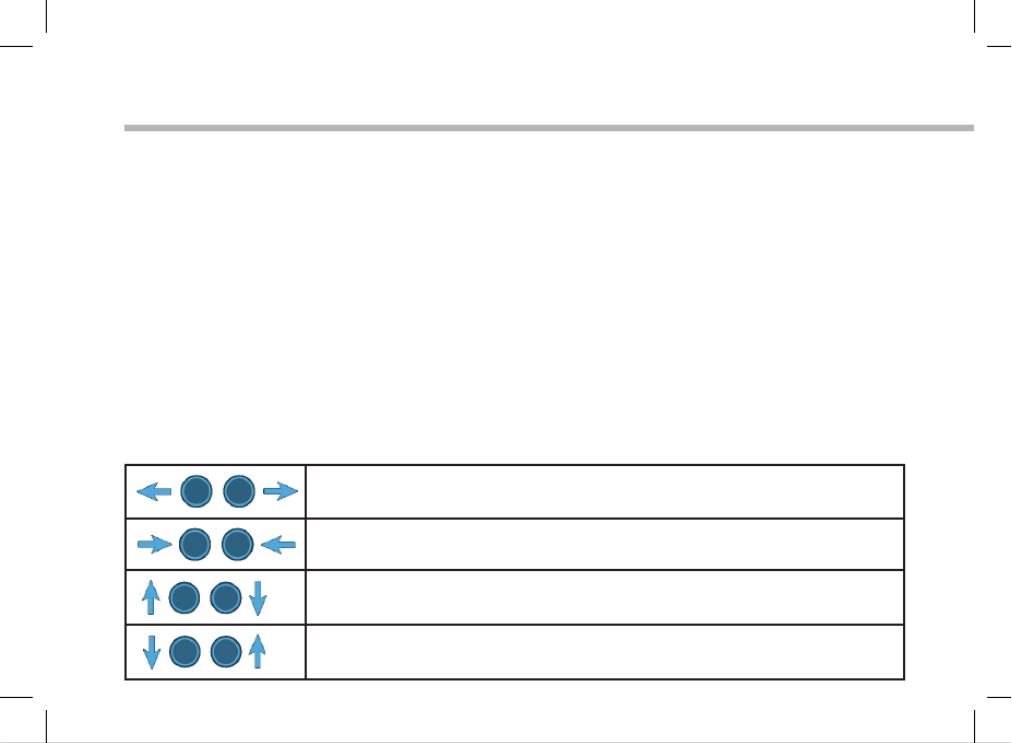
Gesture emulation mode
In the Gesture emulation mode, the analog sticks allow you to:
Zoom in: Move at the same time the left analog stick to the left
and the right analog stick to the right.
Zoom out: Move at the same time the left analog stick to the right
and the right analog stick to the left.
Rotate clockwise: Move at the same time the left analog stick up
and the right analog stick down.
Rotate counter-clockwise: Move at the same time the left analog
stick down and the right analog stick up.
11
EN
Finger mode
In the Finger mode, each analog stick corresponds to a virtual
nger.
-The left analog stick corresponds to the virtual nger named L1.
-The right analog stick corresponds to the virtual nger named
R1.
Using the virtual ngers
1. Use the left (right) analog stick to move the virtual nger L1
(R1).
2. When you select an icon with the left (right) analog stick, press
the L1 (R1) button to validate.
Validating corresponds to a nger touch.
Zoom in: Hold the L1 and R1 buttons and move the left analog stick to the left and the right
analog stick to the right.
Zoom out: Hold the L1 and R1 buttons and move the left analog stick to the right and the right
analog stick to the left.
Rotate clockwise: Hold the L1 and R1 buttons and move the left analog stick up and the right
analog stick down.
Rotate counter-clockwise: Hold the L1 and R1 buttons and move the left analog stick down
and the right analog stick up.
Analog stick
left
Analog stick
right
L1 R1

12
Navigating through the ARCHOS TV CONNECT
You can use, either the pointer, or the Finger mode to navigate through interfaces and to select
items.
Pointer
-On the remote, press the "Pointer" button to activate or deactivate the pointer on screen.
-If the "Pointer functioning light" is on, the pointer is displayed on screen.
-To select an item, put the pointer on the item and press the "OK" button.
-To move an item, put the pointer on the item and hold the "OK" button until the item
enlarges, then move it.
-To swipe between home screens, move the pointer left or right while holding the "OK" button.
Finger mode
-Use the left (right) analog stick to move the virtual nger L1(R1).
-When you select an item with the left (Right) analog stick, press the "L1 (R1)" button to
validate.
-To move an item, put the L1 ( ) virtual nger on the item and hold the "L1 " button until R1 R1
the item enlarges, then move it.
TIP:
Pointer mode is deactivated after 2 minutes if not used.

13
EN
Connecting to Internet
TIPS:
-When entering a WiFi password, we recommend that you select “Show password” so you can see the
characters you are typing.
-To get the correct WiFi password (or settings) for the network, contact the Internet service provider.
Connecting to a WiFi Network
WARNING: Make sure that you are in a WiFi zone.
During the installation wizard, you will reach the WiFi connection step.
1. At the WiFi connection step, the WiFi is turned on automatically.
2. Once the WiFi is on, the ARCHOS TV CONNECT will scan for WiFi networks in range.
3. Select the name of network you want to connect to.
Private networks are shown with a lock icon and will require you to enter a password.
Connecting via the Ethernet port
Connect a RJ 45 cable to the Archos and to your Internet modem.
14
ARCHOS Game mapping tool
Tip2:
Whenever you launch a game whose virtual
controls are mapped, the right mapping profile
will automatically be selected.
Tip1:
Within ARCHOS mapping tool, there are already
mapping profiles for over 100 games. For a game
with a mapping profile, hold the “Alt” and “Pointer”
buttons to display the preloaded mapping.
ARCHOS mapping tool is an application installed in your ARCHOS TV CONNECT. It is used
for games. It allows you to link the virtual controls of games to the physical controls of the
ARCHOS TV TOUCH remote by using mapping controls.
a
physical
control a
mapping
control
a
virtual
control

15
EN
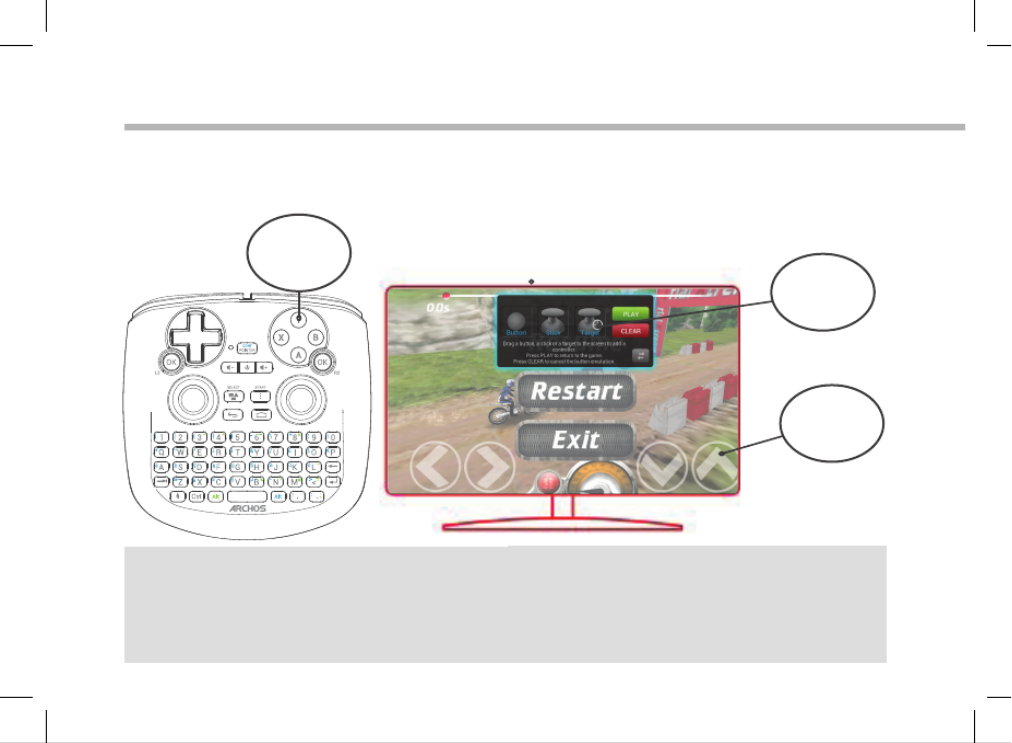
Starting ARCHOS mapping tool
1. Start a game.
When you reach the starting screen, the virtual controls are displayed.
2. On the ARCHOS TV TOUCH remote, hold the "Alt" and "Pointer" buttons.
The mapping overlay is displayed with the mapping tool interface.

16
Positioning a mapping control
Select and drag a type of mapping control to the desired virtual button.
Button
It is for the directional pad
, , , , the X, Y, B, A, buttons
and the L1, R1, L2, R2, Start,
Select buttons.
Stick
It is for the analog
directional sticks.
Target
It is for analog stick
targetting. It is placed
normally in the central
area of the screen on
shooting games.
There are three types of mapping control
ARCHOS Game mapping tool

17
EN
Linking a mapping control to a physical control
1. When a mapping control is placed on a virtual control, you are asked to select the desired
physical control you want to associate with it.
2. Once a physical control is associated to the mapping control, the name of the physical
control is displayed on the mapping control.
18
Enlarging a mapping control
Some virtual controls are larger than the mapping controls.
Enlarge the mapping control so that it is tailored to the virtual control.
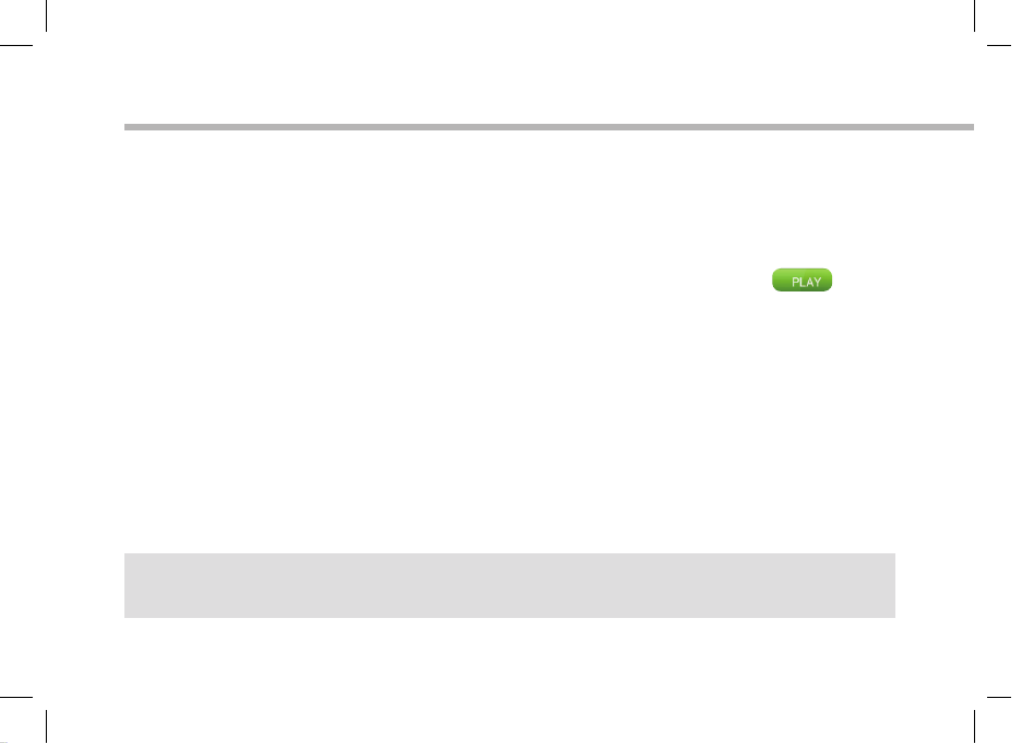
Saving your parameters
When you have mapped the virtual controls of a game, select "Play" to validate .
The prole is saved and associated with that game.
The mapping overlay disappears and you can play.
Whenever you start the game, you are informed that the emulation of virtual controls is
running.
Press the notication to display the mapping prole of the game. You can either modifyit, or
delete it.
Tips:
-You can only enlarge the mapping controls Stick and Target.
-Each mapping is specific to a game.
ARCHOS Game mapping tool

19
EN
Q&A about the mapping
You placed a mapping control on a virtual control but no option is available?
1. Select the mapping control and hold the "OK" button.
A menu box is displayed
2. Select the icon to set up the mapping control.
You want to remove a mapping control that you set?
1. Select the mapping control and hold the “OK” button.
A menu box is displayed
2. Select the icon to remove the mapping control.
You want to remove a mapping prole set for a game?
1. From ARCHOS mapping tool, select "Clear".
2. Select "OK" to conrm.
Removing a mapping prole
Displaying options

20
1
2
3
5
6
7
8
4
The Android
TM
Interface

21
EN
GoogleTM Search
>Select "Google" for text search or select the microphone icon for voice search.
"Recent apps" button
"Home" button
"Back" button
"All Apps" button
> Select this icon to show all the applications and widgets installed on your ARCHOS.
All your downloaded applications are here.
Widget
AndroidTM apps shortcuts
> Select to start an application.
The status bar
> Displays notications and quick settings.
1
2
3
4
5
6
7
8

22
The Android
TM
Interface
The Quick settings
-Notications:
To activate/deactivate incoming notications.
-Settings:
To access all your settings.
Here is the percentage of batteries remaining
for the ARCHOS TV TOUCH remote.

23
EN
The Recent Apps
Opens a list of thumbnail images of apps you’ve worked
with recently:
-To open an app, select it.
-To close an app, select and swipe it left or right.

24
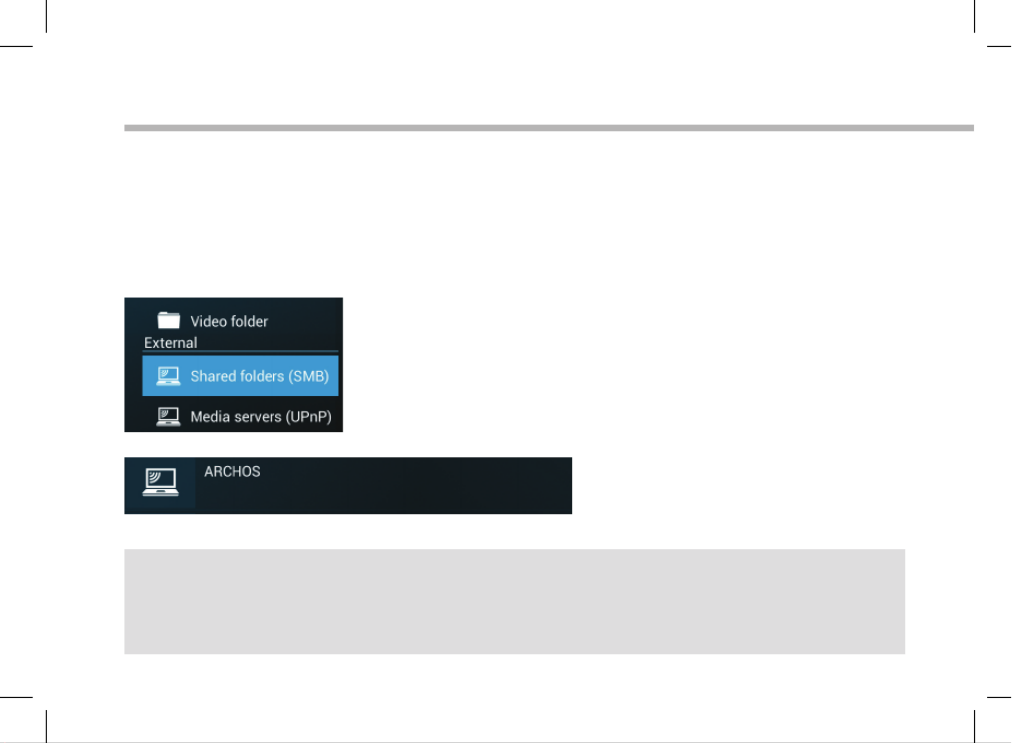
ARCHOS video & music
You can watch shared media les stored on your server(s). There are two main ways : Media server
(UPnP) and Shared folders (SMB).
To access shared media
1. Select the Archos Video (or Archos Music) application.
Make sure you are connected to Internet.
2. In the External column, select Media servers UPnP or Shared folders (SMB).
The available servers are displayed.
TIPS:
The servers you want to access must be connected to the same Internet network.
Prior to accessing media on your server(s), you need to set up sharing settings on your server(s).
Some servers do not require authorizations to share media. See the sharing options of your OS.

25
EN
Indexing folders
Indexing will allow you to integrate folders and subfolders in the Archos Video (Music) library
and to get posters and descriptions.
1. In the Archos Video (Music), select Shared folders
(SMB) in the External column.
2. Select the desired server. Available folders are
displayed.
The menu bar displays the option "Index folder".
3. Select a folder, then select "Index folder".
Or
Select "Index folder" to index all the displayed folders.
The indexed folders are dispayed below the servers
icons.

26
Getting familiar with Android
TM
Google account
A Google account lets you take full advantage of any Google apps and services that you may
want to use.
1. Go to "Settings" > "Accounts" > "Add account".
2. Select the account type "Google" to add.
3. Follow the onscreen steps to enter information about the account.
The extended home screen:
Navigate between dierent home screen panels by moving the pointer left and right while
holding an “OK” button.
Moving a home screen item:
Select the item until the positioning gridlines appear, then slide it to the desired location, and
release.
Removing a home screen item:
Select the item, slide it towards the top of the screen and drop it over the "Remove" icon.
Uninstalling an item:
From the "All apps" screens, select the item, slide it towards the top of the screen and drop it
over "Uninstall" bin.

27
EN
Creating application folders:
Select an app icon and drop it over another on a home screen and the two icons will be
combined.
Widgets:
Select the "All Apps" icon on your home screen. Select "Widgets" at the top of the screen. From
the main Widget screen, you can move around widgets just as you do for app icons.
Changing your wallpaper:
Select an empty space on a home screen and hold the "OK" button.
Locking the touchscreen:
From the quick settings dashboard in the status bar, select "Settings". In "Settings", scroll down
and select "Security". Select "Screen lock". Select the type of lock you would like to use. After you
set a lock, a lock screen is displayed whenever your screen wakes up, requesting the pattern,
pin or other specied key.

28
Troubleshooting
If you do not see the pointer:
The ARCHOS TV TOUCH remote goes in stand by mode. Press any button on the remote to
wake it up. A message displayed on screen tells you the remote is active.
If your ARCHOS TV TOUCH remote does not respond:
Press the ON/OFF button on the ARCHOS TV CONNECT. Select the option "Start remote pairing
process" and conrm. Follow the onscreen instructions. Note that a short press on the ON/OFF
button allows you to switch between options and a long press to validate.
If your WiFi reception is too low:
Make sure you are not far from the WiFi hotspot.
Update the rmware of the device: http://www.archos.com/support.
Reset and redene your connection parameters.
Contact your WiFi connection provider.
If you can’t access media on external servers:
Make sure the devices are connected to the same Internet network.
Make sure the servers are turned on and sharing options set.
Consult the help of your device to know the sharing process.

29
FR
Table des matières
Pour plus d’informations, consultez-les FAQs sur www.archos.com. Consultez-les avant d’envisager un éventuel retour
du produit. Le problème que vous rencontrez peut être résolu facilement. Comme nous mettons à jour et améliorons
régulièrement nos produits, le logiciel de votre appareil peut présenter une interface ou des fonctionnalités légèrement
diérentes de celles décrites dans ce guide.
Contenu de la boîte.............................................................................................................................
Description de l’ARCHOS TV CONNECT.........................................................................................
Mise en route..........................................................................................................................................
Description de la télécommande ARCHOS TV TOUCH ..........................................................
Mode pointeur de la télécommande ARCHOS TV TOUCH ...................................................
Naviguer dans l’ARCHOS TV CONNECT........................................................................................
Se connecter à Internet......................................................................................................................
ARCHOS Game mapping tool........................................................................................................
L’interface AndroidTM...........................................................................................................................
ARCHOS Vidéo & Musique................................................................................................................
Se familiariser avec AndroidTM.........................................................................................................
Dépannage.............................................................................................................................................
30
32
34
36
38
40
41
42
48
52
54
56

30
Contenu de la boîte
ARCHOS TV CONNECT
Télécommande ARCHOS TV TOUCH*
*La télécommande ARCHOS TV TOUCH fonctionne avec 2 piles AA LR6
31
HDMI
Warranty
FR
Câble HDMI
Chargeur
Guide d’utilisation rapide
Guide des garanties et des mentions
légales

32
43
5 6
7
8
9
2
10
1
11
12
Description de l’ARCHOS TV CONNECT
Face avant
Face arrière
Vue de haut

33
FR
Microphones
Témoin de fonctionnement
Webcam
Témoin de notication
Port micro-USB
Connecteur d’alimentation
Sortie vidéo mini-HDMI
Port Ethernet
Port USB
Molette d’ajustement de la webcam
Bouton ON/OFF
Lecteur carte micro-SD
19
210
311
4
5
6
7
8
12

34
Mise en route
Installation
1. Positionnez l’ARCHOS TV CONNECT au-dessus de la
télévision.
2. Branchez le câble d’alimentation fourni sur le connecteur
d’alimentation de l’ARCHOS TV CONNECT et sur une prise
secteur.
3. Connectez le câble HDMI à l’ARCHOS TV CONNECT et à la
télévision
4. Allumez la télévision.
5. Appuyez sur le bouton ON/OFF de l’ARCHOS TV CONNECT pour l’allumer.
Le bouton ON/OFF de la TOUCH TV remote ne permet pas d’allumer l’ARCHOS TV CONNECT.
L’ARCHOS TV CONNECT s’allume.
Sur la télévision, si vous n’êtes pas sur le bon canal HDMI, sélectionnez le bon canal.
ASTUCES:
Pour bénéficier d’une assistance complète, enregistrez votre produit. A partir de votre tablette,
sélectionnez "Toutes les applications", puis "Enregistrement en ligne" et suivez les instructions à l’écran.
A partir de votre ordinateur, allez sur www.archos.com/register.
35
FR
Assistant de démarrage
La première fois que vous démarrez l’ARCHOS TV CONNECT, l’assistant
de démarrage vous permet de l’associer à sa télécommande ARCHOS
TV TOUCH et aussi de la paramétrer :
-Détection de la télécommande
-Langue
-Mode pointeur de la télécommande
-Date & heure
-Connexion WiFi
-Les options du service de localisation
-Applications tierces
Achage de l’interface ARCHOS TV CONNECT sur la télévision
An d’ajuster l’achage de l’interface ARCHOS TV CONNECT à la taille
de l’écran de télévision, allez sur: Paramètres > Achage et sélectionner
Overscan. Déplacez le curseur an d’augmenter l’ overscan.

36
1
7
3
2
4
3
10
5
8
6
9
Description de la télécommande

37
FR
Boutons directionnels
Boutons A, X, Y, B
Joysticks analogiques
Clavier(1)
Gâchettes
Témoin de fonctionnement
Activer/désactiver l’ achage du pointeur
Bouton ON/OFF
Boutons de volume
Boutons de l’interface Android
19
210
3
4
5
6
7
8
(1) Clavier Qwerty
38
Mode pointeur de la télécommande
Dans plusieurs applications,vous pouvez utiliser les joysticks de la télécommande ARCHOS TV
TOUCH an de réaliser des gestes standards applicables à l’interface Android. Il est possible de
choisir entre deux modes : mode d’émulation des mouvements et mode d’émulation des doigts.
Ces deux modes permettent de zoomer ou dézoomer lors de la navigation sur Internet et de
changer l’achage des cartes.
Passer d’un mode à un autre
1. Pour gérer les modes d’émulation, sélectionner le bouton "Toutes les applications".
2. Dans l’interface "Toutes les applications", sélectionnez l’application "Archos mapping tool".
3. Sélectionnez "Emulation des gestes(Gesture mode)" an de choisir entre le mode d’émulation
des mouvements et le mode d’émulation des doigts.
Mode d’émulation des mouvements
Dans le mode d’émulation des mouvements, les joysticks vous permettent de :
Zoomer : orientez en même temps le joystick gauche vers la gauche et
le joystick droit vers la droite.
Dézoomer : orientez en même temps le joystick gauche vers la droite
et le joystick droit vers la gauche.
Tourner dans le sens horaire : orientez en même temps le joystick
gauche vers le haut et le joystick droit vers le bas.
Tourner dans le sens antihoraire: orientez en même temps le joystick
gauche vers le bas et le joystick droit vers le haut.

39
FR
Mode d’émulation des doigts
Dans le mode d’émulation des doigts, chaque joystick
correspond à un doigt virtuel.
- Le joystick gauche correspond au doigt virtuel nommé L1.
- Le joystick droit correspond au doigt virtuel nommé R1.
Utilisation des doigts virtuels
1. Utilisez le joystick gauche (droit) pour déplacer le doigt virtuel
L1 (R1).
2. Lorsque vous sélectionnez une icône avec le joystick gauche
(droit), appuyez sur le bouton L1 (R1) pour valider.
Le fait de valider correspond au toucher du doigt.
Zoomer : maintenez les boutons L1 et R1 enfoncés et orientez le joystick gauche vers la gauche
et le joystick droit vers la droite.
Dézoomer : maintenez les boutons L1 et R1 enfoncés et orientez le joystick gauche vers la
droite et le joystick droit vers la gauche.
Tourner dans le sens horaire : maintenez les boutons L1 et R1 enfoncés et orientez le joystik
gauche vers le haut et le joystick droit vers le bas.
Tourner dans le sens antihoraire : maintenez les boutons L1 et R1 enfoncés et orientez le
joystick gauche vers le bas et le joystick droit vers le haut.
Joystick
gauche Joystick
droit
L1 R1

40
Naviguer dans l’ARCHOS TV CONNECT
Utilisez soit le curseur, soit le mode d’émulation des doigts an de naviguer dans les interfaces et
de sélectionner des éléments.
Curseur
- Sur la télécommande ARCHOS TV TOUCH, appuyez sur le bouton "Pointer" pour activer ou
désactiver le curseur à l’écran.
- Si le témoin de fonctionnement du curseur est allumé, le curseur est aché à l’écran.
- An de sélectionner un élément, placez le curseur sur l’élément et appuyez sur le bouton "OK".
- An de déplacer un élément, placez le curseur sur l’élément et maintenez le bouton "OK"
enfoncé jusqu’à ce que l’élément s’agrandit, puis déplacez-le.
- An de naviguer entre les écrans d’accueil, déplacez le curseur de gauche à droite tout en
maintenant le bouton "OK" enfoncé.
Emulation des doigts
- Utilisez le joystick gauche (droit) an de déplacer le doigt virtuel L1(R1).
- Lorsque vous sélectionnez un élément avec le joystick gauche (droit), appuyez sur le bouton "L1
(R1)" an de valider.
- An de déplacer un élément, placez le doigt virtuel L1 ( ) sur l’élément et maintenez enfoncé le R1
bouton "L1 " jusqu’à ce que l’élément s’agrandisse, puis déplacez-le.R1
ASTUCE :
L’affichage du curseur est désactivé après deux minutes d’inactivité.

41
FR
Se connecter à Internet
ASTUCES :
- Lorsque vous saisissez un mot de passe, nous vous recommandons de sélectionner “Afficher le mot de
passe” afin de voir les caractères saisis.
- Afin d”obtenir le bon mot de passe (ou les bons paramètres) du réseau, contactez le fournisseur d’accès
à Internet.
Se connecter via WiFi
ATTENTION : assurez-vous d’être dans une zone WiFi.
Au cours de l’assistant de démarrage, vous allez atteindre l’étape de connexion WiFi.
1. A l’étape de connexion WiFi, le WiFi est activé automatiquement.
2. Une fois le WiFi activé, l’ARCHOS TV CONNECT va rechercher des réseaux WiFi à portée.
3. Sélectionnez le nom du réseau auquel vous voulez vous connecter.
Les réseaux privés s’achent avec un cadenas et requièrent un mot de passe.
Se connecter via le port Ethernet
Connectez le câble RJ 45 à l’Archos et à votre modem Internet.

42
L’ARCHOS Game mapping tool
Astuce1:
Plus de 100 configurations de jeux sont déjà intégrées. En
outre, plusieurs jeux permettent l’utilisation automatique
des boutons physiques sans aucun mapping. Pour afficher
le mapping d’un jeu, maintenez enfoncé “Alt” et “Pointer” .
L’ ARCHOS Game mapping tool est une application installée sur votre ARCHOS TV CONNECT.
Elle est utilisée pour les jeux. Elle vous permet d’associer les boutons virtuels des jeux aux
boutons physiques de la télécommande ARCHOS TV TOUCH en utilisant les boutons de
mapping. un
bouton
physique un
bouton de
mapping
a
virtual
control
Astuce2:
Dès que vous démarrez un jeu dont
les boutons virtuels ont été mappés, le
mapping correspondant est sélectionné
automatiquement.

43
FR
Ouvrir ARCHOS Game mapping tool
1. Sélectionnez un jeu.
Une fois sur l’écran de démarrage, les touches virtuelles s’achent.
2. Sur la télécommande ARCHOS TV TOUCH, maintenez enfoncé "Alt" et "Pointer".
L’interface de l’application ARCHOS mapping tool s’ache.

44
L’ARCHOS Game mapping tool
Placer un bouton de mapping
Sélectionnez un bouton de mapping et faites-le glisser sur le bouton virtuel souhaité.
Il existe trois types de boutons de mapping :
Bouton
Il est utilisé pour les
boutons directionnels ,
, , , les boutons X, Y, B, A
et les boutons L1, R1, L2, R2,
Start, Select.
Stick
Il est utilisé pour
les joysticks
directionnels
analogiques
Cible
Il est utilisé pour les
joysticks directionnels
analogiques servant de
pointeur de cible. Il est
placé en général dans la
partie centrale de l’écran
sur les jeux de tir.

45
FR
Associer un bouton de mapping à un bouton physique
1. Lorsque vous placez un bouton de mapping sur un bouton virtuel, il faut sélectionner le
bouton ou le stick analogique auquel vous voulez l’associer.
2. Dès qu’un bouton physique est associé au bouton de mapping, le nom du bouton physique
est aché sur le bouton de mapping.
46
Agrandir un bouton de mapping
Certains boutons virtuels sont plus grands que les boutons de mapping.
Agrandissez le bouton de mapping an de l’ajuster au bouton virtuel.
Sauvegarder vos paramètres
Une fois que vous avez mappé les boutons virtuels d’un jeu, sélectionnez Jouer pour
valider. La conguration est sauvegardée et dénie pour ce jeu.
L’interface ARCHOS mapping tool est fermée et vous pouvez jouer.
A chaque fois que vous démarrez le jeu, on vous informe que l’émulation des boutons virtuels
est active.
Sélectionnez le message de notication an d’acher la conguration des boutons virtuels. Il
est possible de le modier ou de le supprimer.
Astuces:
- Vous pouvez seulement agrandir les boutons de mapping Stick et Cible.
- Chaque configuration est spéficique à un jeu.
L’ARCHOS Game mapping tool

47
FR
Questions & Réponses à propos de la conguration des touches
Vous avez placé un bouton de mapping sur un bouton virtuel mais aucune option ne
s’ache?
1. Sélectionnez le bouton de mapping et maintenez enfoncé le bouton "OK".
Une boîte de dialogue s’ache.
2. Sélectionnez l’icône pour paramétrer le bouton de mapping.
Vous voulez supprimer un bouton de mapping déni?
1. Sélectionnez le bouton de mapping et maintenez enfoncé le bouton "OK".
Une boîte de dialogue s’ache.
2. Sélectionnez pour supprimer le bouton de mapping.
Vous voulez supprimer la conguration des touches d’un
jeu?
1. A partir de l’ARCHOS mapping tool, sélectionnez Eacer.
2. Sélectionnez OK pour conrmer.

48
1
2
3
5
6
7
8
4
Interface Android
TM

49
FR
Google TM Search
> Sélectionnez "Google" pour saisir votre recherche ou l’icône microphone pour l’énoncer.
"Applications récentes"
"Accueil"
"Retour"
" Toutes les Applications"
> Sélectionnez pour acher toutes les applications et les widgets installés sur votre
tablette. Vous retrouverez toutes vos applications téléchargées.
Widget
Raccourcis d’applications Android TM
> Sélectionnez une application pour l’ouvrir.
Barre de statuts
> Elle ache les notications et permet l’accès aux réglages rapides.
1
2
3
4
5
6
7
8

50
Les Réglages rapides
- Notications :
pour activer/désactiver les notications entrantes.
- Paramètres :
pour accéder à tous vos paramètres.
Le pourcentage de batteries restant pour la
télécommande ARCHOS TV TOUCH.
Interface Android
TM

51
FR
Les Applications récentes
L’application ache une liste de vignettes des
applications utilisées récemment :
- Pour acher une application, sélectionnez-la.
- Pour fermer une application, sélectionnez-la, maintenez
le bouton "OK" enfoncé et faites-la glisser vers la gauche
ou vers la droite.
52
ARCHOS vidéo & musique
Vous pouvez regarder des chiers partagés stockés sur vos serveurs. Il y a deux sortes de procédé :
Serveurs de Média (UPnP) et Répertoires partagés (SMB).
Accéder aux chiers partagés
1. Sélectionnez l’application Archos vidéo (ou Archos musique).
Assurez-vous d’être connecté à Internet.
2. Dans la colonne "Externe", sélectionnez Serveurs de Média (UPnP) ou Répertoires partagés (SMB).
Les serveurs disponibles s’achent.
Astuces:
Les serveurs auxquels vous voulez accéder doivent être connectés au même réseau Internet.
Avant d’accéder aux fichiers sur les serveurs, vous devez définir les paramètres de partage à partir des des
serveurs concernés.

53
FR
Indexer des dossiers
L’indexation permet d’ajouter des dossiers et des sous-dossiers dans la bibliothèque de
l’application Archos vidéo (ou Archos musique) et
d’obtenir les couvertures et les synopsis des chiers.
1. Dans l’application Archos vidéo (musique),
sélectionnez Répertoires partagés (SMB) dans la
colonne "Externe".
2. Sélectionnez le serveur souhaité. Les dossiers
disponibles s’achent.
La barre de menu ache l’option "Indexer les dossiers".
3. Sélectionnez un dossier, puis sélectionnez "Indexer les
dossiers".
Ou
Sélectionnez "Indexer les dossiers" an d’indexer tous
les dossiers achés.
Les dossiers indexés s’achent dans la section "Dossiers
indexés".

54
Se familiariser avec Android
TM
Compte Google
Un compte Google vous permet de tirer pleinement parti des services et applications Google
que vous pourriez utiliser.
1. Accédez à "Paramètres" > "Comptes" > "Ajouter un compte".
2. Sélectionnez le type de compte "Google".
3. Suivez les instructions qui s’achent pour saisir les informations relatives au compte.
L’écran d’accueil étendu :
Naviguez entre les diérents écrans d’accueil en déplaçant le curseur vers la gauche ou vers la
droite tout en maintenant enfoncé le bouton "OK".
Déplacer une icône de l’écran d’accueil :
Placez le curseur sur l’icône puis maintenez enfoncé le bouton "OK" jusqu’à ce que s’achent
les lignes de positionnement, puis faites-la glisser vers l’emplacement souhaité, et relâchez.
Supprimer une icône de l’écran d’accueil :
Placez le curseur sur l’icône puis maintenez enfoncé le bouton “OK”, puis faites-la glisser vers le
haut de l’écran, et déposez-la sur l’icône "Supprimer".
Désinstaller une application :
A partir de l’écran "Toutes les applications", placez le curseur sur l’icône puis maintenez enfoncé
le bouton “OK”, puis faites-la glisser vers le haut de l’écran et déposez-la sur l’icône "Désinstaller".
55
FR
Créer des dossiers d’applications :
A partir d’un écran d’accueil, déposez une icône sur une autre pour les rassembler.
Widgets :
Sélectionnez l’icône "Toutes les applications". Sélectionnez "Widgets" en haut de l’écran. A partir
de l’écran d’accueil des widgets, vous pouvez déplacer les widgets de la même façon que vous
procédez avec les applications.
Changer le fond d’écran :
Placez le curseur sur un emplacement vide de l’écran et maintenez enfoncé le bouton "OK", puis
choisissez parmi la liste d’options.
Verrouiller votre tablette :
A partir du panneau des réglages rapides dans la barre de statuts, sélectionnez "Paramètres".
Faites déler l’écran vers le bas, puis sélectionnez "Sécurité". Sélectionnez "Verrouillage de
l’écran". Sélectionnez le type de verrouillage que vous voulez utiliser. Une fois que vous avez
sélectionné une option, un écran de verrouillage s’ache chaque fois que votre écran est
réactivé. Vous êtes alors invité à saisir le code PIN ou tout autre code spécié.
56
Dépannage
Si le curseur ne s’ache pas :
La télécommande ARCHOS TV TOUCH peut passer en mode veille. Appuyez sur n’importe
quel bouton pour la réveiller. Un message à l’écran vous informe que la télécommande est
réactivée.
Si votre télécommande ARCHOS TV TOUCH ne répond pas :
Appuyez sur le bouton ON/OFF de l’ARCHOS TV CONNECT. Sélectionnez l’option "Démarrer le
processus d’association de la télécommande" puis conrmez. Suivez les instructions à l’écran.
Un appui court sur le bouton ON/OFF permet de sélectionner une option et un appui long
permet de valider votre choix.
Si la connexion WiFi est faible :
Assurez-vous de ne pas être trop loin de la borne WiFi.
Mettez à jour le logiciel de l’appareil à partir de : http://www.archos.com/support.
Réinitialiser les paramètres de connexion puis les saisir à nouveau.
Contactez votre fournisseur d’accès.
Si vous ne pouvez pas accéder à vos chiers sur des serveurs externes :
Assurez-vous que vos appareils sont connectés au même réseau Internet.
Assurez-vous que vos serveurs de partage sont allumés et que les paramètres de partage ont
été bien dénis.
Consultez la documentation de vos serveurs pour connaître le mode de partage de chiers.

57
DE
Inhaltsverzeichnis
Weitere Informationen nden Sie unter den FAQs auf www.archos.com. Diese unbedingt durchlesen, bevor Sie eine
Rückgabe des Produkts in Erwägung ziehen. Es könnte ein geringfügiges Problem vorliegen. Da unsere Produkte
kontinuierlich aktualisiert und weiterentwickelt werden, kann die Software Ihres Geräts in Erscheinung und
Funktionalität geringfügige Abweichungen zu den Darstellungen in dieser Kurzbedienungsanleitung aufweisen.
Verpackungsinhalt...............................................................................................................................
Beschreibung von ARCHOS TV CONNECT....................................................................................
Erste Schritte..........................................................................................................................................
Beschreibung der ARCHOS TV TOUCH-Fernbedienung.......................................................
ARCHOS TV TOUCH-Fernbedienung Gestenmodus...............................................................
Navigation durch ARCHOS TV CONNECT....................................................................................
Verbindung zum Internet.................................................................................................................
ARCHOS Spiel-Mapping-Tool...........................................................................................................
Die AndroidTM
Benutzeroberfläche................................................................................................
ARCHOS Video & Musik......................................................................................................................
Erste Schritte mit Android TM
.............................................................................................................
Fehlerbehebung...................................................................................................................................
58
60
62
64
66
68
69
70
76
80
82
84

59
HDMI
Warranty
DE
Ladegerät
Benutzerhandbuch
Garantie, Impressum und
Sicherheitshinweise
HDMI-Kabel

61
DE
Mikrofone
Betriebsanzeige
Webcam
Benachrichtigungsanzeige
Micro-USB-Anschluss
Stromanschluss
Mini-HDMI Videoausgang
Ethernet-Anschluss
USB-Anschluss
Einstellrad für Kamera
ON/OFF-Taste
Micro-SD Kartenslot
19
210
311
4
5
6
7
8
12

63
DE
Installationsassistent
Wenn Sie Ihren ARCHOS das erste Mal in Betrieb nehmen, leitet Sie
der Installationsassistent durch einige Bildschirme, um Ihnen dabei zu
helfen, die grundlegenden Einstellungen vorzunehmen :
- Remote control discovery
- Sprache
- Remote control pointer mode
- Datum & Uhrzeit
- WLAN Verbindung
- Standortdienst
- Anwendungen von Drittanbietern
Anzeige des ARCHOS TV CONNECT-Schnittstelle
Um die Anzeige des ARCHOS TV CONNECT-Schnittstelle einzustellen, gehen Sie zu:
Einstellungen> Display und wählen Sie Overscan. Ziehen Sie den Mauszeiger, um den
Overscan zu erhöhen.

64
1
7
3
2
4
3
10
5
8
6
9
Beschreibung der Fernbedienung

66
Fernbedienung Gestenmodus
Bei vielen Anwendungen können Sie mithilfe der Analog-Sticks der ARCHOS TV TOUCH-
Fernbedienung die Standard-Android-Gesten durchführen. Es kann aus den folgenden
Modusarten ausgewählt werden: Gesten-Emulationsmodus und Fingermodus. Mithilfe dieser
zwei Modi können Sie während des Surfens im Web vergrößern oder verkleinern und ändern
die Kartenanzeige.
Umschalten zwischen den Modi
1. Zur Einstellung des Gestenmodus drücken Sie die Taste "All Apps (Alle Apps)".
2. In der Benutzeroberäche "All Apps (Alle Apps)" wählen Sie die Archos-Anwendung.
3. Wählen Sie "Gesture mode (Gestenmodus)" für die Auswahl zwischen dem Gesten-
Emulationsmodus und dem Fingermodus.
Gesten-Emulationsmodus
Im Gesten-Emulationsmodus können Sie mithilfe der Analog-Sticks:
Vergrößern: Bewegen Sie gleichzeitig den linken Analog-Stick nach
links und den rechten Analog-Stick nach rechts.
Verkleinern Bewegen Sie gleichzeitig den linken Analog-Stick nach
rechts und den rechten Analog-Stick nach links.
Drehen im Uhrzeigersinn: Bewegen Sie gleichzeitig den linken
Analog-Stick nach oben und den rechten Analog-Stick nach unten.
Drehen gegen den Uhrzeigersinn: Bewegen Sie gleichzeitig den
linken Analog-Stick nach unten und den rechten Analog-Stick nach
oben.

70
ARCHOS Spiel-Mapping-Tool
Tipp 2:
Immer wenn Sie ein Spiel starten, dessen
virtuelle Steuerung gemappt ist, wird
das richtige Mapping-Profil automatisch
ausgewählt.
Tipp 1:
Innerhalb des ARCHOS-Mapping-Tools befinden sich bereits
Mapping-Profile für über 100 Spiele. Bei einem Spiel mit
einem Mapping-Profil drücken Sie für die Anzeige des
vorgeladenen Mappings die Tasten "Alt" und "Pointer".
Das ARCHOS Mapping-Tool ist eine auf Ihrem ARCHOS TV CONNECT installierte Anwendung.
Es wird für Spiele verwendet. Es ermöglicht Ihnen die Verbindung der virtuellen Steuerung der
Spiele mit der physischen Steuerung der ARCHOS TV TOUCH-Fernbedienung mittels Mapping-
Steuerung. eine
physische
Steuerung eine
Mapping-
Steuerung
eine
virtuelle
Steuerung
Specyfikacje produktu
| Marka: | Archos |
| Kategoria: | tablet do rysowania |
| Model: | TV connect |
Potrzebujesz pomocy?
Jeśli potrzebujesz pomocy z Archos TV connect, zadaj pytanie poniżej, a inni użytkownicy Ci odpowiedzą
Instrukcje tablet do rysowania Archos

9 Października 2024
20 Września 2024
17 Września 2024
15 Września 2024
14 Września 2024
12 Września 2024
10 Września 2024
7 Września 2024
5 Września 2024
3 Września 2024
Instrukcje tablet do rysowania
- tablet do rysowania Samsung
- tablet do rysowania Lenovo
- tablet do rysowania SilverCrest
- tablet do rysowania Gigabyte
- tablet do rysowania Acer
- tablet do rysowania Fujitsu
- tablet do rysowania Panasonic
- tablet do rysowania Viewsonic
- tablet do rysowania Asus
- tablet do rysowania Medion
- tablet do rysowania Boss
- tablet do rysowania Toshiba
- tablet do rysowania Vivax
- tablet do rysowania Alcatel
- tablet do rysowania HP
- tablet do rysowania Prixton
- tablet do rysowania Hyundai
- tablet do rysowania Creative
- tablet do rysowania Manhattan
- tablet do rysowania SBS
- tablet do rysowania Zebra
- tablet do rysowania Trust
- tablet do rysowania Dell
- tablet do rysowania Wacom
- tablet do rysowania Thomson
- tablet do rysowania Huion
- tablet do rysowania Digiland
- tablet do rysowania AARP
- tablet do rysowania Denver
- tablet do rysowania RCA
- tablet do rysowania Genius
- tablet do rysowania BOOX
- tablet do rysowania Laser
- tablet do rysowania Cybernet
- tablet do rysowania Doro
- tablet do rysowania Royole
- tablet do rysowania Sylvania
- tablet do rysowania Blackberry
- tablet do rysowania Boogie Board
- tablet do rysowania InFocus
- tablet do rysowania Ematic
- tablet do rysowania Leitz
- tablet do rysowania BakkerElkhuizen
- tablet do rysowania Monoprice
- tablet do rysowania Vankyo
- tablet do rysowania Beafon
- tablet do rysowania Cruz
- tablet do rysowania Advantech
- tablet do rysowania Rocketbook
- tablet do rysowania Getac
- tablet do rysowania Vulcan
- tablet do rysowania Trimble
- tablet do rysowania Leotec
- tablet do rysowania Cydle
- tablet do rysowania Xplore
- tablet do rysowania XP-PEN
- tablet do rysowania Punos
- tablet do rysowania Tivax
- tablet do rysowania Kocaso
- tablet do rysowania Wikipad
- tablet do rysowania ICAN!
- tablet do rysowania Hamlet
- tablet do rysowania Barnes And Noble
- tablet do rysowania Sungale
- tablet do rysowania Bea-fon
- tablet do rysowania Onyx BOOX
- tablet do rysowania Veikk
- tablet do rysowania Xencelabs
- tablet do rysowania Ugee
- tablet do rysowania Aegex
- tablet do rysowania Zeki
- tablet do rysowania Iskn
Najnowsze instrukcje dla tablet do rysowania
15 Stycznia 2025
15 Stycznia 2025
31 Grudnia 2025
27 Grudnia 2024
27 Grudnia 2024
27 Grudnia 2024
27 Grudnia 2024
27 Grudnia 2024
27 Grudnia 2024
27 Grudnia 2024