Instrukcja obsługi AMX MXT-1901-PAN
Przeczytaj poniżej 📖 instrukcję obsługi w języku polskim dla AMX MXT-1901-PAN (2 stron) w kategorii monitor. Ta instrukcja była pomocna dla 4 osób i została oceniona przez 2 użytkowników na średnio 4.5 gwiazdek
Strona 1/2
Quick Start Guide
MXT-1901-PAN 19.4" Modero X Series® G5Panoramic Tabletop Touch Panel
Overview
In the MXT-1901-PAN 19.4” Modero X Series G5 Panoramic Tabletop Touch Panel
(FG5968-41), the most elegant interface designed specifically for dedicated room
control has been significantly enhanced to include a new G5 Graphic Engine to
provide even faster and smoother animations and transitions. It also quadruples the
processing power with a new Quad Core Processor. This new generation of touch
panels is built for usability offering edge-to-edge capacitive touch glass with multi-
touch capabilities. It features advanced technology empowering users to operate AV
equipment seamlessly, while providing the ultimate in audio and video quality. The
distinctive appearance will complement even the most sophisticated meeting facilities
and homes. With a lightning fast processor, brilliant graphics and enhanced
capabilities, the Modero X Series is the control surface that simply delivers more.
For more information on installation and configuration, please refer to the
MXT/MXD-1901-PAN Operation Reference Guide, available at www.amx.com
Common Application
The MXT-1901-PAN is ideal for boardrooms, conference rooms, or auditoriums where
a panoramic control surface is needed to provide access to multiple functions
simultaneously while remaining elegantly unobtrusive. In residences, it is perfect for
kitchens, home theaters, or home offices where the panoramic control surface can be
used to manage systems throughout the house.
Features
•Panoramic Control Surface – Combined with the new PanTastic UI, the
panoramic touch panels take the user experience to a whole new level with an
impressive control surface to perform activities much in the same way you use a
computer – multi-tasking with dedicated spaces.
•Apps - Modero X Series G5 touch panels now have the ability to run stand-alone
applications (apps) within the control environment.
•Future Technology Visions – HD video chat and conferencing using integrated
camera and hardware - ready to support Near Field Communication (NFC)
Technology, which promises short-range wireless technologies that deliver
peer-to-peer communication by 'sharing, pairing and transaction' between RF
devices like exchanging data/identities.
•Enhanced Usability – HD video streaming.
•Graphic Leaps & Bounds – The Modero X Series includes some striking new
intuitive UI functionality including: gesturing, swiping, dynamic reordering and
enhanced animation capabilities
•Perfect From Any Angle – Includes In-Plane Switching (IPS), the latest
technology in popular tablet/mobile devices that delivers the widest viewing
angles and the most accurate color reproduction on the market.
Product Specifications
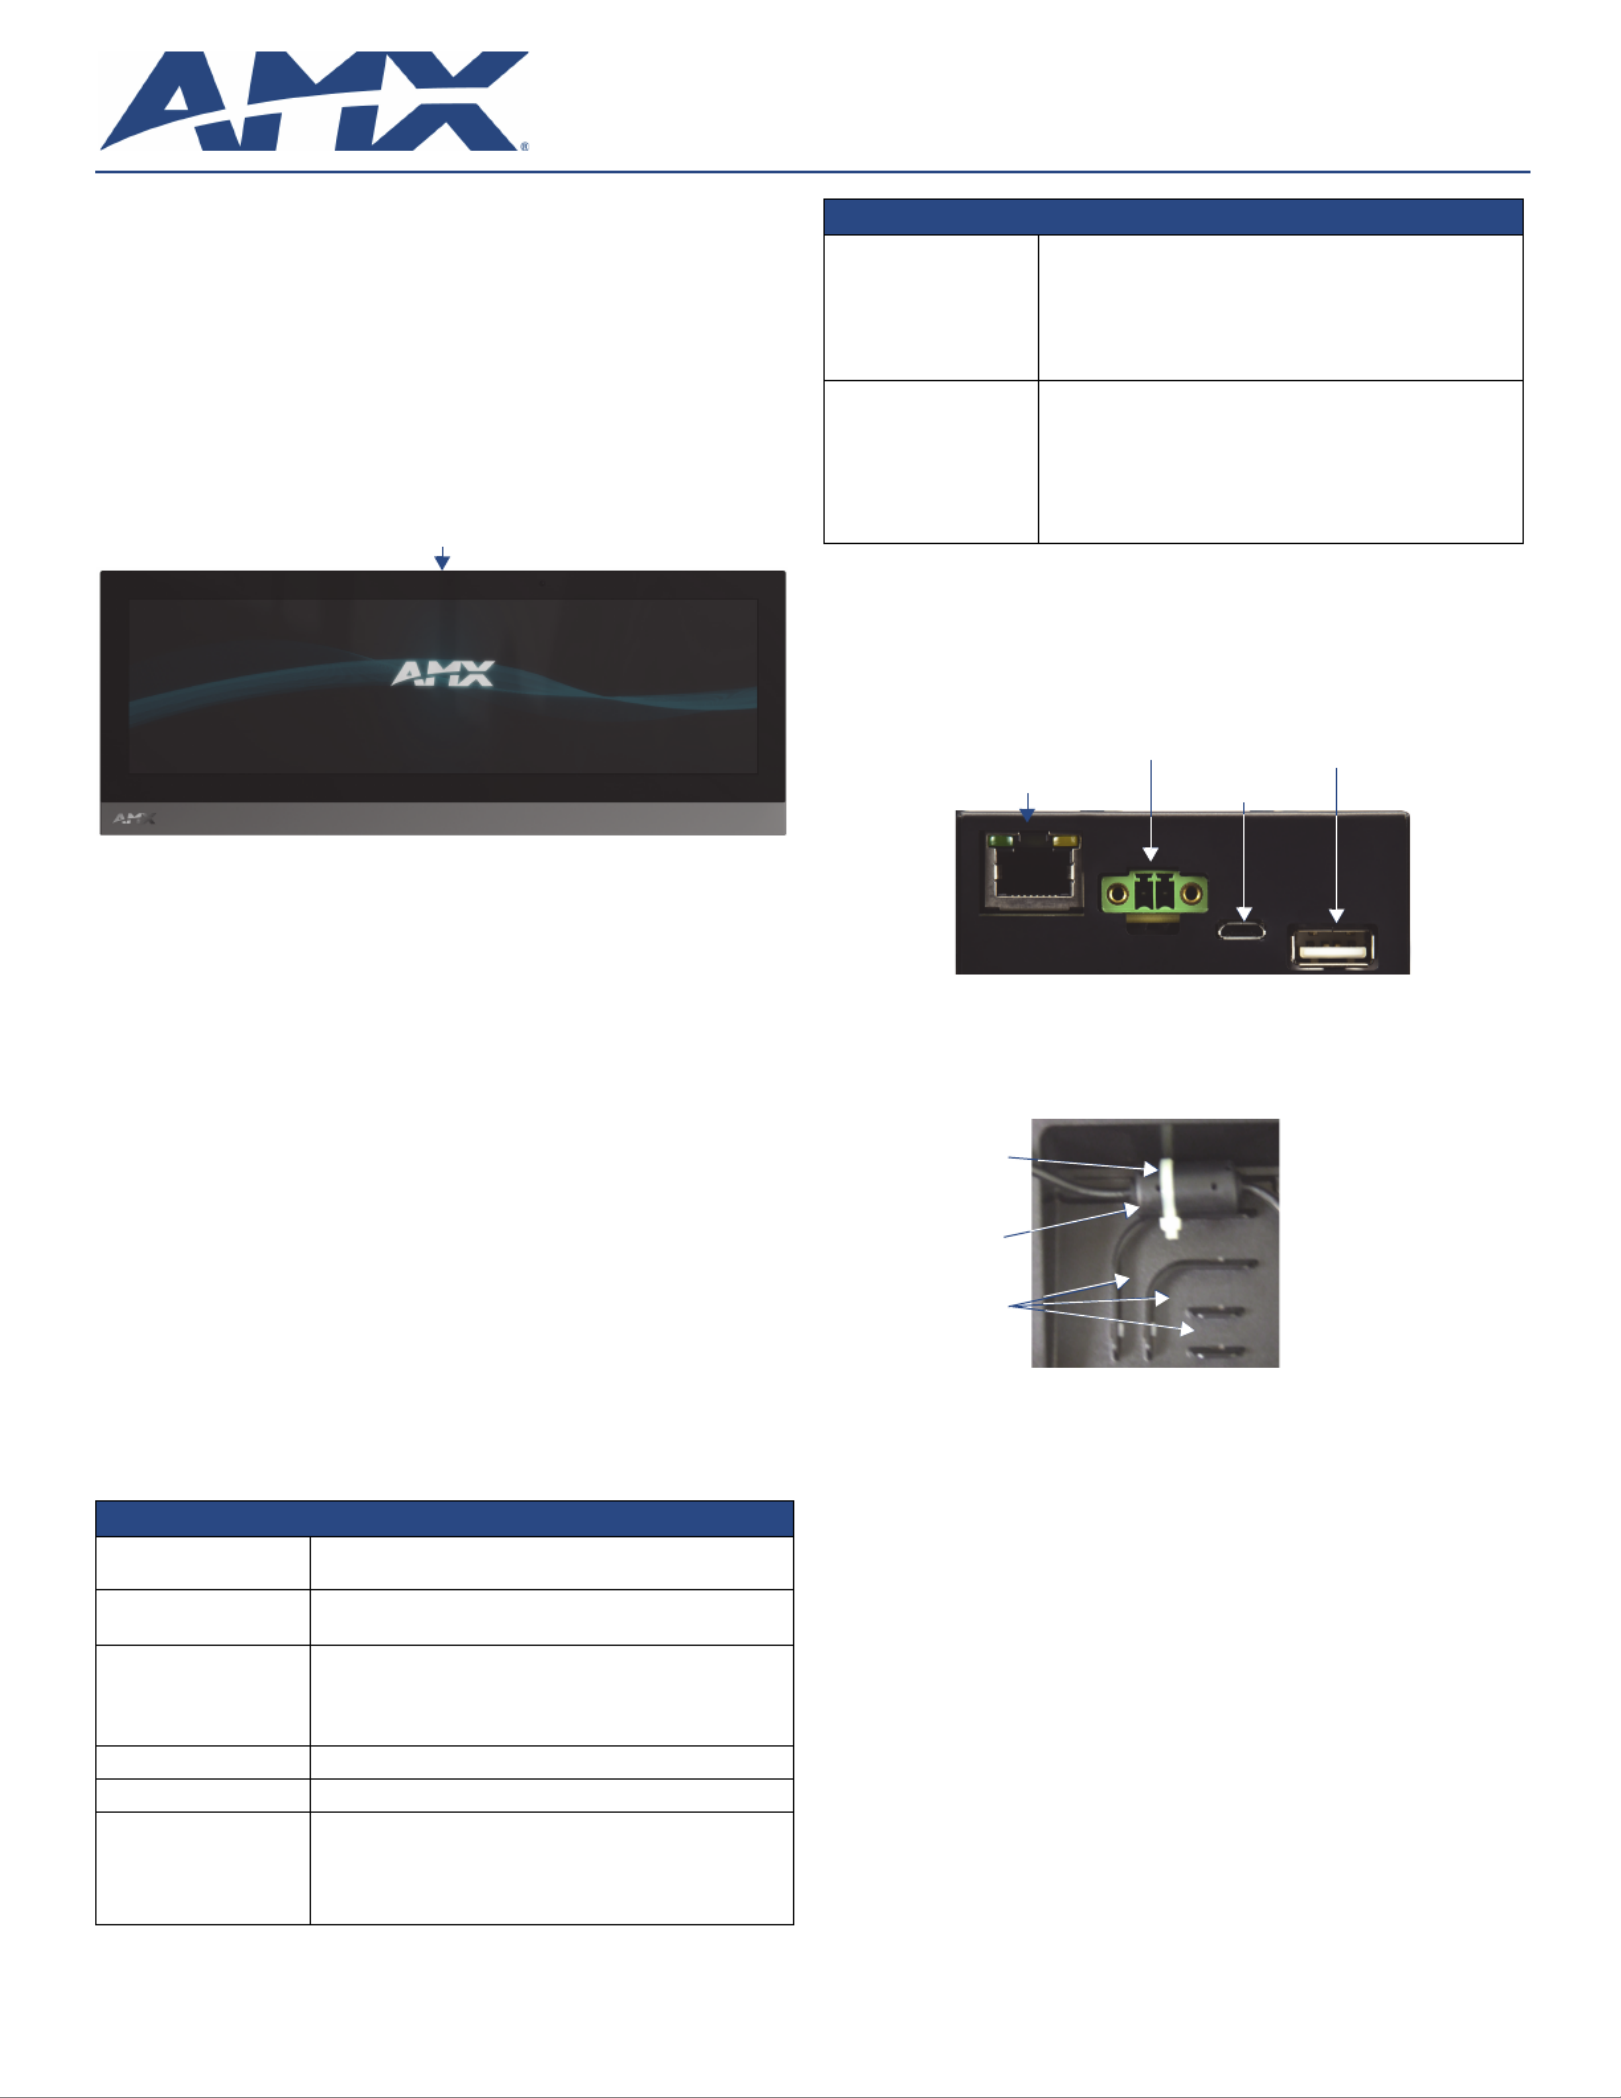
Panel Connectors and Wiring
FIG. 2 shows the connectors located on the underside of the MXT-1901-PAN. The
Micro-USB port is used for camera video output. The underside USB port, as well as
the two rear USB ports, may be used with a flash drive for page transfers, firmware
upgrades, or Picture View. Any USB peripherals (mouse, keyboard, etc.) may be
connected to one of the two USB ports on the rear of the device.
The MXT-1901-PAN does not have individual channels on the base of the device to
allow passage of cables from underneath the base. Instead, it has one slot at the base
to allow options on cable configuration, with channels for securing power, Ethernet,
and Micro-USB cables (FIG. 3).
Each channel side has slots for attaching tie-wraps to secure each cable. The ferrite
on the power cable must be secured with the included tie-wrap during installation to
prevent the possibility of the panel not sitting flush on the table.
Wiring Guidelines
The MXT-1901-PAN uses a 12 VDC-compliant power supply to provide power to the
panel via the 2-pin 3.5 mm captive wire PWR connector. Use the previously provided
power requirement information to determine the power draw. The incoming PWR and
GND wires from the power supply must be connected to the corresponding locations
within the PWR connector.
NOTE: Apply power to the panel only after installation is complete.
NOTE: Connecting power to the MXT-1901-PAN should be done using the included 2-
pin 3.5mm captive wire connector included with the device. This connector is retained
within its port with locking screws instead of the pins on each side of standard captive
wire connectors, and using force to insert a standard captive wire connector may
damage the device.
FIG. 1 MXT-1901-PAN 19.4” Panoramic Tabletop Touch Panel
MXT-1901-PAN (FG5968-41) Specifications
Power Requirements: 12VDC, 4.4A LPS: 2-pin, locking 3.5mm captive wire
connector.
Power Consumption: • Full-On: 35 W (12 VDC, 2.9 A)
•Standby: 7 W (12 VDC, 0.6 A)
Operating Environment: • Operating Temperature: 32° F to 104° F (0° C to 40° C)
•Storage Temperature: 4° F to 140° F (-20° C to 60° C)
•Humidity Operating: 20% to 85% RH
•Humidity Storage: 5% to 85% RH
Dimensions (HWD): 7" x 20 7/16” x 5 5/16” (177.8 mm x 519 mm x 134.6 mm)
Weight: 9.4 lbs (4.26 Kg)
Certifications: • UL
• FCC Part 15 Class B
• C-Tick CISPR 22 Class B
• CE EN 55022 Class B and EN 55024
• CB Scheme IEC 60950-1
Sleep Button
MXT-1901-PAN (FG5968-41) Specifications (Cont.)
Included Accessories: • MXT-1901-PAN Installation Guide (93-5968-041)
• MXA-CLK Modero X Series Cleaning Kit (FG5968-16)
• 3.5mm Locking Captive Wire Connector (41-0002-SA)
• HPG-10 .75-inch HydraPort .75-IN. Grommet (FG570-01)
• Type A USB Covers (2)
• Tie Wrap for Power Source Ferrite
Other AMX Equipment: • PSN4.4 4.4AMP, 13.5VDCA5 Power Supply (FG423-45)
• MXA-USB-C USB Cover Kit (FG5968-18)
• MXA-MPL, Modero X Series Multi Preview Live
( )FG5968-10
• MXA-MP, Modero X Series Multi Preview (FG5968-20)
• MXA-STMK-19, Secure Table Mount Kit, 19.4" Modero X
Tabletop (FG5968-65)
FIG. 2 Rear connectors
FIG. 3 Tie-wrap for power connector ferrite
Ethernet 10/100
Port Micro-USB
Port
USB Port
12 VDC
Power Port
Tie-wrap channels
Tie-wrap
Ferrite

For full warranty information, refer to the AMX Instruction Manual(s) associated with your Product(s).
3/14
©2014 AMX. All rights reserved. AMX and the AMX logo are registered trademarks of AMX.
AMX reserves the right to alter specifications without notice at any time.
3000 RESEARCH DRIVE, RICHARDSON, TX 75082 • 800.222.0193 • fax 469.624.7153 • technical support 800.932.6993 • www.amx.com
93-5968-41 REV: A
Wiring a Power Connection
To use the 2-pin 3.5 mm captive wire connector with a 12 VDC-compliant power
supply, the incoming PWR and GND wires from the external source must be
connected to their corresponding locations on the connector (FIG. 4). The connector
uses locking screws to insure a connection to the device, so make sure to insert and
tighten the screws before applying power.
1. Insert the PWR and GND wires on the terminal end of the 2-pin 3.5 mm
captive wire cable. Match the wiring locations of the +/- on both the power
supply and the terminal connector.
2. Tighten the clamp to secure the two wires. Do not tighten the screws
excessively; doing so may strip the threads and damage the connector.
3. Verify the connection of the 2-pin 3.5 mm captive wire to the external
12 VDC-compliant power supply and apply power.
Configuring the MXT-1901-PAN
The MXT-1901-PAN is equipped with a Settings app that allow you to set and
configure various features on the panel. For more information on connecting and
configuring the MXT-1901-PAN to a network, please refer to the Modero X Series G5
Programming Guide, available at www.amx.com.
Accessing the Settings App
To access the Settings app on the MXT-1901, press and hold the Sleep Button
(FIG. 1) on the top of the panel for 3 seconds. The user will be prompted to release the
button to enter the Settings app.
Accessing the NetLinx Subpage
1. From the Settings app page, select NetLinx. This opens a password keypad.
2. Enter the panel password into the keypad (the default is 1988) and select OK to
access the subpage.
Setting the Panel’s Device Number and Device Name
In the NetLinx subpage:
1. Press Device Number to open the NetLinx editing window.
2. Enter a unique Device Number assignment for the panel and press OK.
3. Enter a unique Device Name assignment for the panel and press OK.
Accessing the Ethernet Subpage
1. From the Settings app, select Ethernet. This opens a password keypad.
2. Enter the panel password into the keypad (the default is 1988) and select OK to
access the page.
Connecting to a Master
The panel requires that you establish the type of connection you want to make
between it and your Master.
In the NetLinx page:
1. Press Mode to toggle through the available connection modes:
2. If you have enabled password security on your Master, you need to set the user-
name and password within the device.
a. Select Username to open the NetLinx editing window.
b. Set your Username and Master Password.
e. Click OK to return to the NetLinx page.
Configuring the Panel to a Network
The first step is to configure the panel’s communication parameters. This only
configures the panel to communicate with a network, and it is still necessary to tell the
panel with which Master it should be communicating.
Network Communication With a DHCP Address
In the Ethernet subpage:
1. Toggle the DHCP/Static field to open the DHCP/Static window. DHCP is the default
setting.This action causes all fields on the Ethernet subpage (other than Host Name)
to be greyed-out.
2. Select Host Name to open the Host Name window. Enter the new host name
and click OK.
Network Communication with a Static Address
In the Ethernet subpage:
1. Toggle the DHCP/Static field to open the DHCP/Static window.
2. Select Static in the window. This opens the Static IP editing window.
3. Click on any field to open either a keypad (for numeric entries) or keyboard (for alpha-
numeric entries). To minimize the keypad/keyboard, click the two downward-pointing
arrows at the bottom right corner of the screen.
4. Enter your network’s information in the Static IP editing window. To move from field to
field, simply press the next field you wish to edit.
5. When finished, click OK to save your changes and return to the subpage.Ethernet
FIG. 4 NetLinx power connector wiring diagram
PWR +
GND -
To the Touch Panel
Power Supply
Connection Modes
Mode Description Procedures
Auto The device connects to the first
master that responds.
This setting requires that you set
the System Number.
Setting the System Number:
1. Select Master System Number to open
the keypad.
2. Set your Master System Number and
select OK.
URL The device connects to the
specific IP of a master via a TCP
connection.
This setting requires that you set
the Master’s IP.
Setting the Master IP:
1. Select the Master IP number to open the
keyboard.
2. Set your Master IP and select OK.
Listen The device “listens” for the
Master to initiate contact.
This setting requires you provide
the master with the device’s IP.
Confirm device IP is on the Master URL list.
You can set the Host Name on the device
and use it to locate the device on the master.
Host Name is particularly useful in the DHCP
scenario where the IP address can change.
Specyfikacje produktu
| Marka: | AMX |
| Kategoria: | monitor |
| Model: | MXT-1901-PAN |
| Kolor produktu: | Black, White |
| Typ ekranu: | IPS |
| Długość przekątnej ekranu: | 19.4 " |
| Procesor wbudowany: | Quad Core |
| Rozdzielczość: | 1920 x 530 px |
| Typ ekranu dotykowego: | Blad |
| Ekran dotykowy: | Tak |
| Karta graficzna: | G5 Graphics |
| Kształt ekranu: | Płaski |
| NVIDIA G-SYNC: | Nie |
| AMD FreeSync: | Nie |
| Jasność: | 350 cd/m² |
| Montaż naścienny / rzutowanie na sufit: | Nie |
| Technologia touchscreen: | Pojemnościowy |
Potrzebujesz pomocy?
Jeśli potrzebujesz pomocy z AMX MXT-1901-PAN, zadaj pytanie poniżej, a inni użytkownicy Ci odpowiedzą
Instrukcje monitor AMX

28 Września 2024
28 Września 2024
28 Września 2024
21 Czerwca 2024
21 Czerwca 2024
20 Czerwca 2024
20 Czerwca 2024
20 Czerwca 2024
20 Czerwca 2024
20 Czerwca 2024
Instrukcje monitor
- monitor Sony
- monitor Yamaha
- monitor Samsung
- monitor PeakTech
- monitor UPERFECT
- monitor LG
- monitor Xiaomi
- monitor Joy-It
- monitor Sharp
- monitor Huawei
- monitor TCL
- monitor Pioneer
- monitor Lenovo
- monitor Philips
- monitor Plantronics
- monitor SilverCrest
- monitor Gigabyte
- monitor Acer
- monitor Bosch
- monitor Epson
- monitor JBL
- monitor Hikvision
- monitor Fujitsu
- monitor HyperX
- monitor LC-Power
- monitor Hisense
- monitor Panasonic
- monitor Promethean
- monitor Canon
- monitor Crestron
- monitor Viewsonic
- monitor Behringer
- monitor Asus
- monitor AG Neovo
- monitor Allen & Heath
- monitor IK Multimedia
- monitor Medion
- monitor Boss
- monitor Marquant
- monitor MSI
- monitor Toshiba
- monitor Tesla
- monitor Westinghouse
- monitor Jensen
- monitor Yealink
- monitor Ring
- monitor Garmin
- monitor Blaupunkt
- monitor Salora
- monitor Iiyama
- monitor Citizen
- monitor APC
- monitor Haier
- monitor HP
- monitor Hyundai
- monitor Honeywell
- monitor Chauvet
- monitor Tripp Lite
- monitor Shure
- monitor Cisco
- monitor Xerox
- monitor Smart
- monitor Cooler Master
- monitor Alpine
- monitor Godox
- monitor Dynaudio
- monitor Deltaco
- monitor JVC
- monitor V7
- monitor Dell
- monitor IFM
- monitor Corsair
- monitor Alesis
- monitor Vimar
- monitor Dahua Technology
- monitor Schneider
- monitor Eurolite
- monitor Ricoh
- monitor SMART Technologies
- monitor NZXT
- monitor Emos
- monitor Renkforce
- monitor Marshall
- monitor Viessmann
- monitor Omron
- monitor Thomson
- monitor Velleman
- monitor Neumann
- monitor DataVideo
- monitor Danfoss
- monitor Pyle
- monitor Apple
- monitor Newline
- monitor Waeco
- monitor AOC
- monitor Peerless-AV
- monitor Speco Technologies
- monitor Samson
- monitor PreSonus
- monitor ARRI
- monitor Kindermann
- monitor Olympus
- monitor Mitsubishi
- monitor Fluid
- monitor Razer
- monitor ART
- monitor Continental Edison
- monitor RCF
- monitor NEC
- monitor Brandson
- monitor Prestigio
- monitor OSEE
- monitor Sanyo
- monitor Elvid
- monitor Optoma
- monitor Focal
- monitor Asrock
- monitor Monkey Banana
- monitor Abus
- monitor AMCV
- monitor Jay-Tech
- monitor Mackie
- monitor Palmer
- monitor Barco
- monitor Insignia
- monitor AVer
- monitor Akuvox
- monitor 3M
- monitor Element
- monitor Denver
- monitor Marshall Electronics
- monitor Orion
- monitor Hitachi
- monitor Postium
- monitor Kali Audio
- monitor IStarUSA
- monitor Seiki
- monitor Ernitec
- monitor Wohler
- monitor SmallHD
- monitor AJA
- monitor KRK
- monitor BenQ
- monitor Atlona
- monitor Thermaltake
- monitor Simrad
- monitor Hanwha
- monitor Odys
- monitor Elo
- monitor Ikan
- monitor BOOX
- monitor JUNG
- monitor Burg Wächter
- monitor Eizo
- monitor Monacor
- monitor Aputure
- monitor Daewoo
- monitor Tannoy
- monitor GVision
- monitor Positivo
- monitor Adj
- monitor Freedom Scientific
- monitor SPL
- monitor Qian
- monitor I3-Technologies
- monitor Stairville
- monitor Vitek
- monitor Planar
- monitor Mobile Pixels
- monitor REVO
- monitor Atomos
- monitor Newstar
- monitor SWIT
- monitor Kramer
- monitor RGBlink
- monitor Midas
- monitor Alienware
- monitor Archos
- monitor Acti
- monitor Emachines
- monitor Caliber
- monitor Maxdata
- monitor Sunstech
- monitor GlobalTronics
- monitor Sunny
- monitor BlueBuilt
- monitor Da-Lite
- monitor ProXtend
- monitor Kubo
- monitor GeoVision
- monitor LaCie
- monitor InFocus
- monitor Festo
- monitor Konig
- monitor Swissonic
- monitor IHealth
- monitor Peaq
- monitor QSC
- monitor Hannspree
- monitor ESI
- monitor Avocor
- monitor Vivitek
- monitor Genelec
- monitor Interlogix
- monitor Vorago
- monitor EverFocus
- monitor POSline
- monitor Peerless
- monitor M-Audio
- monitor Mad Catz
- monitor Krom
- monitor Monoprice
- monitor Eve Audio
- monitor Yorkville
- monitor HoverCam
- monitor Voxicon
- monitor Sonifex
- monitor TV One
- monitor Fostex
- monitor Prowise
- monitor Terra
- monitor Neets
- monitor Soundstream
- monitor Xoro
- monitor HKC
- monitor CTOUCH
- monitor Ozone
- monitor Ibm
- monitor Maxell
- monitor Packard Bell
- monitor Provision ISR
- monitor Mybeo
- monitor CSL
- monitor Bearware
- monitor Drawmer
- monitor Blue Sky
- monitor Zalman
- monitor Iadea
- monitor Advantech
- monitor Hercules
- monitor Avantone Pro
- monitor Ganz
- monitor TVLogic
- monitor Gamber-Johnson
- monitor Extron
- monitor Neat
- monitor Legamaster
- monitor Belinea
- monitor Adam
- monitor Triton
- monitor ITek
- monitor Kogan
- monitor Posiflex
- monitor Antelope Audio
- monitor MicroTouch
- monitor X-Rite
- monitor EKO
- monitor ONYX
- monitor IBoardTouch
- monitor Mirai
- monitor Elite Screens
- monitor Hollyland
- monitor Mitsai
- monitor Christie
- monitor Skytronic
- monitor Enttec
- monitor Feelworld
- monitor Phoenix Contact
- monitor COMMBOX
- monitor Yiynova
- monitor Alogic
- monitor Pelco
- monitor Lilliput
- monitor LightZone
- monitor AOpen
- monitor Planet Audio
- monitor EC Line
- monitor Datacolor
- monitor HELGI
- monitor Desview
- monitor Syscom
- monitor Allsee
- monitor Night Owl
- monitor ProDVX
- monitor Varad
- monitor PureTools
- monitor DoubleSight
- monitor CTL
- monitor Game Factor
- monitor Nixeus
- monitor Chimei
- monitor Blue Sea
- monitor Faytech
- monitor Hamlet
- monitor Wyse - Dell
- monitor Approx
- monitor Bauhn
- monitor GeChic
- monitor Oecolux
- monitor ADS-TEC
- monitor Satco
- monitor Casalux
- monitor Jupiter
- monitor Transvideo
- monitor Innocn
- monitor KeepOut
- monitor Shimbol
- monitor Raysgem
- monitor Motrona
- monitor Ikegami
- monitor AORUS
- monitor Portkeys
- monitor Mimo Monitors
- monitor American Dynamics
- monitor AIS
- monitor Wortmann AG
- monitor Viotek
- monitor Vidi-Touch
- monitor KTC
- monitor CoolerMaster
- monitor Atlantis Land
- monitor HEDD
- monitor Colormetrics
- monitor IOIO
- monitor DTEN
- monitor Cocopar
- monitor Titan Army
- monitor Xenarc
- monitor Delvcam
- monitor Wimaxit
- monitor BookIT
- monitor SideTrak
- monitor TRIUMPH BOARD
- monitor Japannext
Najnowsze instrukcje dla monitor

8 Kwietnia 2025

8 Kwietnia 2025

8 Kwietnia 2025
7 Kwietnia 2025

5 Kwietnia 2025

4 Kwietnia 2025

4 Kwietnia 2025
3 Kwietnia 2025
2 Kwietnia 2025

2 Kwietnia 2025