Instrukcja obsługi AKAI AK5020NF
Przeczytaj poniżej 📖 instrukcję obsługi w języku polskim dla AKAI AK5020NF (48 stron) w kategorii Telewizja. Ta instrukcja była pomocna dla 11 osób i została oceniona przez 2 użytkowników na średnio 4.5 gwiazdek
Strona 1/48

MODEL: AK5020NF
User Manual
50” Ultra HD
Smart TV

2
Welcome
Congratulations on your purchase!
This manual tells you all you need to know about using your new AKAI product.
Please take special note of any important safety and usage information presented with the symbol.
All products brought to you by AKAI are manufactured to the highest standards of performance and safety and, as
part of our philosophy of customer service and satisfaction, are backed by our comprehensive 3 Year Warranty.
We hope you will enjoy using your purchase for many years to come.

3
Contents
Networking 17
Connecting to a Wireless Network 17
Connecting to a Wired Network 17
TV Setting Menus 18
Picture 20
Audio 22
General 23
PVR Option 25
Time 27
Network 28
Lock 29
Channel 30
App Settings 32
High Dynamic Range (HDR) 33
Smart TV 34
Smart TV Applications 34
App Portals 35
Welcome 2
Contents 3
Unpack and Prepare 4
What's in the box 4
Important Tips 5
Attaching the stand 6
Wall-mounting the TV 7
Connect to power 8
Connect your antenna 8
Controls and Connections 9
Get to know your TV 9
Buttons on the TV 9
Ports on the TV 10
Remote Control 12
Setup 12
Using the Remote Control 13
Buttons on the Remote 14
On-Screen Set Up 16
TV Guide 36
Recording 37
Recording Live TV 38
Scheduled Recording 38
Playback 38
Pause Live TV (Time-shift) 39
USB Mode 40
Set up 40
Troubleshooting 42
Specications 45
Compliance and
Responsible Disposal 46

4 | UNPACK AND PREPARE
See the inside flap of the
box for how to handle the
TV without damaging it!
Unpack and Prepare
What's in the box
In the box you will find:
A. 50" Ultra HD Smart TV
B. Remote Control
C. AAA Batteries
D. TV Stands
E. Screws for TV Stands
F. Warning Sheet
G. TV Toppling Safety Message
H. Quick Start Guide
I. Warranty Certificate
J. General Safety Warnings
K. User Manual
You will need:
• Phillips-head screwdriver (for stand installation)
• Someone to help you lift and install your TV
Before installing your new TV, check you have everything needed.
• Antenna cable (to watch live TV)
• Broadband internet connection (to use smart apps)
ABB
C
D
E
F
GHI J
K

UNPACK AND PREPARE | 5
Important Tips
• Place the TV on a level surface.
• Place the TV away from any source that may generate heat or vibrations.
• Make sure there is enough space around vents for airflow.
• The remote control works up to 5 metres away from the TV.
• Unplug the TV before cleaning it.
• Clean using a dry cloth only - do not use water or chemicals.
• Use only the power supply provided.
• It is highly recommended to use safety straps for securing the TV in place.
• Keep liquid, children and pets away from the TV at all times.

6 | UNPACK AND PREPARE
Unless you are wall-mounting the TV, you will need to
attach its stand/legs.
1. Lay the TV face-down on a soft, flat surface (like the
sofa, or a towel on a table) larger than the TV itself.
2. Match stands to the installation points on the
underside of the TV.
3. Attach the stands to the TV at the installation points
using the screws provided. (Grab a screwdriver for
this bit). Make sure the legs are facing away from
each other (not leaning inwards).
Attaching the stand
• This TV is heavy! We recommend asking
someone to help you lift it.
• Unplug the TV from the power outlet before
installing or removing the stand.
• Only touch the frame, not the screen.
• It is highly recommended to use safety straps for
securing the TV.
CAUTION!
Do not apply
excessive force as
you might damage
the screw holes.
1
2
3

UNPACK AND PREPARE | 7
200mm
200mm
Back of the TV
Wall-mounting the TV
The TV comes with holes on the back panel for use with
wall-mounting brackets (bracket not included).
Use four standard M6*10mm screws (or longer,
depending on the mounting bracket) to wall-mount this
TV (screws are not included).
• Unplug the TV from the power outlet
before wall-mounting.
• Contact a professional for assistance
with wall-mounting the TV.
Required
• VESA Mounting
Bracket
• 4 x M6*10mm
screws (or longer
as required)
The screws in the package are for securing the TV stands
only. If you are wall-mounting the TV, consult a qualified
installer for advice on bracket support and wall support.

8 | UNPACK AND PREPARE
Free-to-airTVinHD(HighDenition)
High Definition (HD) channels
provide the best viewing quality and
are available with a digital antenna
connection.
TV channels in Ultra HD resolution are
not currently available in Australia.
Therefore when you watch HD
broadcast signals on an Ultra HD TV,
the picture can appear 'soft' and lacks
the detail you see when watching the
same content on a HD TV.
Connect to power
Make sure the TV is switched off at the power outlet
until you have finished connecting your cables.
Connect your antenna
Antenna cable not included.
ABC HD
SBS ONE HD
7HD
9HD
10 HD
PRIME7 HD
WIN HD
Example
HD Channels
Don't forget to plug in the TV to the power
outlet. Leave the power switched off until
installation is finished.
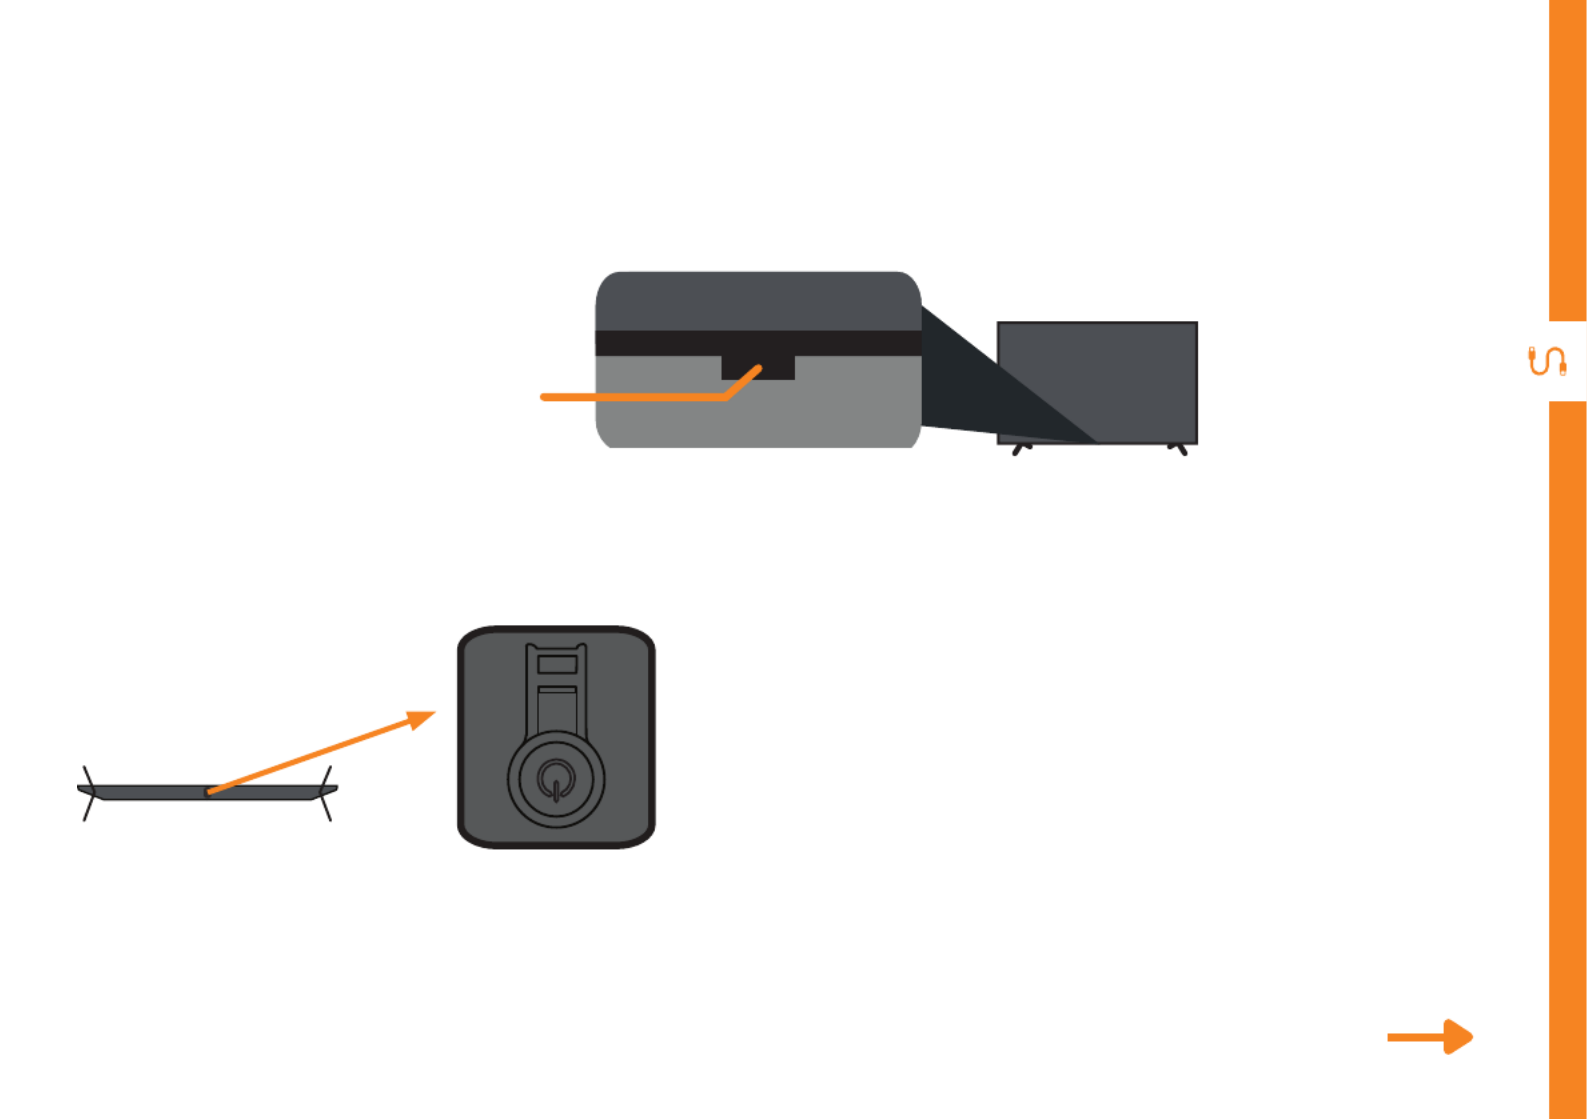
CONTROLS AND CONNECTIONS | 9
See next page for more info on the connections.
Controls and Connections
Buttons on the TV
Get to know your TV
On/Standby light and Remote sensor
Bottom view
• When the TV is on standby, press this
button to turn the TV on.
• When the TV is on, press to turn the TV off.

10 | CONTROLS AND CONNECTIONS
Ports on the TV
12 3 4 5 6
1Headphone Jack
SOUND
Connect to your headphones, amplifier or audio device, using an
AUX cable (not included).
2
HDMI
Use a high-speed
HDMI cable for
best picture and
sound quality.
SOUND
SOUND
COMPUTER
All-digital connection between the TV and any HDMI device.
Supports Ultra HD resolution. Requires a high-speed HDMI cable
(not included).
3AUDIO IN
SOUND
You can use this to connect Audio to your TV for AV or Component
video inputs. Requires a RCA stereo audio cable (not included).
4AV IN CVBS/Y
PICTURE
You can use this to connect your DVD player. Supports Standard
Definition (SD) resolution. Requires an AV cable (not included).
5COMPONENT IN
PICTURE
You can use this to connect your DVD player. Supports Full High
Definition (FHD) resolution. This also requires a component cable
(not included).
6 USB
STORAGE
• PVR record and pause live TV.
• Play your stored media files (supported file codecs and extensions
may vary).
• Software updates.

CONTROLS AND CONNECTIONS | 11
7 6 8 2 9 10 11
7 OPTICAL AUDIO
OUT
SOUND
Connect an external digital audio device. Use an Optical cable (not
included) to connect the unit with an amplifier, soundbar or other
audio decoding device for digital audio signal output.
8 LAN
INTERNET
Connect to your broadband modem using a network cable
(not included) for the best streaming experience. However, the TV
also has built-in Wi-Fi.
9 PC VGA
PICTURE
Connect to a PC or other device with a VGA cable (not included).
10 PC AUDIO
SOUND
Connect audio from your PC via a 3.5mm connector (not included).
11 ANTENNA IN
FREE-TO-AIR
TV
Connect your antenna for live TV (Antenna cable not included).
VGA AUDIO
LAN HDMI IN 1
PC IN
HDMI IN 2

12 | REMOTE CONTROL
Setup
Insert two AAA size batteries according to the
polarity markings (+/-) inside the compartment. Make
sure the batteries are correctly aligned and properly
pushed into place.
Precautions When Using Batteries
• Do not use old and new batteries together.
• Do not use different types of batteries (e.g.
Manganese and Alkaline batteries) together.
• Remove the batteries from the remote if you do
not intend to use it for a long time.
• When discarding used batteries, follow any
guidelines for recycling and disposal of batteries
that apply in your local area.
• Keep batteries away from children and pets.
• Never throw batteries into a fire or expose them
to extreme heat.
Remote Control
AAA size
batteries
included

REMOTE CONTROL | 13
Using the Remote Control
To use the remote, point it towards the remote sensor
at the front of the TV. The remote will not operate if its
path is blocked.
The remote has a range of up to about 5 metres from
the TV at an angle of up to 30 degrees to either side of
the sensor, as illustrated below.
Image is an
example only.
Remote sensor
location on TV
may vary.
5m
Remote Hints and Tips
• Do not drop, step on or
otherwise impact the remote
control. This may damage the
parts or lead to malfunction.
• Do not place objects between the
remote control and the remote
sensor.
• Do not use this remote control
while simultaneously operating a
remote control for other devices.

14 | REMOTE CONTROL
Buttons on the Remote
(ON): Switch the TV to On or Standby
NUMBER BUTTONS: Key in a TV channel
number
CH.LIST: Display or exit the channel list
MENU: Access streaming apps, TV
settings
/ / / : Press the UP/DOWN/
LEFT/RIGHT buttons to navigate
RETURN: Return to the previous screen/
menu
(MUTE): Mute or restore sound
: Return to the previous viewing
channel
APPS: Direct access to YouTube, Toon
Goggles, Foxxum and Netflix app
SOURCE: Switch the input source
OK: Confirm your selection
EXIT: Exit/Quit the current screen
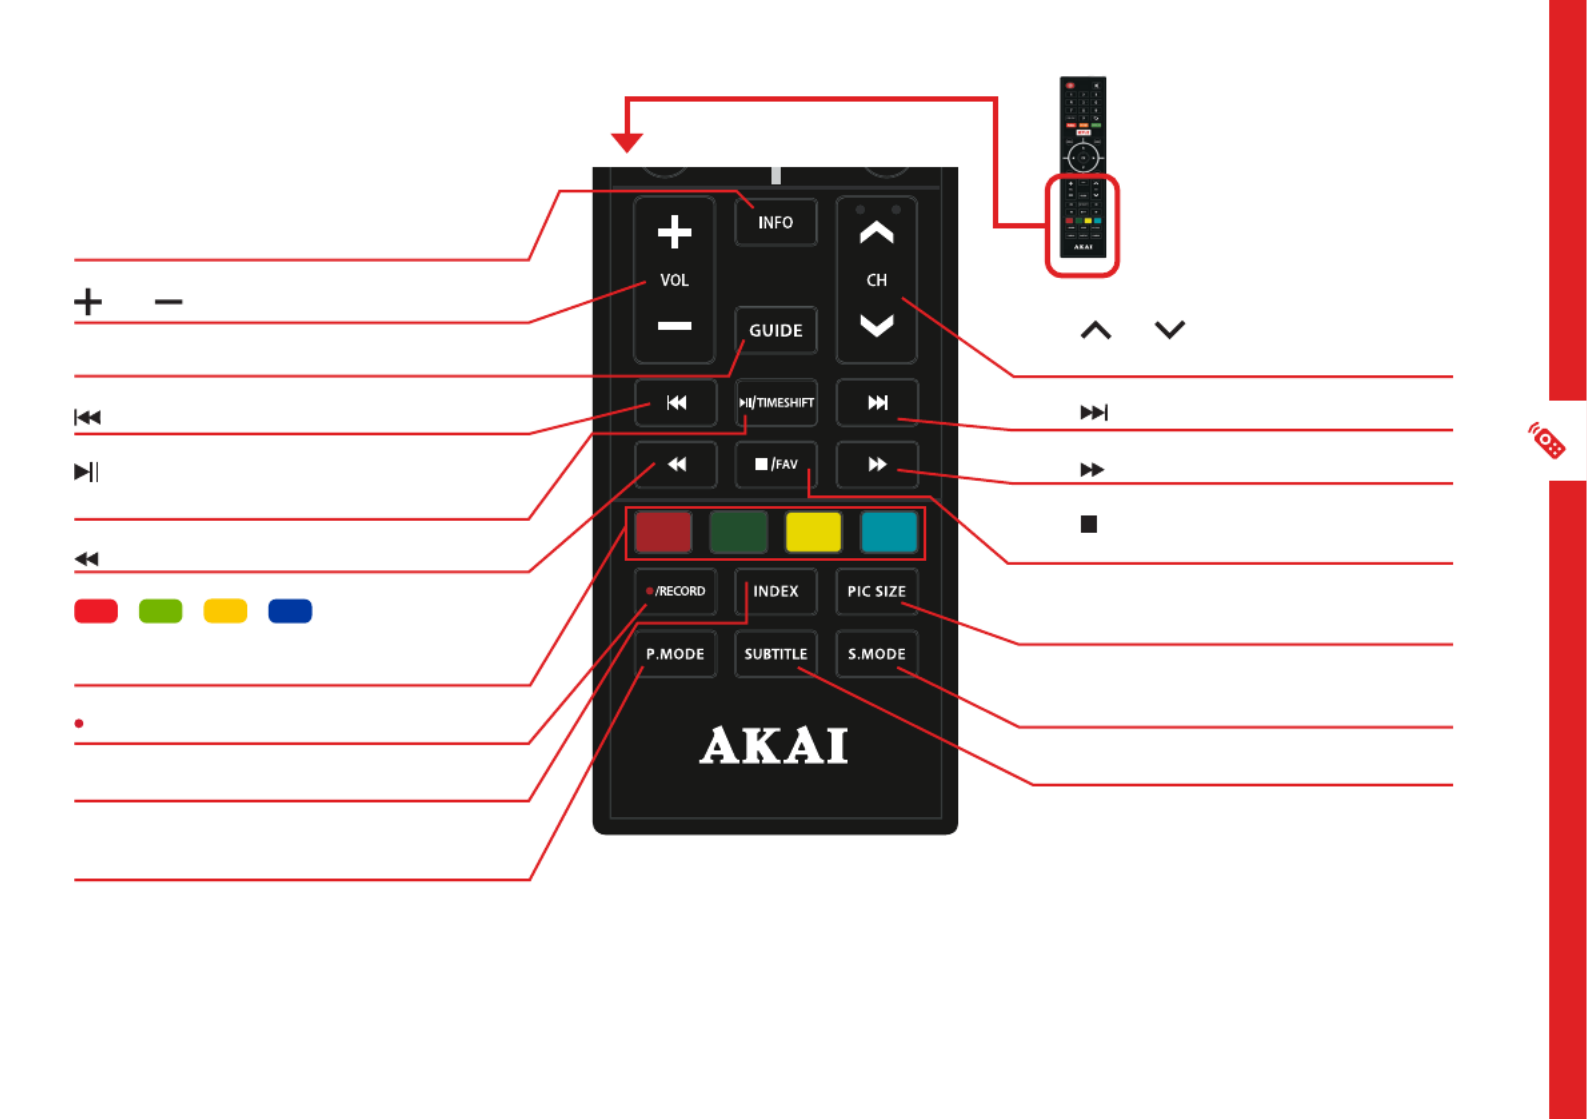
REMOTE CONTROL | 15
INFO: Display program information
VOL : Turn the volume up or down
GUIDE: Launch the TV Guide (DTV)
: Skip backwards
/ TIMESHIFT: Play/Pause live TV and video
playback.
: Rewind
/ / / RED/GREEN/
YELLOW/BLUE: Functions are according to
the on-screen display.
/RECORD: Record a TV program.
INDEX: Display the list of recorded programs
P.MODE: Cycle through the different picture
modes
: Go to the next or CH
previous channel
: Skip forwards
: Fast forward
/ FAV: Stop/Display your favourite
channel list
PIC SIZE: Press to select desired
screen size
S.MODE: Cycle through the different
sound modes
SUBTITLE: Enable/disable subtitles
16 | ON-SCREEN SET UP
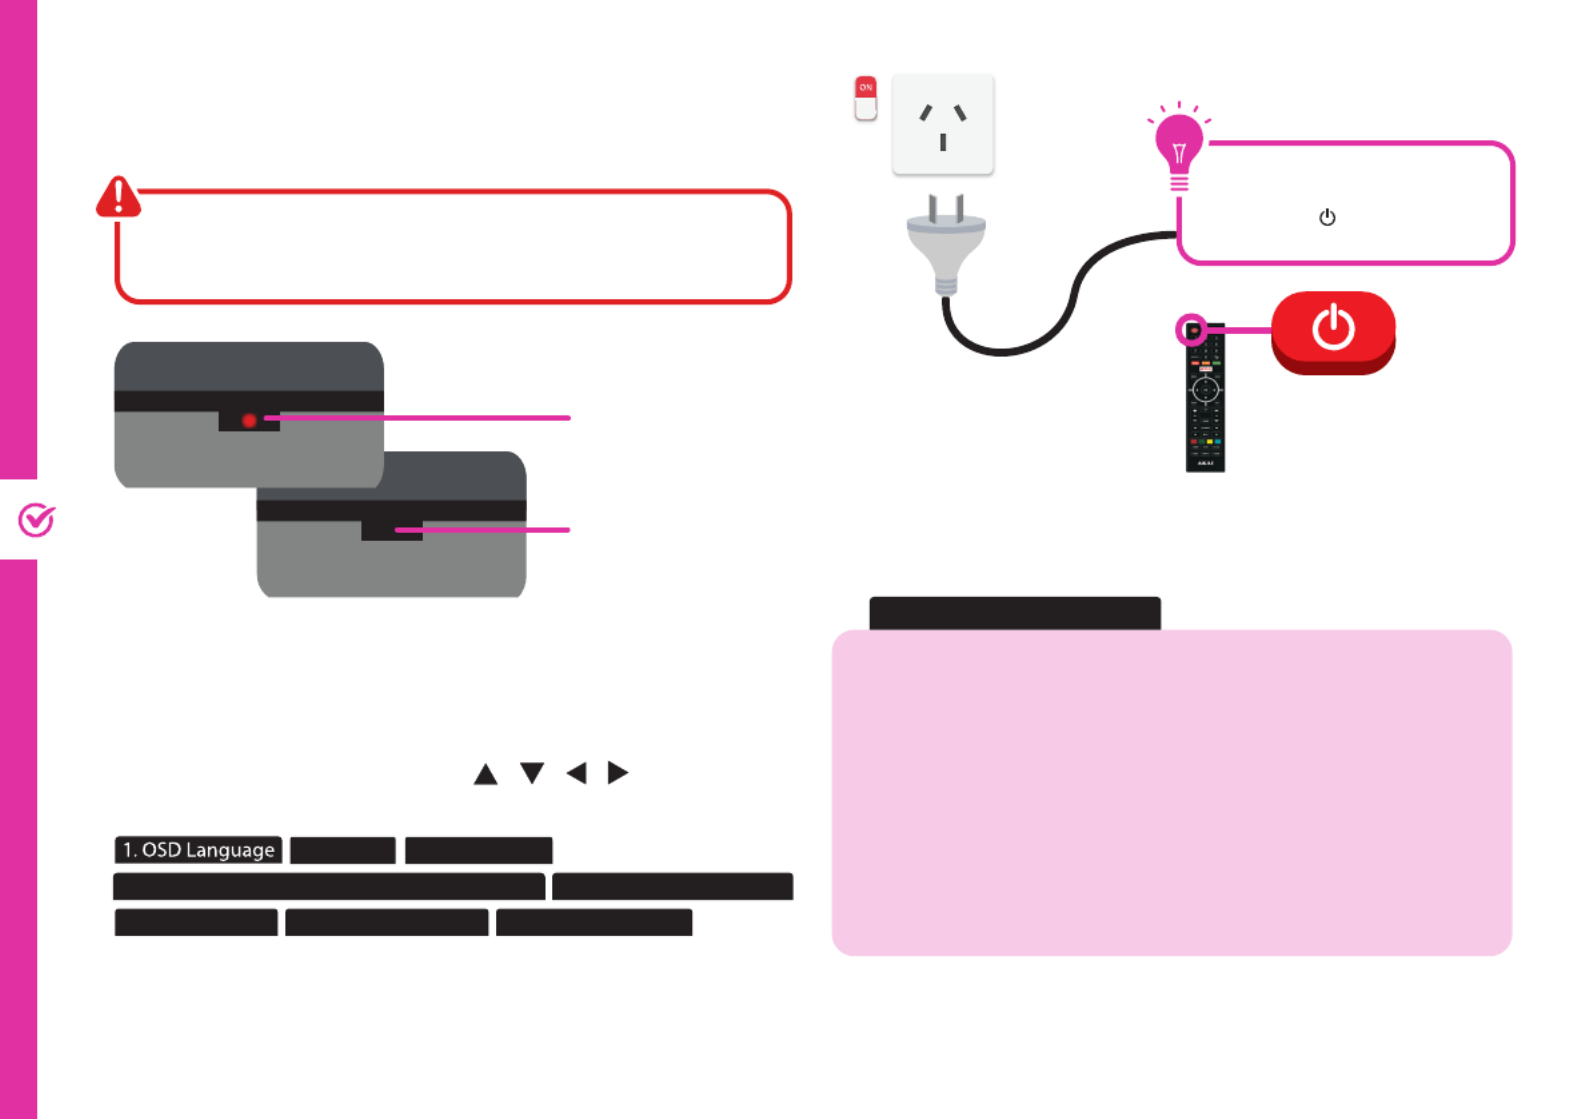
On-Screen Set Up
Make sure equipment is properly connected (as shown on pages
10-11) before connecting the TV to power.
On/Standby light is RED
in standby mode.
On/Standby light is OFF
when the TV is on.
First Time Setup menu
When you turn the TV on for the first time, the First Time
Setup menu will appear.
Follow the prompts using the buttons to / / / / OK
select your preferences. You will be guided through:
Note: If you choose to setup Netflix or select an input source other than
DTV, the set up wizard will exit and will not let you tune TV channels.
To tune channels, go to Menu > TV Settings > Channel > Auto Scan.
2. Country 3. Environment
4. Data Collection And Firmware Update Notice
5. Connect To The Internet
6. Set Up Netix
7. Select Input Source
8. Tune TV Channels
If you make an error, you can update your preferences
in the settings menu later.
If you are using a wired network, connect an ethernet cable to the
TV and select 'wired'. The TV will automatically connect to the
Internet.
If you are using a wireless connection, select 'Wireless'. The TV will
scan for nearby wireless networks. Make sure that the TV is within
the range of your wireless modem/router, and you have your Wi-Fi
password handy.
Or, you can connect to the internet later by going to the User Menu
settings.
5. Connect To The Internet
Make sure the TV is plugged in at
the power socket and switched
on. Press the (ON) button to
turn on the TV.

NETWORKING | 17
Networking
You can set up your TV so that it can access the Internet through
your home network using a wired or wireless connection.
Connecting to a Wireless Network
• Press the button on the remote to select TV MENU
Settings > Network.
• Change network type to 'Wireless' and press . The TV OK
will automatically search nearby Wi-Fi access points. When
done, it will display a list of available networks.
• In the list of networks, press the / button to select
your home network, then press the button. OK
• When the Wi-Fi password entry screen appears, use the
on-screen keyboard. Use the / / / buttons on
the remote control to select a character and press to OK
enter it.
• Input the correct password, select ‘Connect’ and press
the button to connect to the network. If connection is OK
successful, a tick will appear next to your Wi-Fi networks's
name.
Connecting to a Wired Network
• Connect an ethernet cable to the LAN port on the back of
the TV.
• Press the button on your remote to select TV MENU
Settings > Network.
• Change the Network Type setting to 'Wired'. The TV
will automatically pick up the network setting from the
modem and connect to the network. If connection is
successful, you will see 'Connected' on-screen.
• Press the button to close the menu.EXIT
Make sure you have an
ethernet cable on hand if
you want to connect to a
wired network.
If the TV isn't connecting to the
internet check the troubleshooting
section for more info!

18 | TV SETTING MENUS
Menus Index
Picture 20
• Picture Mode
• User Mode Settings:
• Contrast, Brightness, Colour,
Sharpness, Tint
• Colour Temp
• Advanced Options:
• Backlight, Noise Reduction
• Open HDR
Audio 22
• Sound Mode
• Bass/Treble
• Balance
• Auto Volume
• Digital Audio Output
• Surround Sound
• AD Switch
TV Setting Menus
Menu Navigation Buttons
Press the button and select TV Settings. See the MENU
guide below for all the other buttons you'll need to use
to adjust and change your settings.
Function Remote Button
Display the main menu
MENU
Enter a sub menu
Select an option /
Adjust a value /
Return to the previous menu
MENU
OR RETURN
Exit a menu
EXIT
MENU
Once you have programmed
any settings, the unit will
retain them in its memory
until you change them, even
after turning the TV off.
TV SETTING MENUS | 19
General 23
• OSD Language
• Subtitle Language
• Audio Language
• Hearing Impaired
• Transparency
• Zoom Mode
• VGA Settings
• Other Settings:
• HDMI EDID, INLINK, DLC
• PVR Option
• Restore Default
• Software Update (USB)
• View End User License
Agreement
• HbbTV
• Software Update (Network)
• Software Information
PVR Option 25
• Recorded List
• Record
• Remind
• Schedule List
• PVR File System
Time 27
• Sleep Timer
• Auto Standby
• OSD Active Time
• Time Zone
• DST (Daylight Saving Time)
Network 28
• Network Type:
• Wired: (Auto Connect,
Manual Connect, Disable
Connect)
• Wireless: (Connect, Manual
Setup)
• My Network
• IP Address
Lock 29
• Change Password
• System Lock
• Channel Lock
• Parental Guidance
• Clear Lock
Channel 30
• Auto Scan
• DTV Manual Tuning
• Program Edit
• Channel List
• Favourite List
• Signal Information
• OAD (Over Air Download)
App Settings 32
• Deactivate App
• Terminate App
• Netflix Version
High Dynamic Range (HDR) 33
!
20 | TV SETTING MENUS
Dynamic
Dynamic
Option Description
Contrast Adjust the contrast of the bright and dark areas of the picture. The
closer to 100, the higher the contrast.
Brightness Adjust the overall screen brightness. The closer to 100, the brighter the
picture.
Colour Adjust the saturation. The closer to 100, the deeper the colour.
Sharpness Adjust the sharpness of the picture. The closer to 100, the sharper and
clearer the image.
Tint Adjust the colour balance between red and green. (Only available with
NTSC video standard. Australia uses PAL video standard.)
Picture
User Mode settings
User
To adjust the brightness,
change the Picture Mode
to User and modify the
Brightness setting.
Picture Mode
Dynamic : Brighter and clearer picture settings for bright viewing environments.
Dynamic
:Picturesettingforgeneralviewingenvironmentsandisenergyefcient.
Movie : Settings are optimised for viewing movies.
: Adjust settings to best suit your viewing environment and content.
Standard

TV SETTING MENUS | 21
Option Description
Backlight Adjust the screen brightness by adjusting the backlight. The closer to 100,
the brighter the screen.
Noise
Reduction Reduces screen noise/static.
Advanced Options
Colour Temp
Adjust the on-screen colour temperature.
Open HDR
Select high-dynamic range setting (TV must be receiving an HDR signal for this setting to be active.)

22 | TV SETTING MENUS
Option Description
Sound Mode
Bass/Treble Adjust the bass and treble. When changed, the sound mode will turn to
'User' Automatically.
Balance Adjust the audio output between the left and right speakers.
Auto Volume Set auto volume to on or off.
Digital Audio Ouput Set the audio out signal of the TV to match the sound capabilities of the
connected external audio system.
Surround Sound Turn on/off surround sound for better sound experience.
AD Switch Audio Description (AD) provides an additional audio track for visually
challenged persons (DTV only, subject to program).
Audio
Want to set up your TV
with HDMI-ARC? See
page 26 for details.
Movie

TV SETTING MENUS | 23
Option Description
OSD Language Select the system language
Subtitle Language Select your preferred subtitle language. (Available for digital channels, depending on the
program).
Audio Language Select your preferred audio language. (Available for digital channels, depending on the
program.)
Hearing Impaired Turn on/off hearing impaired function
Transparency Turn on/off transparency effect of OSD menu
Zoom Mode Adjust video size
VGA Settings Configure VGA settings when a device is connected via VGA interface.
Other Settings
• HDMI EDID: Select Mode 2 when the source signal is transferred by HDMI 2.0.
specification. Select Mode 1 when the source signal is transferred by HMDI1.4 specification.
• INLINK: See page 26 for more information.
• DLC: Turn on/off Dynamic Luminance Control.
General !

24 | TV SETTING MENUS
Option Description
PVR Option See page 25 for more information.
Restore Default Restore the system settings to the factory default. When the restore is complete, the TV will
enter standby mode.
Software Update (USB) Update the TV software via USB.
View End User License
Agreement View the usage license.
HbbTV Turn HbbTV functionality On/Off.
Software Update
(Network) Update the software through net.
Software Information View the software information.

TV SETTING MENUS | 25
PVR Option
To make changes to PVR (Personal Video Recording), ensure your USB drive
is inserted into the TV. Check the troubleshooting section if you're having
problems setting up your USB device.
Option Description
Recorded list Display and play recorded programs.
Record Schedule a recording.
Remind Schedule a reminder.
Schedule List Display scheduled recordings or reminders.
PVR File System Select disk and timeshift size, format your USB device, check USB speed.

26 | TV SETTING MENUS
Option Description
HMDI CEC Turn HDMI CEC On/Off.
Auto Power On When this is set to On, turning on the TV will also turn on the connected device.
Device Power Off When this is set to On, turning off the TV will also turn off the connected device.
HDMI-ARC If this function is enabled, sound from the TV can be sent to an HDMI-ARC
supported external audio device.
INLINK (HDMI CEC) Setup
This feature allows for your TV and your connected HDMI device to be controlled by one remote
control. It also means you can turn them both on or off simultaneously.
Press the SOURCE button on the TV or remote control to select the HDMI input source.

TV SETTING MENUS | 27
Time
Option Description
Sleep Timer Select the desired Auto Sleep (Standby) duration.
Auto Standby Turn On/Off to set the TV to sleep after selected time of no user
operation.
OSD Active Time Select desired OSD menu active time.
Time Zone Adjust your time zone.
DST (Daylight Saving
Time) Turn on/off Daylight Saving Time.

28 | TV SETTING MENUS
Option Description
Network Type
Select the network type (Wired/Wireless).
• Wired:
• Auto connect - select to connect directly
• Manual connect - select to connect manually by entering the network
address manually
• Disable connect - disable current network connection.
• Wireless:
• Connect - Connect to an available wireless network nearby.
• Manual setup - Configure the wireless network manually by entering
the SSID, Security mode and password.
My Network View current network information.
IP Address Display current network address.
Network
Keep it simple for easy setup!
If an item isn't required, just
leave it on the default setting.

TV SETTING MENUS | 29
Factory Password: 0000
Master Password: 8899
Option Description
Change
Password
Input a new password using the number buttons on the remote and confirm to set
the new password.
System Lock Enable/disable the lock on the system.
Channel Lock Press the green button repeatedly to lock/unlock the highlighted channel.
Parental
Guidance
This item is used to block access to specific program ratings. See options down
below.
Clear Lock Turn clear lock on/off
Lock
Enter the factory password '0000' using the number buttons
on the remote and select 'OK' on-screen. If you changed your
password but forgot it, you can still use the master password.

30 | TV SETTING MENUS
Channel
Option Description
Auto Scan Automatically tunes all available free-to-air TV channels. Adjust settings (default settings
are set for Australia), select 'Auto scan' and press OK.
DTV Manual Tuning Manually select the broadcast channel frequency and tune digital TV channels.
Program Edit See the next page for more information.
Channel List Displays the list of channels
Favourite List Displays the list of saved favourite channels.
Signal Information Display current signal information (DTV mode only).

TV SETTING MENUS | 31
Program Edit
Press then select Channel > Program Edit then use the / buttons to highlight a channel.MENU
Option Description
Delete Press to delete the highlighted channel. / RED
Skip Press to skip the highlighted channel. / BLUE
Favourite Press / FAV to add the channel to the Favourites list.
Menu Press to go back.MENU

32 | TV SETTING MENUS
App Settings
Under this setting, you can configure the settings of the Netflix app.
Option Description
Deactivate App Select to deactivate the Netflix app.
Terminate App Select to Terminate Netflix app.
Netflix Version Current version of Netflix app.

TV SETTING MENUS | 33
About the HDR feature
High Dynamic Range (HDR) is a picture feature on your TV that attempts to mimic the way visuals are
perceived in real life by the human eye.
By using this feature, the TV can reproduce greater dynamic range of luminosity by capturing and then
combining several different exposures.
HDR promises better picture quality thanks to brighter, more realistic highlights, more realistic colour and
other improvements.
It delivers the look that the filmmakers intended to achieve, showing the hidden areas of dark shadows and
sunlight with full clarity, colour and detail.
HDR on your TV
HDR is supported in HDMI and USB input sources.
When the TV is displaying HDR media, the information banner (press the INFO button on the remote) will
display ‘HDR’.
NOTE: When watching HDR content, make sure the Menu > TV Settings > General > Other Settings >
HDMI-EDID setting is set to mode 2. This requires an HDR playback-capable external media player and HDR
optimised media content. Use a High-Speed HDMI cable when connecting to an external media player.
High Dynamic Range (HDR)
34 | SMART TV
Smart TV
Before you start using apps, your TV must be
connected to the internet.
The speed of your internet connection determines
the quality of your audio/video experience when you
watch streaming content.
Accessing internet content may count towards your
download limit and may incur fees from third parties
such as your internet service provider (ISP).
• Netflix
• YouTube
• Twitter
• Facebook
• Zeasn app store
• NetRange app portal
• Foxxum app portal
• Toon Goggles
You cannot download any extra apps on this TV.
Function Remote Button
Display the Home/App screen
MENU
Select different apps /
Open your desired app
Smart TV Applications

SMART TV | 35
Netflix is a streaming service that offers unlimited
viewing of a wide variety of award-winning TV shows,
movies and documentaries.
A paid subscription is required.
This TV can play Netflix content in 4K UHD HDR
resolution, however the playback resolution may be
lower depending on your subscription level and your
network speed.
Streaming Netflix content will count towards the data
usage of your broadband plan.
App Portals
NetRange, Foxxum and Zeasn app portals gives
you access to number of other content and service
providers.
Some apps may require a paid subscription.
Streaming content will count towards the data usage
of your broadband plan.

36 | TV GUIDE
TV Guide
(Free to air TV)
To access the TV guide, press the
GUIDE button on the remote.
To activate the TV Channels use
the / buttons to select a
channel in the left column, then
press OK to confirm.
TV Guide Functions
Function Remote Button
Select a channel or program / / /
Schedule selected program for recording / RED
Display program guide of previous day / GREEN
Display program guide for next day. / YELLOW
Show program information INFO
Set program reminder / BLUE
Exit TV Guide menu
EXIT
GUIDE
Specyfikacje produktu
| Marka: | AKAI |
| Kategoria: | Telewizja |
| Model: | AK5020NF |
Potrzebujesz pomocy?
Jeśli potrzebujesz pomocy z AKAI AK5020NF, zadaj pytanie poniżej, a inni użytkownicy Ci odpowiedzą
Instrukcje Telewizja AKAI

29 Grudnia 2024
30 Września 2024
29 Września 2024
29 Września 2024
22 Września 2024
21 Września 2024
20 Września 2024
17 Września 2024
16 Września 2024
16 Września 2024
Instrukcje Telewizja
- Telewizja Sony
- Telewizja Yamaha
- Telewizja Samsung
- Telewizja Electrolux
- Telewizja AEG
- Telewizja Beko
- Telewizja LG
- Telewizja Küppersbusch
- Telewizja Xiaomi
- Telewizja Sharp
- Telewizja TCL
- Telewizja Pioneer
- Telewizja Lenovo
- Telewizja Philips
- Telewizja SilverCrest
- Telewizja Acer
- Telewizja Nokia
- Telewizja Hisense
- Telewizja Infiniton
- Telewizja Panasonic
- Telewizja Muse
- Telewizja Viewsonic
- Telewizja Nedis
- Telewizja AG Neovo
- Telewizja Medion
- Telewizja OK
- Telewizja Lenco
- Telewizja Polar
- Telewizja Marquant
- Telewizja Toshiba
- Telewizja Tesla
- Telewizja Westinghouse
- Telewizja Majestic
- Telewizja Jensen
- Telewizja ILive
- Telewizja Blaupunkt
- Telewizja Brandt
- Telewizja Vivax
- Telewizja Terris
- Telewizja Salora
- Telewizja Siemens
- Telewizja Teac
- Telewizja Casio
- Telewizja Iiyama
- Telewizja Citizen
- Telewizja Dual
- Telewizja Grundig
- Telewizja Haier
- Telewizja Soundmaster
- Telewizja Hyundai
- Telewizja Manhattan
- Telewizja Strong
- Telewizja ECG
- Telewizja Oyster
- Telewizja Icy Box
- Telewizja Bang & Olufsen
- Telewizja JVC
- Telewizja V7
- Telewizja Dell
- Telewizja Furrion
- Telewizja Funai
- Telewizja Oppo
- Telewizja TechniSat
- Telewizja Schneider
- Telewizja Krüger&Matz
- Telewizja Philco
- Telewizja CHiQ
- Telewizja Qilive
- Telewizja Uniden
- Telewizja Thomson
- Telewizja Ferguson
- Telewizja Wharfedale
- Telewizja Manta
- Telewizja Pyle
- Telewizja Cecotec
- Telewizja Marantz
- Telewizja AOC
- Telewizja Monster
- Telewizja Peerless-AV
- Telewizja Caratec
- Telewizja Nevir
- Telewizja Mitsubishi
- Telewizja Arçelik
- Telewizja Continental Edison
- Telewizja GoGen
- Telewizja Intenso
- Telewizja NEC
- Telewizja Polaroid
- Telewizja Aiwa
- Telewizja Sanyo
- Telewizja Clatronic
- Telewizja Telefunken
- Telewizja Optoma
- Telewizja SVAN
- Telewizja Innoliving
- Telewizja Abus
- Telewizja Jay-Tech
- Telewizja Bush
- Telewizja Loewe
- Telewizja Kemo
- Telewizja VOX
- Telewizja Insignia
- Telewizja AYA
- Telewizja Element
- Telewizja Orima
- Telewizja Denver
- Telewizja Kernau
- Telewizja Aspes
- Telewizja Albrecht
- Telewizja Orion
- Telewizja Hitachi
- Telewizja Technika
- Telewizja Seiki
- Telewizja SereneLife
- Telewizja RCA
- Telewizja MBM
- Telewizja BenQ
- Telewizja Trevi
- Telewizja Lexibook
- Telewizja GPX
- Telewizja Sencor
- Telewizja Odys
- Telewizja Nabo
- Telewizja Nextbase
- Telewizja Zenith
- Telewizja Daewoo
- Telewizja Allview
- Telewizja Metz
- Telewizja Kunft
- Telewizja Grunkel
- Telewizja Alphatronics
- Telewizja XD Enjoy
- Telewizja RevolutionHD
- Telewizja FFalcon
- Telewizja Dyon
- Telewizja Reflexion
- Telewizja Megasat
- Telewizja Sogo
- Telewizja Proline
- Telewizja Finlux
- Telewizja Alden
- Telewizja Aldi
- Telewizja Airis
- Telewizja Aristona
- Telewizja Apex
- Telewizja Ziggo
- Telewizja Techwood
- Telewizja Walker
- Telewizja Saba
- Telewizja Antarion
- Telewizja Tevion
- Telewizja Proscan
- Telewizja Vestel
- Telewizja Tucson
- Telewizja Energy Sistem
- Telewizja Sagem
- Telewizja Sunstech
- Telewizja Sylvania
- Telewizja Sunny
- Telewizja Luxor
- Telewizja Nordmende
- Telewizja AudioAffairs
- Telewizja Magnum
- Telewizja Audiosonic
- Telewizja Kubo
- Telewizja Coby
- Telewizja Seg
- Telewizja Vivo
- Telewizja Daitsu
- Telewizja Changhong
- Telewizja Alba
- Telewizja Naxa
- Telewizja Star-Light
- Telewizja Fantec
- Telewizja Mpman
- Telewizja Sweex
- Telewizja Vizio
- Telewizja Cello
- Telewizja Mx Onda
- Telewizja Nikkei
- Telewizja Peaq
- Telewizja Hannspree
- Telewizja DGM
- Telewizja Yasin
- Telewizja Roadstar
- Telewizja Humax
- Telewizja MT Logic
- Telewizja Superior
- Telewizja Difrnce
- Telewizja ITT
- Telewizja Avtex
- Telewizja Inovia
- Telewizja Lin
- Telewizja Aconatic
- Telewizja NPG
- Telewizja Bluesky
- Telewizja Videocon
- Telewizja Xoro
- Telewizja Durabase
- Telewizja HKC
- Telewizja Edenwood
- Telewizja Woxter
- Telewizja Premier
- Telewizja Onn
- Telewizja Teleco
- Telewizja Packard Bell
- Telewizja Opera
- Telewizja LTC
- Telewizja JTC
- Telewizja Zalman
- Telewizja Horizon
- Telewizja United
- Telewizja SYLVOX
- Telewizja Doffler
- Telewizja FOX Electronics
- Telewizja Viewpia
- Telewizja XS4ALL
- Telewizja JGC
- Telewizja Online
- Telewizja DirecTV
- Telewizja Tele 2
- Telewizja Graetz
- Telewizja Kogan
- Telewizja Telesystem
- Telewizja EKO
- Telewizja E-motion
- Telewizja Mitsai
- Telewizja Selfsat
- Telewizja High One
- Telewizja Tve
- Telewizja ISymphony
- Telewizja Pantel
- Telewizja Magnavox
- Telewizja ATYME
- Telewizja HCI
- Telewizja Inno-Hit
- Telewizja Engel
- Telewizja Bang Olufsen
- Telewizja TechLine
- Telewizja Elements
- Telewizja Digihome
- Telewizja Englaon
- Telewizja Time
- Telewizja Reflex
- Telewizja Astar
- Telewizja Visco
- Telewizja Tivax
- Telewizja H&B
- Telewizja Norcent
- Telewizja TELE System
- Telewizja TIM
- Telewizja Belson
- Telewizja Vision Plus
- Telewizja Sbr
- Telewizja Bauhn
- Telewizja Voxx
- Telewizja Rm 2000
- Telewizja Hoher
- Telewizja Felson
- Telewizja Mach Power
- Telewizja Elbe
- Telewizja Axing
- Telewizja CGV
- Telewizja Smart Tech
- Telewizja Séura
- Telewizja Mitzu
- Telewizja JTC24
- Telewizja Coocaa
- Telewizja Kivi
- Telewizja Smart Brand
- Telewizja Mystery
- Telewizja Linsar
Najnowsze instrukcje dla Telewizja

9 Kwietnia 2025

9 Kwietnia 2025

9 Kwietnia 2025
9 Kwietnia 2025
9 Kwietnia 2025
9 Kwietnia 2025
9 Kwietnia 2025

9 Kwietnia 2025
9 Kwietnia 2025
9 Kwietnia 2025