Instrukcja obsługi AEG IDK84451IB
Przeczytaj poniżej 📖 instrukcję obsługi w języku polskim dla AEG IDK84451IB (216 stron) w kategorii Kołek. Ta instrukcja była pomocna dla 11 osób i została oceniona przez 2 użytkowników na średnio 4.5 gwiazdek
Strona 1/216

EN Instruction on mounting and use
DE Montage- und Gebrauchsanweisung
DA Bruger- og monteringsvejledning
FI Asennus- ja käyttöohjeet
FR Prescriptions de montage et mode d’emploi
IT struzioni di montaggio e d'uso I
NL Montagevoorschriften en gebruiksaanwijzingen
NO Instrukser for montering og bruk
SV Monterings- och bruksanvisningar
USER
MANUAL
IDK84452IB
IDK84451IB


4 x
1x
1x
1 x
2,8 m
4x
1x
1x
1x
1x
2x
1x
x8
x4
x4
1x
2x
3,5x9,5mm
1x
FDS 100
2x

KIT FDS 100
www.elektrotechnik-schabus.de

A B

A B
FDS100
N
L
A
B
2x
2,9x9,5mm
FDS 100


1
min.50
min.500
min.40
min.40

1a
805
490
830
515
210
805
490
210
50
³
P
inst.A
50
³
60
60
P

1b
805
490
834
519
834
519
830
515
210
490 805 210
*
s
s
*
inst.B
R11
50
³
50
³
60
60
6.5 mm
6,5
4
1,6
P
P

2
.a
.b

2a
inst.A
1 x
2,8 m

inst.B
1 x
2,8 m
2b

.a
3
OK!
OK!
.b
.a
.c
220V-240V ~
50Hz/60Hz
OPTIONAL
CONNECTION
2x
1 2 3
L
220V
240V
4
N
220V-240V ~
50Hz/60Hz
1x
380V-415V ~ 2N~
50Hz/60Hz
380V-415V ~ 3N~
50Hz/60Hz

.b
.c
N
L۱
L۲
380V-415V ~ 2N~
50Hz/60Hz
220V
240V
BROWN
BLACK
GREY
Y/G
BLUE
220V
240V
N
L۱
L۲
L۳
380V-415V ~ 3N~
50Hz/60Hz
220V
240V
220V
240V
BROWN
BLACK
GREY
Y/G
BLUE
220V
240V

4
OK!

5
OK!
4 x

inst.B
6
x4
x4
x8

7

1
7a.1
7a.2
7a.3
BACK
FRONT
.a
.b

!
1
1
7a.4

* *
*
600
45
49060 50
210
550
189
488
*
89
227
455
7b
*
*
*

*
189
488
210
490 50
³
600
>
>560
89
227
7b
***
* *
*
*
*

7c

8

9a.2
9a.1
9a
9a.3
clack!
600
clack!
9a.4
!
2x
3,5x9,5mm

9a.4
BACK
FRONT
.a
.b
!
9a.5

1
9a.6
1
1
!

> 600
clack!
9b.1 9b.2
9b.3
9b

2x
3,5x9,5mm
clack!
9b.4
9b.5

!
9b.6
9b.7
BACK
FRONT
.b .a

2
9b.8
2
1
1
2
!

10
£ 900
94
227
55
218
1
2
3
!

11
3
60
³
441
26,50
R.10
475,5
40,5

13
12
H
2x
X
.a
X
.b
.c
H

600
490
60 50
450
560
151 151 183
485
210
13a

490 50
³
685-845
>560
210
138 183
13a

13b
OK!
OK!

FIG.18
FIG.15
FIG.17
FIG.16

15
16
.a
.b
.a
.b

17a
17
17.1
17.2
17.3
17.4
1
2
4
3
1
234

1
3
2
2
3
1
1
12

17b
1
2
3
4
1
2
4
3
4
2
3
1
4
OK!

4
3
2
2
3
1
clack! clack!
2
3
4
1
2
1

17c
17c.3
17c.4
17c.1
17c.2
1
1

18

18a

18b
clack!
1,85 kw
2,1 - 3,7 kw
Ø 145mm
2
4
2
1
3
1
2,1 - 3,7 kw
Ø 145mm
2,1 - 3,7 kw
Ø 145mm
3
4
2,1 - 3,7 kw
Ø 145mm
3 4
1 2
1,85 kw
3,7 kw
Ø 220mm
19

OK!
OK!
NO!
NO! NO!
OK!
NO!
!

52
EN - Instruction on mounting and use
Strictly observe the instructions in this manual. No liability
will be assumed for any problems, damage or fires caused by
failure to comply with the instructions in this manual. The
device is intended for domestic use only, to cook food and
extract the fumes generated by cooking. No other use is
allowed (e.g. heating rooms). The manufacturer declines any
liability for inappropriate use or incorrect setting of the
controls.
The product may have different aesthetic features with
respect to the illustrations in this handbook, however
the operating, maintenance and installation
instructions remain the same.
This manual must be stored for future consultation at any
time. If sold, transferred or moved, it must remain with
the product.
! Read the instructions carefully: they contain important
information on installation, operation and safety.
! Do not make electrical changes to the product.
! Before installing the device, check that none of the
components are damaged. Otherwise, contact the dealer
and do not continue with the installation.
! Check the integrity of the product prior to its installation.
Otherwise, contact the dealer and do not continue with
the installation.
Note: The parts marked with the symbol "(*)" are optional
accessories supplied only with some models or otherwise not
supplied, but available for purchase.
1. Warnings
Caution! Strictly observe the following
instructions:
-The device must be disconnected from
the electrical network before performing
any installation work.
-Installation or maintenance must be
performed by a qualified technician, in
compliance with the manufacturer's
instructions and with local safety
regulations. Do not repair or replace any
part of the device unless specifically
stated in the operating manual.
-Earthing the device is compulsory.
-The power cable must be long enough
to allow the device, built-in to the cabinet,
to be connected to the electrical network.
-In order to ensure the installation
complies with current safety standards, a
regular omnipolar switch is required that
assures the complete disconnection of
the mains under category III over-voltage
conditions, in accordance with the
installation rules.
-Do not use multiple sockets or
extension cords.
-Once installation is complete, the
electrical components must no longer be
accessible by the user.
- The device and its accessible parts heat
up during use. Be careful not to touch the
heating elements.
-Ensure that children do not play with the
device; keep children away and
supervise them, as the accessible parts
may become very hot during use.
-For people with pacemakers and active
implants it is important to check, prior to
using the induction hob, that their
pacemaker is compatible with the device.
-During and after use, do not touch the
heating elements of the device.
-Avoid contact with cloths or other
flammable materials until all the device
components have sufficiently cooled.
-Do not place flammable materials on or
near the device.
-Overheated fats and oils easily catch
fire. Supervise the cooking of foods rich
in fat and oil.
-If the surface is cracked, switch off the
device to avoid the possibility of an

53
electric shock.
-The device is not intended to be run with
an external timer or a separate remote
control system.
-Unattended cooking on a hob with oil or
fat may be dangerous and may cause a
fire.
- The cooking process must be
supervised. A short-term cooking process
must be constantly monitored.
- NEVER attempt to put fires out using
water. Instead, turn off the device and
smother the flames, for example with a
lid or a fire blanket. Fire hazard: do not
rest objects on the cooking surfaces.
-Do not use steam cleaners.
-Do not place metal objects such as
knives, forks, spoons and lids on the hob
surface as they may overheat.
- Before connecting the device to the
electrical network: check the data plate
(on the bottom of the device) to ensure
that the voltage and power correspond to
the network values and that the
connection socket is suitable. If in doubt,
consult a qualified electrician.
Important:
- After use, switch off the hob from its
control device and do not rely on the pot
detector.
-Avoid spills; when boiling or heating
liquids, lower the heat supply.
- Do not leave the heating elements on
with pots and pans empty or without
containers.
- Once cooking is complete, turn off the
relative zone.
- Never use aluminium foil to cook with,
and never directly place products
packaged with aluminium on top of the
cooking surface. The aluminium would
melt and irreparably damage your device.
- Never heat a tin or a tin can containing
foods without first opening it: it might
explode!
This warning also applies to all other
types of hobs.
- A high power level such as the Booster
function should not be used to heat
certain liquids such as oil for frying.
Excessive heat may be dangerous. In
these cases we recommend the use of a
lower power level.
-The containers must be placed directly
on the hob and should be centred. Under
no circumstances may anything be
inserted between the pot and the hob.
- In high temperature situations, the
device automatically decreases the
power level of the cooking zones.
Before performing any cleaning or
maintenance, disconnect the product
from the electrical network by detaching
the plug or disconnecting the home's
master switch.
For all installation and maintenance
operations, always use work gloves.
The device can be used by children 8
years or older and by persons with
physical, sensory or mental impairments,
or by people without any experience or
the necessary knowledge, provided they

54
are supervised or have received
instructions regarding the safe use of the
device and provided they have a
thorough understanding of the associated
risks.
Children must be supervised to ensure
they do not play with the device.
Cleaning and maintenance must never
be performed by children unless they are
properly supervised.
The room must be properly ventilated
when the cooker hood is used at the
same time as other combustion devices,
gas or otherwise.
The hood must be regularly cleaned both
internally and externally (AT LEAST
ONCE PER MONTH), in strict
accordance with the maintenance
instructions.
Failure to follow the rules for hood
cleaning and filter replacement and
cleaning shall result in a fire hazard.
It is strictly prohibited to flame food.
The use of an open flame may damage
the filters and cause a fire hazard; it must
therefore be avoided under all
circumstances.
Extra care must be taken when frying to
prevent the oil from overheating and
catching fire.
CAUTION: When the hob is on, the
accessible parts of the hood may
become hot.
Caution! Do not connect the device to
the electrical network until installation is
entirely complete.
In regards to the technical and safety
measures that must be adopted for fume
extraction, regulations issued by local
authorities must be strictly followed.
The extracted air must not be conveyed
through the same ducts used to extract
the fumes generated by gas combustion
or other types of combustion devices.
Never use or leave the hood without
properly installed light bulbs, so as to
prevent the risk of an electric shock.
Never use the hood unless the grill has
been correctly assembled!
Use only the fastening screws supplied
with the product for its installation, or
not supplied, purchase the correct type of
screws. Use screws with the right length,
as indicated in the installation guide.
When the cooker hood is used together
with other devices powered with non-
electrical energy, the negative pressure
of the room must not exceed 4 Pa (4 x
10-5 bar).
This device is marked in compliance with the European
Directive 2002/96/EC, Waste Electrical and Electronic
Equipment (WEEE). By ensuring that this product is disposed
of correctly, the user will help prevent potential negative
consequences for the environment and human health.
The symbol on the product or accompanying
documentation indicates that this product should not be
treated as household waste but should be handed over at a
suitable collection point for the recycling of electrical an
electronic equipment. Dispose of the device in accordance
with local regulations on waste disposal. For further
information about the treatment, recovery and recycling of thi
product, please contact your local authority, a collection
service for household waste or the shop where the product
was purchased.
Device designed, tested and developed in compliance with
regulations on:
• Safety: EN/IEC 60335-1; EN/IEC 60335-2-6, EN/IEC
60335-2-31, EN/IEC 62233.
• Performance: EN/IEC 61591; ISO 5167-1; ISO 5167-3; ISO
5168; EN/IEC 60704-1; EN/IEC 60704-2-13; EN/IEC 60704-
ISO 3741; EN 50564; IEC 62301.

55
• EMC: EN 55014-1; CISPR 14-1; EN 55014-2; CISPR 14-2;
EN/IEC 61000-3-3; EN/IEC 61000-3-12. Recommendations
for correct use in order to reduce the impact on the
environment: When starting to cook, turn on the hood at
minimum speed and leave it on for a few minutes even after
cooking is complete. Increase the speed only if there is a large
amount of fumes and steam, using the Booster function only
in extreme cases. To keep the odour reduction system
running efficiently, replace the carbon filter/s when necessary.
To ensure the high performance of the grease filter, clean it
when necessary. To improve efficiency and minimise noise,
use the maximum ducting diameter indicated in this manual.

56
2. Use
Using the hob
The induction cooking system is based on the physical
phenomenon of magnetic induction. The main characteristic of
this system is the direct transfer of energy from the generator
to the pot.
Advantages:
When compared to electric hobs, your induction hob is:
- Safer: lower temperature on the glass surface.
- Faster: shorter food heating times.
- More accurate: the hob immediately reacts to your
commands
- More efficient: 90% of the absorbed energy is transformed
into heat. Moreover, once the pot is removed from the hob,
heat transmission is immediately interrupted, avoiding
unnecessary heat losses.
2.1 Cooking containers
Use only pots bearing the symbol
Important:
to avoid permanent damage to the hob surface, do not use:
- containers with less than perfectly flat bottoms.
- metal containers with enamelled bottoms.
- containers with a rough base, to avoid scratching the hob
surface.
- never place hot pots and pans on the surface of the hob's
control panel
2.1.1 Pre-existing containers
Induction cooking uses magnetism to generate heat.
Containers must therefore contain iron. Check if the pot
material is magnetic using a magnet. Pots are not suitable if
they are not magnetically detectable.
2.1.2 Recommended pan bottom diameters
IMPORTANT: if the pots are not correctly sized, the
cooking zones will not turn on
For details of the minimum pot diameter that needs to be used
on each zone, see the illustrated part of this manual.
2.2 Energy saving
Recommendations for best results:
- Use pots and pans with a bottom diameter equal to that of
the cooking zone.
- Use only pots and pans with flat bottoms.
- Where possible, keep the lid on pots during cooking
- Cook vegetables, potatoes, etc. with a small amount of water
to reduce cooking time.
- Use a pressure cooker, it further reduces the energy
consumption and cooking time
- Place the pot in the centre of the cooking zone drawn on the
hob.
Using the extractor fan
The extraction system can be used in two versions: external
extraction and evacuation or as a filter with internal
recirculation.
Extraction version
Fig.7
The fumes are evacuated towards the outside through a
series of pipes (bought separately) fastened to the supplied
connecting flange.
The diameter of the exhaust pipe must be equivalent to the
diameter of the connecting ring:
- for rectangular outlets 222 x 89 mm
- for circular outlets Ø 150 mm (*)
For more information, see the page relative to the extraction
version in the illustrated part of this manual.
Fig.7c
Connect the product to wall-mounted exhaust pipes and holes
with a diameter equivalent to the air outlet (connecting flange)
Using wall-mounted exhaust pipes and holes with a smaller
diameter may reduce the efficiency of extraction and
drastically increase noise levels.
All responsibility in this regard is therefore denied.
! Use ducting with the minimal indispensable length.
! Use ducting with the least possible number of curves
(maximum angle: 90°).
! Avoid drastic changes in the ducting diameter.
Filtration version
Fig. 8
The extracted air will be filtered in special grease filters and
odour filters before being sent back into the room.
The product is supplied with all parts necessary for standard
installation, with the air outlet positioned in the front part of th
cabinet plinth.
Four high-performance ceramic activated carbon filter packs
are already supplied with the product. Ceramic filters are
innovative modular carbon filters, which are regenerating (see
the Maintenance - Activated carbon filters section of this
manual).
Their chemical-physical properties allow extremely efficient
odour absorption and high mechanical resistance.
For more information, see the page relative to the filtration
version (in the illustrated part of this manual).
Fig. 13b

57
3. Installation
The electrical and mechanical installation must be
performed by qualified personnel.
The electrical appliance is designed to be built-in to a 2-6 cm thick
worktop in the case of TOP installations; 2.5-6 cm in the case of
FLUSH installations.
The minimum clearance between the cooktop and wall must
be at least 5 cm at the front, at least 4 cm on the side and at
least 50 cm with respect to the wall units above.
NB = The suggested clearances are indicative: when
designing the spaces, follow the instructions of the
kitchen manufacturer.
3.1 Electrical connection
Fig. 3
- Disconnect the device from the electrical network
-The installation must be performed by professionally qualified
personnel familiar with the applicable installation and safety
standards.
-The manufacturer declines any liability to people, animals or
things in the case of failure to follow the guidelines provided in
this chapter.
-The power cable must be long enough to allow removal of the
hob from the worktop
-Make sure that the voltage on the rating plate on the bottom
of the device corresponds to that of the house where it will be
installed.
-Do not use extension cords.
- Earthing is required by law
- The earth power cable must be 2cm longer than the other
cables
- If the household appliance is not equipped with a power
cable, use one with a minimum conductor diameter of 2.5
mm2 for power up to 7200 Watt; for higher power levels, the
diameter must be 4 mm2.
- At no point along the length of the cable must it reach a
temperature of 50° C above the room temperature.
- The device is intended to be permanently connected to the
electrical network, therefore, make the connection to the fixed
network via a standard omnipolar switch, which assures the
complete disconnection of the mains under category III over-
voltage conditions, and which is readily accessible after the
installation.
Note: to connect the appliance using the optional single
phase connection the existing cable must be removed
and replaced with another type (not supplied) having the
following specifications:
single phase connection: H05V2V2-F 3G4 cable
Fig. 3a
Caution! Before reconnecting the circuit to the mains power
supply and checking its correct operation, always check that
the network cable has been correctly assembled.
Caution! The interconnection cable must be replaced by
authorised customer service personnel or equally qualified
person.
Note : the product is equipped with a Power Limitator
function, which allows a maximum power limit to be set
The limit must be set at the time of the product's connection to
the electrical network or when the electrical network itself i
reconnected (within the following 2 minutes). For the Power
Limitation setting sequence, see the Operation section of
this manual.
3.2 Mounting
Before starting the installation:
• After unpacking the product, check that it has not been
damaged during transport and in the case of problems,
contact your dealer or Customer Service, before
proceeding with the installation.
• Check that the product is the right size for the installation
location.
• Check for accessories inside the packaging (placed there
for ease of transport) such as bags containing screws,
the warranty card, etc.. Remove them and keep them
safe.
• Also check that there is a power socket near the
installation area
Preparing the cabinet for installation:
- The product cannot be installed above cooling appliances,
dishwashers, heaters, ovens, washing machines and
dryers.
- Cut the cabinet before inserting the hob and carefully
remove shavings or sawdust.
IMPORTANT: use a single component adhesive sealant
(S), resistant against high temperatures up to 250°;
prior to installation, the surfaces that need to be glued
must be carefully cleaned, removing all substances that
may compromise adhesion
(e.g. release agents, preservatives, grease, oils, powders,
old adhesive residue, etc.);
the sealant must be evenly distributed along the entire
perimeter of the frame;
after gluing, leave to dry for approximately 24 hours.
Fig. 1b
CAUTION! Failure to install screws and fasteners in
accordance with these instructions may result in electrical
hazards.
Note: to ensure the correct installation of the product, it is
recommended to tape the pipes using an adhesive with the
following characteristics:
- soft elastic PVC film, with an acrylic-based adhesive
- which complies with DIN EN 60454 regulations
- flame retardant
- excellent resistance against wear
- resistant against temperature fluctuations
- can be used in low temperatures

58
4. Operation
Control panel
Note: To select the commands, simply touch (press) the symbols representing them
Keys
1. ON/OFF of the hob / extractor fan for hob
2. Cooking zone position indicator
3. Cooking zone selection
Increase/Decrease Power Level
4. Temperature Manager activation
5. Extractor fan indicator
6. Extractor fan selection
Increase/Decrease extraction speed (power)
7. Activation of automatic functions
Reset filter saturation
8. Activate Timer
Increase/Decrease Timer value
9. Key Lock
9+10. Child Lock
10. Pause / Recall
Display / LED
11. View Power Level
12. View extraction speed (power)
13. Cooking zone display
14. Extractor fan display
15. Timer display
16. Temperature Manager display
17. Filter assistance indicator
18. Automatic extraction function indicator
19. Timer indicator active
20. Bridge indicator active

59
USING THE HOB
Before you begin, it is important to know:
All functions of this hob are designed in order to comply with
the most stringent safety regulations.
For this reason:
• Some functions will not be activated, or will be
automatically deactivated, in the absence of pots on the
burners or when they are poorly positioned.
• In other cases the activated functions will be automatically
deactivated after a few seconds when the specific function
requires a further setting that has not been selected (e.g.:
“ ” “Turn the hob on without Selecting the cooking zone”
and the “Operating temperature , ”or the “Lock Function”
or the function). “Timer”
Warning! In the case (for example) of prolonged use,
the cooking zone may not immediately shut down because it
is in the cooling phase; the "" symbol will appear on the
cooking zone display to indicate the execution of this “ ”
phase.
Wait for the display to turn off before approaching the cooking
zone.
Cooking zone display
the cooking area display indicates:
Cooking zone on
Power Level
- …
Residual Heat Indicator
Pot Detector
Temperature Manager Function
active
Child Lock Function active
Pause function
Automatic Heat UP function
Hob characteristics
Safe Activation
The product is activated only in the presence of pots on the
cooking zone: the heating process does not start or is
interrupted if there are no pots, or if these are removed.
Pot Detector
The product automatically detects the presence of pots on the
cooking zones.
Safety Shut Down
For safety reasons, each cooking zone has a maximum
operating time, which depends on the maximum power level
set.
Residual Heat Indicator
When one or more cooking zones shut down, the presence of
residual heat is indicated by a visual signal on the
corresponding zone display, by way of the "" symbol. “ ” .
Operation
Note: Before activating any functions, the desired zone must
be activated
Power-on
Press (touch) ON/OFF hob/ extractor
The indicator light will turn on to indicate that the hob/extracto
is ready for use
Press again to turn off
Note: This function has priority over the others.
Selecting the cooking zone
Touch (press the Selection bar (3) corresponding to the
desired cooking zone.
9 Power Levels
The hob features 9 power levels
Touch and scroll along the Selection bar (3):
to the right to increase the level of power;
to the left to decrease the level of power.
Power Booster
The product features a supplementary power level (after level
), which remains active for 10 minutes, after which the
temperature returns to the previously set value.
Touch and scroll along the Selection bar (3) (after level )
and activate the Power Booster
The Power Booster level is shown on the display of the
selected zone with the symbol" ”

60
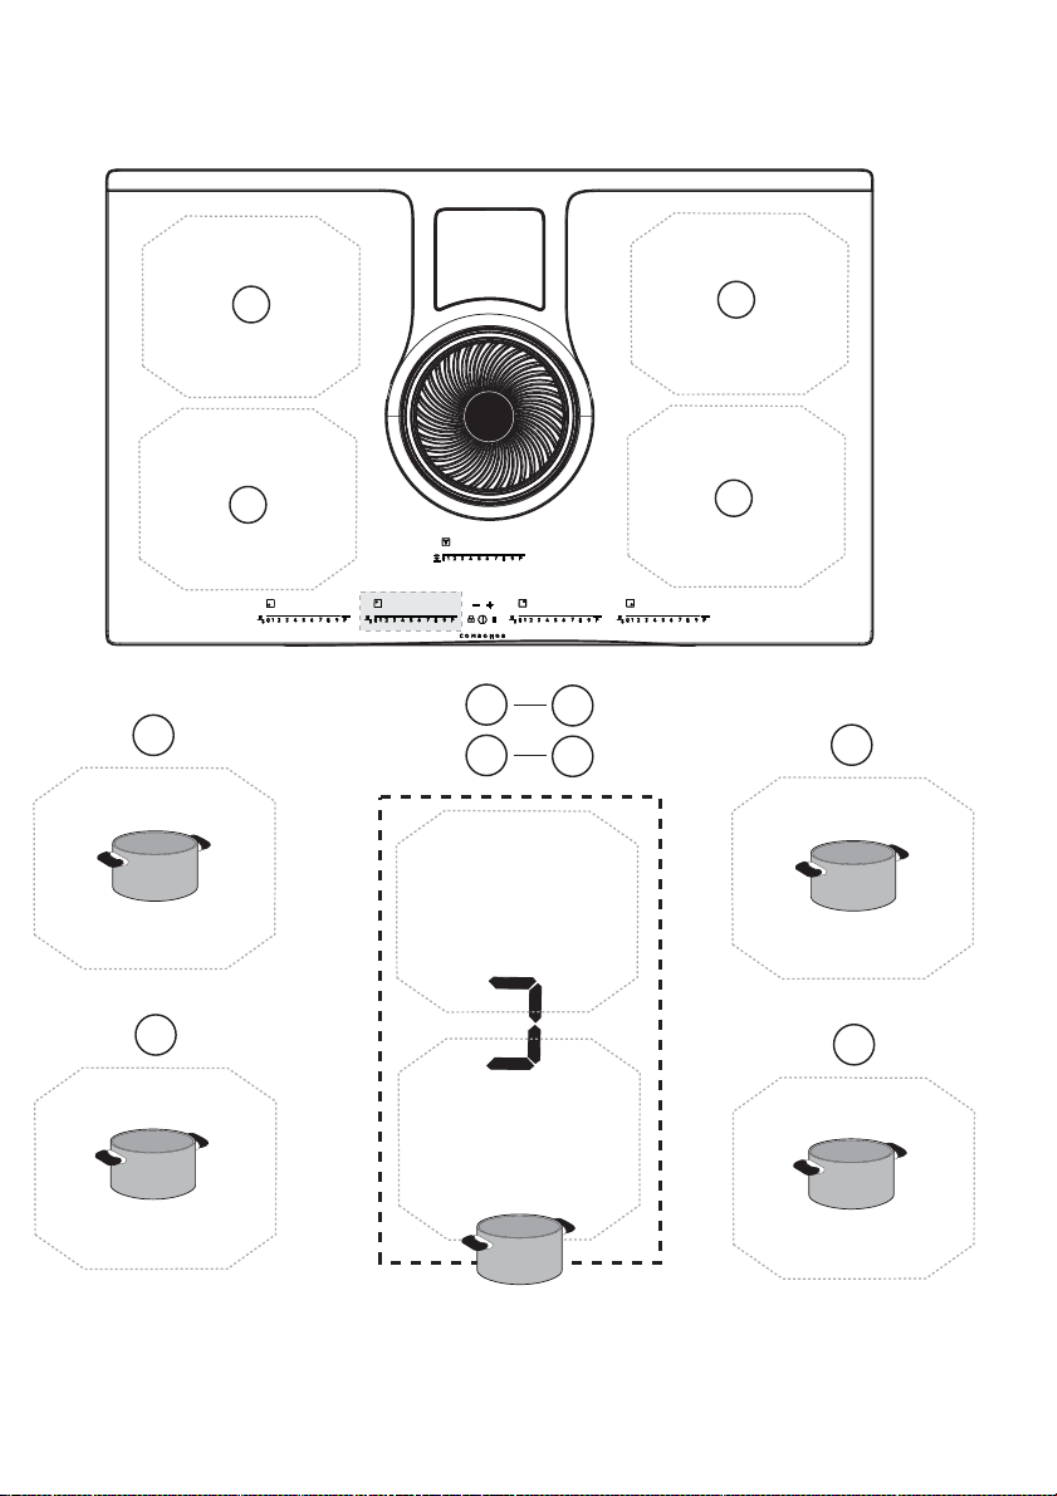
Bridge Zones
Thanks to the Bridge function, the cooking zones are able to
work in a combined manner, creating a single zone with the
same power level. This function allows evenly distributed
cooking with large-sized pots and pans.
The front “Master” cooking zone can be used in combination
with the corresponding “Secondary” cooking zone at the
back
(to check which zones are equipped with this function, see the
illustrated part of this manual).
To activate the Bridge Function:
- simultaneously select the two cooking zones you want
to use
- the Bridge indicator of the (20) “Secondary” cooking zone
lights up “ ”
- by means of the Selection bar (3) of the “Master" cooking
zone it will be possible to set the operating level (Power)
- to deactivate the Bridge Function simply repeat the same
activation procedure
Temperature Manager
Temperature Manager is a function that allows to set the most
suitable pre-set temperature to achieve the desired result (see
the Temperature Manager table at the end of this chapter).
Select the desired cooking zone.
• Press once or multiple times to choose the most (4)
suitable level among the ones available:
Melting*
Warming*
Simmer*
* See the Temperature Manager at the end of this
chapter.
• Press again to turn it off.
The following symbol appears on the display of the zone
working in Temperature Manager mode “ ”
Key Lock
The Key Lock allows to block the settings of the hob to
prevent accidental tampering, leaving the functions that have
already been set active.
Activation:
• press (9)
• The LED over the button will turn on, to indicate that it
has been activated
Repeat the operation to deactivate.
Child Lock
The Child Lock makes it possible to prevent children from
accidentally accessing the cooking zone and extraction zone,
preventing the activation of any functions.
The Child Lock can only be activated when the product is on,
but with the cooking zones (and extraction zone) off.
Activation:
• remove any pots from the hob
• press and hold simultaneously and an (9) (10),
acoustic signal indicates that the function is active, and an
" " appears on the displays (13) (14) and .
Repeat the operation to deactivate.
Timer
The Timer function is a countdown, which can be set for each
cooking zone (and extraction zone), even simultaneously.
At the end of the set period, the cooking zones (or extraction
zone) will automatically shut down and the user will be
informed by way of an acoustic signal.
Activation/Regulation of hob Timer function
• Select the cooking zone (power 0).
• Press to access the Timer function (8)
• Regulate the duration of the Timer:
press the selector , to increase the automatic shut-
down time
press the selector , to decrease the automatic
shut-down time
If desired, repeat the operation for the other cooking zones.
Note: Each cooking zone can have a different Timer set;
on the display, , the countdown of the last selected hob (15)
will be shown for 10 seconds, after which the countdown
with the least remaining time will be shown.

61
When the timer has finished the countdown, there is an
acoustic signal (for 2 minutes, or it will stop when one of the
buttons on the hob is pressed), while the display will (15)
flash, with the symbol ". “.
Note: on the side of the display of the cooking zone, the
following symbol will appear (19)
To switch off the Timer:
• select the cooking zone
• set the value of the timer to " " , by means of
Not: the function remains active if no other key is pressed
in the meantime.
Egg Timer
The Egg Timer function is a countdown independent of the
cooking zones (and the extraction zone). The Egg Timer is
activated by pressing . (8)
Note : to regulate the Egg Timer function, follow the same
procedure as for the Timer
When the timer has finished the countdown, there is an
acoustic signal (for 2 minutes, or it will stop when one of the
buttons on the hob is pressed), while the display will (15)
flash, with the symbol ". “.
Pause
The Pause function allows to suspend any function active on
the hob, bringing the cooking power to zero.
Activation:
• press (10)
• a " " is displayed (13).
To deactivate the function:
Note: this operation restores the hob settings to those prior
to the pause.
• press (10)
• within 10 seconds scroll to the right along
the Selection bar (3), cooking zone 2 relating to the
(FIG.19);
: if the operation is not performed within this time Note
the pause function will remain active.
Note: , Pause Functionif after 10 minutes the is not
deactivated, the hob will turn off automatically.
Recall
The Recall function allows to recover all the hob settings, in
case of accidental shut-down.
Activation:
• turn the hob back on
within 6 seconds after shut-down
• press " "
within the next 6 seconds
Automatic Heat UP
The Automatic Heat UP function allows to reach the set power
faster; with this function it is possible to cook food faster, but
without the risk of burning it, because the temperature does
not exceed the set level.
This function is available for the levels of power 1 -8 .
Activation:
• press and hold, on the , the desired Selection bar (3)
power
• a " " is displayed . (13)
Power Limitation
The Power Limitation function allows the product to be used
while limiting its maximum absorption.
Note : the limit must be set when the hob is off, without
pressing , within 2 minutes from when the hob is
connected to the electrical network, or from when the
electrical network itself is reconnected.
To set the Power Limitation:
- press and hold keys , until an acoustic signal
sounds
- slide along sliders FL and RL at
the same time, from left to right,
and press down at the letters , until a short acoustic signal P
sounds
the Timer display ( ) shows the symbols , to 15 “CF6”
indicate that it can be set
the display shows the current setting** FL zone
0 = 7.4 KW
1 = 4.5 KW
** by default, the limit is set to 7.4 KW

62
- to change the Power Limitation setting slide on the FL
slider
- from left to right to increase the Kw
- from right to left to decrease the Kw
- to save the selection, press the keys , for 1
second;
an acoustic signal will sound to confirm the setting and the
function will close.

63
USING THE EXTRACTOR FAN
Power-on
Press (touch) ON/OFF hob/ extractor
The indicator light will turn on to indicate that the hob/extractor is
ready for use
Press again to turn off
Note: This function has priority over the others.
Switching on the extractor fan:
Touch (press) the Selection bar (6) to activate the extractor fan
Extraction speed (power):
Touch and scroll along the Selection bar (6):
to the right to increase the speed (power) of the extractor fan (0-
10);
to the left to decrease the speed (power) of the extractor fan (10-
0);
Timer
Activation/Regulation of Timer function for the extractor
fan
• Select the extractor fan (speed
0).
• Press (8) to access the Timer function (from
any speed)
• Regulate the duration of the Timer:
press the selector , to increase the automatic shut-
down time
press the selector , to decrease the automatic shut-
down time
the display (15) will show the countdown,
Note: on the side of the display of the extractor fan, with the Timer
in use, the following symbol will appear (19)
When the timer has finished the countdown, there is an acoustic
signal (for 2 minutes, or it will stop when one of the buttons on the
hob is pressed), while the display (15) will flash, with the symbol
“. ".
To switch off the Timer:
• select the cooking zone
• set the value of the timer to " " , by means of
Not: the function remains active if no other key is pressed in
the meantime.
Filter saturation indicator
The hood indicates when filter maintenance is needed:
Grease filter
the ( ) LED lights up “ ” 17
Activated carbon odour filter
the ( ) LED flashes“ ” 17
Reset filter saturation
After carrying out maintenance on the filters (grease and/or
activated carbon) hold down the key ; (7)
the “ ” ( ) LED turns off and the count restarts. 17
Activation of activated carbon odour filter saturation
indicator
This indicator is normally deactivated.
To activate it, proceed as follows:
- turn on the aspiration hob by pressing ;
- with the aspiration motor and cooking zones off, press and
hold ; (7)
- turns on, then off to indicate successful “ ”
activation.
Deactivation of activated carbon odour filter saturation
indicator
repeat the activation steps described above
“ ” flashes, then turns off to indicate successful
deactivation.

64
Automatic operation (Hob2Hood)
The hood will turn on at the most suitable speed, adapting the
extraction capacity to the cooking level used in the cooking zone.
Once the hob is turned off, the hood adapts its aspiration speed,
gradually decreasing it, so as to eliminate residual vapours and
odours
To activate this function:
Briefly press (7) , the LED “ ” (18) will light up to
indicate that the hood is working in this mode.
The suction surface is designed to be used in
combination with a Window sensor KIT (not provided by
the manufacturer)
When installing the Windows sensor KIT (only in the case of
use of the surface in SUCTION mode), the suction will stop
operating every time when the KIT which with the surface is
equipped detects that the window is closed in the room where
it is installed.
It is recommended the purchase of the FDS KIT - 100
Elektrotechnik Schabus, available at authorised Elektrotechnik
Schabus centres or directly on the Internet site
www.elektrotechnik-schabus.de.
- The electrical connection of the suction surface KIT
must be carried out by qualified and specialised technical
personnel.
- The manufacturer of the suction surface declines all
responsibility for any inconvenience, damage or fire
caused by defects and/or problems of malfunctioning
and/or incorrect installation of the KIT.

65
Temperature Manager
Description
Melting
It identifies a suitable cooking level to slowly melt delicate products withou
compromising their sensory characteristics (chocolate,
butter, etc.).
Warming
It identifies a suitable cooking level to allow to delicately keep the food at th
same temperature, without letting it boil.
Simmer
It identifies a suitable cooking level to simmer food for prolonged periods.
Suitable to cook tomato sauces, meat sauces, soups, minestrone,
maintaining a controlled cooking level (ideal for bain-marie). It prevents the
food from spilling or sticking at the bottom of the pan, typical of these
preparations.
Use this function after bringing the food to a boil.

66
4.1 Power tables
Power level Cooking type
Use of level
(display combines the experience and cooking
habits)
Max power
Boost Heat quickly
Ideal to quickly increase the temperature of the food up
to fast boiling in the case of water or quickly heat
cooking liquids
8-9 Fry - boil Ideal for browning, starting to cook, frying frozen
products, boiling rapi
High power
7-8 Brown - fry - boil - grill Ideal for frying, keeping the boil, cooking and grilling (fo
short times, 5-10 minutes)
6-7 Brown - cook - stew - fry - grill
Ideal for frying, maintaining a simmer, cooking and
grilling (for average times, 10-20 minutes), preheating
accessories
Medium
power
4-5 Cook - stew - fry - grill Ideal for stewing, maintaining a light boil, cooking (for
longer times)
Stir pasta
3-4 Cook - simmer - thicken - stir
Ideal for slow cooking (rice, sauces, roasts, fish) in the
presence of liquid (e.g. water, wine, broth, milk), stirring
pasta
2-3 Cook - simmer - thicken - stir
Ideal for slow cooking (volume less than one litre: rice,
sauces, roasts, fish) in the presence of liquid (e.g.
water, wine, broth, milk)
Low power
1-2 Melt - thaw - keep warm - stir Ideal for softening butter, gently melting chocolate,
thawing small produc
1 Melt - thaw - keep warm - stir
Ideal for keeping small portions of freshly cooked food
warm or keeping the temperature of serving dishes and
stirring risot
OFF Zero power Support surface Hob in stand-by or off (possible presence of residual
heat fro
m the end of cooking, signalled b
-
L
-
O)

67
4.2 Cooking tables
Category of
foods
Dishes or type
of cooking
Power level and cooking pattern
First stage Powers Second stage Powers
Pasta, rice
Fresh pasta Heating water Booster-9 Cooking pasta and
maintaining the bo
7-8
Fresh pasta Heating water Booster-9 Cooking pasta and
maintaining the bo
7-8
Boiled rice Heating water Booster-9 Cooking pasta and
maintaining the bo
5-6
Risotto
Frying and roastin
7
-
8
Cookin
4
-
5
Vegetables,
legumes
Boiled
Heating wate
Booster
-
9
Boilin
6
-
7
Fried Heating oil 9 Frying 8-9
Sauté
Heating accessor
7
-
8
Cookin
6
-
7
Stewed
Heating accessor
7
-
8
Cookin
3
-
4
Fried Heating accessory 7-8 Browning fried 7-8
Meats
Roast Meat browning with oil
(if with butter, power
7-8 Cooking 3-4
Grilled Pre-heating pan 7-8 Grilling on both
sides
7-8
Browning Browning with oil
(if with butter, power 6) 7-8 Cooking 4-5
Stew Browning with oil
(if with butter, power 6) 7-8 Cooking 3-4
Fish
Grilled Pre-heating pan 7-8 Cooking 7-8
Stew Browning with oil
(if with butter, power 6) 7-8 Cooking 3-4
Fried Heating oil or fat 8-9 Frying 7-8
Eggs
Omelettes Heating pan with butter or fat 6 Cooking 6-7
Omelettes
Heating pan with but
r or fa
6
Cookin
5
-
6
Soft
boiled/boile
Heating water Booster-9 Cooking 5-6
Pancakes
Heating pan with but
6
Cookin
6
-
7
Sauces
Tomato Browning with oil (if with butter,
power 6) 6-7 Cooking 3-4
Meat sauce Browning with oil (if with butter,
power 6) 6-7 Cooking 3-4
Béchamel Preparing the base (melt butter and
flour) 5-6 Bring to simmering
point 3-4
Desserts,
creams
Custard Boil the milk 4-5 Keep simmering 4-5
Puddings Boil the milk 4-5 Keep simmering 2-3
Rice puddin
Heat the mil
5
-
6
Keep
simmerin
2
-
3

68
5. Maintenance
Hob maintenance
Caution! Before any cleaning or maintenance, make sure
the cooking zones are switched off and the heat indicator
has turned off.
5.1 Cleaning
The hob must be cleaned after each use.
Important:
Do not use abrasive sponges, scouring pads. Their use, over
time, may ruin the glass.
Do not use chemical irritants, such as oven sprays or stain
removers.
After each use, leave the hob to cool and clean it to remove
deposits and stains caused by food residue.
Sugar or food with a high sugar content damages the hob and
must be immediately removed.
Salt, sugar and sand may scratch the glass surface.
Use a soft cloth, paper towel or specific products to clean the
hob (follow the Manufacturer's instructions).
DO NOT USE STEAM JET CLEANERS!!!
Important:
If liquids accidentally or excessively leak out of the pots, the
drain valve located on the lower part of the product can be
opened so as to remove any residue and be able to clean in
conditions of maximum hygiene.
Fig.18
For a more complete and in-depth clean, the lower tray can be
completely removed.
Fig.18a - 18b
Extractor fan maintenance
Cleaning
For cleaning, use a cloth moistened with neutral liquiONLY
detergents. DO NOT USE CLEANING UTENSILS OR
TOOLS!
Avoid the use of products containing abrasives.
DO NOT USE ALCOHOL!
Grease filter
Fig. 15-16
Traps grease particles generated by cooking.
Must be cleaned once per month (or when the filter saturation
indication system indicates this need), with non-aggressive
detergents, either manually or in the dishwasher at a low
temperature and in a short cycle.
When cleaned in the dishwasher, the metal grease filter may
discolour, but its filtering characteristics remain unchanged.
Activated carbon filters
(Only for Filtration Version)
Fig. 17 – 17a – 17b – 17c
Traps unpleasant odours generated by cooking.
The product is equipped with four filter packs that trap odours
thanks to the activated carbons. The activated carbons are
incorporated into a ceramic structure, making them easily and
completely accessible by impurities, thus creating a large
absorption surface.
The ceramic activated carbon filters will become saturated
after a more or less prolonged period of use, depending on
the type of cooking and frequency with which the grease filter
are cleaned. These odour filters can be thermally regenerated
every 2/3 months in an oven preheated to 200°C for 45
minutes. Regeneration allows a maximum filter lifespan of 5
years.

69
5.2 Troubleshooting
ERROR CODE DESCRIPTION POSSIBLE CAUSES ERROR REMOVAL
E2 The command zone switches off due to
an excessively high temperature
The temperature inside
the electronic parts is too
high
Wait for the hob to cool
before reusing it
ERR03
+
acoustic signal
Continuous (permanent) key activation
is detected. The interface switches off
after 10 seconds.
Water, pots or kitchen
tools are on top of the
user interface.
Clean the surface,
remove any objects from
the surface.
For all other error
signals
( E … U … )
Call customer service and report the error code
5.3 Customer service
Before contacting Customer Service
1. Check that you cannot solve the problem yourself based on the points described in "Troubleshooting".
2. Switch the device off and on again to see if the problem resolves itself.
If the fault persists after the above checks, contact the nearest Customer Service.

70
DE - Montage- und Gebrauchsanweisung
Bitte halten Sie sich genau an die in dieser Anleitung
enthaltenen Anweisungen. Es wird keinerlei Haftung
übernommen für Probleme, Schäden oder Brände, die durch
Nichteinhaltung der in diesem Handbuch aufgeführten
Anweisungen verschuldet wurden. Das Gerät ist
ausschließlich für den Hausgebrauch bestimmt, zum Kochen
von Speisen und Absaugen von Rauch der beim Kochen
selbst entsteht. Es ist keine andere Nutzung erlaubt (z. B. das
Wärmen von Räumen). Der Hersteller übernimmt keine
Verantwortung für eine unsachgemäße Verwendung oder
falsche Einstellung des Gerätes.
Das Produkt kann sich in seinem Aussehen, von den in
dieser Broschüre dargestellten Abbildungen
unterscheiden, jedoch bleiben die Anweisungen für
den Gebrauch, die Wartung und die Installation
gleich.
Es ist wichtig diese Anleitung aufzubewahren, um sie
jederzeit heranziehen zu können. Im Falle eines
Verkaufes, Abgabe oder Umzugs, stellen Sie sicher,
dass die Gebrauchsanweisung dem Produkt beigefügt
ist.
! Lesen Sie die Anweisungen sorgfältig; sie liefern
wichtige Informationen über die Installation, Verwendung
und Sicherheit.
! Führen Sie dem Produkt keine elektrischen
Veränderungen zu.
! Bevor Sie mit der Installation des Gerätes fortfahren,
überprüfen Sie ob alle Komponenten unbeschädigt sind.
Anderenfalls kontaktieren Sie Ihren Händler und fahren
Sie nicht mit der Installation fort.
! Überprüfen Sie die Integrität des Gerätes bevor Sie mit
der Installation fortfahren. Anderenfalls kontaktieren Sie
Ihren Händler und fahren Sie nicht mit der Installation
fort.
Hinweis: Die mit dem“(*)“ Symbol versehenen Elemente sind
optionales Zubehör, welche nur bei einigen Modellen
vorhanden sind oder Teile die nicht im Lieferumfang enthalten
sind und getrennt zu erwerben sind.
1. Warnungen
Achtung! Befolgen Sie die exakt die
folgenden Anweisungen:
-Das Gerät muss vor der Durchführung
von jeglichen Arbeiten von der
Stromversorgung getrennt werden.
-Die Installation oder Wartungen müssen,
von einem qualifizierten Techniker,
entsprechend den Anweisungen des
Herstellers und mit Berücksichtigung der
örtlichen Vorschriften in Bezug auf
Sicherheit durchgeführt werden.
Reparieren Sie kein Teil des Geräts oder
ersetzen Sie es nicht, sofern dies nicht
ausdrücklich in der Bedienungsanleitung
angegeben ist.
-Es ist Pflicht, dass das Gerät geerdet
wird.
-Das Netzkabel muss lang genug sein,
um die Verbindung des Gerätes im
eingebauten Zustand an das Stromnetz
zu ermöglichen.
-Damit die Installation den aktuellen
Sicherheitsbestimmungen entspricht,
muss ein Leitungsschutzschalter
eingebaut sein, der die vollständige
Trennung vom Netz, unter den
Bedingungen der
Überspannungskategorie III, in
Übereinstimmung mit den
Installationsanweisungen, gewährleisten.
-Keine Mehrfachsteckdosen oder
Verlängerungskabel verwenden.
-Wenn die Installation abgeschlossen ist,
müssen die elektrischen Komponenten,
dem Benutzer unzugänglich sein.
-Das Gerät und seine zugänglichen Teile
werden bei Betrieb heiß. Achten Sie
darauf, die erhitzten Elemente nicht zu
berühren.
- Achten Sie darauf, dass Kinder nicht mit
dem Gerät spielen; behalten Sie ihre
Kinder im Auge und halten Sie sie vom
Gerät fern, da die zugänglichen Teile
während des Betriebs heiß werden

71
können.
- Für Menschen mit Herzschrittmachern
und aktiven Implantaten ist es wichtig,
vor dem Gebrauch des Induktionsherdes,
zu überprüfen, ob Ihr Herzschrittmacher
mit dem Gerät kompatibel ist.
.-Während und nach dem Gebrauch die
Heizelemente des Gerätes nicht
berühren.
-Vermeiden Sie den Kontakt mit Tüchern
oder anderen brennbaren Materialien, bis
nicht alle Komponenten des Gerätes
ausreichend abgekühlt sind.
-Auf dem Gerät oder in dessen Nähe
keine brennbaren Materialien abstellen.
-Überhitzte Fette und Öle können leicht
Feuer fangen. Überwachen Sie das
Kochen von Lebensmitteln, die reich an
Fett und Öl sind.
-Falls die Oberfläche rissig wird, schalten
Sie das Gerät aus, um die Möglichkeit
eines Stromschlages zu vermeiden.
-Das Gerät ist nicht dafür bestimmt, mit
Hilfe eines externen Timers
(Zeitschaltuhr) oder einer separaten
Fernbedienung, in Betrieb genommen zu
werden.
-Das unbeaufsichtigte Kochen auf einem
Herd, mit Öl oder Fett, kann gefährlich
sein und zu einem Brand führen.
- Der Kochvorgang muss überwacht
werden. Auch ein kurzer Kochvorgang
muss kontinuierlich überwacht werden.
- Versuchen Sie NIE Flammen mit
Wasser zu löschen. Im Gegenteil,
schalten Sie zuerst das Gerät aus und
ersticken Sie die Flammen dann zum
Beispiel mit einem Deckel oder einer
Löschdecke. Brandgefahr: Stellen Sie
keine Gegenstände auf der Kochflächen
ab.
- Keine Dampfreiniger verwenden.
-Legen Sie keine Metallgegenstände wie
Messer, Gabeln, Löffel und Deckel auf
der Oberfläche des Kochfeldes ab, da sie
sich überhitzen könnten.
- Bevor Sie dieses Modell an das
Stromnetz anschließen: Überprüfen Sie
das Typenschild (auf der Unterseite des
Geräts), um sicherzustellen, dass die
Spannung und die Stromversorgung dem
des Stromnetzes entsprechen und die
Steckdose geeignet ist. Im Zweifelsfall
rufen Sie einen qualifizierten Elektriker.
Wichtig:
- Nach dem Gebrauch schalten Sie das
Kochfeld an seinem Steuergerät aus und
verlassen Sie sich nicht auf den Sensor.
- Vermeiden Sie das Verschütten von
Flüssigkeiten, indem Sie, beim Kochen
oder Erhitzen von Flüssigkeiten, die
Wärmezufuhr reduzieren.
- Lassen Sie auf den eingeschalteten
Kochflächen keine leeren Töpfe oder
Pfannen stehen und stellen Sie
keinesfalls etwas ohne Kochgeschirr ab.
- Sobald sie mit dem Kochen fertig sind,
schalten Sie das jeweilige Kochfeld aus.
- Benutzen Sie zum Kochen niemals
Alufolie bzw. stellen Sie niemals etwas,
das in Alufolie verpackt ist, direkt auf
dem Kochfeld ab. Das Aluminium würde
schmelzen und Ihr Gerät irreparabel

72
beschädigen.
- Erhitzen Sie niemals eine mit
Nahrungsmittel gefüllte Dose oder
Konserve aus Blech, ohne sie vorher
geöffnet zu haben: Sie könnte
explodieren!
Diese Warnung richtet sich an alle
Kochflächen.
- Das Verwenden einer erhöhten
Leistung wie z.B. Die Booster Funktion
ist für das Erwärmen einiger
Flüssigkeiten wie z.B. von Frittieröl
ungeeignet. Die erhöhte Hitze könnte
gefährlich sein. In solchen Fällen wird zu
einer niedrigeren Stufe geraten.
- Das Kochgeschirr muss direkt auf dem
Herd gestellt werden und muss zentriert
werden. Auf keinen Fall irgendetwas
zwischen dem Kochgeschirr und dem
Herd legen.
- Im Fall von erhöhter Temperatur senkt
das Gerät automatisch die Stromzufuhr
des jeweiligen Kochfeldes ab.
Vor jedem Reinigungseingriff oder
Wartung, trennen Sie das Gerät vom
Stromnetz indem Sie den Stecker ziehen
oder schalten Sie den Strom am
Hauptschalter des Hauses im
Sicherungskasten aus.
Verwenden Sie für alle Installations- und
Wartungsarbeiten Handschuhe.
Das Gerät kann von Kindern, ab einem
Alter von mindestens 8 Jahren, benutzt
werden und von Menschen mit
eingeschränkten physischen,
motorischen oder geistigen Fähigkeiten
oder Mängel an Erfahrung oder
notwendiger Kenntnis, sofern sie unter
Aufsicht stehen oder nachdem sie in die
sichere Benutzung des Gerätes
eingeführt wurden und sie sich den
Gefahren, die von dem Gerät ausgehen,
bewusst sind.
Kinder sollten beaufsichtigt werden, um
sicherzustellen, dass sie nicht mit dem
Gerät spielen.
Die Reinigung und Wartung darf nicht
von Kindern ohne Aufsicht durchgeführt
werden.
Der Raum muss ausreichend belüftet
sein, wenn die Dunstabzugshaube
zusammen mit anderen Geräten mit
Gasverbrennung oder andere
Brennstoffe verwendet wird.
Die Haube muss regelmäßig sowohl von
Innen als auch von Außen gereinigt
werden (MINDESTENS EINMAL PRO
MONAT), dabei aber genau die Angaben
der Bedienungsanleitung befolgen.
Das nicht beachten der Vorgaben
bezüglich der Reinigung der Haube und
dem Erneuern bzw. Reinigen der Filter
kann Brände verursachen.
Es ist strengstens verboten, Essen über
offener Flamme zu kochen.
Die Verwendung von offenen Flammen
ist für die Filter schädlich und kann
Brände verursachen und muss daher in
jedem Fall vermieden werden.
Jegliches Frittieren muss mit Sorgfalt
erfolgen, um zu vermeiden, dass das
überhitzte Öl Feuer fangen kann.
ACHTUNG: Wenn der Herd in Gebrauch
ist, können die zugänglichen Teile der

73
Haube heiß werden.
Achtung! Schließen Sie das Gerät nicht
an das Stromnetz an, bis die Installation
vollständig abgeschlossen ist.
Was die technischen und die
Sicherheitsmaßnahmen bezüglich dem
Abzug der Dämpfe angeht, halten Sie
sich strikt an die Vorschriften der
örtlichen Behörden.
Die angesaugte Luft darf nicht über das
selbe Abluftrohr abgeleitet werden, das
für die Abfuhr von Rauchgasen, die
durch Gasverbrennung oder die
Verbrennung anderer Brennstoffen
erzeugt werden, verwendetet wird.
Benutzen Sie die Haube nicht ohne die
Lampen richtig montiert zu haben oder
gar ohne jegliche Lampen, da die Gefahr
eines elektrischen Schlags besteht.
Verwenden Sie die Haube nie ohne das
Gitter korrekt eingebaut zu haben!
Bei der Montage, verwenden Sie nur die
mitgelieferten Schrauben, oder, falls
nicht im Lieferumfang enthalten,
erwerben Sie Schrauben gemäß der
Vorgaben. Verwenden Sie bei den
Schrauben die richtige Länge, wie sie im
Montagehandbuch angegeben werden.
Wenn die Dunstabzugshaube und
gleichzeitig andere Geräte, die eine
andere Energiequelle als Strom haben, in
Betrieb sind, darf der Unterdruck im
Raum nicht mehr als 4 Pa überschreiten
(4 x 10⁻⁵ bar)..
Dieses Gerät entspricht der EU-Richtlinie 2012/19/EU, Waste
Electrical and Electronic Equipment (WEEE-Richtlinie). Stellen
Sie sicher, dass dieses Gerät gemäß den Vorschriften
entsorgt wird, so verhindern Sie mögliche negativen Folgen
für die Umwelt und die Gesundheit.
Die Kennzeichnung auf diesem Produkt oder den
Begleitpapieren gibt an, dass dieses Produkt nicht als
Hausmüll entsorgt werden darf, sondern muss an einer
Sammelstelle für das Recycling von elektrischen und
elektronischen Geräten abgegeben werden. Bei der
Entsorgen beachten Sie bitte die örtlichen Vorschriften.
Weitere Informationen über die Behandlung, Verwertung und
das Recycling dieses Produkts erhalten Sie in Ihrem Rathaus,
bei Ihrer Müllabfuhr oder bei dem Händler, wo das Produk
erworben wurde.
Dieses Gerät wurde gemäß den folgenden Vorschriften
entwickelt, getestet und hergestellt:
• Sicherheit: EN / IEC 60335-1; EN / IEC 60335-2-6, EN / IEC
60335-2-31, EN / IEC 62233.
• Leistung: EN / IEC 61591; ISO 5167-1; ISO 5167-3; ISO
5168; EN / IEC 60704-1; EN / IEC 60704-2-13; EN / IEC
60704-3; ISO 3741; EN 50564; IEC 62301.
• EMC: EN 55014-1; CISPR 14-1; EN 55014-2; CISPR 14-2;
EN / IEC 61000-3-3; EN / IEC 61000-3-
12. Empfehlungen für eine richtige Benutzung, um die
Umweltbelastung zu reduzieren: Wenn Sie zu kochen
beginnen, schalten Sie die Haube auf der niedrigsten
Geschwindigkeit ein und lassen Sie sie nach Beendigung des
Kochvorgangs noch für einige Minuten eingeschaltet. Erhöhen
Sie die Geschwindigkeit nur im Fall von großen Mengen an
Rauch und Dampf und verwenden Sie die Booster-Funktion
nur in extremen Fällen. Um die Effizienz der Reduktion von
Gerüche aufrecht zu erhalten, ersetzen Sie wenn nötig,
den/die Kohlefilter. Um die Effizienz des Fettfilters aufrecht z
erhalten, reinigen Sie diesen bei Bedarf. Zur Optimierung der
Effizienz und um Geräusche zu minimieren, verwenden Sie
beim Abluftsystem den maximalen Durchmesser der in
diesem Handbuch angegeben ist.

74
2. Betriebsart
Kochen mit Induktion
Das Induktionskochsystem beruht auf dem physikalischen
Phänomen der magnetischen Induktion . Das wesentliche Merkmal
dieses Systems ist die direkte Energieübertragung von dem
Energiegenerator an den Topf.
Vorteile:
Wenn Sie dieses mit Elektroherden vergleichen, werden Sie
feststellen, dass es:
- sicherer ist: niedrigere Temperatur auf der Glasoberfläche.
- schneller ist: schnelleres Erhitzen von Gerichten.
- genauer ist: Kochfeld reagiert sofort auf Ihre Befehle
- effizienter ist: 90% der aufgenommenen Energie wird in Wärme
umgewandelt. Darüber hinaus wird die Wärmeübertragung sofort
abgebrochen, sobald Sie die Pfanne von der Oberfläche entfernen
und so unnötige Wärmeverluste vermieden.
2.1 Kochgeschirr
Verwenden Sie nur Kochgeschirr, das mit dem Symbol
versehen ist.
Wichtig:
um dauerhafte Schäden an der Oberfläche des Kochfeldes zu
vermeiden, verwenden Sie nicht:
- Behälter mit einem zu 100% flachen Boden.
- Metallbehälter mit emailliertem Boden.
- Behälter mit einem rauen Untergrund, um zu verhindern, dass die
Oberfläche des Kochfeldes verkratzt wird.
- Stellen Sie niemals heiße Töpfe und Pfannen auf der Oberfläche
des Bedienfeldes ab.
2.1.1 Kochgeschirrmaterial
Das Induktionskochverfahren verwendet Magnetismus, um Wärme
zu erzeugen. Das Kochgeschirr muss daher Eisen enthalten. Sie
können einfach mit einem Magneten überprüfen, ob eine Pfanne
aus magnetischem Material besteht. Kochgeschirr ist ungeeignet,
falls Sie keine magnetische Anziehungskraft erkennen können.
2.1.2 Abmessung des Kochgeschirrs
WICHTIG: Wenn die Töpfe nicht die richtige Größe haben, werden
sich die Kochfelder nicht einschalten.
Um den richtigen Durchmesser der Töpfe in Bezug auf jedes
einzelne Feld festzustellen, ziehen Sie den illustrierten Teil dieser
Gebrauchsanweisung zu Rate.
2.2 Energieeinsparung
Um bessere Ergebnisse zu erhalten, empfehlen wir:
- Verwenden Sie nur Töpfe und Pfannen, deren
Bodendurchmesser mit dem des Kochfeldes übereinstimmt.
- Verwenden Sie nur Töpfe und Pfannen mit flachem Boden.
- Wenn möglich, benutzen Sie einen Deckel während des
Kochvorgangs.
- Kochen Sie Gemüse, Kartoffeln usw. mit einer geringen Menge
an Wasser, um die Kochzeit zu reduzieren.
- Das Verwenden eines Schnellkochtopfs reduziert den
Stromverbrauch und die Garzeit
- Stellen Sie den Topf in die Mitte des aufgezeichneten Kochfeldes.
Die Benutzung der Abzugshaube
Die Abzugshaube kann entweder im Abluftbetrieb oder im
Umluftbetrieb benutzt werden. Abluftbetrieb
Abb.7
Die Dämpfe werden durch eine Reihe von Rohren nach
draußen geleitet ( die als Sonderzubehör getrennt erworben
werden müssen), welche an den mitgelieferten
Anschlussstutzen befestigt werden müssen.
Der Durchmesser des Abluftrohres muss mit dem des
Anschlussrings übereinstimmen:
- Im Fall eines rechteckigen Austritts 222 x 89 mm
- Im Fall eines runden Austritts Ø 150 mm (*)
Für weitere Informationen ziehen Sie die Seite über das
Zubehör der Abzugshaube dieses Handbuchs zu Rate.
Abb. 7c
Schließen Sie das Gerät an Rohrleitungen und
Wandabzugslöcher an, deren Durchmesser dem Luftauslass
entsprechen (Anschlussstutzen).
Die Verwendung von Rohren und Wandabzugslöchern mit
einem kleineren Durchmesser wird eine Verringerung der
Absaugleistung und eine drastische Erhöhung des
Geräuschpegels zur Folge haben.
Es wird daher diesbezüglich keinerlei Verantwortung
übernommen.
! Reduzieren Sie die Länge des Rohres auf das
Notwendigste.
! Verwenden Sie ein Rohr mit einer möglichst geringen
Anzahl an Kurven (maximal zugelassener Winkel: 90°).
! Vermeiden Sie drastische Unterschiede im Durchmesser
des Rohres.
Umluftbetrieb
Abb.8Die angesaugte Luft wird durch spezielle Fettfilter und
Geruchsfilter gefiltert, bevor sie wieder dem Raum zugeführt
wird.
Das Produkt wird mit allem Notwendigsten geliefert, das Sie
für eine Standardmontage, mit einem Luftauslass an der
Vorderseite des Sockels, benötigen.
Im Lieferumfang sind bereits vier Sätze Keramik-Filter mit
Aktivkohle für hohe Leistung enthalten. Keramik-Filter sind
innovative modulare Kohlefilter, der regenerierbar ist (Lesen
Sie dazu auch im Kapitel „Wartung“ den Abschnitt
„Aktivkohlefilter“).
Die physikalisch-chemischen Eigenschaften ermöglichen eine
hohe Effizienz was die Aufnahme von Gerüchen betrifft und
lange mechanische Beständigkeit.
Für weitere Informationen konsultieren Sie die zum Zubehör
des Umluftbetriebes gehörige Seite (im illustrierten Teil dieses
Handbuchs).
Abb. 13b

75
3. Befestigung
Sowohl der elektrische Anschluss, als auch der mechanische
Einbau, darf nur von ausgebildetem Personal durchgeführt werden.
Das Elektro-Haushaltsgerät ist für den Einbau in eine Arbeitsfläche mit
einer Stärke von 2-6 cm bei einer TOP-Installation und 2,5 – 6 cm bei
einer FLUSH-Installation hergestellt worden.
Der Mindestabstand zwischen dem Kochfeld und der Wand muss
vorne mindestens 5 cm und an der Seite mindesten 4 cm und
mindestens 50 cm zu den oberen Hängeschränken sein.
HINWEIS: Die empfohlenen Abstände sind Richtwerte: Bei der
Planung der Räume müssen die Anweisungen des Herstellers der
Küche befolgt werden.
3.1 Elektrischer Anschluss
Abb. 3
-Trennen Sie das Gerät vom Stromnetz
-Der Anschluss muss von qualifiziertem Personal, mit Kenntnisse
über die Vorschriften bezüglich der Installation und
Sicherheitsfragen, durchgeführt werden.
-Der Hersteller übernimmt keine Verantwortung für Menschen, Tiere
oder Dinge im Falle eines Nichtbeachtens der im vorangehenden
Kapitel genannten Vorgaben.
-Das Netzkabel muss lang genug sein, um das Entfernen des
Kochfeldes von der Arbeitsplatte zu ermöglichen,
-Stellen Sie sicher, dass die Spannung, die auf dem Typenschild
auf der Unterseite des Gerätes angegeben ist, der des Hauses
entspricht in dem es installiert wird.
-Verwenden Sie keine Verlängerungskabel.
- Die Erdung ist gesetzlich vorgeschrieben.
- Das Kabel für die Erdung muss 2cm länger als die anderen Kabel
sein.
- Falls das Gerät nicht mit einem Netzkabel geliefert wird, ist ein
Leiter mit einem Querschnitt von mindestens 2,5 mm und einer
Leistung bis 7200 Watt zu verwenden; während es für höhere
Spannungen 4 mm sein müssen.
- Das Kabel darf an keiner Stelle eine Temperatur von mehr als 50 °
C über der der Raumtemperatur erreichen.
- Das Gerät ist für einen dauerhaften Anschluss an das Stromnetz
gedacht, deshalb muss der Anschluss an das Stromnetzt über
einen Fehlerstrom-Schutzschalter erfolgen, der die vollständige
Trennung vom Stromnetz unter der oben genannten
Überspannungskategorie III garantiert und nach dem Einbau leicht
erreichbar ist.
Hinweis : Um das Elektrohaushaltsgerät mit dem
optionalen einphasigen Anschluss anzuschließen, muss
das vorhandene Kabel abgenommen werden und mit
einem anderen Kabeltyp (nicht mitgeliefert) mit den
folgenden Spezifikationen ausgetauscht werden :
Einphasiger Anschluss : Kabel H05V2V2-F 3G4
Abb. 3a
Achtung! Bevor Sie die Stromversorgung wiederherstellen und ihre
korrekte Funktion überprüfen, überprüfen Sie immer ob das
Netzkabel korrekt angeschlossen ist.
Achtung! Der Austausch des Verbindungskabels muss von einem
autorisierten Servicemitarbeiter durchgeführt werdeno oder von
einer Person mit ähnlicher Eignung.
Hinweis: Das Produkt ist mit der Funktion „Power Limitator“
(Leistungsbegrenzung) ausgestattet, die es ermöglicht einen
maximalen Grenzwert bezüglich der kW Aufnahme einzustellen.
Die Einstellung muss bei Anschluss des Gerätes an das Stromnetz
oder bei einer Wiederherstellung des Stromnetzes selbst
durchgeführt werden (innerhalb der darauffolgenden 2 Minuten).
Für die Abfolge zur Einstellung der Leistungsbegrenzung
konsultieren Sie dieses Handbuch im Abschnitt „Betrieb“.
3.2 Montage
Vor dem Einbau:
• Nachdem Sie das Produkts ausgepackt haben, stellen Sie
sicher, dass es keine Schäden während des Transports
erlitten hat und im Falle von Problemen, kontaktieren Sie Ihre
Händler oder den Kundendienst, bevor Sie mit dem Einbau
fortfahren.
• Überprüfen Sie, ob das erworbene Produkt von seinen
Ausmaßen, in den von Ihnen ausgewählten Einbauort, passt.
• Überprüfen Sie, dass sich im Inneren der Verpackung keine
Zubehörteile (wie z.B. Tütchen mit Schrauben, Garantie etc.)
befinden (aus Transportgründen), welche gegebenenfalls
entfernt und aufbewahrt werden müssen.
• Stellen Sie des weiteren sicher, dass in der Nähe des
Montagebereichs eine Steckdose zur Verfügung steht.
Überprüfung des Einbauorts:
- Das Gerät darf nicht über folgenden Geräten eingebaut
werden: Geräte die der Kühlung dienen,
Geschirrspülmaschinen, Herde, Öfen, Waschmaschinen und
Trocknern.
- Alle Schneidarbeiten am Einbauort müssen vor dem Einsetzen
des Kochfeldes durchgeführt werden und Holzsplitter oder
Sägespäne müssen gründlich entfernt werden.
WICHTIG: Verwenden Sie einen Dichtkleber (1 Komponente) mit
einer Temperaturbeständigkeit bis 250°C;
Vor dem Einbau müssen alle Oberflächen gründlich gereinigt
werden um alle Substanzen, die eine Haftung beeinträchtigen
könnten, zu beseitigen. (z.B.: Trennmittel, Konservierungsstoffe,
Fette, Öle, Staub, Rückstände alter Klebstoffe etc.);
Der Klebstoff muss gleichmäßig über den gesamten Umfang des
Rahmens verteilt werden;
nach dem Einkleben muss der Kleber für etwa 24 Stunden
trocknen.
Abb. 1b
ACHTUNG! Die mangelhafte Verwendung von Schrauben und
anderen Befestigungselementen, gemäß dieser Anleitung, kann
Gefahren elektrischen Ursprungs verursachen
Hinweis: Für den korrekten Einbau dieses Gerätes ist es
empfehlenswert die Rohre mit einem Klebeband, mit folgenden
Eigenschaften, zu umwickeln:
- Elastisches Klebeband aus weichem PVC mit einem Klebstoff auf
Acrylsäure Basis
- Entsprechend der DIN EN 60454 Norm
- Schwer entflammbar
- Sehr gute Alterungsbeständigkeit
- Beständig gegen Temperaturschwankungen
- Einsetzbar bei niedrigen Temperaturen

76
4. Gerätebeschreibung
Bedienfeldanordnung
Anmerkung: Um die Steuerungen zu wählen, ist es ausreichend, die Symbole, die sie darstellen, zu berühren (drücken)
Tasten
1. EIN/AUS Kochfeld/ Gebläse
2. Anzeige Position des Kochbereichs
3. Einstellung Leistungsstufe der jeweiligen Kochzone
4. Aktivierung Temperatur-Manager
5. Anzeige automatische Abzugsfunktion
6. Einstellung Abzugsleistung Gebläse
7. Aktivierung automatische Absaugfunktion
Neustart Sättigungsanzeige der Filter
8. Aktivierung Timer
Erhöhung/Verringerung Zeit Timer
9. Tastensperre
9+10. Kindersicherung
10. Pause / Memory
Display / LED
11. Visualisierung Power Level
12. Visualisierung Geschwindigkeit (Leistung) der
Ansaugung
13. Display Kochbereich
14. Display Gebläse
15. Display Timer
16. Anzeige Temperatur-Manager
17. Anzeige Filterwechsel
18. Anzeige automatische Absaugfunktion
19. Anzeige Timer aktiv
20. Anzeige Bridge-Funktion aktiv

77
VERWENDUNG DES KOCHFELDS
Was vor dem Beginn zu wissen ist:
Alle Funktionen dieses Kochfelds wurden unter Beachtung der
strengsten Sicherheitsvorschriften geplant.
Aus diesem Grund:
• Einige Funktionen aktivieren sich nicht oder
deaktivieren sich automatisch in Abwesenheit von Töpfen
auf dem Herd oder wenn diese falsch positioniert sind.
• In anderen Fällen deaktivieren sich die aktivierten
Funktionen automatisch nach wenigen Sekunden, wenn die
gewählte Funktion eine weitere Einstellung, die nicht
eingegeben wurde, benötigt (z.B.: “ Das Kochfeld
einschalten Den Kochbereich wählen ” ohne “ ” und die
“ ” oder die “ ” oder Betriebstemperatur , Funktion Lock
diejenige des “ ”). Timer
Achtung! Im Falle (zum Beispiel) von längerer
Verwendung könnte das Abschalten des Kochbereichs nicht
umgehend erfolgen, da er sich in Phase der Abkühlung
befindet; auf dem Display der Kochbereiche erscheint das
Symbol “ ” , um anzuzeigen, dass er sich in dieser Phase
befindet.
Warten Sie ab, dass das Display ausgeht, bevor Sie sich dem
Kochbereich nähern.
Display Kochbereich
Auf den Displays bezüglich der Kochbereiche wird Folgendes
angezeigt:
Eingeschalteter Kochbereich
Kochstufe
… -
Restwärmeanzeige
Topferkennung
Funktion Temperatur-Manager
aktiv
Funktion Kindersicherung aktiv
Funktion Pause
Funktion Ankochautomatik
Eigenschaften des Kochfelds
Aktivierung Kochfeld
Das Produkt aktiviert sich nur in Anwesenheit von Töpfen auf
dem Kochfeld: Der Heizprozess startet nicht oder unterbricht
sich im Falle der Abwesenheit oder Entfernung der Töpfe.
Topferkennung
Das Produkt erfasst automatisch das Vorhandensein von
Töpfen auf den Kochbereichen.
Sicherheitsabschaltung
Aus Sicherheitsgründen besitzt jeder Kochbereich eine
maximale Betriebsdauer, die vom eingestellten
Leistungsniveau abhängt.
Restwärmeanzeige
Beim Abschalten von einem oder mehreren Kochbereichen
wird die Anwesenheit von Restwärme mit entsprechendem
optischen Signal auf dem Display des bezüglichen
Kochbereichs durch das Symbol “ ” angezeigt.
Funktionsweise
Anmerkung: Zur Aktivierung jeglicher Funktion ist es vorher
notwendig, den gewünschten Bereich zu aktivieren
Einschalten
EIN/AUS Kochfeld/ Gebläse drücken ( berühren)
Die Kontrolllampe leuchtet zur Anzeige auf, dass das
Kochfeld/ Gebläse bereit zur Verwendung ist
Zum Abschalten erneut drücken
Anmerkung: Diese Funktion hat den Vorrang vor allen
anderen.
Wahl der Kochbereiche
Die Auswahlleiste (3) entsprechend des gewünschten
Kochbereichs berühren (drücken).
9 Leistungsstufen
Das Feld besitzt 9 Leistungsstufen
Mit den Fingern längs der Auswahlleiste (3) berühren und
durchlaufen :
nach rechts, um die Leistungsstufe zu erhöhen;
nach links, um die Leistungsstufe zu senken;
Power-Funktion
Das Produkt ist mit einer zusätzlichen Leistungsstufe
ausgestattet (über der Stufe ), die für 10 Minuten aktiv
bleibt, danach kehrt die Leistung auf die vorhergehende Stufe
zurück.
Mit den Fingern längs der Auswahlleiste (3) (über der Stufe
) berühren und durchlaufen und die Power-Funktion
aktivieren
Die Power-Funktion wird auf dem Display des Kochbereichs
mit dem Symbol” ” angezeigt

78
Bridge-Funktion
Diese Funktion verbindet zwei übereinanderliegende Kochzonen
miteinander. Sie funktionieren dann wie eine Kochzone. Diese
Funktion erlaubt ein gleichmäßiges Garen mit Backformen und
Töpfen von größeren Abmessungen.
Es ist möglich, den vorderen Kochbereich “Master” in Kombination
mit dem entsprechenden hinteren “Nebenbereich” zu verwenden
(konsultieren Sie, um zu prüfen, auf welchen Bereichen diese
Funktion vorgesehen ist, den Teil der Abbildungen dieses
Handbuchs).
Um die Bridge-Funktion zu aktivieren:
- gleichzeitig die beiden Kochbereiche, die man zu verwenden
wünscht, wählen
- die Anzeige Bridge (20) des Kochbereichs “Nebenbereich"
leuchtet auf “ ”
- durch die Auswahlleiste (3) des Kochbereichs “Master" ist es
möglich, die Betriebsstufe einzustellen
- um die Bridge-Funktion zu deaktivieren, ist es ausreichend, die
gleiche Prozedur der Aktivierung zu wiederholen
Temperatur-Manager
Temperature Manager ist eine Funktion, die erlaubt, die
voreingestellte Temperatur geeigneter einzustellen, um die
gewünschte Art von Ergebnis zu erhalten (konsultieren Sie die
Tabelle Temperatur-Manager am Ende dieses Kapitels).
Wählen Sie den gewünschten Kochbereich.
• Drücken Sie ein- oder mehrmals (4) , um die geeignetste
Stufe zu wählen:
Schmelzen*
Erwärmen*
Köcheln*
* Konsultieren Sie die Tabelle Temperature Manager am Ende
dieses Kapitels.
• Drücken Sie erneut, um abzuschalten.
Auf dem Display des Kochbereichs, der mit Temperature Manager
in Betrieb ist, erscheint das Symbol “ ”
Tastensperre
Die Tastensperre erlaubt, die Einstellungen des Felds zu
blockieren, um unbeabsichtigte Änderungen zu verhindern
und dabei die bereits eingestellten Funktionen aktiv zu lassen.
Aktivierung:
• Drücken Sie (9)
• die LED auf der Taste leuchtet zur Anzeige der erfolgten
Aktivierung auf
Wiederholen Sie den Vorgang zur Deaktivierung
Kindersicherung
Die Kindersicherung verhindert, dass Kinder unabsichtlich die
Kochbereiche und das Gebläse einschalten und versperrt die
Aktivierung jeglicher Funktion.
Die Kindersicherung kann nur bei eingeschaltetem Kochfeld,
aber mit abgeschalteten Kochbereichen (und Gebläse)
aktiviert werden.
Aktivierung:
• entfernen Sie eventuell auf dem Kochfeld vorhandene
Töpfe
• und (9) (10) gleichzeitig drücken und halten,
ein akustisches Signal zeigt an, dass die Funktuion
eingeschaltet ist und es erscheint " " auf den Display (13)
und . (14)
Wiederholen Sie den Vorgang zur Deaktivierung
Timer
Die Funktion Timer ist ein Countdown, den man, auch
gleichzeitig, auf jedem Kochbereich (und Bereich des
Gebläses) einstellen kann.
Am Ende der eingestellten Zeit schalten sich die
Kochbereiche (oder Bereiche des Gebläses) automatisch ab
und der Benutzer wird mit einem entsprechenden akustischen
Signal darauf hingewiesen.
Aktivierung/Einstellung der Funktion Timer für das
Kochfeld
• Wählen Sie den gewünschten Kochbereich (Leistung 0).
• Drücken Sie zum Zugang zur Funktion (8)
Timer
• Die Dauer des Timers einstellen:
den Wahlschalter drücken, um die Zeit der
automatischen Abschaltung zu erhöhen
den Wahlschalter drücken, um die Zeit der
automatischen Abschaltung zu verringern

80
- gleichzeitig auf den Slidern FL und RL
von rechts nach links scrollen
und lange solange den Buchstaben gedrückt halten, bis ein P
kurzer Signalton erklingt
Am Display Timer ( ) erscheint das Symbol 15 “CF6”,
was bedeutet, dass nun die Einstellung vorgenommen
werden kann
das Display (7) des Bereichs FL zeigt die
Stromeinstellung an**
0 = 7,4 KW
1 = 4,5 KW
** Voreinstellung beträgt 7,4 KW
- um die Einstellung der Power Limitation zu ändern, den
Slider scrollen FL
- von links nach rechts, um die kW zu erhöhen
- von rechts nach links, um die kW zu verringern
- um die Wahl abzuspeichern, Tasten eine
Sekunde lang drücken;
es erklingt ein Tonsignal, das die Einstellung bestätigt und
die Funktion wird verlassen.
Specyfikacje produktu
| Marka: | AEG |
| Kategoria: | Kołek |
| Model: | IDK84451IB |
Potrzebujesz pomocy?
Jeśli potrzebujesz pomocy z AEG IDK84451IB, zadaj pytanie poniżej, a inni użytkownicy Ci odpowiedzą
Instrukcje Kołek AEG

31 Stycznia 2025
19 Stycznia 2025
18 Stycznia 2025
18 Stycznia 2025
18 Stycznia 2025
18 Stycznia 2025
18 Stycznia 2025
17 Stycznia 2025
17 Stycznia 2025
17 Stycznia 2025
Instrukcje Kołek
- Kołek Bauknecht
- Kołek Samsung
- Kołek Bertazzoni
- Kołek Electrolux
- Kołek Balay
- Kołek Beko
- Kołek Teka
- Kołek Küppersbusch
- Kołek Etna
- Kołek SilverCrest
- Kołek Candy
- Kołek Whirlpool
- Kołek Miele
- Kołek Baumatic
- Kołek Siemens
- Kołek Grundig
- Kołek Silverline
- Kołek Mesko
- Kołek Indesit
- Kołek Unold
- Kołek Viking
- Kołek CATA
- Kołek Kenwood
- Kołek Mestic
- Kołek PKM
- Kołek Melissa
- Kołek Beper
- Kołek Thetford
- Kołek Zanussi
- Kołek Bourgini
- Kołek Fagor
- Kołek Koenic
- Kołek ProfiCook
- Kołek KitchenAid
- Kołek Exquisit
- Kołek Privileg
- Kołek Atag
- Kołek Novy
- Kołek Inventum
- Kołek BORA
- Kołek Esperanza
- Kołek Orion
- Kołek Respekta
- Kołek Frigidaire
- Kołek Rommelsbacher
- Kołek Gaggenau
- Kołek Sencor
- Kołek Elica
- Kołek Ignis
- Kołek Sogo
- Kołek Constructa
- Kołek Zanker
- Kołek Acec
- Kołek Alno
- Kołek Techwood
- Kołek Progress
- Kołek Vestel
- Kołek Junker
- Kołek Scholtes
- Kołek Castor
- Kołek Luxor
- Kołek Nordmende
- Kołek Friac
- Kołek Boretti
- Kołek Everglades
- Kołek Nova
- Kołek M-System
- Kołek Primo
- Kołek Atlantic
- Kołek Efbe-schott
- Kołek Brixton
- Kołek Superior
- Kołek Waves
- Kołek Tecnolux
- Kołek Gutmann
- Kołek Oranier
- Kołek Mia
- Kołek Venga
- Kołek Rival
- Kołek Eudora
- Kołek PowerTec Kitchen
- Kołek Bifinet
- Kołek Wigo
- Kołek Konig Electronic
- Kołek RoyaltyLine
- Kołek Berbel
- Kołek Prosolo
- Kołek Schott Ceran
- Kołek Howat
Najnowsze instrukcje dla Kołek

9 Kwietnia 2025

9 Kwietnia 2025

9 Kwietnia 2025
7 Kwietnia 2025
7 Kwietnia 2025
7 Kwietnia 2025

6 Kwietnia 2025

6 Kwietnia 2025
6 Kwietnia 2025
5 Kwietnia 2025