Instrukcja obsługi Acronis Snap Deploy 3
Acronis
Oprogramowanie
Snap Deploy 3
Przeczytaj poniżej 📖 instrukcję obsługi w języku polskim dla Acronis Snap Deploy 3 (103 stron) w kategorii Oprogramowanie. Ta instrukcja była pomocna dla 18 osób i została oceniona przez 2 użytkowników na średnio 4.5 gwiazdek
Strona 1/103


2 © Acronis, Inc
Copyright © Acronis, Inc., 2010 . All rights reserved.
“Acronis”, “Acronis Compute with Confidence”, and the Acronis logo are trademarks of Acronis, Inc.
Linux is a registered trademark of Linus Torvalds.
Windows is a registered trademark of Microsoft Corporation.
All other trademarks and copyrights referred to are the property of their respective owners.
Distribution of substantively modied versions of this document is prohibited without the explicit
permission of the copyright holder.
Distribution of this work or derivative work in any standard (paper) book form for commercial
purposes is prohibited unless prior permission is obtained from the copyright holder.
DOCUMENTATION IS PROVIDED «AS IS» AND ALL EXPRESS OR IMPLIED CONDITIONS,
REPRESENTATIONS AND WARRANTIES, INCLUDING ANY IMPLIED WARRANTY OF
MERCHANTABILITY, FITNESS FOR A PARTICULAR PURPOSE OR NON-INFRINGEMENT, ARE
DISCLAIMED, EXCEPT TO THE EXTENT THAT SUCH DISCLAIMERS ARE HELD TO BE LEGALLY
INVALID.
Third party software notices. Third party code may be provided with the Software and/or Service.
The license terms for such third-parties are detailed in the license.txt le located in the root installation
directory. You can always find the latest up- -to date list of the third party code and the associated
license terms used with the Software and/or Service at http://kb.acronis.com/content/7696.

© Acronis, Inc 3
Table of Contents
1. Introducing Acronis® Snap Deploy® ............................................................................... 6
1.1 Overview.............................................................................................................................. 6
1.1.1 What is Acronis Snap Deploy ........................................................................................... 6
1.1.2 Who needs Acronis Snap Deploy? ................................................................................... 6
1.1.3 Acronis Snap Deploy infrastructure .................................................................................. 6
1.2 What you can do with Acronis Snap Deploy 3 ......................................................................... 7
1.2.1 Take an image of the master system (Acronis Snap Deploy 2.0 functionality) ..................... 7
1.2.2 Manual deployment (Acronis Snap Deploy 2.0 functionality) .............................................. 7
1.2.3 Scheduled deployment (new in v 3) ................................................................................. 7
1.2.4 Event- driven deployment (new in v 3) ............................................................................. 8
1.2.5 Command line and scripting under Win PE (new in v 3) .................................................... 8
1.2.6 Standalone deployment (new in v 3) ............................................................................... 9
1.2.7 Custom Deployment (User-initiated deployment) (new in v 3) ........................................... 9
1.2.8 Deployment of a disk partition or MBR (new in v 3) ........................................................ 10
1.2.9 Selective deployment (MAC filtering) (new in v 3)........................................................... 10
1.2.10 Password protection (new in v 3) ................................................................................ 10
1.2.11 Manage a remote computer (Acronis Snap Deploy 2.0 functionality) .............................. 10
1.3 What else is new in v 3? ..................................................................................................... 11
1.3.1 Encrypted communication ............................................................................................. 11
1.3.2 Multicast TTL and network bandwidth throttling ............................................................. 11
1.4 Supported operating systems .............................................................................................. 11
1.5 License policy ..................................................................................................................... 12
1.5.1 Server and workstation licenses .................................................................................... 12
1.5.2 Licenses for Acronis Universal Deploy ............................................................................ 12
1.5.3 Acronis Snap Deploy trial version ................................................................................... 12
1.6 Upgrade to v 3 ................................................................................................................... 13
1.6.1 Upgrading licenses ....................................................................................................... 13
1.6.2 Upgrading components ................................................................................................. 13
1.7 Technical support ............................................................................................................... 14
2. Understanding Acronis Snap Deploy ............................................................................... 15
2.1 Terminology ....................................................................................................................... 15
2.2 Components ....................................................................................................................... 16
2.3 Support for le systems and storage media .......................................................................... 17
2.3.1 Supported le systems .................................................................................................. 17
2.3.2 Supported media .......................................................................................................... 17
2.4 Usage ................................................................................................................................ 17
2.4.1 Offline imaging ............................................................................................................. 18
2.4.2 Online imaging ............................................................................................................. 19
2.4.3 Deployment ................................................................................................................. 19
2.5 What is Acronis Universal Deploy ......................................................................................... 21
2.5.1 Acronis Universal Deploy purpose .................................................................................. 21
2.5.2 Acronis Universal Deploy general principles .................................................................... 21
2.5.3 Acronis Universal Deploy and Microsoft Sysprep ............................................................. 22
2.5.4 Getting Acronis Universal Deploy ................................................................................... 22
3. Installation ..................................................................................................................... 23
3.1 System requirements .......................................................................................................... 23
3.2 Used ports and IP addresses ............................................................................................... 23
3.3 General rules of installation ................................................................................................. 24
3.3.1 Installation le ............................................................................................................. 24
3.3.2 Common installation congurations ............................................................................... 24
3.4 Installation of Acronis Snap Deploy Management Console ..................................................... 26
3.5 Installation of Acronis License Server ................................................................................... 26

4 © Acronis, Inc
3.5.1 Installation ................................................................................................................... 26
3.5.2 Adding licenses using Acronis Snap Deploy Management Console .................................... 27
3.5.3 Adding licenses in command line mode .......................................................................... 28
3.6 Installation of Acronis OS Deploy Server .............................................................................. 28
3.7 Installation and setup of Acronis PXE Server......................................................................... 29
3.7.1 Installation of Acronis PXE Server .................................................................................. 29
3.7.2 Setting up a computer to boot from PXE ........................................................................ 29
3.7.3 Setting up the PXE to work in other subnet .................................................................... 30
3.8 Installation of Acronis WOL Proxy ........................................................................................ 30
3.9 Installation of Acronis Snap Deploy Management Agent ........................................................ 30
3.10 Installation of Acronis Universal Deploy .............................................................................. 31
3.11 Extracting the Acronis Snap Deploy components ................................................................. 31
3.12 Using Acronis License Server ............................................................................................. 32
3.12.1 Understanding Acronis License Server .......................................................................... 32
3.12.2 Viewing information about licenses .............................................................................. 32
3.12.3 Removing licenses ...................................................................................................... 34
3.12.4 Using the Acronis License Server Management Tool, ..................................................... 34
4. Using Acronis Snap Deploy Management Console .......................................................... 35
4.1 Connections ....................................................................................................................... 35
4.1.1 Connect to a local machine ........................................................................................... 35
4.1.2 Connect to another computer ........................................................................................ 35
4.2 Installation and update of Acronis components on remote computers .................................... 36
4.3 Browsing logs ..................................................................................................................... 37
5. Creating Acronis bootable media .................................................................................... 38
6. Configuring PXE Server ................................................................................................... 42
7. Taking an image .............................................................................................................. 43
7.1 Preparation of the master OS .............................................................................................. 43
7.2 Online vs. oine imaging .................................................................................................... 43
7.3 Starting oine imaging ....................................................................................................... 43
7.4 Starting online imaging ....................................................................................................... 46
7.5 Steps of the Master Image Creation Wizard .......................................................................... 46
7.5.1 Disks or partitions to image ........................................................................................... 46
7.5.2 Image name and location ............................................................................................. 47
7.5.3 Setting options ............................................................................................................. 48
7.5.4 Comments and summary .............................................................................................. 50
8. Checking the master image ............................................................................................ 51
9. Deployment templates .................................................................................................... 52
9.1 Why save templates? .......................................................................................................... 52
9.2 Creating templates ............................................................................................................. 52
9.2.1 Master image selection ................................................................................................. 52
9.2.2 Disk/partition selection ................................................................................................. 53
9.2.3 Target disk and partition selection ................................................................................. 55
9.2.4 User accounts .............................................................................................................. 56
9.2.5 Computer names and domain/workgroup ....................................................................... 56
9.2.6 Network settings .......................................................................................................... 58
9.2.7 Security identifiers ........................................................................................................ 59
9.2.8 Transferring files .......................................................................................................... 59
9.2.9 Executing applications .................................................................................................. 59
9.2.10 Using Acronis Universal Deploy .................................................................................... 59
9.2.11 Deployment options.................................................................................................... 61
9.2.12 Comments and summary ............................................................................................ 65

6 © Acronis, Inc
1. Introducing Acronis® Snap Deploy®
This chapter gives a general idea of how an IT department can meet various real life challenges using
the Acronis Snap Deploy.
1.1 Overview
1.1.1 What is Acronis Snap Deploy
Acronis Snap Deploy is a exible, ecient software solution for deployment of a fully congured
operating system (with or without application software and any other data) to multiple computers.
Because the product uses disk imaging technology, it is ideal for rapid bare metal installations and -
exible centralized provisioning.
1.1.2 Who needs Acronis Snap Deploy?
Acronis Snap Deploy is primarily designed to be used by:
Small and medium-size businesses:
- IT service providers
- Hardware retailers
IT departments of larger corporations
Schools and universities
R&D and software testing labs.
The enterprise features added to Acronis Snap Deploy scheduled deployment, v 3 ( support for
Preinstallation Environment, command line and scripting, to name a few) can help automate the tasks
of the IT department in large enterprise environments.
1.1.3 Acronis Snap Deploy infrastructure
Components of the Acronis infrastructure are installed on Windows computers. Centralized imaging,
deployment and managing Acronis Snap Deploy the Acronis infrastructure is performed using
Management Console.
A reference image can be taken either in Windows or in the Acronis or Windows PE environment. The
Acronis environment provides the GUI mode. Under Windows PE, command line mode and scripting
are supported.
Deployment is performed in the Acronis or Windows PE environment.
A dedicated bootable utility enables full functional deployment with GUI on a standalone computer (a
computer isolated from the network or included in a network without Acronis Snap Deploy
infrastructure.)

© Acronis, Inc 7
1.2 What you can do with Acronis Snap Deploy 3
1.2.1 Take an image of the master system (Acronis Snap Deploy 2.0
functionality)
First, you create the desired system conguration and save the image of the system hard disk on a
network share, detachable or removable media. Image is a le that contains the system in a packaged
form.
Scenarios:
1. Usually, company departments, such as accounting, sales or technical support, use a xed set
of applications for daily work. Capture an entire library of images and deploy them to new
hardware without having to manually configure the operating system and applications.
2. The administrator might a standard configuration included in the library need to deploy on
various hardware. The separately sold Acronis Universal Deploy option can configure Windows
system drivers so that Windows is able to boot on dissimilar hardware. Without this option the
motherboard, processors and mass storage devices of the imaged and the target hardware
mus non Windowst be identical. The same applies to - operating systems.
1.2.2 Manual deployment (Acronis Snap Deploy 2.0 functionality)
Boot the to deploy totarget computers (the computers ) into Acronis environment using Acronis
bootable media or Acronis PXE (Preboot eXecution Environment) Server. Set up and save parameters
of the deployment operation (the deployment template.)
Launch the deployment. The program multicasts the image to the computers you specified and
deploys the system on their hard disks. DNS names, domain or workgroup membership, TCP/IP
settings, user accounts and security identiers are assigned on the y according to the settings you
made.
Once the deployment is completed, the computers boot up from their hard disks. The program can
shut down or restart the computers according to the settings you made. Sometimes you will have to
complete configuration of devices, otherwise the computers are ready to work. (Activation of the
operating system is needed though.)
1.2.3 Scheduled deployment (new in v 3)
Deployment can be run on hedulea sc .
Scheduling presumes that when the scheduled time comes, the program will power on the target
computers with predefined MAC addresses using the BIOS Wake On LAN (WOL) functionality.
Computers in other subnets through a WOL proxy agencan woken be t delivered with Acronis Snap
Deploy.
Computers that do not support WOL can be booted into Acronis environment manually before the
scheduled time comes. Such computers will also be deployed provided that their MAC addresses are
included in the total list.

8 © Acronis, Inc
Scenarios:
1. An organization receives a shipment of computers from a manufacturer along with the list of
their MAC addresses. The IT department has to deploy the operating system to the new
hardware.
2. An Internet café, school or university lab has 100 computers with known MAC addresses. The
nightly deployment of the initial standard image on these computers is needed.
1.2.4 Event- (new in v 3) driven deployment
Deployment can be run when the predefined number of computers is ready. The program counts how
many computers have connected to the deployment server and starts multicasting when the
predefined number of computers is connected.
The administrator can specify a time out, deployment will start on the computers - -out period. On time
that are ready despite that the predefined number is not reached.
Scenario:
1. An organization receives 100 computers from a manufacturer. The IT department has to
deploy systems, preconfigured according to the employees’ roles, to the predefined number of
computers. For example, 10 computers for accountants, 10 computers for the marketing
department, 70 computers for sales and 10 for the managers.
1.2.5 Command line and scripting under Win PE (new in v 3)
Acronis Snap Deploy provides a command line utility that can be added to a Windows Preinstallation
Environment (Win PE) image. The administrator uploads the customized image PE to a PXE server or
transfers the PE image on removable media.to
Having booted a machine in the Preinstallation Environment, the administrator can perform imaging or
deployment in the command line mode or execute scripts.
Using Acronis Snap Deploy in Windows Preinstallation Environment allows a combination of both the
products facilities and provides more functionality than using only Acronis b- ootable media. The
following scenarios can be implemented using Acronis Snap Deploy command line and Win PE.
Scenarios:
1. The administrator might need to deploy diverse images on each of the networked computers.
The administrator writes a deployment script that can read the target’s MAC address (for example, 01-
02 03- - - -04 05 06) and pull an image with a name corresponding to the MAC address (for example,
image- - - -01 02 03 04- -05 06.tib) from any convenient location. The script can be executed on any
number of targets.
2. The administrator might need to start imaging or deployment automatically each time a
networked computer boots from the PXE server.
The administrator creates an imaging or deployment script, adds the script to the PE and includes the
script in the
startnet.cmd
file. On booting into the PE, the operation will be performed automatically.
3. The administrator might need to automatically execute pre-deployment operations (disk
partitioning, for example) on the networked computers.

© Acronis, Inc 9
The administrator creates a script that performs pre deployment operations, adds the script along with -
deployment script to the PE and includes both scripts in the
startnet.cmd
file. On booting into the PE,
both operations will be performed automatically.
4. The administrator might need to execute imaging or deployment in Win PE environment if the
Acronis environment lacks Linux drivers for some exotic hardware.
Limitation:
Acronis Snap Deploy command line utility can generate a new SID but cannot adjust other
settings on the fly. To change the computer name, domain or workgroup membership and
other settings, apply the Microsoft System Preparation Tool (Sysprep) to the master system
and specify the new settings in the Sysprep.inf answer le.
1.2.6 Standalone deployment (new i 3) n v
The administrator might need to deploy on a computer isolated from a network or included in a
network without Acronis Snap Deploy infrastructure. A dedicated bootable utility enables full functional
deployment with GUI on a standalone computer.
T he Acronis Universal Deploy option is not available in the standalone mode.
1.2.7 (UserCustom Deployment -initiated deployment) (new in v 3)
Acronis Snap Deploy can be configured in such a way that users will be able to deploy and re-deploy
their computers with one click on the boot menu.
Scenarios:
1. Software testers have to deploy clean operating systems or preconfigured systems on test
machines. A test team leader creates custom bootable media or a PXE package that provides a
xed set of choices on the target side. A test team member reboots a test computer and
selects what to deploy from the boot menu with one click. The deployment starts immediately.
The choices can be various operating systems, various editions of the same operating system,
the same operating system with various settings or various applications, to name a few. The
deployment proceeds independently on each computer.
2. The same scenario ts in a university or school lab when switching between exercises requires
reconfiguring puter the com entirely. Students can switch or restart exercises without the
teacher’s assistance.
If a student messes up the machine (deletes a file, changes configuration, etc.) then he/she
could choose a self-restore option from the boot menu.
The custom deployment mode is intended for continual work without the administrator’s assistance.
Once the mode is set, other methods of deployment (manual, scheduled, event driven deployment) -
become unavailable. loyment mode is on,Any scheduled task that has to start while the custom dep
will not start. Only users (the ones on the target side) can initiate deployment. However, the
administrator can view logs, create new deployment templates, change the custom deployment
configuration (add, edit or remove boot menu items) and perform other management operations
except for deployment.

10 © Acronis, Inc
To initiate deployment on the console side, the administrator switches o the custom deployment
mode.
1.2.8 Deployment of a disk partition or MBR (new in v 3)
You do not necessarily have to deploy the entire disk. Provided the master and the target disks have a
similar partitioning scheme, you can image and deploy only the system partition or only the data,
depending on your needs.
Acronis Snap Deploy can image and deploy the Master Boot ) Record (MBR .
1.2.9 Selective deployment (MAC ltering) (new in v 3)
Acronis Snap Deploy has the ability to disable deployment on computers with specied MAC addresses.
This protects production servers and user’s systems from unfortunate events. The program can import
the access list from a text le. Both straight (enabling) and inverse (disabling) lists are supported.
Scenario:
1. Let’s say, a networked computer boots up from PXE by mistake. The new image then might be
deployed on the computer by an -event driven operation or by the PE configured to start
deployment upon booting. The original data will be lost.
1.2.10 Password protection (new in v 3)
Images taken with Acronis Snap Deploy can be protected with a password to prevent unauthorized
deployment.
Acronis Snap Deploy also supports password protected images created with the Acronis True Image
products family.
To prevent Acronis bootable components from unauthorized execution, the Acronis boot menu can
also be protected with a password.
1.2.11 Manage a remote computer (Acronis Snap Deploy 2.0
functionality)
An administrator can perform operations on a remote computer using Acronis Snap Deploy.
File management: Create and edit text les (for example batch les or scripts), copy les/folders to
the clipboard, paste them, rename and delete files and folders.
Applications management: E (xecute service applications conguration les, scripts) on a remote
computer by scheduling tasks. The scheduled task contains the application to execute and when the
application will be run.

© Acronis, Inc 11
1.3 What else is new in v 3?
1.3.1 Encrypted communication
Acronis Snap Deploy components communicate to each other using the Secure Sockets Layer (SSL)
cryptographic protocol. Encryption starts on the first (earliest) stage of connection attempt, so all data
transferred in the next steps (including data required for client authentication) is encrypted.
Once Acronis Snap Deploy components are installed, encrypted communication between the
components is enabled automatically. The deploy stream, being transferred via the communication
protocol, is not encrypted.
1.3.2 Multicast TTL and network bandwidth throttling
Deployment conguration has a parameter that species time to live (TTL) for multicast packets. Using
this setting, you can the distribution of limit multicast packets via gateways.
By setting the permitted bandwidth you can limit the network usage during deployment.
1.4 Supported operating systems
Acronis Snap Deploy provides full-featured imaging and deployment of the following operating
systems:
D eployment
Change
settings
License
type*
MS Windows Server 2008 R2
Yes Yes S
MS Windows Server 2008 (x86, x64)
Yes
Yes
S
MS Windows Server 2003 Service Pack 2 (x86, x64)
Yes Yes S
MS Windows Server 2003 R2 (x86, x64)
Yes Yes S
MS Windows Small Business Server 2003
Yes Yes S
MS Windows Storage Server 2003 R2
Yes Yes S
MS Windows Server 2003 x64 Editions
Yes
Yes
S
MS Windows 2000 Server
Yes Yes S
MS Windows 2000 Advanced Server
Yes
Yes
S
MS Win dows 2000 Professional SP4
Yes Yes WS
MS Windows 7 Home Basic (x86, x64)
Yes Yes WS
MS Windows 7 Home Premium (x86, x64)
Yes Yes WS
MS Windows 7 Professional (x86, x64)
Yes Yes WS
MS Windows 7 Ultimate (x86, x64)
Yes
Yes
WS
MS Windows Vista Home Basic (x86, x64)
Yes Yes WS
MS Windows Vista Home Premium (x86, x64)
Yes
Yes
WS
MS Windows Vista Business (x86, x64)
Yes Yes WS
MS Windows Vista Ultimate (x86, x64)
Yes
Yes
WS
MS Windows XP Home
Yes Yes WS
MS Windows XP Professional
Yes Yes WS
MS Windows XP Professional x64 Edition
Yes
Yes
WS
MS Windows XP Professional SP2
Yes Yes WS
MS Windows XP Professional SP3
Yes
Yes
WS
MS Windows NT/4.0 Server
Yes S No
MS Windows 98/Me
Yes
No
WS
Linux (kernel: 2.4.9 – 2.6.x)
Yes S No

12 © Acronis, Inc
* - – – S server license, WS workstation license.
Acronis Snap Deploy enables, with certain limitations (some operations or options will not be
available), -imaging and deployment of any PC based operating system. For example, Windows
98/NT/ME .9 2.6.x), NT/4.0 Server, Linux (kernel: 2.4 – - -y can be deployed only as is, on the
settings adjustment is not performed.
The Acronis Universal Deploy option is not applicable to Windows 98/NT/ME and NT/4.0 Server.
1.5 License policy
Acronis Snap Deploy licensing is based on the number of deployed and/or managed computers
(servers or workstations.) For example, to deploy a system on 100 computers you need 100
deployment licenses. No additional licenses are required to manage the deployed computers or re-
deploy any of them.
1.5.1 Server and workstation licenses
Acronis Snap Deploy has two types of licenses. A license for the server product is needed to deploy a
server operating system or install the management agent on a server operating system . A license for
the workstation product is needed to deploy a workstation operating system or install the management
agent on a workstation operating system.
A workstation license is needed to deploy a disk or partition that does not contain an operating
system, if the en assignedtarget computer has not be a license before.
Linux is considered as a server OS. The explicit list of server and workstation operating systems is in
the previous section.
If Acronis Snap Deploy fails to identify the operating system, the operating system is type of
considered as a workstation OS.
A server license could be used instead of workstation license a automatically or through a prompt.
1.5.2 Licenses for Acronis Universal Deploy
Acronis Universal Deploy is an add- s on to Acronis Snap Deploy and has its own serial number and
license agreement.
The Acronis Uni used and versal Deploy licenses are counted, upgraded in the same way as the Acronis
Snap Deploy licenses. Acronis Universal Deploy also has two types of licenses for server and
workstation operating systems. You need one Universal Deploy license . per target computer
You do not need a license to install Acronis Universal Deploy. However, do not forget to add the
Acronis Universal Deploy licenses to the license server before starting deployment. If the licenses are
not found during deployment, the Acronis Universal Deploy step will be skipped.
1.5.3 Acronis Snap Deploy trial version
The Acronis Snap functionality of the standard version. To upgrade Deploy trial version has all the
from the trial version to the standard product you do not need to re-download the software. Simply
buy the licenses and import them to the license server.

© Acronis, Inc 13
1.6 Upgrade to v 3
To upgrade from Acronis Snap Deploy version 2 1 3 .0 or .0 to version , upgrade both the licenses and
the program components.
1.6.1 Upgrading licenses
Buy the necessary number of upgrade licenses and import the licenses to your license server.
The table illustrates below how the various combinations of licenses will be upgraded. Use the table to
calculate 3 the number of upgrade licenses you need.
W
W
W
WW hat you can do w
hat you can do w
hat you can do w
hat you can do what you can do w ith A
ith A
ith A
ith Aith ASD
SD
SD
SD SD 3
3
3
33
after th
after th
after th
after thafter th e upgrade
e upgrade
e upgrade
e upgradee upgrade
1 2 3 4 5 6 7
Deploy to
any target
Deploy to
Host1
Deploy to
any target
Deploy to
Host1
Deploy to
any target
Deploy to
Host1
Deploy to
any target
You
buy
3 Upg
3 Upg
3 Upg
3 Upg
3 Upg
3 Upg
3
You
have
- - - 2.0 Upg 2.0 Upg 2.0 2.0
1.0 1.0 1.0 1.0 - - -
New Used
(assigned
to Host1)
Ne Used w
(assigned
to Host1)
New Used
(assigned
to Host1)
-
(1) yet You have a v 1.0 license that has not been used. Import a v 3 upgrade license. You will be
able to deploy to any computer with Acronis Snap Deploy 3 .
(2) You have a v 1.0 license that is used and 3 assigned to the computer Host1. Import a v
upgrade license. You will be able to deploy to Host1 with Acronis Snap Deploy 3.
(3) have yet You have a combination of v 1.0 license v 2.0and licenses upgrade license. The not
been used. Import a v 3 upgrade license. You will be able to deploy to any computer with
Acronis Snap Deploy 3 .
(4) You have a combination of v 1.0 license and v 2.0 upgrade license. Either license assigned is
to the computer Host1 by v 1.0 or v 2.0 . Import a v ble to 3 upgrade license. You will be a
deploy to Host1 with Acronis Snap Deploy 3 .
(5) yet You have a v 2.0 license that has not been used. Import a v 3 upgrade license. You will be
able to deploy to any computer with ASD 3.
(6) You have a v 2.0 license that is used and assigned to the computer 3 Host1. Import a v
upgrade license. You will be able to deploy to Host1 with Acronis Snap Deploy 3.
(7) You don’t have any ASD licenses. Import a v 3 license. You will be able to deploy to any
computer with ASD 3.
1.6.2 Upgrading components
Install the components of v 3 over the v 2.0 or v 1.0 components.
Components of v components since they use 3 cannot communicate with v 2.0 and v 1.0
cryptographic communication protocol that was not supported by the previous program
versions. Remove old Acronis Snap Deploy components, if the new components are installed
on other computers.

14 © Acronis, Inc
1.7 Technical support
As part of a purchased annual Support charge you are entitled to Technical Support as follows: to the
extent that electronic services are available, you may electronically access at no additional charge,
Support services for the Software, which Acronis shall endeavor to make available twenty four (24)
hours a day, seven (7) days per week. Such electronic services may include, but are not limited to:
user forums; software-specic information; hints and tips; bug x retrieval via the internet; software
maintenance and demonstration code retrieval via a WAN-accessible FTP server; and access to a
problem resolution database via Acronis customer support system.
Support shall consist of supplying telephone or other electronic support to you in order to help you
locate and, on its own, correct problems with the Software and supplying patches, updates and other
changes that Acronis, at its sole discretion, makes ronis makes or adds to the Software and which Ac
generally available, without additional charge, to other licensees of the Software that are enrolled in
Support. Upon mutual agreement by both parties, Acronis shall: (i) supply code corrections to you to
correct Software malfunctions in order to bring such Software into substantial conformity with the
published operating specications for the most current version of the Software unless your
unauthorized modifications prohibit or hamper such corrections or cause the malfunction; or (ii) supply
code corrections to correct insubstantial problems at the next general release of the Software.
More information about contacting Acronis Technical Support is available at the following link:
http://www.acronis.com/enterprise/support/

© Acronis, Inc 15
2. Understanding Acronis Snap
Deploy
This chapter the Acronis Snap Deploy infrastructure components describes and their interaction.
2.1 Terminology
The following table lists the common terms and descriptions used in this document.
M
M
M
MMast
ast
ast
astaster system
er system
er system
er systemer system
The system to be deployed.
M
M
M
MMa
a
a
aaster
ster
ster
sterster im
im
im
im im a
a
a
aage
ge
ge
gege
(I
(I
(I
(I(Im
m
m
mm ag
ag
ag
agage)
e)
e)
e)e)
A file that contains the master system in a packaged form. The le has a
“.tib” extension.
Onl
Onl
Onl
OnlOnlin
in
in
inine im
e im
e im
e ime im agi
agi
agi
agiaging
ng
ng
ngng
Taking an image while the master system is in a production state (the
operating system is running on the master computer.)
Offline
Offline
Offline
OfflineOffline im
im
im
im im agin
agin
agin
aginaging
g
g
gg
Taking an image while the master computer is booted into Acronis or
Windows preinstallation environment.
Dep
Dep
Dep
DepDeploy
loy
loy
loyloym
m
m
mm en
en
en
enent
t
t
tt
Transferring the operating system (OS), applications and data from the
master image le to a physical In most cases, deployment is hard disk.
performed by multicasting the image through the network.
Standalo
Standalo
Standalo
StandaloStandalone
ne
ne
ne ne
dep
dep
dep
depdeploy
loy
loy
loyloym
m
m
mmen
en
en
enent
t
t
tt
Deployment on a computer isolated from a network or included in a
network without Acronis Snap Deploy infrastructure. Standalone
deployment is performed locally using the bootable Acronis Snap Deploy
component.
T
T
T
TTa
a
a
aarget disk
rget disk
rget disk
rget diskrget disk
The physical disk to be deployed to (an internal hard disk of the target
computer.)
Ta
Ta
Ta
TaTar
r
r
rrg
g
g
gge
e
e
eet
t
t
tt c
c
c
c co
o
o
oom
m
m
mm p
p
p
ppu
u
u
uut
t
t
tte
e
e
eer
r
r
rr
(T
(T
(T
(T(Target)
arget)
arget)
arget)arget)
The hardware to be deployed to.
Dep
Dep
Dep
DepDeploy
loy
loy
loyloym
m
m
mm en
en
en
enent
t
t
t t
tem
tem
tem
temtemplate
plate
plate
plate plate
(Tem
(Tem
(Tem
(Tem(Templa
pla
pla
plaplate)
te)
te)
te)te)
C onfiguration parameters of the deployment operation:
1. Path to the master image
2. The operation mode (multicast or unicast, how to handle the target disk
free space etc.)
3. Settings to be applied to the deployed systems (DNS names, user
accounts etc.)
4. Operations to be performed on the deployed systems (transfer les,
execute applications, shut down, restart)
Once you save a deployment template, you can use it in the future.
Adm
Adm
Adm
AdmAdm in
in
in
ininistra
istra
istra
istraistrator
tor
tor
tortor
The person who has rights to manage Acronis Snap Deploy infrastructure.
Custom
Custom
Custom
CustomCustom
dep
dep
dep
depdeploy
loy
loy
loyloym
m
m
mmen
en
en
enent
t
t
tt
m
m
m
mmode
ode
ode
odeode
The mode when deployment can be initiated on the target side only.

16 © Acronis, Inc
User
User
User
UserUser
The person es the custom deployment on the target side who initiat . This
term relates to the custom deployment mode only.
2.2 Components
Acronis Snap Deploy includes the following components:
1. Acronis Snap Deploy Management Console is an administrative tool for remote access to
Acronis servers . and Acronis Snap Deploy Management Agent
When disconnected from the Acronis components, the console allows only installing Acronis
products on remote machines.
2. Acronis OS Deploy Server is a component that performs centralized deployment through the
network with the help of Acronis Snap Deploy Agents.
3. Acronis Snap Deploy Agent is a bootable component that performs deployment on each target
computer under control of Acronis OS Deploy Server. the
There are two ways to load Acronis Snap Deploy Agent on target computers: locally from bootable
media or remotely using Acronis PXE Server.
4. Acronis Master Image Creator , is a bootable locally controlled component that takes an image
of the master system.
There are two ways to load Acronis Master Image Creator on a master computer: directly from
bootable media or remotely using Acronis PXE Server.
5. Acronis Snap Deploy Management Agent is a component that takes an image of the master
system in Windows environment under the administrator’s control through the ronis Snap Ac
Deploy Management Console. The administrator can also manage files and execute applications on
a remote computer using Acronis Snap Deploy Management Agent.
6. Acronis PXE Server allows for network booting computers into Acronis Snap Deploy Agent,
Acronis Master Image Creator or Preinstallation Environment. The computers must support PXE.
Using Acronis PXE Server considerably reduc time required for booting multiplees the computers
as compared to using bootable media. It also eliminates the need to have a technician onsite to
install the bootable media into the system that must be booted.
7. Acronis Wake on LAN Proxy is a component that enables the Acronis OS Deploy Server to
wake the target computers located in the other subnet.
8. Acronis Standalone Utility is a bootable component that enables full functional deployment
with GUI on a standalone computer (a computer isolated from the network or included in a
network without Acronis Snap Deploy infrastructure.)
9. Acronis License Server is a component that tracks licenses of Acronis products.
10. Acronis Universal Deploy -(optional) is an add on to Acronis Snap Deploy that enables
hardware-independent operating system deployment.

© Acronis, Inc 17
2.3 Support for file systems and storage media
2.3.1 Supported le systems
Acronis Snap Deploy provides full-featured imaging and deployment of the following file systems:
- FAT16/32
- NTFS
- Ext2/Ext3
- ReiserFS
- Reiser4
- Linux SWAP
- XFS
- JFS
2.3.2 Supported media
Acronis Master Image Creator can save an image:
- on a network share
- on the master computer internal hard drive
- - on USB and FireWire (IEEE 1394) storage devices (hard drives, flash drives) attached to the
master computer
- - - on DVD+R/RW, DVD R/RW, CD R/RW loaded in the master computer media drive.
A sizeable image can be split between multiple media automatically .
Acronis OS Deploy Server can deploy images located:
- in network shared folders
- on the deploy server internal hard drive
- - on USB and FireWire (IEEE 1394) storage devices (hard drives, ash drives) attached to the
deploy server
- - - on DVD+R/RW, DVD R/RW, CD R/RW loaded in the deploy server media drive.
The best practice is keeping images on the deploy server hard drive. This minimizes network trac
during deployment.
The image created on removable e media disk. To deploy an image media has to fit into on spread
over several CDs, DVDs or other media, copy all parts of the image to the same folder on the deploy
server or on a network share.
Acronis Standalone Utility can deploy images located:
- in network shared folders
- - on USB and FireWire (IEEE 1394) storage devices (hard drives, ash drives) attached to the
managed computer
- - - on DVD+R/RW, DVD R/RW, CD R/RW loaded in the managed computer media drive.
The image created on removable media eploy an image has to fit into one media disk. To d spread
over several CDs, DVDs or other media, copy all parts of the image to the same folder on an external
drive or a network share.
2.4 Usage
This section gives a general idea of using the product and does not contain the detailed instructions on
how to perform operations. Nevertheless, advanced users are welcome to use this section as a step-
by- step quick start guide. The details can be found in the further User’s Guide sections.

© Acronis, Inc 19
2.4.2 Online imaging
Online imaging means that the master system is imaged live (without reboot or suspending
operations.) Online imaging can be performed remotely whenever you need. The disadvantage is that
you have to install imaging software that (1) takes a license and (2) is included in the master image.
This is not always rational.
1. Configure the master system.
2. Install Acronis Snap Deploy Management Console and Acronis License Server. Import licenses to
the license server.
3. Install Acronis Snap Deploy Management Agent on the ma ster system locally or remotely, using
Acronis Snap Deploy Management Console. This will take a license from the license server. Reboot
on pro Acronis Snap Deploy Management Agentmpt. Once is installed, you can image the master
system online (without reboot) at any time.
4. Connect the console to the master system, click Create Master Image > Create master - -> Next
image on a remote computer. Follow the Create Image Wizard instructions to configure and
launch the imaging operation. The image can be saved on a network share, detachable or
removable media.
Onl
Onl
Onl
OnlOnlin
in
in
inine im
e im
e im
e ime im agi
agi
agi
agiagin
n
n
nng
g
g
gg
2.4.3 Deployment
The following illustrates the Acronis components functionality by the example of manual deployment.
During event driven and scheduled deployment the components - perform similarly.
Deployment presumes that you have created a master image, so at least the Acronis Snap Deploy
Management Console is installed.
1. Inst all Acronis License Server. Import licenses to the license server. Install Acronis OS Deploy
Server.
2. Do one of the following:

20 © Acronis, Inc
Create bootable media w command line ith Acronis Snap Deploy Agent (or PE with Acronis Snap Deploy
utility)
or
Install Acronis PXE Server, connect the console to the PXE server and upload Acronis Snap Deploy
Agent (or PE with Acronis Snap Deploy command line utility.)
3. Do one of the following depending on your choice in, : step 2
Boot the target computer(s) into Ac (or PE)ronis Snap Deploy Agent from bootable media
or
Boot the target computer(s) into Acronis Snap Deploy Agent (or PE) from the PXE Server.
You must have a DHCP server or configure the target computers network settings manually to enable
the target computers to connect to Acronis OS Deploy Server.
4. Do one of the following the agent or the PE is running, depending on whether :
- Connect the console to the Acronis OS Deploy Server. Select the Deployment tab
- This Make sure that the target computers IP addresses are displayed on the Deployment tab.
means that the computers are connected and ready for deployment
- Click Manual Deployment and follow the Manual Deployment Wizard instructions to configure and
launch the deployment operation
or
- perform deployment in PE using Acronis command line utility.
M
M
M
MManual dep
anual dep
anual dep
anual depanual deployment
loyment
loyment
loymentloyment

© Acronis, Inc 21
2.5 What is Acronis Universal Deploy
This section describes the Acronis proprietary technology that helps deploy and boot up Windows on
dissimilar hardware. Acronis Universal Deploy saves you from configuring a new master system for
each make of hardware you have to deploy . on
If you plan to deploy Windows on multiple computers that are identical to each other, but differ from
the master computer hardware; deploy the master image on one of the identical computers using
Acronis Universal Deploy. This will adjust Windows to dissimilar hardware. Then image the the
adjusted system and deploy it to the identical computers.
The Acronis Universal Deploy option is not available in the standalone mode.
2.5.1 Acronis Universal Deploy purpose
A system disk image can be deployed easily on the hardware where it was created or to identical
hardware. However, if you change a motherboard or use another processor version, the deployed
system could be unbootable. An attempt to transfer the system to a new, much more powerful
computer will usually produce the same unbootable result because the new hardware is incompatible
with the most critical drivers included in the image.
Using Microsoft System Preparation Tool (Sysprep) does not solve this problem, because Sysprep
permits adding drivers only for Plug Play devices (sound cards, network adapters, video cards - -and
etc.). As for the system Hardware Abstraction Layer (HAL) and mass storage device drivers, they must
be identical on the source and the target computers (see Microsoft Knowledge Base, articles 302577
and 216915).
Acronis Universal Deploy technology provides an ecient solution for hardware-independent system
deployment by adding the crucial Hardware Abstraction Layer (HAL) and mass storage device drivers.
2.5.2 Acronis Universal Deploy general principles
1. Automatic HAL and mass storage drivers selection
Acronis Universal Deploy searches the Windows default driver storage folders (in the image being
deployed) for HAL and mass storage device drivers and installs drivers that better t the target
hardware. You can specify a custom driver repository (a folder or folders on a network share or CD)
which will also be used for drivers search.
The Windows default driver s
torage folder is determined in the registry key
HKEY_LOCAL_MACHINE SOFTWARE\ \Microsoft\ \ \Windows Current version DevicePath. This
storage folder is usually WINDOWS/inf.
2. Manual selection of mass storage device driver
If the target hardware has a specific mass storage controller (such as a SCSI, RAID, or Fibre Channel
adapter) for the hard disk, you can install the appropriate driver manually, bypassing the automatic
driver search- - and install procedure.
3. Installing drivers for plug and play devices
Acronis Universal Deploy -relies on built in plug and play discovery and configuration process to handle
hardware dierences in devices that are not critical for the system startdeployed -up, such as video,
audio and USB. Windows takes control over this process during the logon phase, and if some of the
new hardware is not detected, you will have a chance to install drivers for it later manually.

22 © Acronis, Inc
2.5.3 Acronis Universal Deploy and Microsoft Sysprep
Acronis Universal Deploy is not a system preparation tool. You can apply it to any system image
created by Acronis products you cannot apply it to , however, images of systems prepared with
Microsoft System Preparation Tool (Sysprep).
2.5.4 Getting Acronis Universal Deploy
Acronis Universal Deploy is an add-on to Acronis Snap Deploy. It is purchased separately, has its own
license, and is installed from a separate setup le. r more information please visit Fo
http://www.acronis.com/enterprise/products/snapdeploy/universal-deploy.html.

© Acronis, Inc 23
3. Installation
3.1 System requirements
The Acronis Snap Deploy components can be installed on computers running t he following operating
systems:
T
T
T
TThe ty
he ty
he ty
he tyhe type o
pe o
pe o
pe ope of
f
f
f f license required for
license required for
license required for
license required for license required for th
th
th
ththe
e
e
e e
A
A
A
AAcronis S
cronis S
cronis S
cronis Scronis Snap D
nap D
nap D
nap Dnap D eploy M
eploy M
eploy M
eploy Meploy M anagem
anagem
anagem
anagemanagem en
en
en
enen t
t
t
t t
Agent instal
Agent instal
Agent instal
Agent instalAgent installation
lation
lation
lationlation
MS Windows Server 2008 R2
S
MS Windows Server 2008 (x86,x64)
S
MS Windows Server 2003 Service Pack 2 (x86, x64)
S
MS Windows Server 2003 R2 (x86, x64)
S
MS Windows Small Business Server 2003
S
MS Windows Storage Server 2003 R2
S
MS Windows Server 2003 x64 Editions
S
MS Windows 2000 Server
S
MS Windows 2000 Advanced Server
S
MS Windows 2000 Professional SP4
WS
MS Windows 7 Professional (x86, x64)
WS
MS Windows 7 Ultimate (x86, x64)
WS
MS Windows Vista Business (x86, x64)
WS
MS Windows Vista Ultimate (x86, x64)
WS
MS Windows XP Professional
WS
MS Windows XP Professional x64 Edition
WS
MS Windows XP Professional SP3
WS
* - – – S server license, WS workstation license.
3.2 Used p P addressesorts and I
The Acronis OS Deploy Server and the Acronis Snap Deploy Management Console use the following
ports and IP addresses for remote operation:
- UDP port: 9876
- TCP port: 9876, if busy, choose a port at random
- IPv4 multicast address: 239.255.219.45
- A cronis Snap Deploy Management Console UDP port: 9877, if busy, choose a port at random
The Acronis PXE Server uses the following ports and IP addresses:
- UDP port: 67, 68, 69.
- Broadcast address: 255.255.255.255
For a remote installation, the TCP port 25001 is used.
If you are using a rewall, you might have to set the appropriate access options.

24 © Acronis, Inc
3.3 General rules of installation
3.3.1 Installation le
Acronis Snap Deploy installation le includes the following components and the components’ features:
Acronis Snap Deploy Management Console
Acronis Snap Deploy PE Builder
Media Builder for Acronis Image Creator
Acronis Media Builder for Snap Deploy Agent
Utility Media Builder for Acronis Standalone
Acronis License Server
Acronis License Server
Acronis License Server Management Console
Acronis License Server Management Tool
Acronis OS Deploy Server
Acronis PXE Server
Acronis Snap Deploy Management Agent
Acronis WOL Proxy
T
T
T
TThe
he
he
hehe instal
instal
instal
instal installation w
lation w
lation w
lation wlation w indow
indow
indow
indowindow
The Acronis Universal Deploy option installs from its own installation le.
3.3.2 Common installation congurations
Acronis Snap Deploy components can be installed in various congurations, in terms of distributing the
components and features among the networked computers.

26 © Acronis, Inc
to the management agent installed on the master computer. The management agent will be included
in the master image and deployed on all target computers. This will enable you to manage les and
execute applications on target computers at any time after deployment.
However, having excess software in the master image is not always rational. installation of Besides,
the agent takes a license.
We recommend that you create a master image using bootable Acronis Master Image Creator or the
command line utility in PE. Nevertheless, having at least one management agent on the network (not
necessarily on the master computer) makes sense. You will be able to validate (check) your images
integrity using the management agent.
6. To add the Acronis OS Deploy Server ability to deploy in other subnet (across a switch) to any
configuration but (1), install Acronis WOL Proxy on any server in the subnet where the target
computers are. No additional actions are required.
Acronis WOL Proxy has to be installed only if:
- you are going to perform scheduled deployment (manual or event ven deployment do not -dri
require WOL Proxy Server)
AND
- all or some of the target computers are in subnet other (s) than Acronis OS Deploy Server.
3.4 Installation of Acronis Snap Deploy Management Console
Acronis Snap Deploy Management Console is an administrative tool for remote access to Acronis
servers and Acronis Snap Deploy Management Agent. Install Acronis Snap Deploy Management
Console on any networked computer from which you prefer to operate.
To install Acronis Snap Deploy Management Console:
1. Run the Acronis Snap Deploy setup program
2. Click Install Acronis Snap Deploy Management Console
3. Follow the Install Wizard instructions on the screen.
Typical and complete installations install, besides , Acronis Snap Deploy Management Console Media
Builder fo Media Builder for r Acronis Image Creator, Acronis Snap Deploy Agent and Media
Builder for Acronis Standalone Utility. We strongly recommend that you install all the features
that enable creation of bootable CD, DVD or other removable media with bootable Acronis
components.
Once Acronis Snap Deploy Management Console is installed, you can install the other components
remotely using the console’s remote installation feature (for more information, see
4.2 Installation
and update of Acronis components on remote computers
).
3.5 Installation of Acronis License Server
3.5.1 Installation
Acronis License Server Install is a component that tracks licenses of Acronis products. Acronis
License Server nstalling on a computer accessible to Acronis OS Deploy Server. I both products on
the same computer would make sense.
A typical installation installs Acronis License Server and the Acronis License Server Management
Console. A complete installation installs, besides these two, Acronis License Server Management Tool.
A custom installation lets you choose components to install.

© Acronis, Inc 27
The Acronis License Server Management Tool -is a simple command line utility for controlling
Acronis License Server. Acronis License Server Management Console an easy- -provides to use
GUI. Alternatively, you can control Acronis License Server using Acronis Snap Deploy Management
Console. So you can choose to install only the Acronis License Server.
If you have already installed Acronis License Server that came with another Acronis product,
you still need to install Acronis License Server that came with Acronis Snap Deploy. You can
install both license servers on the same computer. The Acronis License Server then will be
seen as a common server for all Acronis products.
There is no need to install Acronis License Server Management Console or Acronis License
Server Management Tool once again, because you already have the necessary management
instruments.
To install Acronis License Server:
1. Run the Acronis Snap Deploy setup program
2. Click Install Acronis License Server
3. Follow the Install Wizard instructions on the screen.
4. Reboot on prompt.
After installation, Acronis License Server launches automatically as Windows service.
Before installing Acronis OS Deploy Server, import serial numbers to Acronis License Server either in
command-line mode or using Acronis Snap Deploy Management Console.
3.5.2 Adding licenses using Acronis Snap Deploy Management Console
1. Run the Acronis Snap Deploy Management Console.
2. Click Manage licenses. Connect to the computer where Acronis License Server is installed.
3. ck Cli Add License on the sidebar.
4. In the Add Lic number or a path to the .txt or .eml file containing ense window, type in the serial
the serial numbers. Or you can browse to the le.
5. In the final window, click Proceed. Acronis License Server performs the operation and reports the
number of newly- added licenses.
Th
Th
Th
ThThe
e
e
ee
lic
lic
lic
liclicens
ens
ens
ensense serv
e serv
e serv
e serve server
er
er
erer ha
ha
ha
ha has 1
s 1
s 1
s 1s 10
0
0
00 serv
serv
serv
servserver
er
er
erer lic
lic
lic
liclicens
ens
ens
ensenses
es
es
eses

28 © Acronis, Inc
3.5 icenses.3 Adding l in command line mode
If you have insta Acronis License Server Management Tool, you can add licenses to the Acronis lled
License Server in line mode.the command
1. Run cmd.exe (Windows Command Prompt)
2. Go to the folder where Acronis License Server is installed. By default, it is
\ \ \ Program Files Acronis LicenseServer
3. Enter the following command:
LicenseServerCmdLine --import- file [servername] [filename]
where:
servername – name of the computer where Acronis License Server is installed
filename – name of the file (*.txt or *.eml) with the serial n umbers
Example:
This n \ - will add the serial umbers from C: AcronisEnglish.txt to the license server Ltest 2.
3.6 Installation of Acronis OS Deploy Server
Acronis OS Deploy Server is a component that performs centralized deployment through the
network with the help of Acronis Snap Deploy Agents.
Before installing Acronis OS Deploy Server, you need to install the Acronis License Server and import
license numbers to it (for more information see the previous section).
To install Acronis OS Deploy : Server
1. Run the Acronis Snap Deploy setup program
2. Click Install Acronis OS Deploy Server
3. Follow the Install Wizard instructions on the screen.
4. Reboot on prompt.
The wizard will ask you for Acronis License Server. Browse to the server, or enter its name or IP
address, or let the server be found automatically on the network. t decrease the number of This will no
deployment licenses. The program just checks the availability of the licenses and stores the specied
Acronis License Server parameters to be able to ac se Server later, when the cess the Acronis Licen
deployment is launched.
If during Acronis OS Deploy Server installation the License Server was specied by its IP
address, the Acronis OS Deploy Server will not be able to nd it in future in case the
sp ecied IP address changes.

32 © Acronis, Inc
3.12 Using Acronis License Server
This s installation procedure.ection steps does not describe of the It contains general information
necessary for understanding Acronis License Server and covers more operations with licenses than
described in
3.5.2 Adding licenses using Acronis License Server Management Console
and
3.5.3
Adding licenses in command line mode
.
3.12.1 Understanding Acronis License Server
The Acronis License Server is a mechanism that tracks licenses of Acronis products. Acronis Snap
Deploy licensing is based on the number of deployed and/or managed computers (servers or
workstations). For example, to deploy a system on 100 computers you need 100 deployment licenses.
No additional licenses are required to manage the deployed computers or re- deploy any of them.
Acronis Universal Deploy is an add-on to Acronis Snap Deploy and has its own serial number and
license agreement.
Acronis License Server tracks the licenses using a MAC address, which is unique for each network
interface card (NIC). Although a MAC address is usually hardwired to the NIC, some operating systems
offer a way to change it. It is important to note that attempting to change the MAC address on a
system may impede the Acronis License Server operation and prevent you from other deployments to
the same computer or from managing that computer remotely.
When installing Acronis OS Deploy Server, you have to specify the Acronis License Server. Once the
Acronis License Server is the program checks for available licenses on the server and stores its found
net address to be able to access the Acronis License Server later, when deployment is launched.
When starting a deployment, Acronis OS Deploy Server checks the availability of free licenses on the
Acronis License Server. If there are enough free licenses for ment, the the deploy process will run and
the number of free licenses will decrease by the number of deployed systems.
Acronis License Server can import multiple license numbers from .txt or .eml les, saving you from the
time- consuming procedure of typing in each number.
When upgraded, recovered or reinstalled, the Acronis License Server keeps all the imported licenses
intact. However, it is recommended that you copy the file(s) with license numbers to removable
media, or create a hard copy of that file(s) and keep it in a safe place. This ensures that you have
license data available in case of hardware failure.
3.12.2 Viewing information about licenses
1. Run the Acronis Snap Deploy Management Console.
2. Click Manage licenses. Connect to the computer where Acronis License Server is installed. This
will display all serial numbers available on the Acronis License Server. One serial number can
contain multiple licenses.

© Acronis, Inc 33
You have 10
You have 10
You have 10
You have 10You have 10
server licen
server licen
server licen
server licenserver licenses and 5
ses and 5
ses and 5
ses and 5ses and 5 w
w
w
w w ork
ork
ork
orkorksta
sta
sta
stastation
tion
tion
tion tion licenses
licenses
licenses
licenseslicenses
Right the -click on the column headings bar to choose details to display: Product Name, Serial Number,
Import Date, Expiration Date and Total number of licenses assigned to each serial number, as well as
how many of them are available (i.e. free) and used. For example, if one license corresponds to one
serial number, Total=1, Available=1, Used=0 (if the license is free) or Available=0, Used=1 (if the
license has been allocated.)
3. To display more information about used licenses, select Manage Used Licenses on the sidebar.
(This item does not appear while all licenses are free.)
The Used -mode lists all licenses that are allocated. Right click on the column headings bar to choose
the details to display: Product Name, Host Name, Host Address, Serial Number, Acquire Date (date of
deployment or installation that used the license) and Renewal Date (the latter is not valid for Acronis
Snap Deploy licenses).
Tw
Tw
Tw
TwTw o
o
o
oo
license
license
license
licenselicenses are used
s are used
s are used
s are useds are used
You can sort any list using View -> Arrange Icons by.

34 © Acronis, Inc
3.12.3 Removing licenses
To completely remove a license from the Acronis License Server, select it from the list of available
licenses and click Remove License on the sidebar.
3.12.4 Using the Acronis License Server Management Tool,
The Acronis License Server Management Tool - ronis is a command line utility for controlling Ac
License Server. The LicenseServerCmdLine.exe le installs with only the Acronis License Server
complete installation. The tool is located in the installation folder, by default it is \Program
Files\ \ Acronis LicenseServer. If the le is not found, install it by running the Acronis Snap Deploy setup
program. For more information, see
3.5 Installation of Acronis License Server
.
LicenseServerCmdLine.exe uses the following syntax:
LicenseServerCmdLine [command] [option1] [option2]
LicenseServerCmdLine.exe supports the following commands and command options:
--list
Displays the list of Acronis License Servers found on the local network.
-- address]status [servername or server IP-
Displays the status of the specified License Server, i.e. the number of total/free licenses for each
Acronis product.
--import [servername] [serial key]
Adds information about a new license (new serial key). You can specify multiple serial numbers (space
separated).
--import- file [servername] [filename]
Imports license serial keys from .txt or .eml le.
--help
Shows usage.
© Acronis, Inc 35
4 Using . Acronis Snap Deploy
Management Console
4.1 Connections
4.1.1 Connect to a local machine
When started, Acronis Snap Deploy Management Console to the local machine connects if there is a
manageable Acronis Snap Deploy component on this machine. You can manage any Acronis server or
Acronis Snap Deploy Management Agent installed on the same machine without any additional actions.
T
T
T
TThe m
he m
he m
he mhe m an
an
an
ananag
ag
ag
agagem
em
em
emem ent
ent
ent
entent co
co
co
co console hom
nsole hom
nsole hom
nsole homnsole hom e w
e w
e w
e we w i
i
i
iindow
ndow
ndow
ndowndow
4.1.2 anConnect to other computer
Acronis Snap Deploy Management Console can connect to any networked computer where an Acronis
server or Acronis Snap Deploy Management Agent is installed. Once connected, you can manage the
Acronis server or perform operations using the Acronis Snap Deploy Management Agent. To connect to
any Acronis component you need the administrator’s privileges on the remote machine.
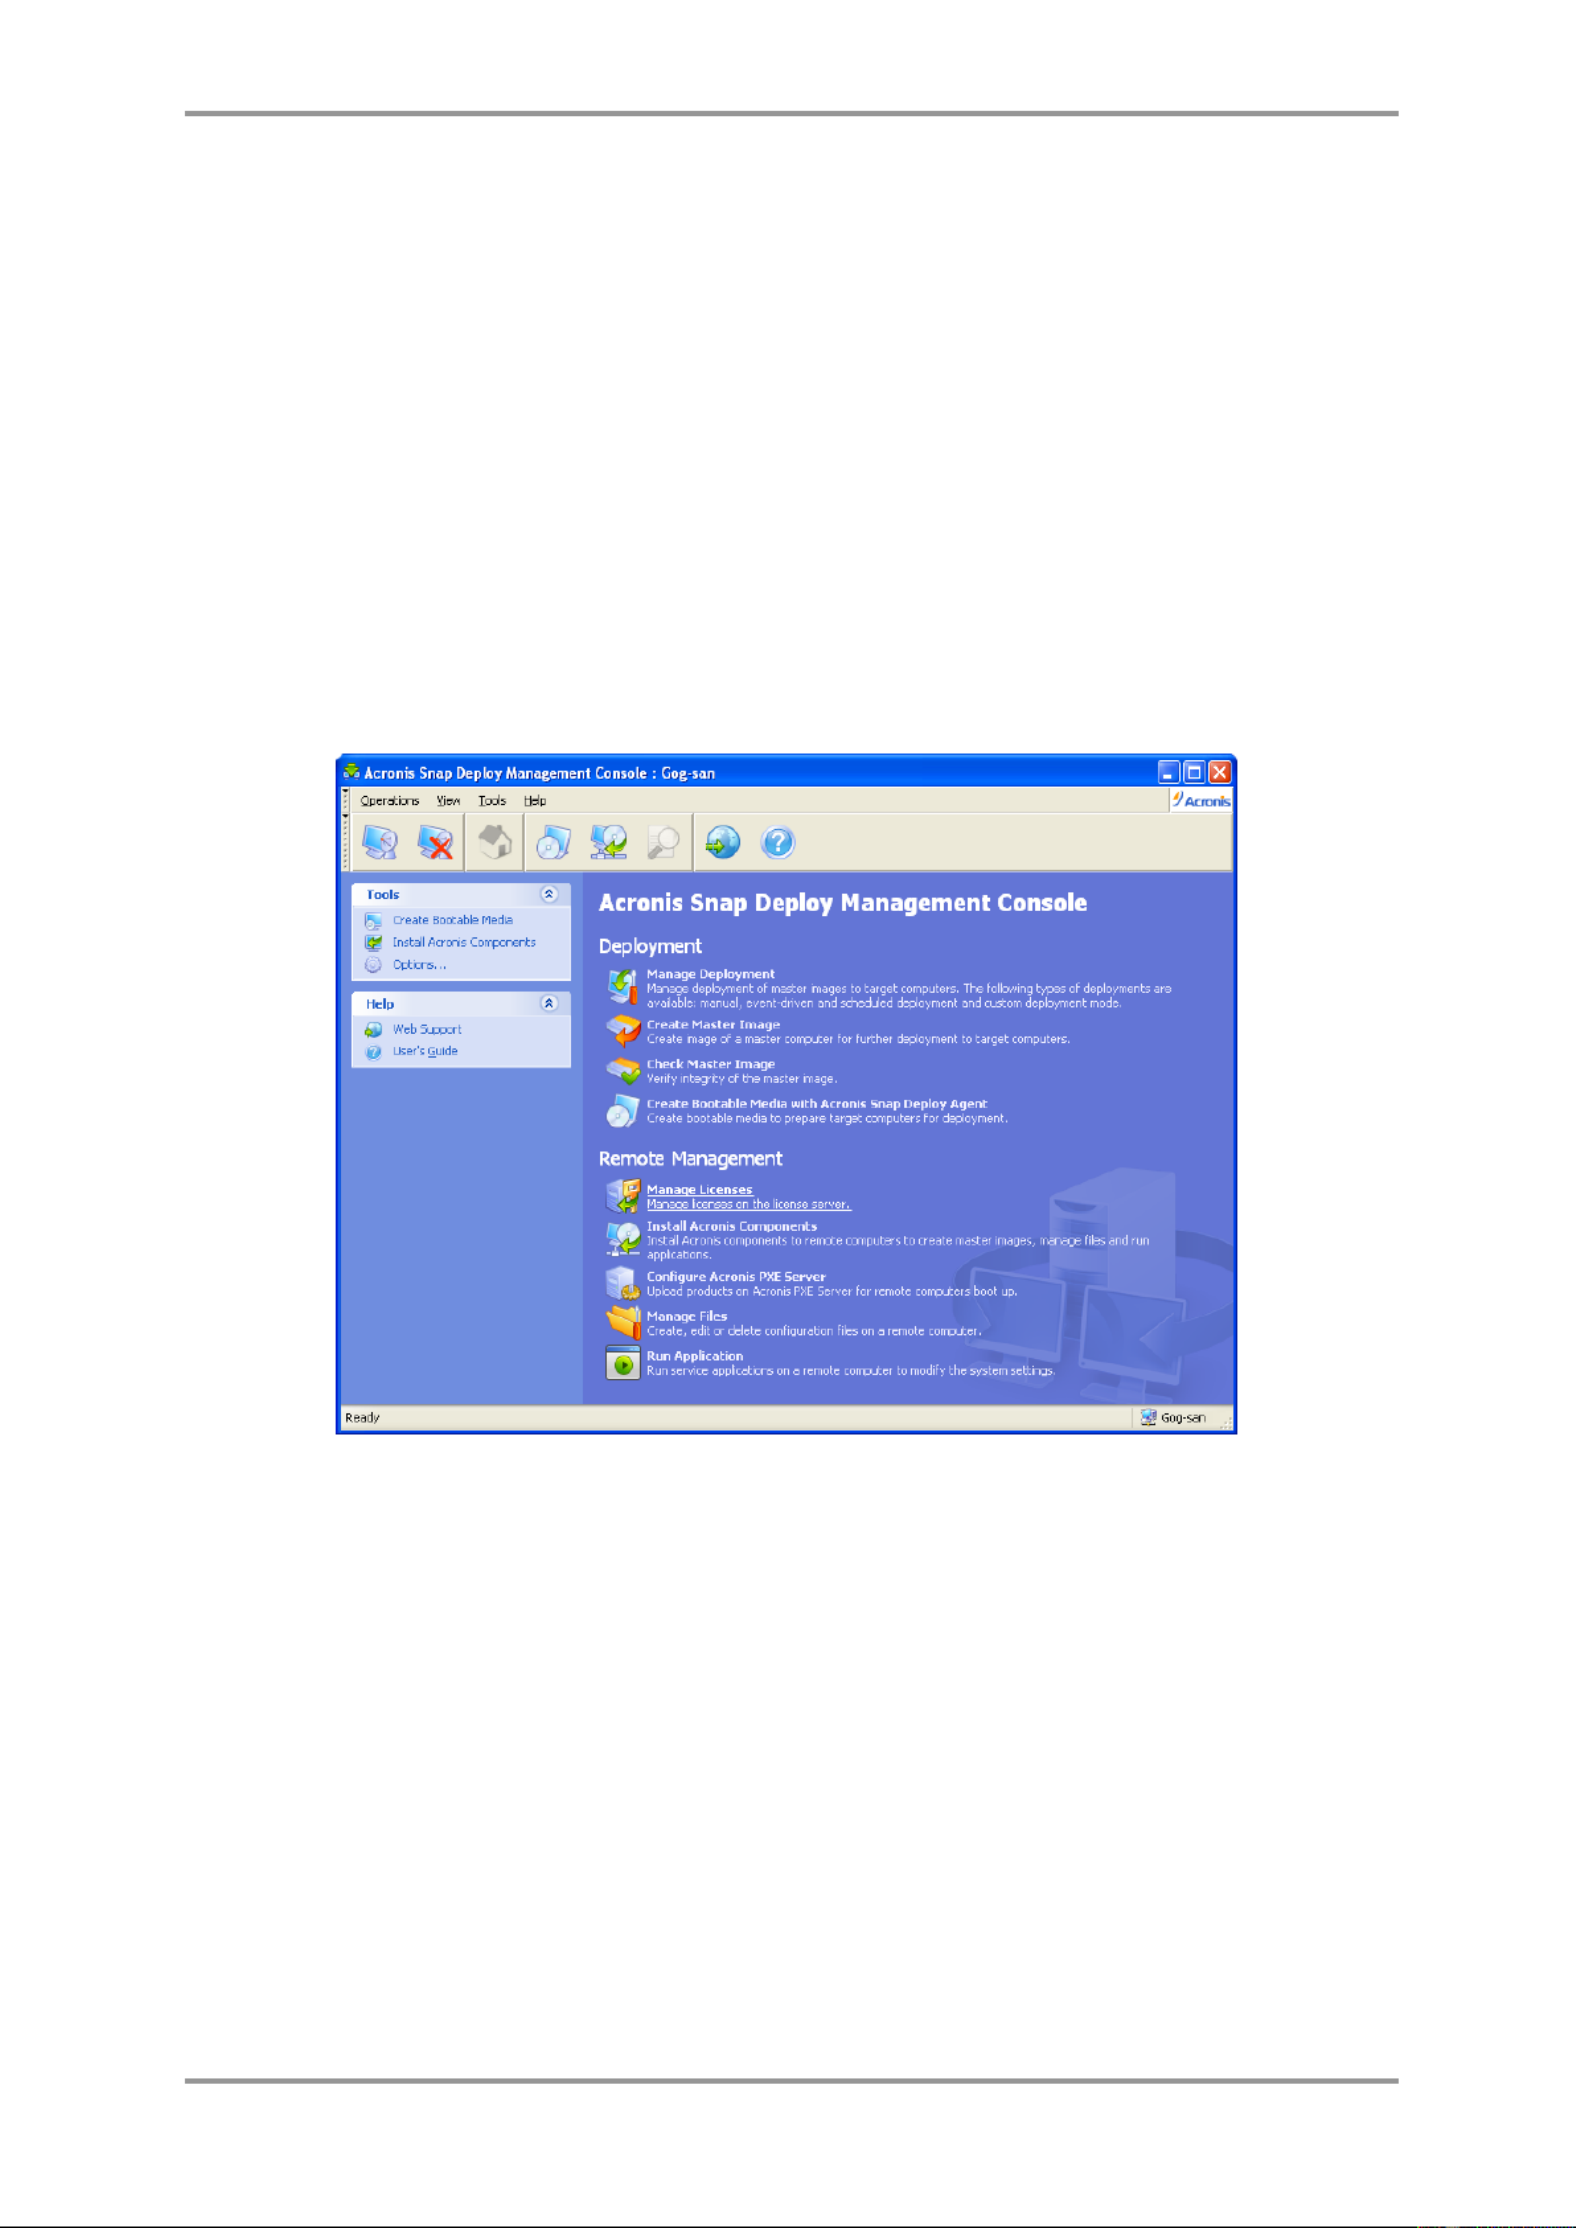
Manage Deployment – connect to Acronis OS Deploy Server.
Create Master Image – connect to Acronis Snap Deploy Management Agent (or start Acronis Media
Builder)
Check master image – connect to Acronis Snap Deploy Management Agent
Create Bootable media with Acronis Snap Deploy Agent – connection is not needed
Manage Licenses – connect to Acronis License Server
Install Acronis components – connection is not needed
Configure Acronis PXE Server – connect to Acronis PXE Server

36 © Acronis, Inc
Manage files – connect to Acronis Snap Deploy Management Agent
Execute Applications - . connect to Acronis Snap Deploy Management Agent
4.2 Installation and update of Acronis components on remote computers
The following components of Acronis Snap Deploy can be installed remotely:
- Acronis OS Deploy Server
- Acronis License Server
- Acronis PXE Server
- Acronis WOL Proxy
- Acronis Snap Deploy Management Agent.
Preparation
For a successful installation on a remote computer running any Windows XP version, the option
Control panel Folder options -> -> View -> Use simple file sharing must be disabled on that
computer.
For a 2 successful installation on a remote computer running Windows XP with Service Pack or
Windows 2003 Server, the option Control panel - - -> Windows Firewall > Exceptions > File and
Printer Sharing in the Control panel - -> Windows Firewall > Exceptions must be enabled on
that computer.
Acronis Snap Deploy utilizes TCP port 25001 for a remote installation. Make sure this port added to
exceptions in your rewall settings.
Installation
1. Click Install Acronis components.
2. Select the installer location from the list (Registered Components, Search removable media
or Specify location). The default selection will use setup les from the Registered Components
default C:\ \ \ \ Program Files Common Files Acronis RemoteInstall folder.
3. Select the Acronis component and specify the component features you want to install (for
component features see
3.3 General rules of installation
).
4. Browse to the remote computer or specify its network name or IP address.
5. Enter admin the istrator’s username and password for the remote machine.
6. Specify the Acronis License Server, if the wizard asks. You must have at least one free license on
the license server to install Acronis OS Deploy Server or Acronis Snap Deploy Management Agent.
7 Ins requires . tallation of some Acronis components system restart. If you allow immediate remote
computer reboot, check the Reboot the remote computer box.
8 . . Click Proceed
The Acronis component then will be installed on the remote computer. If system restart is necessary,
the remote machine will reboot or the program will prompt you to restart the remote machine,
depending on your choice in step 6.
To update an Acronis component on a remote computer, perform the same procedure.

© Acronis, Inc 37
4.3 Browsing logs
To view operation logs of the Acronis OS Deploy Server or Acronis PXE Server, connect the console to
the server. Logs are displayed in the lower part of the console window.
The log browsing window can be accessed by selecting Tools -> Show log.
The log browsing window contains two panes: the left one features the log list, while the right one
shows selected log contents.
The left panel can contain up to 50 logs. If there are more, you can browse the list using the More
and Less buttons with the left and right arrows.
To delete a log, select it and click Delete.
If any step was terminated by an error, the corresponding log will be marked with a red circle with a
white “X” inside.
The right window features the list of steps contained in the selected log. The three buttons to the right
control message lters: the white “X” in the red circle lters error messages, the exclamation sign in a
yellow triangle lters warnings, and the “i” in the blue circle lters information messages.
To select columns (step parameters) to display, right click the headers line or left- -click the Choose
Details button. Then check the desired parameters.
To sort messages by a particular parameter, click its header (click again to reverse order) or the
Arrange Icons by button (the second from the right) and select the desired parameter.
You can also change column width by dragging the borders with a mouse.

38 © Acronis, Inc
5. Creating Acronis bootable media
Acronis Snap Deploy has three bootable components that can boot and perform operations on any PC-
compatible hardware, including bare metal and computers with non supported le systems. The -
components are:
- Acronis Snap Deploy Agent (boots on a target computer to enable deployment performed by
Acronis OS Deploy Server)
- Acronis Standalone Utility (boots on a target computer and performs deployment on its own)
- Acronis Master Image Creator (boots on a master computer and takes an image of the
system.)
A computer can be booted into a bootable component using physical media or Acronis PXE Server.
Acronis bootable media is a physical media (CD, DVD, USB ash drive, diskettes or other media
supported by the computer BIOS as a boot device) that contains bootable components of Acronis Snap
Deploy.
Acronis PXE S t of as a kind of bootable erver with uploaded bootable components can also be though
media. That’s why you can create bootable media or configure the PXE server using the same wizard.
To start the bootable media builder, select from the start menu Acronis -> Acronis Snap Deploy
Management Console > Bootable Media Builder- . You can also run the Bootable Media Builder
from the Acronis Snap Deploy Management Console window (click Create Bootable Media on the
toolbar or the sidebar, or select Create Bootable Media from the Tools menu.)
1. ct place Sele bootable components to be d on the media.
Sel
Sel
Sel
SelSelect
ect
ect
ectecting
ing
ing
inging b
b
b
b boo
oo
oo
oooota
ta
ta
tatabl
bl
bl
blble com
e com
e com
e come com pon
pon
pon
ponponen
en
en
enent
t
t
tts
s
s
ss
Select the component that will start automatically (such component is d as the default also referre
boot menu item and specify the timeout interval for the ) component automatic start. If you
choose, say, Acronis Snap Deploy Agent and set the , Start automatically after parameter to 10
sec, the agent will launch 10 seconds after the boot menu is displayed. You also have the options:
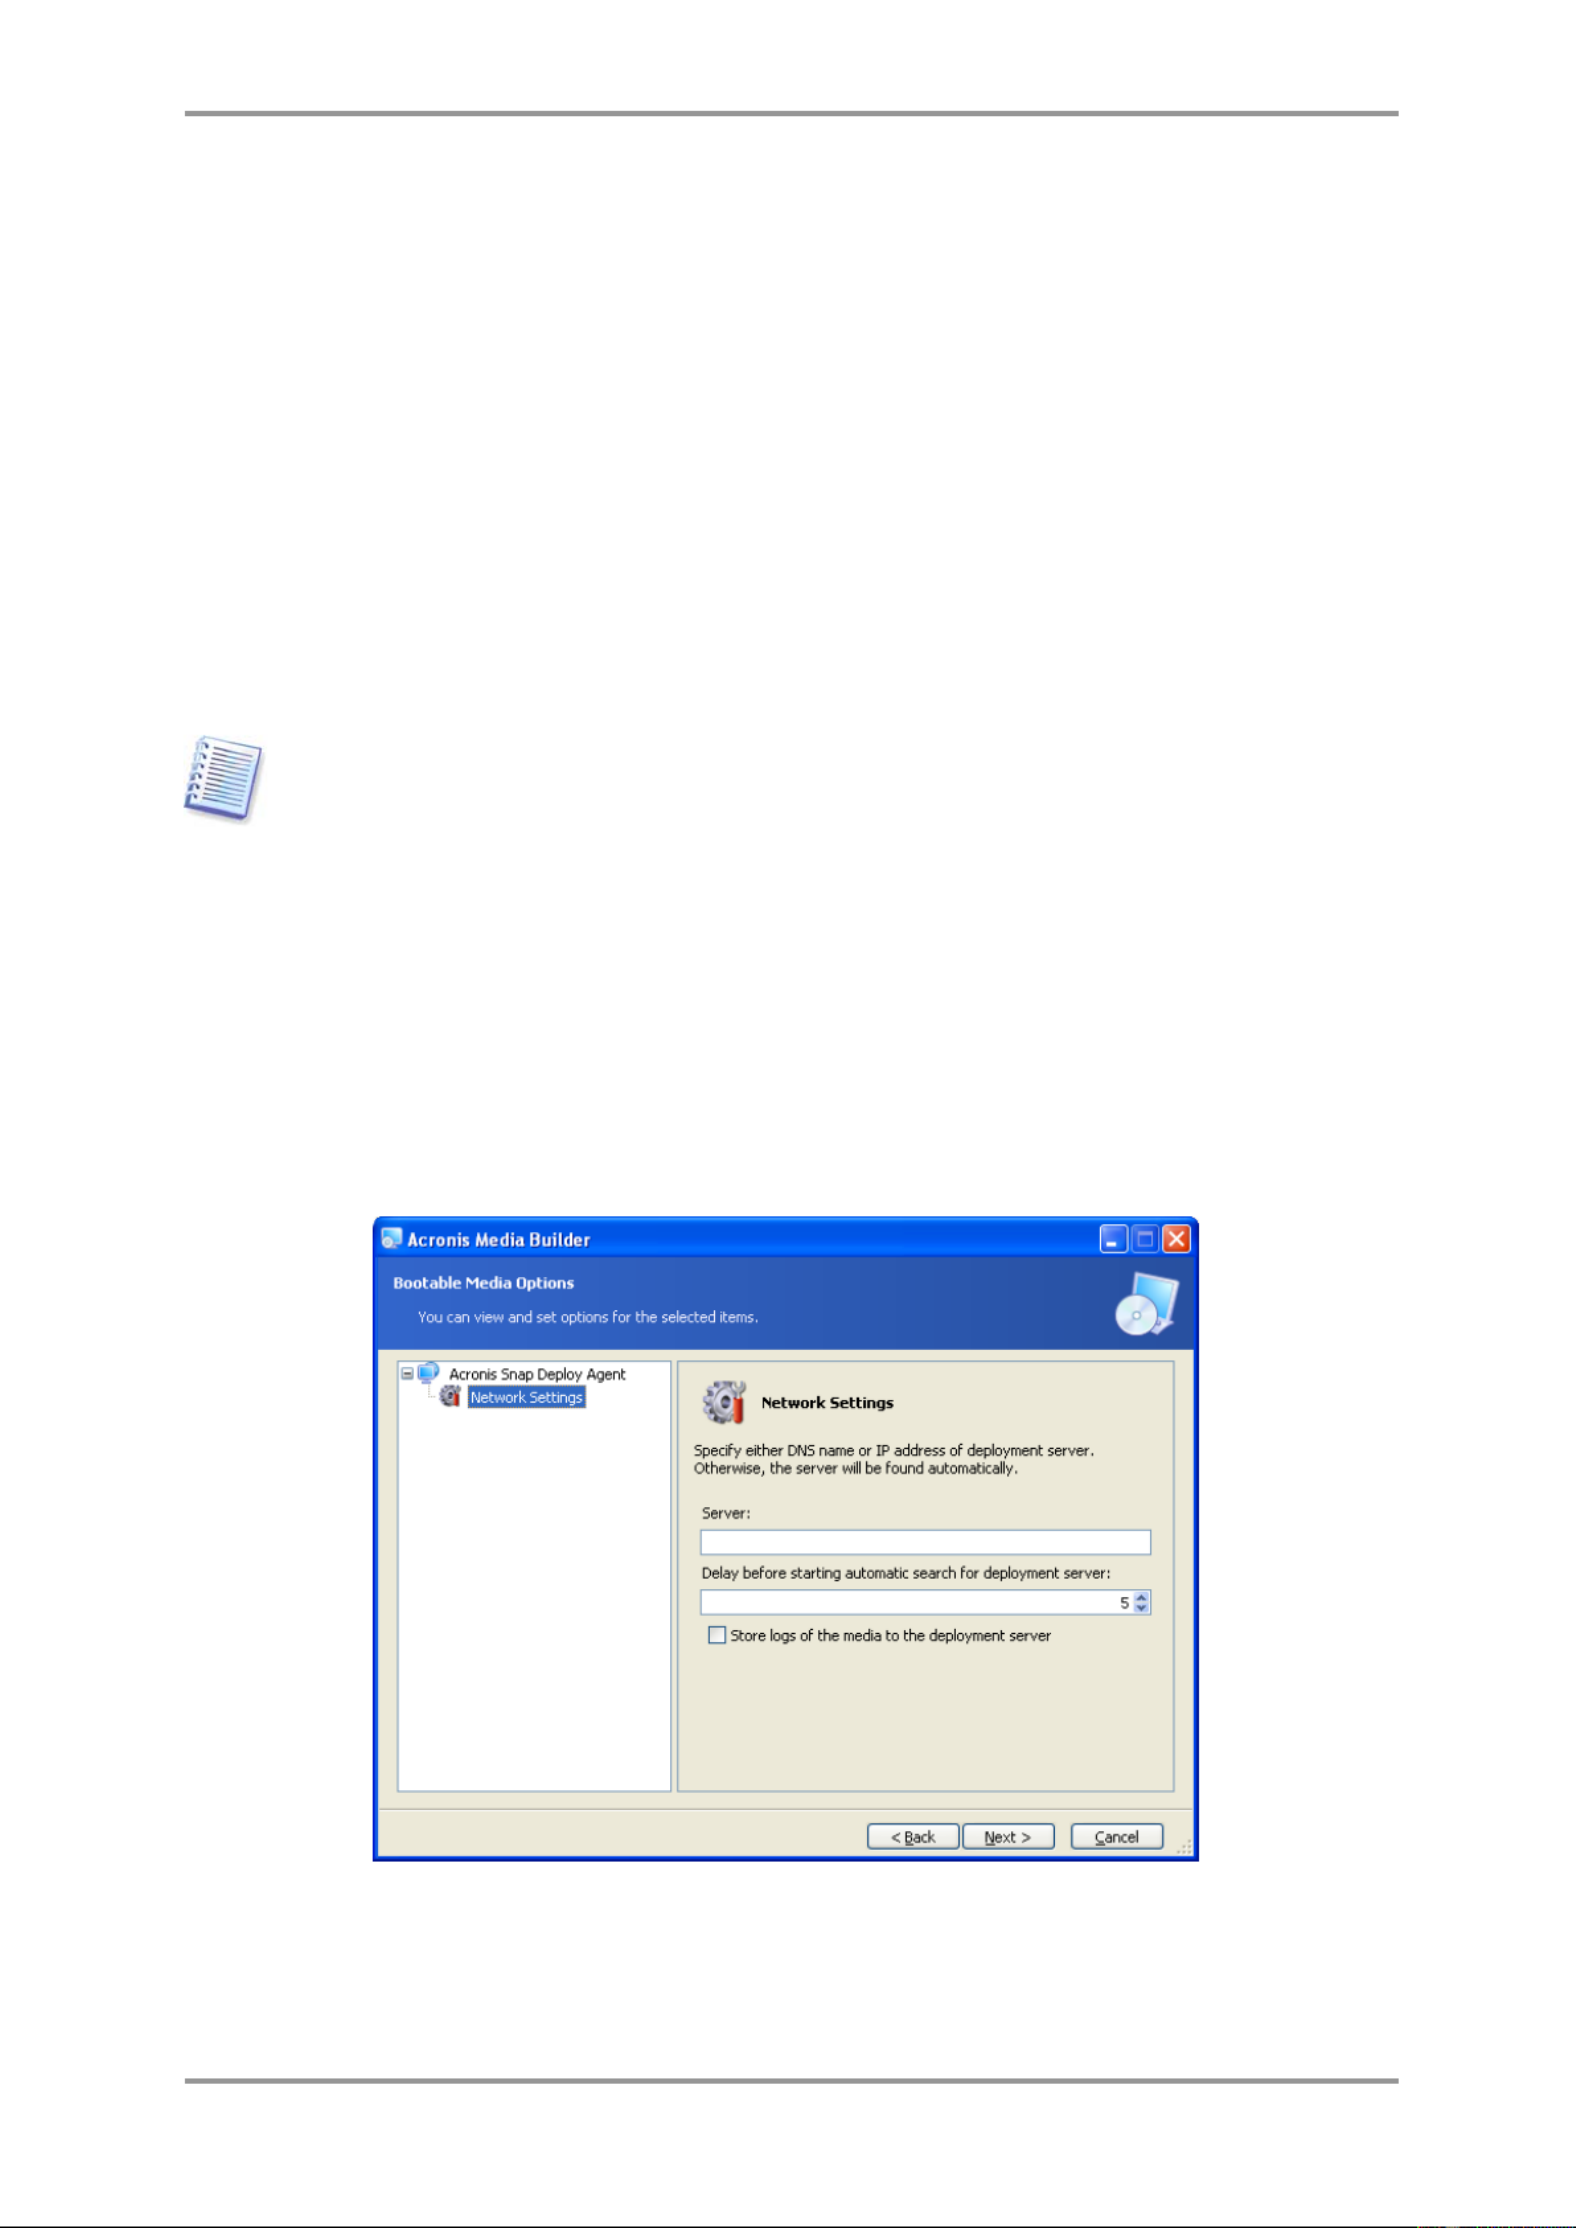
© Acronis, Inc 39
No auto start - the Acronis loader will display the boot menu and wait for someone to select
whether to boot the OS or the Acronis componentone of s.
Booting from HDD – the operating system, if present on the booting computer’s hard disk, will
start after the specied time runs out. This option is designed to make the target computer to
boot into the deployed OS after deployment. The main usage scenario is as follows.
You create a PXE package for scheduled deployment and configure the Acronis Snap Deploy Agent to
start automatically. After the scheduled deployment is completed, the target computer reboots into the
agent again and might be deployed by some other deployment operation. How to avoid this situation?
To ensure that the target computer boots into the agent
before deploymentthe
, tune the PXE Server
to work with your deployment server when scheduling the deployment. To ensure that the target
computer boots into the deployed OS
after the deployment
, choose the Booting from HDD option
when creating the PXE package for the scheduled deployment.
Acronis Standalone Utility can be placed on a physical media only. This component is not
designed to boot from a PXE server.
2. Acronis Snap Deploy Agent can be configured to connect to a specified deployment server. This
setting allows you to have multiple deployment servers that perform different functions on the
same network.
The deployment server (along with the agent network interface settings) can be specied also
onsite when booting up the agent. the agent onsite, set up a To be able to enter configuration
reasonable delay before applying the default network settings. See details in
11.1 Booting up the
targets
.
If not configured in either way, the deployment server will be found automatically.
Settin
Settin
Settin
SettinSettings fo
gs fo
gs fo
gs fogs for the Acronis
r the Acronis
r the Acronis
r the Acronisr the Acronis Snap Deplo
Snap Deplo
Snap Deplo
Snap Deplo Snap Deploy Agent
y Agent
y Agent
y Agenty Agent
The option to save log to the agent’s the deploy server is designed for troubleshooting. Normally,
you should leave this check x uncheckbo ed because additional operations performed by the agent

40 © Acronis, Inc
can slow down the deployment. If you choose to save the agent’s log, the log will be available on
the deploy server in:
\ \ \ \ \ \ Documents and Settings All Users Application Data Acronis DeployServer AgentsLogs.
3. Select the type of bootable media to create. You can:
- create CD, DVD, diskettes or other bootable media such as USB ash drive if the hardware BIOS
allows for boot from such media
- build an ISO image of a bootable disc to burn it later onto a blank disc
- upload the selected components to the PXE server. The previously uplo will be aded components
deleted from the PXE server before uploading the newly selected ones.
When using 3.5” diskettes, you will be able to write only one component at a time on a diskette
(or a set of the diskettes) — for example, Acronis Snap Deploy Agent. To write another
component, start the Bootable Media Builder once again.
4. physical To create , media, insert the blank disk so the program can determine its capacity, or
attach the flash drive.
To create a bootable disk ISO image, specify the ISO file name and the folder in which to place it.
To upload the components to a PXE server, specify the server and provide the user name and
password to access it.
5. T he components being uploaded to the PXE server can be protected with a password to prevent
the mpone co nts from unauthorized execution. The password prompt will come up before
displaying the Acronis boot menu.
P
P
P
PProtecti
rotecti
rotecti
rotectirotecting t
ng t
ng t
ng tng the bo
he bo
he bo
he bohe boot m
ot m
ot m
ot mot m enu w
enu w
enu w
enu wenu w ith
ith
ith
ithith a passw
a passw
a passw
a passw a passw o
o
o
oord
rd
rd
rdrd
6. Next, the program will calculate how many blank disks are required (in case you have not chosen
ISO or PXE) and give you time to prepare them. When you have . finished, click Proceed
After you create a boot disk, mark it and keep it in a safe place.

© Acronis, Inc 41
Acronis Snap Deploy bootable components are based on Linux kernel and equipped with the
Linux system and device drivers.
Acronis regularly supplements the driver set with drivers for new devices. However, there
may be a chance of drivers being incompatible with your hardware and the bootable
component cannot start, hangs or cannot access the necessary device. In this case, try to
elude using Linux drivers by building Bart PE or Win PE media with Acronis Snap Deploy
command line utility.

42 © Acronis, Inc
6. Conguring PXE Server
You can access Acronis PXE server conguration in the following ways:
- when creating Acronis bootable media
- when creating bootable media for custom deployment mode
- . using direct server conguration
To perform the direct PXE server configuration:
1. Start Acronis Snap Deploy Management Console
2. Click Configure PXE Server
3. Connect to the server.
Configure PXE Server – click to upload Acronis Snap Deploy bootable components in the same way
as when creating Acronis bootable media. The previously uploaded components, including PE image,
will be deleted from the PXE server before uploading the newly selected ones.
Upload PE to PXE Server – click to upload the Preinstallation Environment image (.wim or .iso)
previously created with Acronis Snap Deploy PE builder. See details in
15.2 Uploading PE images to
Acronis PXE Server.
Remove products from PXE Server – click to remove any component or PE from the PXE server.
Disable PXE Server – click to disable the PXE server. The service does not stop, but no longer
responds to incoming requests.
Enable PXE Server – click to enable the disabled PXE server.
Acronis
Acronis
Acronis
Acronis Acronis boo
boo
boo
boobootable com
table com
table com
table comtable com po
po
po
poponents a
nents a
nents a
nents anents are uploa
re uploa
re uploa
re uploare uploaded
ded
ded
dedded

© Acronis, Inc 43
7. Taking an image
To be able to deploy a system, you need to create the desired system configuration and save the
image of the system hard disk on a network share, detachable or removable media.
Acronis Snap Deploy also supports images taken with the Acronis True Image products family,
including password protected images.
7.1 Preparation of the master OS
It is very common to prepare a master operating system with the Microsoft System Preparation Tool
( ) bSysprep efore creating the system image. Sysprep is designed for corporate system administrators,
OEMs, and others who need to deploy and automatically congure operating systems on multiple
computers.
After a syspreped operating system is deployed Sysprep , generates a unique security ID (SID) for the
new host, initiates Windows mini setup for plug- -and domain - , applies play devices the computer name,
or workgroup specied membership and other settings in the Sysprep.inf answer le.
Use Sysprep on the master system if the system image will be deployed in P reinstallation E nvironment
with Acronis Snap Deploy command line utility. The command line utility cannot generate a SID or
adjust settings y, it simply deploys the system as is. on the
In Acronis environment (any case except for command line mode), Acronis Snap Deploy automatically
configures the deployed system using parameters you set in the deployment template. Therefore, you
have the choice of using the functionality of either Sysprep or Acronis Snap Deploy.
You can download Sysprep from www.microsoft.com or extract it from deploy.cab located on Windows
NT/2000/XP/Server 2003 installation CD.
We strongly recommend that you read articles about Sysprep and disk duplication in the
Microsoft Knowledge Base.
7.2 Online vs. offline imaging
A master image can be taken:
- using ster online, in Windows, Acronis Snap Deploy Management Agent installed on the ma
Management Agent and create a master image using Acronis Master Image Creator or the
command line utility in PE.
The next sections describe imaging with Acronis Snap Deploy Management Agent and
Acronis Master Image Creator. For information about imaging in PE please see
15.
15.
15.
15.15.
Com
Com
Com
ComComm
m
m
mman
an
an
anan d line a
d line a
d line a
d line ad line and scriptin
nd scriptin
nd scriptin
nd scriptinnd scripting u
g u
g u
g ug under W
nder W
nder W
nder Wnder W in P
in P
in P
in Pin P E
E
E
E E
7.3 Starting offline imaging

© Acronis, Inc 45
P
P
P
PProm
rom
rom
romrompt
pt
pt
ptpt for configur
for configur
for configur
for configur for configuring t
ing t
ing t
ing ting the m
he m
he m
he mhe m ast
ast
ast
astaster im
er im
er im
er imer im ag
ag
ag
agage creator
e creator
e creator
e creatore creator
The image creator -can be pre configured to apply the default network settings automatically on
timeout.
The manual conguration is needed if auto conguration is not possible (no DHCP server on the
network) or does not succeed. To configure the network connections manually, click in the OK
prompt window.
Acronis
Acronis
Acronis
Acronis Acronis M
M
M
MMast
ast
ast
astaster I
er I
er I
er Ier I m
m
m
mma
a
a
aage Creator
ge Creator
ge Creator
ge Creatorge Creator configu
configu
configu
configu configuration
ration
ration
rationration :
:
:
:: ne
ne
ne
ne netw
tw
tw
twtw ork
ork
ork
orkork set
set
set
set settings
tings
tings
tingstings
Set the preferable values and click OK.
7. When Acronis Master Image Creator starts, it displays the Master Image Creator welcome window:

46 © Acronis, Inc
M
M
M
MMast
ast
ast
astaster I
er I
er I
er Ier I m
m
m
mm age Creatio
age Creatio
age Creatio
age Creatioage Creation W
n W
n W
n Wn W iza
iza
iza
izaizard:
rd:
rd:
rd:rd: w
w
w
w welcom
elcom
elcom
elcomelcom e w
e w
e w
e we w indo
indo
indo
indoindow
w
w
ww
8. In this window, click Next and go to step
7.5.1 Disks or partitions to image
.
7.4 Starting online imaging
Online imaging means that the master system is imaged live (without reboot or suspending
operations). Online imaging can be performed remotely whenever you need. The disadvantage is that
you have to install imaging software that is included in the master image. This is not always rational.
1. Install Acronis Snap Deploy Management Console and Acronis License Server. Import licenses to
the license server.
2. Configure the master system.
3. Install Acronis Snap Deploy Management Agent on the mas ter system locally or remotely, using
Acronis Snap Deploy Management Console Acronis Snap Deploy . Reboot on prompt. Once
Management Agent is installed, you can image the master system online (without reboot) at any
time.
4. Start the Acronis Snap Deploy Management Console.
5. Connect to the master computer.
6. Select Create Master Image - -> Next > Create master image on a remote computer.
If you choose Create master image using bootable media, the program will suggest that you
create the bootable media for offline imaging.
7.5 Steps of the Master Image Creation Wizard
7.5.1 Disks or partitions to image
Select the disks or partitions to image. You can select a random set of disks and partitions. The Master
Boot Record (MBR) will be also included in the image.
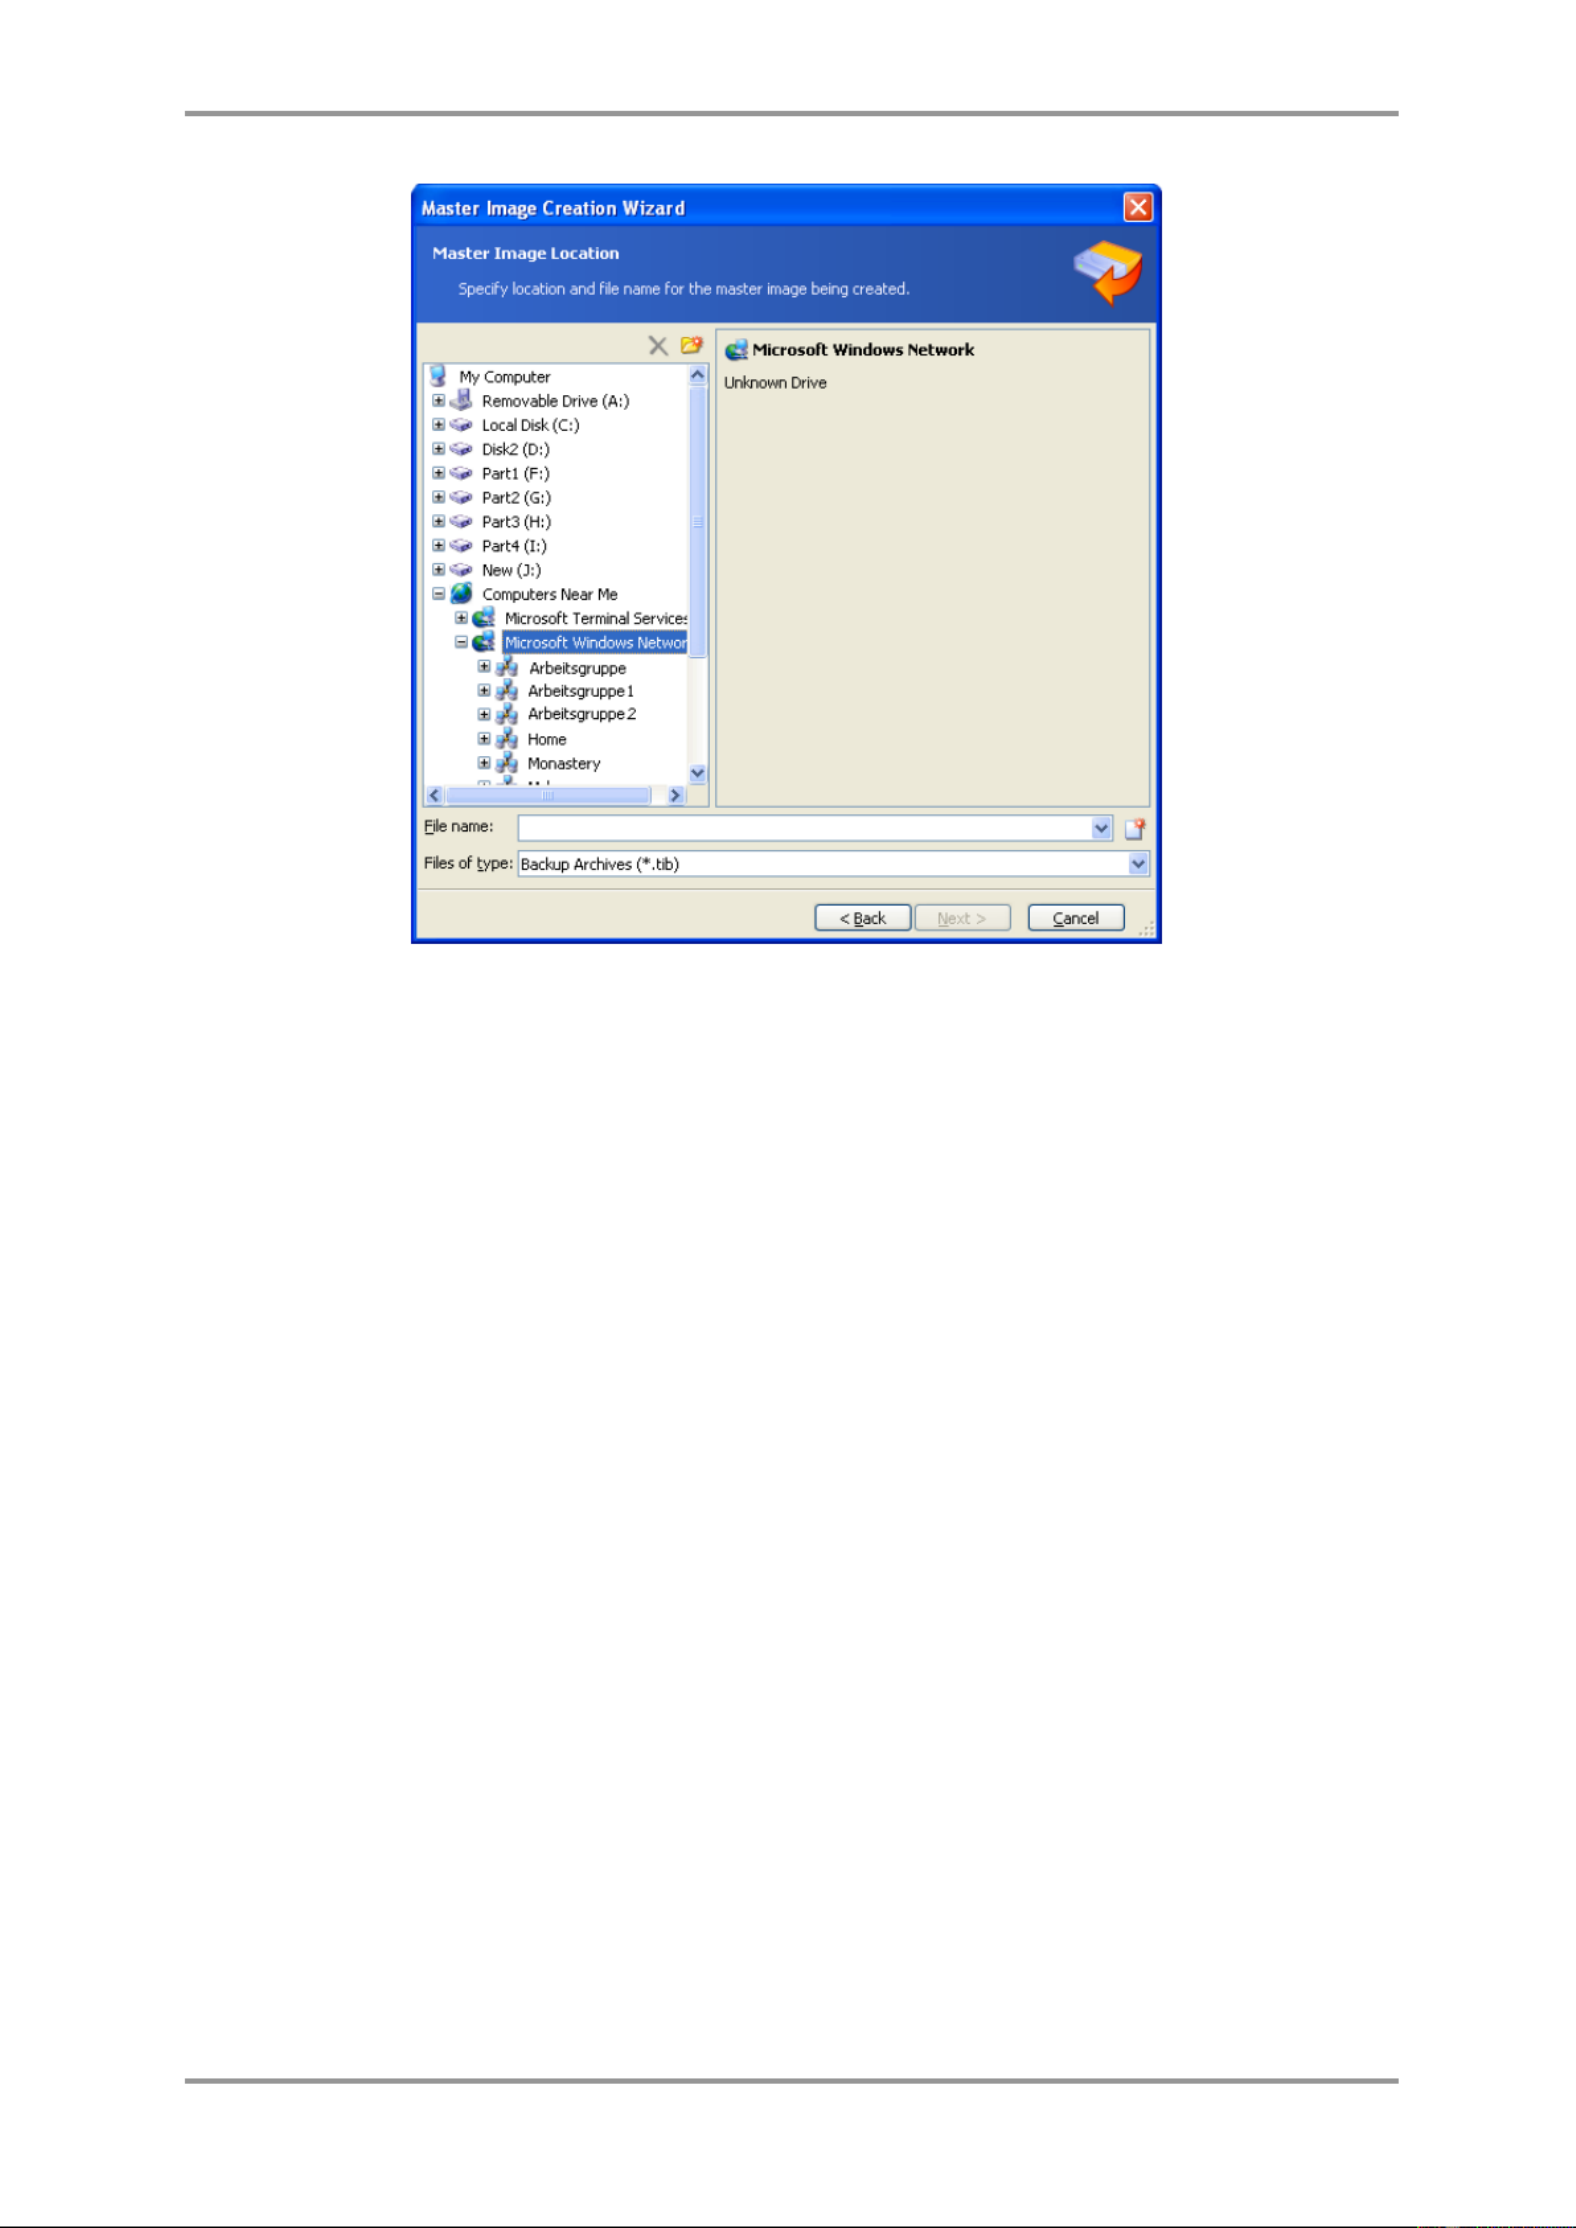
48 © Acronis, Inc
Selecting t
Selecting t
Selecting t
Selecting tSelecting the im
he im
he im
he imhe ima
a
a
aage location
ge location
ge location
ge locationge location
7.5.3 Setting options
Set the options for creating the master image.
1. [OPTIONAL] Password for the image
The preset is no password.
Protect the image with a password to prevent unauthorized deployment.
2 . Compression level
The preset is Normal.
The data compression level for the image being created.
The description eld provides estimations for image size and image creation time for each compression
level. You can select the compression level based on these estimations. The default level is Normal
recommended in most cases.

© Acronis, Inc 49
Sel
Sel
Sel
SelSelecti
ecti
ecti
ectiecting
ng
ng
ngng
the
the
the
the the data co
data co
data co
data codata co m
m
m
mmpression
pression
pression
pressionpression level
level
level
level level
3 . [FOR ONLINE IMAGING ONLY] Image creation priority
The preset is . Low
The priority of any process running in a system determines the amount of CPU usage and system
resources allocated to that process. Decreasing the image creation priority will free more resources for
other CPU tasks. Increasing of image creation priority could speed up the imaging by taking resources
from the other running processes. The effect will depend on total CPU usage and other factors.
4. Archive splitting
Sizeable images can be split into several les that together the original image.make up
The preset is Automatic. With this setting, the program will act as follows.
When creating an image on a hard disk:
If the selected disk has enough space and its le system allows the estimated le size, the
program will create a single image le.
If the storage disk has enough space, but its le system does not allow the estimated le size,
the image will automatically split into several les.be Such might be the case when the image
is placed on FAT16 and FAT32 file systems that have a 4 GB le size limit.
If free space imageon the disk runs out while creating an , the program will warn you and wait
for your decision as to how you plan to fix the problem. You can try to free some additional
space and continue or and select another disk. click Back
When creating an image on a CD- - R/RW, DVD R/RW or DVD+R/RW diskette:
Acronis Master Image Creator will ask you to insert a new disk when the previous one is full.
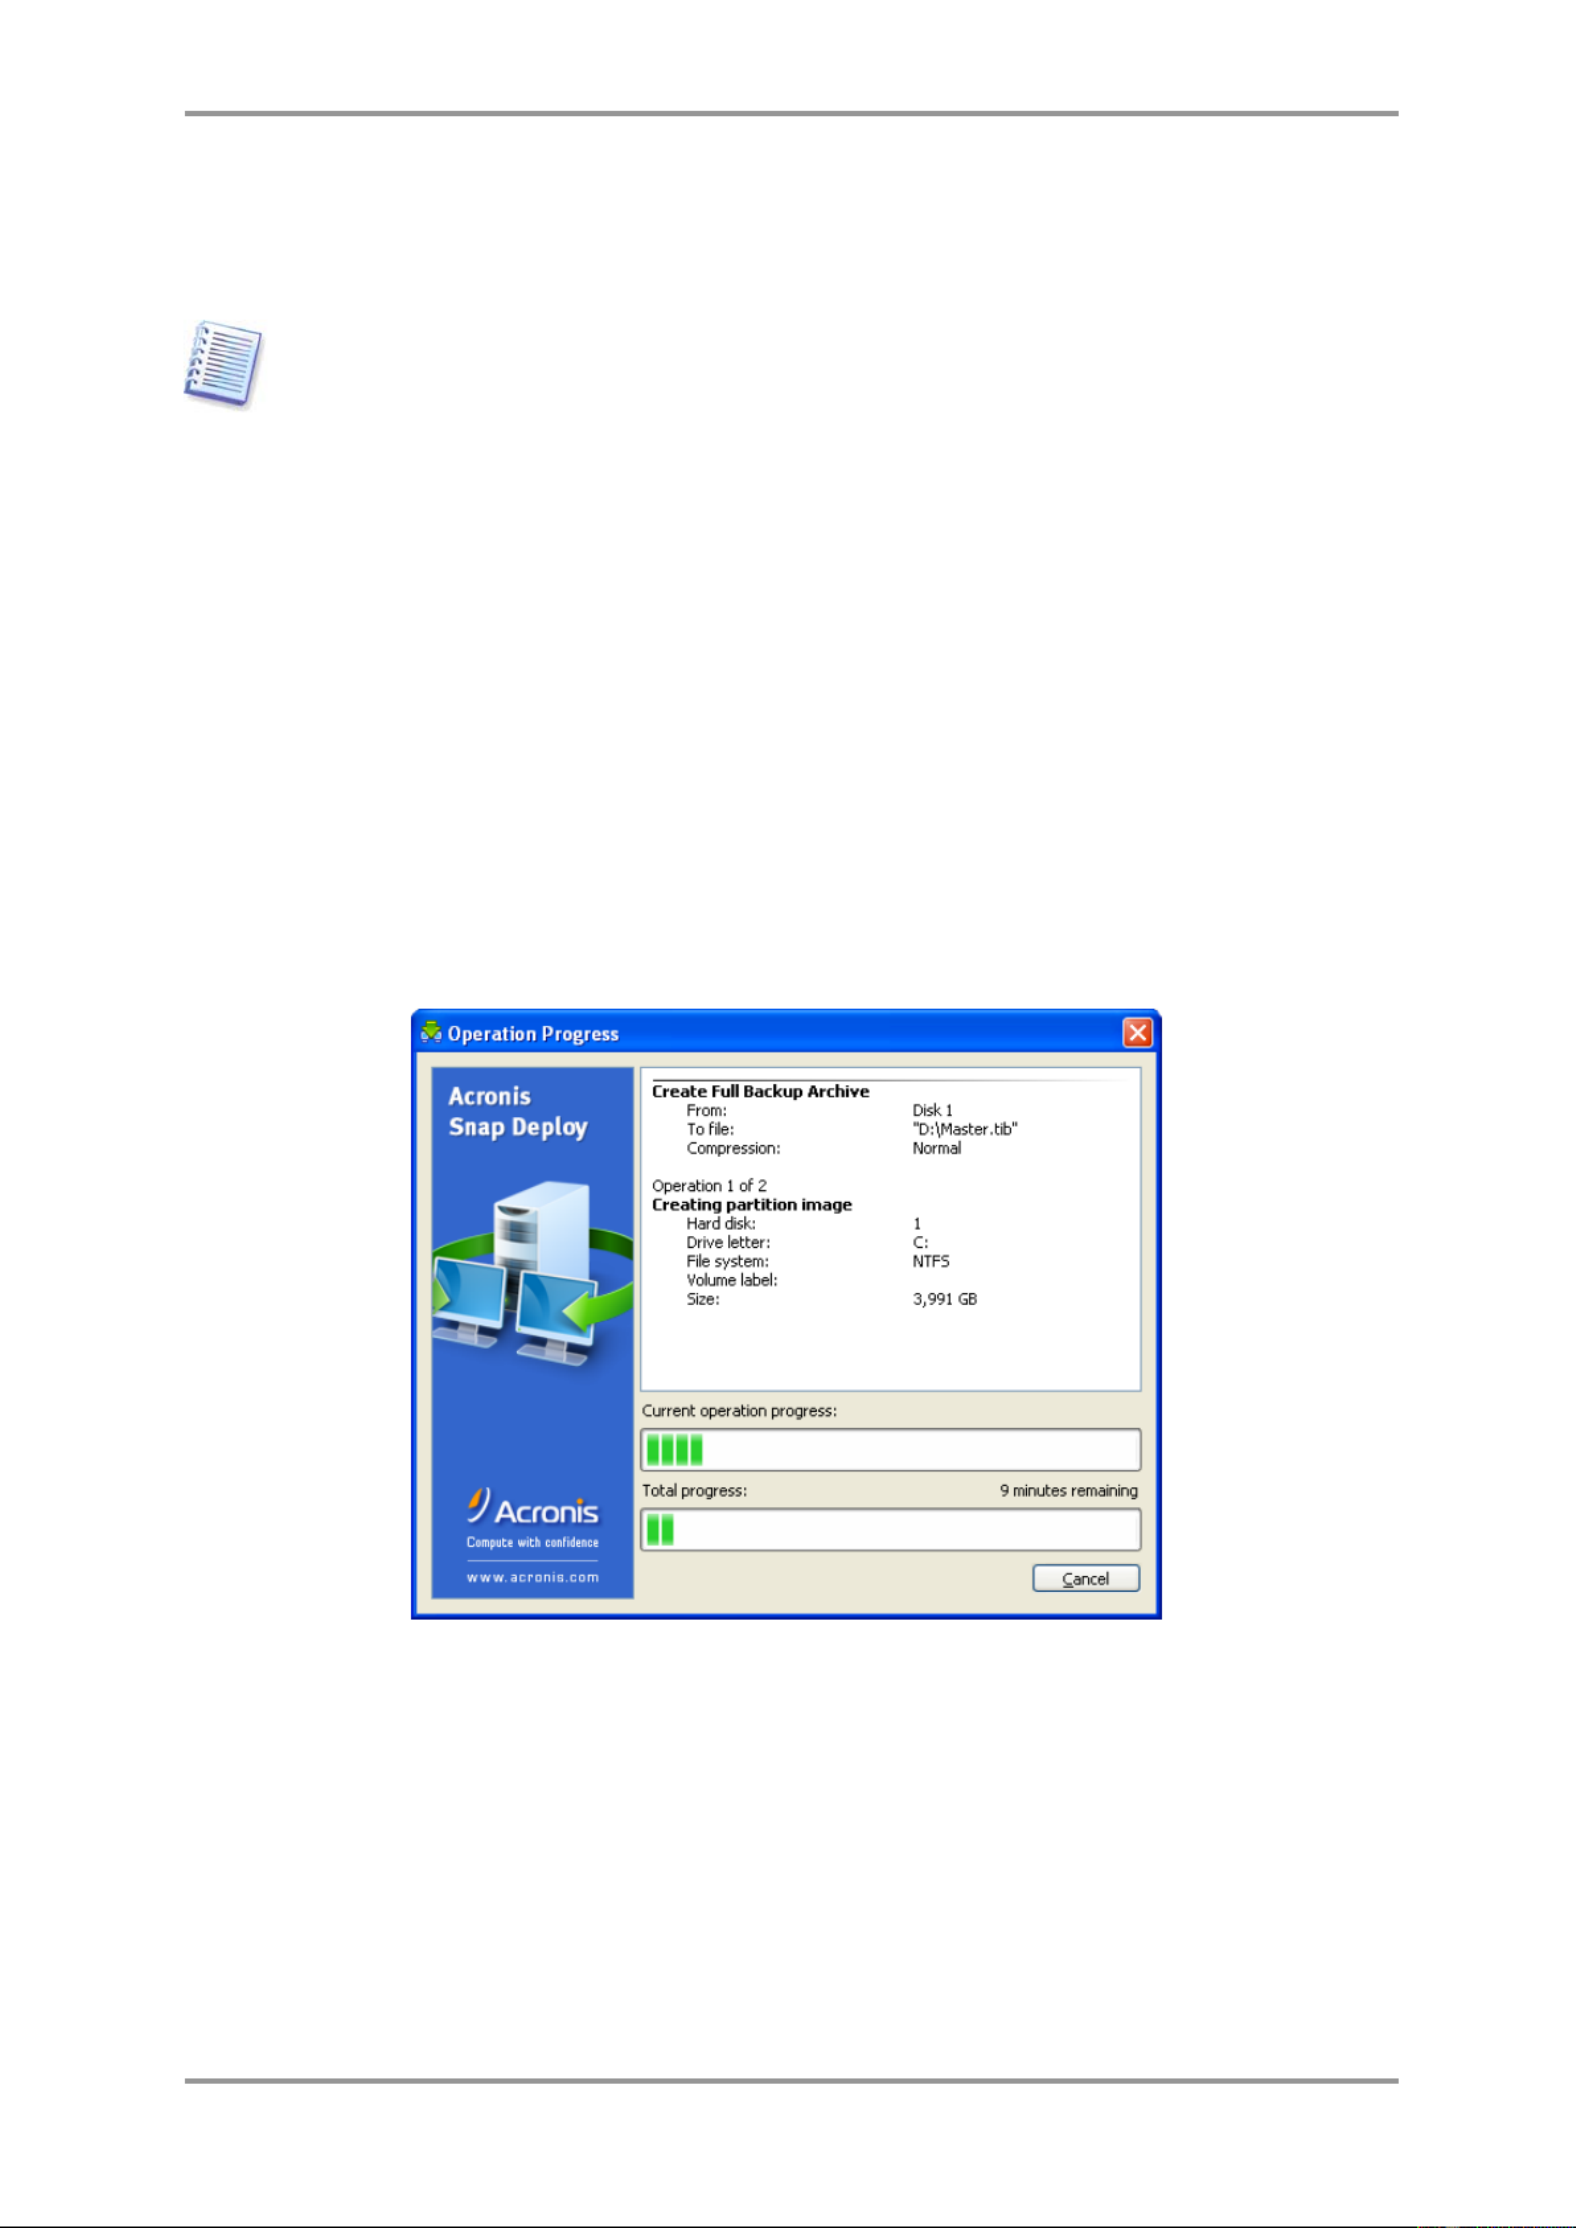
50 © Acronis, Inc
You also can select Fixed size and enter the desired file size or select it from the drop-down list. The
image will then be split into multiple les of the specied size. This comes in handy when creating an
image that you plan to burn to multiple CD-R/RW, DVD R/RW or DVD+R/RW later on.-
Creating images directly on CD- -R/RW, DVD R/RW or DVD+R/RW usually takes more time
than it would on a hard disk.
5 . [OPTIONAL] Additional settings
Validate the image upon operation completion
The preset is disabled.
If enabled, the program will check just created image.the integrity of the
Reboot the computer automatically after imaging is nished.
The preset is disabled.
7.5.4 Comments and summary
[OPTIONAL] It is recommended that you provide a comment for easy identification of the image.
Next you will see the imaging procedure summary. Check the settings and click Proceed.
The imaging operation starts and its progress is displayed.
Acronis
Acronis
Acronis
AcronisAcronis
Snap D
Snap D
Snap D
Snap DSnap D eploy
eploy
eploy
eployeploy is tak
is tak
is tak
is takis takin
in
in
ining
g
g
gg
the
the
the
thethe master im
master im
master im
master immaster im age
age
age
ageage
Specyfikacje produktu
| Marka: | Acronis |
| Kategoria: | Oprogramowanie |
| Model: | Snap Deploy 3 |
Potrzebujesz pomocy?
Jeśli potrzebujesz pomocy z Acronis Snap Deploy 3, zadaj pytanie poniżej, a inni użytkownicy Ci odpowiedzą
Instrukcje Oprogramowanie Acronis

19 Stycznia 2025
18 Stycznia 2025
4 Lipca 2024
4 Lipca 2024
4 Lipca 2024
4 Lipca 2024
3 Lipca 2024
3 Lipca 2024
3 Lipca 2024
3 Lipca 2024
Instrukcje Oprogramowanie
- Oprogramowanie Sony
- Oprogramowanie Canon
- Oprogramowanie Garmin
- Oprogramowanie Casio
- Oprogramowanie BTicino
- Oprogramowanie Nikon
- Oprogramowanie Google
- Oprogramowanie IRiver
- Oprogramowanie Cyberlink
- Oprogramowanie Omron
- Oprogramowanie Apple
- Oprogramowanie Zoom
- Oprogramowanie Antares
- Oprogramowanie Microsoft
- Oprogramowanie Corel
- Oprogramowanie GoPro
- Oprogramowanie Acoustica
- Oprogramowanie Aritech
- Oprogramowanie Arcsoft
- Oprogramowanie Adobe
- Oprogramowanie Android
- Oprogramowanie Omni Group
- Oprogramowanie Nero
- Oprogramowanie Envivo
- Oprogramowanie Safescan
- Oprogramowanie SMA
- Oprogramowanie McAfee
- Oprogramowanie Norton
- Oprogramowanie Minolta
- Oprogramowanie Pinnacle
- Oprogramowanie Roxio
- Oprogramowanie Teasi
- Oprogramowanie AVG
- Oprogramowanie Suse
- Oprogramowanie FileMaker
- Oprogramowanie Lebara
- Oprogramowanie Magix
- Oprogramowanie Ulead
- Oprogramowanie Fiber
- Oprogramowanie Image-Line
- Oprogramowanie Davilex
- Oprogramowanie Skype
- Oprogramowanie Osirius
- Oprogramowanie Igo
- Oprogramowanie Hercules
- Oprogramowanie SAB
- Oprogramowanie LibreOffice
- Oprogramowanie Route 66
- Oprogramowanie Trend Micro
- Oprogramowanie Office
- Oprogramowanie BlueGriffon
- Oprogramowanie Startech
- Oprogramowanie Enfocus
- Oprogramowanie Wolters Kluwer
- Oprogramowanie TeamViewer
- Oprogramowanie Techsmith
- Oprogramowanie Serif
- Oprogramowanie Nedsoft
- Oprogramowanie FreakinSoftMania
- Oprogramowanie Solcon
- Oprogramowanie Macromedia
- Oprogramowanie DraftSight
- Oprogramowanie ZTE Blade V8
- Oprogramowanie Stentec
- Oprogramowanie Foveon
- Oprogramowanie Enra
Najnowsze instrukcje dla Oprogramowanie

14 Stycznia 2025
14 Października 2024
13 Października 2024
10 Października 2024
6 Października 2024
5 Października 2024
5 Października 2024
5 Października 2024
28 Września 2024
27 Września 2024