Instrukcja obsługi Acer Liquid E1
Przeczytaj poniżej 📖 instrukcję obsługi w języku polskim dla Acer Liquid E1 (71 stron) w kategorii smartfon. Ta instrukcja była pomocna dla 22 osób i została oceniona przez 2 użytkowników na średnio 4.5 gwiazdek
Strona 1/71


© 2013 All Rights Reserved
Acer Liquid E1 Duo V360 User’s Manual
Model: V360
First issue: 2/2013
Acer Liquid E1 Duo V360 Smartphone
Model number: __________________________________
Serial number: ___________________________________
Date of purchase: ________________________________
Place of purchase: ________________________________

Table of contents
Table of contents . . . . . . . . . . . . . . . . . . . . . . . . . . . . . . . . . . . . . . . . . . 3
Setting up . . . . . . . . . . . . . . . . . . . . . . . . . . . . . . . . . . . . . . . . . . . . . . . . 5
Unpacking your smartphone . . . . . . . . . . . . . . . . . . . . . . . . . . . . . . . . . . . . . . . . 5
Getting to know your smartphone . . . . . . . . . . . . . . . . . . . . . . . . . . . . . . . . . . . . 5
Installing or removing the battery . . . . . . . . . . . . . . . . . . . . . . . . . . . . . . . . . . . . 6
Installing a SIM or microSD Card . . . . . . . . . . . . . . . . . . . . . . . . . . . . . . . . . . . . 8
Using your smartphone. . . . . . . . . . . . . . . . . . . . . . . . . . . . . . . . . . . . 10
Turning on for the first time . . . . . . . . . . . . . . . . . . . . . . . . . . . . . . . . . . . . . . . . 10
Locking your smartphone . . . . . . . . . . . . . . . . . . . . . . . . . . . . . . . . . . . . . . . . . 10
Using the touchscreen . . . . . . . . . . . . . . . . . . . . . . . . . . . . . . . . . . . . . . . . . . . . 11
The Home screen . . . . . . . . . . . . . . . . . . . . . . . . . . . . . . . . . . . . . . . . . . . . . . . 13
Managing contacts. . . . . . . . . . . . . . . . . . . . . . . . . . . . . . . . . . . . . . . . 21
Managing your contacts . . . . . . . . . . . . . . . . . . . . . . . . . . . . . . . . . . . . . . . . . . 21
Making calls . . . . . . . . . . . . . . . . . . . . . . . . . . . . . . . . . . . . . . . . . . . . . 22
Before making a call . . . . . . . . . . . . . . . . . . . . . . . . . . . . . . . . . . . . . . . . . . . . . 22
Making a call . . . . . . . . . . . . . . . . . . . . . . . . . . . . . . . . . . . . . . . . . . . . . . . . . . . 22
The voice call screen. . . . . . . . . . . . . . . . . . . . . . . . . . . . . . . . . . . . . . . . . . . . . 23
Internet calling . . . . . . . . . . . . . . . . . . . . . . . . . . . . . . . . . . . . . . . . . . . 26
Adding an Internet calling account . . . . . . . . . . . . . . . . . . . . . . . . . . . . . . . . . . 26
Editing or removing an Internet calling account. . . . . . . . . . . . . . . . . . . . . . . . . 26
Using Internet calling . . . . . . . . . . . . . . . . . . . . . . . . . . . . . . . . . . . . . . . . . . . . . 26
Receiving Internet calls . . . . . . . . . . . . . . . . . . . . . . . . . . . . . . . . . . . . . . . . . . . 26
Calling a contact’s Internet calling address . . . . . . . . . . . . . . . . . . . . . . . . . . . . 26
Calling a phone number using Internet calling . . . . . . . . . . . . . . . . . . . . . . . . . 26
Messaging. . . . . . . . . . . . . . . . . . . . . . . . . . . . . . . . . . . . . . . . . . . . . . . 28
Creating a new message. . . . . . . . . . . . . . . . . . . . . . . . . . . . . . . . . . . . . . . . . . 28
Replying to a message . . . . . . . . . . . . . . . . . . . . . . . . . . . . . . . . . . . . . . . . . . . 29
MMS messages . . . . . . . . . . . . . . . . . . . . . . . . . . . . . . . . . . . . . . . . . . . . . . . . . 29
Going online . . . . . . . . . . . . . . . . . . . . . . . . . . . . . . . . . . . . . . . . . . . . . 31
Browsing the Internet. . . . . . . . . . . . . . . . . . . . . . . . . . . . . . . . . . . . . . . . . . . . . 31
Setting up your Google email . . . . . . . . . . . . . . . . . . . . . . . . . . . . . . . . . . . . . . 32
Composing an email . . . . . . . . . . . . . . . . . . . . . . . . . . . . . . . . . . . . . . . . . . . . . 32
Setting up Email . . . . . . . . . . . . . . . . . . . . . . . . . . . . . . . . . . . . . . . . . . . . . . . . 32
Maps, Navigation, Places and Latitude . . . . . . . . . . . . . . . . . . . . . . . . . . . . . . . 34

AcerCloud setup . . . . . . . . . . . . . . . . . . . . . . . . . . . . . . . . . . . . . . . . . 36
AcerCloud setup for Windows 7 . . . . . . . . . . . . . . . . . . . . . . . . . . . . . . . . . . . .36
Using the Camera. . . . . . . . . . . . . . . . . . . . . . . . . . . . . . . . . . . . . . . . . 39
Camera icons and indicators . . . . . . . . . . . . . . . . . . . . . . . . . . . . . . . . . . . . . . .39
Taking a photo. . . . . . . . . . . . . . . . . . . . . . . . . . . . . . . . . . . . . . . . . . . . . . . . . . 40
Shooting a video . . . . . . . . . . . . . . . . . . . . . . . . . . . . . . . . . . . . . . . . . . . . . . . . 42
Viewing photos and videos . . . . . . . . . . . . . . . . . . . . . . . . . . . . . . . . . . . . . . . .42
Geotagging . . . . . . . . . . . . . . . . . . . . . . . . . . . . . . . . . . . . . . . . . . . . . . . . . . . . 42
Advanced settings . . . . . . . . . . . . . . . . . . . . . . . . . . . . . . . . . . . . . . . . 43
Putting your smartphone in Airplane mode . . . . . . . . . . . . . . . . . . . . . . . . . . . .43
Adjusting settings . . . . . . . . . . . . . . . . . . . . . . . . . . . . . . . . . . . . . . . . . . . . . . .43
Connecting to a PC . . . . . . . . . . . . . . . . . . . . . . . . . . . . . . . . . . . . . . . . . . . . . . 47
FM radio . . . . . . . . . . . . . . . . . . . . . . . . . . . . . . . . . . . . . . . . . . . . . . . . . . . . . .48
Multimedia playback . . . . . . . . . . . . . . . . . . . . . . . . . . . . . . . . . . . . . . . . . . . . .48
Restoring to factory settings . . . . . . . . . . . . . . . . . . . . . . . . . . . . . . . . . . . . . . .49
Accessories and tips . . . . . . . . . . . . . . . . . . . . . . . . . . . . . . . . . . . . . . 50
Using the headset . . . . . . . . . . . . . . . . . . . . . . . . . . . . . . . . . . . . . . . . . . . . . . . 50
Using a Bluetooth headset . . . . . . . . . . . . . . . . . . . . . . . . . . . . . . . . . . . . . . . . 50
Inserting a microSD Card . . . . . . . . . . . . . . . . . . . . . . . . . . . . . . . . . . . . . . . . . 50
Appendix. . . . . . . . . . . . . . . . . . . . . . . . . . . . . . . . . . . . . . . . . . . . . . . . 51
FAQ and troubleshooting. . . . . . . . . . . . . . . . . . . . . . . . . . . . . . . . . . . . . . . . . . 51
Other sources of help . . . . . . . . . . . . . . . . . . . . . . . . . . . . . . . . . . . . . . . . . . . . 52
Warnings and precautions. . . . . . . . . . . . . . . . . . . . . . . . . . . . . . . . . . . . . . . . .52
Emergency calls . . . . . . . . . . . . . . . . . . . . . . . . . . . . . . . . . . . . . . . . . . . . . . . . 55
Taking care of your smartphone . . . . . . . . . . . . . . . . . . . . . . . . . . . . . . . . . . . .55
Managing your SIM cards . . . . . . . . . . . . . . . . . . . . . . . . . . . . . . . . . . . . . . . . .57
Specifications . . . . . . . . . . . . . . . . . . . . . . . . . . . . . . . . . . . . . . . . . . . . . . . . . . 60
Safety . . . . . . . . . . . . . . . . . . . . . . . . . . . . . . . . . . . . . . . . . . . . . . . . . . . . . . . .62
End User License Agreement . . . . . . . . . . . . . . . . . . . . . . . . . . . . . . . 70
5
Setting up
Unpacking your smartphone
Your new smartphone comes packed in a protective box. Carefully unpack the box
and remove the contents. If any of the following items is missing or damaged,
contact your dealer immediately:
• Acer Liquid E1 Duo V360 Smartphone
• Battery
• Quick Guide
• USB cable
• AC adapter
• Headset
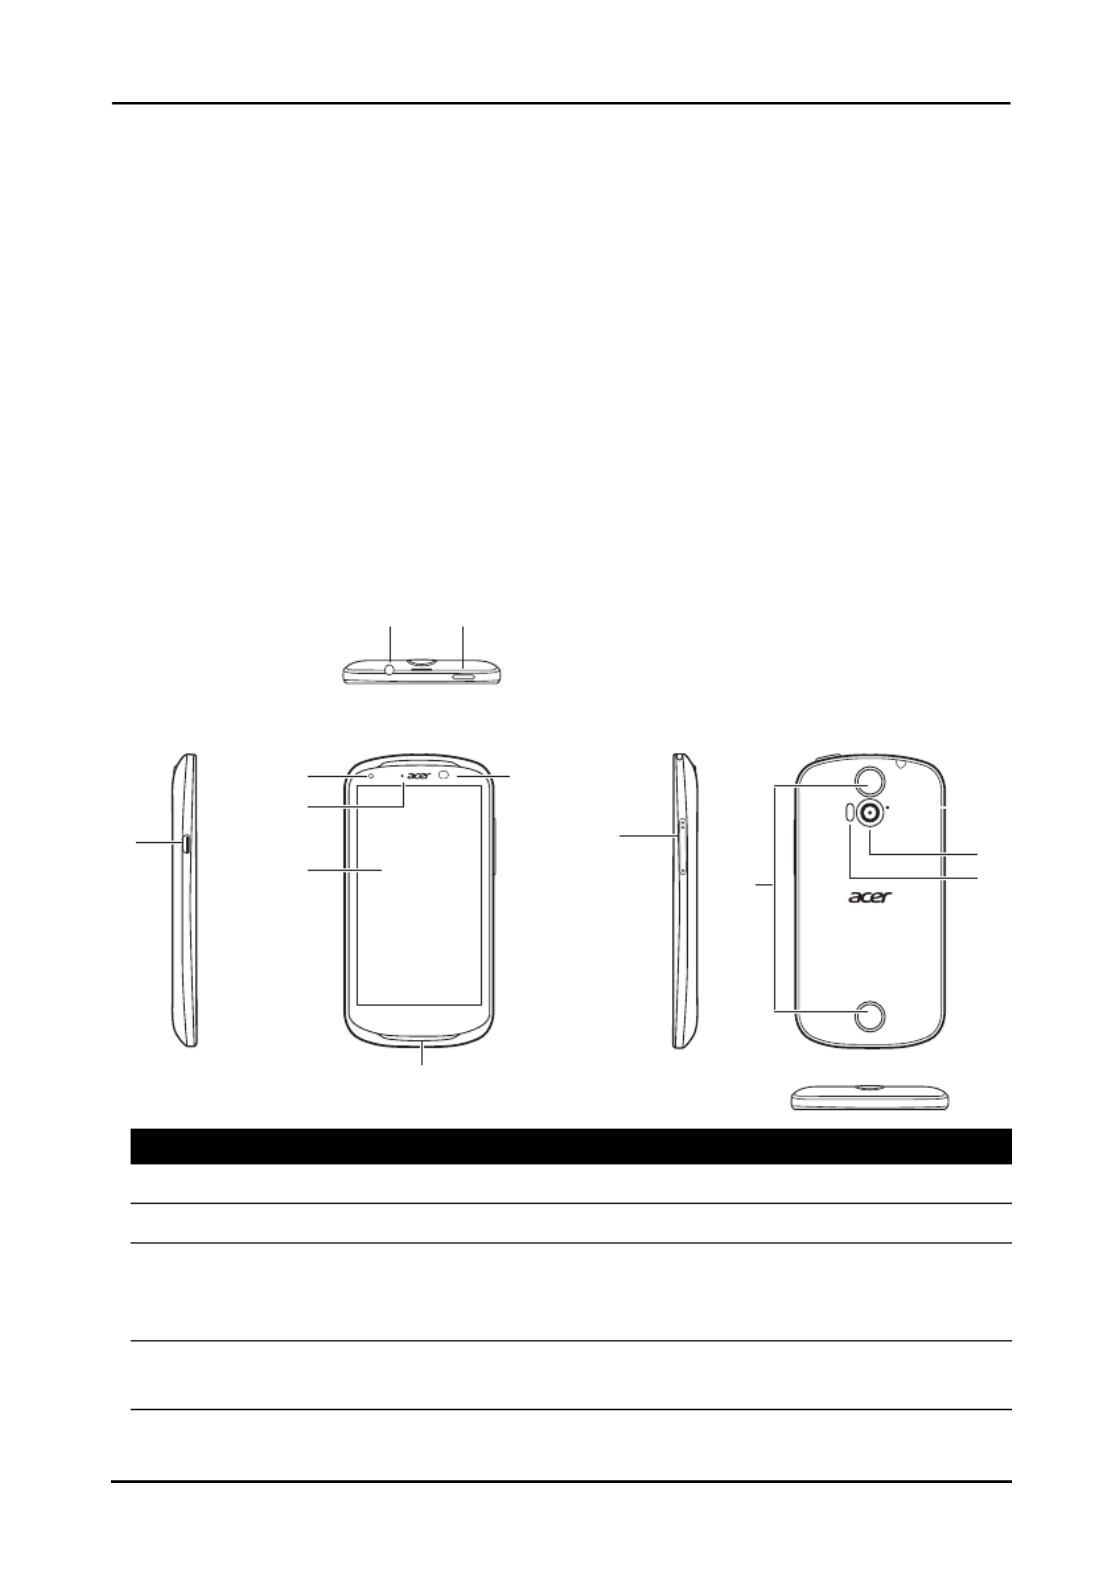
Getting to know your smartphone
Views
9
3
4
5
6
7
1
2
814
12
10
11
13
No. Item Description
1 Micro USB connector Connects to a USB cable/charger.
2 3.5 mm headphone jack Connects to stereo headphones.
3 Power button Press to turn the screen on/off or enter sleep
mode; press and hold to turn the smartphone on
or off.
4 Phone speaker Emits audio from your smartphone; suitable for
holding to your ear.

6
LED Indicators
Installing or removing the battery
Your smartphone uses a replaceable battery to provide power. It is packed
separately from your smartphone and needs to be inserted and charged before you
can use the smartphone.
5 Front-facing camera A 0.3-megapixel camera for video chats and self
portrait images.
6 LED indicator Indicates the phone’s battery, call, and message
status (see table below).
7 Light sensor Detects ambient light and automatically adjusts
screen brightness.
8 Touchscreen 4.5-inch, 960 x 540 pixel capacitive touchscreen
to display data, phone content and enter
information.
9 Microphone Internal microphone.
10 Volume up/down buttons Increases or decreases the phone volume.
11 Handsfree stereo
speakers
Emits stereo audio from your smartphone;
suitable for handsfree use.
12 Microphone Receives audio for video recording.
13 Rear camera A 5-megapixel camera for taking high-resolution
images.
14 Flash LED flash for camera.
Status Description
Blinks red every
eight seconds
Low battery, not plugged in (only in sleep mode).
Blinks red every
three seconds
Critically low battery, not plugged in (only in sleep mode).
Blinks red every two
seconds
Bad battery or charging error.
Red Charging.
Green Fully charged, plugged in.
Blinks green every
ten seconds
Missed call, voice mail, or new message (only in sleep mode).
Blue Plugged in but not ready / not enough charge to power on.
Leave the device plugged in and try again later.
No. Item Description

7
Installing the battery
Insert your fingernail into the cutout between the
battery cover and the phone. Unclip the cover and
lift off the battery cover.
Place the battery into the battery compartment,
lining up the battery connectors with those at the
top of the compartment.
Align the tabs on the cover into the slots on the
phone. Gently press the cover until it snaps in
place.
CAUTION: RISK OF EXPLOSION IF BATTERY IS REPLACED BY AN
INCORRECT TYPE.
DISPOSE OF USED BATTERIES ACCORDING TO THE INSTRUCTIONS.
Charging the battery
For initial use, you need to charge your smartphone for eight hours. After that you
can recharge the battery as needed.
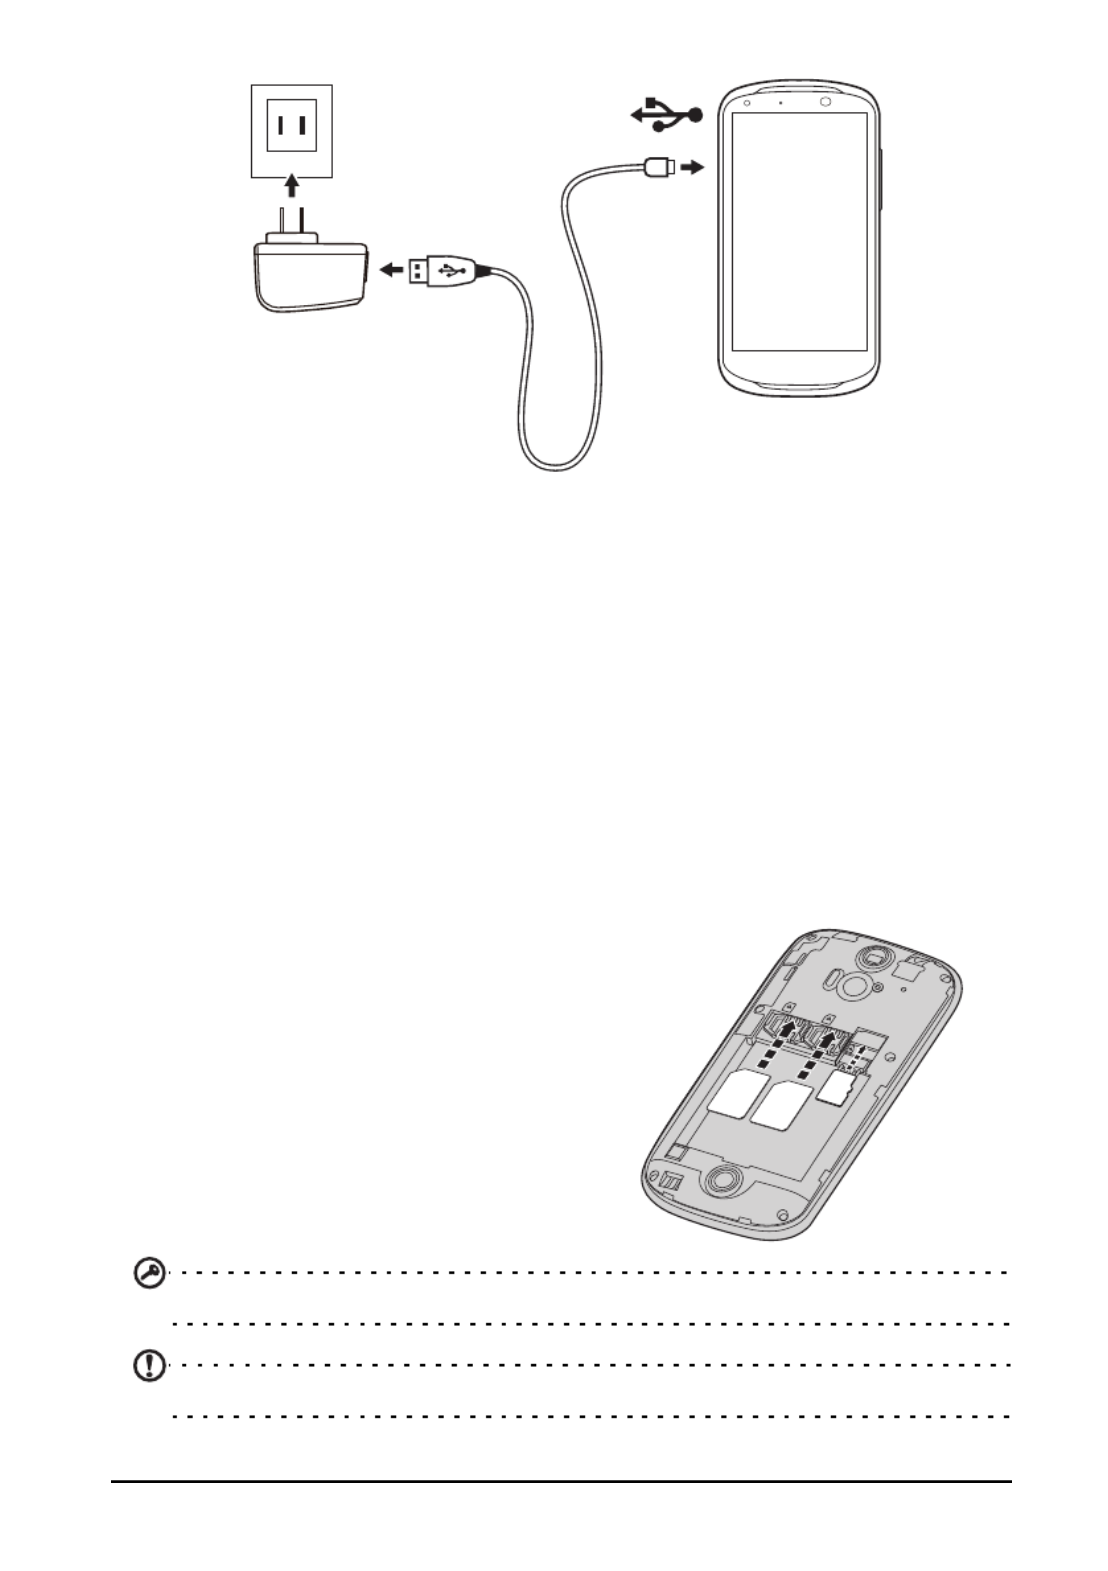
8
Connect the AC adapter cord to the micro USB connector on your smartphone.
Removing the battery
Open the battery compartment as shown in "Installing the battery" on page 7. Lift
the battery out of the compartment by lifting at the top of the battery on either side of
the camera.
Replace the battery cover as described above.
Installing a SIM or microSD Card
To take full advantage of your smartphone’s telephony capabilities, you must install a
SIM card. The SIM card holder is located at the top of the battery bay.
Your new phone has two SIM card holders, you may install one or two SIM cards.
Additionally, you may wish to increase your smartphone’s storage by inserting a
microSD Card into the slot provided. This is next to the SIM card slot.
1. Turn off the phone by pressing and
holding the power button.
2. Open the cover and remove the battery
as described in "Removing the
battery" on page 8.
3. Insert the SIM or microSD Card as
shown.
4. Replace the battery and battery cover.
Important: Turn off your phone before installing or removing the microSD Card.
Note: Ensure that the microSD Card is inserted all the way into the card slot.

9
SIM card lock
Your smartphone may come with a SIM card lock, i.e., you will only be able to use
the SIM card provided by your network operator.
To cancel the SIM lock, contact your network provider.

11
Waking your smartphone
If the screen is off and the smartphone does not
react to any taps on the screen or front panel
button, then it has been locked and is in sleep
mode.
Press the power button to wake your smartphone.
Unlock your smartphone by sliding your finger from
one side of the screen to the other (it works both
ways).
For additional security, you may set an unlock
pattern, a set of dots that must be touched in the
correct order to access the phone. Open the
Application menu and then tap Settings >
Security > Screen lock.
Note: If you forget your unlock pattern, please refer to "Unlock pattern" on
page 52.
You may also directly enter the lock screen ap ttom of the screen. plications at the bo
Tap the icon and slide your finger to the left or right across to quickly access the
application. To change the lock screen applications, see "Managing the lock
screen" on page 17.
Using the touchscreen
Your smartphone uses a touchscreen for selecting items and entering information.
Use your finger to tap the screen.
Tap: Touch the screen once to open items and select options.
Drag: Hold your finger on the screen and drag across the screen to select text and
images.
Tap and hold: Tap and hold an item to see a list of actions available for that item. On
the pop-up menu that appears, tap the action you want to perform.
Scroll: To scroll up or down the screen, simply drag your finger up or down the
screen in the direction that you want to scroll.
Android keyboard
This is a standard onscreen QWERTY keyboard that
allows you to enter text. Tap and hold a key with
numbers at the top to select alternative characters,
such as letters with accents.
Tap the ?123 button to see numbers and special
characters, and then tap the ALT key to see even
more.

12
You can choose another input language by tapping and holding the comma key.
Alternatively, you can open the Application menu and then tap Settings >
Language & input. Then tap the Settings button next to "Android keyboard" >
Input languages. The keyboard layout changes according to the selected
language.
After setting up more than one language, the world button appears next to
the space bar. Tap this button to quickly toggle between multiple input
languages.
Text assistance
The Android keyboard has various features that assist you to enter correct text. In
the Application menu, tap Settings > Language & input and then tap the Settings
button to the right of Android keyboard. From here you can enable or disable
several keyboard-related settings.
Changing the text input method
To change the input method, in the Application menu tap Settings > Language &
input > Default and then select your preferred input method.
Predictive text
Both Swype and Android keyboard provide predictive text input for the browser. As
you tap the letters of a word, a selection of words are displayed above the keyboard
that continue the sequence of letters tapped, or are a close match allowing for
errors. The word list changes after every key press. If the word you need is
displayed, you can tap on it to insert it into your text.
Swype
Swype is a fast way to enter text. It allows you to type
with one continuous motion across the screen
keyboard; you create a word by drawing through
letters.
Put your finger on the first letter of the word and draw
a path from letter to letter, lifting up only after the last
letter. Swype will insert spaces where necessary.
Swype will usually add a double letter in a word when
needed, but you can help Swype recognize you want
a double letter by scribbling slightly or making a loop
on the letter. For example, to get the "ll" in "hello",
scribble (or make a loop) on the "l" key.

13
When there are multiple suggestions for the word
you want to enter, Swype displays a Word Choice
List. To accept the default word in the Word Choice
List, just keep Swyping. Otherwise, scroll through the
list by dragging your finger, and tap the word you
want.
Press and hold the Swype key to access settings, features, updates,
preferences, and help.
Tap the +!= button to see numbers and special characters; tap the page
(shift) key to see even more.
Additional keys vary depending on the type of text you enter, e.g. a key to add a
smiley is available when typing a text message. Like other keys, tap and hold for
additional options.
To change the input method, open the Notification area (see "Status and
notification area" on page 17.) and tap Choose input method.
Text assistance
The Swype keyboard has various features that assist you to enter correct text. In the
Application menu, tap Settings > Language & input and then tap the Settings
button to the right of Swype. You can also tap and hold the Swype key . From
here you can enable or disable the following:
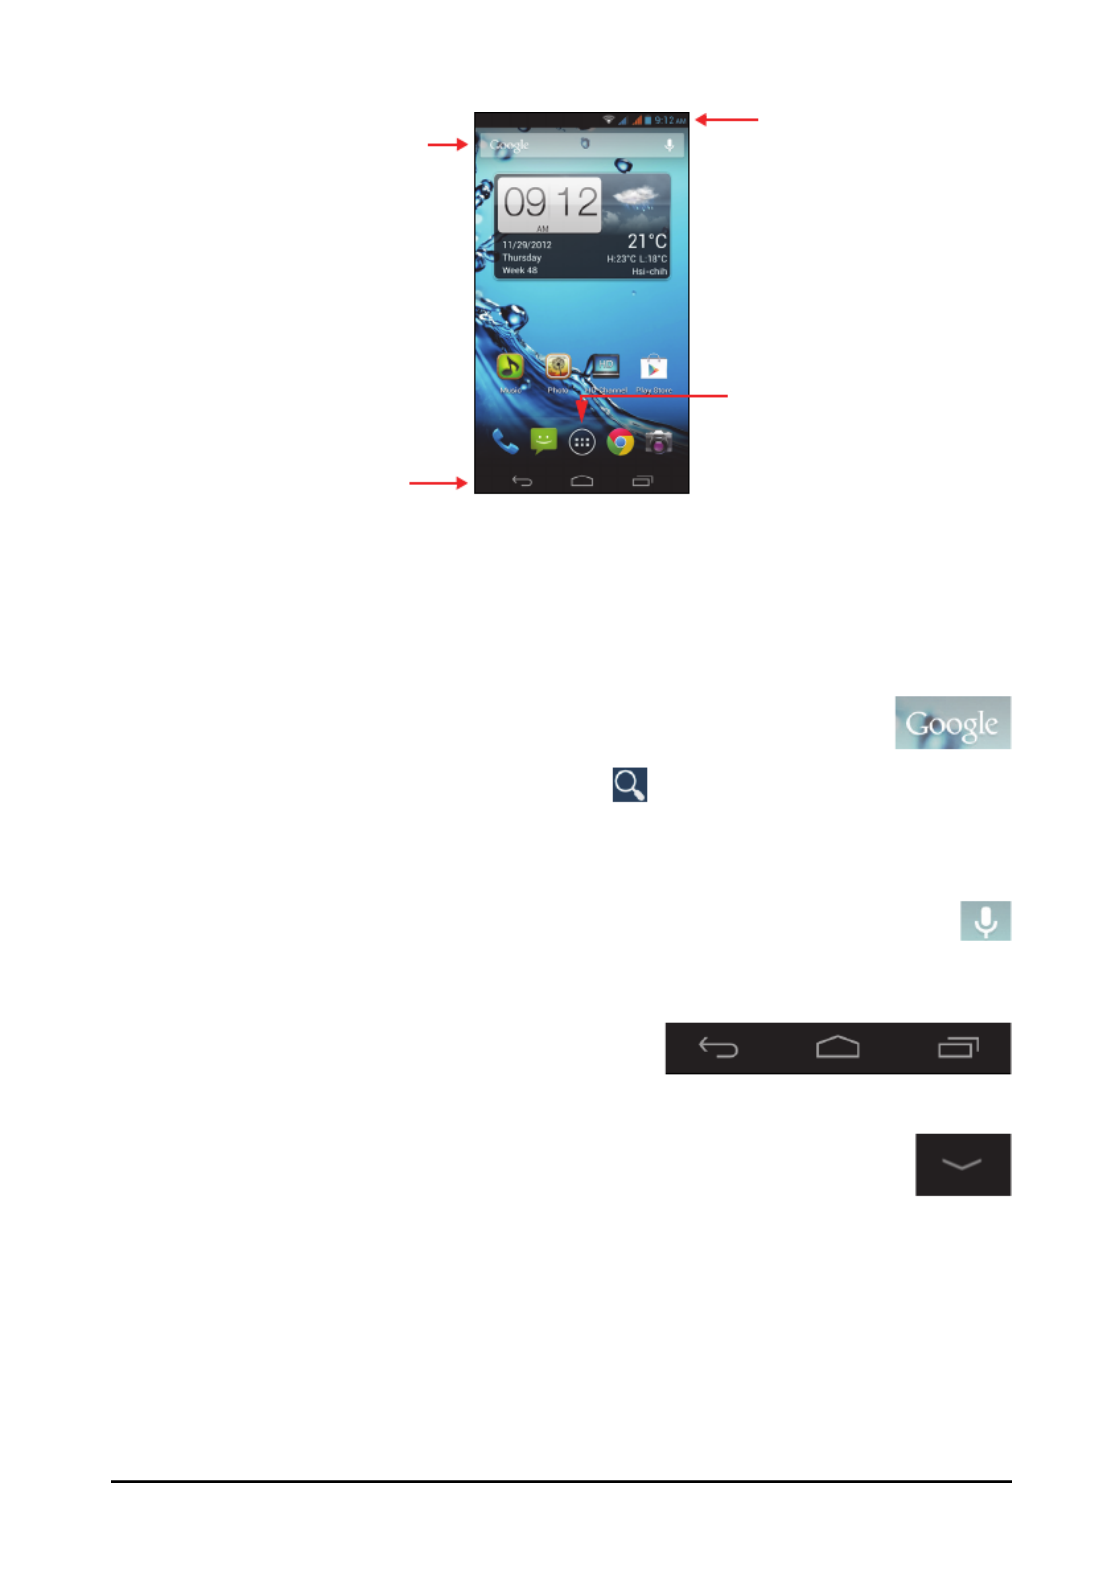
The Home screen
After rebooting, your smartphone will display the home screen. This screen gives
you quick access to information and simple controls with widgets or shortcuts. These
Function Description
How to Swype Learn how to use the Swype keyboard.
Preferences Change your text input preferences.
Language
Options
Set the language used by the keyboard.
Swype Connect • Add contact names and words used in posts to your personal
dictionary.
• Change data settings.
Personal
dictionary
Check words added you your personal dictionary.
Updates Check for application and dictionary updates.
14
display information such as the time and weather, or provide additional controls and
direct access to applications and other frequently used features of your smartphone.
Search
Time and Status
Navigation
Application menu
At the bottom of the screen is the application dock which displays default
applications. Tap an icon to open the application. Tap the Application icon in the
middle of the application dock to view your applications. To change applications, see
"Changing application dock icons" on page 16..
Search
To search for applications, files or for information on the Internet, tap the
Google icon in the top-left corner.
Simply enter the text you want to find and tap or tap one of the suggestions,
applications or files shown in the list.
Voice search
If voice search is available, tap the microphone and speak your search
request. See "Voice search" on page 31.
Navigation
Back Home Recent
To navigate through menus and options, three (or
more) icons are shown in the bottom-left corner.
Back
Tap this icon to go to the previous page, or to go up one level in a menu.
This icon may be replaced with the hide icon in certain cases (such as if
the keyboard or list of recent applications is shown).
Hide
Home
Tap this icon to go directly to the Home screen.
Recent
Tap this icon to see recently opened applications. Tap an application to open it, or
tap anywhere on the screen to return to the Home screen. See "Multitasking" on
page 20.
15
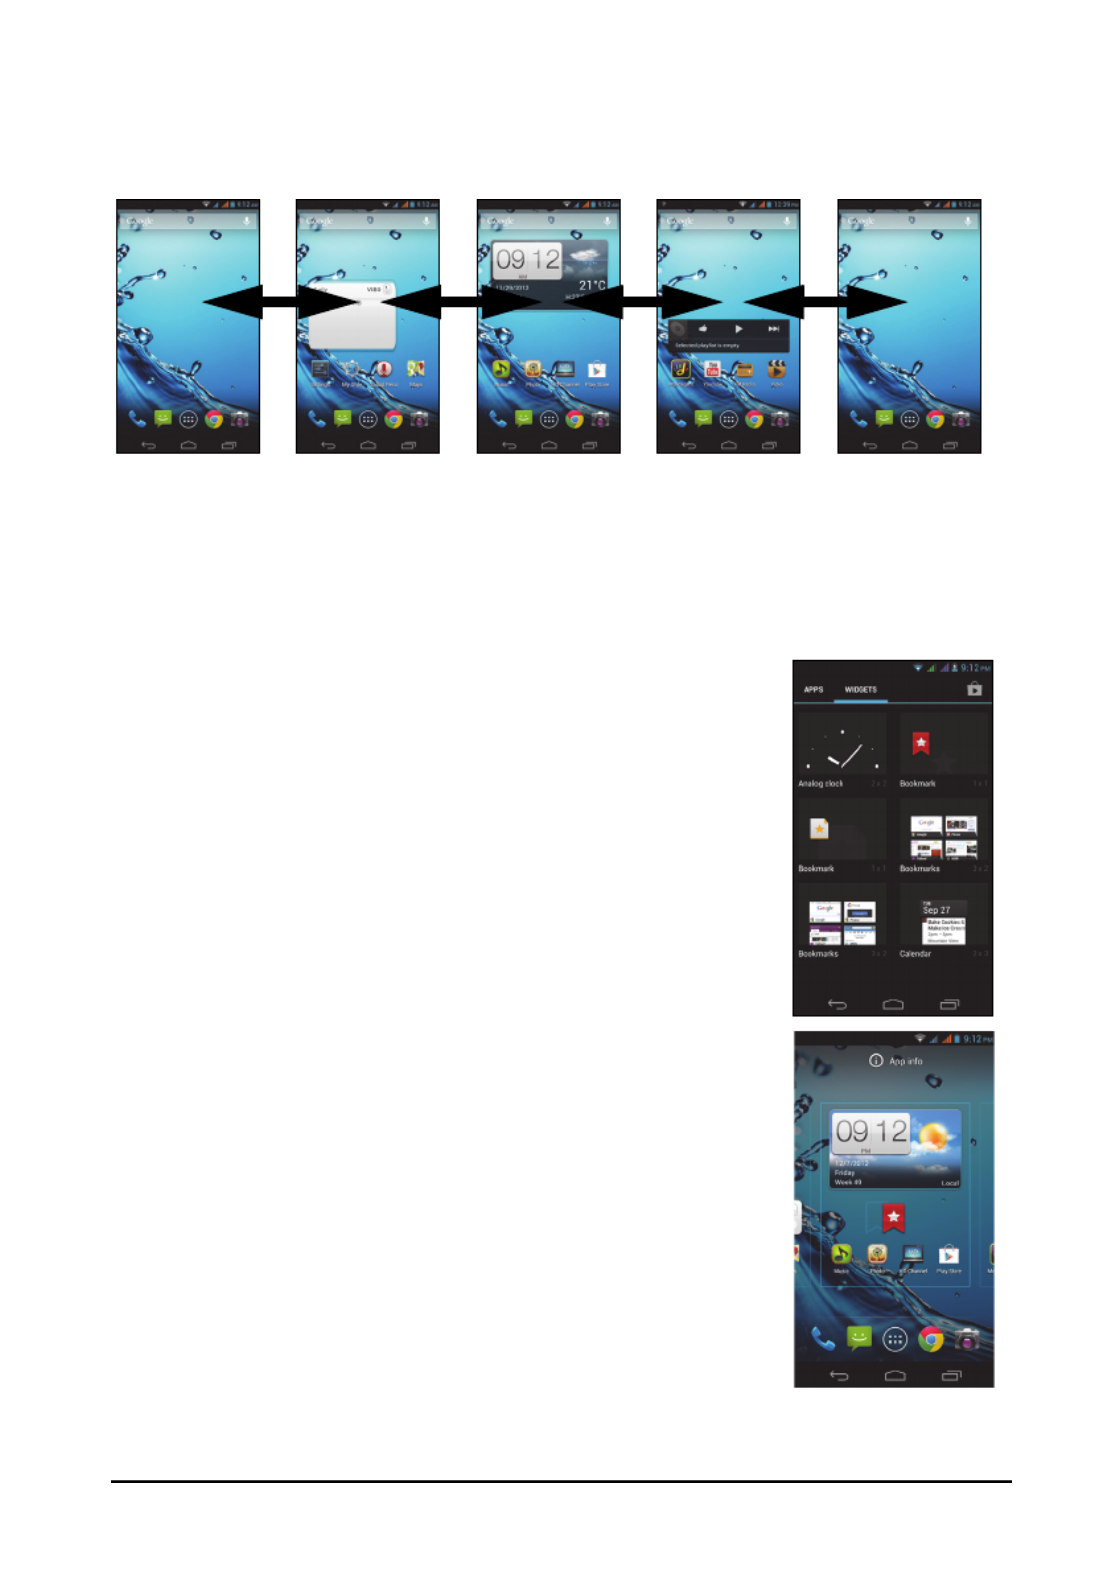
The extended Home screen
The Home screen extends to either side of the screen, giving you more room to add
icons, widgets or features. To view the extended screen, slide your finger to the left
or right.
Personalizing the Home screen
You may personalize your Home screen by adding or removing application shortcuts
or widgets, and by changing the wallpaper.
Adding and removing shortcuts and widgets
To add shortcuts or widgets, tap the Application menu icon
in the bottom-center of the Home screen.
Tap APPS to see a list of shortcuts to applications you can
drag to a Home screen.
Tap WIDGETS to see small applications and links (such as
custom shortcuts, contacts or bookmarks) that you can add
to a Home screen. Widgets are small applications that
display constantly-updated information or quick shortcuts to
applications or special functions.
To move an App or Widget to the Home screen, tap and
hold an item until it is selected. The Home screen will open.
Drag the item to any free area on the screen. To view
information about the App or Widget, drag it to the icon at
the top of the screen.
To move the item to a different Home screen, drag it to the
side of the screen, the Home screen will switch to the
screen in that direction. Release the item when it is
positioned correctly.
To remove a shortcut or widget from the Home screen, tap
and drag it to Remove at the top of the screen.
16
Resizing widgets
Some widgets can be resized. As soon as you place a widget on the Home screen,
you can resize it by dragging the corners.
To resize a widget that is already on the Home screen, tap and hold the widget.
Once the Remove icon appears, release the widget. If the widget is resizable, you
will be able to drag the sides of the widget to resize it.
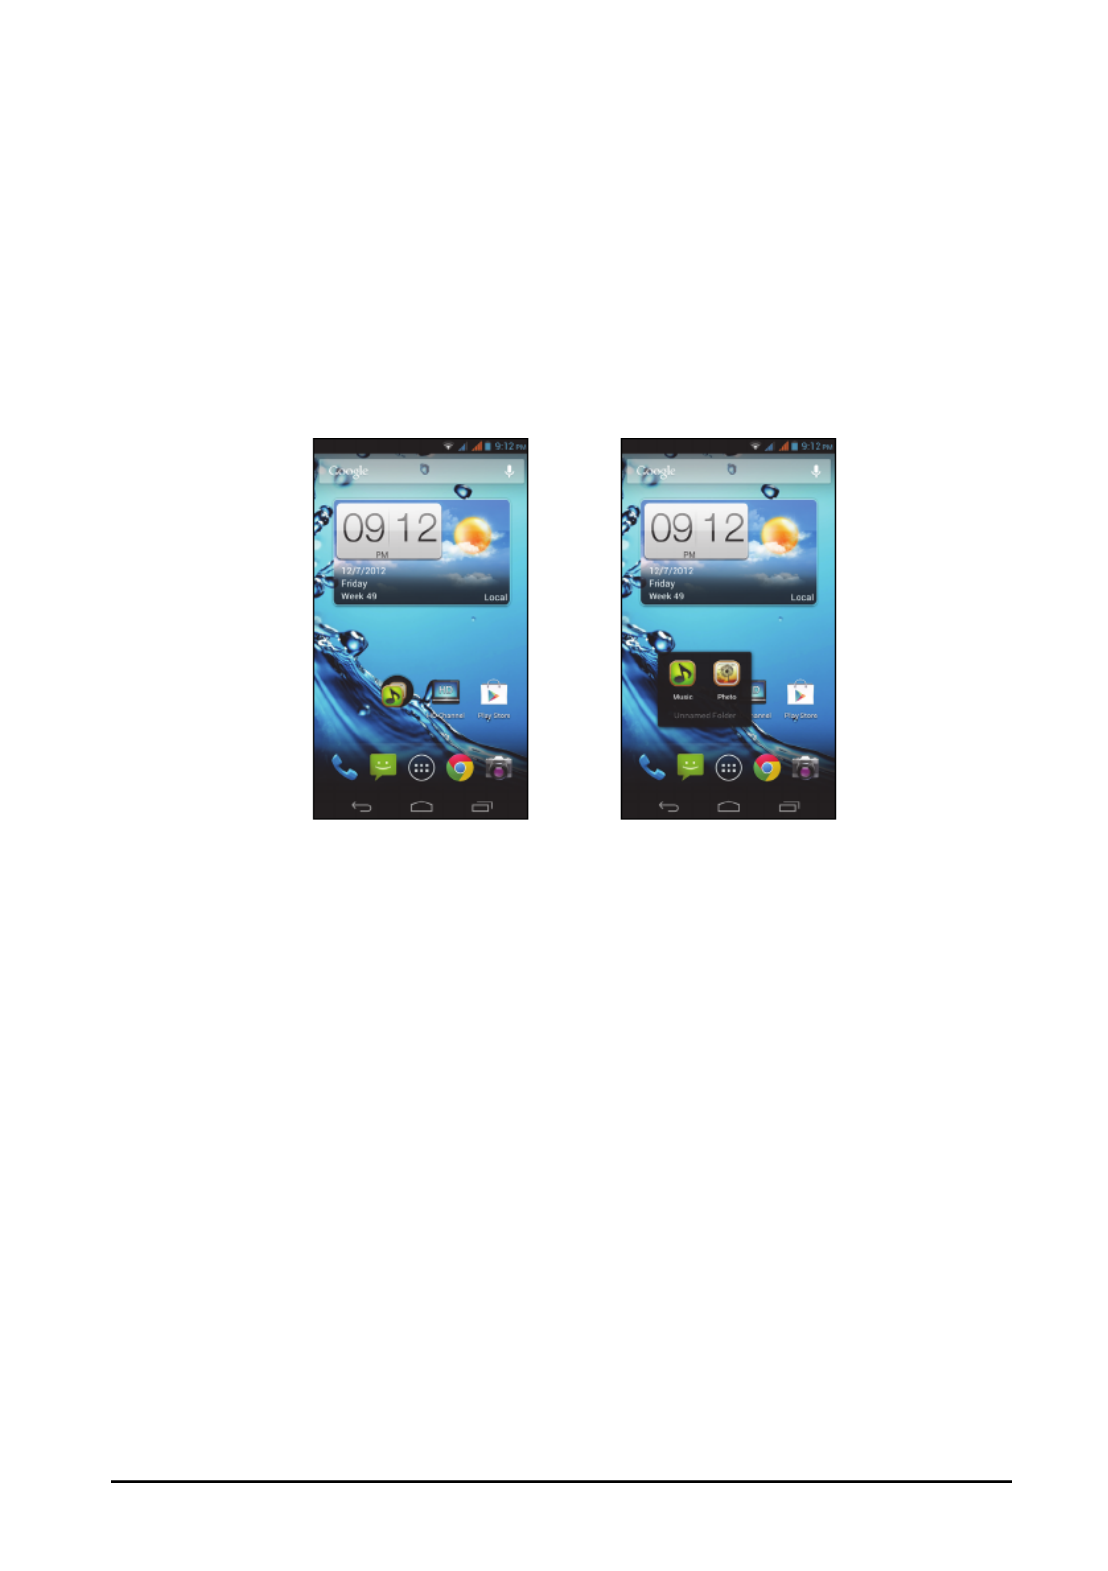
Adding or removing folders
You can also add folders to your Home screen. To create a new folder drag and drop
an application icon onto another application icon in the Home screen. This will
create an Unnamed Folder. Tap the folder icon and then tap the name of the folder
to rename it.
To delete an application shortcut from a folder, tap on the folder icon to display the
applications inside and then tap and hold the application icon that you want to
remove. Drag and drop the icon on Remove that will appear at the top of the screen.
To delete a folder, tap and hold on the folder and then drag and drop the folder on
Remove that will appear at the top of the screen.
Changing application dock icons
You can set icons for installed applications in the application dock. Open the
Application menu and find the application you want to add. Tap and hold the icon,
then drag it to any open position in the dock. Dragging the new application to an
existing dock icon will create a folder for both icons.
To remove an icon from the dock, tap and hold the icon to select it. Either drag the
icon to a different location outside the dock or to Remove at the top of the screen.
Changing the wallpaper
Tap and hold any open area on the Home screen. Tap the Wallpaper tab to change
the lock screen and home wallpaper. You can choose from images stored in the
Gallery, standard wallpapers, Live Wallpapers featuring animated or interactive
backgrounds, or Video Wallpapers enabling you to use videos as your background.
18
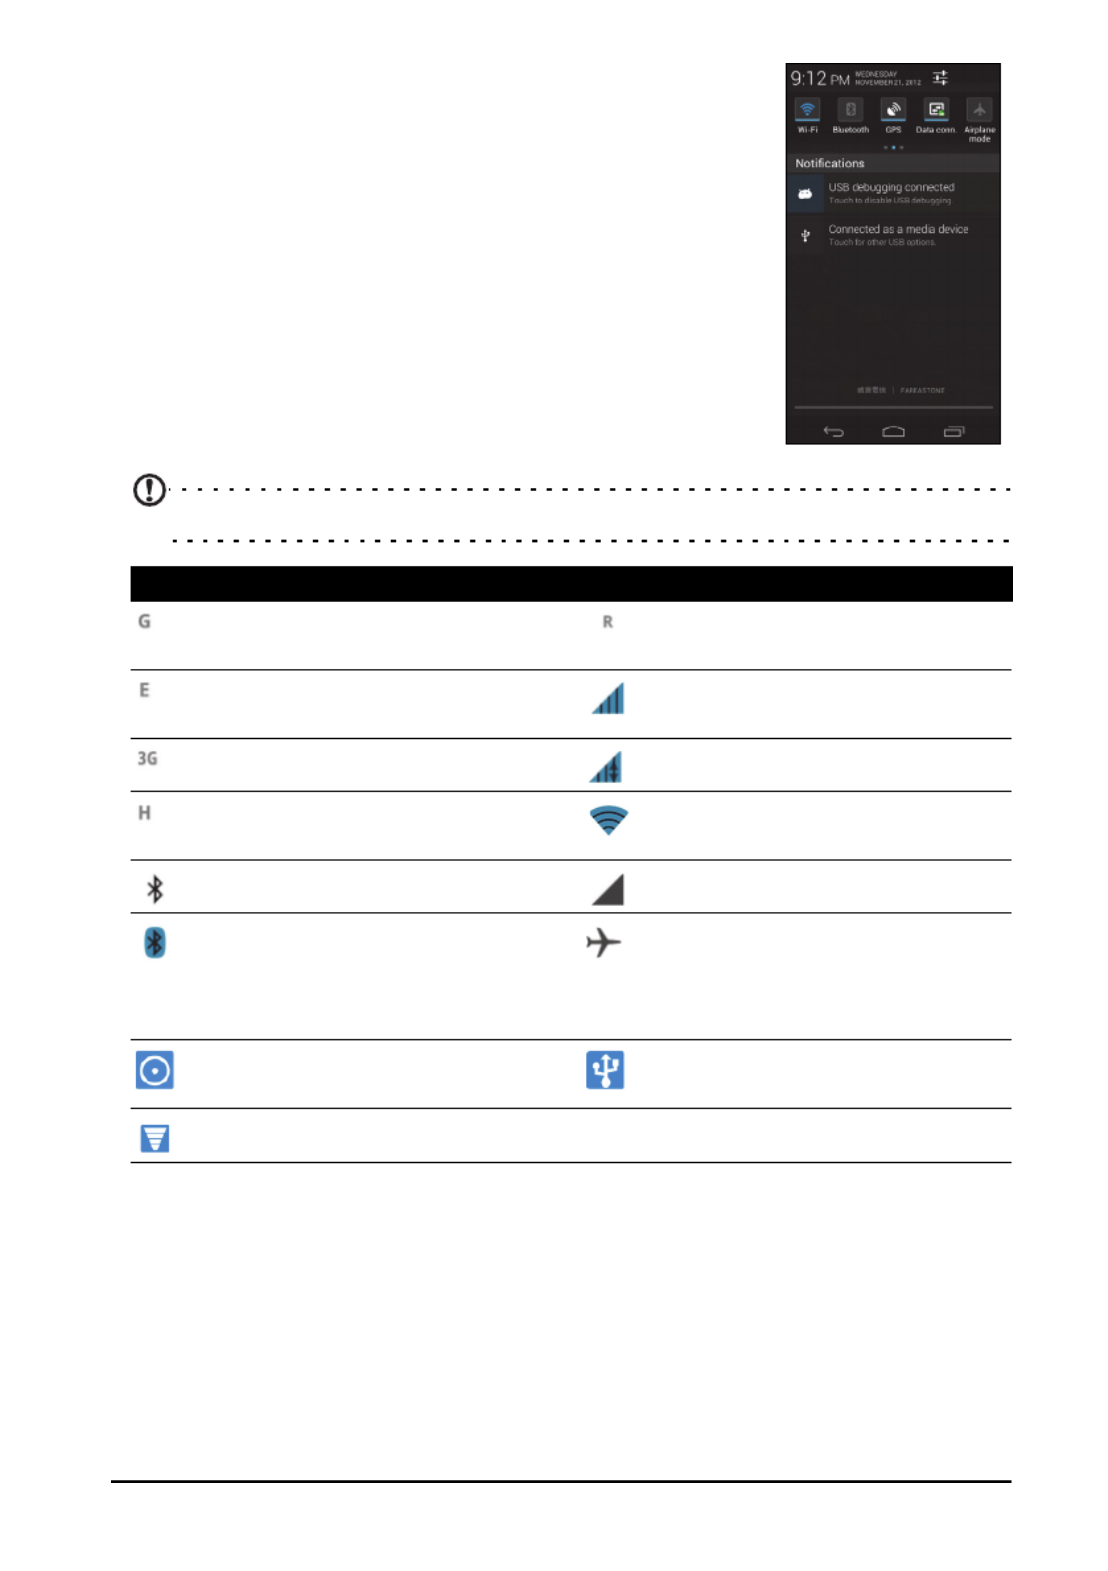
This area contains a variety of icons to inform you of your
phone’s status. The left side of the Notification area displays
event icons that indicate a new event (such as a new
message). The icons on the right side indicate signal
strength, connection, battery status and the time.
Drag the Notification area down the screen to view more
information about new events adjust commonly used
settings.
Connection icons
Note: Connection icons appear in different colors if you have two SIMs inserted.
Icon Description Icon Description
Connected to GPRS mobile
network
Roaming
Connected to EDGE mobile
network
Cellular signal strength
Connected to 3G mobile network Mobile data transferring
Connected to HSDPA network Connected to a wireless
network
Bluetooth is on No signal
Bluetooth connected Airplane mode (Wireless
connectivity disconnected.
Please disable airplane mode
before trying to make a call.)
USB and wireless tethering are
activated
USB tethering is activated
Wireless tethering is activated

19
Battery icons
Notification icons
Note: Notification icons appear in different colors if you have two SIMs inserted.
Icon Description Icon Description
Battery is very low Battery is partially drained
Battery is low Battery is full
Battery is charging
Icon Description Icon Description
Alarm is set SIM card is invalid or not
installed
Speakerphone is on Vibrate mode
New Gmail message Ringer is silenced
New/unread SMS/MMS Phone microphone is off
Problem with sending SMS/MMS Application update available
New Google Talk message System update available
New voicemail Missed call
Upcoming event Song is playing
Syncing data More notifications
Warning, open the notification
area for more information
GPS is on
SD card or USB storage is full Receiving location data from
GPS
An open wireless network is
available
Uploading data
Phone is connected to PC via
USB
Downloading data
Carrier data use threshold
exceeded
Download finished
Connected to or disconnected
from virtual private network
(VPN)

20
Multitasking
You can have multiple applications open at the same time.
To open a new application, tap to return to the Home
screen, then start the new application.
To view your active applications, tap . Then tap an icon
to go to the application.
Tip: To prolong battery life, it is better to close an application when you’ve
finished using it. Do this by either pressing the Back key or the Menu button and
selecting Exit (if available).

21
Managing contacts
Managing your contacts
Your smartphone features an address book that allows you
to save contacts to either the internal memory or onto your
SIM card.
Open the People a pplication from the Application menu or
tap from the Dialer to view your contacts.
If you don’t have any contacts stored on your phone, you
can import your Google account contacts, add a new
contact or import contacts from your SIM or SD card. Open
the People application from the Application menu and then
tap to add a contact, to search for a contact, or tap
the Menu bu tton to open the menu.
Adding a contact
Tap to add a new contact. You may also scan a person’s
profile barcode to add the person to your contact list or
group .
To create a contact, first choose where you want to store the
co ntact’s information. You will then be asked to enter the
contact’s information, such as name, address, and phone
number.
You may scroll down the page and tap Ad d another field to
add things such as:
• IM addresses.
• Add any personal notes about the contact.
• Phonetic name
• Link a website
To assign an image to your contact, tap the silhouette and
se lect whether to take a photo or select an image from your
smartphone’s picture gallery.
When done, click Done at the top of the screen.
Tapping on the contacts name will brin g up their profile. Tap
while viewing a contact’s profile to edit, share, delete, or print the contact. You
may also set a ringtone for the contact, or associate the contact with a SIM card.
Tip: You may also create a contact from an already dialed or received number,
see "Saving a dialed number to contacts" on page 25.

22
Making calls
This chapter shows you how to make phone calls, and the various options available
to you during your call.
Before making a call
Check that the phone function is on before you make a call. You can confirm the
phone status from the Notification area.
Note: Status and notification icon colors may vary.
Making a call
Note: The phone function needs to be enabled before the call can be connected.
1. From the Home screen tap Phone to open the onscreen
number pad.
2. Enter the number you wish to dial.
3. Tap to make the call.
4. To end the call, tap .
If the contact you need is displayed, simply tap the contact
name to make a call.
Dialing a number from Call Log
Your call history can be viewed by tapping the Call Log tab
at the top of the screen. It displays recent received, dialed,
and missed calls.
Tap the phone icon to redial. To view details of the call, tap
the number or contact’s name. While viewing the details of a call, tap the Menu
button for other options: Remove from call log; Edit number before call.
Viewing missed calls
Missed call notifications are displayed in the following three areas:
Icon Description
Not connected to the network: You are unable to make a call.
Connected to the network: You may make a call.
Airplane mode: Wireless connectivity disconnected (Wi-Fi, Bluetooth, 2G
and 3G). Please disable airplane mode before trying to make a call.

23
1. The Notification area with the missed call icon. Open the Notification area
and tap the missed call notification to display the missed call details.
2. By the Phone icon (the number in the box is the number of missed calls). Tap
Phone from either the Home screen or the Application menu to directly display
the missed call details.
3. On your phone’s lock screen. Tap the notification
and slide to the left or right to display the missed
call details.
Making a call to one of your contacts
Calling a contact from the People tab
1. Tap the People tab at the top of the screen to view your contacts.
2. Tap on a contact to call them.
Calling a contact from the People application
1. Tap the People icon the Application menu to view your contacts.
2. Tap on a contact to open their profile.
3. Tap on the contact’s phone number to call them.
Dialing an international number
When dialing international numbers, there is no need to enter the international direct
dialing prefix (’00’ etc.) before the country code. Simply tap and hold 0+ on the
onscreen number pad until + appears onscreen.
Warning: International call rates can vary greatly depending on the country
you are calling and your network provider. We suggest you check all call
rates with your network provider, to avoid excessive phone bills. If you are
using your smartphone abroad, roaming charges will apply. Consult your
network provider for roaming rates specific to the country you are visiting
before you leave.
Direct dial widget
You may add a direct dial widget for a contact on your Home screen. Open the
Application menu, then tap the WIDGETS tab. Tap and hold Direct dial and you
will be able to place the widget on your Home screen. Once placed, you will be able
to select a contact to associate with that particular widget on your Home screen.
The voice call screen
Once you have dialed your number the voice call screen appears, which displays
the number/contact you are talking to, the call duration and voice call options.
You can minimize the call window to appear as a movable dialog instead of a whole
screen by tapping the icon. You can even set this "floating" dialog box as the

24
default voice call screen. To do so, open the Notification area and tap the Float
caller button.
Answering or declining a call
When you have an incoming call, the number will be shown on the screen. To accept
or decline the call, tap the appropriate icon and slide your finger across the screen.
To decline the call with a text message, tap the icon and select a message.
Ending a call
To end a call, tap from the voice call screen.

25
Voice call options
• Add a second call
• Record the conversation.
Saving a dialed number to contacts
You can save a number you have dialed to your contacts for future use.
1. Select the number from the Call log tab, and tap Add to contacts .
2. Tap Create new contact and select how to complete the action. See "Adding a
contact" on page 21.
Conference calls
If you have one call on hold and another on line, you can combine both calls to
create a conference call.
After the first call is established, tap to add a second call. Tap to start the
conference call.
Icon Description
Place the call on hold.
Mute a call.
Speakerphone.
Access the keypad while a call is in
progress.
Two options:
Minimizes the call window to a "floating"
screen.

26
Internet calling
You can place and receive Internet calls over wireless network.
Adding an Internet calling account
In the Application menu tap Settings > Call settings > Internet Call. Then tap
Use Internet calling > Accounts > ADD ACCOUNT. Input the Username,
Password, and Server accounts. You can also configure optional settings such as
Authentication username, Display name, Outbound proxy address, Port number,
Transport type, and Send keep-alive.
Editing or removing an Internet calling account
Open an existing Internet calling account and make the edits you want on the SIP
account details. Tap Save to save your changes, tap the Menu button and then tap
Discard to discard the changes, or tap the Menu button and then select Remove
account to delete the existing account.
Using Internet calling
You can configure your phone to use Internet calling (when you’re connected to Wi-
Fi) for all calls, only for Internet calls, or to ask each time you place a call.
Receiving Internet calls
You can configure your phone to receive Internet calls made to an Internet calling
account you added to your phone. To receive Internet calls, in the Application menu
tap Settings > Call settings > Internet Call. Then tap Use Internet calling >
Accounts and ensure the Receive incoming calls box is checked.
Calling a contact’s Internet calling address
You must add an Internet calling address to a contact to be able to place an Internet
call to them.
To make an Internet call, open People from your Home screen or in the Application
menu. Tap on the contact to open their profile, and then tap on their Internet calling
address to place the call.
Calling a phone number using Internet calling
If you have configured your phone to place all calls using Internet calling or to ask for
each call, you may also call a phone number using Internet call, whenever you are
connected to a wireless network.
Dial the number and tap , or select the contact you wish to place a call to, then
tap the Internet call account you want to use to make the call.

29
Replying to a message
When a new text message arrives a message icon appears in the Notification area
and the message icon at the bottom of the phone displays the number of unread text
messages.
Tap Messaging on the Home screen to view the message list or open the
Notification area to see a summary of the message. Tap the summary to open the
message list.
To reply to an SMS or MMS message, open the message from the message list.
Enter your text in the text box labeled Type message. Tap the Menu button to see
available options.
MMS messages
MMS messages are similar to text messages but also allow you to attach multimedia
files such as pictures, audio or video clips. Each MMS message can be up to 300 kB
in size.
Note: You need to set up an MMS profile before you can send MMS messages.
Normally, your smartphone will set up the profile for you based on information
retrieved from your provider.
Tip: Ask your network provider for the necessary information if you need to
manually set up the MMS profile.
Receiving MMS messages
When a new MMS message arrives, a message icon appears at the top of the
screen and a notification message is displayed.
1. Open Messaging to view a summary of the message.
2. Tap Download to download the message content.
Option Description
Add subject Add a subject to the message.
Send Send the message.
Delete messages Deletes the message thread.
Insert quick text Insert pre-defined text content.
Insert smiley Insert a smiley/emoticon into your message text.
Insert contact Add a contact to the recipients list.
Add to contacts Add the other contact to your contacts list.
Settings Modify various messaging settings.
30
Note: Downloads can take a long time, depending on your connection quality. If
you reply or open another application, the download will be stopped.
Important: You may be charged to download message content, especially if you
are roaming. Please contact your provider if you have any questions.
3. Tap the message to view the content.
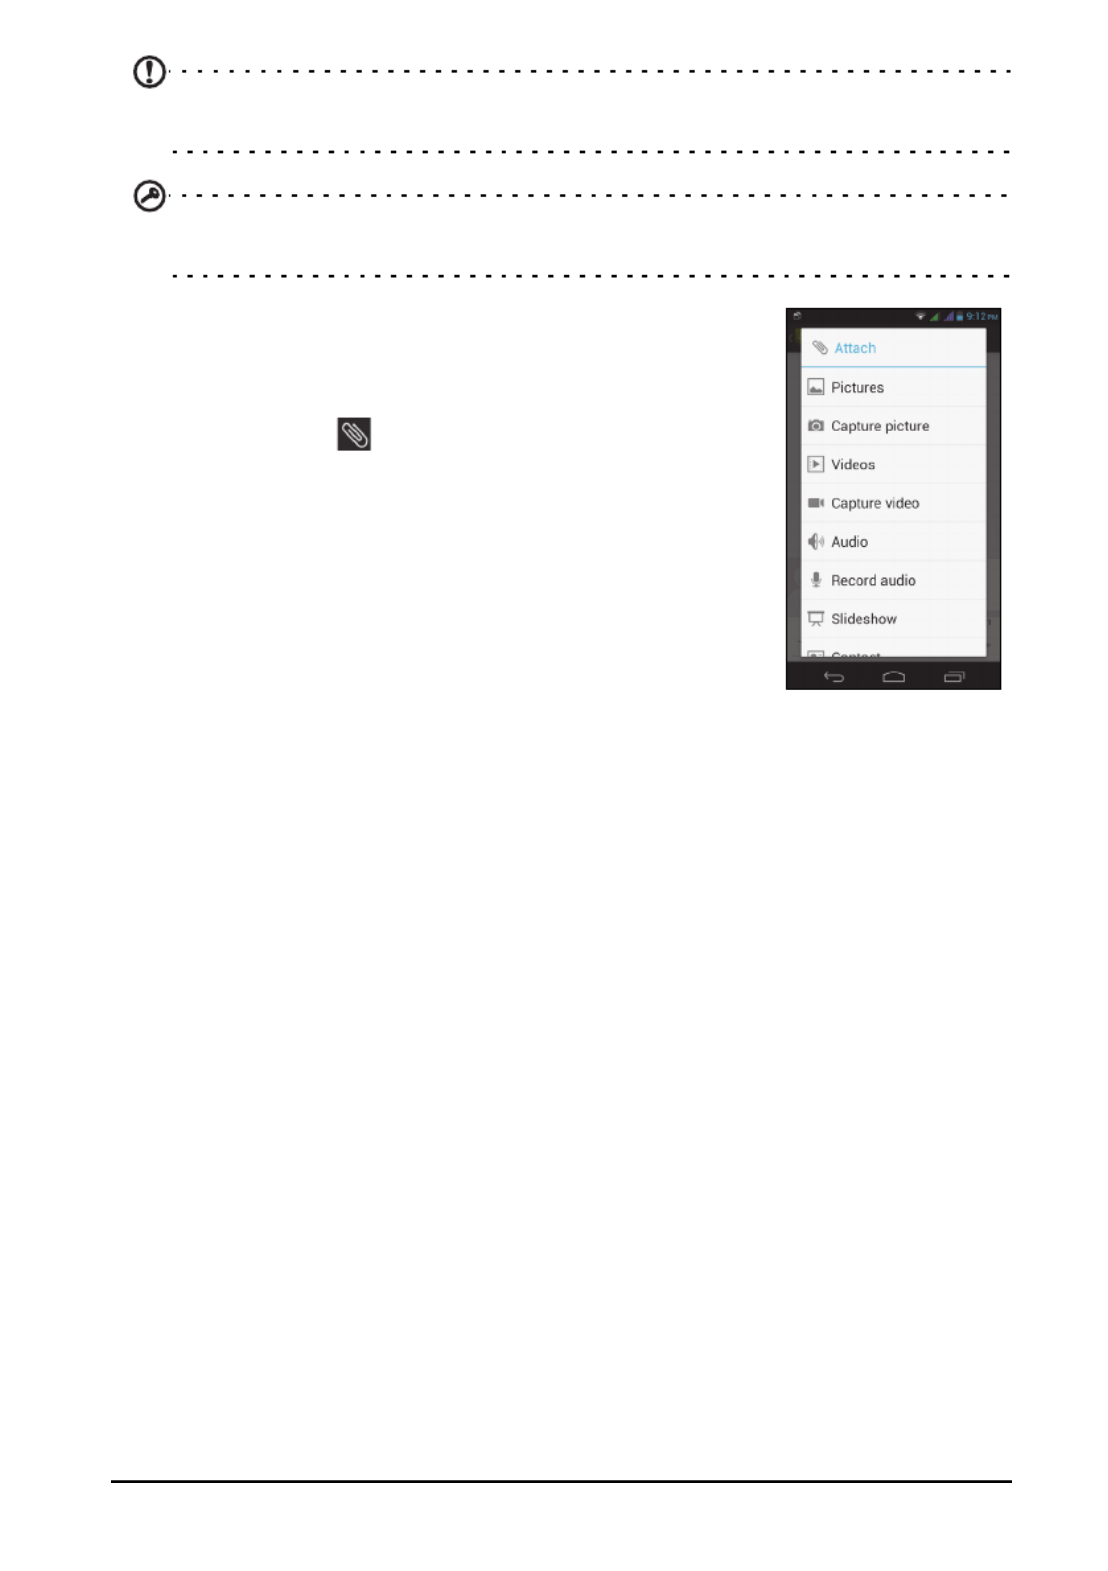
4. To reply to the message, enter your text in the text box
labeled Type message and tap the Send icon. Simple
text replies will be sent as SMS messages. If you wish to
attach a file, tap . You will be presented with a menu
of options.
5. When you have finished composing the message, tap the
Menu button and tap Send.

31
Going online
Browsing the Internet
In order to browse the Internet with your smartphone, you must be connected to a
data or wireless network.
Using the browser
To start browsing, tap the Chrome
icon on the Home screen, or open the
Application menu and select
Chrome. To open a new website, tap
the address box at the top of the
page. Enter the address using the
keyboard and tap Go. You can zoom
in or out of pages by pinching or
reverse pinching.
To navigate forward and backward in
your browser’s history, view your
bookmarks, adjust browser settings,
and perform other tasks, tap the
Menu button.
Chrome enables you to open multiple
pages. Tap at the top of any
webpage to display all of your open
tabs (tap again to close). Tap a tab
from the list to open it. To open a new
tab, tap New tab. The number in the
icon represents the number of open
tabs.
Voice search
Note: Voice search is available only in some regions.
With voice actions, you can send text messages, place calls, send emails, find
directions of establishments, automatically call establishments, search the Internet

36
AcerCloud setup
AcerCloud is a personal cloud service that allows you to access your files over the
Internet, and make sure your most important files are always up to date. With your
personal cloud all your devices (PC, tablet, phone) with AcerCloud installed can
access files on your main Cloud PC. Open the Application menu and tap
AcerCloud.
For more information please visit the AcerCloud website:
www.acer.com/acercloud
Note: To access files on other devices, your Cloud PC must be on and
connected to the Internet. If your PC has Always Connect, your PC may be in
Sleep mode, but must be connected to a power supply (not battery power).
AcerCloud setup for Windows 7
To install AcerCloud on a PC without AcerCloud, you can download the AcerCloud
setup program from the AcerCloud website (https://www.cloud.acer.com/ops/
downloads) and select AcerCloud Installer in the Windows part.
After download, double-click on the installer and follow the instructions to install
AcerCloud.
AcerCloud is designed for Windows 7 and Windows 8. It is not compatible with
older Windows Operation Systems or MAC OS X.

37
Install AcerCloud
Double-click on the AcerCloud icon, then double-click on AcerCloudSetup. Follow
the instructions to install AcerCloud.
Sign in using your Acer ID
Start the AcerCloud program from the desktop or Start Menu.
If you already have an Acer ID, use your email address and password to sign in to
your AcerCloud account.
Create an AcerCloud ID
If you do not have an AcerCloud ID, you first need to sign up for an AcerCloud
account, which you can do from your smartphone. Open the Application menu, tap
AcerCloud, then tap Sign up for an Acer ID, and enter the requested information
Make a note of the email address and password you used for your Acer Cloud
ID. You must use this information to sign in to the AcerCloud service from each
follow the instructions to register a new Acer ID.
After entering the information, tap Next to apply for an Acer ID. Check your email
account for an Acer ID activation message and click on the link in the email to
activate your Acer ID device.

41
2. Align the camera to take a photo of one end of the panoramic scene (the furthest
left, right, top or bottom).
3. Press the camera button to take the first image; then smoothly turn the camera to
the left or right to take the next image of the scene.
• A blue dot shows the center of the next image; move the camera so the dot is
in the center of the screen; your smartphone will then automatically capture an
image and select the center of the next section of the image. Repeat to capture
all images.
Note: If fewer than five images are sufficient for your panoramic photo, tap the tick icon to
stop the selection process and process the captured images.
The camera application will process the images and save a single extended image
to your smartphone’s gallery.
Note: Panoramic images work best with static outdoor scenes. Objects to close to the
camera or large straight edges may confuse the detection process.
Camcorder settings menu
Tap to activate the camcorder. Tap to mute, and tap again to unmute.
To adjust the settings, tap the settings button. The menu options are:
Icon Description
Resolution:
Set the video quality.
Set the timer:
Off, 5 seconds, 10 seconds, 15 seconds.
* Only for the rear camera.
Select photo storage location:
SD card or internal memory.
Set store location on (enables geotagging) or off. Please refer to "Geotagging" on
page 42.
Exposure value:
Adjust from "-3" to "3" with "0" being the default.
Focus mode:
Infinity, Continuous
Audio mode (noise cancellation options):
Normal, Indoor, Outdoor
Restore all settings to default.
43
Advanced settings
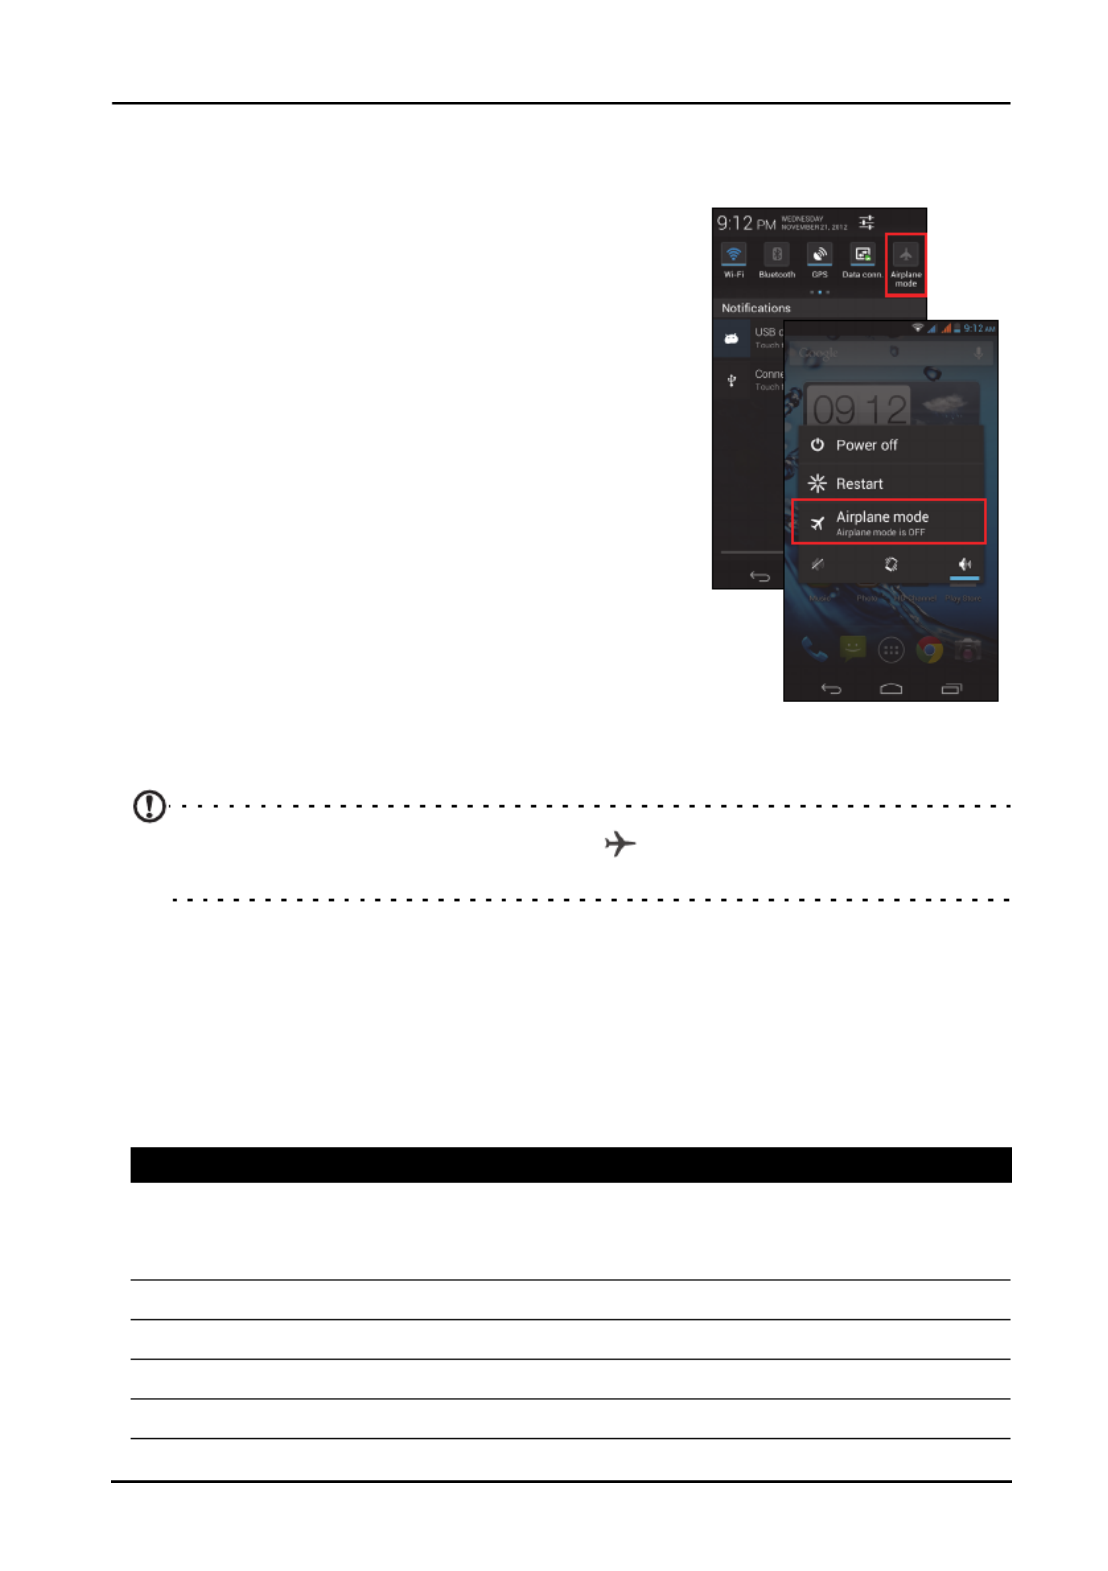
Putting your smartphone in Airplane mode
You can enter Airplane mode (also known as flight
mode) to turn off telephone and Bluetooth functions
and use your smartphone as a handheld device
during a flight. Check with your airline to make sure
this is permitted onboard.
Switch your smartphone off during takeoff and
landing as it may interfere with aircraft electronic
systems.
Turning Airplane mode on or off
1. Open the Notification area.
2. Tap the Airplane mode button.
-OR-
1. Press and hold the power button until you get the
phone options menu.
2. Tap Airplane mode to switch it ON or OFF.
Note: When Airplane mode is active, the
icon will be displayed in the
Notification area.
Adjusting settings
This section will show you how to adjust detailed settings for your phone, data, Wi-Fi
and Bluetooth connections.
Activating or deactivating connections
Open the Application menu and tap Settings to manage your connection settings.
Item Description
SIM management Set a default SIM for particular functions (such as voice calling
or messaging), turn the data connection on or off, set roaming
preferences and associate contacts with a SIM.
Wi-Fi Turn the Wi-Fi function on or off.
Bluetooth Turn the Bluetooth function on or off.
Data usage View an estimate of the mobile data used on each SIM.
Call settings Modify voice, video, internet, and other call settings.

44
Important: If your phone is in Airplane mode, the option to turn Bluetooth on will
be disabled. Please refer to "Putting your smartphone in Airplane mode" on
page 43 for instructions on turning Airplane mode on or off.
Adjusting Bluetooth settings
You can use Bluetooth to exchange information between your smartphone and other
mobile devices.
Bluetooth connections
For all Bluetooth settings, open the Application menu and tap Settings > Bluetooth.
Here you can switch Bluetooth on or off, set a device name and discoverability. Tap
SEARCH FOR DEVICES to scan for available devices.
To connect to a device, tap the device in the list of available devices. You may be
asked to enter a PIN on both devices to establish the connection.
To simply turn on or off Bluetooth, open the Notification area and tap the Bluetooth
button.
Internet sharing
Tethering via USB
If you wish to share your mobile Internet connection with a computer, you can
connect your phone to a PC using the supplied USB cable.
1. Plug the USB sync cable into the micro USB connector on your smartphone.
2. Plug the USB client connector into an available USB port on your computer.
3. Push the Menu button and then tap Settings > > More.. Tethering & portable
hotspot and then tap USB tethering.
Wi-Fi hotspot
You can turn your smartphone into a portable Wi-Fi hotspot to share your mobile
Internet connection with up to 8 clients.
1. Push the Menu button and then tap Settings > More... > Tethering & portable
hotspot > Set up Wi-Fi hotspot.
2. Set the Network SSID and adjust security between None and WPA2 PSK. Tap
Save to finish.
More... Access additional connection settings:
Airplane mode: Disable all wireless connections so you can
safely use this device onboard an aircraft.
VPN: Set up and manage Virtual Private Networks.
Tethering & portable hotspot: Share your phone’s mobile
data connection via USB or as a portable Wi-Fi hotspot.
Mobile network: Set your options for connecting to mobile
networks.
Item Description
45
Note: When your smartphone is serving as a Wi-Fi hotspot, you can’t use your
phone’s applications to access the Internet via its Wi-Fi connection.
Phone network settings
In the Application menu tap Settings > More... > Mobile networks to adjust your
network settings. You can turn data connection on or off when roaming, choose a
preferred network mode, specify a network operator and define access point names.
Selecting a network
Your phone will automatically detect your carrier/network settings when you insert a
new SIM card. However, you may prefer to manually select a network. This may be
a good idea when roaming.
Tip: When you are traveling, manually selecting a network may help to reduce
your roaming charges. Check with your home service provider for the network
offering the most competitive rates at your destination.
1. Open the Application menu and tap Settings > More... > Mobile networks >
Network operators.
2. Your phone will search for available networks.
3. Select your preferred network from the list generated. You phone will attempt to
register on the selected network.
4. Tap Select automatically to connect to the available network with the strongest
signal. This may lead to your phone jumping between networks when you move
around.
Note: Contact your service provider should you have any problems
obtaining voice mail and the text message service center numbers.
Data usage control settings
Data usage controls let you monitor total usage by network type and application and
then set limits if needed.
To access the Data usage settings, from the Application menu tap Settings > Data
usage.
Note: To set a data limit, Wi-Fi or Mobile data must be enabled.
Phone settings
Many phone settings are automatically configured by your smartphone when you
insert a SIM card. The device will communicate with your provider and automatically
obtain all necessary settings, such as network name, voice mail and text message
center numbers.

47
Connecting to a PC
If you wish to transfer information between the microSD
Card in your phone and your computer, you can connect
your phone to a PC using the supplied USB cable. Plug the
USB sync cable into the micro USB connector on your
smartphone. Plug the USB client connector into an available
USB port on your computer.
Open the Notification area, and tap Connected as media
device to configure the USB options.
You will now be able to see the microSD Card in your phone
as a drive in your computer’s file explorer.
Note: After turning on USB storage, you will not be able
to access the files in the microSD card or applications
such as Gallery or Music.
Synchronization
You can sync your calendar, email and contacts on your
phone and never worry about losing them again. Sync in
real time or adjust it as you please. In the Application menu,
tap Settings. Under ACCOUNTS, tap the appropriate
account and again under ACCOUNTS tap that account’s
email address to access the synchronization settings.
To add a new account, tap Add account. Select the type of
account (AcerCloud, Corporate, Email, Facebook, or
Google) and then follow the on screen instructions.
Google Sync
In Google, you can set synchronization for Browser,
Calendar, Contacts, Gmail, and Google Photos. In your
Google account’s synchornization settings menu, tap the
checkmark next to the item you would like to have auto-sync. Tap again to uncheck
any for manual synchronization.
To manually synchronize an item, make sure the item is checked, tap the Menu
button and then tap Sync now.
Note: You need a Google account to sync your calendar and appointments.
48
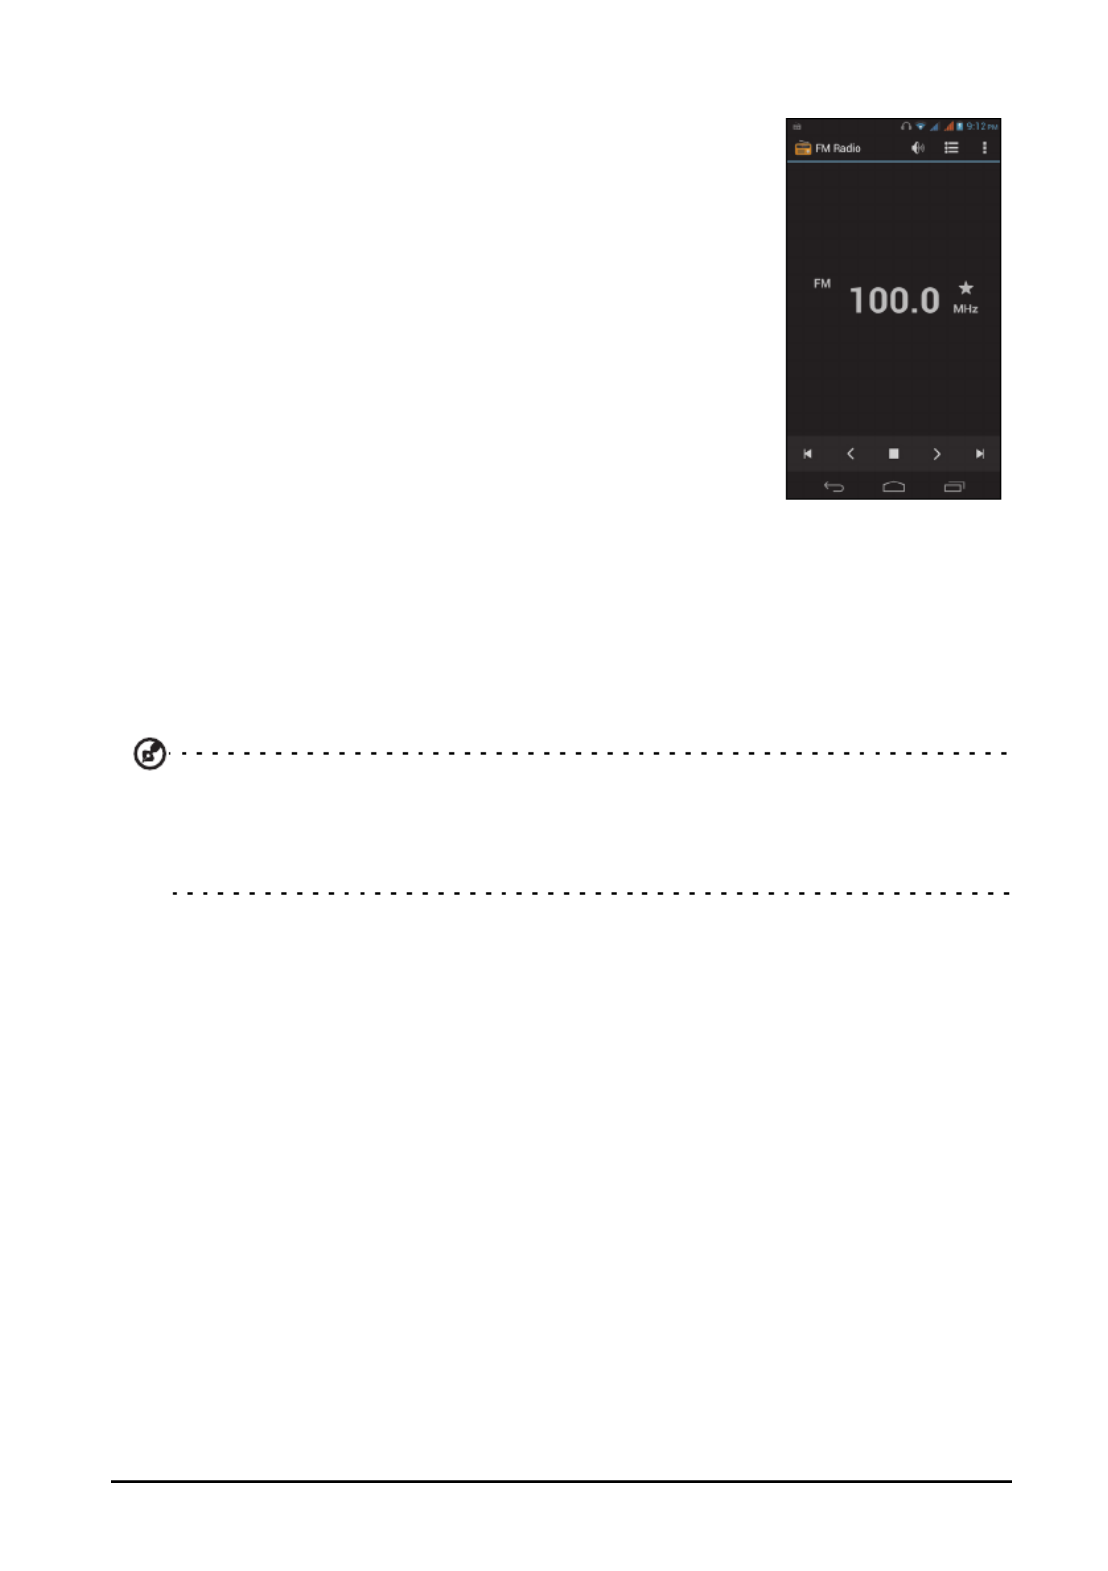
FM radio
The FM radio allows you to listen to your favorite stations
while on the move. Headphones must be inserted to the 3.5
mm jack as it functions as an antenna.
You can access the radio by tapping FM Radio from the
Application menu.
Tap the back icon to turn the radio off.
Multimedia playback
Your smartphone comes supplied with a variety of programs
that you can use to enjoy multimedia content.
Adjusting the volume
Adjust the volume of your phone using the volume button on
the side of the phone. Alternatively, you can set the
Ringtone, Notifications, and Alarms volume by opening the Application menu and
tapping Settings > Sound > Volumes.
Setting the date and time
To set the date and time, open the Application menu and tap Settings > Date &
time.
Tip: If you travel frequently or live in an area that uses daylight saving time,
activate Automatic date & time from this menu. This will enable your
smartphone to set the date and time based on information it receives from the
network.
Setting alarms
There are two predefined alarms on your phone by default. Tap Clock in the
Application menu, and then tap Set alarm to edit alarm settings. You may:
• Turn the alarm on or off.
• Set the alarm time.
• Set which days to repeat the alarm.
• Set a ringtone.
• Enable or disable vibrate.
• Give it a label.
Changing language and text options
Set your location and language input preferences by opening the Application menu
and going to Settings > Language & input.
49
Closing an application
To close an active application, in the Application menu tap Settings > Apps. Swipe
over to the Running tab, then tap the program you wish to close. Select Stop to
close the program.
Uninstalling an application
You can remove programs installed on your smartphone to free up extra storage
memory.
1. In the Application menu tap Settings > Apps.
2. Swipe over to the Downloaded tab.
3. Find the application in the list and tap on it.
4. Tap the Uninstall button and then tap OK
Warning! You should only remove programs if you are familiar with the
Android operating system.
Restoring to factory settings
You may perform a clean boot to restore your smartphone to the factory settings.
Note: Before performing a clean boot, ensure that your smartphone is not
locked. Press any key or tap the screen to see if the phone responds.
Warning! You should only perform a clean boot when all other options
have failed to restore your smartphone to an operational state.
Warning! This will erase all your personal information, any contacts stored
on your phone and any programs you installed.
If your phone is responding to screen input, then open Settings from the Application
menu. Tap Backup & reset > Factory data reset > Reset phone and then Erase
everything to format your phone.

50
Accessories and tips
This chapter shows you how to use accessories with your smartphone, as well as
provide useful tips for when you are using your smartphone.
Using the headset
Your smartphone comes packaged with a headset with built-in microphone for
handsfree use when making calls.
To use the headset, plug it into the 3.5 mm headphone jack at the top of the phone.
When the headset is plugged in, all audio is routed to the headset, and the speakers
are turned off.
• To answer an incoming call, press the button on the microphone.
• Adjust the volume using the volume up/down button on the smartphone.
• End the call by pressing the button again.
Using a Bluetooth headset
Your smartphone’s Bluetooth functions make it fully compatible with all Bluetooth
headsets. This allows you to use the unit handsfree when making calls, without the
inconvenience of wires.
Creating a new access point
When you need to add another GPRS/3G/EDGE connection on your phone, obtain
the access point name and settings (including username and password if required)
from your wireless service provider.
1. Open the Application menu and tap Settings > More... > Mobile networks >
Access Point Names, and select an operator.
2. Tap the Menu button and then tap New APN.
3. Enter the APN settings. Tap an item to adjust it.
4. When you have finished tap the Menu button and then tap Save.
Important: Some providers and countries do not allow the use of a smartphone
as a modem over HSDPA. Please check with your provider before attempting to
do so.
Inserting a microSD Card
Your smartphone features a memory expansion slot that accepts a microSD Card to
expand memory and storage capacity.
Please refer to "Installing a SIM or microSD Card" on page 8 for instructions on
installing a microSD Card.

52
Other sources of help
Warnings and precautions
• Do not use this product near water.
• Do not place this product on an unstable cart, stand or table. If the product falls, it
could be seriously damaged.
• Slots and openings are provided for ventilation to ensure reliable operation of the
product and to protect it from overheating. These openings must not be blocked or
covered. The openings should never be blocked by placing the product on a bed, sofa,
rug or other similar surface. This product should never be placed near or over a
radiator or heat register, or in a built-in installation unless proper ventilation is
provided.
• Never push objects of any kind into this product through cabinet slots as they may
touch dangerous voltage points or short-out parts that could result in a fire or electric
shock. Never spill liquid of any kind onto or into the product.
• To avoid damage of internal components and to prevent battery leakage, do not place
the product on a vibrating surface.
• Never use this product when engaging in sporting activities, exercising, or in any
vibrating environment which may cause a short circuit or damage, and even a risk of
explosion from the battery pack.
Unlock pattern I forgot my unlock
pattern.
After a certain number of wrong entries,
you will be presented with an option to
reset your pattern. Tap Forgot pattern?
and enter your google account username
and password.
Note: You must have an active Google
account on the smartphone.
Alternatively, you restore your
smartphone to factory settings. See
"Restoring to factory settings" on
page 49.
Heat The phone heats up
when charging or
making long duration
calls.
It is normal for the phone to heat up when
charging. When charging is complete, it
will return to its normal temperature.
It is also normal for the phone to heat up
during long periods of use, such as
watching a video or a long phone
conversation.
For information on: Refer to:
Up-to-date information regarding your
smartphone
www.acer.com
mobile.acer.com
Service enquiries www.acer.com/support
Aspect Question Answer

53
CAUTION when listening to music
To protect your hearing, follow these instructions.
• Increase the volume gradually until you can hear clearly and comfortably.
• Do not increase the volume level after your ears have adjusted.
• Do not listen to music at high volumes for extended periods.
• Do not increase the volume to block out noisy surroundings.
• Decrease the volume if you can’t hear people speaking near you.
Battery information
This product uses a Lithium battery. Do not use it in a humid, wet and/or corrosive
environment. Do not put, store or leave your product in or near a heat source, in a high
temperature location, in strong direct sunlight, in a microwave oven or in a pressurized
container, and do not expose it to temperatures over 60 °C (140 °F). Failure to follow these
guidelines may cause the battery to leak acid, become hot, explode or ignite and cause injury
and/or damage. Do not pierce, open or disassemble the battery. If the battery leaks and you
come into contact with the leaked fluids, rinse thoroughly with water and seek medical attention
immediately. For safety reasons, and to prolong the lifetime of the battery, charging will not
occur at low (below 0° C/32° F) or high (over 45° C/113° F) temperatures.
The full performance of a new battery is achieved only after two or three complete charge and
discharge cycles. The battery can be charged and discharged hundreds of times, but it will
eventually wear out. When the talk and standby times are noticeably shorter than normal, buy
a new battery. Use only Acer approved batteries, and recharge your battery only with Acer
approved chargers designated for this device.
Unplug the charger from the electrical plug and the device when not in use. Do not leave a fully
charged battery connected to the ac charger, since overcharging may shorten its lifetime. If left
unused, a fully charged battery will lose its charge over time. If the battery is completely
discharged, it may take a few minutes before the charging indicator appears on the display or
before any calls can be made.
Use the battery only for its intended purpose. Never use any charger or battery that is
damaged.
Do not short-circuit the battery. Accidental short-circuiting can occur when a metallic object
such as a coin, clip, or pen causes direct connection of the positive (+) and negative (-)
terminals of the battery. (These look like metal strips on the battery.) This might happen, for
example, when you carry a spare battery in your pocket or purse. Short-circuiting the terminals
may damage the battery or the connecting object.
Leaving the battery in hot or cold places, such as in a closed car in summer or winter
conditions, will reduce the capacity and lifetime of the battery. Always try to keep the battery
between 15° C and 25° C (59° F and 77° F). A device with a hot or cold battery may not work
temporarily, even when the battery is fully charged. Battery performance is particularly limited
in temperatures well below freezing.
Do not dispose of batteries in a fire as they may explode. Batteries may also explode if
damaged. Dispose of batteries according to local regulations. Please recycle when possible.
Do not dispose as household waste.
Replacing the battery pack
Your smartphone uses lithium batteries. Replace the battery with the same type as that which
came bundled with your product. Use of another battery may present a risk of fire or explosion.
Specyfikacje produktu
| Marka: | Acer |
| Kategoria: | smartfon |
| Model: | Liquid E1 |
Potrzebujesz pomocy?
Jeśli potrzebujesz pomocy z Acer Liquid E1, zadaj pytanie poniżej, a inni użytkownicy Ci odpowiedzą
Instrukcje smartfon Acer

15 Stycznia 2025
5 Grudnia 2024
16 Września 2024
15 Września 2024
12 Września 2024
6 Września 2024
5 Września 2024
5 Września 2024
4 Września 2024
2 Września 2024
Instrukcje smartfon
- smartfon Sony
- smartfon Samsung
- smartfon AEG
- smartfon LG
- smartfon Motorola
- smartfon Xiaomi
- smartfon MyPhone
- smartfon Sharp
- smartfon Huawei
- smartfon TCL
- smartfon Lenovo
- smartfon TP-Link
- smartfon Philips
- smartfon SilverCrest
- smartfon Gigabyte
- smartfon Realme
- smartfon Gigaset
- smartfon Geemarc
- smartfon Nokia
- smartfon Hisense
- smartfon Infiniton
- smartfon Panasonic
- smartfon Mio
- smartfon Asus
- smartfon Nedis
- smartfon Medion
- smartfon OK
- smartfon Audioline
- smartfon Toshiba
- smartfon Tesla
- smartfon Alcatel-Lucent
- smartfon Majestic
- smartfon Bluebird
- smartfon Garmin
- smartfon Blaupunkt
- smartfon Profoon
- smartfon Vivax
- smartfon Evolveo
- smartfon Alcatel
- smartfon Haier
- smartfon HP
- smartfon Hyundai
- smartfon Honeywell
- smartfon Honor
- smartfon Kodak
- smartfon ZTE
- smartfon MaxCom
- smartfon Dell
- smartfon Google
- smartfon Intex
- smartfon Oppo
- smartfon Kyocera
- smartfon Krüger&Matz
- smartfon Qilive
- smartfon Thomson
- smartfon Manta
- smartfon Apple
- smartfon NGS
- smartfon CRUX
- smartfon Emporia
- smartfon Nevir
- smartfon Mitsubishi
- smartfon Razer
- smartfon GoClever
- smartfon SPC
- smartfon Intermec
- smartfon NEC
- smartfon Polaroid
- smartfon Prestigio
- smartfon Aiwa
- smartfon Sanyo
- smartfon Telefunken
- smartfon OnePlus
- smartfon Amazon
- smartfon Olympia
- smartfon Microsoft
- smartfon Bush
- smartfon HTC
- smartfon CAT
- smartfon Denver
- smartfon Saiet
- smartfon Albrecht
- smartfon RCA
- smartfon Media-Tech
- smartfon BenQ
- smartfon Trevi
- smartfon Lexibook
- smartfon Overmax
- smartfon Micromax
- smartfon Sencor
- smartfon NUU Mobile
- smartfon Alecto
- smartfon Binatone
- smartfon Hammer
- smartfon Allview
- smartfon Oukitel
- smartfon Best Buy
- smartfon Cyrus
- smartfon Kazam
- smartfon Tecdesk
- smartfon KPN
- smartfon Swissvoice
- smartfon I.safe Mobile
- smartfon TrekStor
- smartfon Brondi
- smartfon Fysic
- smartfon Wiko
- smartfon Yarvik
- smartfon Aligator
- smartfon Amplicomms
- smartfon AQISTON
- smartfon Amplicom
- smartfon Archos
- smartfon Androidtech
- smartfon Crosscall
- smartfon Ecom
- smartfon Sony Ericsson
- smartfon Vestel
- smartfon Sonim
- smartfon Energy Sistem
- smartfon Doro
- smartfon Sagem
- smartfon Lava
- smartfon Blu
- smartfon Easypix
- smartfon Konrow
- smartfon Brigmton
- smartfon Sunstech
- smartfon Aspera
- smartfon Sunny
- smartfon Nordmende
- smartfon Blackberry
- smartfon Vivo
- smartfon Wolder
- smartfon NGM
- smartfon Vodafone
- smartfon Switel
- smartfon InFocus
- smartfon GreatCall
- smartfon XD
- smartfon Pantech
- smartfon Alba
- smartfon RugGear
- smartfon Umidigi
- smartfon AT&T
- smartfon Mpman
- smartfon Bury
- smartfon Logicom
- smartfon Karbonn
- smartfon Palm
- smartfon Hannspree
- smartfon Phicomm
- smartfon Plum
- smartfon Lumigon
- smartfon Infinix
- smartfon Keneksi
- smartfon Klipad
- smartfon Iget
- smartfon T-Mobile
- smartfon JCB
- smartfon Casper
- smartfon Unnecto
- smartfon Wileyfox
- smartfon ITT
- smartfon Yota
- smartfon Avus
- smartfon Spice
- smartfon Wolfgang
- smartfon BQ
- smartfon ORA
- smartfon Danew
- smartfon Echo
- smartfon Primux
- smartfon Tiptel
- smartfon UTStarcom
- smartfon Zipy
- smartfon Mediacom
- smartfon Beafon
- smartfon BGH
- smartfon Billow
- smartfon Telstra
- smartfon Ulefone
- smartfon CSL
- smartfon ToughGear
- smartfon Benefon
- smartfon Komu
- smartfon Doogee
- smartfon Energizer
- smartfon Tremay
- smartfon Kurio
- smartfon Piranha
- smartfon Coolpad
- smartfon Syco
- smartfon TAG Heuer
- smartfon Mobistel
- smartfon Itel
- smartfon Garmin-Asus
- smartfon Handheld
- smartfon Fero
- smartfon AT Telecom
- smartfon Xtreamer
- smartfon Verykool
- smartfon O2
- smartfon General Mobile
- smartfon Mustang
- smartfon Kogan
- smartfon Pharos
- smartfon Storex
- smartfon Fairphone
- smartfon Freeman
- smartfon HomTom
- smartfon Leotec
- smartfon Auro
- smartfon Maxx
- smartfon ITTM
- smartfon Posh Mobile
- smartfon THL
- smartfon NGM-Mobile
- smartfon POCO
- smartfon Nothing
- smartfon Lark
- smartfon Senifone
- smartfon Tecno
- smartfon Telme
- smartfon UMi
- smartfon Olitech
- smartfon Mobiola
- smartfon Meizu
- smartfon Neffos
- smartfon Gionee
- smartfon TIM
- smartfon Cubot
- smartfon Leagoo
- smartfon NTech
- smartfon Nubia
- smartfon LeEco
- smartfon GSmart
- smartfon Bea-fon
- smartfon Opticon
- smartfon EStar
- smartfon Facom
- smartfon Jitterbug
- smartfon Custom
- smartfon Aplic
- smartfon HMD
- smartfon Opis
- smartfon Volla
- smartfon Nothing Tech
- smartfon Maxwest
- smartfon Kalley
Najnowsze instrukcje dla smartfon

2 Kwietnia 2025

30 Marca 2025
10 Marca 2025
7 Marca 2025
5 Marca 2025
5 Marca 2025
3 Marca 2025

2 Marca 2025

26 Lutego 2025
26 Lutego 2025